Written By: Don Dodi
Fact Checked By: Kristen Brown
Reviewed By: Diego Rosenberg
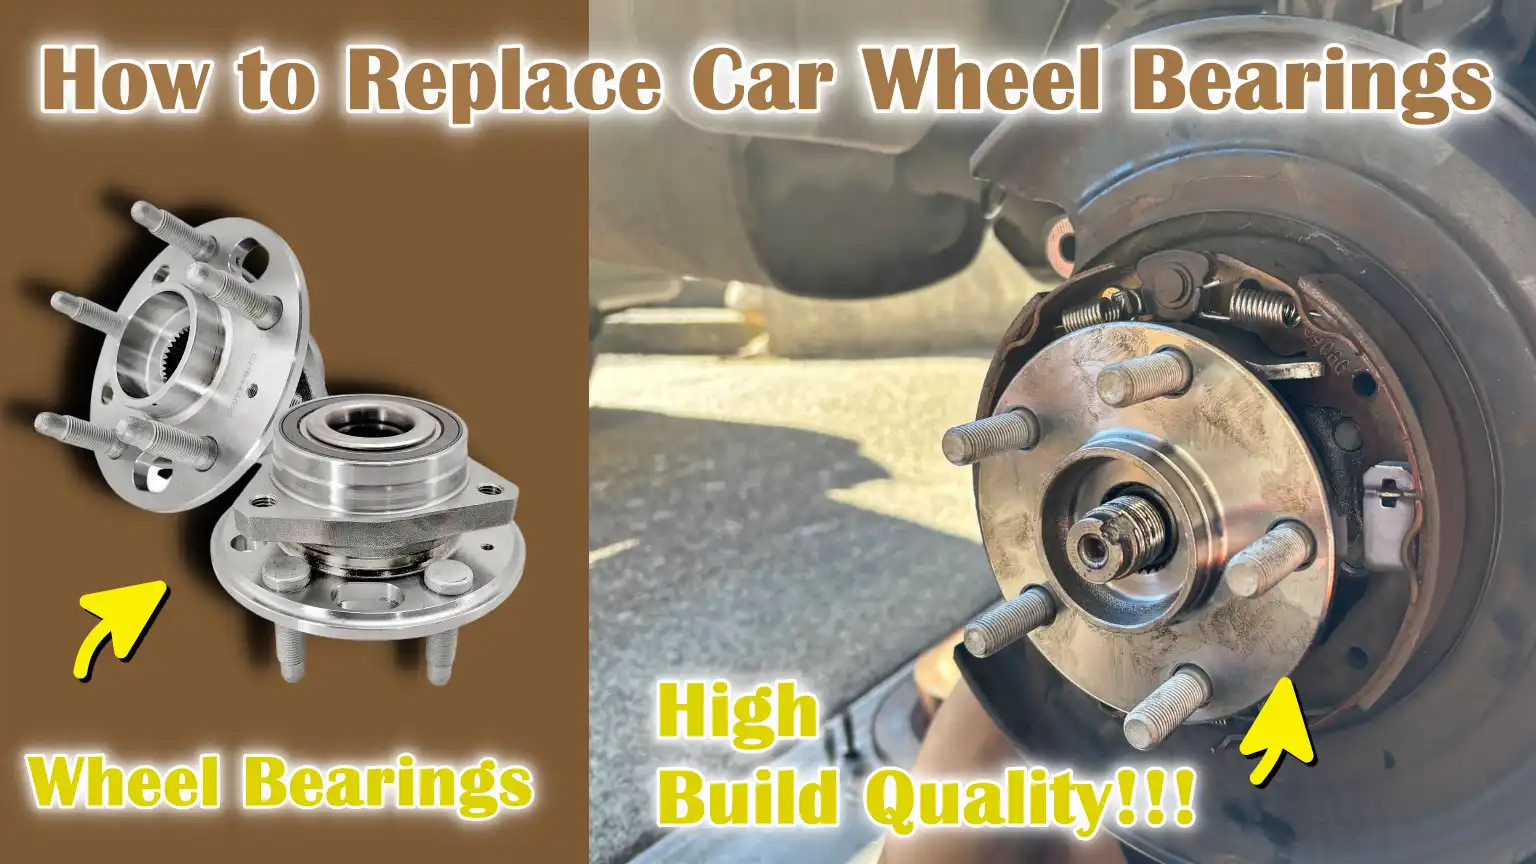
These are the tiny metallic rings that spins thousands of times per minute and it can be dangerous because wear out bearings can cause wheel wobble & brake failure which is dangerous.
Basically, each wheel actually contains a bearing that connects it to the axle, that helps the tire to rotate in a free way and they supports the vehicle’s entire weight as well.
But you should keep this in mind, that most of the modern cars actually uses sealed bearings that can last anywhere from 85,000 to 100,000 miles, but just like all the moving parts and things in the world, they eventually wears out as well due to the heat, pressure and road conditions as well.
But when the bearings starts to fail, then you may actually notice something grinding or humming noises, even it can be loud enough to irritate you while turn the vehicle or even vibration can be feel through the steering wheel as well.
And there’s not doubt that, driving with a worn-out bearing is literally unsafe, as it can cause the wheel to wobble, damage the hub assembly and even it can lead to the loss of control if it completely fails.
So, when you learn How to Replace Car Wheel Bearings, then you can save money of course but you also increase your vehicle’s lifespan and drive safer as well.
Now, At First We Have to Understand About Wheel Bearings
1. Definition and Function
Wheel bearings are precisely designed components that enable your car’s wheels to rotate smoothly and carry the vehicle’s full weight with minimal friction.
They are located inside the wheel hub assembly and connect the wheel to the axle, allowing the wheels to rotate freely and efficiently.
Each bearing contains small metal balls or rollers housed within a metal ring called a race.
As the wheel rotates, these balls or rollers move against the race, reducing friction and absorbing excessive forces generated by the car’s acceleration, braking and cornering.
Without properly functioning wheel bearings, the wheel will not rotate evenly, causing vibration, noise and uneven tire wear.
In most modern vehicles, these bearings are sealed units designed to keep out dirt, moisture and debris, allowing them to last for thousands of miles under various driving conditions.
2. Types of Wheel Bearings
1. Ball Bearings
Ball bearings are the most common type used in passenger cars because they can handle both radial and axial loads.
They contain smooth steel balls that rotate between inner and outer races, reducing friction and allowing for faster speeds.
Ball bearings are ideal for everyday driving where loads and angles are moderate, such as in the city and on highways.
Their design helps maintain smooth wheel movement while reducing road noise.
However, ball bearings can wear out quickly when exposed to excessive heat or contaminated with dirt or water.
2. Roller Bearings
Roller bearings use small cylindrical rollers instead of round balls.
This design increases the contact area between moving parts, allowing them to handle heavier radial loads—those acting directly downward on the wheel.
Roller bearings are often found in older vehicles, heavy trucks and heavy-duty trailers.
Although they are excellent at carrying loads, they are less effective at handling lateral or thrust loads than ball bearings.
Proper lubrication is essential for roller bearings, as even slight contamination can cause premature wear.
3. Tapered Roller Bearings
Tapered roller bearings are designed with cone-shaped rollers that can handle both radial and axial forces simultaneously.
This makes them ideal for vehicles that face sharp turns, such as pickup trucks, SUVs and performance cars.
The tapered shape helps the bearings distribute load evenly, improving stability and reducing wear.
These bearings are often adjustable and usable, allowing for proper tightening to achieve the correct preload – an essential factor in preventing noise, vibration and premature wear.
Tapered roller bearings are durable, but require precise installation and regular maintenance to maintain their performance.
4. Sealed vs Serviceable Bearings
Modern cars are typically equipped with sealed wheel bearings, also known as hub units.
These bearings are pre-lubricated with grease and sealed by the manufacturer to prevent dirt and moisture from entering.
They require no maintenance, but must be completely replaced if they wear out.
Sealed bearings offer excellent durability and comfort, typically lasting 85,000 to 100,000 miles under normal driving conditions.
Serviceable bearings, on the other hand, are found in older vehicles and can be cleaned, inspected and re-greased during maintenance.
Although they require more maintenance, if properly maintained, these serviceable bearings can last longer and allow mechanics to replace only the bearings instead of the entire hub assembly.
3. Location in the Vehicle
Wheel bearings are located in the center of each wheel hub, where the wheel connects to the axle.
Front wheel bearings are typically integrated with the steering and suspension system, making them more difficult to replace.
They are subject to additional stress due to steering forces and braking loads, specially in front-wheel-drive cars, where they also transmit power from the engine to the wheels.
Rear wheel bearings, on the other hand, experience primarily radial loads because they do not steer.
In many rear-wheel-drive vehicles, these bearings may be part of a solid axle assembly and are often easier to service.
The design and replacement procedure depend on whether the vehicle uses front-wheel drive, rear-wheel drive, or all-wheel drive.
Understanding the location and function of each bearing helps determine the correct tool, torque specification and installation method when performing a replacement.
What are The Symptoms of a Bad Wheel Bearing
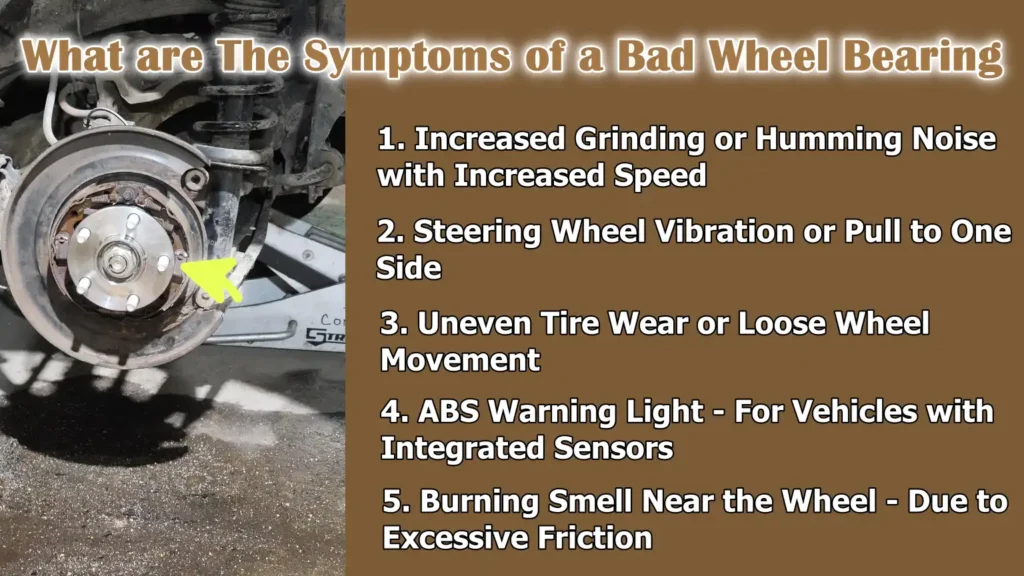
1. Increased Grinding or Humming Noise with Increased Speed
One of the most common and easily recognizable symptoms of a bad wheel bearing is a grinding, humming, or roaring sound coming from around the wheel.
This sound usually gets louder as the vehicle speeds up and may change when the steering wheel is turned slightly to the left or right.
This noise occurs because the inner metal surfaces of the bearing begin to wear, increasing friction and causing uneven rotation.
In a healthy bearing, tiny steel balls or rollers glide smoothly inside the raceway.
But as the grease inside the bearing breaks down or contamination enters, the metal components begin to rub against each other, producing that distinctive sound.
If left unattended, the bearing can fail completely, causing serious damage to the wheel or axle.
Listening for changes in noise while driving at different speeds or when cornering is one of the best ways to quickly identify a bad bearing.
2. Steering Wheel Vibration or Pull to One Side
Damaged wheel bearings can cause noticeable vibrations or tremors in the steering wheel, specially at high speeds.
This occurs because the bearings no longer hold the wheel firmly in place, causing it to shift slightly out of alignment.
The imbalance caused by this looseness is transferred to the steering system through the suspension.
In some cases, the car may even pull to one side when driving straight, which could be mistaken for a wheel alignment problem.
However, unlike alignment problems, bearing-related vibration often worsens during acceleration or cornering.
This symptom is not only uncomfortable but also unsafe, as it can affect steering control and braking stability.
If you experience vibrations depending on the speed or direction of the turn, it’s a clear sign that the wheel bearings should be checked immediately.
3. Uneven Tire Wear or Loose Wheel Movement
A worn wheel bearing can cause uneven tire wear because it allows the wheel to wobble slightly as it rotates.
This wobble alters the tire’s contact with the road surface, causing an irregular wear pattern on the tire’s tread.
Over time, you may notice one tire wearing faster than the other, specially on the inner or outer edges.
When manually inspecting the wheel, if you try to lift and rock the vehicle back and forth, excessive looseness or play often indicates bearing failure.
This looseness not only affects tire life but can also put additional stress on suspension components like ball joints and tie rods.
Regularly checking for abnormal tire play or wheel play can help detect worn bearings before costly repairs.
4. ABS Warning Light – For Vehicles with Integrated Sensors
In many modern vehicles, the wheel bearing assembly contains an integrated ABS (Anti-Lock Braking System) sensor that monitors wheel speed.
When the bearing is worn or damaged, it can disrupt the sensor’s ability to send accurate data to the car’s computer.
As a result, an ABS warning light may appear on the dashboard.
This light indicates that the ABS system is not functioning properly during emergency braking, reducing the car’s ability to maintain grip and stability.
Although there can be many causes of an ABS warning, a bad wheel bearing with a built-in speed sensor is a common problem.
If this warning appears along with strange noises or vibrations from the wheels, the bearing assembly may be defective and should be replaced immediately to restore full braking capability.
5. Burning Smell Near the Wheel – Due to Excessive Friction
A burning smell near a wheel can also be a sign of excessive wheel bearing wear.
As a bearing wears, friction between its metal parts increases dramatically, generating heat inside the hub assembly.
This excessive heat can burn the lubricant and sometimes damage the grease seal, causing a grease leak.
In severe cases, heat can spread to the brake rotor or caliper, causing a strong smell reminiscent of burning rubber or metal.
This symptom is dangerous because it indicates that the bearing is close to complete failure, which could cause the wheel to lock up or even come loose while driving.
If you ever smell a burning smell near your tires after driving, it’s important to stop the vehicle safely, allow the parts to cool and have the bearings inspected immediately before continuing your journey.
Tools
| Tool / Material Name | Purpose / Description | Helpful Tips for Use |
|---|---|---|
| Jack and Jack Stands | A jack is used to raise the car off the ground and secure it while work is being done underneath. The jack raises the car and the stands secure it. | Always use jack stands on a flat, solid surface. Never rely solely on the jack to support the vehicle. |
| Lug Wrench | Helps loosen and tighten the nuts that hold the wheel to the hub. | Loosen the lug nuts slightly before raising the car. After lowering, tighten them in a star pattern for even pressure. |
| Socket Set and Torque Wrench | A socket set removes bolts and nuts of various sizes. A torque wrench ensures that bolts are tightened to the correct level recommended by the manufacturer. | Always check the correct torque value in your vehicle’s manual when tightening axle nuts or hub bolts. |
| Screwdrivers and Pliers | Used to remove small parts such as clips, dust caps or retaining rings during disassembly. | Have a variety of screwdrivers (flathead and Phillips) for flexibility when handling different fasteners. |
| Hammer and Punch | The hammer helps loosen the parts, while the punch is used to break out old bearing races or alignment pins. | Use gentle and controlled taps to avoid damaging surrounding parts. Always wear safety glasses when using these tools. |
| Bearing Puller or Press | Special tools that remove the old bearing from the hub or press the new bearing into place. | If you don’t have a press, many auto parts stores can press the bearings in for a nominal fee. When installing new bearings, make sure they are in the correct position. |
| Replacement Wheel Bearing or Hub Assembly | A new bearing or hub unit that will replace an old, worn bearing or hub unit. | Always choose high-quality OEM or certified aftermarket parts. Check compatibility with your vehicle’s make and model before purchasing. |
| Brake Cleaner | A strong cleaning spray that removes grease, oil and dirt from brake and hub components. | Before installing the new bearing, spray thoroughly around the hub area to ensure the surface is clean and dry. Avoid contact with rubber parts. |
| Grease | Used to lubricate moving metal parts and prevent friction or overheating, specially in non-sealed bearings. | Apply high-temperature wheel bearing grease evenly. Do not over-apply grease to the bearing, as this may increase pressure. |
| Gloves and Safety Glasses | Protect your hands and eyes from sharp edges, chemicals and debris while working. | Always wear gloves when handling grease or chemicals and always wear gloves when hammering or spraying brake cleaner. |
Take Safety Precautions First
1. Park on a Level Surface and Apply the Parking Brake
Before replacing any wheel bearings, it’s important to park your car on a level and solid surface.
A level surface prevents the vehicle from rolling or moving while being lifted.
Concrete or asphalt driveways are the best options, as they provide stable ground for the jack and stands.
After parking the vehicle, always firmly engage the parking brake to lock the rear wheels and prevent the car from moving.
If your car has an automatic transmission, put it in “Park,” and if it has a manual transmission, put it in first gear.
Taking a little time to properly secure your car before lifting can prevent serious accidents and make the entire repair process safer and more stable.
2. Use Wheel Chocks for Extra Safety
Wheel chocks are small wedges made of rubber or metal that you place behind or in front of the tires to prevent the vehicle from rolling.
These are specially useful when you’re only lifting one end of the car off the ground.
For example, if you’re lifting the front of the car, place chocks behind the rear wheels.
Even with the parking brake engaged, vibrations or slight movements can cause the car to sway slightly, which can be very dangerous.
Wheel chocks provide an additional layer of security by firmly holding the tires in place, ensuring the car remains completely still while you’re working underneath.
The easiest and smartest way to protect yourself during any car repair is to purchase a set of sturdy wheel chocks.
3. Always Support the Vehicle Firmly with Jack Stands
Although hydraulic jacks are great for lifting your vehicle, they aren’t designed to hold the car upright for long periods of time.
Jacks can malfunction or lose pressure, causing the vehicle to suddenly drop.
This is why jack stands are so important.
After raising the car to the appropriate height, carefully slide jack stands under the recommended lifting points on the vehicle’s frame or suspension.
Slowly lower the car onto the stands, ensuring it rests evenly on both sides.
Before working, rock the vehicle slightly to ensure it is stable and balanced.
Proper use of jack stands ensures the car remains firmly in place during repairs, reducing the risk of injury or damage.
4. Wear eye and hand protection
When working on wheel bearings, you’ll be dealing with metal parts, sharp edges, grease and cleaning chemicals.
Wearing safety glasses protects your eyes from flying debris, rust particles, or brake cleaner spray.
Gloves are equally important—they protect your hands from sharp objects, hot surfaces and harsh chemicals that can irritate your skin.
Nitrile or mechanic’s gloves are best, as they provide grip and flexibility while keeping your hands clean.
Protective equipment may seem like a small thing, but it can prevent serious injuries.
They also help you work more comfortably and confidently, allowing you to focus on getting the job done right.
5. Avoid working under a car supported solely by a jack
One of the most dangerous mistakes in car maintenance is working under a car supported solely by a jack.
Hydraulic jacks are meant for lifting, not for holding.
They can gradually lose pressure or slip without warning, causing the car to fall.
Such an accident can cause serious injury or death.
Whenever you have to work under a car, always use jack stands or a vehicle lift.
If you need to remove a component while lifting the car, make sure the jack stands are firmly in place and have additional support nearby, such as a backup stand or a solid piece of wood, as an added precaution.
Remember, safety should never be rushed.
Taking a few minutes to double-check your setup can be the difference between a smooth and successful repair and a serious accident.
How to Replace Car Wheel Bearings – Easy Method
You Have to Do Preparation To Ensure Safety
Replacing a wheel bearing begins with careful preparation, ensuring the repair is performed safely and correctly.
Preparation may seem simple, but it’s one of the most important steps in the entire process, as it lays the foundation for everything that follows.
Before starting any work, make sure you’re parked on a level surface and the parking brake is firmly engaged.
This prevents the vehicle from rolling when lifted off the ground.
Gather all your necessary tools, such as a jack, jack stands, lug wrenches and a socket set, so everything is easily accessible.
It’s also helpful to wear gloves and safety glasses from the start, as you’ll be working with heavy metal parts that could cause injury if handled incorrectly.
Taking a few minutes to organize your workspace will make the process easier and reduce the likelihood of mistakes or accidents.
1. Loosen the lug nuts slightly before lifting the vehicle
Before lifting the vehicle, it’s important to loosen the lug nuts slightly while the vehicle is still on the ground.
This step may seem trivial, but it prevents the wheel from turning when you try to loosen the nuts after the vehicle is raised.
Using a lug wrench or breaker bar, turn each nut about half a turn anti-clockwise.
Don’t remove them completely at this stage—only loosen them enough to allow for easy removal later.
If your vehicle has locking lug nuts, make sure you have the correct key before starting.
Loosening the lug nuts while the tire is firmly on the ground gives you the stability you need to safely apply force.
Trying to loosen them after the vehicle is raised could cause the wheel or the entire vehicle to move dangerously, specially if the jack or jack stands are not perfectly balanced.
Once all the lug nuts are slightly loosened, you can proceed to lift the vehicle with complete control and safety.
2. Raise the Car and Remove the Wheel
The next step is to safely raise the vehicle so you can access the wheel hub and bearing assembly.
Place your jack under the manufacturer’s recommended lift point, which is usually marked along the frame or under the rocker panel near each wheel.
Slowly raise the car until the tire is about two inches off the ground and then carefully place jack stands under the frame for support.
Lower the jack slightly so that the car’s weight is evenly distributed on the stands, not the jack.
Before removing the wheel, gently shake the car to ensure it is stable and not swaying.
Once you’re sure the vehicle is secure, completely remove the loosened lug nuts and place them in a clean container so they don’t roll or get dirty.
Lift the wheel straight up from the hub and place it flat on the ground nearby.
Removing the wheel exposes the brake and hub assembly, giving you full access to the parts you’ll be working on next.
Taking time during this step not only ensures safety but also prevents accidental damage to the wheel studs or hub threads, which will need to be re-attached later.
How to Remove the Brake Components
1. Detach the Brake Caliper and Secure It with Wire – Don’t Let It Hang
After removing the wheel, the next important task is to remove the brake caliper so you can access the hub and wheel bearing assembly.
The brake caliper is the component that slows or stops the car by pressing the brake pads onto the rotor.
It is usually held in place by two mounting bolts that can be removed with a socket or wrench.
After removing the bolts, gently remove the caliper from the rotor.
It is important not to let the caliper hang freely from the brake hose, as the hose is not designed to bear its weight and could burst or leak.
A damaged brake hose can cause brake failure, which is extremely dangerous.
Instead, use strong wire, bungee cords, or a coat hanger to securely hang the caliper from the suspension spring or frame.
This safely removes the caliper from the way and prevents unnecessary pressure on the brake line.
Before removing the brake pads, be sure to check them for uneven wear or cracks, as this is a good opportunity to replace them if they’re worn out.
Being careful during this step ensures your brake system remains safe and functioning when you reinstall everything later.
2. Remove the Brake Rotor or Drum to Reveal the Hub Assembly
After the caliper is securely in place, you can now remove the brake rotor or drum, depending on your vehicle’s brake system.
The rotor is a large, flat metal disc that sits between the wheel and the caliper, while the drum is a round, closed casing used in some rear brakes.
In most vehicles, the rotor comes out easily after removing the caliper, but if it’s been in place for a long time, it may become stuck due to rust and corrosion.
If this happens, loosen it by gently tapping the center of the rotor with a rubber mallet or hammer.
Be careful not to hit the braking surface directly, as this could damage or distort it.
Some cars may have small screws or clips holding the rotor in place; these should be removed before removing the rotor.
After removal, place the rotor or drum in a clean area.
You should now have a clear view of the wheel hub and bearing assembly.
Take a moment to clean the exposed area with brake cleaner to remove dust, grease and debris.
Keeping the work area clean will prevent contamination and make reassembly easier when installing the new bearing.
This step is crucial, as the hub area must be free of dirt and rust for proper alignment and secure installation of the new bearing.
How to Access the Hub Assembly
1. Remove the Dust Cap, Cotter Pin and Axle Nut – If Applicable
After removing the brake rotor or drum, the next step is to access the hub assembly, which holds the wheel bearing.
The hub assembly is the central part that connects the wheel to the axle and allows it to rotate smoothly.
In the center of the hub, you’ll usually see a small, round metal cover called a dust cap.
This cover protects internal components, such as the cotter pin, castle nut and axle nut, from dirt and moisture.
To remove the dust cap, use a flathead screwdriver or a small chisel and gently pry it off at the edges.
Be careful not to scratch or deform it, as you may need to reuse it later.
After removing the dust cap, you’ll see the cotter pin, a small, bent piece of metal wire that locks the nut in place and prevents it from loosening during driving.
Straighten the end of the cotter pin with pliers and pull it out completely.
If it breaks or feels brittle, replace it with a new one when reassembling.
After removing the cotter pin, remove the retaining cap or washer (if installed) and then loosen and remove the axle nut using a socket and breaker bar.
Axle nuts are typically very tightly tightened—often requiring considerable force to loosen—so it’s helpful to have the right-sized socket and a firm grip on the hub.
This nut secures the hub to the axle shaft and holds all the related components tightly together.
Proper removal is crucial because overtightening or cross-threading during reassembly can cause premature bearing wear or even damage to the bearing.
Performing this step carefully ensures that the hub assembly can be disassembled safely and without damaging the axle threads or bearings.
2. Separate the Wheel Hub Assembly from the Steering Knuckle
After removing the axle nuts, the next step is to separate the wheel hub assembly from the steering knuckle.
The hub assembly is usually attached to the knuckle with several bolts that secure it to the knuckle.
The knuckle is the component that connects the wheel to the suspension and helps the car steer.
In front-wheel-drive vehicles, the axle passes through the center of the hub, while in rear-wheel-drive cars, the hub is attached to the axle housing.
To remove the hub assembly, start by removing the mounting bolts on the back of the steering knuckle.
These bolts can sometimes be difficult to access, specially if they have accumulated rust or corrosion.
Spraying penetrating oil on these bolts and letting them soak for a few minutes can make them easier to remove.
Using a socket, ratchet, or breaker bar, loosen the bolts one by one.
After removing the bolts, the hub assembly may still be tightly seated, stuck to the knuckle due to years of heat and road grime.
To remove it, lightly tap the edges of the hub with a hammer or mallet, taking care not to damage the surface or axle threads.
If the hub is stuck, a special hub puller tool can help separate it evenly without damaging surrounding parts.
Once the hub is completely detached, carefully slide it off the axle shaft and set it aside.
You will now have a clear view of the wheel bearing part, ready for removal.
This part of the process is crucial as it determines whether the new bearing will fit properly.
Taking the time to remove the hub without bending or scratching any metal surfaces ensures a perfect fit for the new parts, preventing vibration problems later and increasing the lifespan of the new bearing.
How to Remove the Old Wheel Bearing
1. Use a Bearing Puller or Press to Remove the Old Bearing
After detaching the hub assembly from the steering knuckle, the next step is to remove the old wheel bearing from its housing.
This step is very important because wheel bearings fit tightly to the hub, meaning they cannot be easily removed by hand.
A bearing puller or hydraulic press is typically used to apply even force and push the old bearing out without damaging surrounding parts.
The type of tool required depends on the vehicle design.
In some modern vehicles, the bearing is integrated into a sealed hub assembly that is replaced as a single unit, while in others, the bearing can be disassembled and replaced separately.
If you are working with a serviceable bearing, position the bearing puller or hub press so that it applies direct, even pressure to the outer part of the bearing rather than the inner part, as applying pressure to the wrong part can distort or break the metal.
Apply slow and steady pressure until the bearing disengages from the hub.
You may hear a pop or click as it releases.
If the bearing is heavily rusted, lightly heating the surrounding metal with a heat gun may loosen the fitting.
Never use open flames, as this could damage or distort the grease seal.
It is important to remove the old bearing properly without bending the hub surface, as even the slightest distortion can cause vibration, noise and uneven wear after the new bearing is installed.
Always ensure that all old bearing components, such as races or seals, are completely removed, as leaving any old parts will prevent the new bearing from fitting properly.
2. Clean the hub and spindle thoroughly to remove dirt and debris
After removing the old bearing, it is important to clean the hub and spindle thoroughly before installing the new bearing.
This step helps ensure that the new bearing is level and works properly.
Use a clean cloth or towel to wipe away grease, dirt and metal fragments accumulated around the hub.
Brake cleaner or degreasing solvents are effective at removing old grease residue and contaminants that can affect bearing alignment.
If there is rust or corrosion on the inner surface of the spindle or hub, gently remove it with fine sandpaper or a wire brush.
Do not remove too much metal, as this can impair the bearing’s fit and cause looseness or noise after installation.
Pay special attention to the bearing seat—the smooth surface where the new bearing will be installed—as any debris, roughness, or remaining grease can prevent the new bearing from seating properly.
A clean, polished surface ensures better contact, increasing rotational smoothness and durability.
Once the area is completely clean, wipe it again with a lint-free cloth and ensure it is completely dry before proceeding.
Proper cleaning not only ensures a precise fit for the new bearing, but also helps prevent premature failure caused by contamination.
This step may seem simple, but it greatly impacts the reliability and safety of the repair, making it the most important part of the wheel bearing replacement process.
How to Install the New Bearing
1. Carefully press or tap the new bearing in place
After thoroughly cleaning the hub and spindle, the next step is to install the new wheel bearing into its housing.
This step requires precision, patience and the right tools, as incorrect installation can easily damage the new bearing.
In most vehicles, the new bearing must be pressed into the hub using a hydraulic or manual press that applies even and controlled pressure.
If a press is not available, some bearings can be installed using a bearing driver set or by lightly tapping with a hammer and a piece of wood or a soft metal drift.
During installation, it is important to always apply force to the outer race of the bearing—never to the inner race—as applying pressure to the wrong surface can distort the inner ball or roller and shorten the bearing’s lifespan.
Ensure the bearing is perfectly straight before applying pressure; even a slight tilt can jam it or cause it to seat unevenly.
As you press or tap the bearing, listen and feel for a change in tone or resistance, which often indicates that it is fully seated on the hub shoulder.
When installed correctly, the bearing should be fully seated in the hub housing, without any obvious gaps or misalignment.
Taking time to do this ensures smooth wheel rotation and long-term durability.
2. Make sure it is seated evenly and rotating freely
After pressing the bearing in, it is important to check that it is seated evenly and rotating without any tight spots or wear.
You can check this by gently rotating the hub by hand or, if possible, by rotating the inner race.
The movement should be smooth, quiet and consistent, without any vibrations or uneven resistance.
If the bearing feels rough or doesn’t seat flat, it could be a sign that it was installed at an angle or that debris is trapped inside the housing.
In such cases, it’s best to remove and reinstall it properly to avoid premature wear.
Correct seating is crucial, as even slight misalignment can cause wheel vibration, noise, or put additional strain on the suspension system.
Ensuring the bearing rotates freely also confirms that it wasn’t overtightened or damaged during installation.
A properly installed bearing provides balanced, friction-free motion, allowing the wheel to rotate smoothly and the car to glide smoothly on the road.
3. Apply appropriate grease if necessary (for unsealed types)
Depending on the design of your wheel bearing, lubrication may or may not be necessary.
Many modern vehicles use sealed bearings, which are pre-greased from the factory and don’t require additional lubrication.
However, older or serviceable bearings, such as tapered roller bearings, should be manually greased before installation.
For proper lubrication, use high-quality automotive bearing grease specifically designed to withstand high temperatures and pressures.
Grease must be thoroughly applied to the bearing so that it adheres tightly to the rollers or balls and fills the voids.
This reduces metal-to-metal contact, reduces heat buildup and prevents wear during rotation.
Applying the correct amount of grease is crucial—too little grease can cause friction and overheating, while too much grease can cause leakage and contamination of nearby components, such as brakes.
After thoroughly greasing the bearing, lightly grease the spindle and bearing seat for additional protection against corrosion.
Proper lubrication is one of the most important steps in extending wheel bearing life and ensuring quiet and smooth operation even under heavy driving conditions.
Properly greased and evenly seated bearings help maintain vehicle stability, prevent wheel movement and improve the overall performance of the suspension system.
How to Reassemble the Parts
1. Reassemble the Hub Assembly, Rotor and Brake Caliper
Once the new wheel bearings are securely installed and properly seated, the next important step is to begin reassembling the parts in the reverse order of disassembly.
Begin by carefully placing the hub assembly back on the steering knuckle or spindle, ensuring it is perfectly aligned with the axle shaft (for front-wheel or all-wheel-drive vehicles).
The hub should slide easily without any pressure, indicating that the bearing and spindle are correctly aligned.
If there is resistance, it is important to recheck the bearing alignment, as forcing the hub onto the spindle can damage the bearing’s inner race or deteriorate its seal.
Once the hub is in place, reinstall the brake rotor onto its mounting surface.
Ensure the rotor sits flat on the hub—any debris or rust between them could cause brake pulsation or uneven rotor wear later.
Once the rotor is properly seated, reinstall the brake caliper and secure it with the mounting bolts you removed earlier.
The caliper should slide easily onto the rotor and the bolts should be threaded straight without any cross-threading.
It’s also a good idea to check that the brake hoses are not bent and are properly supported, as bent lines can obstruct fluid flow and affect braking performance.
This careful reassembly ensures that the braking system remains safe, responsive and properly aligned even after the job is complete.
2. Tighten the bolts and axle nuts according to the manufacturer’s specified torque settings
After reassembling all major components, it’s important to tighten each fastener to the vehicle manufacturer’s recommended torque specifications.
Torque specifications aren’t random—they’re carefully designed to ensure that each component stays securely in place without excessive pressure.
Using a calibrated torque wrench, tighten the hub bolts, caliper bolts and axle nuts to the values specified in your car’s service manual.
Overtightening can damage the threads, bend the hub, or put excessive pressure on the bearings, leading to premature wear.
Undertightening, on the other hand, can cause parts to loosen while driving, causing the wheels to shake, vibrate, or even come loose while on the road.
When tightening the axle nuts, tighten them gradually while rotating the hub to ensure the bearings are properly seated.
Once the specified torque is reached, check that the wheel rotates freely and that there is no wear or tightness, which could indicate misalignment.
Some vehicles also require a new cotter pin or locking cap to secure the axle nut—always replace these securing parts with new ones to prevent the nuts from loosening during operation.
Finally, take a moment to inspect all connections and make sure everything is evenly tightened and properly aligned.
Accurate torque not only maintains safety and performance, but also extends the lifespan of the new bearings and prevents future maintenance issues.
Properly torqued parts create a safe and stable wheel assembly, ensuring smooth rotation and reliable operation on every drive.
How to Reinstall the Wheel
1. Install the Wheel, Tighten the Lug Nuts and Lower the Vehicle
After all the brake and hub components have been properly reassembled and torqued, it’s time to reinstall the wheel.
Carefully lift the wheel and align its bolt holes with the wheel studs, ensuring they rest flat on the hub surface.
It’s important that no rust, grease, or debris is trapped between the wheel and hub, as even small particles can cause uneven contact, leading to vibration or loosening of the lug nuts over time.
Once the wheel is in position, first thread the lug nuts onto the studs by hand.
This helps prevent cross-threading, which can damage both the nut and stud.
After hand-tightening each lug nut, use a lug wrench or socket to lightly tighten them in a crisscross or star pattern.
This tightening sequence ensures the wheel sits evenly on the hub and prevents the brake rotor from warping.
Don’t fully tighten the nuts while the vehicle is raised, as this can put undue stress on the suspension or cause the wheel to spin freely, making it difficult to tighten properly.
Once the nuts are evenly tightened, carefully lower the vehicle to the ground using a jack until all four wheels are in contact with the ground.
When the tires are fully supporting the car’s weight, you can safely remove the jack and stands.
Lowering the vehicle before final tightening ensures accurate torque application and ensures that the wheel is firmly and evenly seated on the hub.
2. Perform a final torque check after the car is on the ground
Now that the vehicle is safely on the ground, it’s important to perform a final torque check on all lug nuts using a torque wrench.
Each vehicle manufacturer specifies a precise torque value—measured in foot-pounds or Newton-meters—for its lug nuts.
This value ensures that the nuts are tightened enough to securely hold the wheel in place, but not so much that they damage the studs or make them difficult to remove in the future.
Overtightening can stretch or weaken the studs, while undertightening can cause the wheel to loosen while driving, causing dangerous vibrations or even wheel detachability.
When tightening, follow the crisscross or star pattern used previously, gradually applying even pressure until each nut clicks to the specified torque setting.
After tightening all the nuts, double-check that the wheel turns smoothly and that there are no scratching or grinding sounds from the new bearings.
It’s also a good practice to recheck the lug nut torque after driving 50 to 100 kilometers, as even slight movement of the parts can cause slight variations in tightness.
This final torque check not only ensures safety and stability, but also confirms that your wheel bearings were installed correctly.
A properly torqued wheel provides a secure connection between the hub and tire, maintains balance, prevents vibration and ensures smooth and confident driving on the road.
Read More:
How to Do Inspection After Replacement
1. Test drive slowly to ensure that the noise and vibration are gone
After replacing a wheel bearing, it’s important to conduct a careful test drive to ensure everything is working properly.
Start by driving slowly in a quiet area, such as an empty parking lot or the side of the road.
Listen carefully for any unusual sounds, such as humming, grinding, or clicking, which could indicate that the bearing is not properly installed or that some other component is worn.
A properly fitted wheel bearing should not produce any significant noise and the ride should feel smooth and stable.
If you previously experienced vibration in the steering wheel or floorboards, it should no longer be present.
While testing, take gentle turns in both directions to see if the noise changes as the load shifts left or right.
If you hear a persistent or increasing noise, it’s best to re-inspect the installation before driving.
This step is important because early detection of problems can prevent damage to new bearings, hubs, or suspension components.
2. Check for Smooth Wheel Rotation
After completing a test drive, park the vehicle on a level surface and manually rotate each wheel (if possible) to check for smooth rotation.
The wheels should rotate freely without resistance, friction, or vibration.
Smooth rotation confirms that the bearings are properly aligned within the hub and were tightened evenly during installation.
If the wheel feels stiff or rough, there may be an alignment problem, debris in the bearing seat, or over-torqueing of the axle nut.
Smooth, even rotation also indicates that the internal bearing components are properly lubricated and the rolling elements (balls or rollers) are functioning as expected.
Checking for proper wheel rotation not only confirms the quality of your repair but also ensures that the new bearings will last longer by reducing unnecessary friction and wear during regular driving.
3. Verify that the Brake and ABS Sensors are Working Properly
Modern vehicles often have wheel speed sensors installed in or near the wheel bearing assembly.
These sensors provide critical data to the anti-lock braking system (ABS) and traction control system (TCS).
After replacing a bearing, it’s important to ensure that these sensors are properly connected and functioning.
Start by gently applying the brakes during a test drive to ensure the pedal is firm and responsive.
There should be no pulsation, pressure, or uneven braking, which could indicate rotor or caliper misalignment or contamination.
Next, check the ABS warning light on your dashboard.
If the light remains on after a few seconds, it could mean the ABS sensor wasn’t reinstalled properly or debris is obstructing its signal.
Cleaning the sensor or reseating its connector usually resolves the problem.
Properly functioning brake and ABS sensors are essential for safe vehicle operation, specially during emergency stops or on slippery roads, so this check should never be skipped.
4. Check for any grease leaks or unusual noises
The final step in the post-replacement inspection is to carefully examine the hub and bearing area for any signs of grease leaks, loose fittings, or unusual noises.
A properly installed bearing should be dry and clean and there should be no traces of grease leaking from the seal.
Grease leaks often indicate a damaged or poorly fitted seal, which can allow contaminants like dirt and water to enter the bearing and significantly shorten its life.
Use a flashlight to inspect the hub, backing plate and axle nut area.
Pay attention to any clicking, scratching, or rattling sounds when turning the wheel by hand or driving slowly.
Even minor noises can point to underlying problems, such as improper torque, misaligned parts, or worn bearings.
Addressing these issues promptly helps prevent further damage and ensures the repair remains reliable for thousands of miles.
A clean, quiet and smooth-running wheel assembly confirms that the wheel bearing replacement was successful and your vehicle is safe and ready for regular driving.
What are The Common Mistakes to Avoid
1. Reusing Damaged or Contaminated Bearings
One of the most common mistakes when replacing wheel bearings is attempting to reuse old, damaged, or contaminated bearings to save time or money.
This almost always results in premature bearing failure and can undo all the work done during the repair.
Removed bearings are often weakened by the stress applied during removal and even the slightest trace of dirt, moisture, or metal debris can disrupt their smooth operation.
Wheel bearings rely on completely clean, polished metal surfaces to allow the wheel to rotate freely with minimal friction.
Once these surfaces become scratched, pitted, or rusted, the bearings begin to make noise, vibrate and wear out quickly.
Reusing such bearings can cause uneven tire wear, poor handling and even complete bearing failure while driving, which is extremely dangerous.
Always use a brand-new, high-quality bearing that meets or exceeds the vehicle manufacturer’s specifications.
If dust or dirt gets on the bearing during installation, it should be cleaned or replaced immediately, as even a small particle can cause premature bearing wear due to the load.
2. Not Torqueing Nuts and Bolts Correctly
Incorrect torque is another common mistake that significantly impacts the safety and performance of the wheel bearing assembly.
Each nut and bolt in the suspension and hub area is designed to be tightened to a specific torque value to ensure proper clamping force without excessive stress on the components.
If a bolt or axle nut is undertightened, they may loosen during driving, causing the hub to move, leading to noise, vibration and excessive bearing wear.
On the other hand, overtightening can distort the bearing races, increase rolling resistance and generate excessive heat, potentially damaging internal components.
Over time, this can cause premature wear of the bearing, hub, or even axle threads.
The best way to avoid this problem is to use a calibrated torque wrench.
Always consult the vehicle’s service manual for the correct torque specifications and follow them exactly.
This ensures that all components are securely connected and aligned, ensuring smooth operation and increasing the lifespan of both the new bearing and surrounding suspension components.
3. Excessive Force During Bearing Installation
Another major mistake when installing new bearings is using excessive force.
Bearings are precisely designed components that depend on precise tolerances for proper function and excessive hammering or uneven pressure can damage their internal structure before they even rotate for the first time.
Hammering the bearing directly or applying pressure to the wrong race can distort the rolling elements and seals, causing noise, friction and early failure.
The correct way to install a bearing is to apply even, steady pressure using a bearing press or driver tool that contacts the inner race while applying pressure only to the outer race or shaft for press-fit bearings.
Forcing the bearing into place can also damage the hub or spindle, creating uneven surfaces that prevent the bearing from seating properly.
Always take the time to align the bearing straight, use the correct tools and apply slow, consistent pressure.
Proper installation prevents internal stress, ensures smooth wheel rotation and helps maintain the bearing’s factory precision and lifespan.
4. Neglecting to Clean or Inspect Surrounding Parts – Hub, Spindle, Seals
Replacing a wheel bearing isn’t just about replacing the bearing—it’s also an opportunity to inspect and clean related parts that affect bearing performance.
Neglecting to clean or inspect the hub, spindle, or seal is a common mistake that can lead to premature bearing failure.
Before installing a new bearing, the hub and spindle surfaces must be completely free of rust, dirt and grease, as any contamination can interfere with proper seating and alignment.
Bearing seals also play a vital role in preventing water and debris from entering, so if they become worn or damaged, they should be replaced immediately.
Failure to do so can allow contaminants to enter the bearing, breaking down the grease and increasing friction.
Furthermore, if the hub or spindle shows signs of dents, pits, or uneven wear, it’s essential to have them repaired or replaced before installing a new bearing.
Neglecting these small but important details can cause the new bearing to fail much earlier than expected.
Thorough cleaning, inspection and preparation ensure that the bearing operates efficiently, remains well-lubricated and provides smooth and quiet performance for thousands of miles.
When You Should Call for Professional Help
1. If the Hub or Spindle Is Severely Damaged
Sometimes, during inspection or disassembly, you may discover that the hub or spindle is severely worn, rusted, or bent.
In such cases, simply replacing the bearings will not solve the problem, as new bearings rely on a perfectly smooth and straight surface to function properly.
A damaged spindle or hub can disrupt the alignment of the new bearings, causing immediate noise, uneven rotation, or accelerated wear.
Repairing or replacing these components requires precise measurements and machining to restore correct tolerances, often within fractions of a millimeter.
Attempting to repair this at home without professional equipment can result in unsafe wheel alignment and handling problems.
A professional mechanic has the necessary measuring instruments, such as micrometers and dial indicators, to verify that the hub and spindle conform to factory specifications.
They can also determine whether the damage is minor enough to repair or whether the entire assembly needs to be replaced.
Seeking professional help in this situation ensures that the bearings are in perfect condition, reducing the risk of vibration, wheel movement and premature wear.
It also ensures that your vehicle maintains proper wheel balance and road safety after repair.
2. If Special Tools Are Unavailable – Such as a Bearing Press
Replacing wheel bearings often requires specialized tools designed to remove and install the bearings without damaging them.
The most important of these is a bearing press or hub puller, which applies even and controlled pressure during installation.
Without these tools, removing the old bearing or installing the new bearing correctly becomes very difficult.
Using makeshift methods such as a hammer or metal rod can easily deform the bearing races, damage the seals, or cause the bearing to seat unevenly inside the hub.
This can cause noise, irregular wheel rotation, or even bearing failure soon after installation.
Professional workshops have hydraulic or pneumatic presses, precision adapters and alignment fixtures to ensure the bearing is installed perfectly straight and at the proper depth.
Mechanics also have torque wrenches, impact tools and diagnostic scanners available to confirm ABS sensor readings.
If you don’t have these specialized tools at home, it’s often safer and more economical to have a professional replace it.
This not only prevents potential damage to expensive components but also ensures the new bearing lasts its full lifespan.
3. When working with modern vehicles with integrated hub assemblies
Many newer cars and trucks use advanced integrated hub and bearing assemblies that combine multiple components into a single sealed unit.
These assemblies often include the wheel bearing, hub flange, wheel speed sensor and sometimes even the ABS tone ring, all manufactured together as a single module.
Although this design increases reliability and reduces maintenance, it also makes replacement more complex.
These units are not designed to be disassembled or repaired individually, so attempting to remove or replace components without the proper tools and knowledge can result in costly damage or system malfunction.
Additionally, integrated assemblies are often connected to electronic systems such as ABS, traction control and stability control, which require recalibration or sensor reset after installation.
A professional mechanic has the necessary diagnostic equipment and training to safely perform these procedures.
They can also ensure that sensor wiring, connectors and magnetic encoder rings are properly aligned and functional.
When working on modern vehicles with such technology, professional assistance is highly recommended to maintain both mechanical and electronic accuracy.
This ensures that your vehicle’s braking, traction and safety systems continue to function as designed even after repairs.
Basic Maintenance Tips to Ensure Bearing Longevity
1. Don’t Overload Your Vehicle
One of the most common causes of premature wheel bearing failure is excessive load.
When a vehicle is loaded beyond its rated capacity, the extra weight puts additional pressure on the wheel bearings, causing them to overheat and wear out faster.
Bearings are designed to carry a certain amount of load, including the vehicle’s weight, passengers and luggage.
Exceeding this limit can cause metal fatigue, deformation of the bearing races and reduced lubrication.
Over time, this can lead to grinding noise, irregular wheel rotation and bearing seizure.
To avoid this, always adhere to the load limits specified in your vehicle’s manual.
This includes not only passenger load, but also towing and luggage limits.
Keeping loads within safe limits ensures that bearings operate at normal stress levels, rotate smoothly and increase their overall lifespan.
Proper load management also improves fuel efficiency and reduces stress on suspension components.
2. Keep tires properly balanced and aligned
The balance and alignment of your wheels directly impact the lifespan of your bearings.
When tires are unbalanced or misaligned, they generate uneven rotational forces that are transferred directly to the wheel bearings.
This uneven load can cause one part of the bearing to wear faster than the other, leading to premature damage and noise during driving.
Misalignment also increases friction, which increases operating temperatures and causes grease to deteriorate faster.
To avoid this, have your wheels regularly balanced and aligned, specially after hitting potholes or curbs.
Balanced tires ensure that the load is evenly distributed during wheel rotation, reducing vibration and stress on the bearings.
Proper alignment ensures that the wheels rotate straight and in the correct direction, preventing unnecessary lateral loads that can distort the bearing races.
Regular tire balancing and alignment maintenance not only preserves bearing life but also improves handling, steering stability and tire longevity.
3. Replace worn seals to prevent moisture and dirt ingress
Wheel bearings rely heavily on clean lubrication and effective sealing to remain in good condition.
The seals surrounding the bearings are designed to keep grease in and contaminants out.
When these seals wear out, crack, or dry out over time, dirt, water and road salt can enter the bearing assembly.
Contamination quickly degrades the lubricant and causes corrosion and pitting inside the bearing.
Moisture ingress is particularly harmful, as even small amounts of water can combine with grease and reduce its protective properties.
To maintain your bearings, inspect the seals during regular brake or tire service.
If you notice any damage or leaks, replace them immediately.
Using high-quality seals and applying a thin layer of bearing grease during installation helps ensure a tight, moisture-proof fit.
Keeping seals in good condition protects bearings from corrosion and debris, significantly increasing their operational life and performance reliability.
Even, NHTSA shows that if there’s insufficient grease or nothing at the hub that can cause the bearings to overheat and fail, which is why it is really important to check for proper grease and replacement of damaged seals during the service, as it is not optional at all because it is a safety step.[¹]
4. Regularly inspect bearings for any wear or noise
Regular inspection is one of the simplest and most effective ways to ensure the long-term safety of wheel bearings.
A quick check for wear or roughness can help you spot early signs of wear before serious damage occurs.
To check for wear, safely lift the wheel off the ground and rock it back and forth by hand.
Any looseness or rattling noises may indicate a worn bearing or a bad hub assembly.
While driving, pay attention to buzzing, grinding, or rumbling sounds that intensify with increased speed—these are common signs of bearing wear.
Regular inspections also help you check for proper lubrication and cleanliness around the hub.
Early detection allows for timely maintenance or replacement, preventing complete bearing failure, which can lead to unsafe driving or wheel lock-up.
By checking your bearings at regular intervals, specially before long trips, you can ensure years of comfortable riding, improved handling and reliable wheel performance.
Conclusion – How to Replace Car Wheel Bearings
The Wheel Bearings literally affects the car’s performance, as it truly connects power to the pavement and keeps every journey safe and perfect.
When you replace your car’s wheel bearings correctly, it smooths wheel rotation, eliminates unwanted noise and prevents excessive tire wear.
Properly installed wheel bearings ensure that the wheel hub rotates freely with minimal friction, reducing stress on the suspension and braking systems.
Neglecting this maintenance can lead to serious problems such as uneven tire wear, unstable steering and, in extreme cases, complete wheel failure.
Modern vehicles rely on precisely designed bearings to operate at high loads and speeds, so keeping them in top condition is crucial for safe and efficient driving.
Regular inspection, proper lubrication, using the correct torque and adhering to manufacturer specifications can significantly extend the lifespan of wheel bearings.
By following proper installation techniques and paying attention to early warning signs of failure, drivers can save money on costly repairs and ensure a safer, quieter and more comfortable journey every day.
Another important point is that wheel bearings don’t just support your wheels—they also play a crucial role in efficiently transmitting power from the drivetrain to the wheels.
When bearings are in good condition, energy loss due to friction is minimized, which improves fuel economy and reduces carbon emissions.
On the other hand, damaged or poorly maintained bearings increase friction, create vibration and put additional stress on connected components like axles and CV joints.
Therefore, wheel bearing maintenance is crucial not only for comfort but also for improving the performance and longevity of your entire vehicle.
Whether you do the work yourself or hire a professional, always prioritize precision, cleanliness and quality parts.
Small habits like checking for unusual noises or balancing your car’s weight can go a long way in maintaining both your bearings and your peace of mind.
Ultimately, carefully maintaining your wheel bearings means protecting the entire foundation of your vehicle’s movement—ensuring reliability, safety and driving confidence for miles to come.
So, that’s all from this guide, now you can ask some questions in the comment box related to this guide.
Frequently Asked Questions
Q1. What is a wheel bearing and what is its function in a car?
Answer: A wheel bearing is a small but essential part that helps a wheel rotate smoothly with very little friction. It’s located inside the wheel hub and supports the car’s weight while helping the wheel rotate. When bearings function properly, your wheels rotate quietly and evenly, ensuring safe and stable driving. Without good wheel bearings, the wheel won’t rotate freely and this can cause noise, vibration and even damage to the suspension or axle over time.
Q2. What are the signs that my wheel bearings are failing?
Answer: The most common sign of a failing wheel bearing is a grinding, humming, or rumbling sound that gets louder with increasing speed. You may also notice vibrations in the steering wheel, or the car may lean slightly to one side. Other signs include uneven tire wear, an ABS warning light, or a burning smell near the wheels. If you notice any of these symptoms, it’s best to have the bearings inspected immediately, as continued driving with a damaged bearing could cause the wheel to loosen or even separate.
Q3. Can I drive with a bad wheel bearing?
Answer: Driving with a bad wheel bearing is unsafe. Even if the car continues to run, a bearing can suddenly fail, causing the wheel to shake or lock. This can lead to loss of control, specially at high speeds. Furthermore, damaged bearings put additional stress on hubs, axles and suspension components, leading to more expensive repairs. If you suspect a problem, have your vehicle inspected and repaired as soon as possible.
References:
[1] Part 573 Safety Recall Report 24V-830, International Motors, LLC
https://static.nhtsa.gov/odi/rcl/2024/RCLRPT-24V830-9694.PDF

Guys, I’m a car audio enthusiast and customization expert and I love clear sound and clean installation. Plus, I have spent years helping people build their dream audio setups. And whenever I’m working on cars, I probably listen to music and thinks about the next big upgrade.