Written By: Don Dodi
Fact Checked By: Kristen Brown
Reviewed By: Diego Rosenberg
So, brake pads actually works silently to give you full control over your vehicle, as whenever you press your brake pedal then it turns motion into steady through pure friction.
Basically, brake pads are one of the most important components which is actually responsible for slowing and stopping the car: as it does this by crating friction against the brake rotors.
But over the period of time, it is a natural thing that every set of brake pads actually wears down due to heat, pressure and constant use as well, which is why you should replace them in every 30,000 to 70,000 miles, yes that even depends on the driving style, road conditions and material quality as well.
Even, according to the NHTSA; nearly 22% of the vehicle crashes which are related to the mechanical failure are actually linked to the brake issues, which is why it is really important to have them in the absolute healthy condition, so for the safe driving you should know How to Replace Car Brake Pads, so that you can restore braking performance and efficiency again.
As well as, when you change the your vehicle’s brake pads then you have actually increased the lifespan of your rotors and calipers as well.
Tools
| Item | Purpose / Description |
|---|---|
| Socket Wrench | Used to remove and tighten bolts on the brake caliper and wheel. |
| Jack | Safely raises the car off the ground to access the wheels and brakes. |
| Lug Wrench | Loosens and tightens wheel nuts before removing wheel. |
| C-Clamp | The caliper compresses the piston to make room for the new brake pads. |
| Brake Cleaner | Cleans dust, dirt and grease from brake assemblies for improved performance. |
| New Brake Pads | Worn pads are replaced for safe and smooth braking. |
| Anti-Squeal Grease | Reduces noise and prevents vibration between the pads and caliper. |
| Gloves | Protects your hands from dirt, grease and chemicals. |
| Safety Glasses | Protects your eyes from brake dust, debris and brake cleaner spray. |
| Torque Wrench | Ensure bolts and lug nuts are tightened to the correct manufacturer specifications. |
| Wire Brush | Cleaning calipers, rotors and other parts by removing rust and debris from them. |
| Brake Fluid Tester | Checking the condition of the brake fluid to ensure it is safe and effective. |
Safety Precautions You Need to Follow
1. Park on a Level Surface
Before beginning any braking work, always ensure your car is parked on a completely level and stable surface.
This reduces the risk of the vehicle tipping over or rolling over while being lifted.
Working on slopes or uneven ground can cause serious accidents, even if the parking brake is engaged.
Engage the Parking Brake and Use Wheel Chocks
After parking, fully engage the parking brake.
Then, place wheel chocks on the ground in front of and behind the wheels.
Wheel chocks are barriers that prevent the car from unexpected movement.
According to automotive safety experts, using wheel chocks while working under a vehicle can prevent accidents caused by sudden movements.
2. Use Jack Stands Properly
Never rely solely on a hydraulic jack to raise your car.
The jack could malfunction or slip, causing the car to fall.
Instead, use jack stands that are strong enough to support your vehicle’s weight and securely support the car.
Place the stands under the manufacturer’s recommended lifting point and ensure the car is stable before beginning any work.
This simple step dramatically reduces the risk of injury when replacing brake pads.
3. Wear Safety Equipment and Avoid Brake Dust
Always wear gloves and safety glasses when working with brakes.
Brake dust can contain microscopic metal particles and other harmful substances that can irritate your skin, eyes, or lungs.
Avoid touching your face while working and wash your hands thoroughly after finishing.
Wearing proper protective equipment is one of the easiest ways to avoid injury and exposure to potentially dangerous chemicals.
Prepare the Vehicle First
1. Loosening the Lug Nuts Before Lifting the Car
Before raising your vehicle, it’s important to slightly loosen the lug nuts on the wheel you’re working on.
This is because it’s safer to loosen them when the car is firmly on the ground, as the wheel won’t spin.
Using a lug wrench, turn each nut anti-clockwise just enough to loosen the initial tightening.
To avoid any accidents, loosen the nuts completely only when the car is fully raised.
2. Raising the Vehicle Safely with a Floor Jack
Once the lug nuts are loose, position a floor jack under the manufacturer’s recommended lifting point, which is usually provided in the car’s owner’s manual.
To raise the vehicle, slowly press the jack down until the wheel is off the ground.
Using the correct lifting point prevents damage to the car’s frame or underbody and ensures that the vehicle remains stable during this process.
3. Securing the Car with Jack Stands
After raising the car, always place jack stands under the appropriate support points and carefully lower the car onto them.
Never rely solely on a hydraulic jack, as it could malfunction or slip, causing serious injury.
Ensure the vehicle is completely stable before working under or around the wheel.
Using jack stands when changing brake pads significantly reduces the risk of accidents.
4. Removing the Wheel to Expose the Brake Assembly
With the car safely raised and supported, completely remove the loosened lug nuts and remove the wheel.
This exposes the brake assembly, including the rotor, caliper and old brake pads, giving you full access to replace them.
Carefully removing the wheel ensures clear visibility and space to work, making the brake replacement process safe and easy.
How to Inspect the Brake Assembly
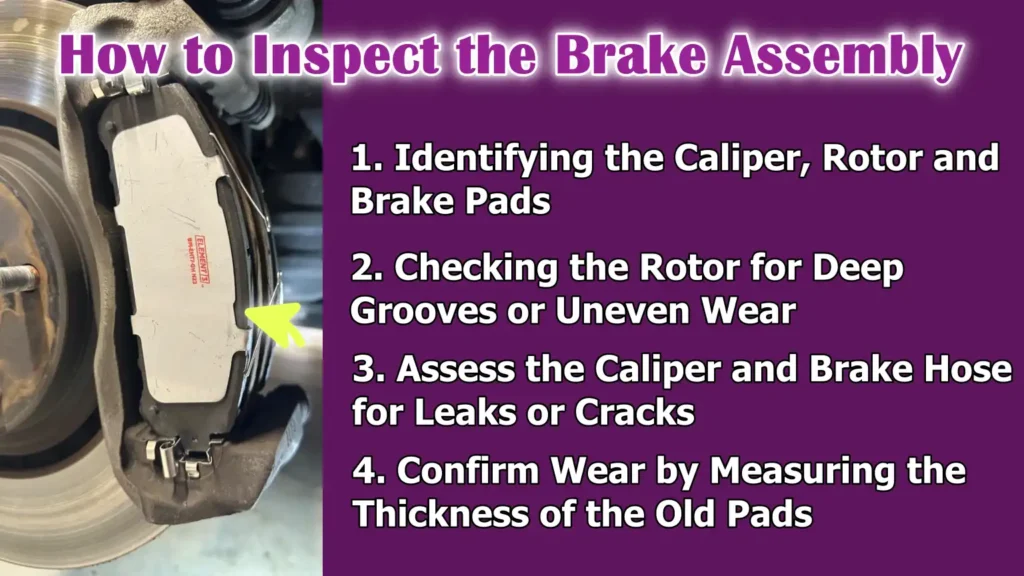
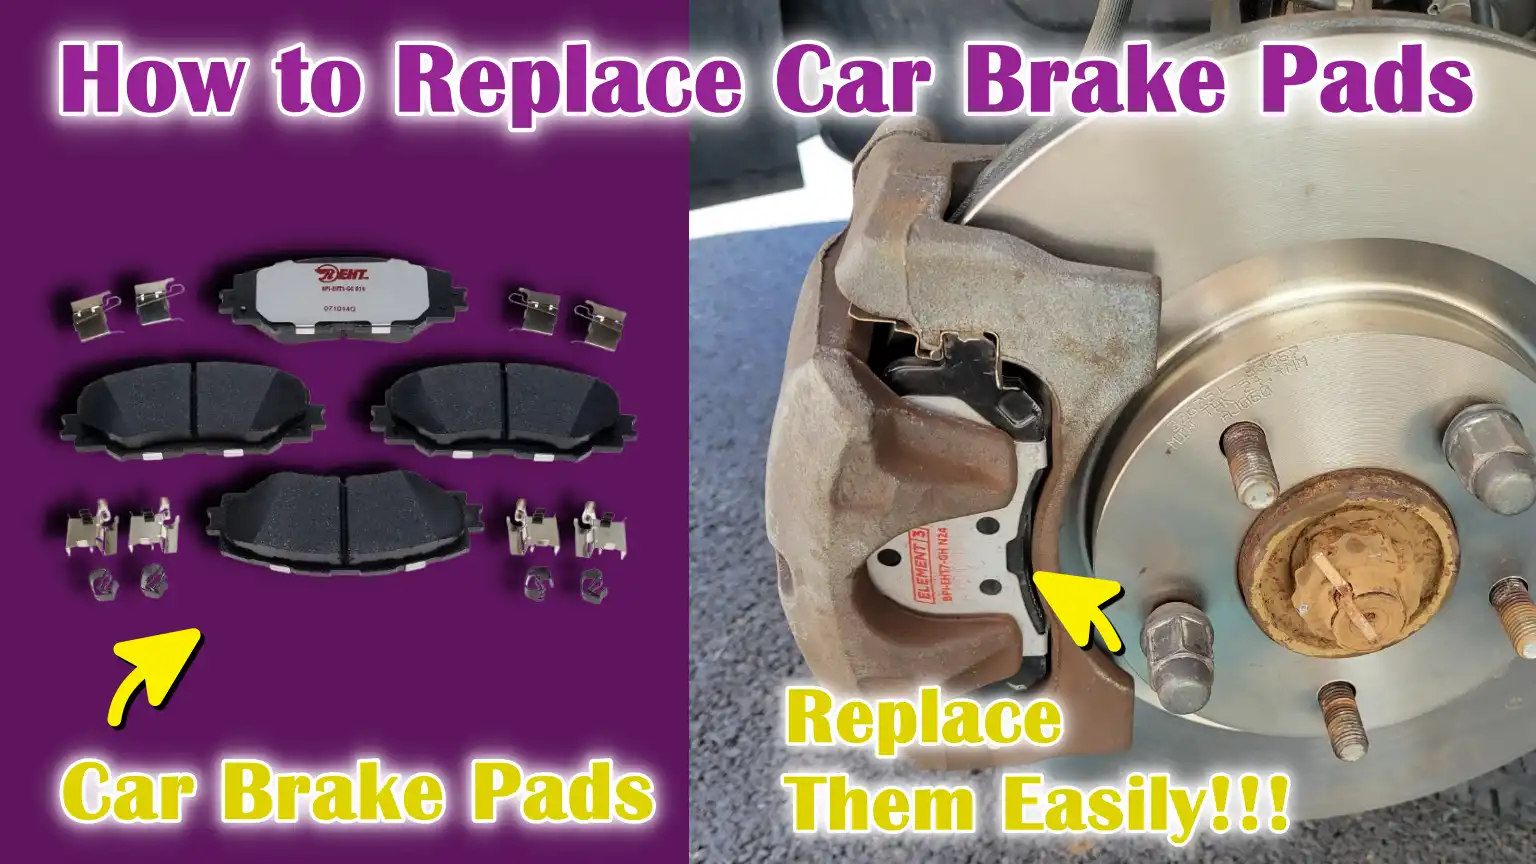
1. Identifying the Caliper, Rotor and Brake Pads
The first step in inspecting the brake assembly is to clearly identify its main parts.
The brake caliper is a clamp-like device that holds the brake pads and presses them onto the rotor, bringing the car to a stop.
The rotor, a flat, circular metal disc, rotates with the wheel and the brake pads apply pressure to it, generating friction.
The brake pads themselves are flat, rectangular discs that wear down over time due to constant friction.
Understanding these parts helps you know what to check and how they work together to stop your vehicle safely.
2. Checking the Rotor for Deep Grooves or Uneven Wear
Deep grooves, notches, or uneven wear can develop on the rotor over time, reducing braking efficiency and causing vibration when braking.
Gently tap the rotor surface or inspect it for rough spots or discoloration due to heat.
If the grooves are too deep or the surface is uneven, the rotor surface may need to be resurfaced or replaced.
According to automotive safety experts, driving with worn or damaged rotors can increase stopping distance by up to 30 percent, making inspection essential.
3. Assess the Caliper and Brake Hose for Leaks or Cracks
When inspecting the caliper, check for any signs of fluid leaks, cracks, or corrosion.
A brake fluid leak can lead to brake failure, which is extremely dangerous.
Also, check the brake hose connecting the caliper to the brake line.
Any cracks, bulges, or damage can affect braking performance and should be repaired immediately.
Keeping the caliper and hose in good condition ensures reliable and consistent braking.
4. Confirm Wear by Measuring the Thickness of the Old Pads
Brake pads have a minimum safe thickness, which is usually around 3 to 4 millimeters, depending on the manufacturer.
Use a ruler or caliper to measure the remaining pad material.
If the pad is thinner than the recommended thickness, it must be replaced to maintain safe braking performance.
Worn pads not only reduce stopping power, but can also damage the rotor and caliper over time, leading to more expensive repairs.
How to Remove Old Brake Pads
1. Carefully Removing the Caliper Bolts
The first step in removing old brake pads is to carefully loosen and remove the caliper bolts.
These bolts hold the brake caliper to the rotor and pads.
Using an appropriately sized socket wrench, turn the bolts anti-clockwise, being careful not to strip them.
It is important to remove the caliper bolts slowly and carefully to avoid damaging the threads or the caliper, as this could lead to costly repairs.
2. Properly Supporting the Caliper
Once the caliper is loose, it is important to support it with a wire, hook, or bungee cord.
Never hang the caliper by the brake hose, as this could damage the hose and cause brake fluid leakage or reduce braking power.
Properly supporting the caliper prevents pressure from being placed on the hydraulic system and keeps all components safe during the pad replacement process.
3. Removing Worn Brake Pads and Clips
Once the caliper is secured, the old brake pads can be removed from the caliper bracket.
These pads may be held in place by clips or small retaining hardware.
To properly install the new parts, carefully remove the clips along with the pads, paying attention to their orientation.
It’s important to completely remove the worn pads to properly inspect the rotor and caliper and make room for the new pads.
4. Check for rust or dirt on the caliper pins and slides
After removing the pads, inspect the caliper pins and slides, which help the caliper move smoothly during braking.
Check for any signs of rust, dirt, or corrosion.
Dirty or rusty pins can cause uneven pad wear, brake noise, or sticking of the caliper.
Cleaning these parts and applying a small amount of high-temperature grease ensures smooth caliper operation and increases the lifespan of the new brake pads.
How to Compress the Caliper Piston
1. Why Retracting the Piston is Important
The caliper piston creates friction by pressing the brake pads against the rotor and stopping the vehicle.
Over time, as the brake pads wear, the piston moves outward.
When installing new, thicker brake pads, it’s important to push the piston back into the caliper housing to create enough space for the new pads.
Not retracing the piston may result in a poor wheel fit or may cause the brakes to stretch, potentially damaging the pads, rotor, or caliper.
2. Using a C-Clamp or Brake Caliper Tool
A C-clamp or a specialized brake caliper tool is used to slowly and evenly push the piston back into the caliper.
Place the clamp or tool on the piston and the back of the caliper, then tighten it slowly.
Slow and steady pressure ensures that the piston moves smoothly without bending or damaging internal components.
For vehicles with dual-piston calipers, each piston must be compressed equally to maintain proper brake performance.
3. Monitoring the Brake Fluid Reservoir
As the piston is pushed back, the brake fluid in the caliper returns to the master cylinder reservoir.
It’s important to monitor the fluid level during this process to prevent overflow, which could spill onto painted surfaces and cause damage.
Checking the reservoir ensures that the fluid is safely stored and prevents contamination of the braking system.
4. Checking the Rubber Boot Around the Piston
Before reinstalling the caliper, inspect the rubber boot around the piston.
This boot protects the piston from dirt, debris and moisture, which can cause corrosion and shorten the caliper’s lifespan.
If the boot is cracked, broken, or damaged, it should be replaced before proceeding.
A healthy boot ensures smooth piston movement and extends the lifespan of both the caliper and new brake pads.
How to Install New Brake Pads
1. Applying Brake Grease
Before installing new brake pads, apply a thin layer of high-temperature brake grease to the back of each pad and to the caliper contact points.
This grease reduces friction between the pad and caliper, preventing squeaking and vibration when braking.
Proper lubrication also helps pads glide smoothly and wear evenly, extending their lifespan and improving overall braking performance.
2. Installing the New Pads in the Correct Position
Carefully insert the new brake pads into the caliper bracket, ensuring they are positioned in the same way as the old pads.
The friction surface of the pads should face the rotor and the backing plate should align with the caliper bracket.
Correct positioning is important because misaligned pads can cause uneven braking, increased wear and reduced stopping power, affecting vehicle safety.
3. Reinstalling or Replacing Hardware Clips
If your brake system is equipped with hardware clips or retaining springs, carefully reinstall them or, if available, replace them with new clips.
These clips hold the pads securely in place and help reduce vibration and rattle.
Using old or damaged clips can cause the pads to move, make noise, or wear unevenly, so checking and replacing them as needed ensures reliable braking.
4. Reinstalling the Caliper and Tightening the Bolts
Once the pads and clips are in place, carefully install the caliper over the rotor and pads.
Reinstall the caliper bolts and tighten them to the manufacturer’s recommended torque specification using a torque wrench.
Proper torque ensures that the caliper is securely in place without overtightening, which could damage the threads or components.
Following the correct torque specifications is essential for safe, reliable braking and prevents potential accidents caused by loose or incorrectly installed parts.
Read More:
How to Reassemble and Final Steps
1. Reinstalling the Wheel and Hand-Tightening the Lug Nuts
After installing the new brake pads and securing the caliper, carefully reinstall the wheel onto the hub.
Begin tightening the lug nuts by hand to ensure they are properly aligned and not cross-threaded.
Hand-tightening the nuts first reduces the risk of damaging the wheel studs and makes the final tightening easier after the car is lowered.
2. Carefully Lowering the Car Back to the Ground
After placing the wheel in place, use a jack to slowly lower the vehicle until it is completely off the ground.
Ensure that jack stands, if used, are securely removed and the car is stable before applying full pressure to the wheels.
Lowering the car slowly prevents sudden movements or tilts that could cause injury or damage.
3. Tightening the Lug Nuts in a Crisscross Pattern
With the car on the ground, use a torque wrench to tighten the lug nuts according to the manufacturer’s recommended torque specification.
Tightening in a crisscross pattern ensures the wheel sits evenly on the hub, preventing twisting, vibration, or uneven pressure.
Correct torque is essential for safe driving and prevents the nuts from loosening over time.
4. Repeating the Process on the Other Side
If you’re replacing brake pads on both sides of an axle, repeat the entire process for the opposite wheel.
Ensuring both sides are serviced maintains balanced braking performance, which is essential for safe stopping and vehicle control.
Regular inspection and replacement on both sides also extends the life of your braking system and prevents uneven wear.
How to Check the Brake System
1. Pumping the Brake Pedal Before Starting the Vehicle
After replacing the brake pads, it’s important to pump the brake pedal several times before starting the vehicle.
This action helps restore hydraulic pressure in the brake lines and push the caliper pistons onto the new pads.
Failure to do so can cause the brake pedal to become soft or spongy, which can reduce stopping power and compromise safety.
2. Checking the Brake Fluid Level in the Reservoir
Next, check the brake fluid level in the master cylinder reservoir.
Replacing the brake pads drains fluid back into the reservoir and in some cases, it may need to be topped up.
Using the correct type of brake fluid recommended by the manufacturer is crucial to maintaining braking system performance and preventing air from entering the lines, which can cause brake failure.
3. Taking a Short Test Drive at Low Speeds
When the pedal feels firm and the fluid level is correct, take a short test drive at low speeds in a safe, open area.
To ensure the vehicle stops smoothly and consistently, gently apply the brakes several times.
Testing at low speeds helps you identify any immediate problems without endangering yourself or others.
4. Listening for Unusual Sounds and Checking for Vibrations or Strain
During the test drive, pay attention to any unusual sounds, such as squeaking, grinding, or rattling.
Also, observe if the car pulls to one side or vibrates when braking.
These signs could indicate improper installation, misaligned pads, or a problem with the caliper or rotor.
Addressing these problems promptly ensures reliable braking performance and maintains your vehicle’s safety.
Common Mistakes to Avoid During Brake Pad Replacement
1. Don’t Forget to Torque the Caliper Bolts Correctly
One of the most common mistakes when replacing brake pads is not tightening the caliper bolts to the manufacturer’s recommended torque specification.
Bolts that are too loose can cause the caliper to slip when braking, leading to uneven pad wear or brake failure.
Overtightening can strip threads or damage components.
Using a torque wrench and adhering to the specified values ensures the caliper remains secure and the braking system functions safely.
2. Not Applying Grease to the Pad Contact Points
Not applying high-temperature grease to the back of the brake pad and to the caliper contact points can cause squealing, vibration, or uneven pad wear.
Grease reduces friction between moving parts and helps the pad glide smoothly within the caliper bracket.
Proper lubrication improves braking performance and extends the lifespan of both the pad and caliper.
3. Air ingress into brake lines
Air can enter the brake lines by inadvertently opening the brake fluid reservoir while compressing the caliper piston or during other brake operation.
Air in the lines reduces hydraulic pressure, causing the brake pedal to become soft or spongy and reducing the brakes’ stopping power.
To avoid this, carefully monitor fluid levels and avoid leaks, ensuring the hydraulic system remains sealed and fully functional.
4. Ignoring rotor wear or not cleaning the braking surface
Another common mistake is ignoring the condition of the rotors or not cleaning the braking surface before installing new pads.
Rotors with grooves, rust, or debris can cause uneven pad wear, reduced braking efficiency and vibration.
Cleaning or replacing rotors ensures a smooth contact surface for the pads, restoring optimal stopping performance and extending the lifespan of both the rotors and the new brake pads.
How to Maintain Car’s Brake Pads for Longer Life
Not only this, many studies actually shows that the brake wear is a leading source of non-exhaust road pollution in cities, this clearly means that your choice of brake pad and how you maintain them literally influences stopping power and also local air quality as well.[¹]
1. Break-In/Bedding Procedure for New Pads
After installing new brake pads, it’s essential to perform a proper break-in or bedding procedure.
This involves gently applying the brakes several times at moderate speeds to allow the pads to evenly deposit the substance onto the rotor surface.
Proper bedding improves braking performance, reduces noise and prevents uneven wear.
Skipping this step can cause the pads to polish prematurely, reduce stopping power and increase rotor wear.
2. Regular Brake Fluid Checks
Brake fluid plays a vital role in hydraulic braking systems.
After replacing pads, it’s important to regularly check the fluid level to ensure it’s within the recommended range.
Low or contaminated brake fluid can reduce braking efficiency, cause a soft pedal feel and potentially damage components.
Using the manufacturer’s recommended brake fluid type maintains system reliability and safety.
3. Pad Inspection Every 10,000-15,000 Miles
Even after replacing brake pads, they should be inspected at regular intervals, typically every 10,000 to 15,000 miles, depending on driving habits.
Checking pad thickness and wear patterns can help you detect uneven wear early, prevent rotor damage and maintain optimal braking performance.
Regular inspection is a simple and effective way to extend the lifespan of your braking system.
4. Avoid Aggressive Braking During the First Few Hundred Miles
During the first few hundred miles after installing new pads, it’s important to avoid aggressive braking, such as sudden stops from high speeds.
Gentle braking allows the pads to properly seat onto the rotor and prevents uneven wear or glazing.
This careful approach ensures maximum performance, safety and longevity of the new brake components.
When You Should Ask For Help From Professional
1. If the Caliper Piston Isn’t Compressing
If you notice that the caliper piston isn’t retracting easily when you try to compress it, it could be a sign of rust, damage, or a stuck caliper.
Applying force to the piston can cause permanent damage to the caliper or brake system, leading to costly repairs.
A professional mechanic can safely inspect, repair, or replace the caliper to ensure proper braking.
2. If the Rotors Are Excessively Bent or Rusted
Brake rotors that are excessively bent, scratched, or excessively rusted may not make smooth contact with the brake pads, reducing braking efficiency and causing vibration or friction.
Attempting to reuse a severely damaged rotor may compromise safety.
A certified technician can rebuild or replace the rotor surface to restore optimal stopping power and prevent further damage to the braking system.
3. If the brake pedal still feels soft or spongy after replacing it
A soft or spongy brake pedal, even after replacing the pads, usually indicates air trapped in the brake lines or a problem with the hydraulic system.
Driving under such conditions is unsafe as it reduces braking performance.
Professional brake bleeding and inspection ensure that hydraulic pressure is restored and the system is functioning properly.
4. If the ABS or Brake Warning Light Remains On
If the ABS or brake warning light remains on after replacing the brake pads, it could indicate a sensor problem, a lack of brake fluid, or a malfunction in the braking system.
Ignoring these warning lights can lead to serious safety risks.
A trained mechanic can diagnose and resolve the underlying problem, ensuring that the ABS and braking system are functioning properly and safely.
Conclusion – How to Replace Car Brake Pads
The brake pads are actually meant to stop the vehicle safely and smoothly, so if the brake pads are worn out or damaged then you have to take the time to inspect, replace and maintain them to ensure your vehicle stops exactly when it should be, every single time.
Brake pads are crucial for stopping your car efficiently and worn pads can increase braking distance, cause uneven rotor wear and even lead to brake failure.
By following proper safety precautions, using the right tools and carefully inspecting and installing new pads, you not only improve your vehicle’s performance but also avoid costly repairs caused by neglected brakes.
Regular maintenance, such as checking brake fluid, inspecting pads and following a proper break-in procedure, ensures your brakes remain effective and durable for years to come.
Now, you can comment down below if you still have confusion or queries related to this guide.
Frequently Asked Questions
Q1. How do I know if my brake pads need replacing?
Answer: Brake pads should be replaced when they are worn, usually less than 3 to 4 millimeters thick. A loud squealing sound when braking, vibration in the brake pedal, increased stopping distance, or a brake warning light coming on are common symptoms. Regular inspections can detect worn pads before they damage the rotor or caliper, saving money and maintaining safety.
Q2. Can I change my brake pads myself, or should I call a mechanic?
Answer: Replacing brake pads is a task many car owners can do themselves if they have basic mechanical skills and the right tools. However, if you have any doubts about handling the caliper, pressing the piston, or ensuring proper torque, it’s safer to call a professional. Installation mistakes can reduce braking performance and compromise safety.
Q3. How long does it take to replace car brake pads?
Answer: For those familiar with the process, changing brake pads on a single axle can take about 30 to 60 minutes. For beginners, it may take longer, specially if you carefully follow safety precautions, check the parts and ensure everything is installed correctly. Replacing all four wheels will take about the same amount of time.
Q4. Do I need to replace the rotors when changing brake pads?
Answer: Not always. Rotors only need to be replaced if they are bent, have deep grooves, or are rusted. Minor surface wear can often be cleaned or resealed. Checking the condition of the rotors before installing new pads makes braking easier and prevents premature pad wear.
Q5. What happens if I drive with worn brake pads?
Answer: Driving with worn brake pads is dangerous. This can increase your stopping distance, damage rotors and calipers and in severe cases, even lead to brake failure. Worn pads can cause squealing or grinding noises, vibrations, or trigger warning lights. Timely pad replacement is essential for safety.
Q6. How do I install new brake pads correctly?
Answer: Installing new brake pads involves applying the brakes gently several times at moderate speeds so the pads can evenly deposit material onto the rotors. This process reduces noise, prevents uneven wear and improves braking efficiency. Avoid hard braking during the first few hundred miles to ensure the pads and rotors are seated correctly.
References:
[1] Brake wear particle emissions: a review
https://www.researchgate.net/publication/266974002_Brake_wear_particle_emissions_a_review

Guys, I’m a car audio enthusiast and customization expert and I love clear sound and clean installation. Plus, I have spent years helping people build their dream audio setups. And whenever I’m working on cars, I probably listen to music and thinks about the next big upgrade.