 Skip to content
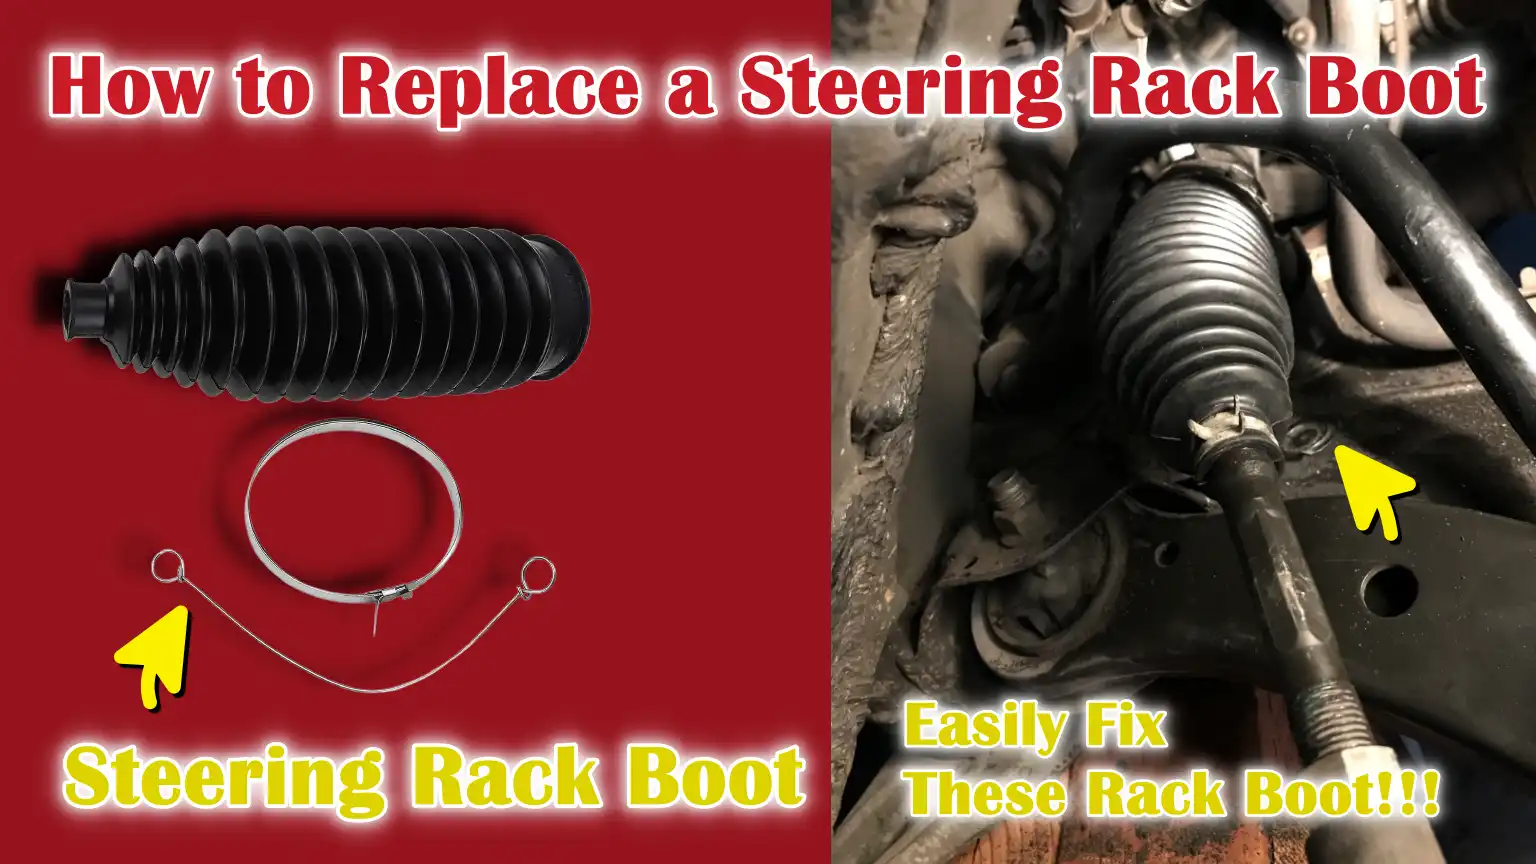
Written By: Don Dodi
Fact Checked By: Kristen Brown
Reviewed By: Diego Rosenberg
Actually, steering rack boot is just a small rubber kind of boot that stands between your steering rack and damaging road dirt, water and corrosion, so yeah if it is worn out then you should replace it immediately.
This small rubber cover literally plays important role to keep your vehicle’s steering system safe and smooth.
So, basically it’s main job is to provide protection to the inner tie rod and steering rack from the dust, water, mud and road salt as well, as these are the things that can quickly cause rust and wear.
And, whenever the steering rack boot tears or cracks, then the dirt can easily enter the steering rack, in that way it leads to the loose steering, strange noises while turning and even expensive steering rack failure if you ignore it.
Now, this is the proper guide on How to Replace a Steering Rack Boot, so that you can safely and easily maintain proper steering control and prevent any possible contamination of sensitive parts.
Common Signs that the Steering Rack Boot Needs Replacing
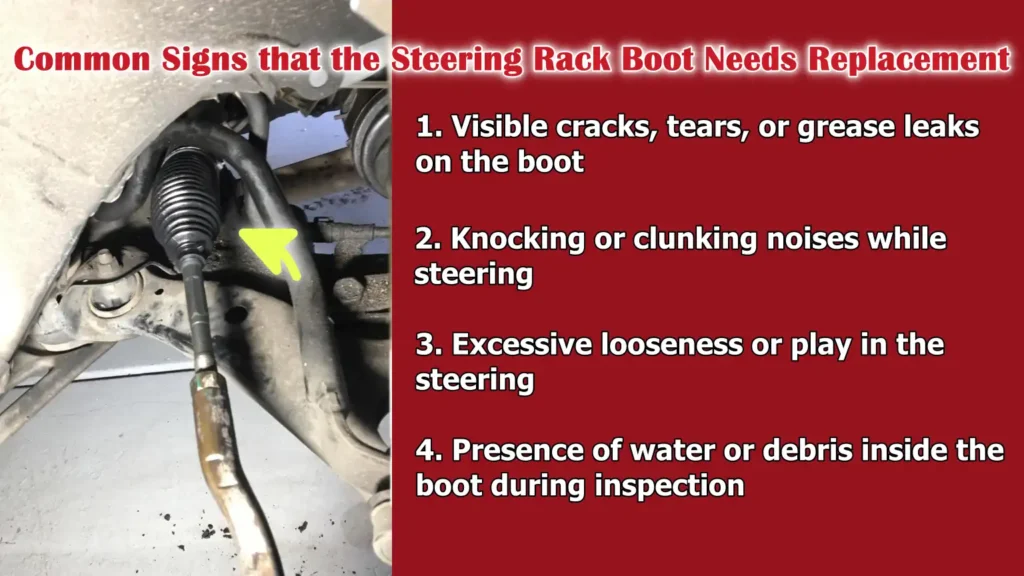
1. Visible cracks, tears, or grease leaks on the boot
The steering rack boot is made of rubber and like all rubber parts, it deteriorates over time due to heat, age, road salt and constant movement.
When the boot develops visible cracks or tears, it can no longer properly seal the steering rack.
Grease leaking from the boot is a major warning sign because that grease is there to protect the inner tie rod from friction and wear.
Once the grease leaks out, dirt and moisture can get in, accelerating the damage.
Even a small crack can quickly worsen, so visible damage should never be ignored.
2. Knocking or clunking noises while steering
A damaged steering rack boot often produces unusual noises when turning the steering wheel, specially at low speeds or while parking.
These knocking or clunking sounds are usually caused by dirt and water entering the boot and wearing down the inner tie rod joint.
As the joint becomes loose or dry, it makes noise during steering movements.
These noises are not normal and often indicate that the steering components are no longer properly protected.
3. Excessive looseness or play in the steering
When the steering rack boot is damaged, the inner tie rod can wear out faster than normal due to contamination inside the boot.
This wear often manifests as a loose or vague steering feel, where the steering wheel moves slightly before the wheels respond.
Drivers may notice that the car feels less stable, specially when driving straight or making small steering corrections.
This looseness reduces driving confidence and, if left unaddressed, can compromise the overall safety of the vehicle.
4. Presence of water or debris inside the boot during inspection
During visual or manual inspection, finding water, mud, sand, or road debris inside the steering rack boot is a clear indication that the boot is damaged.
A healthy boot should be dry and clean inside.
Moisture inside the boot can cause rust on metal components and wash away the protective grease, leading to accelerated wear of the steering components.
Once contamination is present, replacing the boot as soon as possible helps prevent serious damage to the steering rack and inner tie rods.
Tools
| Item Name | Simple Explanation | Why It Is Important |
|---|---|---|
| Car Jack | A device used to lift a vehicle off the ground. | This gives access to the wheel and steering components. |
| Jack Stands | After the car was lifted, strong supports were placed underneath it. | This keeps the car safely elevated and prevents accidents. |
| Lug Wrench | A wrench used to loosen and tighten wheel nuts. | The wheel had to be removed and reinstalled. |
| Tie Rod Tool or Adjustable Wrench | A tool used to loosen and remove a tie rod end. | Helps disassemble steering parts without damaging them. |
| Pliers | A hand tool used to hold and cut clamps. | Useful for removing old boot clamps. |
| Flat Screwdriver | A simple flathead tool. | This is helpful in opening tight clamps or boots. |
| Steering Rack Boot | The rubber cover that protects the steering rack. | Replacement parts for keys damaged by dust and water leaks. |
| Boot Clamps | Metal or plastic bands that hold the boot in place. | Keeps new boots well sealed. |
| Grease (if required) | Thickened lubricant for steering parts. | This reduces wear and tear and helps the parts run smoothly. |
| Wheel Chocks | Blocks are placed behind the wheels. | Prevents vehicle from rolling while being raised. |
| Proper Lifting Points | Strong point under the car frame. | This protects the car from damage and increases safety. |
| Eye Protection | Safety glasses or goggles. | It protects the eyes from dust, rust and grease. |
| Gloves | Basic work gloves. | Protects hands from cuts and chemicals. |
| Flat Ground | Flat and solid surface. | Keeps the car stable during repairs. |
How to Prepare Vehicle Before Replacement
1. Parking the Vehicle on a Level Surface and Engaging the Parking Brake
Before beginning any steering rack boot replacement, it is crucial to park the vehicle on a flat and level surface.
A level surface keeps the vehicle stable and prevents it from moving while you are working underneath.
Engaging the parking brake locks the rear wheels in place, minimizing the risk of the vehicle rolling forward or backward.
This step is specially important because steering and suspension work involves considerable force and even slight movement can pose serious safety risks.
Taking a few seconds to properly secure the vehicle creates a safe working environment and prevents accidents.
2. Safely Lifting and Supporting the Vehicle
Once the vehicle is safely parked, the next step is to lift it using a car jack at the correct factory-recommended lifting points.
Lifting the car correctly protects the vehicle’s frame and prevents damage to critical components.
After lifting, jack stands should be placed under sturdy support points to safely support the weight of the vehicle.
A single jack is not designed to support the vehicle for extended periods.
Properly securing the car maintains stability, keeps the suspension in a relaxed position and allows for safe access to the steering components during the repair.
3. Removing the Front Wheel for Access
After the vehicle is safely supported, it is necessary to remove the front wheel to access the steering rack boot.
Removing the wheel provides clear access to the tie rod, steering rack and boot area, making the job easier and more precise.
Removing the wheel also makes it easier to inspect surrounding components for wear or damage while working.
Proper access reduces the likelihood of errors, facilitates correct installation and allows the steering rack boot to be replaced cleanly and safely.
How to Remove the Outer Tie Rod End
1. Marking the Tie Rod Position to Maintain Alignment
Before removing the outer tie rod end, it’s crucial to mark its exact position on the inner tie rod.
This can be done by counting the number of turns required to remove it or by making a clear mark on the threads.
The outer tie rod controls wheel alignment, specifically the toe angle, which affects how straight the car drives and how evenly the tires wear.
Marking the position ensures that the alignment remains close to its original setting when the tie rod is reinstalled.
While a professional wheel alignment is recommended afterward, this step helps prevent severe misalignment that could make driving unsafe.
2. Loosening the Jam Nut
The jam nut is a locking nut that securely holds the outer tie rod end in place.
Before removing the tie rod, the jam nut should be loosened while the tie rod is still attached to the steering knuckle.
Loosening it at this stage prevents the inner tie rod from twisting and reduces stress on the steering rack.
Jam nuts are often tight due to road grime, corrosion and prolonged pressure, so consistent force may be required.
Properly loosening this nut makes the rest of the removal process easier and helps prevent damage to the steering threads.
3. Separating the Outer Tie Rod from the Steering Knuckle
Once the jam nut is loosened, the outer tie rod end must be separated from the steering knuckle.
This connection uses a tapered fit designed to remain tight under driving forces, which is why it may not separate easily.
Applying controlled pressure helps release the tie rod without damaging the knuckle or joint.
Proper separation allows the tie rod to rotate freely, providing full access to the steering rack boot.
Carefully removing the tie rod protects surrounding suspension components and ensures easier reinstallation during the final repair steps.
How to Remove the Old Steering Rack Boot
1. Cutting or Loosening the Boot Clamps
The steering rack boot is secured by clamps at both ends, one near the steering rack and the other near the inner tie rod.
These clamps are designed to tightly seal the boot to prevent dirt and water from entering.
Over time, they can corrode or become difficult to loosen.
Carefully cutting or loosening the clamps allows the boot to be removed without damaging the steering rack housing.
The old clamps should not be reused as they often lose their strength and will not seal properly after removal.
Clean removal of the clamps ensures that the new boot will fit securely and provide complete protection.
2. Sliding the Boot Off the Inner Tie Rod
Once the clamps are removed, the old steering rack boot can be slid off the inner tie rod.
This step should be done gently to avoid pulling or twisting the inner tie rod joint.
The boot may be stuck due to dried grease or accumulated dirt inside, specially if it has been damaged for a long time.
Carefully sliding the boot off provides clear access to the inner tie rod and steering rack area.
This access is crucial for proper inspection and correct installation of the new boot in the following steps.
3. Checking the Inner Tie Rod for Damage or Excessive Play
After removing the boot, the inner tie rod should be carefully inspected as it is a critical steering component.
The joint should rotate smoothly without binding, stiffness, or excessive play.
Excessive play, rough movement, or visible corrosion indicates that dirt or water has already caused damage.
It’s crucial to catch these problems early because a faulty inner tie rod can lead to poor steering control and uneven tire wear.
If any damage is found, replacing the inner tie rod before installing a new boot can prevent repeated repairs and protect the steering rack from further wear.
Read More:
How to Inspect Steering Component
1. Checking the Condition and Movement of the Inner Tie Rod
After removing the steering rack boot, the inner tie rod becomes fully visible and should be carefully inspected.
The inner tie rod is responsible for transferring steering movement from the rack to the wheels, so it should move smoothly and firmly.
When pushed and pulled by hand, it should not feel loose, wobbly, or rough.
Any grinding sensation, stiffness, or side-to-side play usually indicates that the joint is worn due to lack of lubrication or contamination from a damaged boot.
A healthy inner tie rod ensures precise steering response and helps maintain vehicle stability during turns and straight-line driving.
2. Checking the Rack Seals for Power Steering Fluid Leaks
The steering rack seals keep the power steering fluid contained within the rack where it is needed to assist with steering movement.
After removing the boot, the area around the rack should be inspected for moisture, oily residue, or fluid drips.
Power steering fluid leaks are often mistaken for grease, but they are typically thinner and spread more easily.
A leaking seal is a serious problem because low fluid levels can lead to heavy steering, whining noises and internal rack damage.
Early detection of seal leaks can prevent complete steering rack failure, which is far more expensive than simply replacing the boot.
3. Determining if Further Repairs are Needed Before Installation
After inspecting the inner tie rod and rack seals, a clear decision should be made before installing the new steering rack boot.
If the inner tie rod shows significant wear or the rack seals are leaking, simply replacing the boot will not solve the problem.
Worn parts will continue to cause poor steering performance and can also quickly damage the new boot.
Addressing these issues at this stage can save time, money and the need for repeated repairs.
Proper diagnosis ensures that the new boot protects a healthy steering system and restores long-lasting reliability and safe steering performance.
How to Install the New Steering Rack Boot
1. Applying Light Grease – If Recommended by the Manufacturer
Before installing the new steering rack boot, it’s essential to check if the vehicle manufacturer recommends applying a small amount of grease inside the boot.
Light grease helps reduce friction and protects the inner tie rod from moisture and premature wear.
Only a thin layer should be used, as excessive grease can trap heat or put undue pressure on the boot during steering movements.
Using the correct type of grease, typically specified for steering components, helps extend the boot’s lifespan and keeps steering movements smooth and quiet.
2. Sliding the New Boot into Place
The new steering rack boot should be carefully slid onto the inner tie rod and into its correct position on the steering rack.
It should sit straight without any twists or kinks, as improper installation can lead to premature cracking or allow contaminants to enter.
The boot should cover the entire exposed section of the inner tie rod and be flush with the rack housing.
Taking time during this step ensures that the boot will move naturally when the steering is turned and will not rub against surrounding components.
3. Ensuring Proper Sealing at Both Ends
The steering rack boot only functions correctly when it is tightly sealed at both ends.
One end should fit snugly against the steering rack housing, while the other end should seal around the inner tie rod.
Any gaps, uneven fit, or loose areas can allow water, dust and road debris to enter.
Proper sealing protects the sensitive steering components from corrosion and wear.
A properly sealed boot helps maintain consistent steering feel and protects the internal components of the steering rack from long-term damage.
4. Securing the Boot with New Clamps
Once the boot is correctly positioned and sealed, new clamps should be installed to secure it firmly in place.
Old clamps should never be reused as they lose their tension and can deteriorate over time.
New clamps ensure that the boot remains sealed during steering movements and while driving on rough roads.
Tightening the clamps evenly prevents air leaks and keeps the boot from slipping.
Secure clamping is the final step that guarantees protection and ensures the new steering rack boot performs its function effectively.
How to Reinstall the Outer Tie Rod End
1. Threading the Tie Rod Back to the Marked Position
The process of reinstalling the outer tie rod end begins with threading it back onto the inner tie rod at the same position that was marked during removal.
This step is crucial because the tie rod directly affects wheel alignment, particularly how straight the vehicle tracks on the road.
Returning it to its original position ensures that the alignment remains close to its original setting and minimizes the risk of uneven tire wear.
Careful threading also prevents damage to the threads and ensures the tie rod seats properly without cross-threading.
2. Tightening the Jam Nut to Specifications
After threading the tie rod end into place, it’s essential to tighten the jam nut against it to securely lock its position.
The jam nut prevents the tie rod from rotating during driving, which could alter the alignment over time.
Tightening it to the correct torque specification is critical, as a loose jam nut can introduce play in the steering, while overtightening can damage the threads.
Properly securing the jam nut helps maintain stable steering and keeps the alignment consistent until a professional alignment is performed.
3. Reconnecting the Tie Rod End to the Steering Knuckle
The final step is reconnecting the outer tie rod end to the steering knuckle.
This connection transmits steering movement from the steering wheel directly to the front wheels, making it a critical safety component.
The tie rod end must fit snugly into the knuckle’s hole to handle the driving forces without any play.
Once connected, it should feel solid without any looseness or movement.
Properly reassembling the components ensures smooth steering response, precise control over the vehicle and safe operation on the road.
How to Do Final Assembly and Lower the Vehicle
1. Reinstalling the Wheels and Lug Nuts
After the steering work is complete, the wheels should be carefully reinstalled onto the wheel hubs, ensuring they are seated flat and centered correctly.
The lug nuts should be initially tightened by hand to ensure they are threading correctly and to avoid damaging the threads.
Proper wheel installation is crucial as the wheels bear the entire weight of the vehicle and maintain its stability during driving.
Taking the time at this step prevents future issues such as vibrations, uneven wheel seating and loose lug nuts.
2. Safely Lowering the Vehicle
Once the wheels are installed, the vehicle should be lowered slowly and carefully.
The jack is used to slightly raise the vehicle to allow for the safe removal of the jack stands and then the car is gradually lowered until the tires are fully on the ground.
Lowering the vehicle in a controlled manner prevents sudden weight shifts that could damage suspension components or cause the car to jolt.
This step ensures the vehicle returns to a stable driving position without any risk.
3. Torquing the Lug Nuts to Manufacturer Specifications
After the vehicle is on the ground, the lug nuts should be tightened to the correct torque specified by the vehicle manufacturer.
The correct torque ensures the wheel is securely fastened and will not loosen during driving.
Under-tightened lug nuts can cause the wheel to wobble, while over-tightened lug nuts can stretch or break the wheel studs.
Using the correct torque maintains wheel safety, prevents damage to the brake rotors and ensures long-term reliability during everyday driving.
What are The Post-Installation Checks
1. Steering Wheel Lock-to-Lock Rotation to Verify Boot
After installing the new rack boot and with the vehicle fully assembled and while the car is stationary, the steering wheel should be slowly turned from full left lock to full right lock.
This allows you to confirm that the new boot is not twisted, binding, or dislodged and that it moves freely and smoothly.
A properly installed boot will move naturally with the steering rack and remain sealed at both ends.
This check is crucial as an improperly fitted boot can lead to premature grease leakage and contamination of the steering system.
2. Checking for Unusual Noises or Stiffness
During the lock-to-lock test and initial driving, any unusual noises or stiffness in the steering wheel should be noted.
Grinding, knocking, or excessive resistance noises can indicate faulty components, loose fasteners, or worn parts that were not properly addressed.
The steering wheel should turn smoothly with equal resistance in both directions.
Any sudden tight spots or specific resistance could indicate misalignment or air trapped in the system.
Addressing these issues promptly helps prevent further damage and ensures safe and reliable steering.
3. Inspecting Boot Fitment After a Short Test Drive
After a short test drive, the steering rack boot should be inspected again to confirm that it remains properly in place.
Driving introduces vibrations and real-world stresses that can reveal problems not apparent during the initial installation.
The boot should still be sealed, the clamps should be tight and there should be no signs of tearing or movement.
This final inspection confirms that the boot methods have been implemented correctly and that the stock rack and inner tire provide long-term protection.
Ensuring proper fitment after driving helps maintain lasting ownership and avoids the need for repeated repairs.
How to Do Wheel Alignment
1. The Importance of Alignment After Tie Rod Removal
Whenever tie rods or other steering components are removed or adjusted, wheel alignment becomes crucial.
Alignment refers to the precise positioning of the wheels to ensure they are straight and track evenly on the road.
Even minor changes to the tie rod length or angle can cause the wheels to be slightly angled inward or outward, affecting the vehicle’s handling, stability and steering response.
Performing or checking the alignment after tie rod work ensures the car tracks straight, the steering wheel remains centered and the tires wear evenly over time.
2. When Professional Alignment is Recommended
While marking the tie rod position before removal can help maintain a reasonable alignment, a professional wheel alignment is strongly recommended after replacing any tie rod or steering component.
Modern vehicles utilize precise camber and caster angles, requiring specialized alignment equipment for accurate adjustments.
Professional alignment ensures optimal handling, even tire wear and prevents premature tire failure.
A certified technician can ensure all alignment specifications are within tolerance, resulting in safer and more comfortable driving.
3. Impact of Misalignment on Tire Wear and Steering
Misalignment can lead to rapid and uneven tire wear, such as feathering, cupping, or excessive wear on the inner or outer edges of the tires.
The steering may feel loose, pull to one side, or require constant correction.
Misalignment can also increase stress on suspension and steering components, leading to premature wear.
Maintaining proper alignment after tire road or plant shop work ensures tire safety, facilitates improvements in plant roads or within the plant itself, enhances plant safety and maintains a scaled and responsive stock of all types of sheet metal.
What are The Common Mistakes to Avoid
1. Reusing Worn Boot Clamps
One of the most common mistakes when replacing steering rack boots is reusing old or worn clamps.
Over time, clamps lose their tension and can become corroded or damaged, preventing them from properly sealing the boot.
Reusing these clamps can lead to the boot slipping, allowing dirt, water and debris to enter the steering system.
Always using new clamps ensures a tight, secure fit that protects the steering rack and inner tie rod for many miles, reducing the risk of premature component failure.
2. Overtightening Tie Rod Components
Another common mistake is overtightening the tie rod or jam nut during reinstallation.
While it’s crucial to securely tighten these components, excessive force can strip the threads, bend the tie rod, or even damage the steering knuckle.
Overtightening can also make future adjustments difficult and put undue stress on the steering rack.
Using the correct torque according to the manufacturer’s specifications ensures a secure connection without compromising the durability or safety of the steering system.
3. Failing to Inspect Inner Tie Rod Wear When Replacing Boots
Some technicians or DIYers focus solely on the boot and fail to properly inspect the inner tie rod.
Ignoring signs of wear, such as looseness, rough movement, or corrosion, can lead to steering problems shortly after replacing the boots.
A worn inner tie rod can result in poor steering response, uneven tire wear and even steering rack failure.
Checking the inner tie rod when replacing the boot ensures that all steering components remain in good condition, preventing frequent repairs, saving time and money and maintaining vehicle safety.
How to Maintain Steering Rack Boot
As well as, automotive sources also describes that steering rack boot, also known as steering rack gaiters: as these are the really important to shield the tie rod and rack components from any possible damage from moisture and debris. Also, without these protective boots, the corrosive elements can easily penetrate the system and increase the friction, wear and eventual failures of steering parts as well.[¹]
1. Regular Inspection of Steering Boots
Regularly checking the condition of your steering rack boots is one of the most effective ways to prevent serious steering problems.
Over time, the boots can crack, tear, or become loose at the clamps, allowing dirt and moisture to enter.
Inspecting them every few thousand miles or during routine service helps detect minor damage early, before it affects the inner tie rods or steering rack.
A simple visual check can save significant repair costs and ensure your steering remains smooth and responsive.
2. Avoiding Harsh Chemicals on Rubber Parts
Rubber boots and seals are sensitive to harsh chemicals, including strong cleaners, solvents and certain oils.
Exposure to these substances can cause the rubber to dry out, crack, or lose its flexibility, compromising its ability to protect the steering system.
When cleaning around the steering rack, use mild soap and water or products specifically designed for rubber parts.
Proper care maintains the durability and extends the lifespan of the boots, ensuring the steering system remains well-protected.
3. Prompt Replacement to Prevent Rack Damage
To prevent more serious damage to the steering rack and inner tie rods, it’s crucial to replace a damaged steering rack boot immediately upon detection.
A torn or leaking boot allows dirt, water and road debris to enter, leading to premature wear of the steering components and potentially requiring expensive repairs.
Prompt replacement keeps the system clean and lubricated, ensures consistent steering performance and extends the life of essential steering components.
Regular maintenance reduces repair costs and improves overall vehicle safety.
Conclusion – How to Replace a Steering Rack Boot
It is true that: the steering rack boot is actually a small but really necessary protector that actually keeps the steering system truly safe and secure from any possible damage and wear.
A properly functioning boot protects the inner tie rod and steering rack from dirt, water and debris, which can lead to excessive wear, loose steering and costly repairs.
Following the correct procedures, including inspecting the steering components, using new clamps and ensuring proper installation, helps maintain smooth and reliable steering.
Furthermore, post-replacement checks and wheel alignment ensure the vehicle remains safe, handles correctly and experiences even tire wear.
By understanding the importance of the steering rack boot and performing timely maintenance or replacement, car owners can extend the life of their steering system, improve driving safety and avoid expensive repairs in the future.
So, that’s all from this one and if you still have confusion, just comment below for more information.
Frequently Asked Questions
Q1. What is a steering rack boot and why is it important?
Answer: A steering rack boot is a rubber cover that protects the inner tie rod and steering rack from dirt, water and other road debris. Its main function is to keep these crucial steering components clean and lubricated so they can operate smoothly. Without a proper boot, dirt and moisture can enter the steering system, leading to wear and tear, loose steering, strange noises and ultimately, costly damage to the steering rack. Maintaining or replacing the boot ensures safe, smooth and reliable steering.
Q2. How do I know if my steering rack boot needs replacing?
Answer: You should inspect the boot for visible cracks, tears, or grease leaks. If you hear knocking or rattling noises when turning the steering wheel, or if the steering feels loose or has excessive play, it could indicate a damaged boot or inner tie rod. Additionally, if inspection reveals water, dirt, or road debris inside the boot, it means the boot is no longer protecting the steering components and needs replacement.
Q3. Can I replace a steering rack boot myself?
Answer: Yes, replacing a steering rack boot is possible for someone with basic tools and mechanical knowledge. The process involves safely lifting the car, removing the front wheel, disconnecting the outer tie rod end, sliding off the old boot, inspecting the inner tie rod, installing the new boot and then reassembling everything. However, care must be taken to mark the tie rod position, use new clamps and check for proper steering movement afterward. While DIY replacement is possible, it’s recommended to have a wheel alignment performed after the work for safety.
Q4. What tools and materials are needed to replace a steering rack boot?
Answer: Essential tools include a car jack, jack stands, lug wrench, tie rod tool or adjustable wrench, pliers and a flathead screwdriver. Materials include a new steering rack boot, clamps and light grease if recommended by the manufacturer. Safety equipment such as wheel chocks, gloves and eye protection are also necessary. Using the correct tools and materials ensures the boot is properly installed and the steering system is not damaged.
Q5. How long does it take to replace a steering rack boot?
Answer: For someone with basic automotive repair experience, replacing a steering rack boot can take approximately one to two hours. This includes safely lifting the car, removing the wheel, replacing the boot, reattaching the tie rod and performing post-replacement checks. For beginners, it may take longer due to careful inspection and handling. The process is straightforward, but it shouldn’t be rushed, as proper installation is crucial to prevent steering problems.
Q6. Why is wheel alignment necessary after replacing a steering rack boot?
Answer: Replacing or adjusting the tie rod can slightly alter the wheel alignment. Even a slight misalignment can cause the car to pull to one side, lead to uneven tire wear, or affect steering response. Professional alignment ensures the wheels are in the correct position according to the manufacturer’s specifications, resulting in better handling, longer tire life and safe and responsive steering.
Q7. What common mistakes should be avoided when replacing a steering rack boot?
Answer: Common mistakes include reusing old or damaged clamps, overtightening tie rods or jam nuts and failing to inspect the inner tie rods for wear. Using damaged clamps can cause the boot to slip, overtightening can strip the threads and neglecting to inspect the inner tie rods can lead to steering problems shortly after replacement. Avoiding these mistakes ensures that the repair is effective and long-lasting.
Q8. How can I maintain my steering rack boot to extend its lifespan?
Answer: Regularly inspecting the boot for cracks or damage allows for early detection of problems. Avoid using harsh chemicals or strong cleaners on the rubber components, as these can dry out and crack the material. If any damage is observed, replace the boot immediately to prevent dirt and water from entering the steering system. Proper maintenance ensures smooth steering, protects internal components and prevents costly repairs.
Q9. What happens if I ignore a damaged steering rack boot?
Answer: Ignoring a torn or worn steering rack boot allows dirt and water to enter the steering system, leading to accelerated wear on the inner tie rods and steering rack. Over time, this can result in loose steering, uneven tire wear, strange noises and ultimately, complete failure of the steering rack. Repairing a damaged boot is far less expensive and time-consuming than replacing the entire steering rack.
References:
[1] Gaiter (vehicle)
https://en.wikipedia.org/wiki/Gaiter_%28vehicle%29

Guys, I’m a car audio enthusiast and customization expert and I love clear sound and clean installation. Plus, I have spent years helping people build their dream audio setups. And whenever I’m working on cars, I probably listen to music and thinks about the next big upgrade.
