Written By: Don Dodi
Fact Checked By: Kristen Brown
Reviewed By: Diego Rosenberg
If your car tire goes flat in the middle of nowhere, so you can change it by yourself that actually saves a ton of time and money of course.
It is really common problem that every car owner has to face it, so with the right tools and the clear guidance you can safely change a flat tire in less than 20 minutes.
When you learn How to Change a Flat Tire on a Car, then you become more self-sufficient and that gives you lot of convenience as well.
So, here’s the simplest possible way to replace it.
Signs You Have a Flat Tire
1. Sudden Vibration or Thumping Noise
The first sign of a flat tire is unusual vibrations or rhythmic banging, specially when you are driving at high speeds.
This happens because the punctured tire can no longer move smoothly on the road and this causes the ride to become uneven.
2. Pulling to One Side While Driving
If your vehicle suddenly starts pulling to the left or right, the tire may be punctured or low on air. This happens because a punctured tire has less air and more rolling resistance, which throws off the vehicle’s balance.
The steering wheel may also feel heavy or difficult to control. Driving with a tire in this condition can be dangerous, specially at high speeds or in wet weather.
3. Tire Pressure Warning Light (TPMS)
Modern vehicles come equipped with a tire pressure monitoring system (TPMS), which lights up on your dashboard when the pressure in one or more tires drops below the recommended pressure.
This is often the first warning for many drivers. A study conducted in 2021 by the Rubber Manufacturers Association found that nearly 50% of drivers ignore TPMS alerts, but taking it seriously can prevent tire blowouts, uneven tire wear, and poor fuel economy.
4. Visual Cues: Sagging or Deflated Tire
Sometimes, the easiest way to spot a punctured tire is to simply look at your tires. A punctured tire will appear lower or tilted more than the other tires.
The rubber may feel soft, bruised or almost touching the ground. If you notice your car leaning a bit or the tire feels “sunk,” this is a clear sign that it needs immediate attention.
Safety First: What to Do Immediately
1. Pull Over to a Safe, Flat Location Away from Traffic
As soon as you realize you have a flat tire, your first priority is your safety, not the tire. Slowly reduce your speed, hold the steering wheel firmly, and find a flat, stable place to stop—ideally a wide shoulder, parking lot, or side of the road.
2. Turn On Hazard Lights
As soon as you stop, turn on your hazard lights to let other drivers know your car is off. This is specially important at night or in poor visibility conditions such as fog or rain.
Flashing hazard lights give vehicles coming from behind enough time to slow down or change lanes, thereby reducing the risk of collision.
3. Apply the Parking Brake
Before doing anything, apply the parking brake to prevent the car from rolling while you work. This step is often skipped, but it’s extremely important—specially on uneven surfaces.
This keeps the car stable and secure while it is being jacked up. Rolling your car while changing a tire could cause serious injury or damage.
4. Place Wheel Wedges (If Available)
If you have wheel wedges, bricks, or large stones, place them on the opposite side of the tire you’re changing. For example, if you’re changing a front tire, wedge the rear wheels.
This helps to prevent any accidental movement. Wheel wedges are an inexpensive but powerful safety device that can dramatically reduce the risk of accidents while working.
5. Avoid Stopping on a Slope or Soft Ground
Do not stop the vehicle on a hill, sloped road, or soft surfaces such as sand, grass or gravel. These places make it difficult to stabilize the jack and can cause the car to slide or tip over.
If no level ground is available, consider calling roadside assistance – safety should always come first.
Tools
| Tool | What It Is | Why You Need It |
|---|---|---|
| Spare Tire (Full-size or Donut) | A backup tire kept in your car (a full-size tire is like a regular tire; a “donut” is smaller and temporary). | Replaces your punctured tire so you can get safely to the repair shop. |
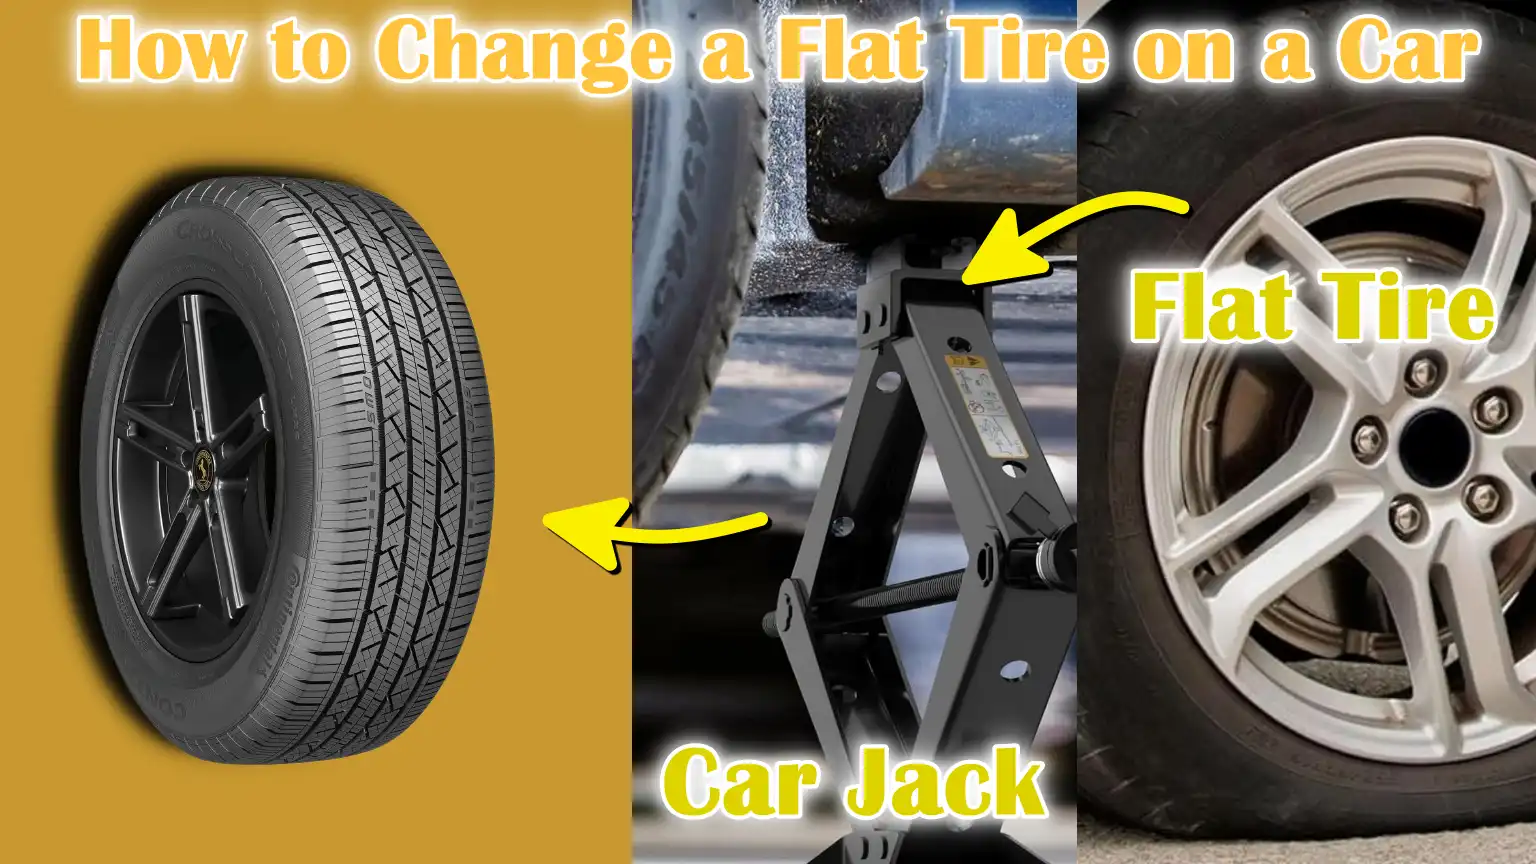
| Car Jack | A small lifting device that raises your car off the ground. | Raises the car enough to remove the punctured tire and install the spare tire. |
| Lug Wrench (Tire Iron) | A cross or “L” shaped tool, used to loosen and tighten the nuts on your wheels. | This allows you to remove the wheel nuts that hold your flat tire in place. |
| Owner’s Manual | The guidebook that comes with your car. | Tells you where to place your tools, where to place the jack, and what the specific steps are for your vehicle. |
| Flashlight | A small portable light (use a headlamp or phone flashlight at night). | This helps you see clearly if you are changing a tire in the dark. |
| Wheel Wedges or Bricks | Objects you place behind or in front of the tires that stay on the ground. | Prevents the car from rolling away when it’s being lifted up – which is important for your safety. |
| Gloves (Optional) | Hand protection made of cloth, rubber or leather. | Keeps your hands clean and protected from sharp edges, dirt or hot surfaces. |
How to Change a Flat Tire on a Car – Proper Guide
1. Prepare the Vehicle
Start with the engine off and make sure the car is on level, solid ground. This will prevent the car from rolling or moving while you work.
Place wheel wedges behind opposite tires to prevent the car from moving (for example, if you’re changing a front tire, place wedges behind the rear tires).
If your car has hubcaps or wheel covers, carefully remove them with the flat end of a lug wrench or a screwdriver. Not all cars have these, but if they do, they usually come off with a little pressure.
2. Loosen Lug Nuts
Use a lug wrench (also called a tire iron) to loosen the lug nuts on the punctured tire. Turn them anti-clockwise, but don’t remove them all the way yet.
Sometimes the nuts are tightly set, so it’s a good idea to carefully press down on the wrench with your foot or body weight. Doing this while the tire is still on the ground will prevent it from rotating when pressure is applied.
3. Jack Up the Car
Consult your owner’s manual to find the correct jack point, which is usually a metal part underneath the car near each wheel.
Place the car jack securely under this point and raise the car until the punctured tire is about 6 inches above the ground. While the car is on the jack, do not put any part of your body underneath it, as this can be dangerous.
4. Remove the Flat Tire
Now, remove the loosened lug nuts by unscrewing them completely. Place them in a small container or inside a hubcap so they don’t roll away.
Then, use both hands to pull the punctured tire straight off the wheel bolt. It may feel heavy, but it will come off if you pull gently. Keep the punctured tire flat on the ground so it doesn’t roll.
5. Mount the Spare Tire
Lift the spare tire and align it with the wheel bolts. Push it straight onto the bolts until it fits snugly on the wheel hub.
Then, take the lug nuts and tighten them back by hand, just enough to hold the tire in place. Don’t tighten them all the way yet—this is done after the car is lowered.
6. Lower the Vehicle
Lower the car to the ground slowly and carefully with the jack until the entire weight of the car is on the spare tire. When the tire touches the ground and the car is stable, remove the jack.
7. Tighten Lug Nuts
Using a lug wrench, tighten the lug nuts in a criss-cross (or star) pattern rather than in a circle. This ensures the tire sits evenly and securely on the hub.
Tighten each nut firmly, applying consistent pressure. It is best to go around the pattern two or three times to make sure all nuts are tightened evenly.
8. Replace Hubcap (If It Fits)
If your original hubcap fits over the spare tire, carefully replace it. Some small “donut” spare tires do not allow for reinstallation of the hubcap, so in that case, keep the hubcap safely in your trunk.
After Changing the Tire
1. Check the Tire Pressure of the Spare
After installing the spare tire, the first thing you should do is check its air pressure with a tire pressure gauge. Most spare tires (specially the smaller “donut” spare tires) require higher pressure than regular tires—usually around 60 PSI.
Driving with a low-inflation spare is dangerous and can cause the spare to wear out faster or even fail while driving.
If you don’t have a pressure gauge, stop at the nearest gas station to check the tire and inflate it properly. Driving even a short distance on a low-pressure spare tire can reduce braking performance and fuel efficiency.
2. Drive Cautiously and Don’t Exceed 50 mph on a Donut Tire
If you have installed a temporary spare tire (also called a “donut”), it’s important to understand its limitations. Donuts are not designed for long distance or high speed driving.
Most manufacturers recommend not driving faster than 50 mph (80 km/h) and only driving distances of 50–70 miles (80–110 km).
These spare parts are small, light and have less grip, which means they can affect your car’s stability, handling and braking. Always take extra care when using a donut—avoid sharp turns, sudden stops and wet or rough roads.
3. Visit a Tire Repair Shop as Soon as Possible
The spare tire is only a temporary solution, so your next stop should be a professional tire repair shop or service center.
There, a technician will inspect the punctured tire to see whether it can be safely repaired (for example, whether it was caused by a small nail or screw), or whether it needs to be replaced completely.
Driving with a spare tire for too long can damage your suspension system and cause the tire to wear unevenly, so it’s best to have the original tire repaired or replaced the same day if possible.
If your spare tire is a full size, it may last longer – but it’s still wise to have a damaged tire inspected immediately to ensure your vehicle remains balanced and safe on the road.
Read More:
Common Mistakes to Avoid
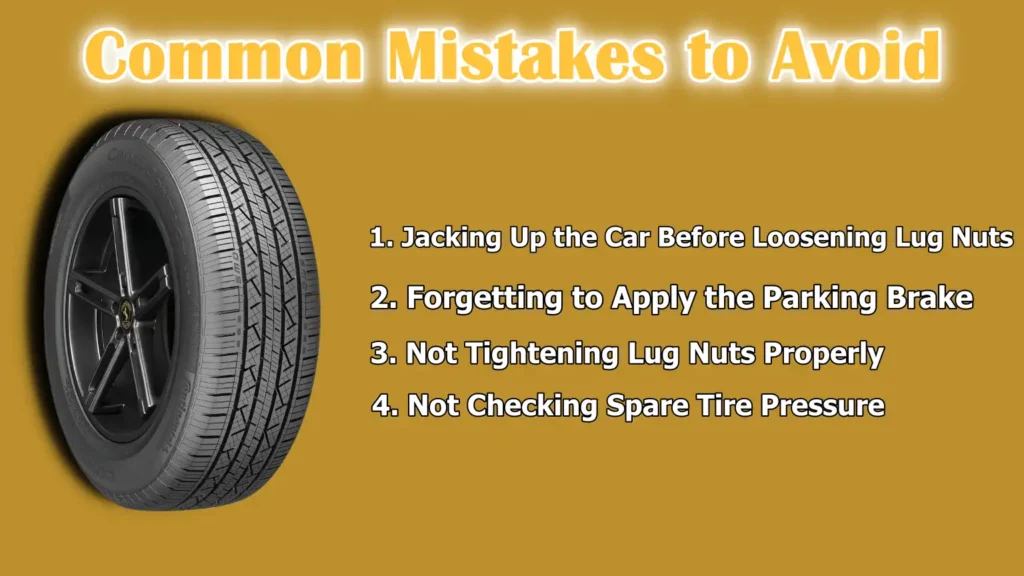
1. Jacking Up the Car Before Loosening Lug Nuts
One of the most common and risky mistakes is trying to jack up the car before loosening the lug nuts. When the tire is off the ground, it can spin freely, making it very difficult (and sometimes impossible) to loosen tightly held lug nuts.
Always loosen the lug nuts slightly to keep the tire on the ground and keep the wheel stable. This also reduces the chance of the car falling off the jack when you apply force, which can be extremely dangerous.
2. Forgetting to Apply the Parking Brake
Not applying the parking brake is a small step that can have serious consequences. The parking brake prevents your car from rolling away when it’s lifted, specially on slight slopes or uneven surfaces.
Skipping this step could cause the car to move unexpectedly, increasing the risk of injury or damage.
3. Not Tightening Lug Nuts Properly
After changing a tire, it is necessary to tighten the lug nuts in a criss-cross (or star) pattern, not in a circular order.
This maintains even pressure on the wheel hub and helps the spare tire sit properly. If the nuts are tightened unevenly, this can cause wheel vibration, damage to the brake rotor, or even the wheel coming off while driving.
Use your body weight to tighten each nut firmly, and re-check the tightness after driving a few miles.
4. Not Checking Spare Tire Pressure
Many drivers forget to check the air pressure of the spare tire before driving off, assuming it’s ready to go. However, spare tires—specially donuts—often sit unused for years and slowly lose air.
An under-inflated spare tire can deflate while you’re driving, creating a dangerous situation. Always use a tire pressure gauge to check tire pressure (most donuts require about 60 PSI) and fill it up at a nearby gas station if necessary.
When to Call Roadside Assistance Instead
1. No Spare Tire or Tools Available
If your vehicle doesn’t have a spare tire, jack, or lug wrench, it’s best not to attempt to change a tire yourself.
Driving on a punctured tire can cause serious damage to your wheel rim, suspension, and even brakes, which can lead to very costly repairs.
Without the proper tools, there is no safe way to get the job done. In such a case, the safest and most practical option for you is to call a roadside assistance service.
2. Unsafe Location (e.g., Highway Shoulder)
Attempting to change a tire on a busy highway, narrow road, or poorly lit area could put you in serious danger.
If there is no flat, wide, and safe place to work near moving traffic, stay in your vehicle with your hazard lights on and call for roadside assistance. Your safety always comes first.
3. Tire Blowout with Rim or Axle Damage
If your tire is the result of a violent blow, such as hitting a pothole or debris at high speed, the damage may not be limited to just the rubber.
In some cases, the wheel rim may be bent or the axle, suspension or brake components may be affected.
It is not safe to assess or repair this type of damage without proper training. If you notice a burning smell, grinding sound, or fluid leaking near the wheel, do not drive or attempt to change the tire—call a professional immediately.
4. Physically Unable to Change the Tire
Changing a flat tire requires some physical effort, including lifting, kneeling and loosening lug nuts with your body weight. If you have a health problem, injury or physical problem, it’s perfectly fine to call for help.
Pushing yourself or trying to do something you’re not comfortable with can cause injury. Roadside assistance providers are trained to do the job quickly and safely—if you’re not up to it, let them do it.
Conclusion – How to Change a Flat Tire on a Car
So, with this proper guidance you can resume your journey in less than 20 minutes or less.
As whether you are on a solo road trip, driving in the city or just heading to the work, you can now handle a flat tire by yourself.
Remember, it’s not just about changing the rubber – it’s about making smart decisions: stopping safely, making the right moves, and knowing when to ask for help.
Don’t forget to check the status of your spare tire regularly, keep your tool kit full, and remember to go over this procedure every few months. Like any life skill, the more you know, the more confident and capable you become.
So, it is the fact that flat tires do happens and it can happen with your vehicle as well, as flat tires occurs nearly every 7 seconds in the U.S. which collectively becomes over 220 million annually, and they are responsible for around 20% of the roadside events as well.[¹]
And if you use this knowledge even just once, that one moment can save you time, money, and unnecessary stress.
Frequently Asked Questions
Q1. Do you need a jack to change a flat tire?
Answer: Yes, you will need a jack to change a punctured tire. A jack is a device that helps lift the car off the ground so that you can safely remove the punctured tire and put in a spare tire. It is almost impossible to change a tire without a jack because the weight of the car will keep the tire pressed firmly to the ground. Even if you manage to loosen the lug nuts, you won’t be able to pull the tire or put on the spare wheel unless the car is raised. Most cars have a small manual jack stored in the trunk or under the floor panel along with a lug wrench. It’s important to make sure your jack is in your vehicle at all times, specially before going on long drives. If you’re using a spare tire (also known as a donut), a jack is not only helpful, it’s also vital.
Q2. Where to put the jack when fixing a flat tire?
Answer: When fixing a punctured tire, the jack should always be placed under the jack point closest to the tire you are replacing. Jack points are special reinforced spots on the underside of a car designed to safely hold weight when lifting the car. You can usually find the right jack point behind the front tire or in front of the rear tire—near the edge of the car’s frame. The exact location depends on your car model, so it’s always a good idea to check your owner’s manual, which has illustrations showing the exact location. Never place the jack in the middle of the car or under any metal parts, as this can damage your car or cause the jack to slip, which is very dangerous. Make sure the jack is on firm, level ground, not a soft surface like grass or sand. Once the jack is in the correct position, slowly raise the car until the punctured tire is about 6 inches above the ground, giving you enough room to safely remove and replace the tire.
References:
[1] How flat tires have become the number one roadside hassle, especially for EVs
https://blog.agero.com/how-flat-tires-have-become-the-number-one-roadside-hassle-especially-for-evs

Guys, I’m a car audio enthusiast and customization expert and I love clear sound and clean installation. Plus, I have spent years helping people build their dream audio setups. And whenever I’m working on cars, I probably listen to music and thinks about the next big upgrade.