Written By: Don Dodi
Fact Checked By: Kristen Brown
Reviewed By: Diego Rosenberg
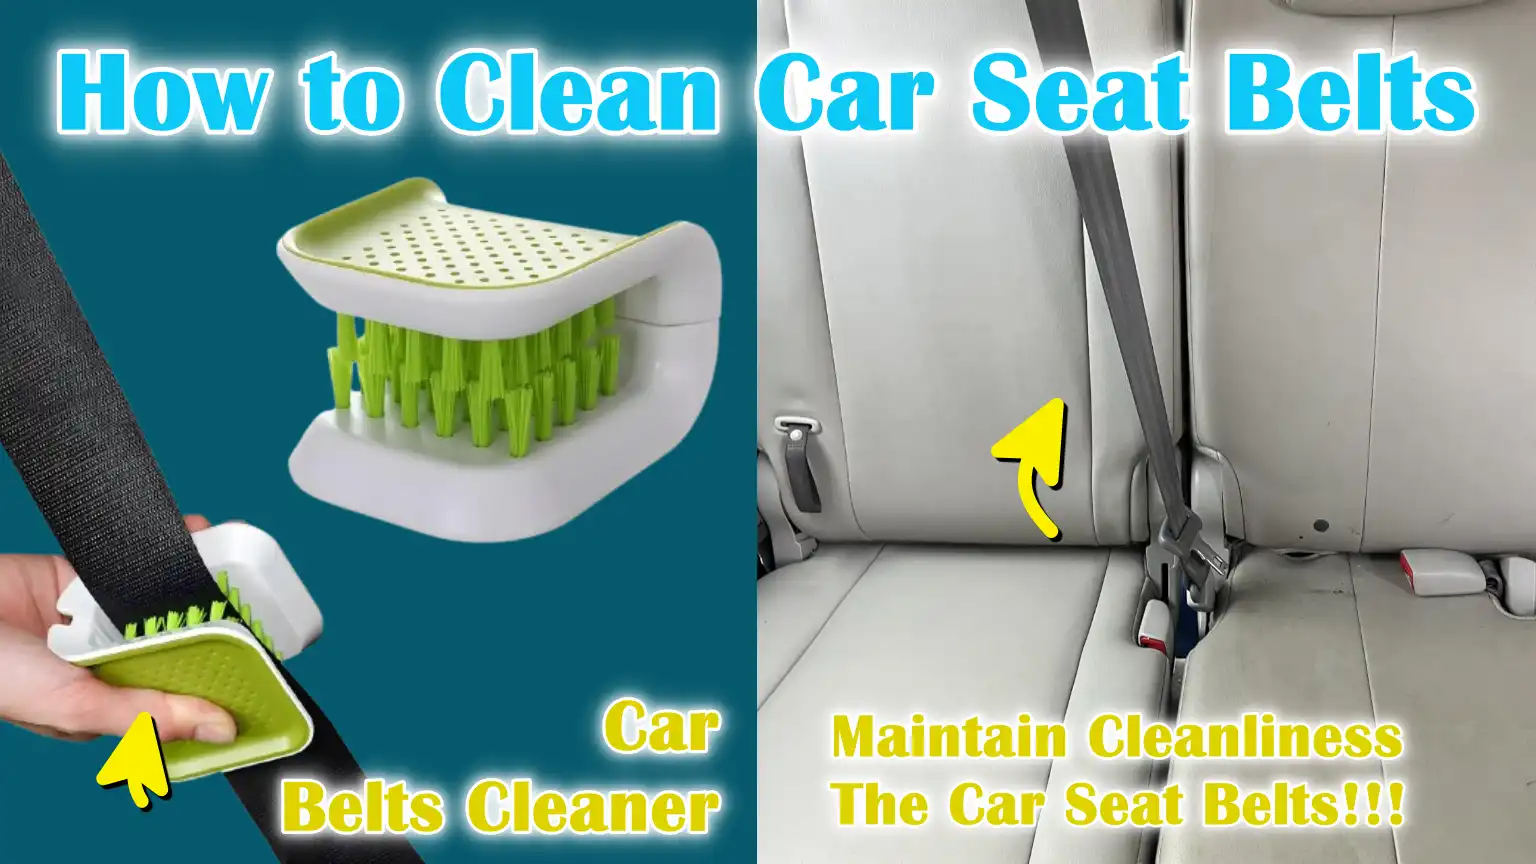
It is really important to maintain the neat and clean car seat belts, as they literally touches our hands and clothes like whenever we enter the lovely vehicle, but it is again true that most of the drivers never aware to clean them until they smell badly, starts to cause discomfort or just stop working like they want.
So, how they actually get bad smell?
This is really simple, that every time we drive, have seat belts on then it comes to direct contact with our hands, clothes, skin, sweat, food particles, dust, body oils and germs as well.
And, over the months and years to this game, this buildup does not just make the seat belts look dirty or produces unpleasant smell, but it can actually affects how smoothly they move and retract as well.
Because, the seat belts are made from the tightly woven synthetic fibers, which is actually designed to be strong, flexible and reliable enough to keep you safe in sudden stops and accidents.
Even, these dirt, grease and moisture can cause the stiffness, leads to the slow retraction and even give long-term wear as well.
So, this is the guide which is specifically shows you How to Clean Car Seat Belts, so that you can clean them carefully and restore their full capability with nice odor.
Now, At First Understand About the Materials and Construction of Car Seat Belts
Car seat belts aren’t just pieces of cloth.
They’re carefully crafted safety components designed to protect passengers during sudden braking or accidents.
Each seat belt is constructed using tightly woven fibers that balance strength, flexibility and durability.
This unique construction allows the belt to securely hold the body while also providing comfort during everyday driving.
Because seat belts play such a vital role in safety, understanding what they’re made of and how they work helps people clean and maintain them properly without damaging them.
1. Common Materials Used in Seat Belts
Most modern car seat belts are made of strong synthetic materials such as polyester or nylon.
These materials are chosen because they’re lightweight, highly durable and resistant to stretching from sudden forces.
Polyester is particularly common because it handles heat, abrasion and prolonged use very well.
The fibers are woven in a tight pattern that gives the belt its strength, while also keeping it thin and flexible.
This woven structure allows the belt to absorb energy during a collision and reduce the force exerted on the passenger’s body.
Although these materials are strong, they are also sensitive to harsh chemicals and harsh treatments.
2. How Webbing Strength and Flexibility Work
Seat belt webbing is designed to be strong, but not rigid.
The strength comes from thousands of tiny fibers woven together, which distribute the force throughout the belt during a crash.
At the same time, the belt must remain flexible so that it can easily pass through the retractor and fit comfortably around the body.
This balance between strength and flexibility is crucial.
If the fibers become clogged with dirt, oil, or dried-on cleaning residue, the belt may feel stiff, retract slowly, or stop locking properly.
Clean and well-maintained webbing helps seat belts move freely and perform as intended.
3. Why Improper Cleaning Can Weaken Fibers
Improper cleaning is one of the most common ways to damage seat belts.
Harsh chemicals, bleach, or alcohol-based cleaners can break down the protective coating on the fibers and weaken their structure over time.
Soaking the belt in too much water can cause moisture to reach the internal parts of the retractor, causing stiffness or failure.
Vigorous scrubbing can also roughen the fibers, making them brittle and weak.
Although seat belts are designed to handle heavy forces during a crash, repeated harsh cleaning methods can gradually reduce their reliability.
Gentle cleaning with a mild product maintains both the strength and flexibility of the seat belt, keeping it safe and effective for everyday use.
How to Take Safety Precautions Before Cleaning
Before cleaning your car’s seat belts, prioritizing safety is crucial.
Seat belts are part of the vehicle’s safety system, meaning that even minor mistakes during cleaning can affect their functionality.
Seat belts are designed to securely lock, retract and restrain passengers in the event of a sudden collision.
If water, cleaning chemicals, or dirt get into the wrong places, the belt may not function correctly in an emergency.
Taking a few precautionary steps before cleaning will protect both the belt and the internal mechanism, ensuring the seat belt remains reliable and safe to use.
1. Locking the Belt to Prevent Retraction
One of the most important steps before cleaning is to lock the seat belt to prevent it from retracting back into the car.
Seat belts have a spring mechanism and if the belt retracts while wet or dirty, moisture and debris can get inside the retractor mechanism.
This can cause the belt to become sluggish or stop retracting properly over time.
By fully extending and locking the belt, the webbing remains exposed, allowing for safe and even cleaning.
This also prevents sudden retraction, which could damage the belt edges or cause uneven wear.
Keeping the belt extended during cleaning maintains its smooth operation and proper locking function.
2. Protecting the Retractor Mechanism from Moisture
The retractor mechanism is the hidden part inside the car’s body that controls how the seat belt moves and locks.
This mechanism contains springs, gears and locking components that are highly sensitive to moisture.
Even a small amount of water or cleaner in this area can cause stiffness, corrosion, or delayed locking.
Therefore, seat belts should never be soaked or heavily sprayed near the retractor.
Cleaning should always be done with a lightly damp cloth or mild foam and only the visible webbing should be cleaned.
Protecting the retractor from moisture ensures that the seat belt maintains its ability to retract quickly and lock instantly when needed.
3. When Not to Clean and When to Replace
There are certain situations when cleaning a seat belt is not safe or appropriate.
If the belt has visible fraying, deep cuts, melted spots, or excessive stiffness, cleaning will not restore its strength.
Seat belts involved in a serious accident may also need to be replaced, even if they appear fine on the surface, as the internal fibers may be weakened.
A belt that no longer retracts properly or fails to lock when pulled sharply is another warning sign.
In such cases, replacement is the safest option.
Seat belts are designed to save lives and using a damaged or defective belt is far more dangerous than replacing it.
Tools
| Item Name | What It Is | Why It Is Safe and Useful |
|---|---|---|
| Mild liquid soap | A mild soap used for washing clothes. | It removes dirt, sweat and oil without damaging the seat belt fibers. |
| Fabric-safe cleaner | Cleaner designed for fabric surfaces. | Designed to clean fabric without weakening threads. |
| Baby shampoo | Very gentle cleansing liquid. | Safe for sensitive materials and items that come into contact with skin. |
| Soft bristle brush | Brush with soft bristles. | Loosens dirt without scrubbing. |
| Microfiber cloth | Soft cleaning cloth. | It absorbs moisture and gently removes dirt. |
| Old toothbrush | Small soft brush. | It reaches tight areas of the webbing. |
| Seat belt clamp or clip | Tool to hold belt in extended way. | Prevents belt from pulling back when wet. |
| Clean towel | Dry absorbent cloth. | Helps in drying after cleaning. |
| White vinegar (diluted) | Natural cleaning liquid. | Helps reduce odor when added to water. |
| Baking soda | Natural powder cleaner. | Helps remove bad odor from clothes. |
| Warm water | Clean water at moderate temperature. | This activates the cleaner and removes dirt. |
| Bleach | Strong chemical cleaner. | This can weaken the fibers and cause color fading. |
| Alcohol-based cleaner | Fast drying liquid. | This dries out the fibers and reduces their strength. |
| Steam cleaner | High heat cleaning equipment. | Heat and moisture damage the webbing. |
| Pressure spray | High force liquid spray. | This pushes the water into the retractor mechanism. |
How to Clean Car Seat Belts – Effective Method
Cleaning car seat belts properly requires patience and care.
Seat belts are designed to be durable, but incorrect cleaning methods can damage their woven fibers.
Following a careful, step-by-step process will remove dirt, stains and odors, while also ensuring the belt remains safe, flexible and fully functional.
Each step builds upon the previous one to protect both the webbing and the internal locking mechanism.
1. Fully Extending and Securing the Seat Belt
The first step is to pull the seat belt out until it reaches its full length.
This exposes the entire portion that comes into contact with your hands, clothing and body.
Once fully extended, the belt should be secured so it doesn’t retract back into the car.
This is crucial because allowing a wet belt to retract can introduce moisture and dirt into the internal retractor mechanism, potentially leading to sluggish operation or jamming later on.
Keeping the belt extended allows you to clean it evenly from top to bottom, without missing any hidden sections.
2. Pre-treating Visible Stains
Before cleaning the entire belt, visible stains should be pre-treated.
Common stains include food and drink spills, sweat marks, makeup and general grime.
Applying a small amount of a mild cleaner to these areas helps loosen the stains and makes them easier to remove.
Allowing the cleaner to sit for a short period breaks down oils and dirt, reducing the need for excessive scrubbing.
This step makes the overall cleaning process more effective and minimizes stress on the fibers.
3. Applying the Cleaner Safely and Evenly
Once the stains have been pre-treated, a diluted, mild cleaner should be applied to the rest of the seat belt.
The cleaner should be spread evenly across the webbing using a damp cloth or a soft brush.
Using too much liquid is not recommended, as excess moisture can soak into the belt and reach the retractor mechanism.
Applying the cleaner evenly ensures that dirt is removed uniformly and no streaky or sticky residue is left behind.
Applying it gently and in a controlled manner helps maintain the belt’s flexibility and smoothness.
4. Gently Scrubbing Without Damaging the Fibers
Scrubbing should always be done gently and carefully.
Seat belt fibers are tightly woven and vigorous scrubbing can damage the fibers over time, causing them to fray or thin.
Gently scrubbing with a soft brush along the length of the belt helps dislodge dirt trapped between the fibers without weakening them.
Scrubbing in one direction rather than back and forth reduces stress on the fibers and keeps the webbing smooth.
This gentle approach is sufficient to effectively clean the belt and maintain its integrity.
5. Thoroughly Wiping Away Residue
After cleaning, it’s crucial to remove all remaining cleaner from the seat belt.
Leftover soap or cleaning solution can make the belt stiff or sticky once it dries.
Wiping the belt with a clean, slightly damp cloth removes the residue without introducing excess moisture.
This step also improves the belt’s texture and allows it to dry evenly.
Thoroughly removing the residue ensures that the seat belt remains smooth, comfortable and can retract and lock properly as designed.
How to Remove Common Stains from Seat Belts
Seat belts are prone to various stains due to daily use and direct contact with the body.
Unlike regular fabric, seat belt webbing is tightly woven and designed for safety, meaning stains can penetrate deep into the fibers.
Properly removing stains keeps the belt looking clean, reduces odors and maintains its flexibility and smooth operation.
Using gentle methods is crucial, as harsh cleaners or vigorous scrubbing can weaken the fibers and compromise the belt’s long-term reliability.
1. Food and Drink Stains
Food and drink stains are among the most common types of stains on seat belts, specially in family vehicles.
Coffee, juice, soda and sauces can leave deep stains and stickiness if not cleaned promptly.
These stains should be addressed as soon as possible because sugars and acids can attract dirt over time and create unpleasant odors.
A mild cleaner diluted in water helps break down food particles without damaging the webbing.
Gently applying the cleaner to the stain lifts it from the fibers, leaving the belt clean, fresh and maintaining its original texture.
2. Sweat, Body Oils and Dirt Buildup
Sweat, body oils and everyday dirt gradually accumulate on seat belts, even without spills.
These stains often appear as darker or hardened patches, particularly near the shoulder and lap areas.
Body oils can make the belt feel greasy and reduce its smooth movement.
Mild soap and warm water are effective in breaking down these oils without harming the fibers.
Regularly cleaning these areas prevents stiffness and ensures the belt retracts smoothly.
Removing this buildup also improves hygiene, as sweat and oils can trap bacteria and unpleasant odors.
3. Grease, Makeup and Sunscreen Stains
Grease, makeup and sunscreen stains can be particularly difficult to remove because these products are often designed to be water-resistant.
These substances frequently transfer from hands, skin, or clothing and can leave noticeable marks on light-colored seat belts.
A gentle pre-treatment using a fabric-safe cleaner helps to loosen these oily residues.
Allowing the cleaner to sit for a short time before gently rubbing makes stain removal easier.
Working slowly and carefully prevents the stain from spreading or damaging the fibers.
Properly removing these stains keeps the seat belt looking clean and ensures that it remains flexible and safe to use.
How to Eliminate Odors, Bacteria and Germs
Seat belts often develop unpleasant odors, even if they don’t appear visibly dirty.
This is because they absorb sweat, moisture, food particles and oils from daily use.
Because seat belts are in direct contact with the body and are frequently touched, bacteria and germs can also accumulate over time.
Properly eliminating odors is crucial not only for comfort but also for hygiene.
Using safe and gentle methods helps remove odors and reduce germs without damaging the seat belt fibers or compromising their safety performance.
1. Causes of Bad Odors in Seat Belts
Bad odors in seat belts are typically caused by moisture and organic matter trapped within the woven fibers.
Body sweat, specially in warm weather, is absorbed into the belt, creating a warm, damp environment where bacteria can thrive.
Spilled food and drinks leave behind sugars and debris that break down, resulting in sour or musty odors.
In humid conditions, even a small amount of moisture can remain trapped in the belt for extended periods, leading to mildew-like smells.
Dirt and body oils also accumulate over time, further contributing to odors if the belts are not cleaned regularly.
2. Safe Odor Removal Methods
The safest way to remove odors from seat belts is to use mild, fabric-safe cleaners and minimal moisture.
Gentle soap and water can break down odor-causing oils and dirt without damaging the fibers.
Natural odor neutralizers, such as diluted vinegar or baking soda, can help neutralize odors when used cautiously and sparingly.
The key is to avoid soaking the belt and to wipe away all residue after cleaning.
Proper air drying is just as important as cleaning, as residual moisture in the fibers can bring back odors.
The safest way to eliminate odors is to remove the source of the smell, not to mask it with strong fragrances.
3. Preventing Mold and Mildew Growth
Mold and mildew develop when moisture remains trapped in the seat belt fibers for extended periods.
This is more common in humid environments or in cars that are parked for long periods without ventilation.
Preventing mold starts with proper drying after every cleaning.
Seat belts should be fully extended until they are completely dry.
Keeping the car’s interior dry and well-ventilated also prevents moisture buildup.
Regular light cleaning removes organic matter on which mold thrives.
Preventing mold and mildew preserves both the cleanliness and strength of the seat belts, keeping them safe and comfortable to use.
Learn, Proper Drying Techniques
Properly drying car seat belts is just as important as cleaning them.
Even if the belts appear clean, moisture trapped within the woven fibers can lead to stiffness, odors and long-term damage.
Seat belts are designed to move freely and lock instantly upon sudden impact and trapped moisture can hinder this movement.
Proper drying maintains the belt’s flexibility, strength and reliability, ensuring it functions correctly every time it’s used.
1. Why Air Drying is Essential
The safest and most effective way to dry seat belts after cleaning is air drying.
Allowing the air to gently remove the moisture prevents stress on the fibers and damage to the webbing’s internal structure.
Seat belt fibers are tightly woven and slow drying allows the moisture to evaporate naturally without causing shrinkage or stiffness.
Air drying also reduces the risk of moisture reaching the retractor mechanism, which can lead to stiffness or faulty locking.
Keeping the belt fully extended while air drying ensures even drying along its entire length.
2. How Long Should Seat Belts Dry?
Seat belts typically take several hours to dry completely, depending on humidity and airflow.
In most cases, it’s recommended to allow the belts to dry for at least four to eight hours.
In humid environments, drying may take longer.
It’s crucial to ensure the belt feels completely dry to the touch before retracting it.
Retracting a wet belt can trap moisture inside the retractor, potentially leading to future odors and sluggish operation.
Patience during the drying process helps prevent future problems and ensures that the seat belt continues to function correctly.
3. Why Heat, Sunlight and Blow Dryers Are Harmful
Using heat to dry seat belts can cause serious damage.
Excessive heat from blow dryers, heaters, or direct sunlight can weaken the synthetic fibers and reduce their flexibility.
Heat can also cause the belt to stiffen or damage its original texture, making it less comfortable and less effective.
Direct sunlight can fade the belt’s color and degrade the protective coating over time.
While quick-drying methods may seem convenient, they increase the risk of long-term damage.
Air drying is the safest option to protect both the strength and performance of your seat belt.
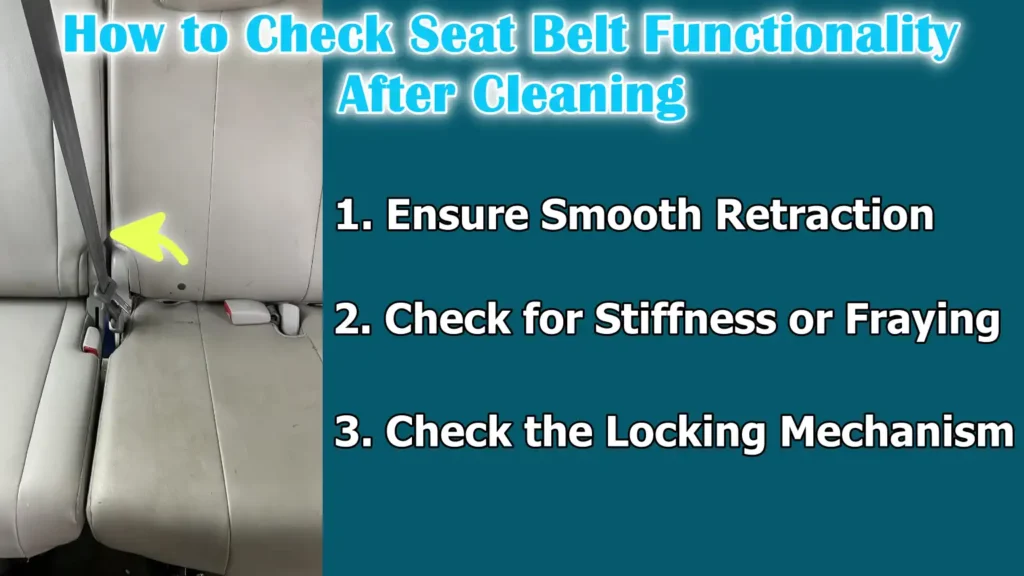
How to Check Seat Belt Functionality After Cleaning
After cleaning and thoroughly drying the seat belts, it’s crucial to ensure they are still functioning correctly.
Seat belts are not just for comfort, but are safety devices and even minor issues can compromise their performance during sudden braking or an accident.
Cleaning should not alter the way the belts move, lock, or feel.
Testing the belts briefly after cleaning ensures they are reliable, comfortable and ready to protect passengers.
1. Ensure Smooth Retraction
A properly functioning seat belt should retract smoothly and evenly when released.
After cleaning, the belt should slide back into the retractor without any hesitation, jerking, or slowing down.
If the belt moves slowly or stops before fully retracting, there might be moisture, cleaning residue, or debris trapped within the fibers.
Smooth retraction is essential because the belt needs to adjust quickly to body movements while driving.
Allowing the belt to dry completely and ensuring no residue remains helps restore normal movement and comfort.
2. Check for Stiffness or Fraying
The seat belt webbing should feel flexible and smooth to the touch.
Stiffness can indicate soap residue, trapped moisture, or damage to the fibers.
Fraying, pilling, or thinning edges are signs that the fibers have weakened.
These issues compromise the belt’s ability to distribute force evenly during an accident.
Even minor signs of wear should not be ignored, as the strength of a seat belt depends on the integrity of every fiber.
A clean seat belt should feel soft, be easily flexible and show no visible signs of damage.
3. Check the Locking Mechanism
Seat belts are designed to lock instantly when pulled quickly or during sudden braking.
After cleaning, it’s crucial to test the locking mechanism to ensure the belt is still functioning correctly.
When the belt is pulled quickly, it should lock without any delay.
If the belt doesn’t lock or locks erratically, moisture or residue may have reached the internal mechanism.
A properly functioning lock ensures the belt securely holds the body in place during an emergency.
Any issues with the locking mechanism should be taken seriously, as they directly impact safety.
How to Check Seat Belt Functionality After Cleaning
Once the car’s seat belts are clean and completely dry, checking their functionality is a crucial final step.
Seat belts are safety systems designed to react instantly to sudden movements or impacts.
Cleaning should never compromise their performance.
Even a light cleaning can sometimes leave behind moisture, soap residue, or stiffness, affecting how the belt moves or locks.
Carefully checking the functionality ensures the belts are still safe, comfortable and ready to provide the expected protection to passengers.
1. Ensuring Smooth Retraction
A properly functioning seat belt should retract smoothly and consistently when released.
After cleaning, the belt should return to the retractor without slowing down, stopping, or jerking.
Smooth retraction is essential because the belt needs to adjust automatically as the driver or passenger moves.
Slow or uneven retraction can indicate residual moisture, soap residue, or dirt trapped in the fibers.
If the belt doesn’t retract properly, it won’t fit snugly against the body, compromising comfort and safety while driving.
2. Checking for Stiffness or Fraying
The seat belt webbing should feel flexible, soft and strong simultaneously.
After cleaning, the belt should bend easily without feeling stiff or rough.
Stiffness often means that cleaning residue has dried within the fibers or that the belt has been exposed to excessive water.
Fraying, pilling, or worn edges are signs that the fibers may be damaged.
These fibers work together to distribute force during an accident, so even small areas of damage can reduce the overall strength of the belt.
A safe seat belt should look and feel smooth along its entire length.
3. Checking the Locking System
The locking system is what allows the seat belt to securely restrain the body during sudden stops or collisions.
After cleaning, the belt should lock immediately when pulled sharply.
This quick response indicates that the internal mechanism is functioning correctly.
If the belt does not lock or locks improperly, moisture or dirt may have entered the retractor mechanism.
Because the locking system is crucial for safety, any problems with the locking mechanism should be taken seriously.
A properly functioning seat belt should move freely during normal use and lock instantly when needed.
Read More:
What are the Common Mistakes to Avoid When You Cleans The Seat Belts
Cleaning seat belts might seem simple, but several common mistakes can compromise their safety and lifespan.
Seat belts are designed to withstand immense force during an accident, yet everyday cleaning errors can damage them.
Using the wrong products or methods can weaken the fibers, affect smooth movement and cause problems with the locking mechanism.
Understanding these mistakes is crucial to maintaining the integrity of seat belts and ensuring they continue to function as a reliable safety feature.
And, there’s scientific literature on automotive safety systems that shows that if you use abrasive materials or washing the seats belts with strong chemicals, leaves belts wet or just drying them in incorrect way; then it can literally degrade the strap’s fibers and it can compromise the performance as well, so rigorous cleaning and direct soaking or chemical exposure can lead to the fiber damage, that’s why it becomes really important to clean it with appropriate substances and in ways that avoid saturation of the webbing as well.[¹]
1. Using Harsh Chemicals or Bleach
Harsh chemicals and bleach are among the most damaging products that can be used on seat belts.
These substances break down the protective coating on the fibers over time and weaken the woven structure.
Bleach can also cause discoloration and make the belt feel rough or brittle.
While the belt might appear clean initially, repeated use of harsh cleaners can reduce its ability to absorb tension and force during an accident.
Mild, fabric-safe cleaners are always the safest option as they clean without damaging the fibers.
2. Soaking the Belt or Retractor
Soaking seat belts in water or cleaning solutions is a serious mistake.
Excessive moisture can seep into the retractor mechanism, which contains springs and locking parts that are sensitive to water.
Moisture inside the retractor can lead to sluggish retraction, stiffness, corrosion, or complete failure of the locking system.
Seat belts should only be cleaned superficially using minimal moisture.
Keeping water away from the retractor ensures smooth movement and reliable locking.
3. Rubbing too vigorously
Rubbing too vigorously can damage the fibers of the seat belt, even when using a mild cleaner.
Harsh rubbing can cause the fibers to fray, become fuzzy and thin the webbing.
These fibers are designed to work together to distribute force evenly across the belt and damaging them reduces its overall strength.
Excessive rubbing can also make the belt stiff and uncomfortable.
Gentle cleaning with light pressure is sufficient to remove dirt and stains, while keeping the belt strong, flexible and safe.
How Often Should You Clean Your Car’s Seat Belts?
The frequency of cleaning car seat belts depends on how often and by whom the vehicle is used.
Seat belts are surfaces that come into contact with hands, clothing, skin and sometimes food or pet hair.
Over time, dirt, sweat and oils accumulate within the fibers, even if the belt appears clean.
Regular cleaning maintains hygiene, keeps the belt flexible and ensures smooth retraction.
Infrequent cleaning allows dirt to harden within the webbing, while excessive cleaning with harsh products can cause wear and tear.
Striking the right balance is crucial for both safety and comfort.
1. Daily Use Vehicles vs Infrequently Used Vehicles
Vehicles driven daily accumulate dirt much faster than those used infrequently.
Daily drivers experience frequent body contact, exposure to external dust, sweat and varying weather conditions.
In these vehicles, a light cleaning every few months is beneficial to prevent dirt buildup.
Infrequently used vehicles, such as weekend cars or second cars, typically require less frequent cleaning.
However, even infrequently used cars can develop odors due to trapped moisture and lack of ventilation.
Regular checks are helpful and cleaning should be done whenever the belts feel stiff, sticky, or develop an odor.
2. Families with Children or Pets
Families with children or pets typically need to clean their car seat belts more often.
Children frequently touch seat belts with dirty hands, spill drinks, or leave food particles.
Pets can leave behind hair, saliva and external dirt on the belts.
These factors increase the likelihood of stains, odors and bacterial buildup.
In such situations, seat belts should be inspected regularly and cleaned whenever any dirt or odor is noticed.
Keeping seat belts clean in family vehicles improves hygiene and comfort and also reduces the risk of long-term fiber damage caused by heavy dirt buildup.
3. Seasonal and Preventive Cleaning Schedule
Seasonal changes also affect how often seat belts should be cleaned.
In warm and humid weather, sweat and moisture accumulate more quickly, increasing the risk of odors and mold growth.
During the rainy season, damp air can cause the belts to retain moisture for longer periods.
Performing preventive cleaning before and after periods of bad weather helps protect the fibers and keeps the belts fresh.
Light, regular cleaning is more effective than waiting until heavy stains or strong odors develop.
Preventive care ensures that seat belts remain smooth, flexible and reliable throughout the year.
How to Clean Children and Rear Seat Belts – Special Considerations
Children and rear seat belts require extra attention because they are used by more vulnerable passengers, such as children and infants.
These belts often feature harnesses or integrated restraint systems that come into direct contact with the child’s body.
Maintaining the cleanliness and proper working condition of these belts is crucial not only for comfort but also for safety.
Children’s seat belts are more prone to accumulating dirt, food particles, saliva, sweat and accidental spills, making careful cleaning and regular inspection essential.
Proper care ensures that the belt or harness remains safe, effective and comfortable for the child with every use.
1. Cleaning Concerns for Children
Children’s seat belts are more likely to have food, drinks, or other substances spilled on them.
Their hands, often covered in dirt and germs from playing, can also transfer these contaminants to the belts during use.
Over time, this can lead to odors, bacterial growth and potential hygiene issues.
Gentle but thorough cleaning of the belts removes this buildup and reduces the risk of skin irritation or infection.
Keeping children’s seat belts clean also provides parents with peace of mind, knowing that the restraint system is safe and hygienic for everyday use.
2. Suggested Cleaning Frequency
Children’s and rear seat belts should generally be cleaned more frequently than front seat belts.
For families with young children, it is recommended to inspect and clean the belts at least once a month, or whenever any dirt, stains, or odors are noticed.
In case of spills or soiling, immediate spot cleaning is necessary to prevent staining and odor absorption into the fibers.
Sometimes, frequent light cleaning is better than occasional deep cleaning because it maintains the seat belt’s flexibility, strength and smooth operation, while also reducing the risk of dirt buildup that can affect cleanliness and comfort.
3. Safety Checks for Child Restraint Systems
In addition to cleaning, regular safety checks are also necessary for child and rear seat belts.
Parents should inspect the belts for tears, stiffness, or frayed areas and ensure that all locking mechanisms are functioning correctly.
The harness and integrated restraint systems should lock securely and retract smoothly without any resistance.
Even minor issues, such as a slightly sticky belt or uneven retraction, can compromise the effectiveness of the restraint system in protecting a child during a sudden stop or collision.
Consistent safety checks and regular cleaning ensure that child seat belts remain fully reliable and safe for everyday use.
What are the Signs That Indicate Seat Belts Need Repair or Replacement
Seat belts are essential safety devices in every vehicle, designed to protect occupants.
Over time, they can experience wear and tear, damage, or malfunction, compromising their effectiveness.
Recognizing when seat belts need repair or replacement is crucial for maintaining safety.
Regular inspections and attention to visible issues ensure that the belts can perform their protective function during sudden stops or collisions.
Ignoring problems can pose a serious risk to drivers and passengers, as even minor damage can compromise the belt’s strength and locking ability.
1. Fraying, Fading, or Stiffness
Fraying, fading, or stiffness of the belt material are clear indicators of wear and deterioration.
Fraying weakens the belt and reduces its ability to distribute force evenly during an accident.
Fading, often caused by exposure to chemicals or prolonged sunlight, suggests that the material has degraded and may not perform as intended.
Stiffness is usually due to dirt accumulation, moisture, or residue from improper cleaning and can prevent the belt from moving freely.
Any of these conditions indicate that the seat belt is no longer in good condition and should be inspected thoroughly or replaced.
2. Slow or Faulty Retraction
Seat belts are designed to retract smoothly into the retractor mechanism when released.
Slow, jerky, or faulty retraction can indicate internal problems, such as dirt or moisture in the retractor, a weakened spring, or damage to internal components.
If the belt does not retract fully or smoothly, it may not properly restrain the occupant in an emergency.
Retraction problems should never be ignored, as they directly affect the belt’s functionality and its ability to safely restrain the passenger.
Immediate inspection and, if necessary, repair or replacement are crucial.
3. Post-Accident Replacement Guidelines
Following a moderate or severe car accident, seat belts should be replaced, even if they appear undamaged.
The force of the collision can weaken the internal fibers and damage the locking mechanism, which may not be visible externally.
Manufacturers and safety experts recommend replacing all seat belts involved in an accident to ensure maximum safety in future incidents.
Post-accident replacement is a precautionary measure that maintains the reliability of the vehicle’s safety system and ensures that every passenger remains fully protected.
How to Maintain Cleanliness for Long Term
Proper long-term maintenance of car seat belts ensures they remain safe, functional and comfortable for years to come.
Regular care not only keeps the belts clean but also protects the fibers and internal mechanisms from damage.
By adopting consistent cleaning habits and preventative measures, drivers and passengers can extend the lifespan of their seat belts while maintaining cleanliness and reliability.
The focus of long-term care is on preventing the buildup of dirt, stains and odors and ensuring the belts operate smoothly in all conditions.
1. Keeping Seat Belts Clean Over Time
The easiest way to keep seat belts clean over time is through gentle and regular maintenance rather than waiting for significant dirt buildup.
Wiping the belts with a damp microfiber cloth after long trips or once a week removes dust, sweat and surface grime before it becomes deeply embedded in the fibers.
Using a small amount of a mild, fabric-safe cleaner prevents dirt accumulation and keeps the webbing supple.
Consistent attention prevents dirt from becoming stubborn stains, preserving both the appearance and functionality of the seat belts.
2. Preventing Future Stains and Odors
Preventing stains and odors is far easier than trying to remove them later.
Avoid eating and drinking in the car and clean up any spills immediately.
Maintaining good ventilation inside the vehicle prevents moisture buildup, which can lead to mold, mildew and unpleasant odors.
Families with children or pets can cover the seat belts with protective fabric covers during high-risk activities to prevent direct contact with dirt, oils and spills.
Preventative measures maintain cleanliness and help keep seat belts fresh and odor-free for longer.
3. Simple Habits That Extend the Life of Your Seat Belt
Simple daily habits can significantly extend the life of your seat belt.
Always allow the belt to retract slowly and completely after use to prevent excessive stretching or uneven wear.
Avoid using harsh chemicals or bleach when cleaning and never force a wet belt to retract.
Regularly inspect the belt for fraying, stiffness, or a faulty buckle and address minor issues before they become major problems.
These small but consistent habits ensure your seat belt remains strong, flexible and reliable, maximizing both safety and comfort for everyone in the vehicle.
Conclusion – How to Clean Car Seat Belts
It is the seat belts, that literally keeps us safe and protects us in the case of mishappening, so just make sure to have proper care about them and keep them well-maintained so that they can be always strong, flexible and dependable.
Now, this guide clarifies that seat belts are not merely fabric straps, but carefully engineered safety systems designed to protect the body during sudden braking or accidents.
As well as, daily use exposes seat belts to sweat, body oils, food and drink spills, dirt, moisture and germs, all of which can gradually affect their flexibility, retraction and locking performance.
That’s why you need, proper cleaning with mild products, gentle techniques and correct drying methods preserves the integrity of the fibers and protects the internal retractor mechanism from damage.
And, for families with children or pets, you need to increase the attention to cleaning frequency and safety checks is essential.
Now, you can ask queries in the comment box, for more related information.
Frequently Asked Questions
Q1. How often should I clean my car’s seat belts?
Answer: The frequency of cleaning depends on how often the car is used and who uses it. For daily drivers, a light cleaning every few months is best to prevent the buildup of dirt, oils and sweat. Cars with children, pets, or those where food is frequently spilled should have their belts inspected and cleaned more often. Even in less frequently used vehicles, trapped moisture can lead to odors or mild staining, so seasonal checks and cleaning are advisable. Regular checks help maintain both hygiene and the proper functioning of the belts.
Q2. Can I use bleach or harsh chemicals to clean seat belts?
Answer: No, bleach and harsh chemicals should never be used on seat belts. Harsh chemicals can weaken the fibers, cause discoloration and make the belts brittle or less durable. Seat belts rely on the strength and integrity of their fibers to protect passengers during sudden braking or accidents, so using harsh products can compromise safety. Instead, mild, fabric-safe cleaners, diluted soap, or even baby shampoo are safe and effective for removing dirt and stains without damaging the belts.
Q3. Is it safe to soak seat belts in water?
Answer: Soaking seat belts is not safe because moisture can get into the retractor mechanism, which contains springs and locking parts. If water reaches these internal components, it can cause stiffness, slow retraction, or malfunction of the locking system. Seat belts should only be cleaned superficially with a lightly damp cloth or a soft brush. Ensuring that excess water does not reach the retractor maintains smooth movement and reliable locking.
Q4. How do I remove a strong odor from my seat belt?
Answer: Seat belt odors typically come from sweat, oils, spilled food, or trapped moisture. To safely remove the odor, use a mild soap or fabric-safe cleaner with lukewarm water and gently clean the webbing. Natural remedies like diluted vinegar or a small amount of baking soda can help neutralize odors. After cleaning, ensure the belt is completely air-dried. Preventive measures, such as promptly cleaning up spills and keeping the car well-ventilated, also help prevent odors from developing.
Q5. What should I do if my seat belt is frayed, stiff, or discolored?
Answer: Fraying, stiffness, or discoloration are signs that the seat belt may be weakened and could fail under stress. Minor fraying or stiffness can be monitored if the belt retracts easily and locks properly, but significant damage requires replacement. Seat belts involved in an accident should always be replaced, even if they appear undamaged, as the internal fibers may be compromised. Regular inspections and timely replacements ensure the belt remains strong and fully reliable.
Q6. How can I prevent stains and dirt buildup on my seat belt?
Answer: Preventing stains is easier than cleaning them later. Avoid eating or drinking in the car, wipe down the belt after exposure to sweat or dirt and use protective covers if you have children or pets. Keeping the car interior well-ventilated and dry prevents moisture buildup, which can lead to odors or mildew. Regular light cleaning prevents small stains from becoming permanent and maintains the flexibility and smoothness of the belt fibers.
Q7. Can children’s and rear seat belts be cleaned in the same way as front seat belts?
Answer: Yes, but they require extra care because they are often used by children who may spill food or touch the belts with dirty hands. Children’s seat belts and harnesses should be gently cleaned with a mild cleaner and thoroughly dried. They should also be regularly inspected for wear, fraying, or locking issues. Proper cleaning and regular safety checks ensure these belts remain clean and fully functional to protect young passengers.
Q8. Is air drying necessary for seat belts?
Answer: Air drying is crucial for seat belts. Excessive heat from sunlight, blow dryers, or heaters can damage the fibers, increasing the risk of fraying, breakage, or discoloration. Allowing the belts to air dry naturally, fully extended, ensures that moisture evaporates evenly, maintaining flexibility and smooth operation. Proper air drying also prevents mold, mildew and odors, keeping the belts safe and comfortable to use.
References:
[1] Effects of Seat Belts and Shock Absorbers on the Safety of Racing Car Drivers
https://www.mdpi.com/2227-7390/10/19/3593

Guys, I’m a car audio enthusiast and customization expert and I love clear sound and clean installation. Plus, I have spent years helping people build their dream audio setups. And whenever I’m working on cars, I probably listen to music and thinks about the next big upgrade.