Written By: Don Dodi
Fact Checked By: Kristen Brown
Reviewed By: Diego Rosenberg
If the dash cam wires are totally exposed, then it may cause the dash cam to stop working because when you move back and forth then that can break the dash cam wires as well
And, now-a-days dash cams have become one of the most useful car accessories as it records your real-time driving footage that actually helps you in accident evidence, any insurance claims and important for safety awareness as well.
But, there are many dash cams that are powered by the long-cables that often remains clearly visible after installation of them, that actually creates a messy look inside the vehicle and sometimes can cause safety concerns as well.
As well as, the loose or dangling wires that can distract the driver, as those wires can block the windshield view or even it can interfere with important vehicle components like: airbags, pedals and steering controls if that are not routed properly.
Even, there’s automotive safety guidelines and professional installers also recommend to hide the dash cam wires along with the existing interior trim, headliners and dashboard edges so that you can keep the cabin clean and reduce driving distractions as well.
So, this is the guide that is specifically about How to Hide Dash Cam Wires, so that you can easily improve the interior appearance and protects the cable from any possible wear, heat and accidental pulling as well.
Let’s, Understand the Dash Cam Power Cables and Routing Options
1. Types of Dash Cam Power Cables
Dash cams use different types of power cables depending on the model and brand, and understanding these can help you easily hide the wiring.
Many dash cams use standard USB cables, which are thin, flexible, and can be easily tucked behind interior panels.
Older dash cam models may use mini-USB cables, which are slightly thicker but still fit easily into trim gaps.
Newer dash cams often come with Type-C cables, which are more robust and provide stable power, but they may be less flexible and require more space when hideing them.
Some dash cams also support hardwire kits, which connect directly to the vehicle’s electrical system instead of using a visible plug.
These hardwire cables are designed for permanent installation and typically allow the camera to automatically turn on and off with the car, making them a popular option for a clean, professional setup.
2. Common Power Sources for Dash Cams
Dash cams typically draw power using the car’s 12V cigarette lighter socket, which is the easiest and most common option.
This method requires no modifications and is best for beginners, but the wiring is often visible if not carefully installed.
Many modern vehicles also have USB ports on the dashboard or center console, which can power dash cams with shorter cables and less visible wiring.
For a completely hidden installation, some drivers choose to connect the dash cam to the fuse box using a hardwire kit.
This method draws power directly from the vehicle and eliminates the need for exposed plugs, but it requires careful routing and basic electrical knowledge to ensure a safe and proper installation.
3. How Cable Length and Flexibility Affect Wire Hideout
The length and flexibility of the dash cam cable play a crucial role in how well it can be hideed.
Longer cables offer more routing options, allowing the wire to be run along the edges of the windshield, headliner, and dashboard without stretching or tension.
However, it’s essential to manage the extra length properly to avoid loose or tangled sections.
Flexible cables can be easily tucked behind trim panels and weather seals without damaging the interior, while stiff or thick cables may resist bending and can become loose over time if not properly secured.
Choosing the right cable type helps maintain a clean installation and prevents the wire from becoming visible again after driving.
4. Temporary vs Permanent Dash Cam Wiring Setups
Dash cam wiring setups generally fall into two categories: temporary and permanent.
Temporary setups typically involve plugging the cable into a cigarette lighter or USB port and are suitable for drivers who want quick installation or who wish to move the dash cam between different vehicles.
These setups are easy to remove, but the wiring may be visible if not carefully hideed.
Permanent setups, such as hardwiring into the fuse box, are designed for long-term installation in a single location and provide the cleanest look.
They minimize clutter, are reliable, and offer a factory-installed appearance, but they require more planning and careful wiring for safety and proper function.
Tools
| Tool or Material Name | Used For |
|---|---|
| Trim Removal Tool – Plastic | Made of plastic, it won’t scratch or break panels. It also helps securely push wires behind trim, making it much safer than metal tools. |
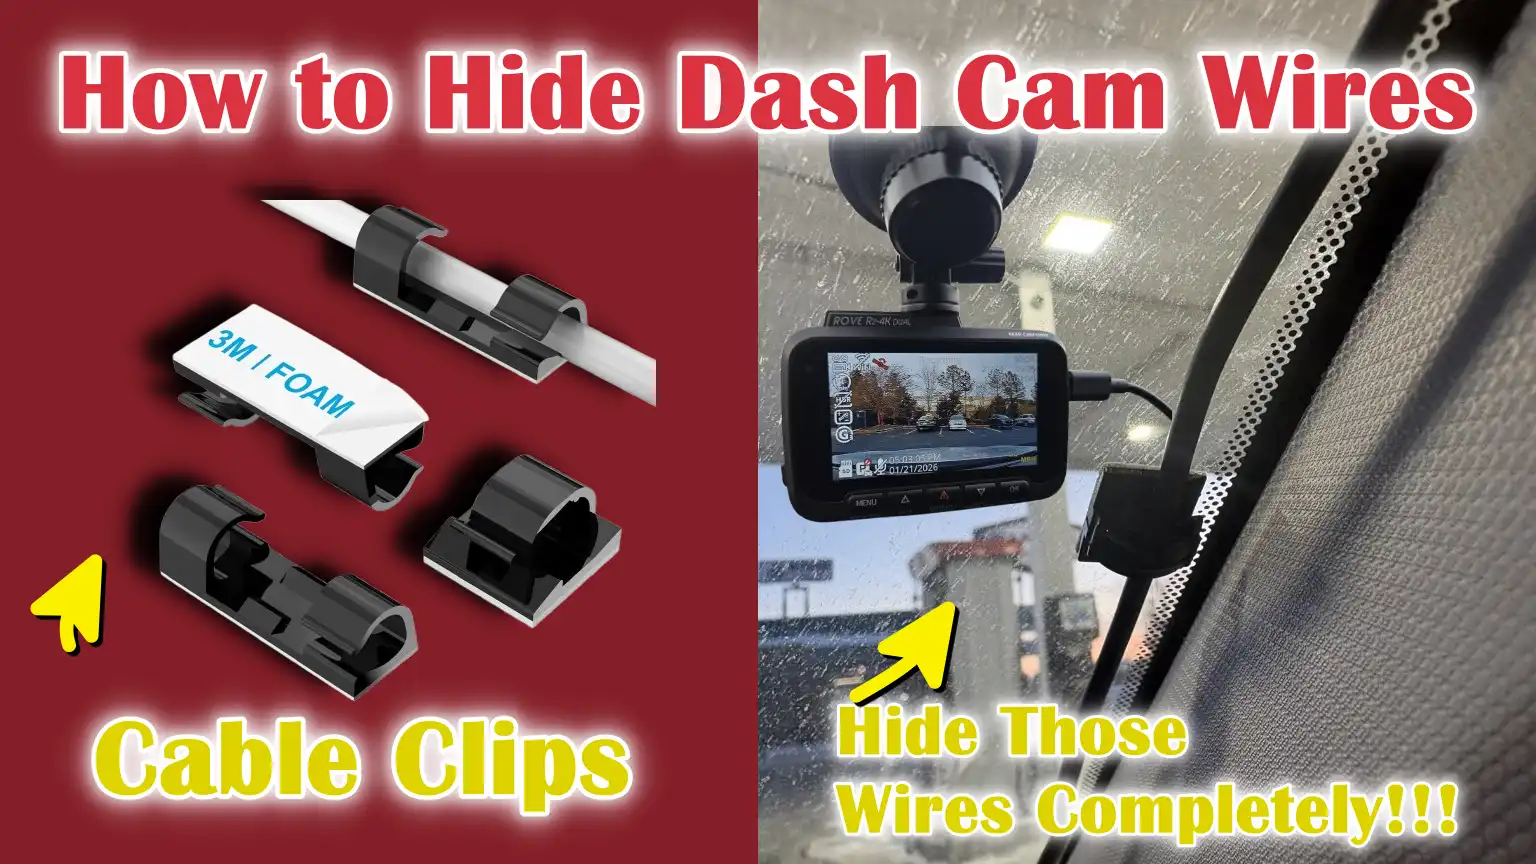
| Cable Clips | It keeps wires tightly and organized at the edges. It prevents wires from dangling or moving while driving. It can be easily removed if needed. |
| Zip Ties | This helps organize and tie up excess cables. It prevents wires from spilling out under the dashboard. Don’t tie it too tightly. |
| Fuse Tap | This provides a secure electrical connection without cutting wires. For hardwire setups only. Fuse sizes must match. |
| Hardwire Kit | It provides a neat and discreet power connection. It automatically turns on and off with the ignition. Best suited for factory-style installations. |
| Microfiber Cloth | It keeps wires hidden and clear of dust. It also prevents rattling noises. It’s safe for all types of internal parts. |
| Credit Card or Plastic Card | This is useful when a trimming tool is not available. It is thin and flexible enough to cut wires easily. Avoid sharp edges. |
How to Take Safety Precautions Before Hiding Dash Cam Wires
1. Turning Off the Vehicle and Disconnecting Power Before Wiring
Before hideing any dash cam wires, the vehicle should be completely turned off, and the dash cam’s power should be disconnected.
Working with live power can lead to short circuits, blown fuses, or accidental damage to the dash cam and the vehicle’s electronics.
Even low-voltage systems like USB or 12V sockets can spark if handled carelessly.
Disconnecting the power also prevents the dash cam from unexpectedly turning on while routing wires near the dashboard or steering area.
This simple step protects both the installer and the vehicle and minimizes the risk of electrical malfunctions during installation.
2. Why Airbag Zones Should Never Be Obstructed
Modern vehicles are equipped with airbags that deploy very quickly and forcefully during a collision.
Many airbags are hidden behind the A-pillar, roof lining, steering wheel, and dashboard panels.
Routing dash cam wires over or directly in front of these airbag zones can prevent them from deploying properly or cause the wires to break and become projectiles during an accident, potentially injuring the driver or passengers.
For safety, wires should always be routed behind trim panels and kept clear of airbag modules and their deployment paths.
Proper wire routing ensures full airbag functionality and reduces the risk of serious injuries.
3. Avoiding Sharp Edges and Moving Parts
Dash cam wires should be routed away from sharp metal edges and moving parts inside the vehicle.
Sharp edges can gradually cut through wire insulation, leading to exposed wires, power loss, or electrical shorts over time.
Moving parts such as pedals, steering column, seat rails, and glove box hinges can pinch or pull on cables while the vehicle is in operation.
Routing the wires along fixed trim lines and securing them firmly reduces wear and tear, minimizes noise, and ensures the dash cam operates reliably for a longer period.
4. Legal Considerations Regarding Dash Cam Installation and Placement
To avoid fines or inspection issues, dash cam installations must comply with local road and safety laws.
In many jurisdictions, dash cams are not permitted to obstruct the driver’s view of the road or windshield.
A camera mounted too low or wires visible across the windshield can reduce visibility and create distractions.
Most safety guidelines recommend mounting the dash cam behind the rearview mirror and completely hideing the wires along the edges of the windshield.
Proper placement ensures compliance with legal regulations while maintaining clear visibility and safe driving conditions.
How to Hide Dash Cam Wires Along the Windshield – Clear Steps
1. Routing the Wire Along the Top Edge of the Windshield
The best place to hide the dash cam wire is along the top edge of the windshield, where it naturally meets the roof lining.
This area already has a thin gap for trim and seals, making it ideal for hideing thin cables.
The wire should be gently inserted into this gap, starting from the dash cam and working towards the passenger side.
Routing the wire upwards keeps it out of the driver’s direct line of sight and reduces the likelihood of it coming loose due to hand movements or sunlight.
2. Securely Tucking the Cables into the Headliner
The headliner is the soft, fabric-covered panel on the interior roof of the car, and it provides gentle pressure to hold the wire in place.
The dash cam wire should be carefully pushed into the headliner using fingers or a plastic trim tool to avoid tearing or creasing the material.
Just a light push is sufficient, as forcing the wire too far in can damage the clips or loosen the lining.
A properly tucked cable remains hidden, while the headliner stays firmly in place and looks undisturbed.
3. Keeping the Wire Hide Without Affecting Visibility
To maintain clear visibility on the road, the wire should remain completely behind the trim lines and never hang down onto the windshield glass.
Even thin cables can be visible to the driver and cause distractions if not properly hideed.
Keeping the wire close to the roof edge and behind the rearview mirror helps ensure an unobstructed view.
A well-hidden wire should not be visible from the driver’s seat and should not cast any shadows or reflections on the windshield.
4. Securing the Cable to Prevent Loosening Over Time
After routing, securing the cable is crucial to ensure it stays in place during daily driving, temperature changes, and vehicle vibrations.
Small gaps in the trim or factory seals help hold the wire naturally, but any excess slack must be carefully managed.
Any loose sections should be guided behind the panel and not left hanging freely.
The correct tension prevents the wire from sagging, reduces noise, and ensures the wire remains hidden even after months of use.
How to Safely Hide Dash Cam Wires Along the A-Pillar
1. What is the A-Pillar and Why is it a Common Routing Path?
The A-pillar is the vertical pillar located on either side of the windshield, connecting the car’s roof to the dashboard.
It’s one of the most common routes for hideing dash cam wires because it provides a direct path from the windshield area to the dashboard and power source.
The A-pillar trim is designed to hide factory wiring, making it suitable for routing thin dash cam cables when done correctly.
Using this route keeps the wires out of sight and maintains a clean and professional look for the interior.
2. How to Route Wires Without Interfering with Side Curtain Airbags
Many modern vehicles have side curtain airbags located behind the A-pillar trim, and these airbags deploy downwards during a crash.
Dash cam wires should never be placed in front of or wrapped around the airbag module.
The wire should always be routed behind the trim panel and kept clear of the airbag’s deployment path.
Keeping the cable loose and tucked along the edge of the pillar ensures that the airbag can deploy freely without obstruction, which is crucial for passenger safety.
3. How to Properly Secure Cables Behind the Trim Instead of the Airbag Module
When routing wires behind the A-pillar trim, the cable should be guided along the outer edge of the pillar, not in the central area where the airbags are typically located.
Gentle pressure should be used to slide the wire into the existing channel behind the trim, rather than forcing it into tight spaces.
The goal is for the wire to rest naturally behind the panel and not cross over or rest on any airbag components.
Properly routing the wire keeps it hideed and protects the vehicle’s built-in safety systems.
4. Securely Reattaching the Trim Panel After Wiring
After running the wire, the A-pillar trim should be carefully pressed back into place, ensuring all clips are fully seated.
Loose trim can cause rattling noises or allow the wire to become dislodged over time.
The panel should sit flush against the pillar with no visible gaps or bulges.
Properly reattaching it restores the original interior finish and ensures the wire remains securely hidden during everyday driving and sudden vehicle movements.
How to Route the Dash Cam Wires to the Power Source
1. Hiding the Wires Behind the Dashboard Panel
Once the dash cam wire reaches the base of the windshield or the A-pillar, the next step is to hide it behind the dashboard panel.
Most dashboards have small gaps or channels along the edges where factory wiring is already routed, making these ideal locations for the dash cam cable.
Carefully removing and lifting these small panels allows the wire to be neatly tucked behind them.
Keeping the wire completely behind the panels prevents it from dangling, reducing the risk of distraction and preventing accidental snagging or rubbing that could damage the insulation over time.
2. Routing the Cable Under the Glove Box or Center Console
For the lower part of the car’s interior, the wire can be routed under the glove box or center console to reach the power source.
These areas are ideal because they provide a clean path from the dashboard to the 12V socket or USB port while keeping the wire out of sight.
Sliding the wire along existing channels or securing it with clips ensures it stays in place and doesn’t obstruct the storage compartments.
This method helps maintain a clean look in the car’s interior and prevents the wire from getting caught by feet or other movements inside the vehicle.
3. Keeping Wires Away from Pedals and Steering Components
It is crucial to ensure that the wires do not come into contact with moving parts such as the brake, clutch, and accelerator pedals or the steering column.
Wires in these areas can be pinched, stretched, or cut during driving, creating a safety hazard and potentially interrupting the dash cam’s power supply.
Routing the wire along the edges of the panels and securing it with clips ensures it remains clear of all moving parts.
This precaution protects both the driver and passengers and ensures that the dash cam operates reliably at all times.
4. Final Connection to the 12V Socket or USB Port
After routing the wires along the panel and under the console, the final step is to connect it to the chosen power source, either the 12V cigarette lighter socket or a USB port.
For a temporary setup, simply plugging it in is sufficient, while hardwired dash cams utilize a connection to the fuse box for a permanent, hideed installation.
Ensuring the wire is properly secured and correctly connected to the socket prevents accidental unplugging or power loss.
A clean and secure final connection guarantees consistent operation of the dash cam while keeping all the wires neatly hidden from view.
How to Hide Dash Cam Wires Using the Car’s Fuse Box – Hardwiring Method
1. What does hardwiring a dash cam mean?
Hardwiring a dash cam means connecting it directly to the vehicle’s electrical system instead of using a visible 12V cigarette lighter or USB plug.
The wiring draws power from the car’s fuse box, allowing the dash cam to automatically turn on when the engine starts and turn off when the car is switched off.
This method provides a permanent, clean installation with no visible wires in the cabin.
Hardwiring is best for drivers who want a professional look and long-term reliability without any clutter or loose cables.
2. Advantages of Fuse Box Wiring
Using the fuse box to power a dash cam offers several advantages.
First, there are no visible cables on the dashboard or center console, improving the aesthetics of the car’s interior.
Second, hardwired dash cams automatically start recording when the vehicle is turned on and stop when the ignition is turned off, ensuring continuous operation without the need to plug in and unplug the device.
Third, the wiring is better protected from accidental damage, heat, and abrasion compared to temporary plug-in methods, extending the lifespan of both the cable and the dash cam.
3. Basic Overview of Fuse Taps and Grounding Points
A fuse tap is a small device that allows you to safely connect a new electrical accessory, such as a dash cam, to an existing fuse in the vehicle’s fuse box.
The tap draws power from the selected fuse while protecting the car’s electrical system from overload.
Grounding points are metal surfaces on the vehicle’s chassis where the negative wire is securely connected to complete the circuit.
Correct use of fuse taps and grounding points ensures that the dash cam receives stable power without interfering with other electronic components of the vehicle.
4. When to Consider Professional Installation
While hardwiring is straightforward for those familiar with car electronics, it involves handling sensitive circuitry and requires the correct selection of fuses, grounding points, and wire routing.
If you are unsure about electrical connections, lack the necessary tools, or want to ensure complete compliance with your vehicle’s safety systems, professional installation is recommended.
Experts can complete the installation cleanly and efficiently, avoiding risks such as blown fuses, short circuits, or interference with airbags and other critical components.
Choosing professional assistance guarantees a reliable, safe, and factory-style dash cam setup.
How to Hide the Rear Dash Cam Wires in a Dual-Camera Setup
1. Best Routing for Wires from Front to Rear Camera
In a dual-camera setup, the rear dash cam requires a cable that runs from the front camera to the back of the vehicle.
The most effective route is along the roofline, following the natural contours of the car’s interior.
This route keeps the wire out of sight and minimizes damage from heat or movement.
Choosing the shortest continuous path along the factory trim lines not only hides the cable effectively but also reduces the risk of damage from pulling or snagging.
2. Routing Cables Along the Headliner and Door Trims
The headliner and door trims provide excellent pathways for guiding the wire from the front to the back of the car.
Carefully tucking the cable under the headliner keeps it hidden from the driver’s view.
Upon reaching the rear seats, running the wire along the door trims or side panels keeps it secure and prevents it from hanging loosely in the passenger area.
Proper alignment with these interior parts prevents rattling, accidental snagging, or interference with interior components.
3. Managing Excess Cable Length
Dual-camera setups often require excess cable length to reach the rear camera, and managing this extra length is crucial for both safety and aesthetics.
Instead of leaving the excess cable loose, it should be neatly coiled and secured behind panels or within trim channels.
Using small clips or utilizing factory channels ensures the wire lies flat against the surface and avoids bulges or clutter.
Good cable management prevents tangling, protects the wire from wear and tear, and maintains a professional, factory-installed look.
4. Ensuring the rear camera cable does not interfere with the rear airbag
Modern vehicles have side and curtain airbags that deploy from the roof and side pillars.
The rear dash cam cable should never be routed in front of these airbag modules.
To ensure safety, the wires should always be routed behind the trim panels and away from the airbag deployment areas.
Proper routing ensures that the airbags can deploy fully in the event of a collision, while the dash cam cable remains safely hideed, providing both passenger safety and a clean installation.
What are the Common Mistakes to Avoid When Hiding Dash Cam Wires

1. Run Wires Over Airbags or Door Seals
One of the most dangerous mistakes is running dash cam wires over airbags or door seals.
Airbags deploy extremely rapidly in milliseconds during a collision, and wires in their path can obstruct full inflation or become projectiles, potentially causing serious injury.
Door seals are also designed to flex slightly when the doors open and close, and a wire trapped inside can be pinched, damaged, or disconnected.
To ensure both passenger safety and the functionality of the dash cam, always route wires behind trim panels and away from any safety devices.
2. Leaving Loose Wires Near Pedals
Leaving wires dangling near the brake, clutch, or accelerator pedals is a major safety hazard.
Loose wires can become entangled around the pedals, obstructing their proper movement, or get caught in the driver’s feet while driving.
This can lead to accidents or damage to both the vehicle and the dash cam.
Properly securing the wires along the edges of panels or under the dashboard ensures they stay out of the way of moving parts and do not compromise driving safety.
3. Forcing the Trim Panels Back into Place
Forcing trim panels back into place after installing a dash cam wire can break clips, crack the panel, or create gaps, resulting in an unstable and unsightly installation.
Poorly fitted trim can rattle while driving, allow wires to come loose, and reduce the resale value of the vehicle’s interior.
Always gently press the panels back into their natural position and ensure the wire fits comfortably behind the trim without any tension or bulging.
4. Using Adhesives that Damage Interior Surfaces
Using strong adhesives, double-sided tape, or glue to hold wires in place might seem like an easy solution, but it can damage the dashboard, headliner, and trim when removed.
Harsh adhesives leave behind sticky residue, discolor surfaces, and can even warp plastic over time.
It’s safer to rely on factory channels, clips, cable ties, and soft trim tools to secure wires, ensuring the car’s interior remains intact and looks professional.
Read More:
Common Tips for Having Factory-Style Hidden Dash Cam Installation
As well as, installation experts also recommends that proper dash cam installation is not just about to enhance the aesthetics, but when wires are misplaced near the critical safety system such as: airbags then it can compromise the effectiveness of these safety devices, also cabling them in front of airbags can interfere with deployment and increase the injury risk in a collision, that’s why hidden wiring behind the trim and away from the sensitive components is strongly recommended as well.[¹]
1. Matching Cable Routes Used by OEM Wiring
One of the most crucial steps in achieving a factory-style installation is following the cable routes used by the vehicle’s original equipment manufacturer (OEM) wiring.
OEM routes are designed to protect cables from heat, abrasion, and interference from moving parts, while also keeping them completely hideed.
Running the dash cam wires along these same channels provides a professional look, protects the cables from damage, and maintains the car’s safety and aesthetics.
2. Using Clips and Ties for Long-Term Security
Clips, cable ties, and other securing methods are essential for keeping dash cam wires in place over the long term.
Properly securing the cables prevents them from coming loose, rattling, or accidentally dislodging during driving.
Using clips or ties that match the cable size ensures a secure fit without excessive pressure, preventing damage to the wires or interior trim.
This practice helps maintain consistent dash cam performance while keeping the wiring organized and out of sight.
3. Neatly Wrapping and Securing Excess Wire
It’s common to have excess cable during a dash cam installation, especially with dual-camera setups or vehicles with long interiors.
Instead of leaving the excess wire exposed, it should be neatly wrapped and secured behind trim panels, within channels, or under the dashboard.
This prevents the wire from becoming tangled, rubbing against sharp edges, or hanging loosely in the passenger compartment.
Well-managed wiring not only looks professional but also protects the cable from wear and tear over time.
4. Checking the Wiring Stability After Driving for a Few Days
Even after the installation is complete, it’s crucial to check the wiring after driving the vehicle for a few days.
Road vibrations, temperature changes, and repeated use of doors or the glove box can cause wires to loosen if they aren’t properly secured.
Checking the cables after this period ensures they remain hideed, securely fastened, and are not interfering with any moving parts.
Timely adjustments can prevent long-term damage, rattling noises, or safety hazards, ensuring a reliable, factory-style installation.
Conclusion – How to Hide Dash Cam Wires
Now, you have clearly understood the importance of well-hidden dash cam wires as it can truly transforms a interior look and even it keeps your passengers safe and ensure your dash cam works reliably every day.
And, by carefully routing the wiring along the windshield, A-pillar, headliner, and dashboard, you can completely hide the wires without interfering with airbags, pedals, or other essential components.
Yes, you have to use the correct tools, clips, and ties ensures the wires remain secure, preventing them from becoming loose, shifting, or accidentally disconnecting over time.
For dual-camera setups, managing the rear camera’s wiring while respecting airbag zones and trim channels maintains both passenger safety and interior aesthetics.
Also, from the hardwiring to the fuse box provides automatic power and eliminates visible plugs, resulting in a more professional-looking installation.
A factory-style hidden dash cam setup not only protects your investment but also enhances driving safety by minimizing distractions and giving your vehicle a clean, professional look.
So, that’s all from this guide and you can comment down for more info.
Frequently Asked Questions
Q1. How do I hide the dash cam wires in my car?
Answer: To hide the dash cam wires, first route the cable along the top edge of the windshield and tuck it into the headliner. From there, run the wire down the A-pillar, making sure to avoid airbags and other safety devices. Route the wire behind the dashboard panel, under the glove box or center console, and finally connect it to the power source. Using clips, cable ties, or factory trim channels will keep the wire secure, hidden, and protected from movement or abrasion. This method ensures the wire doesn’t interfere with pedals, steering components, or visibility, while also maintaining a clean, professional look.
Q2. Can I hide the dash cam wires without removing interior panels?
Answer: Yes, it’s possible to hide the wires without removing all the interior panels, but it will be easier and safer if you carefully lift or remove small trim pieces. Using a plastic trim tool or a thin card, you can gently tuck the wire behind trim and fabric channels without causing damage. While some wires can be routed using small gaps along the edges, temporarily removing panels provides more control, prevents looseness, and ensures the wires remain hidden long-term.
Q3. Is it safe to run dash cam wires along the A-pillar?
Answer: Yes, it is safe to run dash cam wires along the A-pillar, as long as you avoid the airbag area. The A-pillar trim often has small channels that allow wires to be routed behind it without interfering with the airbag. It’s crucial not to place the wires directly in front of the side curtain airbag and to secure them along the edges of the trim to prevent movement or pinching. Following these precautions ensures passenger safety and a clean dash cam installation.
Q4. What is the best way to hide the rear dash cam wire?
Answer: For the rear dash cam, the wire should be routed from the front camera along the headliner and side trims to the back of the vehicle. Any excess cable length should be neatly coiled and secured behind the panels. It’s crucial to keep the wire away from side curtain airbags and other moving parts to avoid safety hazards. Using trim channels or clips along the interior surfaces keeps the wire hidden and prevents rattling or clutter in the rear passenger compartment.
Q5. Can I hardwire the dash cam to the fuse box?
Answer: Yes, hardwiring the dash cam to the fuse box is a common method for a clean, professional installation. Using a fuse tap, the dash cam can draw power directly from the vehicle’s electrical system. Properly grounding the negative wire safely completes the circuit. Hardwiring allows the dash cam to automatically turn on and off with the ignition and eliminates visible plugs or cables. This method is recommended for permanent installations, but if you are unfamiliar with car electronics, it’s advisable to seek professional assistance to avoid short circuits or damage.
Q6. How do I prevent the dash cam wires from dangling or moving?
Answer: To prevent dangling or movement, secure the wires using clips, cable ties, or existing trim channels. Ensure the wire is not excessively bent or stretched, and neatly coil and hide any extra length behind the panels. It’s important to check the wire’s stability after a few days of driving, as vibrations or temperature changes can cause the wires to shift. Properly secured wires remain hidden, reduce rattling, and maintain the dash cam’s performance over time.
Q7. Are there any legal considerations for hiding dash cam wires?
Answer: Yes, there are legal considerations depending on your location. The dash cam’s placement must not obstruct the driver’s view of the road or windshield. The wires and camera should not impede visibility or interfere with airbags or vehicle controls. Adhering to local regulations ensures the installation is safe, legal, and does not affect insurance or traffic laws. Carefully hiding the dash cam and wires and following the manufacturer’s guidelines helps meet these requirements.
Q8. Can I use household items to help hide dash cam wires?
Answer: Yes, common household items like plastic cards or microfiber cloths can be useful. A thin card can help tuck wires behind trim panels without damaging them, and a cloth can clean surfaces before wiring to prevent rattles caused by dirt or dust. While professional tools are better for long-term durability, these common items, when used carefully, can help beginners achieve a safe and clean installation.
References:
[1] COMPETITORS RUNNING DASH CAM WIRING IN FRONT OF AIRBAGS: A SAFETY CONCERN
https://safedrivesolutions.com/blogs/resources/safe-dash-cam-wiring-avoid-airbag-safety-risks

Guys, I’m a car audio enthusiast and customization expert and I love clear sound and clean installation. Plus, I have spent years helping people build their dream audio setups. And whenever I’m working on cars, I probably listen to music and thinks about the next big upgrade.