Written By: Don Dodi
Fact Checked By: Kristen Brown
Reviewed By: Diego Rosenberg
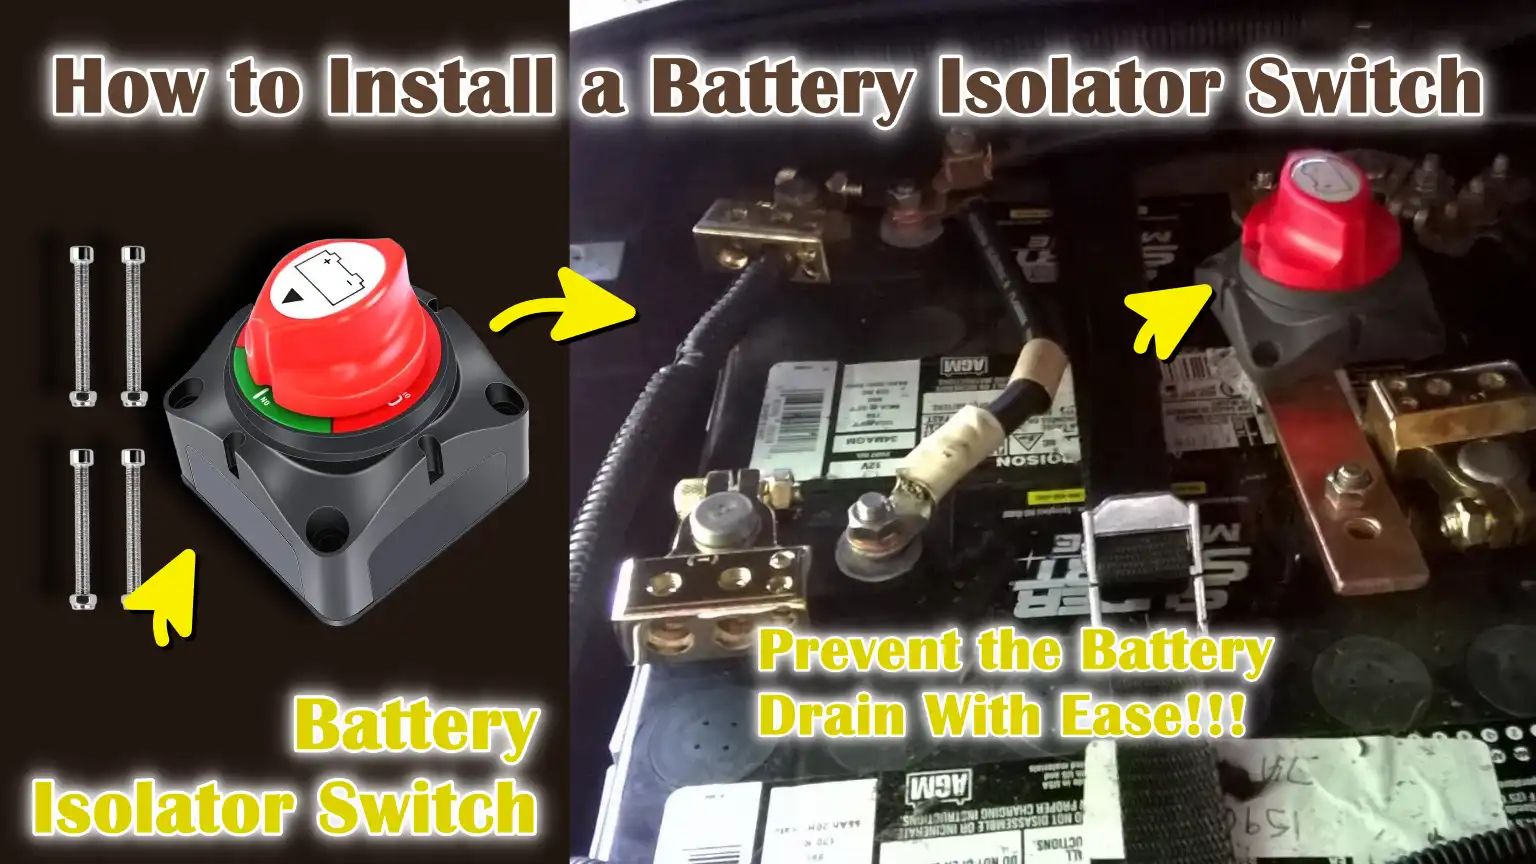
Yes, it is true that a battery isolator switch literally gives you full control over your vehicle’s power with just one simple turn or click, so that you can completely cut off electrical power from a vehicle or electrical system when it is not in use.
And, now-a-days modern vehicles and equipment relies heavily on the electrical components such as: ECUs, sensors, radios, alarms and onboard computers as well; and all of them can slowly drain the battery even when the engine is turned off completely.
Which is why, it is important to learn How to Install a Battery Isolator Switch, as many batteries fail early not because they are worn-out or bad, but because there are small electrical drains that slowly empties them over the period of time and use.
And, with the help of the battery isolator switch you can prevent this kind of drain, protect the battery from deep discharge and even you can reduce the risk of the any possible electrical short circuits and fire hazards as well.
What are the Benefits of Installing a Battery Isolator Switch
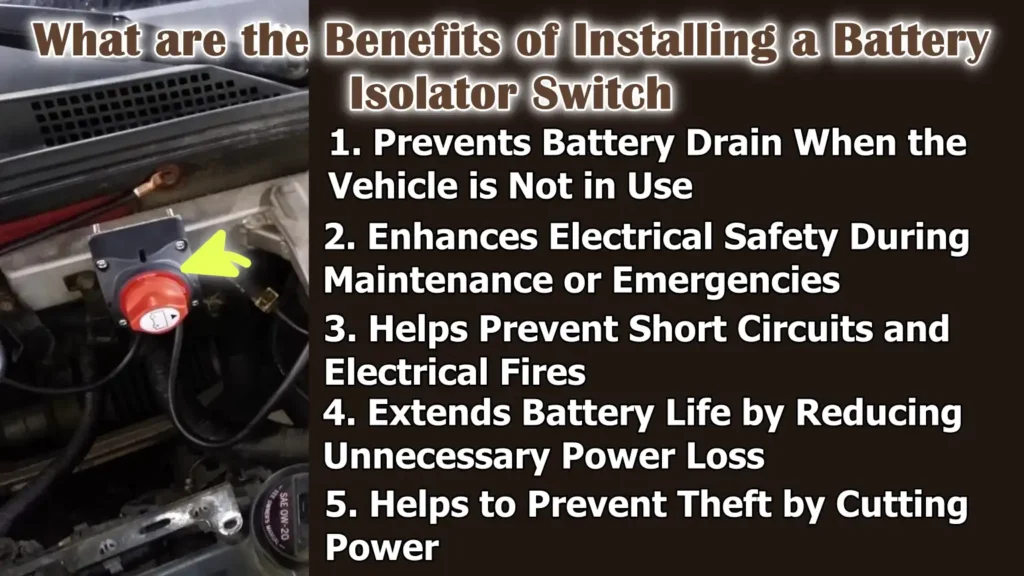
1. Prevents Battery Drain When the Vehicle is Not in Use
Modern vehicles continue to draw a small amount of power even when the engine is off.
Systems such as alarms, clocks, onboard computers, infotainment memory and tracking devices constantly consume power; this phenomenon is known as parasitic drain.
Over time, this gradual power loss can completely discharge the battery, specially if the vehicle is parked for several days or weeks.
A battery isolator switch prevents this unwanted power flow by completely disconnecting the battery from the electrical system when the vehicle is not in use.
This keeps the battery charged for longer and avoids situations like a vehicle failing to start due to a discharged battery.
2. Enhances Electrical Safety During Maintenance or Emergencies
Working on a vehicle’s electrical system can be dangerous if the wires are still live.
Accidental contact with live wires can cause sparks, short circuits, or damage to sensitive electronic components.
A battery isolator switch provides a convenient way to instantly cut power without having to disconnect the battery terminals, making maintenance work safer and more controlled.
In emergency situations such as electrical malfunctions, overheating wires, or smoke coming from the engine bay, the switch provides a quick way to shut off electrical power and reduce the risk of serious damage or injury.
3. Helps Prevent Short Circuits and Electrical Fires
Electrical short circuits are one of the leading causes of vehicle electrical malfunctions and fires.
Faulty wiring, loose connections, worn insulation, or exposure to moisture can cause electricity to flow through unintended paths, generating heat and sparks.
A battery isolator switch mitigates this risk by completely cutting off the power supply when the vehicle is parked or stationary.
By eliminating continuous power flow, the likelihood of electrical overheating or fires caused by accidental faults is significantly reduced, specially in older vehicles or those with modified electrical systems.
4. Extends Battery Life by Reducing Unnecessary Power Loss
Vehicle batteries are designed to deliver power in controlled cycles.
Frequent deep discharges due to parasitic drain shorten battery life and reduce its ability to hold a charge.
A battery isolator switch prevents these unnecessary discharges by electrically isolating the battery when the vehicle is not in operation.
As a result, the battery maintains a healthy charge level, operates more reliably and lasts longer.
This reduces the frequency of battery replacements and lowers overall maintenance costs over time.
5. Helps to Prevent Theft by Cutting Power
No vehicle can start without power to the ignition system, fuel system and onboard electronics.
When the battery isolator switch is turned off, these systems are disabled, making it difficult for unauthorized individuals to start the vehicle.
This adds an extra layer of security, specially for parked vehicles, classic cars, RVs, boats and equipment stored for extended periods.
While not a substitute for an alarm system, a battery isolator switch is a simple and effective way to deter theft by disabling the vehicle’s power.
Know, What are the Types of Battery Isolator Switches Available
1. Manual Battery Isolator Switch
A manual battery isolator switch is the most basic and commonly used type.
It works by physically turning the power connection between the battery and the electrical system on or off using a lever or knob.
When the switch is off, all electrical power is completely disconnected.
This type is widely used because it is simple, reliable and does not rely on sensors or electronics.
It is particularly useful for vehicles that are parked for extended periods, such as classic cars, motorcycles, RVs and boats.
Because they have fewer parts, manual isolator switches are less prone to failure and are easier to inspect and maintain.
2. Key-Operated Battery Disconnect Switch
A key-operated battery disconnect switch functions similarly to a manual switch but requires a removable key to turn the power on or off.
This design adds an extra layer of security by preventing unauthorized access to the vehicle’s electrical system.
When the key is removed, the battery remains disconnected, which helps prevent both battery drain and vehicle theft.
These switches are commonly installed in performance vehicles, commercial equipment and vehicles stored in shared or public areas.
The key system also reduces the likelihood of accidentally turning off the power during normal vehicle use.
3. Rotary Battery Isolator Switch
A rotary battery isolator switch uses a round dial that rotates between on and off positions.
It is designed to handle high electrical loads and is often rated for heavy-duty use.
Rotary switches are popular in larger vehicles, marine applications and off-road equipment because they are durable and easy to operate, even while wearing gloves.
The clear on and off positions minimize user error, making it easy to confirm whether the battery is connected or isolated.
Their robust construction helps them withstand vibration, moisture and temperature changes better than many basic switch designs.
4. Smart or Automatic Battery Isolators
A smart or automatic battery isolator operates without manual input, using voltage sensing or electronic control systems.
It automatically connects the batteries when charging is detected and disconnects them when the engine is off or the voltage drops to a safe level.
This type is commonly used in modern vehicles and dual-battery setups where convenience and battery protection are crucial.
Smart isolators help ensure the starter battery remains charged while the auxiliary battery powers accessories.
These are more expensive than manual switches but offer greater efficiency and reduce the risk of user error.
5. Single-Battery vs Dual-Battery Isolator Systems
Single-battery isolator systems are designed to control power from a single battery and are primarily used to prevent battery drain and improve safety.
Dual-battery isolator systems manage two separate batteries, typically a starter battery and an auxiliary battery.
This setup allows one battery to handle engine starting while the other powers accessories such as lights, refrigerators, or audio systems.
Dual-battery isolators prevent one battery from draining the other, ensuring reliable starting power at all times.
These systems are commonly found in RVs, off-road vehicles, camper vans and marine applications where reliable power management is essential.
Tools
| Tool or Material | Short and Helpful Explanation |
|---|---|
| Battery Isolator Switch | This is the main device that disconnects the power from the battery. It must match the vehicle’s voltage, usually 12V and be rated for the correct current to safely handle the electrical load. |
| Wrenches or Socket Set | These tools are needed to loosen and tighten the battery terminals and mounting bolts. Using the correct tools prevents damage to the nuts and ensures a secure electrical connection. |
| Screwdrivers | A screwdriver is used to install the isolator switch and tighten the small screws. Depending on the switch design, both flat-head and Phillips screwdrivers may be needed. |
| Heavy-Duty Battery Cables | These cables supply power between the battery and the isolator switch. They must be thick enough to handle the high current without overheating or experiencing excessive voltage drop. |
| Cable Lugs and Heat-Shrink Tubing | Cable lugs connect the cable to the battery and switch terminals. Heat-shrink tubing protects the connection from moisture, corrosion and loosening over time. |
| Electrical Tape and Zip Ties | Electrical tape insulates exposed wires and provides extra safety. Zip ties help keep cables neat, secure and away from hot or moving parts. |
| Safety Gloves and Protective Eyewear | Gloves protect hands from sparks, sharp edges and battery acid. Safety glasses protect the eyes from sparks or debris that may be accidentally released during installation. |
How to Ensure Safety Before Installing Battery Isolator Switch
1. Parking the Vehicle on a Level Surface
Before beginning any electrical work, the vehicle should be parked on a flat and stable surface.
A level surface ensures that the vehicle does not roll or move while you are working near the battery and engine bay.
This is specially important as even slight movement can cause tools to slip or cables to accidentally touch the wrong terminals.
Parking on a level surface also provides better access to the battery compartment and reduces the risk of injury during installation.
2. Turning Off the Ignition and Removing the Keys
The ignition must be completely turned off before starting the installation.
Removing the keys ensures that the vehicle does not accidentally start or that any electrical systems are activated while you are working.
Modern vehicles can still send power to electrical circuits even when partially shut off, so removing the key helps to completely disable these systems.
This step significantly reduces the risk of sparks, short circuits, or damage to sensitive electronics.
3. Disconnecting the Negative Battery Terminal
Disconnecting the negative battery terminal is one of the most crucial safety steps when working on any vehicle’s electrical system.
The negative terminal is connected to the vehicle’s ground and disconnecting it breaks the electrical circuit.
This prevents accidental current flow if a tool comes into contact with the vehicle’s metal parts.
It also reduces the risk of sparks, electric shock and damage to electronic components during installation.
4. Wearing Safety Equipment
Always wear safety equipment when working around the battery.
Safety gloves protect your hands from sharp edges, hot surfaces and battery acid.
Safety glasses protect your eyes from sparks or debris that may occur when loosening or tightening connections.
If the terminals are short-circuited, sparks can fly from the car battery, so basic safety precautions are essential to prevent injuries.
5. Avoid contact with live electrical components.
Even after the ignition is turned off, some electrical components may still retain stored energy.
Touching live or exposed wires can cause sparks, short circuits, or damage to the electrical system.
It is crucial to keep tools and hands away from exposed terminals until the battery is completely disconnected.
Exercising caution around live components ensures personal safety and protects the vehicle from electrical malfunctions.
How to Choose the Right Location for the Isolator Switch
1. Accessibility for Quick Power Cut-Off
The battery isolator switch should be mounted in a location that allows for easy and quick access.
In emergency situations such as electrical malfunctions, overheating wires, or sudden smoke, quick access allows for immediate power cut-off.
A difficult-to-reach location can delay response time and increase the risk of damage.
Easy access also encourages regular use of the switch, helping to prevent battery drain and improving overall safety.
2. Mounting Near the Battery or Inside the Cabin
Mounting the isolator switch near the battery minimizes cable length, reducing electrical resistance and power loss.
This location is commonly used for ease of installation and provides a direct and efficient connection.
Mounting the switch inside the cabin offers greater accessibility and added security, specially in vehicles frequently parked in public areas.
When mounting inside the cabin, proper cable routing and insulation are crucial to ensure safety and prevent damage to the wiring.
3. Avoiding Heat, Moisture and Moving Parts
Heat, moisture and moving parts can shorten the lifespan of the isolator switch.
Excessive heat from the engine can damage internal components and degrade performance over time.
Moisture can cause corrosion, leading to poor electrical contact or malfunction.
Moving parts such as belts, fans and steering components can rub against cables and damage the insulation.
Choosing a dry, cool and stable location ensures long-term reliability and safe operation.
4. Ensuring a Solid Mounting Surface
The battery isolator switch should be mounted on a sturdy and stable surface to prevent movement or vibration.
Loose mounting can lead to loose connections over time, increasing electrical resistance and heat.
A solid mounting surface holds the switch firmly in place and maintains consistent electrical contact.
This reduces wear and tear on the cables and terminals and ensures that the system remains safe and reliable while the vehicle is in motion.
How to Install a Battery Isolator Switch – Easy & Working Method
Installing a battery isolator switch requires attention to safety, proper wiring and correct mounting.
Each step must be completed in the correct sequence to ensure the electrical system remains safe and functions as intended.
Following these steps helps prevent battery damage, electrical faults and installation errors, while also ensuring the isolator switch operates reliably.
How to Disconnect the Battery
Disconnecting the battery is the first and most crucial step because it removes active electrical power from the vehicle.
This prevents accidental sparks, short circuits and damage to electronic components while working on the system.
1. Disconnect the Negative Terminal First
Always disconnect the negative battery terminal before any other connections.
The negative terminal is connected to the vehicle’s metal body, which acts as the ground.
Disconnecting it first breaks the electrical circuit and significantly reduces the risk of sparks if a tool accidentally touches a metal surface.
This procedure is recommended by automotive manufacturers and electrical safety guidelines.
2. Ensure Power is Completely Off
After disconnecting the negative terminal, it’s essential to ensure there is no residual electrical power in the system.
Waiting a few minutes allows any stored energy in electronic modules to discharge.
During this time, avoid touching any exposed terminals.
Ensuring the power is completely off protects sensitive electronics and provides a safer working environment.
How to Mount the Battery Isolator Switch
Properly mounting the isolator switch is crucial for safety and longevity.
A well-mounted switch remains secure during vehicle operation and maintains reliable electrical connections.
1. Marking the Mounting Location
Before drilling or installing the switch, carefully mark the mounting location.
The location should be easily accessible and away from heat sources, moisture and moving parts.
Marking the location beforehand ensures that the switch is mounted straight and that the cables can be routed without excessive strain or sharp bends.
2. Securing the Switch
Once the location is determined, the isolator switch should be securely mounted using appropriate screws or bolts.
A loose switch can vibrate during vehicle operation, potentially leading to loose connections, increased electrical resistance, or overheating.
A secure mount keeps the switch stable and ensures consistent performance over time.
How to Connect the Battery Cables
Correct cable connections are crucial because the isolator switch controls the main flow of electrical power.
Incorrect wiring can lead to power loss, overheating, or system failure.
1. Identifying Input and Output Terminals
Battery isolator switches are designed with clearly marked input and output terminals.
The input side connects to the battery, while the output side connects to the vehicle’s electrical system.
Correct identification ensures that power flows in the correct direction and prevents reverse current or improper operation.
2. Connecting the Battery Positive Cable to the Isolator
The positive cable from the battery should be connected directly to the input terminal of the isolator switch.
This allows the switch to control the main power supply.
The cable terminal should be properly secured for good electrical contact.
Poor contact can increase resistance and reduce efficiency.
3. Securing the Cables with the Correct Torque
All cable connections should be tightened to the torque level specified by the manufacturer.
Under-tightening can lead to loose connections, while over-tightening can damage the terminals or strip the threads.
The correct torque ensures secure connections, stable power flow and minimizes heat generation during operation.
How to Reconnect the Battery
Once the isolator switch and cables are properly installed, the battery can be safely reconnected.
This step restores power to the system and allows the isolator switch to control it.
1. Reconnecting the Negative Terminal
The negative terminal of the battery should be connected last.
Reconnecting it completes the electrical circuit and restores power to the vehicle.
This method prevents accidental sparks during installation and follows standard automotive safety practices.
2. Double-Check All Connections
Before proceeding, carefully check all connections.
The cables should be tight, properly seated and routed away from any sharp edges or hot surfaces.
Double-checking helps identify minor issues that could lead to electrical problems later on.
How to Test the Isolator Switch
Testing ensures that the isolator switch is properly installed and functioning as intended.
This step confirms safety and proper operation before regular use.
1. Switching the Switch ON and OFF to Verify Power Disconnection
To confirm that the electrical power is completely disconnected, the isolator switch should be turned off.
When the switch is off, there should be no electrical activity in the vehicle.
When the switch is turned back on, power should be restored immediately, confirming proper operation.
2. Checking the Dashboard and Electrical Accessories
With the switch on, the dashboard lights, radio and other electrical accessories should function normally.
When it is turned off, power to these systems should be cut.
This final check confirms that the isolator switch is correctly controlling the electrical system.
Learn, How to Install a Battery Isolator Switch in a Dual-Battery System
Dual-battery systems are designed to power separate electrical loads without the risk of discharging the starter battery.
They are commonly used in RVs, off-road vehicles, campervans, boats and work vehicles where accessories such as lights, refrigerators, winches, or inverters are used for extended periods.
Installing a battery isolator switch in this system allows both batteries to function efficiently while remaining electrically isolated from each other.
1. Understanding Starter vs Auxiliary Batteries
In a dual-battery system, the starter battery is used to start the engine and power the vehicle’s essential systems.
The auxiliary battery is used to power additional accessories when the engine is off.
These two batteries serve different purposes and keeping them separate is crucial to prevent power loss.
If accessories draw power from the starter battery, the vehicle may not start.
A battery isolator switch ensures that the auxiliary battery can be used independently without discharging the starter battery, guaranteeing reliable vehicle operation at all times.
2. Correct Wiring Sequence
Proper wiring is essential for correct dual-battery operation.
The isolator switch must be wired so that the starter battery receives charging power first when the engine is running.
Once sufficient voltage is reached, the auxiliary battery is charged.
This sequence ensures that the starter battery is fully charged and ready to start the engine.
Incorrect wiring can lead to uneven charging, battery imbalance, or complete power loss, reducing battery life and system efficiency.
3. Preventing Reverse Current Flow
Reverse current flow occurs when electricity flows from one battery to another in the wrong direction.
This can happen if the auxiliary battery discharges into the starter battery or vice versa.
Reverse current can cause problems such as overheating, battery damage and rapid discharge.
A properly installed battery isolator switch allows current to flow only when it is safe and appropriate, preventing these issues.
This protection becomes even more crucial when one battery has a lower charge level than the other, as uncontrolled current flow can stress both batteries.
4. Testing Both Batteries After Installation
After installation, both batteries should be tested to confirm proper operation.
The starter battery should be able to start the engine without delay, while the auxiliary battery should be able to power accessories independently when the engine is off.
Testing ensures that the isolator switch is correctly isolating and connecting the batteries as needed.
This final check confirms that charging, isolation and power distribution are functioning correctly, ensuring the long-term reliability and safe operation of the dual-battery system.
What are the Common Installation Mistakes to Avoid
Installing a battery isolator switch might seem straightforward, but minor errors can lead to serious electrical problems, safety hazards and reduced battery life.
Understanding these common mistakes ensures the switch functions correctly, the electrical system remains safe and provides long-term reliability.
1. Incorrect Installation on the Negative or Positive Terminal
One of the most common mistakes is installing the isolator switch on the wrong side of the battery without understanding the system design.
In most vehicles, isolator switches are installed on the positive cable to provide complete control over the power supply to the electrical system.
Incorrect placement can leave parts of the system energized even when the switch is off.
This can pose a safety hazard during maintenance and compromise the effectiveness of the isolator.
Correct placement ensures complete power isolation and safe operation.
2. Using Undersized Cables
Using undersized cables for the electrical load is a critical mistake.
Battery cables must handle high currents, specially during engine starting.
Undersized cables can overheat, cause voltage drops and reduce performance.
Over time, heat buildup can degrade insulation and increase the risk of fire.
Choosing the correct gauge cable ensures safe power flow and prevents unnecessary electrical stress.
3. Poor Grounding
Grounding plays a crucial role in any vehicle’s electrical system.
Poor grounding can lead to unstable voltage, electrical noise and intermittent system failures.
If the ground connection is weak or faulty, the isolator switch may not function correctly.
A clean, robust ground connection ensures stable electrical performance and protects sensitive electronic components.
4. Loose Connections
Loose cable connections increase electrical resistance, leading to heat buildup and power loss.
This can cause lights to flicker, delays in starting, or even complete system failure in the electronics.
Over time, vibrations from driving can further loosen the connections.
Ensuring all terminals are securely tightened and checking them after installation helps prevent these problems and maintains consistent electrical contact.
5. Installation in Inaccessible Locations
Installing the isolator switch in a difficult-to-reach location reduces its usability and safety.
In an emergency, quick access is crucial for rapidly cutting off the power.
Poor accessibility can also hinder regular use, increasing the risk of battery drain.
Choosing a location that is visible and easily accessible ensures the switch can be used effectively when needed.
Read More:
How to Maintain a Battery Isolator Switch for Long Term Service
Proper maintenance and correct use of the battery isolator switch ensure reliable performance, enhanced safety and a longer battery life.
Regular attention prevents electrical problems, reduces wear and tear on components and ensures the switch continues to effectively protect the vehicle’s electrical system.
Not only this, there industry-level electrical guidance on the battery disconnects that shows that modern vehicles and trucks have an increasing number of electrical loads that’s how they even continue to draw the power even when the engine if totally off, so disconnect switches are recommended so that you can easily isolate these loads, reduces the parasitic drain and even it protects the battery charge levels during the long period of inactivity. Basically, shutting off the battery power also provides protection against unintended working of accessories, that even reduces fire risks and ensures total safety during the electrical maintenance as well, that shows that the battery isolator switches are really good and important for having long-term battery health and it provides system safety as well.[¹]
1. Regularly Check Cable Tightness
Vehicle vibrations and temperature changes can cause battery cables and terminals to loosen over time.
Loose connections increase electrical resistance, leading to overheating, power loss and poor performance.
Periodically checking cable tightness ensures a stable electrical flow and reduces the risk of overheating or sudden power failure.
A secure connection also helps maintain consistent charging and discharging cycles.
2. Clean Terminals to Prevent Corrosion
Battery terminals and cable connections are exposed to moisture, heat and chemical vapors from the battery, which can lead to corrosion.
Corrosion creates a barrier that hinders electrical flow and reduces efficiency.
Regularly cleaning the terminals maintains a strong electrical contact and prevents voltage drops.
Keeping the connections clean also extends the lifespan of both the battery and the isolator switch.
3. When to Turn the Isolator On or Off
The isolator switch should be turned off when the vehicle is parked for extended periods or during maintenance work.
This prevents battery drain by disconnecting the power supply and enhances safety.
During normal driving, the switch should be on to allow the battery to charge properly and power essential systems.
Knowing when to use the switch correctly helps prevent unnecessary battery discharge and electrical problems.
4. Tips for Seasonal Storage
For vehicles stored for specific seasons, such as during winter or for off-season use, utilizing the battery isolator switch offers significant advantages.
Turning off the ignition switch during storage prevents the gradual battery drain caused by clocks, alarms and other onboard electronics.
This helps the battery maintain its charge and reduces the risk of permanent damage from deep discharge.
Proper seasonal storage ensures that the vehicle is ready to start when needed.
How to Solve Common Problems of Battery Isolator Switch
Even after proper installation, battery isolator switches can sometimes experience problems due to wiring errors, loose connections, or component failure.
Addressing these issues promptly helps prevent battery drain, electrical failures and safety hazards.
Understanding common problems and their causes makes it easier to identify and resolve issues without unnecessary repairs.
1. Vehicle Not Starting After Installation
If the vehicle doesn’t start after installing the battery isolator switch, the most common cause is incorrect wiring or the switch being in the off position.
The starter motor requires a significant amount of current and any interruption in power flow can prevent the engine from starting.
Checking that the switch is on and that the battery cables are connected to the correct terminals usually resolves this issue.
Loose or reversed connections can also interrupt current flow and should be carefully inspected.
2. Power Not Shutting Off Completely
When electrical power continues to flow even after the isolator switch is turned off, it often indicates incorrect wiring or improper switch placement.
This can happen if the switch is installed on the wrong cable or if some circuits are bypassing the isolator.
Failure to completely shut off power poses a safety risk during maintenance and defeats the purpose of the switch.
Ensuring the isolator is installed on the main power cable and that all connections pass through it helps achieve complete power isolation.
3. Overheating Cables or Terminals
Overheating cables or terminals typically indicate excessive electrical resistance.
This can be caused by loose connections, undersized cables, or corrosion on the terminals.
Overheating is dangerous as it can damage insulation and increase the risk of electrical fires.
Checking the cable gauge, tightening all connections and ensuring clean contact points helps reduce resistance and prevent overheating.
4. Intermittent Electrical Malfunctions
Intermittent electrical problems, such as flickering lights or accessories suddenly turning off, are often caused by loose connections.
Vibrations from driving can exacerbate loose terminals or poorly seated switches.
Improper grounding can also lead to voltage fluctuations.
Checking and securing all connections and ensuring a solid ground connection will help restore stable electrical performance and reliable system operation.
Conclusion – How to Install a Battery Isolator Switch
The battery isolator switch is literally gives you ability to manage the power wisely so that you can avoid any battery drain in no use also it is a reliable electrical system that deliver power whenever you wanted with convenience.
As well as, modern vehicles rely heavily on electronics, which continue to draw power even when the engine is off.
So, This can gradually discharge the battery and lead to unexpected starting problems.
Also, it is important to have a properly installed isolator switch as it solves this problem by providing complete control over battery power, allowing the system to be safely disconnected when the vehicle is parked, stored, or undergoing maintenance.
Plus, it also reduces the risk of electrical short circuits, overheating wires and accidental sparks, which are common causes of electrical damage and vehicle fires.
As well as, you can still ask unsolved queries in the comment box for more information related to them.
Frequently Asked Questions
Q1. What is a battery isolator switch and what does it do?
Answer: A battery isolator switch is a device that allows you to completely disconnect the battery from the vehicle’s electrical system. When the switch is off, no electrical power flows through the vehicle, helping to prevent battery drain, electrical faults and safety hazards. It’s commonly used in cars, RVs, boats, off-road vehicles and dual-battery systems to easily and safely control power.
Q2. Is a battery isolator switch necessary for a vehicle?
Answer: A battery isolator switch isn’t strictly necessary, but it’s very useful. Modern vehicles continue to draw power even when parked due to systems like alarms, clocks and onboard computers. Over time, this can drain the battery. An isolator switch prevents this drain and provides added security, specially for vehicles that are stored for extended periods or have additional electrical accessories.
Q3. Where should a battery isolator switch be installed?
Answer: A battery isolator switch should be installed in an easily accessible location that is protected from heat, moisture and moving parts. Many people install it near the battery to minimize cable length and power loss. Some prefer to install it inside the cabin for better accessibility and added security. The best location depends on the type of vehicle and its use, but accessibility and safety are always key priorities.
Q4. Should a battery isolator switch be installed on the positive or negative terminal?
Answer: In most vehicles, the battery isolator switch is installed on the positive cable because it provides complete control over the electrical system. Installing it incorrectly can leave parts of the system powered even when the switch is off. Correct installation ensures a complete power cut-off and safe maintenance. Always follow the manufacturer’s instructions for the specific switch being used.
Q5. Will a battery isolator switch affect the vehicle’s electronics?
Answer: When installed correctly, a battery isolator switch does not damage a vehicle’s electronics. However, disconnecting the power may reset some settings, such as the clock, radio presets, or infotainment memory. This is normal and temporary. The switch actually protects sensitive electronics by preventing voltage drops, short circuits and electrical surges during storage or maintenance.
Q6. Can a battery isolator switch drain the battery?
Answer: A battery isolator switch itself does not drain the battery. When switched off, it stops all power flow and helps maintain the battery charge. When switched on, it allows normal electrical operation. Battery drain is typically caused by the vehicle’s electronics, not the isolator switch.
Q7. Is a battery isolator switch safe to use?
Answer: Yes, a battery isolator switch is very safe if installed correctly. It enhances electrical safety by allowing for quick power cutoff during emergencies or maintenance. It also reduces the risk of sparks, overheating wires and electrical fires. Many safety standards recommend power isolation when working on a vehicle’s electrical system.
Q8. Can I install a battery isolator switch myself?
Answer: Many people can install a battery isolator switch themselves if they have basic tools and carefully follow safety procedures. The process involves disconnecting the battery, mounting the switch, connecting the cables correctly and testing the system. If the vehicle has a complex electrical setup or a dual-battery system, professional installation may be a safer option.
Q9. Does a battery isolator switch help protect the battery from damage?
Answer: Yes, a battery isolator switch helps prevent excessive battery discharge, which is one of the main causes of premature battery failure. By preventing unnecessary power loss when the vehicle is not in use, the battery remains healthy and lasts longer. This reduces replacement costs and improves reliability.
Q10. Is a battery isolator switch useful for dual-battery systems?
Answer: A battery isolator switch is particularly useful in dual-battery systems. It separates the starter battery from the auxiliary battery, ensuring that accessories don’t drain the battery needed to start the engine. This setup is widely used in RVs, campervans and off-road vehicles where reliable power management is essential.
Q11. Can a battery isolator switch help prevent theft?
Answer: While not a substitute for an alarm system, a battery isolator switch adds an extra layer of security. When switched off, the vehicle cannot be easily started because the electrical power is cut off. This makes unauthorized use more difficult and discourages theft, specially in parked or stored vehicles.
References:
[1] How to Increase Battery Life with Battery Disconnects
https://www.waytekwire.com/aboutus/the-waytek-blog/battery-management/how-to-increase-battery-life-with-battery-disconnects

Guys, I’m a car audio enthusiast and customization expert and I love clear sound and clean installation. Plus, I have spent years helping people build their dream audio setups. And whenever I’m working on cars, I probably listen to music and thinks about the next big upgrade.