Written By: Don Dodi
Fact Checked By: Kristen Brown
Reviewed By: Diego Rosenberg
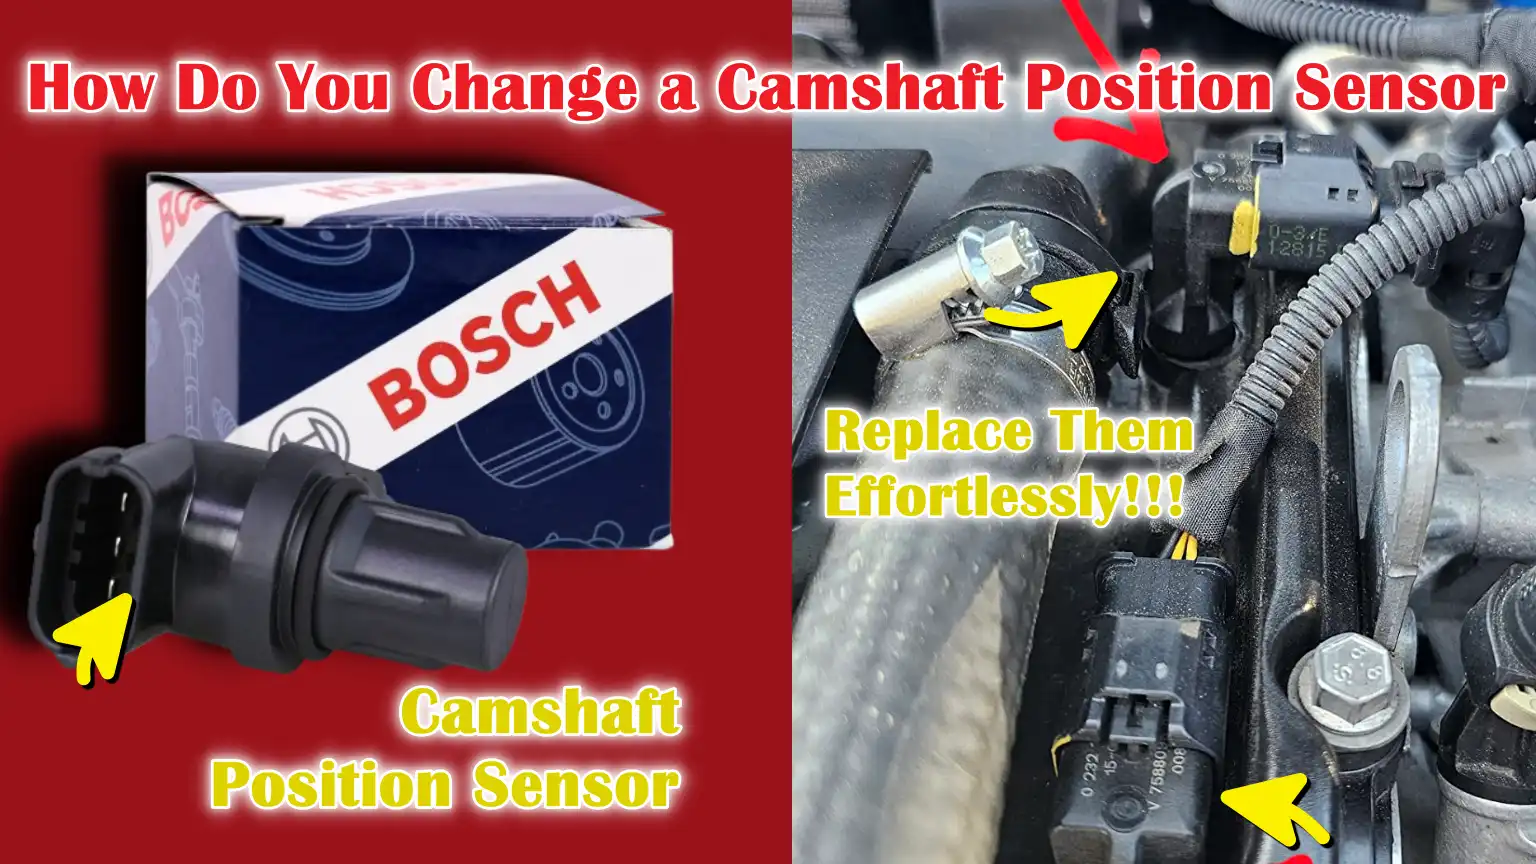
Literally, it is the camshaft position sensor that helps the vehicle’s engine to know when to open the valves and fire the spark plugs at the right time.
And, it tracks the exact position and speed of the camshaft and also it sends this information to the engine control module which is ECM.
According to this data, the ECM actually controls the critical engine functions such as: fuel injection timing, ignition spark timing and valve operation as well.
So, when the camshaft position sensor fails, then the engine may not receive the accurate timing signals, which then leads to the problems such as: hard starting, rough idling, misfires, poor fuel mileage or even the engine stalling can be possible as well.
As well as, in the many vehicles, a faulty sensor can also trigger the check engine light and store the diagnostic trouble codes as well.
So, to solve this issue you need to know How Do You Change a Camshaft Position Sensor, so that you can change it easily and in this guide you’ll learn more about the proper safety steps and simple methods to restore normal engine performance again.
Common Signs and Symptoms of a Faulty Camshaft Position Sensor
1. Check Engine Light Illuminates
One of the earliest and most common signs of a faulty camshaft position sensor is the illumination of the check engine light.
This is because the engine control module relies on the sensor to determine the correct position of the camshaft.
When the sensor sends incorrect signals or stops working, the computer detects the problem and stores a fault code.
Even if the car is initially running normally, the warning light is a clear indication that the engine is not receiving accurate timing information and should not be ignored.
2. Engine Misfires or Rough Idling
A faulty camshaft position sensor can cause engine misfires or rough idling.
This is because the sensor helps control when fuel is injected and when the spark plugs fire.
If the timing information is incorrect or delayed, the engine cannot burn fuel efficiently.
As a result, you may experience jerks, vibrations, or uneven engine speed while driving or idling.
Over time, rough idling can lead to increased wear and tear on the engine and reduced driving comfort.
3. Difficulty Starting or Failure to Start
When the camshaft position sensor fails completely, the engine may be very difficult to start or may not start at all.
The engine control module requires accurate camshaft position data to determine the timing of fuel injection and ignition.
Without this information, the engine may crank for an extended period before starting, or it may not start at all.
This symptom is specially noticeable during cold starts or after the vehicle has been parked for several hours.
4. Poor Acceleration and Reduced Fuel Efficiency
A faulty camshaft position sensor can make the vehicle feel sluggish or underpowered during acceleration.
Because the engine timing is incorrect, the engine cannot generate power efficiently.
This results in delayed throttle response and reduced performance, specially when climbing hills or overtaking other vehicles.
Incorrect timing also causes the engine to burn more fuel, leading to decreased fuel efficiency and increased fuel costs over time.
5. Engine Stalling While Driving
In more severe cases, a faulty camshaft position sensor can cause the engine to stall while driving.
This happens when the sensor suddenly stops sending a signal, causing the engine control module to lose timing data.
The engine may stall at low speeds, while idling, or even during normal driving.
Engine stalling can be dangerous, specially in traffic and usually indicates that the sensor problem requires immediate attention.
Why Replacing a Faulty Camshaft Position Sensor is Important?
1. Role in Ignition Timing and Fuel Injection
The camshaft position sensor plays a vital role in controlling ignition timing and fuel injection.
It provides the engine control module with precise information about the camshaft’s position, allowing the engine to determine when to open and close valves, when to inject fuel and when to fire the spark plugs.
When this sensor malfunctions, the timing information becomes inaccurate or erratic.
This results in fuel being injected at the wrong time and the spark plugs firing too early or too late.
Replacing a faulty sensor restores proper timing, leading to smoother engine operation, efficient fuel combustion and accurate response to throttle input.
2. Impact on Engine Performance and Emissions
A faulty camshaft position sensor directly impacts the engine’s overall performance.
Incorrect timing can lead to reduced engine power, rough idling and weak or sluggish acceleration.
The engine will also fail to burn fuel efficiently, resulting in increased fuel consumption.
When fuel is not completely burned, harmful gases are released into the exhaust.
This increases emission levels and can cause the vehicle to fail emission tests.
Replacing the sensor ensures that the engine operates as designed, resulting in improved fuel economy, reduced emissions and a cleaner, more reliable engine.
3. Potential Damage if Ignored for Too Long
Ignoring a faulty camshaft position sensor for an extended period can lead to more serious engine problems.
Continuous misfires and incorrect timing put excessive stress on engine components such as spark plugs, ignition coils and the catalytic converter.
Unburned fuel entering the exhaust system can overheat and damage the catalytic converter, which is an expensive component to replace.
In severe cases, incorrect timing can cause the engine to stall or prevent the vehicle from starting.
Replacing the sensor promptly helps avoid these costly repairs and prevents long-term damage to the engine.
Tools
| Tool or Material | Detailed Explanation |
|---|---|
| Replacement Camshaft Position Sensor | This is a new sensor that will replace the faulty one. It must match your vehicle’s make, model and engine type. Using the correct sensor ensures proper engine timing and helps prevent future engine problems. |
| Socket Set and Ratchet | A ratchet socket set is used to loosen and tighten the bolts that hold the sensor in place. Most camshaft position sensors are secured by one or two small bolts, so this tool is essential for removal and installation. |
| Screwdrivers – Flathead or Phillips | A screwdriver is often needed to remove clips that obstruct access to the engine cover or sensors. The type of screwdriver required depends on the vehicle, but having both types on hand can prevent delays during repairs. |
| Torque Wrench – If Required | A torque wrench ensures that the sensor bolt is tightened to the correct pressure. This prevents overtightening, which can damage the sensor or engine parts, specially in modern aluminum engines. |
| Clean Rag and Electrical Contact Cleaner | A clean cloth is used to wipe away any dirt or oil around the sensor area. Electrical contact cleaner helps clean the connector pins, ensuring a strong and reliable electrical connection after installation. |
| Safety Gloves and Eye Protection | Gloves protect your hands from sharp edges and hot engine parts. Eye protection prevents dust, oil, or debris from getting into your eyes when working in tight spaces around the engine. |
How to Ensure Safety Before Replacement of Camshaft Position Sensor
1. Parking the Vehicle on a Level Surface
Before beginning any repair work, the vehicle should be parked on a flat and stable surface.
A level surface prevents the vehicle from rolling or shifting while you are working in the engine area.
This is specially important because even slight movement can cause injury or damage when hands and tools are near moving engine parts.
Engaging the parking brake provides additional security and ensures the vehicle remains safely in place during the repair.
2. Turning Off the Engine and Allowing it to Cool
Before replacing the camshaft position sensor, the engine must be completely turned off and allowed to cool down.
Many parts of the engine become extremely hot during operation and touching them prematurely can cause severe burns.
Allowing the engine to cool also reduces the risk of damaging sensitive components.
Working on a cool engine makes the process safer, more comfortable and easier to manage.
3. Disconnecting the Negative Battery Terminal
Disconnecting the negative battery terminal is a crucial safety step that protects both the vehicle and the person performing the repair.
It prevents accidental electrical shocks and avoids short circuits that could damage the engine control module or other electrical components.
It also prevents the engine from accidentally starting while your hands are near moving parts, which could cause serious injury.
4. Wearing Appropriate Safety Equipment
Wearing appropriate safety equipment protects against common workshop injuries.
Gloves protect hands from sharp edges, oil and grime, while eye protection prevents dust, debris, or cleaning fluids from entering the eyes.
Even simple repairs can involve tight spaces and hidden hazards, so using basic safety equipment reduces the risk of accidents and makes the repair process safer and more reliable.
How to Locate the Camshaft Position Sensor
1. Common Sensor Locations
The camshaft position sensor is typically located near the camshaft to accurately monitor its movement.
In many vehicles, the sensor is mounted on the cylinder head, near the top of the engine, or attached to the valve cover.
In some engine designs, particularly older or larger engines, the sensor may be located near the timing cover at the front of the engine.
The exact location depends on the engine layout and the manufacturer’s design.
Knowing these common locations helps in the search and prevents unnecessary removal of other engine components.
2. Consulting the Vehicle’s Service Manual
The most reliable way to locate the camshaft position sensor is to consult the vehicle’s service manual.
The manual provides accurate diagrams, sensor locations and specific information about the engine, eliminating guesswork.
It also indicates whether the engine has one sensor or multiple sensors, which is common in modern vehicles with advanced timing systems.
Using the service manual saves time, reduces errors and ensures that the correct sensor is identified before removal.
3. Identifying the Sensor’s Wiring and Connector
Once the sensor’s location is found, identifying the correct wiring and connector is crucial.
The camshaft position sensor typically has a small electrical connector with two or three wires attached.
These wires transmit timing information directly to the engine control module.
The connector is often secured by a plastic locking tab that must be carefully released.
Correctly identifying the wiring ensures that the correct part is replaced and prevents damage to surrounding sensors or engine wiring.
How Do You Change a Camshaft Position Sensor – Easy Method
1. Disconnect the Electrical Connector
First, locate the electrical connector attached to the camshaft position sensor.
Gently press or lift the locking tab and pull the connector straight out from the sensor.
This step is crucial as forcing the connector can break the plastic clip or damage the wiring.
Disconnecting the connector de-energizes the sensor and prepares it for safe removal without putting any stress on the electrical system.
2. Remove the Mounting Bolt or Fasteners
Once the connector is removed, locate the bolt or bolts holding the sensor in place.
Using the correct size socket or tool, carefully loosen and remove these fasteners.
Most sensors are secured by a single small bolt, but some engines may have two.
Keeping the bolts in a safe place prevents them from getting lost and makes reinstallation easier.
3. Carefully Remove the Old Sensor
After removing the mounting bolts, gently pull the sensor straight out of its mounting hole.
Some sensors may be tight due to an O-ring seal or accumulated dirt.
Wiggling the sensor slightly while pulling will help it come out easily without causing any damage.
Avoid using excessive force, as this can break the sensor housing or damage the mounting area.
4. Check the Sensor Port for Debris or Oil
Before installing the new sensor, inspect the sensor hole in the engine.
Look for any dirt, accumulated oil, or debris that might prevent the new sensor from seating properly.
Clean the area with a clean cloth.
A clean sensor port ensures accurate sensor readings and prevents oil leaks or improper installation.
5. Install the New Camshaft Position Sensor
Insert the new camshaft position sensor into the mounting hole, ensuring it seats properly and is correctly aligned.
If the sensor has an O-ring, ensure it is properly seated and lightly lubricate it if recommended by the manufacturer.
Installing the sensor straight and evenly helps maintain a proper seal and accurate signal detection.
6. Tighten the bolts according to the manufacturer’s torque specifications
Reinstall the mounting bolts and tighten them evenly.
If a torque specification is provided by the manufacturer, use a torque wrench to tighten the bolts to the correct setting.
The correct torque prevents the sensor from coming loose and also prevents damage to the sensor or engine threads from overtightening.
7. Reconnect the electrical connector
Firmly push the electrical connector onto the sensor until you hear a click.
This click confirms a secure connection.
A properly connected sensor ensures stable communication with the engine control module.
After connecting, double-check that the wiring is not loose or touching any hot or moving parts of the engine.
How to Reconnect the Battery and Do Final Checks
1. Reattaching the Battery Terminal
After installing the camshaft position sensor, it’s crucial to securely reattach the negative battery terminal.
Place the terminal back onto the battery post and tighten it until it’s firm and doesn’t move.
A secure battery connection is essential, as loose terminals can cause weak electrical signals, starting problems, or trigger warning lights.
Reconnecting the battery restores power to the engine control module and allows the vehicle’s systems to function normally.
2. Clearing Diagnostic Trouble Codes
In many vehicles, a faulty camshaft position sensor stores diagnostic trouble codes in the engine computer.
After replacement, these codes may still be stored, even if the problem has been fixed.
Clearing the codes using a scan tool resets the engine control module and allows it to re-evaluate the new sensor.
If a scan tool isn’t available, some vehicles may clear the codes automatically after several driving cycles, but manually clearing them ensures that the repair was successful.
3. Starting the Engine and Checking Warning Lights
With the battery connected and the codes cleared, start the engine and let it idle.
Carefully observe the instrument panel for any check engine lights or other warning lights.
The warning lights should typically turn off after the sensor replacement.
This step confirms that the engine control module is receiving correct timing information from the new sensor.
4. Listening for Smooth Engine Operation
Once the engine is running, listen carefully to its sound.
The engine should run smoothly without any hesitation, misfires, or unusual noises.
Smooth operation indicates that the ignition timing and fuel delivery are working correctly.
If the engine sounds normal and responds well to throttle input, it’s a strong indication that the camshaft position sensor has been replaced correctly.
How to Test the Vehicle After Replacement
1. Short Test Drive Conditions
After replacing the camshaft position sensor, a short test drive is necessary to confirm that the repair was successful.
Begin driving at low speeds on a familiar and safe road.
This allows the engine control module to adapt to the new sensor and gather accurate timing data.
Gradual acceleration, steady cruising and gentle braking will reveal any remaining issues without putting excessive stress on the engine.
2. Monitoring Engine Performance and Responsiveness
During the test drive, pay close attention to how the engine responds.
The engine should accelerate smoothly without hesitation, jerking, or sudden power loss.
Throttle response should feel more direct and in automatic vehicles, gear shifts should be smooth.
These improvements indicate that the engine is receiving correct camshaft timing information and is properly adjusting fuel and ignition timing.
3. Verifying That Symptoms Are Resolved
The final step is to confirm that the original problems have been eliminated.
Check for the absence of warning lights on the dashboard and observe the engine’s smooth operation at idle and while driving.
If symptoms such as rough idling, stalling, poor acceleration, or difficulty starting are no longer present, it confirms that the camshaft position sensor was indeed the root cause of the problem.
Successful testing ensures that the vehicle is safe, reliable and ready for normal driving.
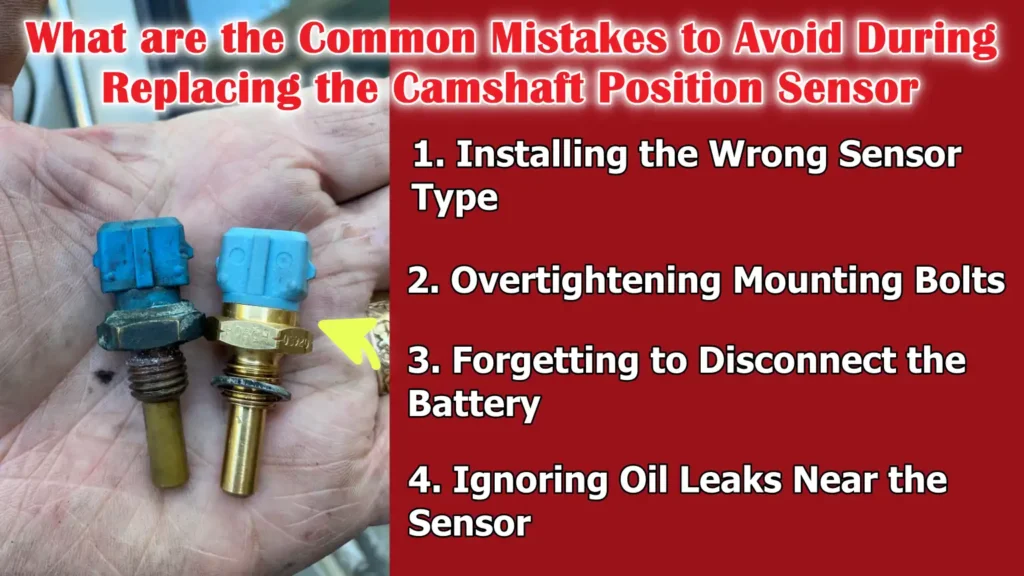
What are the Common Mistakes to Avoid During Replacing the Camshaft Position Sensor
Also, Wikipedia shows that the engine control unit (ECU) that relies on the data from a range of sensors, which includes that the camshaft position sensor and to accurately control fuel injection and ignition timing as well, so this actually highlights how CMP sensors feed is really essential timing information into the engine management system that’s how it ensures smooth and truly efficient combustion.[¹]
1. Installing the Wrong Sensor Type
One of the most common mistakes is installing a camshaft position sensor that doesn’t match the vehicle’s make, model, or engine type.
Even sensors that look identical may have different electrical signals or mounting designs.
Using the wrong sensor can lead to incorrect timing information, trigger a warning light, or prevent the engine from starting.
To ensure proper engine function, always verify compatibility using the vehicle’s specifications.
2. Overtightening Mounting Bolts
Overtightening the mounting bolts can damage the camshaft position sensor or the engine’s threaded mounting holes.
Many engines have aluminum parts that are easily damaged by excessive force.
Cracking the sensor housing or stripping the threads can lead to sensor failure or oil leaks.
Tightening the bolts to the manufacturer’s specified torque protects both the sensor and the engine.
3. Forgetting to Disconnect the Battery
Skipping the step of disconnecting the battery can lead to electrical problems or injury.
Live electrical connections increase the risk of short circuits, which can damage the engine control module or blow fuses.
There’s also a risk of the engine unexpectedly starting while hands are near moving parts.
Disconnecting the battery ensures a safe and controlled repair process.
4. Ignoring Oil Leaks Near the Sensor
Oil leaks near the camshaft position sensor are often overlooked, but they can cause serious problems.
Oil contamination can seep into the sensor connector and disrupt electrical signals.
Over time, this can lead to recurring sensor failures, even after replacement.
Identifying and addressing oil leaks near the sensor ensures long-term reliability and accurate sensor readings.
Read More:
So, How Long Does it Take to Replace a Camshaft Position Sensor?
1. Average Time for Beginners vs Professionals
The time it takes to replace a camshaft position sensor largely depends on experience.
For beginners, this process typically takes between thirty minutes and one hour.
This extra time is spent locating the sensor, understanding the engine layout and carefully following each step.
For professional mechanics, the job is often completed in fifteen to thirty minutes because they are familiar with the sensor’s location and have the necessary tools readily available.
While it may take longer for beginners, it is still considered a relatively quick repair compared to many other engine-related tasks.
2. Factors Affecting Replacement Time
Several factors can influence how long the replacement takes.
The sensor’s location plays a significant role, as sensors that are easily accessible on top of the engine take less time to replace than those hidden behind covers or near the timing system.
The vehicle’s design, engine size and any additional components that need to be removed can also increase the time.
The level of experience, the availability of tools and whether the mounting bolts are tight or corroded all impact the overall time.
Understanding these factors helps set realistic expectations before beginning the repair.
Now, Understand the Cost of Replacing a Camshaft Position Sensor
1. Sensor Price
Compared to other engine parts, the camshaft position sensor is typically inexpensive.
For most vehicles, the sensor price usually falls within a moderate range, depending on the brand, vehicle make and engine type.
Basic aftermarket sensors are less expensive, while Original Equipment Manufacturer (OEM) sensors are often more costly due to their higher quality standards and precise compatibility.
Choosing the correct sensor is crucial, as a low-quality or incorrect part can fail prematurely and lead to further expenses.
2. DIY vs Mechanic Labor Costs
Replacing a camshaft position sensor at home can save a significant amount of money by eliminating labor costs.
A DIY replacement typically only involves the cost of the sensor and basic tools, which many car owners already possess.
When a professional mechanic performs the job, the total cost includes labor charges.
Mechanics charge for their time, expertise and diagnostic work, which increases the final bill.
However, for vehicles with difficult-to-access sensors or complex engine layouts, professional installation may be the better option.
3. Factors Affecting Total Cost
Several factors influence the total cost of replacing a camshaft position sensor.
The vehicle’s design and engine size can increase labor time if the sensor is difficult to access.
The choice between aftermarket and OEM sensors also impacts the cost.
Additional expenses may arise if diagnostic testing is required or if related issues, such as oil leaks or faulty wiring, are discovered during the replacement process.
Understanding these factors helps car owners make informed decisions and avoid unexpected costs.
Conclusion – How Do You Change a Camshaft Position Sensor
So, now its been clear that when engine timing is accurate, only then everything works in the better way from smoother starts to having the better fuel mileage and cleaner emissions as well.
This sensor provides crucial timing information, allowing the engine control module to accurately manage fuel injection, ignition timing and valve operation.
When the sensor fails, engine precision is compromised, leading to rough running, poor fuel efficiency, difficulty starting and the illumination of the check engine light.
And, when you replace a faulty camshaft position sensor restores proper engine timing, improves overall performance and helps prevent damage to expensive engine components such as the catalytic converter and ignition system.
As well as, you can also comment down below for more information related to this guide.
Frequently Asked Questions
Q1. What is a camshaft position sensor and why is it important?
Answer: The camshaft position sensor is an engine component that tells the engine control module the precise position of the camshaft. This information helps the engine determine when to inject fuel and when to fire the spark plugs. Without accurate data from this sensor, the engine cannot run efficiently. A properly functioning camshaft position sensor ensures smooth engine operation, good fuel mileage and reliable starting.
Q2. How do you know if the camshaft position sensor needs to be replaced?
Answer: The camshaft position sensor typically needs to be replaced when symptoms such as a check engine light, rough idling, poor acceleration, difficulty starting, or engine stalling occur. These problems arise because the engine is receiving incorrect timing information. Diagnostic trouble codes stored in the engine computer also help confirm a sensor malfunction. Ignoring these signs can lead to further engine problems.
Q3. Is replacing a camshaft position sensor difficult for beginners?
Answer: Replacing a camshaft position sensor is generally considered an easy to moderate repair, even for beginners. In many vehicles, the sensor is easily accessible and secured by only one or two bolts. With basic tools, proper safety precautions and a clear guide, most car owners can replace it without any advanced mechanical skills. Taking your time and working carefully makes the process much easier.
Q4. How long does it take to replace a camshaft position sensor?
Answer: For beginners, it typically takes thirty minutes to an hour to replace. Professional mechanics can often complete the job in fifteen to thirty minutes. The exact time depends on the sensor’s location, the engine design and the experience level of the person performing the repair. Vehicles where the sensor is easily accessible will take less time.
Q5. Does replacing a camshaft position sensor require special tools?
Answer: Most camshaft position sensors can be replaced with only basic hand tools such as a socket set, ratchet and sometimes a screwdriver. A torque wrench may be needed to properly tighten the sensor bolt. Advanced or expensive tools are typically not required, making this a suitable repair for a do-it-yourself mechanic.
Q6. Should the battery be disconnected before replacing the sensor?
Answer: Yes, disconnecting the negative battery terminal is an essential safety precaution. It prevents electrical shock, protects the engine computer and prevents the engine from accidentally starting during the repair. Disconnecting the battery also helps prevent damage to the electrical connector when removing or installing the sensor.
Q7. What happens if you install the wrong camshaft position sensor?
Answer: Installing the wrong camshaft position sensor can cause the engine warning light to illuminate, poor performance, or prevent the vehicle from starting. Even if the sensor physically fits, it may send incorrect signals to the engine control module. This can lead to timing issues and persistent engine problems. Always use a sensor that matches your vehicle’s make, model and engine type.
Q8. Can you drive with a bad camshaft position sensor?
Answer: Driving with a faulty camshaft position sensor is not recommended. Although the vehicle may still be drivable, it could experience problems such as stalling, reduced power, or increased fuel consumption. Continued driving can also damage other engine parts, such as the catalytic converter. Replacing the sensor promptly helps prevent unsafe driving conditions and costly repairs.
Q9. Will replacing the camshaft position sensor improve engine performance?
Answer: Yes, replacing a faulty camshaft position sensor often results in a noticeable improvement in performance. The engine typically starts more easily, idles more smoothly, accelerates better and runs more efficiently. Fuel mileage may also improve once the engine timing is corrected. These improvements confirm that the sensor was affecting engine performance.
References:
[1] Engine control unit
https://en.wikipedia.org/wiki/Engine_control_unit

Guys, I’m a car audio enthusiast and customization expert and I love clear sound and clean installation. Plus, I have spent years helping people build their dream audio setups. And whenever I’m working on cars, I probably listen to music and thinks about the next big upgrade.