Written By: Don Dodi
Fact Checked By: Kristen Brown
Reviewed By: Diego Rosenberg
Actually a dim or dead interior light are one of the most common car issues that owners have to face all over the world.
As well as, it really plays a big role in safety, comfort and convenience as well, as these lights includes dome lights, map lights, footwell lights, trunk lights and glove box lights as well and they literally help you to see inside the vehicle at night or in the low-light conditions.
And according to the automotive maintenance studies: the average car interior bulb can really last anywhere between the 3,000 to 5,000 hours of use, but they can be burn out much sooner due to the frequent switching on and off, vibration or exposure to extreme temperatures as well.
Plus, the modern cars often use LED bulbs, which actually more energy-efficient up to 80% and they can last over 20,000 hours as well and while older vehicles still rely on the traditional halogen bulbs.
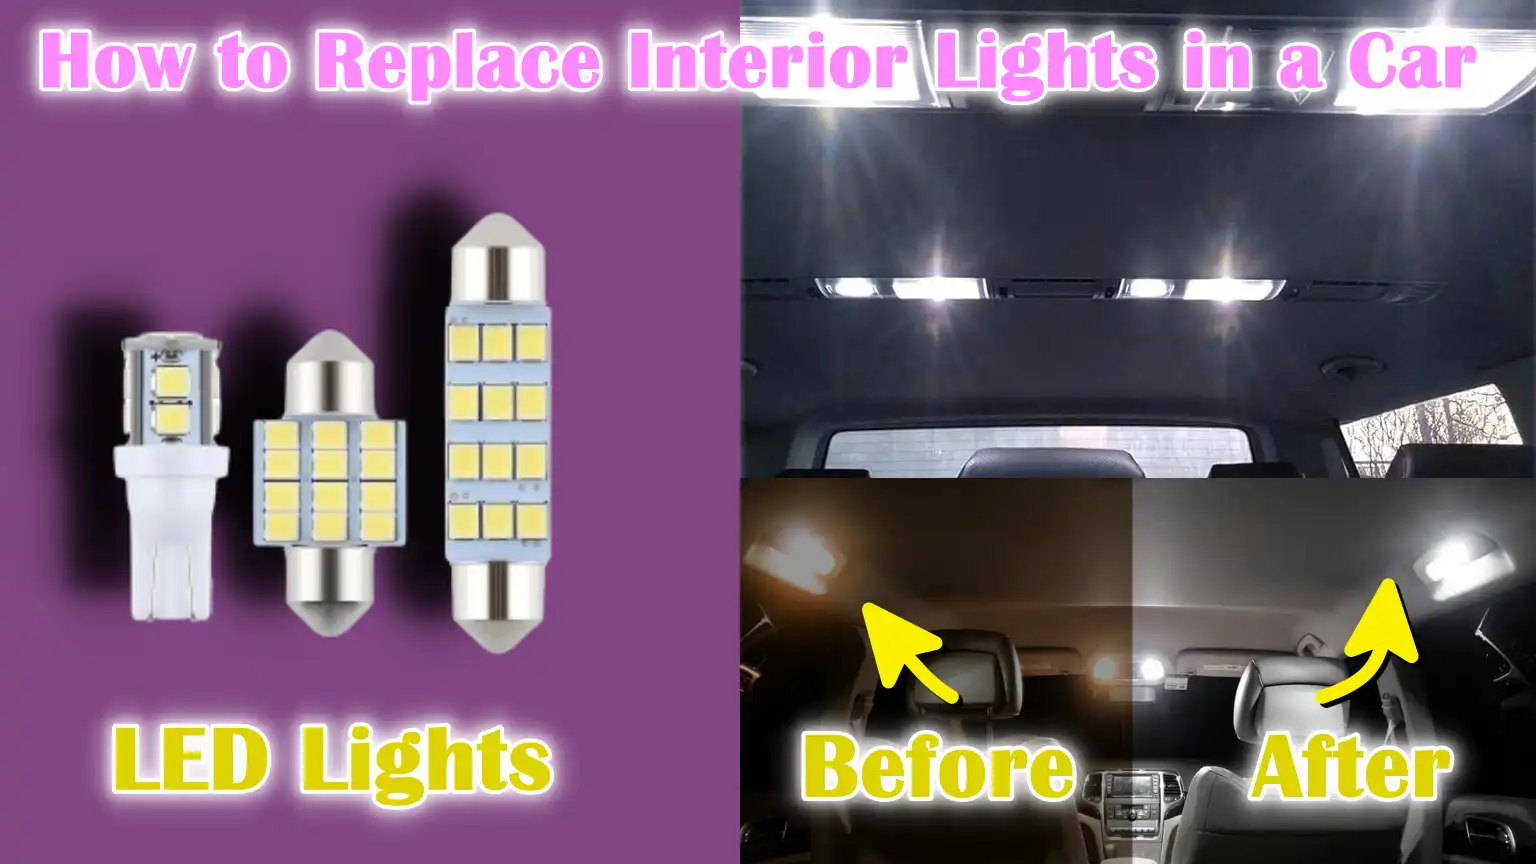
So, you can simply replace the interior lights with the brighter one and this guide tells you all about: How to Replace Interior Lights in a Car so that you can make your cabin safe and well-lit.
Tools
| Item | What It Is | Why You Need It | Extra Tips |
|---|---|---|---|
| Replacement Bulbs (OEM or LED upgrade) | New light bulbs that match your car’s existing bulbs (OEM) or brighter, energy-efficient LED options. | To replace burnt out bulb and restore proper lighting. | Check your car manual for the correct bulb type and size. LED bulbs last longer and give brighter light. |
| Owner’s Manual | The small book that comes with your car that contains important details. | Helps you find bulb locations, type in numbers and access light covers. | If you’ve lost it, you can often download a free version from the car manufacturer’s website. |
| Flathead Screwdriver or Trim Removal Tool | A flat-edged tool or plastic prying tool. | Used to gently open light covers without damaging the car interior. | Trimming tools are safer as they do not scratch plastic or paint. |
| Gloves (Cotton or Latex) | Hand protection when handling bulbs. | Prevents oils from your fingers from getting on the bulbs, which can cause them to burn out faster. | Thin gloves are best so you can easily grip the bulb. |
| Flashlight | A small light source. | Helps you see bulb sockets and wires clearly, specially at night or in dim places. | A headlamp works even better because it keeps your hands free. |
Basic Safety Precautions
1. Turn off the car and remove the keys
Before you start working on the interior lights, it is extremely important to turn off the car completely and remove the keys from the ignition. This step ensures that no electrical current flows through the car’s circuits while you are installing or wiring the lights. Although interior lights operate on low voltage, there is always a slight risk of a short circuit or spark if the power is left on. Turning off the car also reduces the chances of accidentally draining the battery while working.
2. Disconnect the Negative Battery Terminal (Optional but Recommended)
If you want extra safety, you can disconnect the negative battery terminal before touching any electrical part of the car. This step completely cuts off the power supply and eliminates the possibility of a short circuit, accidental spark or shock while working on the light socket. To do this, find the car battery (usually in the engine bay) and use a wrench to loosen the nut on the black negative cable before removing it from the battery post. Although this is an optional step, it is highly recommended for beginners or those unsure about working with car electronics.
3. Let the bulbs cool before touching them.
If you turn on the bulbs right before you start working, they may be very hot. Touching a hot bulb can burn your fingers and even break the bulb.
After turning off the lights, always wait a few minutes for the bulbs to cool completely. If you are in a hurry, you can lightly touch the surrounding area to check the temperature before removing the bulb. This easy step can help you prevent injuries and keep the bulbs safe.
How to Identify the type and location of interior lights
1. Dome light (center of ceiling)
The dome light is the largest and most common interior light in almost every car. It is usually located in the center of the car’s ceiling and is designed to illuminate the entire cabin when the door is opened or turned on manually.
Because it provides general illumination for all passengers, the dome light has a bulb that is slightly brighter than the other interior lights.
Some cars, specially larger SUVs or vans, may have more than one dome light to ensure uniform illumination throughout the vehicle.
2. Map light (front seats)
Map lights are small lights located near the front seats, often next to or along the rear-view mirror.
They are designed to provide focused illumination for the driver and front passenger so they can read maps or see small objects without lighting up the entire cabin.
Unlike dome lights, map lights usually have their own switch and can be turned on without affecting other interior lights. Many modern cars use LED bulbs for map lights because they provide more light without using as much battery power.
3. Footwell lights, glove box and trunk lights
Footwell lights are installed under the dashboard or near the ground to help passengers see where they are stepping, specially in the dark.
Glove box lights are inside the glove compartment and turn on automatically when the compartment is opened, making it easier to find documents or small items.
Trunk lights work in a similar way, but are installed in the cargo area or trunk of a vehicle to ensure visibility when loading or unloading luggage at night.
Although these lights are small, they play an important role in making the car more functional and safer in low light.
4. Reference manual for exact bulb types
Each car model has different sizes and types of bulbs for interior lights, so a reference manual is a must.
It will clearly state the exact location of each light, the type of bulb recommended and instructions on how to use and replace them safely.
If you don’t have a printed manual, most car manufacturers provide a free downloadable version on their official website. Using the right type of bulb not only ensures proper lighting, but also prevents electrical problems and damage to the light housing.
How to Remove the light cover
1. Use a trim removal tool or flathead screwdriver to pry the lens open.
Inspect the light housing carefully and look for a small gap or groove where a tool can fit. Most covers have one or two grooves for opening.
A plastic trim removal tool is best because it is strong but soft enough to protect the surface. If you only have a flathead screwdriver, wrap a layer of cloth or masking tape over the tip to soften the edge. Insert the tool into the groove and pry it up slowly with light, even pressure.
Working along the edge, move it a few millimeters at a time so that the weight is distributed over the clip. Many covers are attached with spring clips or small plastic tabs that open with a slight click.
If the lens won’t budge, stop and check for screws hidden behind a small cap or inside a switch panel, specially on map lights and overhead consoles.
Hot plastic bends more easily, so doing this in a warm place or allowing the lens to warm up a little from cabin heat may reduce the chance of cracking.
Keep one hand underneath the lens as you loosen it so it doesn’t fall on a hard surface.
2. Be careful not to break the plastic or scratch the trim.
Car interior lenses and bezels are made of clear or frosted polycarbonate or acrylic, which can scratch or crack if you apply force.
Apply only gentle pressure and keep the tool as flat as possible to avoid digging into the trim.
Keep the lever close to the clip rather than away from it, as too much pressure can bend the lens and break the tab. If you hear a loud creak or see the lens bending, stop and try another edge.
Protect the surrounding headliner, paint and plastic by placing a thin card or folded tape underneath the tool.
Avoid turning the tool rapidly, as bending concentrates the pressure in one spot. If you feel resistance all the way around, double-check the user manual or parts diagram to confirm the direction the clips open, as some covers slide forward before you can remove them.
Patience and a light hand can prevent damage, keep the lens clean and ensure the lens can be reattached tightly and without rattling.
How to Remove the old bulb
1. Gently pull the old bulb out (some bulbs may twist depending on the type of bulb)
After removing the light cover, the bulb will be visible inside the socket. Bulbs are usually held in place using a push-fit design or a twist-lock base.
If it’s a push-fit bulb, carefully grasp it with your fingers and pull straight out with light, even pressure. Avoid applying too much force as the bulb can easily break.
If the bulb has a twist-lock base, twist it counterclockwise until it comes loose and then pull it out.
It’s best to wear gloves or use a clean cloth when handling the bulb as oil or dirt from your hands can weaken the glass.
If the bulb seems stuck, loosen it by wiggling it slightly rather than pulling it hard. In older cars, heat and age can cause the bulb to become brittle, so be extra careful to avoid breaking the glass.
2. Check for rust or damage in the socket
After removing the bulb, carefully inspect the socket where the bulb is installed. Check for any signs of rust on the metal contacts, which appear as green, white or rust-colored residue.
Rust can interfere with a good electrical connection and cause the new bulb to wear out prematurely. If there is rust, it can be gently cleaned off with a small brush or cotton swab dipped in electrical contact cleaner.
Also check for burn marks, melted plastic or bent contacts on the socket, which indicate electrical problems or overheating.
Correcting these problems before installing a new bulb ensures proper lighting and can prevent future malfunctions. If the socket appears badly damaged or loose, it may need to be replaced or repaired by a professional to keep interior lighting safe and reliable.
How to Install the new bulb
1. Handle the bulb with gloves (oil on fingers can shorten the life of the bulb)
When installing a new bulb, it is very important to handle it with clean gloves or a soft cloth. This will prevent the natural oils from your skin from getting onto the glass surface of the bulb.
Even a small amount of oil can create hot spots as the bulb heats up, which can weaken the glass and shorten its life.
This is specially true for halogen bulbs, as these have much higher temperatures than LED bulbs.
If you accidentally touch the bulb with bare hands, clean it gently with rubbing alcohol and a lint-free cloth before installing it to ensure no residue remains.
2. Insert the LED or standard bulb correctly (ensure proper polarity for LED)
Different types of bulbs require slightly different installation methods. Standard halogen or incandescent bulbs can usually be pushed or twisted into the socket regardless of direction.
However, LED bulbs work on polarity, which means they only light up when they are inserted correctly. If the LED bulb still won’t light up after you insert it, remove it and rotate it 180 degrees and reinsert it into the socket.
Make sure the bulb is firmly seated so it doesn’t come loose while driving on rough roads. Proper connections ensure consistent light and prevent flickering or damage to the bulb.
3. Check the bulb before replacing the cover
Before you reinstall the light cover, it’s best to check the new bulb to make sure it’s working properly.
Put the car’s ignition on accessory mode or open the door if the light is connected to the door switch. If the bulb doesn’t light up, first check that it’s fully seated and, if it’s an LED bulb, reverse the polarity.
Checking the bulb at this time saves time, as you won’t have to remove the cover again later. When the bulb is lit properly, turn it off and let it cool slightly before moving on to the next step, if needed.
This careful approach helps ensure that the new bulb works properly and lasts its full life.
How to Reinstall the light cover
1. Put the lens or cover securely back in place
After you have installed and tested the new bulb, the next step is to reinstall the light cover or lens.
Carefully hold the cover and align it with the opening in the light housing, making sure the edges and clips are in their original positions.
Push the cover in gently but firmly until you hear or feel it click. The clips or tabs should lock securely in place without applying too much force. If the cover does not come on easily, do not force it on, as this can break the tabs or crack the lens. Instead, remove it, realign it and try again.
Some covers, specially those on overhead consoles or map light units, often need to be slightly moved before pressing down, so check how it was removed to ensure proper re-installation.
2. Check for correct alignment
Once the light cover is in place, check it all around to make sure it is level with the surrounding trim.
A misaligned cover can cause a rattling sound while driving or allow dust and moisture to enter, which over time can damage the bulb or electrical contacts.
Press lightly on the edges to ensure all clips are fully seated.
If the cover feels loose or uneven, remove it and reinstall it carefully. Ensuring proper lens alignment not only protects the light assembly, but also spreads cabin light evenly, providing better visibility.
How to Test All Interior lights
1. Turn on each interior light to ensure functionality
After reinstalling the light covers, it’s important to test any interior lights you replaced to make sure they’re working properly.
Put the car’s ignition on accessory mode or open the doors to turn on the interior lights. Test the dome light, map light, footwell light, glove box light and trunk light one by one to make sure they’re all lighting up as expected.
Testing all the lights at this stage saves time because if a light isn’t working properly, you can fix it right away without having to double-check everywhere later.
Proper testing also ensures that the light is evenly spread throughout the interior, improving both visibility and the overall look of the cabin.
2. If an LED bulb does not light, rotate it 180° and reinsert it (polarity problem)
If one or more LED bulbs do not light during the test, chances are high that it is a polarity problem.
Unlike standard halogen or incandescent bulbs, which work in either direction, LED bulbs require the correct alignment of the positive and negative contacts to work.
Simply remove the non-working LED bulb from its socket, rotate it 180 degrees and reinsert it.
This simple adjustment usually fixes the problem immediately. After the bulb is lit, check that it is secure and does not flicker when the car is shaken or a switch is toggled.
Correct polarity and firm seating ensure that your new interior bulbs work reliably and last their full lifespan.
Upgrade to LED – Optional
1. Benefits: More light, less power consumption, longer life
Upgrading to LED interior bulbs makes the cabin look cleaner, brighter and more modern, while also putting less strain on the battery.
A typical old-fashioned incandescent or halogen bulb converts most of its electricity into heat, so often uses 5 to 10 watts of power for a little light.
An LED that gives off the same or even more brightness typically only needs 1 to 3 watts, which means less strain on the electrical system and less chance of weakening the battery if the doors are open for a while. LEDs also last longer.
Many high-quality LED bulbs last thousands of hours with normal use, while conventional bulbs may only last a few thousand hours and wear out more quickly if they are switched on and off frequently or exposed to vibration.
Because LEDs run cooler, plastic lenses and surrounding trim are less likely to yellow or warp over time.
LED lights are more visible and help you find seat belts, switches and objects on the floor more easily, improving comfort and practical safety inside the car.
2. Check compatibility and color temperature before you buy.
Before you buy LED bulbs, make sure they exactly match the size and original style used in your car so they fit snugly in the socket and make good contact. The correct type number will be given in the owner’s manual or parts guide.
Some newer cars use a bulb check or CAN bus system that checks for a certain power consumption; in these cars you may need “error-free” LEDs with built-in resistors so you don’t see warning messages or flicker.
Also choose the color temperature based on your preferences and driving needs. Warm white of around 3000K looks warm and close to the light from the old bulbs, neutral white of around 4000K looks balanced and natural and cool white of around 6000K looks clean and modern, but may be harsh to some at night.
Choose LEDs from a trusted brand with clear specifications for voltage range and heat management so they work well with the car’s dimmer circuit and don’t overheat in tight housings.
A small test before closing the lens helps confirm correct polarity and stable light and a good warranty gives added assurance that the upgrade will last a long time.
Read More:
How To Solve Any Problem After Installing Interior Lights

1. Check the fuses (see fuse box diagram)
If the lights still don’t work, first check the fuses protecting the interior lighting circuits.
Most cars have one or more fuse boxes under the dashboard, behind a small panel at the end of the dashboard, inside the glove box or in the engine bay.
Open your owner’s manual and look for a fuse map that lists the exact location and name of the fuses for the dome light, courtesy light or interior lamp.
Pull the fuse with a small plastic puller or needle-nose pliers and look through the transparent body; fuses with a good blade have an unbroken metal strip, while a melted or broken strip will be visible when the fuse is blown.
Use only fuses with the same amperage rating to avoid wire damage or a fire hazard. If the new fuse blows right away, a short circuit, crushed wire, or the wrong bulb may be drawing too much current and you should stop and diagnose the fault before trying again.
2. Check for a problem with the wiring or switches
If the fuse is okay, look at the switches and wiring that control the lights. Many cars have multiple controls for the same lamp: a door switch in each door frame, a master dome switch on the light and a dimmer or “interior light” wheel near the headlight switch that can turn off the cabin lights completely.
Make sure the dimmer is not set to the “Off” position and that the lights are not turned off in the vehicle settings menu in newer models.
Press each door switch gently and see if the door-open symbol or courtesy light comes on; a stuck or corroded door switch may prevent the lights from coming on.
Look carefully at the lamp socket and harness for loose plugs, bent or pitted metal contacts, brittle insulation, green or white corrosion, or discoloration from heat.
If you have a simple test light or multimeter, make sure power is reaching one side of the socket and that the ground path is solid; a bad ground is a common cause for lights to flicker or stay off.
In cars with bulb-check systems or CAN bus monitoring, LEDs without a built-in resistor may flicker or give warning messages; choosing an “error-free” LED often solves this problem without additional wiring.
3. Double-check bulb seating and polarity
Even if the correct bulb is not seated correctly, it will not shine. Remove the bulb and check the shape of the socket to understand how to fit it.
For wedge bulbs such as the T10, make sure the two metal blades of the bulb touch the two spring contacts in the holder.
For festoon bulbs (tube styles with metal caps on both ends), make sure both ends are pressed firmly into their spring clips so the caps make clean contact with the metal pads.
LEDs are direction-sensitive, so if an LED doesn’t light, rotate it 180 degrees and put it back in to reverse the polarity. Wipe away any fingerprints on the glass or lens portion with alcohol and a lint-free cloth. Put the bulb back in until it feels secure and doesn’t move.
Double-check the light with the door open and the manual switch on and remember that some cars have a dim or delayed light, so give it a few seconds to come on.
Correct seating, correct polarity and clean contacts solve most no-light problems immediately and help the new bulb live its full life.
Read More:
Conclusion – How to Replace Interior Lights in a Car
It is really surprising that how just a small interior lights can make such a huge difference in your car’s comfort, safety and visibility.
And by carefully following each step—such as turning off the car, handling bulbs correctly, checking them before closing the cover and basic troubleshooting—you ensure that your car’s interior lighting stays bright, reliable and safe.
Well-functioning lights not only provide convenience, but also play an important role in overall driving safety.
For example, clearly lit controls, seats and footwells reduce the likelihood of accidents when entering or exiting the car in the dark.
Upgrading to modern LED bulbs can increase these benefits even further as they provide brighter light, use up to 80% less battery power and last up to ten times longer than traditional halogen bulbs.
Taking the time to check sockets, replace worn-out bulbs and upgrade when needed also reduces unnecessary strain on your car’s electrical system.
Many people underestimate the impact of small components such as interior lights, yet they provide great driving comfort at night and can also increase the perceived value of your car.
With this simple task, you save time and money as well as get the satisfaction of improving your vehicle with your own hands.
As well as, the U.S. Department of Energy explains that LED life is defined by the lumen depreciation which is L70: so when output falls to the 70% of the initial plus system reliability of the drivers and thermal design: not the sudden filament breakage.[¹]
That’s it from this guide and now comment box are open to accept your questions.
Frequently Asked Questions
Q1: Can you replace car lights yourself?
Answer: Yes, you can replace car lights yourself and it is often easier than many people think. Most interior car lights, such as dome lights, map lights, glove box lights and trunk lights, are designed to be accessible so owners can change them without special tools. In most cases, you only need basic items like a flathead screwdriver or trim removal tool, gloves and the correct replacement bulb. The process usually involves carefully removing the light cover, taking out the old bulb, checking the socket for any corrosion or damage and then installing the new bulb. Even if you choose to upgrade to LED bulbs, the installation steps are very similar, though you need to ensure they are compatible with your car and installed in the correct direction for proper polarity. Many car owners prefer to do this task themselves because it saves time and money and it is also a good way to learn more about how your vehicle works. As long as you follow simple safety steps, like turning off the car and letting the bulbs cool down, replacing car lights yourself is a safe and straightforward task.
Q2: Is it against the law to drive with your interior car lights on?
Answer: Driving with your interior car lights on is not illegal in most places, but it is often discouraged because it can be distracting and reduce visibility while driving at night. When the interior lights are on, the bright light inside the cabin can reflect off the windows and windshield, making it harder to see outside, specially in low-light conditions. This can create glare and increase the risk of accidents. In some regions or states, police officers may stop you if they believe the interior light is affecting your ability to drive safely. While you might not receive a fine in most cases, they could ask you to switch the light off. Some areas have specific traffic rules about the use of lights in a vehicle, so it is always a good idea to check your local laws. The safest option is to keep the interior lights off while driving and only use them when the car is stopped, as this reduces distractions and keeps your focus on the road.
References:
[1] U.S. DOE — Lifetime and Reliability
https://www1.eere.energy.gov/buildings/publications/pdfs/ssl/life-reliability_fact-sheet.pdf

Guys, I’m a car audio enthusiast and customization expert and I love clear sound and clean installation. Plus, I have spent years helping people build their dream audio setups. And whenever I’m working on cars, I probably listen to music and thinks about the next big upgrade.