Written By: Don Dodi
Fact Checked By: Kristen Brown
Reviewed By: Diego Rosenberg
There are lot of noise that can breach the your silence zone in the car and that’s where you need to soundproof it directly to the root cause.
As there’s road noise, engine sounds, wind and vibrations are available that can easily enter your vehicle’s through the various parts such as: doors, floor, roof and wheel wells also.
And according to the studies by the NHTSA, the high noise levels inside a car can actually increase the fatigue of driver and that lead to the reduced concentration and even it affects your hearing capability over the long period as well.
This is the main reason that you need to make your car soundproof as it also affect your hearing over the long period along with your comfort.
Now-a-days, many new cars actually comes with the build in basic sound insulation, but they often loose their capability over the louder environments such as: highways or heavy traffic.
So, you actually need to add some right sound-deadening materials so that you can effectively reduce the unwanted noise outside the vehicle.
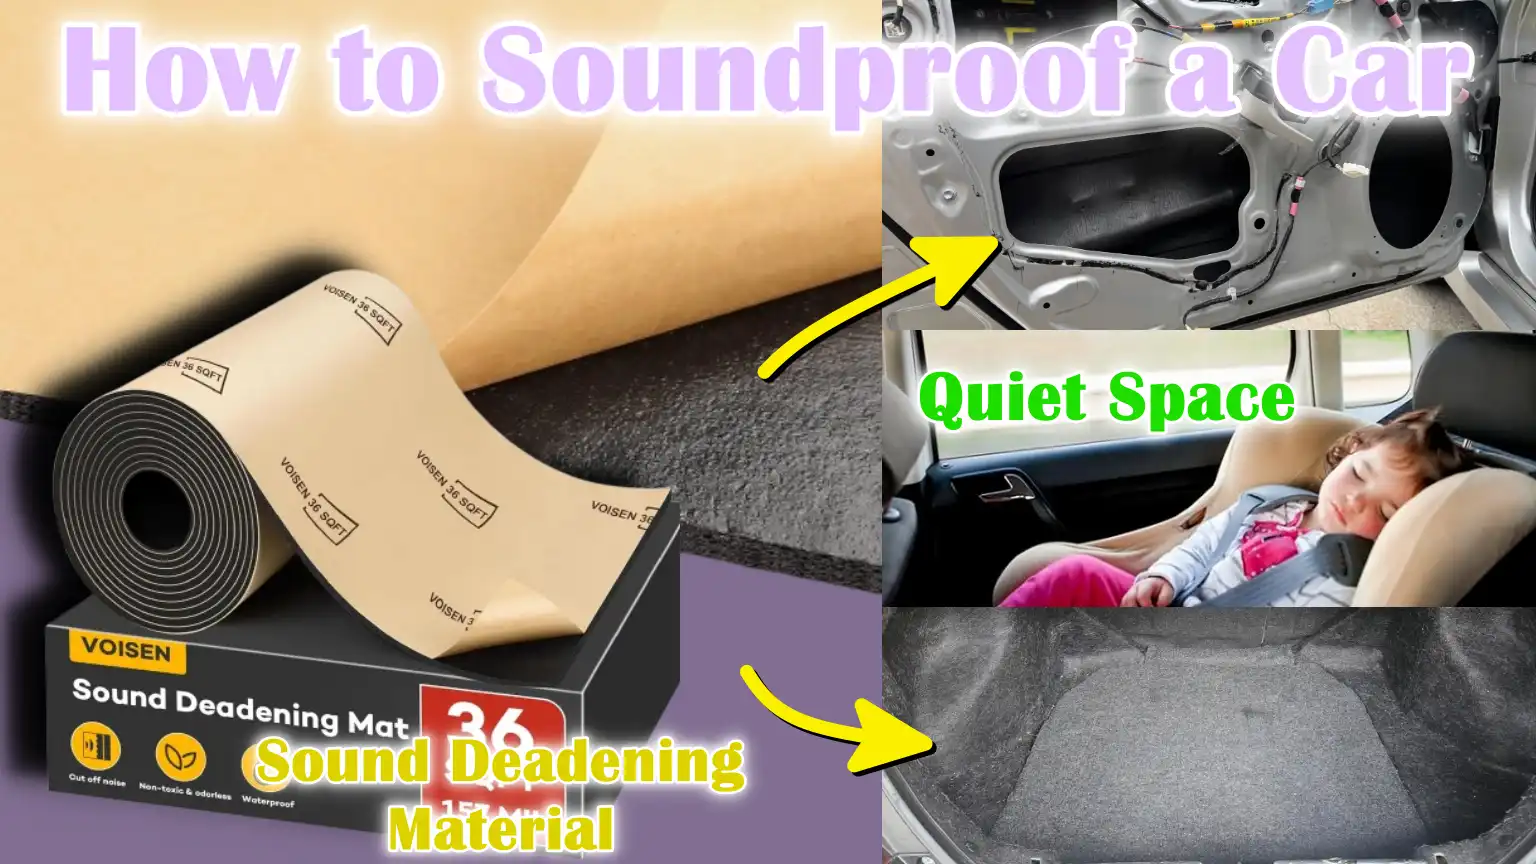
Now, it is the guide which shows How to Soundproof a Car, so that you can have the right materials and the best technique that actually works.
Now, Let’s Understand About Vehicle Noise
To effectively soundproof a car, it is important to first understand where this unwanted noise actually comes from. Vehicle noise is not random—it has specific causes and enters your car from predetermined locations. Knowing these things can help you apply the right soundproofing materials in the right places and avoid wasting time or money. Car noise is usually classified into different types based on the way it propagates and it can enter your cabin from many parts of the vehicle. Let’s understand this clearly.
1. Types of Noise
Airborne noise is sound that propagates through the air and easily enters your car through cracks or thin surfaces.
Examples of airborne noise include the whistling of wind passing through windows, traffic outside the car, loud engines of nearby vehicles and honking horns.
These sounds are specially noticeable when driving at high speeds or in busy urban areas. Airborne noise can be a big problem if your car has bad door or window seals.
Structure-borne noise is the deep sound that travels through the solid parts of your vehicle, such as the frame, body panels and suspension.
It includes vibrations from your engine, the sound of tires spinning on the road or the sound of hitting a pothole.
These noises don’t just travel through the air—they vibrate inside the car, too. You can hear and feel them. They’re specially noticeable in older cars or vehicles with stiff suspensions.
Interior noise comes from inside your car and is usually caused by loose panels, rattling parts or poor interior design.
Sometimes, the sound system itself produces feedback or low-quality noise. Things like loose coins in a cup holder or a glovebox rattling can also cause annoying noises on long drives. This type of noise is often overlooked, but fixing it can greatly improve the comfort in your cabin.
2. Noise entry points into the car
Doors are one of the biggest noise entry points in most vehicles. Thin metal panels, weak insulation and poorly sealed windows allow wind and structural noise to easily enter.
Unless soundproofing is applied to the inside of the door panels, this is where most of the external noise will enter the cabin.
The floor of your car is raised slightly above the road surface, making vibrations and tire noise the main sources of noise.
As the tires spin and the suspension moves, the vibrations travel through the underbody to the floor. Most cars have simple carpet padding, but this is not enough to block out low-frequency road rumble or engine vibrations.
The roof of a car can also be a weak spot for noise protection.
It is a wide, flat surface with very little natural insulation. Rain, high wind pressure and even sunlight reflecting off metal can cause noise to seep in from above. Soundproofing the roof with special materials can significantly reduce wind and weather noise.
The trunk is often overlooked, but it is a significant source of noise, specially in hatchbacks, SUVs and sedans with thin rear panels.
If not properly insulated, road noise, exhaust vibrations and even rear suspension noise can easily travel through the trunk into the passenger cabin.
Wheel wells are located above the tires and are constantly exposed to road debris, water and vibration. Road contact and gravel impact in these areas can be very noisy.
Without proper treatment, the constant rumbling of wheels can be clearly heard in the cabin, specially in cars with thin fender liners.
The firewall and engine bay are important because they separate the engine from the cabin. The firewall is designed to block heat and noise, but in most non-luxury cars, the insulation is limited.
Engine noise, fan noise and vibrations can reach directly to the dashboard area. Applying heat-insulating soundproofing material to the firewall can reduce this type of noise to a great extent.
Tools
| Item | What It Is | What It Does | Why You Need It |
|---|---|---|---|
| Sound deadening mats (Dynamat, Noico, Kilmat) | Thin, sticky sheets made from materials such as butyl rubber or asphalt. | Absorbs vibration and stops noise traveling through metal panels. | Reduces road noise, engine sound and vibration; perfect for doors, floors and trunk. |
| Acoustic foam or closed-cell foam | Soft, flexible foam with tiny air pockets. | Absorbs sound waves inside the car and adds another layer of insulation. | Helps reduce echoes and loud noises inside the cabin. |
| Sound barrier sheets (MLV) | Mass loaded vinyl – a dense, flexible sheet. | Blocks airborne noise by acting as a thick wall between the noise and the cabin. | Very effective at blocking out traffic noise and outside sounds; best used under carpets and on walls. |
| Spray or brush-on sound deadeners | A thick liquid coating (usually rubber-based) that dries to a solid state. | Coating surfaces to dampen vibrations and create a quieter structure. | Great for hard to reach places like wheel wells, under the car, or inside doors. |
| Roller tool | Small hand tool with one wheel. | Helps press soundproofing mats firmly to metal surfaces. | This ensures that the material sticks well for long-term noise reduction. |
| Utility knife | A sharp cutting tool. | Used to cut mats and foam to the correct size. | Makes it easy to shape material to fit door panels, floor curves and small areas. |
| Cleaning materials | Degreaser, cloth, or alcohol wipes. | Used to clean metal surfaces before applying soundproofing. | Ensures strong adhesion and prevents subsequent peeling or bubble formation. |
| Gloves | Protective hand gear. | Protects your hands from sharp edges, tools and sticky materials. | Keeps you safe when cutting or pressing ingredients. |
| Screwdriver set | Multi-headed tool for turning screws. | Used for removing and reinstalling panels, seats and trim. | Essential for disassembling car interiors without damaging them. |
| Panel removal tools | Plastic or metal tools designed to open panels. | Helps remove car interior panels without breaking clips or scratching surfaces. | Keeps your car neat and clean and prevents permanent damage when dismantling. |
How to Soundproof a Car – Truly Step-By-Step Guide
The process of soundproofing a car is complex, but if done correctly, it can make a huge difference in driving comfort.
It not only reduces external noise, but also helps you enjoy music better and creates a more peaceful atmosphere in the cabin.
Each area of the car allows sound to enter or transmit differently, so the process involves treating several areas with the right material.
Below is a step-by-step guide on how to soundproof your car, starting with preparation and moving on to each major part of the vehicle.
1. Preparation
The first step before applying any soundproofing material is to properly prepare the car’s interior. Start by cleaning and vacuuming all interior surfaces.
This removes dirt, dust and loose debris that can prevent the material from sticking well. A clean metal surface is essential for good adhesion.
After cleaning, remove major interior components such as seats, floor carpets and plastic panels.
These parts should be removed carefully so that the surface underneath is exposed and ready for treatment.
During this process, check for any signs of rust, holes or damage on the exposed metal parts. If rust is present, it should be cleaned and treated immediately to avoid long-term structural problems.
Any cracks or holes should be sealed before beginning the actual soundproofing process.
2. Doors
Doors are one of the biggest ways for road noise to enter your car, specially with thin metal and window parts.
To soundproof doors, first remove the inner door panels using a screwdriver or panel removal tool. When the inner part of the door is open, apply soundproofing mats directly to the metal door skin. These mats should cover as much surface area as possible for the best effect.
After that, apply closed-cell foam to the metal parts or to the inner side of the plastic panel. This helps reduce resonating and airborne sound inside the door cavity.
When complete, reinstall the door trim and make sure everything fits tightly and there are no loose parts. Proper sealing ensures maximum sound control and prevents rattling in the future.
3. Flooring and Cabin Floorpan
The floor of the car is directly connected to the tires and the road below, making it a major source of road noise and vibration.
After removing the carpet, begin laying soundproofing mats directly on the exposed metal floor. Roll these mats firmly so they adhere well to the surface.
The more coverage you can achieve, the better the results. After the mats are in place, apply a layer of mass loaded vinyl (MLV) or foam barrier on top to block out airborne noise. This dual-layer approach effectively blocks both vibration and noise.
After installation is complete, reinstall the original carpet and bolt the seats back into place. This creates a thick soundproofing base that dramatically reduces road noise inside the cabin.
4. Roof
The roof is a commonly overlooked source of wind noise, specially at high speeds. Start by carefully removing the headliner without damaging the fabric or plastic mounts.
Once the roof is exposed, apply sound deadening material to the entire metal surface. This helps reduce both the sound of rain coming from outside and noise from wind resistance.
Be sure to use lightweight but effective materials, as excess weight can cause the headliner to warp.
After applying the sound deadening layer, carefully reinstall the headliner, making sure it fits well and looks clean. When done correctly, this step can significantly reduce overhead noise and make conversations clearer while driving.
5. Trunk area
The trunk is another major entry point for road noise, specially if your vehicle has a subwoofer, thin trunk panels or any open connections to the back seat.
To soundproof this area, apply sound deadening mats to the trunk floor, side panels and inner wheel arch areas.
Use thicker materials here, as the trunk area often faces low-frequency vibrations from the exhaust and the road.
For better sound control, apply a layer of MLV to the treated surface. Also, apply insulation, often a thin metal layer, to the underside of the trunk lid. When soundproofed, the trunk will produce less echoes and external noise in the main cabin.
6. Firewall and engine bay
The firewall separates the engine bay from the cabin and is a major barrier between the driver and engine noise. Most cars have very basic insulation here, so improvements are a must.
On the cabin side, install insulation pads or sturdy sound deadening mats under the hood. These help block out low and high noises coming from the engine.
For even better protection, install heat insulation material designed to withstand the heat from the engine. It’s also important to seal any holes, wire entrances or open grommets in the firewall with acoustic sealant or tape.
These small gaps can let a lot of noise into the car.
7. Wheel wells and fenders
Wheel wells are right above the tires, so they can handle constant vibration, impacts from road debris and water noise.
To treat this area, spray a rubberized undercoating inside the wheel arch. This creates a thick, flexible layer that absorbs sound and protects against corrosion.
For more effective soundproofing, you can also install soundproofing liners on the inner wall of the fenders facing the cabin.
These liners help prevent vibrations from the suspension from reaching the passenger space. When both the outer and inner sides are treated, wheel noise and road texture noise are significantly reduced.
Additional Tips for Maximum Effectiveness
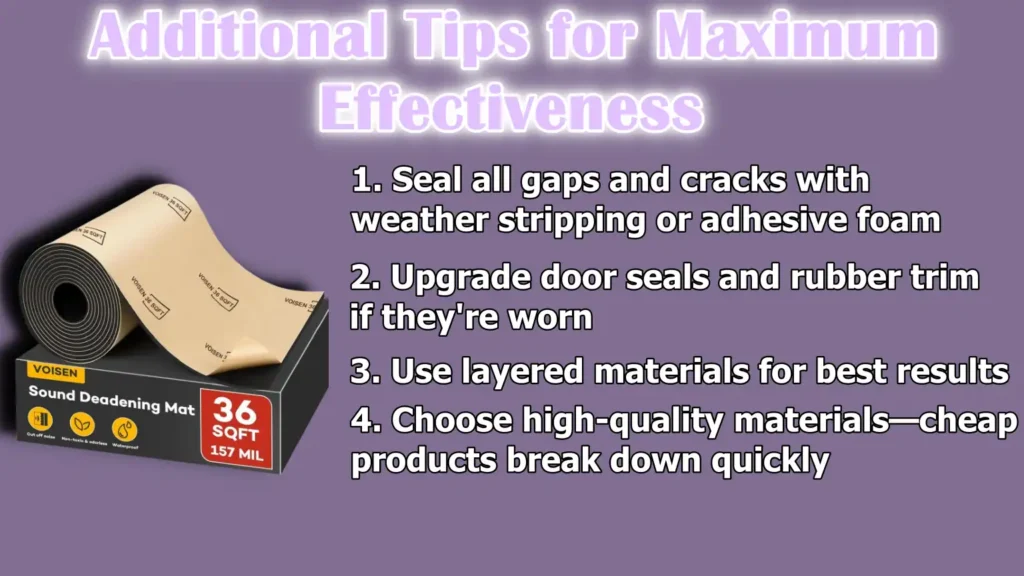
Your car’s soundproofing capabilities become even more effective when you pay attention to the little details that are often overlooked.
These final steps can significantly improve results and give you a quieter and more enjoyable driving experience overall.
Even the best materials will not perform as expected if gaps, poor seals, or shortcuts are not taken care of.
Below are several essential techniques to maximize the effectiveness of your soundproofing project.
1. Seal all gaps and cracks with weather stripping or adhesive foam
Even after insulation is installed, one of the biggest reasons unwanted noise can enter the car is small gaps and cracks.
These small spaces can be found in doors, window frames, the trunk, or even underneath the dashboard.
Airborne noise can easily enter through these paths, specially when driving at high speeds. By using weather stripping or self-adhesive foam tape, you can effectively block these entry points.
These materials are easy to install, flexible and create an airtight seal that blocks wind noise and reduces temperature changes inside the cabin.
Sealing gaps also improves the performance of your car’s air conditioning and heating systems, as it makes the interior more resistant to the weather.
2. Upgrade door seals and rubber trim if they’re worn
Over time, the rubber seals on your car’s doors, trunk and windows can dry out, crack, or become compressed.
When this happens, they can no longer block outside air and noise properly. Replacing these worn seals with new, high-quality rubber trim can make a big difference in noise control.
New seals seal the space between the door and frame more tightly, reducing both wind and road noise. In fact, many car owners who replace their old door seals report a significant reduction in cabin noise even without installing any other soundproofing material.
This is a cost-effective solution that increases long-term value and comfort.
3. Use layered materials for best results
A single material is rarely enough to block all types of noise. Different materials are good at blocking different types of sound.
For example, rubber mats absorb vibrations, foam reduces resonance and vinyl sheets block wind noise. Therefore, applying a combination of soundproofing mats, foam sheets and sound blockers in layers will give the best results. Each layer deals with different sound frequencies.
This method is used in high-end vehicles and professional soundproofing installations because it provides a more complete and balanced solution.
Plus, studies also confirm that when you apply proper damping pads and foam insulation that can literally lower the interior noise by 5 to 20 dB. As that also reduction makes conversations easier, audio more clearer and long drives far less tiring than ever.[¹]
The key is to apply in layers without adding too much weight, as this can interfere with putting panels or seats back into place.
4. Choose high-quality materials—cheap products break down quickly
It may be tempting to choose cost-effective materials to save money, but in the long run, cheap soundproofing products often lead to disappointment.
Low-priced mats may lose their adhesive strength over time, break down in heat, or fail to absorb sound effectively.
Some mats may also produce odors or melt in the heat, specially when used near an engine or under a roof.
On the other hand, high-quality materials are resistant to temperature changes, vibration and long-term wear.
Reputable brands have been tested in both professional and DIY situations and their performance is proven.
Spending a little more upfront on quality materials will not only yield better results, but they will also last for many years without needing repairs or replacement.
Read More:
What are The Common mistakes to avoid
Although soundproofing a car can significantly improve your driving experience, some common mistakes can reduce the effectiveness of the job or create new problems.
Avoiding these mistakes is just as important as choosing the right materials.
By understanding what often goes wrong, you can plan better, get better value for your investment and avoid having to redo the job later.
1. Skipping key areas like the trunk or roof
Many people focus only on soundproofing the doors and floor, assuming that’s where the noise only comes from.
Although these are the major sources of noise, skipping other key areas like the trunk and roof can reduce the overall effectiveness of the project.
The trunk often allows low-frequency road and exhaust sounds to enter the cabin, specially in hatchbacks and sedans that have the rear seats folded down.
The roof is another weak point, specially when driving at high speeds, where wind noise becomes more noticeable.
If these two areas are not taken care of, they can let in a surprising amount of noise. Soundproofing all major surfaces ensures a more balanced and complete reduction in noise throughout the cabin.
2. Using substandard adhesive or failing to clean surfaces first
One of the most common reasons for soundproofing jobs to fail is poor adhesion. If the surface underneath the mat or foam is dusty, oily, or uneven, the soundproofing material will not adhere properly.
Over time, the material can peel, shift out of place, or create air gaps that allow noise to seep back in.
It is also a mistake to use cheap adhesive sprays or inferior mats that lose their stickiness due to heat or vibration.
Cleaning the surface thoroughly with an alcohol-based cleaner and using high-quality adhesive products will keep the material in place for years.
A strong bond between the material and the metal surface is essential for long-term durability and effective sound control.
3. Excess material on panels can cause loosening or fitting problems
Although using multiple layers of soundproofing material can improve results, adding too much thickness in one area can cause problems.
Too much thickness on panels, specially on the ceiling or inside doors, can make it difficult to reinstall trim or cause parts to bulge or come loose over time.
In the case of headliners, adding too much weight can cause the material to loosen and bend, specially in hot weather.
In doors, excess material can interfere with window movement or door handle function. The best approach is to use thin, high-performance materials and install them thoughtfully.
Always test-fit panels before final installation to make sure they close and seal properly.
4. Not allowing ventilation for engine bay insulation
When soundproofing around the firewall or engine bay, it’s important to remember that these areas generate a lot of heat.
Some people make the mistake of completely sealing these areas with thick heat-absorbent materials, which can affect engine performance and reduce ventilation. It is also dangerous to use flammable or heat-resistant materials near the engine.
Proper insulation in this area should allow air to flow freely and use products suitable for high temperatures.
Engine bay insulation should reduce noise and keep the engine operating cool and safely. Ignoring ventilation can cause excessive heat problems or damage the insulation.
Estimated Cost and Time
Before starting a car soundproofing project, it is important to understand the potential cost and time.
These costs depend on the size of the vehicle, the number of areas to be treated, the quality of the materials you choose and whether you will do it yourself or hire a professional.
Planning in advance with this information helps you avoid unexpected events, stay on budget and have realistic expectations.
1. DIY Cost Range: $150 – $600
If you choose to soundproof your car yourself, the total cost can range from about $150 to $600.
The price depends mainly on how many parts of the car you want to insulate and what quality of materials you use.
Basic soundproofing mats for the doors and floor of a small car can cost from $150 to $200. If you use more advanced materials like mass-loaded vinyl or heat-resistant products for the engine bay and if you treat areas like the roof and trunk, the price can reach $600 or more.
DIY is often more economical because you only pay for products, not labor. However, it does require time, patience and basic tools.
For those who love car projects and want to save money, this is a smart option.
2. Professional installation: $500 – $2,000
Hiring a professional to soundproof your car can cost anywhere from $500 to $2,000, depending on the size of the vehicle and the amount of work involved.
For example, a basic treatment of the doors and floor of a small car can cost around $500 to $800.
On the other hand, a service to completely soundproof the doors, floor, roof, trunk, firewall and wheel wells with high-end materials can easily cost $2,000 or more.
The advantage of going to a professional installer is that they have the right tools, experience and techniques to ensure everything is installed correctly and efficiently.
This also saves you the physical effort and reduces the chances of mistakes that can occur in DIY work. This option is ideal for those who want great results without the hassle.
3. Time required: 1-2 days depending on the depth of installation
The time required for a complete soundproofing job depends on how much of the car you plan to cover.
A basic DIY project, such as installing soundproofing mats on the floor and doors, can take anywhere from a full day to a weekend, depending on your speed and level of experience. Installing the roof, trunk, firewall and wheel wells can take up to two days.
If you’re working alone and keeping track of time, it can take up to 16 hours of work over two days. Professional installations typically take a full day for standard coverage and up to two days for more advanced, whole-vehicle treatments.
Whether you do it yourself or hire a service, soundproofing work isn’t a five-minute job—it requires careful removal and reassembly of interior parts, cleaning, measuring, cutting and precise placement of materials to achieve the best results.
Conclusion – How to Soundproof a Car
So the best part of soundproofing is not just about hearing less: but you will start notice more your favorite songs, you can have now more relaxed conversations and more peace of mind as well.
Whether you commute in city traffic every day or enjoy long highway drives, reducing the noise inside your vehicle can greatly improve your experience.
Studies show that excessive noise inside the cabin leads to driver fatigue, stress and decreased concentration over time.
By taking the time to insulate areas like doors, floors, ceiling, trunk, firewall and wheel wells, you not only create a quieter space, but also improve the performance of your audio system and make conversation easier on the road.
This process may seem complicated at first, but with the right knowledge, tools and materials, even a first-time homeworker can achieve professional-level results.
The key is careful preparation, using the right materials—such as soundproofing mats, acoustic foam and mass-loaded vinyl—and not skipping critical areas like the roof or trunk.
Avoiding common mistakes like poor cleaning of surfaces or overloading panels will help ensure long-term durability and sound insulation.
Whether you do it yourself or hire a professional, the result will be a more refined driving experience – where engine noise disappears, road sounds are silenced and you’re surrounded by the peaceful interior your car was built to provide.
So, now you can comment down below your thoughts about this guide.
Frequently Asked Questions
Q1. Can you block road noise?
Answer: Yes, you can block road noise from your car, although it is important to understand that no method can silence it completely. However, with the right soundproofing measures, you can reduce road noise by 50 to 70 percent, depending on how well you maintain your car and the type of materials you use. Road noise mainly enters your car through the doors, floor, trunk, wheel wells and even the roof. These places allow sound and vibration to enter the cabin through the metal panels. To block this noise, you need to install soundproof mats, foam insulation and sound barriers that absorb vibrations and block sound waves. For example, products like Dynamat, Noico and Mass Loaded Vinyl are very effective in reducing road noise. Applying layers of these materials to the floor, inside doors and trunk area can significantly reduce the sound of tires and pavement rumble while driving. Also, replacing or sealing worn door gaskets and weatherstripping helps fill small gaps that allow wind noise and sound to seep in. So, even if you can’t block out every sound, with the proper soundproofing techniques you can make your car quieter and more comfortable to drive every day.
Q2. How much soundproofing material do I need for a car?
Answer: How much soundproofing material you’ll need depends on the size of your car and how many areas you plan to apply soundproofing material to. On average, for a standard sedan or compact car, you’ll need about 50 to 100 square feet of soundproofing mats or sheets to completely cover the floor, doors, trunk and roof. If you’re only repairing doors and floors, you may need about 25 to 50 square feet of space. For larger vehicles, such as SUVs or trucks, you may need 100 to 150 square feet or more. Each part of the car requires a different amount of material. The floor usually requires the most space because it has the largest surface area and is closest to the road where most vibrations come from. Doors usually require about 10 to 15 square feet of space, depending on their size. The roof and trunk may each need about 15 to 25 square feet of space and wheel wells and firewalls require smaller, targeted amounts. It’s a good idea to buy a little more than you need, specially if you plan to apply layers of material or make custom cuts for curved surfaces. If you’re on a budget, you can also soundproof your car in stages—first starting with the floor and doors, then the trunk, roof and engine bay. That way, you can spread the cost and still get good noise reduction.
References:
[1] Wikipedia. Soundproofing
https://en.wikipedia.org/wiki/Soundproofing

Guys, I’m a car audio enthusiast and customization expert and I love clear sound and clean installation. Plus, I have spent years helping people build their dream audio setups. And whenever I’m working on cars, I probably listen to music and thinks about the next big upgrade.