Written By: Don Dodi
Fact Checked By: Kristen Brown
Reviewed By: Diego Rosenberg
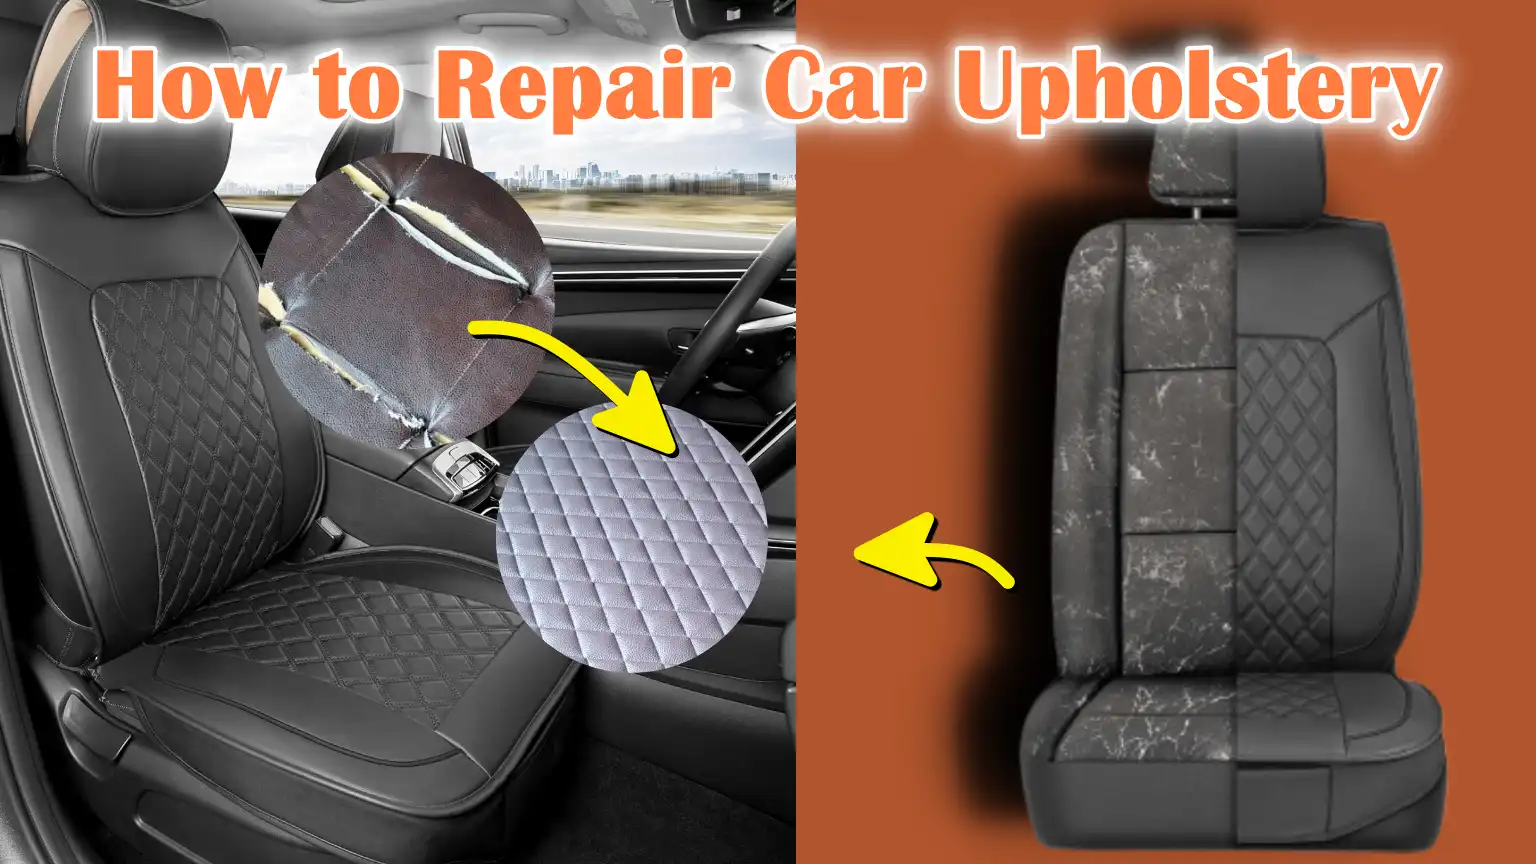
In the single line: The car upholstery is just like a skin: it actually needs care, repair and protection to stay healthy.
Which is why, you should not think as it just damages the interior look, but it does affects comfort, protection and style of course.
And it is the truth that over the period of time, with the exposure to the sunlight, heat, spills, friction and everyday wear can easily cause some tears, stains, fading or sagging in your seats and in that way your car interior look older than it possibly is.
Not only this, according to the automotive maintenance reports, the interior damage is actually one of the top three factors that lowers a vehicle’s resale value drastically and sometimes by hundreds or even thousands of dollars as well.
So, the materials like fabric, leather, vinyl and microfiber each of these do requires a different kind of care and even a small repair if done incorrectly then it can lead to the bigger one, that can be costlier problems later on.
But as always good news is: by this guide you’ll know How to Repair Car Upholstery, so that you can learn from right tools, knowledge and techniques and from small tears to foam replacement: actually you can fix at home without needing a costly full re-upholstery service.
Identify the type of upholstery
Understanding what type of material your car seats are made of is the first and most important step in repairing them.
Different upholstery materials have different textures, strengths, weaknesses and repair needs.
Using the wrong repair method or products can make the damage worse instead of fixing it.
By correctly identifying your upholstery type, you can choose the right tools, adhesives, cleaners and techniques to ensure that the repair blends seamlessly with the original look and lasts for years.
1. Fabric upholstery
Fabric seats are the most common in everyday cars because they are affordable, comfortable and available in many colors and designs.
They are usually made of materials like polyester or nylon, which don’t discolor but can be prone to staining, tearing and absorbing odors.
Fabric is breathable and doesn’t get as hot in the sun as leather or vinyl, but dirt can stay embedded deep in its fibers.
Fabric repairs usually involve sewing, patching or the use of special fabric adhesives.
It’s important to know the weave and thickness of the fabric, as using mismatched materials can result in a repair that looks mismatched rather than matching.
2. Leather Upholstery
Leather seats are known for their luxurious look, smooth texture and long-lasting durability.
They’re made from animal hides that are treated to protect against water and abrasion, but they can crack, fade or tear if not properly cared for.
Sunlight can dry out the leather, making the surface hard and brittle.
Repairs often involve using leather fillers, color-matched dyes and conditioners to restore softness and appearance.
Genuine leather can be more difficult to repair because the texture and texture must match to look natural.
High-quality leather care can significantly extend the life of your seats and prevent costly re-upholstery.
3. Vinyl upholstery
Vinyl is a synthetic material made from PVC (polyvinyl chloride) and is often chosen because it is waterproof, low maintenance and affordable.
It is popular in heavy-duty or outdoor vehicles because it does not absorb moisture or odors.
However, vinyl can become brittle over time, specially in hot weather, which can lead to cracking or peeling.
Vinyl repairs often require heat tools to replicate the texture, as well as vinyl-specific adhesives and patches.
Using leather products on vinyl can damage the material, so it is important to identify it before repair.
4. Alcantara or microfiber upholstery
Alcantara and microfiber are high-end, soft-touch synthetic materials often used in sports cars and luxury vehicles.
They offer a suede-like feel and do not fade, but they can attract dust and show stains more easily than other materials.
These fabrics are sensitive to harsh cleaning agents, so repairs and cleaning should be done with specially formulated products.
Damage such as burns or deep stains often require professional repairs to maintain the same texture and look.
It is important to identify this material before attempting any repairs because using the wrong cleaning or repair method can result in permanent discoloration or rough spots.
How to Assess the Damage Properly
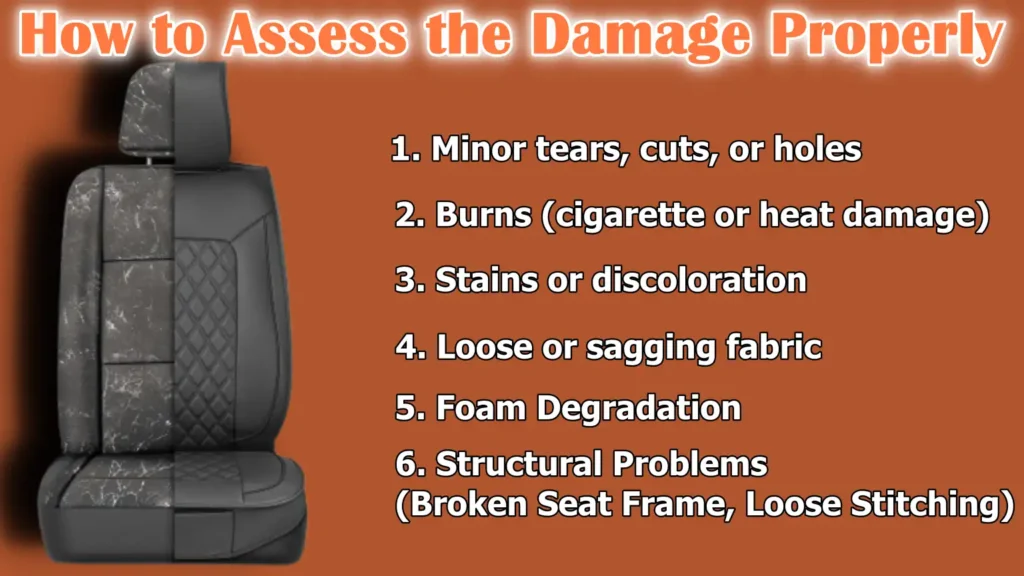
Before beginning any repair work, it’s important to understand the type and extent of the damage.
A proper assessment helps you choose the right repair method, materials and tools, saving time, effort and money.
Each type of upholstery damage has different causes, symptoms and repair methods and ignoring the actual problem can lead to poor results or even more serious problems later on.
By carefully examining your car seats in good light, you can figure out if the problem is cosmetic, structural, or both and plan your repair accordingly.
1. Minor tears, cuts, or holes
Minor tears, cuts and holes are some of the most common upholstery problems, often caused by sharp objects, pet claws, or normal wear over time.
If taken care of in a timely manner, repairs can be quick, inexpensive and nearly invisible.
However, if left unattended, even a small tear can become a large one due to the daily pressure exerted on the seat, making repairs even more difficult and costly.
The method of repairing these damages will depend on the upholstery material, but usually involves stitching, patching or adhesive bonding to restore strength and appearance.
2. Burns (cigarette or heat damage)
Burns occur when hot objects such as cigarettes, dropped lighters or tools come into contact with the upholstery, causing the material to melt or burn.
In fabric seats, burns usually leave a deep, rough hole, while in leather or vinyl, they can create hard, colorless spots.
Burns are difficult to repair because they involve replacing missing material and matching color and texture.
Fabric burns often require fiber or cloth patches, while leather and vinyl burns may require filler compounds and careful color mixing to make the damage less visible.
3. Stains or discoloration
Stains and discoloration are caused by spills, body oils, UV exposure, or cleaning with the wrong products.
Although stains can sometimes be removed with the right cleaner, color changes caused by sun damage or chemical reactions often require more than cleaning—staining or dyeing may be needed to restore a consistent color.
Some stains, specially from substances such as ink or wine, can become deeply embedded in the fibers or surface layer, making them difficult to remove without special products.
Removing stains quickly increases the chances of complete removal without damaging the fabric.
4. Loose or sagging fabric
Loose or sagging fabric is usually a sign that the seat cover has stretched over time or that the attachment points inside the seat have become loose.
Heat, moisture and repeated use can cause the fabric to lose its elasticity or distort the shape of the leather.
This type of damage not only affects the look of the seat, but can also make it uncomfortable to sit on.
Repairing loose upholstery usually involves removing the seat cover, tightening or replacing the inner fasteners and pulling the fabric back into place for a smoother, firmer finish.
5. Foam Degradation
The foam inside the seat can deteriorate due to age, moisture, or repeated heavy use.
When the foam deteriorates, the seat can feel flat, bumpy, or uncomfortable.
This problem also affects comfort, posture and safety in the event of an accident.
Foam damage is often hidden under the upholstery, so it may not be detected until the seat feels different or the cover appears wrinkled.
Repair involves removing the upholstery, replacing the damaged foam with new padding of the correct density and reassembling the seat.
6. Structural Problems (Broken Seat Frame, Loose Stitching)
Structural problems are the most serious upholstery damage because they affect the integrity and functionality of the seat.
A broken seat frame, loose stitching in key areas, or damaged support springs can make the seat unsafe and uncomfortable.
These problems often require more advanced repair skills or professional help, specially if the damage is associated with seat-mounted airbags or safety devices.
Structural repairs may involve welding, replacing hardware, or reinforcing stitching to restore both safety and appearance.
Tools
| Item | What It Is | Why It’s Needed |
|---|---|---|
| Scissors | a sharp cutting tool for cloth and thread. | Used for cutting patches, trimming loose threads, or shaping replacement fabric. |
| Needle and Thread | Hand sewing tools for clothing repair. | Helps mend minor tears, add patches, or reinforce seams. |
| Seam Ripper | A small tool with a pointed blade. | Used to remove old stitches without damaging the fabric. |
| Adhesive | Strong glue made for fabric or upholstery. | Bonds fabric, leather or vinyl without sewing. |
| Upholstery Stapler | A stapler designed for heavy fabrics and padding. | Securely attaches upholstery to seat frame. |
| Hog Ring Pliers | Pliers that close metal rings (hog rings). | Fastens upholstery to the seat’s inner frame or springs. |
| Heat Gun | A device that blows hot air. | Helps soften vinyl or leather for stretching and repair. |
| Patch Kits | Pre-made fabric or vinyl repair sets. | Provides suitable materials and adhesives for quick solutions. |
| Replacement Fabric | New upholstery material. | Used to replace large damaged sections. |
| Foam Padding | Soft cushion material inside the seats. | Replaces worn or broken seat cushioning. |
| Leather Filler | Paste for repairing cracks or holes in leather. | Restores smoothness before dyeing or conditioning. |
| Fabric Glue | Special glue for fabric and upholstery. | Secures patches or seals edges without sewing. |
Safety Precautions
When repairing car upholstery, safety should always be the first priority.
Many people think upholstery repair is just a matter of stitching or gluing, but it can involve working around hidden safety devices, sharp tools, strong adhesives and chemical cleaners.
Not following the right safety precautions can lead to accidents, injuries, or even damage to the vehicle’s built-in safety systems.
Taking a few minutes to prepare and protect yourself will make the repair process not only safer, but more efficient and stress-free.
1. Remove the battery before working near airbags in the seats
Many modern cars have airbags built into the seats, specially on the sides, to protect passengers during an accident.
If you start working on the car seat without removing the battery, there is a small but serious risk that the airbag may accidentally deploy.
This can lead to injuries and costly repairs.
Before removing seat covers, loosening fasteners or cutting fabric near the airbag area, remove the battery and wait a few minutes to allow the stored energy to discharge.
This simple step ensures that you can work safely without damaging important safety equipment.
2. Wear gloves and safety glasses
When repairing upholstered furniture, you often have to use sharp tools such as scissors, knives and sewing tools, as well as materials that can irritate the skin, such as adhesives and cleaning chemicals.
Wearing gloves helps protect your hands from cuts, abrasions and chemical burns, while safety glasses protect your eyes from flying debris, staples or accidental splashes of liquids.
Even if the job seems small, proper safety equipment reduces the risk of injuries that can delay or complicate the repair process.
3. Ensure proper ventilation when using adhesives or cleaners
Many adhesives, solvents and cleaners used to repair upholstered furniture contain strong chemicals that release fumes.
Breathing in these fumes can cause dizziness, headaches and, in some cases, long-term health effects.
Working in a well-ventilated area, such as an open garage or outdoors, keeps the air fresh and prevents exposure to harmful fumes.
If you must work indoors, open windows and run fans to improve air flow.
Proper ventilation also ensures that adhesives dry properly and adhere well, making repairs more durable.
How to Repair Car Upholstery – Easy Method
Repairing car upholstery requires different techniques depending on the material and type of damage. Each material—fabric, leather and vinyl—has its own strengths, weaknesses and repair needs.
Using the wrong method or product can exacerbate the damage or make the repair look unnatural.
Understanding the correct procedure for each type of damage ensures that the seat regains its beauty, comfort and durability.
1. Repairing Fabric Upholstery
A. Minor Cracks
Small cracks in fabric upholstery are best repaired before they become larger due to the constant movement and pulling of the seat.
The first step is to clean the damaged area so that dust and dirt do not interfere with the adhesive or stitching.
A cloth patch can then be applied under the torn area using a suitable adhesive to provide support.
The final step is to sew the edges or use a heat bonding method so that the repair blends together easily and does not unravel over time.
B. Burn Holes
Burn holes from cigarettes or heat sources can leave small but deep scars on fabric upholstery. To repair this, the damaged fibers are carefully cut away so that the edges are clearly visible.
The space is then filled by reapplying fabric fibers taken from hidden parts of the seat. These fibers are bonded with a fabric adhesive, restoring the texture and making the burn marks less visible.
C. Replacing the Foam
When fabric seats lose their strength or look uneven, it often means that the foam padding inside has worn out. Repair begins by carefully removing the seat cover so as not to damage the seams or fasteners.
The damaged or flattened foam is replaced with new foam padding of the correct density. The cover is then reattached using hog rings or upholstery staples so that it stays firmly in place, restoring both comfort and shape.
2. Repairing leather upholstery
A. Minor scratches and cracks
Minor scratches and cracks in the leather can make the seat look old and worn. To repair these, the leather is first cleaned with a special leather cleaner to remove oils and dirt.
Leather filler is then applied to the damaged area to fill the gap and smooth the rough surface. After drying, the area is lightly sanded for an even finish and the paint is reapplied to match the surrounding leather.
B. Tears or holes
Tears or holes in the leather require more structural support during repair. A thin sub-patch is placed underneath the tear to provide a firm base.
Leather adhesive is applied to hold the patch and edges in place so the tear doesn’t spread. The repaired area is then painted so it blends in well with the rest of the seat.
C. Reconditioning
Leather naturally loses moisture over time, which can lead to stiffness and cracking.
After the surface is thoroughly cleaned, a leather conditioner is applied to restore softness and prevent further damage.
Regular conditioning after repair helps maintain the leather’s strength and smooth texture.
3. Vinyl Upholstery Repair
A. Surface Cuts
Surface cuts in vinyl can be repaired without replacing large sections of the surface. A vinyl repair compound is applied directly to the cut to seal it and restore softness.
A heat tool is then used to blend the texture of the repaired area with the original surface, making the repair less noticeable.
B. Panel Replacement
When a section of vinyl is too damaged to allow minor repairs, the best option is to replace the entire panel. The damaged section is carefully removed and a suitable piece of vinyl is cut to size.
The new vinyl is sewn or glued down, making sure it sticks and aligns snugly with the rest of the upholstery.
Reassembly
Reassembly is the stage where all of your car upholstery repair work comes together.
This stage is just as important as the actual repair work because poor reassembly can ruin a good repair, cause discomfort when sitting, or even create new damage over time.
The purpose of reassembly is to ensure that the upholstery is secure, smooth and properly aligned so that it looks and feels the same as before the damage.
Careful handling in this stage not only improves the appearance but also increases the life of the repair.
1. Stretch the fabric or leather properly to avoid wrinkles
When putting the seat cover back on, it is important to stretch the fabric evenly so that no wrinkles or loose spots appear.
Wrinkles not only affect the look of the seat but can also cause uneven wear, leading to premature damage.
Fabric should be pulled tightly over the seat frame and foam, while leather needs a firm but gentle stretch to avoid excessive pressure at the joints.
Ensuring the correct tension ensures that the surface looks smooth and professional when the seat is reassembled.
2. Secure all fasteners (hog rings, clips, staples)
Fasteners such as hog rings, clips and staples hold the upholstery firmly to the seat frame and prevent it from moving during seat use.
Missing or loose fasteners can loosen the material over time, causing the seat to become loose or misaligned.
When reassembling, it’s important to replace any damaged or rusted fasteners and make sure every attachment point is firmly in place.
A properly installed cover stays in place even after daily use, maintaining both comfort and appearance.
3. Ensure seat alignment and comfort
After securing the upholstery, the alignment and comfort of the seat should be checked before final installation in the car.
This includes making sure the seams are straight, the foam is evenly spaced and there are no lumps or uneven areas.
Checking comfort is important because even a slight change in the position of the padding or cover can make the seat uncomfortable during long driving sessions.
By taking the time to check alignment and comfort, you can ensure that the repair not only looks professional but feels right as well.
Final Steps
The final step in upholstery repair isn’t just about making the seat look attractive—it’s about protecting your work, improving comfort and ensuring long-term durability.
Even the best repairs can deteriorate quickly if not properly completed and protected.
Taking a few extra steps in this step helps the repaired part blend in with the rest of the seat, prevents new damage and ensures that the seat remains comfortable and functional.
1. Clean and Condition the Repaired Part
After the repair is complete, it’s important to clean the seat thoroughly to remove any dust, adhesive residue, or fingerprints left during the process.
Cleaning not only improves the appearance, but also prepares the material for conditioning.
Fabric seats can be cleaned with a mild upholstery cleaner, while leather and vinyl seats require a specially designed cleaner.
After cleaning, leather should be conditioned to restore flexibility and prevent drying, while fabric and vinyl may benefit from a stain-resistant protective spray.
This step helps the repaired part blend in well with the surrounding upholstery and extends the life of the material.
2. Apply a UV protectant
Sunlight can be one of the most damaging elements to car upholstery, causing its fibers to fade, crack and weaken over time.
Applying a UV protectant creates a barrier that reduces the effects of direct sunlight and heat.
For leather, this comes in the form of conditioners containing UV inhibitors, while fabric and vinyl can be treated with special sprays.
Using a UV protectant regularly after repairs can help preserve the seat’s color and texture and prevent the repaired part from aging faster than the rest of the upholstery.
3. Check for comfort and firmness
After the repair and finishing treatment is complete, it is important to check the comfort and firmness of the seat before regular use.
Sit normally on the seat and check for even support, smoothness and lumps or cracks.
A well-repaired seat should be as comfortable and supportive as it was before the damage, if not even better.
This step ensures that the repair not only looks good, but also meets the functional needs of the driver and passengers.
Read More:
Preventive maintenance tips
Repairing your car’s upholstery restores its beauty and comfort, but the best way to keep it looking like new is to prevent damage in the first place.
Preventive maintenance reduces the need for frequent repairs, saves money and helps maintain the vehicle’s resale value.
By following a few simple habits, you can extend the life of cloth, leather or vinyl seats and avoid many common problems that result from everyday use, sun and spills.
1. Use seat covers for protection
Seat covers are one of the easiest and most effective ways to protect upholstery from wear, dirt and stains.
They serve as a protective layer between the seat and anything that could damage it, such as food, drink, sharp objects or pet claws.
Seat covers can be removed and washed, making them ideal for keeping the interior clean with minimal effort.
Choosing covers made from breathable and durable materials ensures that they don’t let heat or moisture in, which could damage the seat underneath.
2. Apply conditioner to leather or vinyl regularly
Leather and vinyl are durable materials, but if not properly cared for, they can dry out, crack and lose their softness over time.
Applying a good quality conditioner every few months maintains flexibility, prevents drying out and keeps the surface smooth.
Conditioners also form a thin protective layer that prevents spills and dirt build-up.
Regular conditioner application is specially important in hot or dry climates, where heat and lack of humidity speed up the aging process of these materials.
3. Avoid prolonged exposure to sunlight
Prolonged exposure to direct sunlight can fade colors, weaken fibers and make leather or vinyl brittle.
Whenever possible, park in a shady area, use a sunshade on the windshield, or apply tint to the windows to reduce exposure to UV rays.
Protecting your upholstery from extreme heat not only preserves its beauty, but also maintains the structural strength of the seat over time.
4. Clean up spills immediately
Spilling is the fastest way to cause permanent stains and odors on upholstery.
Acting quickly is the best defense—wipe up the liquid immediately with a clean cloth and use a cleaner safe for that specific material.
For leather and vinyl, mild soap solutions or specialty cleaners work best, while cloth seats may require special upholstery shampoos.
Cleaning up immediately can prevent the spill from penetrating deep into the material, where it can be difficult to remove and cause long-term damage.
When to call a professional
Although many upholstery repairs can be done at home with the right tools and patience, some situations require the skills, tools and experience of a professional.
Performing complex repairs without the proper expertise can result in safety risks, damage to the seat structure and unprofessional repairs.
Knowing when to stop and seek expert help ensures the job is done safely, correctly and while maintaining the value and integrity of the vehicle.
1. Serious structural damage
If the seat frame, springs or internal supports are broken, bent or rusted, the repair goes beyond upholstery work to structural restoration.
Structural components directly affect comfort, posture and safety in a crash.
Professionals have the tools and knowledge to repair or replace these parts without compromising the stability of the seat.
Attempting to fix major structural problems at home can result in unsafe seating and lead to further costly repairs.
2. Replacing large panels
Replacing large sections of upholstery requires precise cutting, sewing and fitting to ensure that the new panel is as good as the original in both appearance and durability.
Without professional equipment such as industrial sewing machines and special stitching techniques, the repair may look uneven or wear out over time.
Upholstery shops can provide suitable materials and ensure that the new panel blends well with the rest of the seat.
3. Airbag-related seat repairs
Many modern vehicles have airbags mounted on the sides of the seats and these systems are extremely sensitive.
Working on or near them without proper training could accidentally deploy the airbag, causing injuries and expensive replacement costs.
Professionals know how to safely remove, handle and reinstall the upholstery surrounding airbag components in an emergency without affecting their functionality.
4. High-Value or Vintage Vehicles
For rare, classic or high-value cars, maintaining originality is crucial to maintaining their value.
Professional upholsterers can match vintage fabrics, stitching patterns and materials to restore the car’s original look.
Any carelessness in these vehicles can significantly reduce their value.
In such cases, expert workmanship is not only recommended but necessary to maintain both functionality and collectability.
Conclusion – How to Repair Car Upholstery
When you repair the upholstery then it clearly indicates that you wanted to preserve the comfort, safety and long-term value of your vehicle and you are damn serious about it.
Not only this, scientific studies show that car seats can actually host bacteria and fungi, which is why deep cleaning is necessary before repair that not only improves bonding but also promotes a healthier cabin as well.[¹]
Knowing how to repair fabric, leather and vinyl helps you keep maintenance costs in check while also extending the life of your interior.
By using the right tools, following step-by-step repair methods and practicing regular preventive care, you can prevent minor issues from turning into costly problems.
A well-done repair not only restores the look of your seats but also maintains their functionality, from proper cushioning to airbag protection in modern designs.
Knowing when to repair yourself and when to seek professional help ensures that you don’t compromise safety or quality.
This balanced approach allows you to enjoy a cleaner, more comfortable interior without unnecessary expense.
In the long run, upholstery care is an ongoing process, not a one-time solution.
With regular cleaning, conditioning and protective measures, your seats can remain in good condition for years.
Whether you drive daily in city traffic or occasionally take long road trips, taking the time to maintain your car’s interior will make every trip more enjoyable while also maintaining the value of your vehicle.
So, it is time to take some questions from your side as well.
Frequently Asked Questions
Q1. What type of fabric is used for car upholstery?
Answer: Car upholstery can be made from a variety of fabrics depending on the vehicle’s style, purpose and price. The most common fabrics are polyester, nylon and microfiber because they are durable, stain resistant and comfortable. Nylon is one of the strongest fabrics used in car interiors, offering good resistance to wear and tear, while polyester blends are softer and available in a variety of colors and textures. Microfiber fabrics, such as microsuede, feel more luxurious and are often used in higher-end cars. In addition to fabric, many cars also use leather, synthetic leather (such as vinyl or polyurethane), or a combination of both to provide a more premium feel. The choice of fabric affects not only comfort and look, but also how easy it is to clean and maintain.
Q2. How to Repair Torn Fabric in a Cloth Car Seat?
Answer: Repairing a tear in a cloth car seat is easy if you take immediate action before the damage worsens. The first step is to clean the area around the tear so that dirt or oil does not interfere with the repair. If the tear is small, you can place a piece of fabric underneath the tear, then apply a strong fabric glue to join the edges. After the glue has set, you can gently blend the fibers or stitch over the tear for extra strength. For larger tears, you may need to sew a matching piece of fabric over the damaged area, making sure it aligns with the seat’s existing pattern. If the foam inside is damaged, it should be replaced or refilled before the repair is complete. This ensures that the seat not only looks neat, but is also comfortable to use.
Q3. How much does car upholstery repair cost?
Answer: The cost of car upholstery repairs can vary greatly depending on the type of material, the size of the job and whether you hire a professional or do it yourself. Minor repairs, such as repairing a seat panel, can cost as little as a few hundred bucks or dollars. However, if you want to completely redo all your car seats with simple fabric, it can cost anywhere from $200 to $750. For leather or high-quality materials, the price can easily go up to $1,000 to $3,000 or even more, especially if it involves custom stitching or design. Labor also adds to the total cost because removing the old fabric, cutting and sewing the new fabric and reassembling the seats is a time-consuming job. In short, the final cost depends on the material you choose, the extent of the work and whether you choose do-it-yourself or professional service.
References:
[1] Stephenson RE, Gutierrez D, Peters C, Nichols M, Boles BR. Elucidation of bacteria found in car interiors and strategies to reduce the presence of potential pathogens.
https://pmc.ncbi.nlm.nih.gov/articles/PMC3962071/

Guys, I’m a car audio enthusiast and customization expert and I love clear sound and clean installation. Plus, I have spent years helping people build their dream audio setups. And whenever I’m working on cars, I probably listen to music and thinks about the next big upgrade.