Written By: Don Dodi
Fact Checked By: Kristen Brown
Reviewed By: Diego Rosenberg
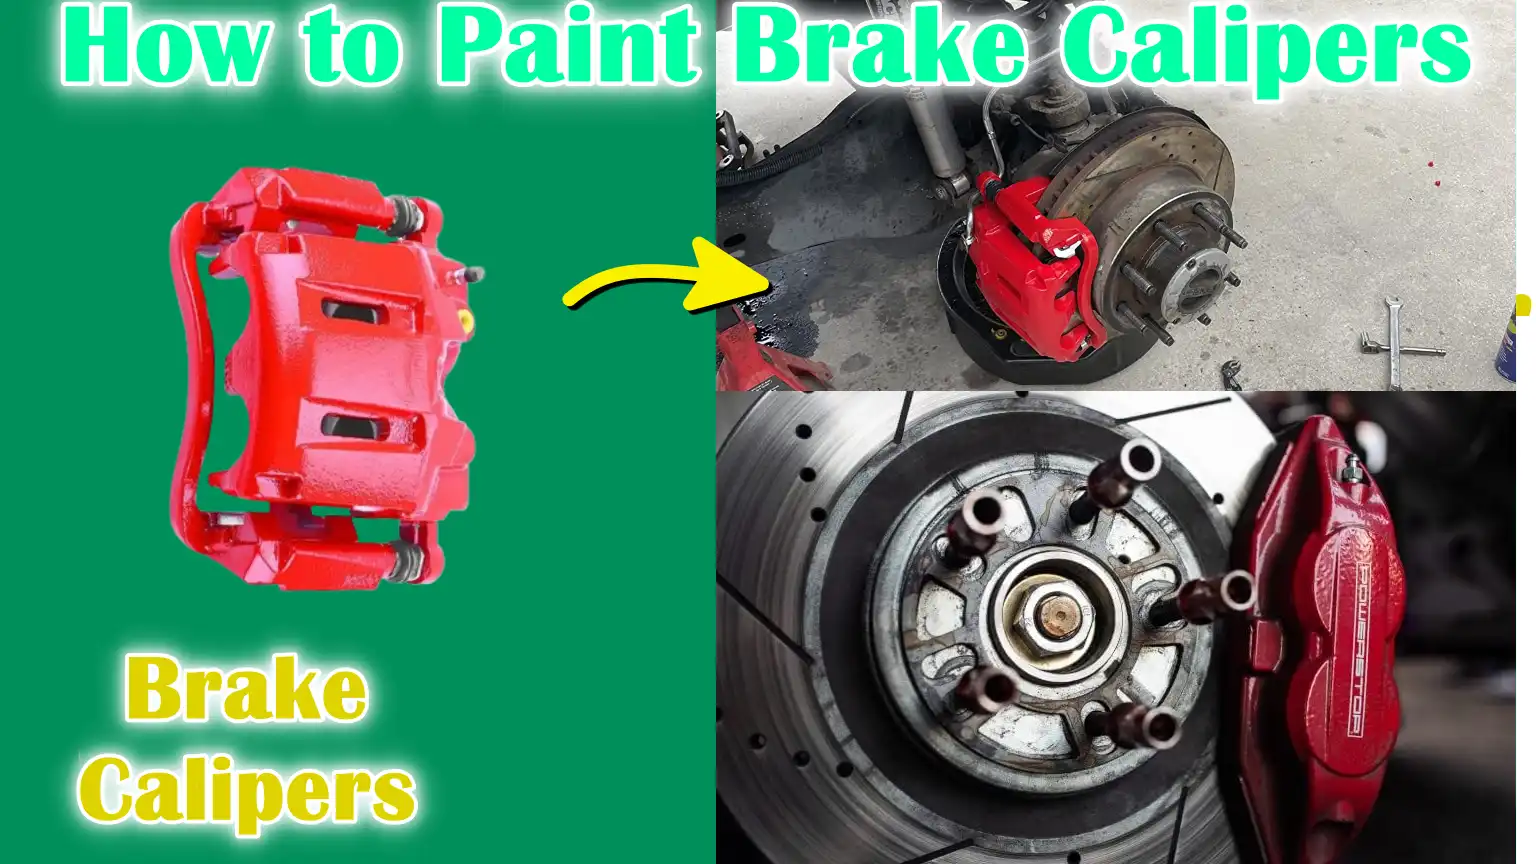
When you wanted to protect your brake calipers from rust and wear then painting them with your favorite color is the great solution out there.
The brake calipers are basically the components which is directly responsible for clamping the brake pads onto the rotors and they are subjected to extreme conditions: as there’s intense heat produced, with exposure to moisture, road salts and brake dust as well.
And because of all these things over the period of time, these elements leads to the corrosion, discoloration and it is common thing that these downgrade the appearance as well.
Not only this, you actually have to apply a high-temperature, heat-resistant paint which is specifically designed for the brake components otherwise it won’t protect against damaging factors.
So, what are the process which requires careful preparation and attention you’ll known in this guide which is all about How to Paint Brake Calipers.
Tools
| Tool / Material | Purpose / Use | Notes / Tips |
|---|---|---|
| Jack and Jack Stands | Raise the car and hold it securely. | Always place on a level surface; never work underneath a car, only on a jack. |
| Lug Wrench | Remove and tighten wheel nuts. | Use the correct size lug nuts for your vehicle. |
| Wire Brush or Drill with Wire Wheel | Remove rust, dirt and old paint. | Drill with a wire wheel speeds up cleaning. |
| Brake Cleaner or Degreaser | Clean the calipers from grease, dirt and brake dust. | Make sure the calipers are completely dry before painting. |
| Masking Tape and Plastic Bags | Protect rotors, pads and surrounding parts from paint. | Cover all unpainted surfaces to avoid overspray. |
| High-Temperature Brake Caliper Paint or Spray | Paint calipers to protect them from heat and rust. | Use specially formulated brake paint that can withstand high heat. |
| Sandpaper (Medium and Fine Grit) | Smooth surface for better paint adhesion. | First medium grit, then fine grit for a polished finish. |
| Safety Gear (Gloves, Mask, Goggles) | Protect your skin, lungs and eyes. | Essential for handling chemicals and paints safely. |
| Optional: Clear Coat | Provides added protection and shine. | Apply after paint has dried; use a high temperature clear coat. |
The Basic Preparation for Painting a Brake Calipers
1. Safety is Paramount
Before starting any work on your brake calipers, safety should be your top priority.
Always park your car on a level surface so that it does not suddenly tip over.
Apply the parking brake to keep the vehicle stationary while you work.
It is important to wear protective equipment such as gloves, goggles and a mask to protect your hands, eyes and lungs from dust, chemicals and debris.
Taking these precautions keeps the painting process safe and accident-free.
2. Remove the Wheels
Removing the wheels gives you full access to the brake calipers and makes the painting process much easier.
Start by loosening the lug nuts slightly while the car is still on the ground.
Then, raise the vehicle with a jack and secure it firmly with jack stands.
Once the car is stationary, remove the wheels completely.
This step not only provides better access to the calipers, but also prevents paint from accidentally getting on the tires or rims.
3. Cleaning the Calipers
Proper cleaning is vital to achieving a long-lasting, smooth paint finish.
First, remove all dirt, grease and brake dust from the calipers with a special brake cleaner or degreaser.
After cleaning, use a wire brush to scrub away any rust or stubborn debris.
Sand the surface with medium and fine grit sandpaper to smooth it and ensure the paint adheres properly.
Clean, rust-free and smooth calipers are vital to both the durability and appearance of the final paint job.
Masking and Protection
Proper masking and protection are essential steps to ensure that paint only goes where it should and doesn’t damage important parts of your vehicle.
1. Protecting Brake Rotors and Pads
Brake rotors and pads are critical parts of the braking system and should never come into contact with paint.
Use high-quality masking tape to carefully cover the edges of the rotor and pad.
This creates a protective barrier that prevents accidental overspray, which can reduce braking performance or cause uneven wear.
Properly masking these parts ensures both protection and a neat, professional-looking finish.
2. Covering Surrounding Parts
Brake calipers are surrounded by other parts such as suspension components, wheel hubs and brake lines.
To prevent paint from getting into these areas, cover them with a plastic bag or protective sheet.
Apply the coverings tightly so they stay in place during painting.
Proper coverage prevents damage and keeps your vehicle looking neat after the project is complete.
3. Avoiding Overspray
Even a little paint on the wrong surfaces can cause problems or require additional cleaning later.
Make sure areas that should not be painted are completely protected and double-check that there are no gaps in the masking.
Avoiding overspray not only protects your car parts, but also gives your brake calipers a clean, professional and long-lasting finish.
How to Paint Brake Calipers – Easy & Lasting Method
Painting brake calipers is the stage where preparation and creativity meet.
Attention to detail and patience are required to achieve a smooth, durable and attractive finish.
Using the right method and technique ensures that the paint adheres properly and can withstand the extreme heat and conditions that the calipers are subjected to.
1. Choose your method
There are two main methods of painting brake calipers, each with their own advantages.
Brush-on paint offers precise control, making it easier to reach tight spaces and corners.
This method is ideal for those who want precision and are comfortable with careful hand application.
Spray paint, on the other hand, provides a more uniform coating and can cover large areas quickly.
It is suitable for achieving a professional, smooth finish with minimal brush marks.
Choosing the right method depends on the level of precision you desire and the tools available.
2. Apply the Paint
Before painting, shake the paint or spray can well to mix the ingredients evenly.
Apply the paint in thin, even coats and allow each coat to dry for 10 to 15 minutes before applying the next coat.
Typically, two to three coats are sufficient to achieve a solid, vibrant color.
It is important to avoid applying thick coats, as these can drip or run, creating an uneven and unprofessional look.
Patience and careful application are key to a long-lasting finish that adheres well to the caliper surface.
3. Optional Clear Coat
For added protection and a glossy look, a high-temperature clear coat can be applied to painted calipers.
This clear coat provides durability, preventing the paint from cracking and fading from heat and road debris.
Apply the clear coat in the same manner as paint, using thin, even coats and allowing proper drying time between coats.
A clear coat increases both the longevity and visual appeal of calipers, giving them a polished, professional look.
Drying and Reassembly
Properly drying and carefully reassembling your painted brake calipers is important to ensure their good appearance and safe operation.
Rushing this process could damage the paint or jeopardize the safety of your vehicle.
1. Allow proper drying time
After painting, it is important to allow the calipers to dry completely.
A minimum of 24 hours of drying time is recommended to ensure the paint is completely dry and adheres to the metal surface.
Thorough drying prevents the paint from staining, cracking or chipping during vehicle use.
Keeping the vehicle in a clean, dry place during this time protects the fresh paint from dust, debris and moisture.
2. Reassemble the Wheels
After the paint has completely dried, carefully reassemble the wheels.
First, install the wheels back on the hubs and hand-tighten the lug nuts to hold them in place.
When tightening, use a star pattern to distribute pressure evenly across the wheel, which prevents the brake rotor from warping and ensures the wheels are in the correct position.
3. Lower the car and apply torque to the lug nuts
When all the wheels are in the correct position, slowly lower the car with a jack and remove the jack stands.
The final step is to torque the lug nuts to the manufacturer’s recommended specifications.
Proper torque ensures the wheels stay secure, prevents uneven wear and maintains overall safety.
Carefully following these steps ensures that your painted calipers stay protected and your vehicle is safe to drive.
Post-Painting Care
Proper post-painting care is essential to keep your brake calipers looking attractive, durable and fully functional.
Taking the right steps will preserve the color, prevent damage and extend the life of the paint.
1. Let the Paint Dry
After the painting process is complete, it’s important to avoid hard braking or driving fast for the first few days.
The paint on the calipers needs time to fully dry and harden.
Driving fast or braking too quickly can cause the paint to crack, peel, or become uneven.
Giving the paint enough time to dry ensures a long-lasting, professional finish.
2. Regular Cleaning and Maintenance
To keep calipers looking their best, clean them regularly with mild soap and water.
Avoid harsh chemicals or abrasive cleaning tools, as these can damage the paint.
Regular cleaning removes brake dust, dirt and road grime that build up over time, allowing the calipers to maintain their bright color and smooth surface.
By following these simple maintenance steps, your painted calipers can remain in excellent condition for months or years, keeping your vehicle looking polished and well-cared for.
What are The Basic Mistakes to Avoid
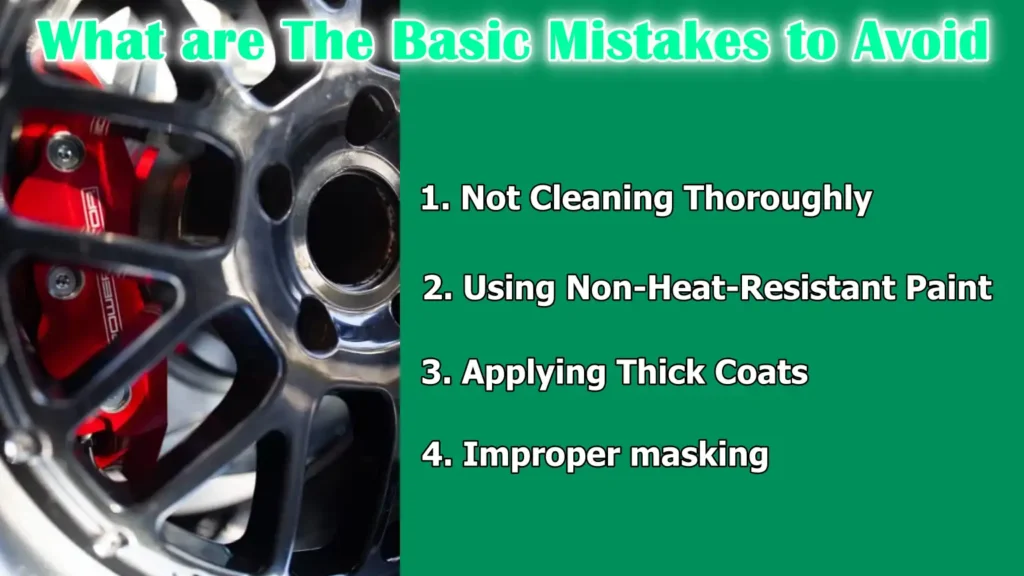
Understanding common mistakes can help ensure that your brake caliper painting project is both safe and successful.
Avoiding these mistakes saves time, prevents damage and provides a professional-like finish.
1. Not Cleaning Thoroughly
One of the most common mistakes is painting calipers without first cleaning them thoroughly.
Dirt, grease, rust and brake dust can prevent paint from adhering properly, causing cracks or uneven surfaces.
Always clean calipers thoroughly with brake cleaner and a wire brush and sand them smooth before applying paint.
2. Using Non-Heat-Resistant Paint
Brake calipers get very hot during normal driving and using normal paint can cause blistering, discoloration or peeling.
It’s important to use a high-temperature, heat-resistant paint designed specifically for brake parts.
This ensures that the paint can withstand the heat generated during braking and maintains its color and finish over time.
3. Applying Thick Coats
Applying paint in thick coats is another common mistake.
Thick coats are prone to spills, drips and drying unevenly, which can ruin the smooth surface of your calipers.
For a professional and long-lasting finish, it’s important to apply several thin, even coats, allowing adequate drying time between each coat.
4. Improper masking
Failing to properly mask brake rotors, pads and surrounding parts can cause paint to get into areas that are critical to safety and performance.
Overspray on rotors or pads can affect braking efficiency and require additional cleaning.
Carefully masking all areas that are not to be painted ensures safety and results in a clean, shiny final look.
Read More:
Conclusion – How to Paint Brake Calipers
It is great thing that a simple coat of paint actually transform the look of your brake calipers and it affects the overall wheel impression as well and the plus point is that it also protect one of the most important parts of your car from wear and heat damage as well.
By taking the time to properly clean and prepare the calipers, carefully mask the surrounding parts and patiently apply high-temperature paint, you can achieve a durable, professional-looking finish.
This process not only enhances the look of your vehicle, but also protects the calipers from rust, corrosion and wear caused by extreme heat and road debris.
Following the drying, reassembly and post-painting care steps ensures that the results last a long time and retain their vibrant look.
Avoiding common mistakes such as not cleaning, using the wrong paint, or applying thick coats will save time and prevent frustration.
With the proper attention to detail, your freshly painted calipers can become a long-lasting feature that adds both personal style and practical value to your vehicle, giving it a polished and customized look while keeping your braking system safe and efficient.
It is the fact that brake calipers are really exposed to the extreme temperatures whenever you brake, that’s why it is a good idea to always use a heat-resistant paint instead of normal one. As standard automotive paints may not withstand that high heat generated and it unfortunately leads to the premature fading and degradation. And that’s why specialized high-temperature caliper paints are formulated to endure these conditions very well, which again ensures the longevity and maintain the caliper’s appearance for longer period of time.[¹]
Now, if you still wanted to ask some questions then comment section is open for you.
Frequently Asked Questions
Q1. Is it better to paint brake calipers with a brush or a spray?
Answer: Both brush-on paint and spray paint can be used to paint brake calipers, but each method has its own advantages depending on what you want to achieve. Brush-on paint offers more control and precision, which is useful for tight corners or intricate designs on your calipers. It can help you easily reach places where spray paint can’t. Spray paint, on the other hand, provides a smooth and even finish on large surfaces and covers the entire caliper quickly. Many professionals prefer spray paint for a clean and uniform look, but beginners often find brush-on paint easier to handle if they want to avoid overspray. Whichever method you choose, it’s important to apply thin and even coats to prevent streaks and make the paint last longer.
Q2. Do you need to prime calipers before painting?
Answer: Priming brake calipers isn’t always necessary, but using a high-temperature primer can greatly improve paint durability and adhesion. Primers help the paint adhere better to the metal surface and prevent cracking or wear over time. If your calipers have rust or an uneven surface, applying a primer is specially helpful because it creates a smooth, protective base for the paint. Some high-quality brake caliper paints adhere well without a primer, but if you want a long-lasting, professional-looking finish, a primer is the best option. Be sure to use a primer designed for high temperatures so it can withstand the heat generated by the calipers during braking.
References:
[1] How To Paint Brake Calipers
https://knowhow.napaonline.com/how-to-paint-brake-calipers/

Guys, I’m a car audio enthusiast and customization expert and I love clear sound and clean installation. Plus, I have spent years helping people build their dream audio setups. And whenever I’m working on cars, I probably listen to music and thinks about the next big upgrade.