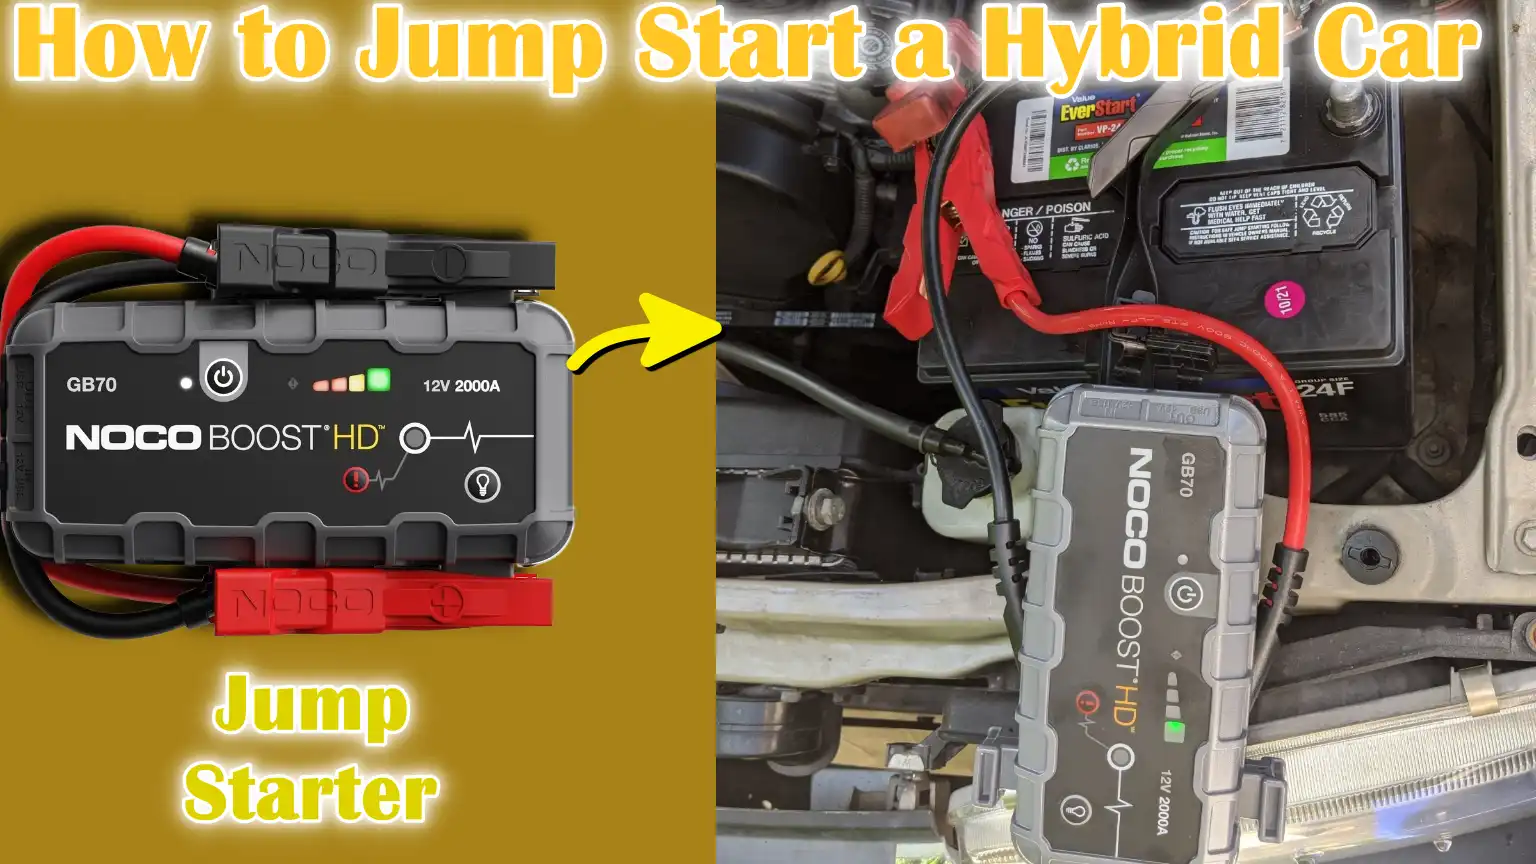
When you think about the hybrid cars then it has the beast kind of image, as hybrid cars combine the gas and electric power together to produce that kind of power, but when the little 12V battery dies then even if there’s a most advanced hybrid won’t even turn on.
Hybrid cars are now millions on the road today, as they literally offers the both fuel savings and reduced emissions as well.
As well as, unlike the traditional cars, the hybrid cars uses the two batteries: a high-voltage traction battery that powers the electric motor and a small 12-volt battery that runs electronics and that helps to start the car’s system.
Plus, studies from AAA also shows that battery-related issues are actually the number one cause of the roadside breakdowns and hybrids are not exception from this issue.
But the good thing is that you can always jump-start your hybrid car which is again safer and straightforward way to start your car if your battery drains out completely as it usually fails to start the car.
As well as, this guide is all about How to Jump Start a Hybrid Car, so that you can learn to jump start your hybrid properly, so that you can save time and stress in an emergency.
At First Identify The Battery That Needs Jumping
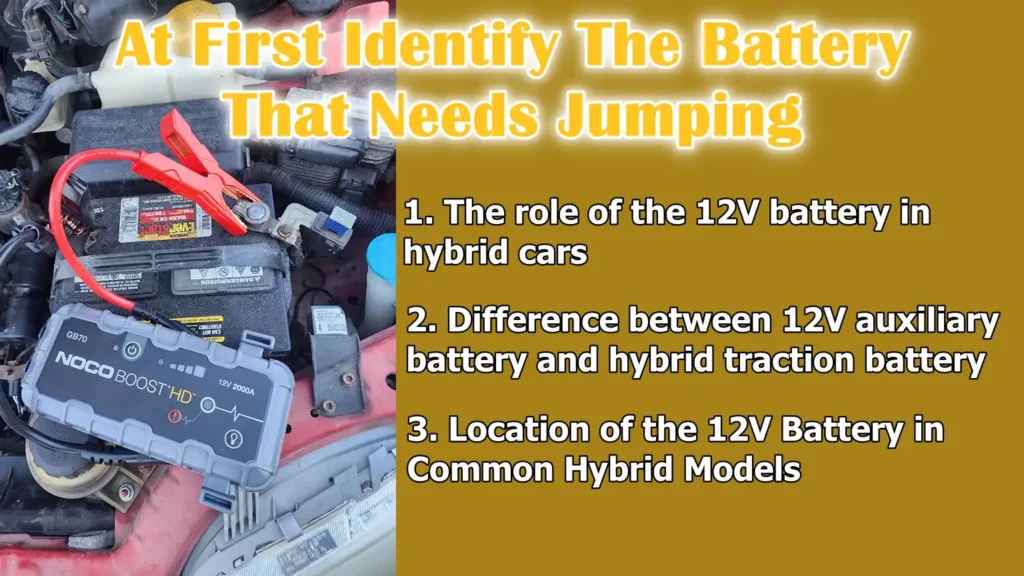
1. The role of the 12V battery in hybrid cars
Every hybrid car comes with two types of batteries, but it’s usually the smaller 12-volt battery that causes starting problems.
This battery powers the car’s essential electronics, such as the dashboard, lights, locks and the computer system that instructs the car to start.
Unlike regular cars, where the 12V battery also cranks the engine, in hybrid cars it mainly acts as an electrical switch to keep the car’s main systems running.
If this smaller battery loses charge, the car won’t even go into “ready” mode, which can confuse drivers even if the larger hybrid battery is still fully charged.
2. Difference between 12V auxiliary battery and hybrid traction battery
The functions of the 12-volt auxiliary battery and the hybrid traction battery are very different and it’s important to understand this difference.
The 12V battery is smaller and works just like a typical car battery, managing accessories and initial start-up power.
The traction battery, on the other hand, is a higher-voltage battery pack, often ranging from 100 to 300 volts depending on the model and it powers the electric motors that drive the car.
Traction batteries are large, expensive and designed to last for many years, while 12V batteries are smaller, more economical and more likely to need replacing or jump-starting.
Many people assume that if a hybrid car won’t start, the problem is in the traction battery, but in reality, it’s almost always the 12V battery that’s bad.
3. Location of the 12V Battery in Common Hybrid Models
The biggest difference between a conventional car and a hybrid is where the 12V battery is located.
In many hybrid cars, the 12V battery is not placed under the hood, but in unusual locations to save space and balance weight.
For example, in the Toyota Prius, the 12V battery is located in the trunk near the rear wheel well.
In some Honda hybrid cars, it is located under the back seat.
In other models, it may also be located under the hood, but smaller and in a less obvious position than on a standard car.
Because of these variations, it is always best to check the owner’s manual or look for clearly marked jump-starting points under the hood, which most hybrid manufacturers provide for convenience.
Knowing where the 12V battery or its jump terminals are located saves time in an emergency and helps avoid mistakes.
Safety Precautions
1. Wear safety gloves and goggles
Whenever you’re working with a car battery, specially a hybrid vehicle, it’s important to protect yourself by wearing safety gloves and goggles.
Car batteries contain acid and in rare cases, they can leak or release small amounts of gas that can cause burns.
Safety gloves help protect your hands from accidental sparks or acid residue, while goggles protect your eyes in the event of a sudden discharge or small explosion.
Hybrid cars also have sensitive electrical systems, so although jump-starting a 12V battery is generally safe, this extra step of personal protection protects you from the risk of injury.
2. Make sure both vehicles are turned off
Before connecting any jumper cables, both the hybrid vehicle and the donor vehicle must be completely turned off.
Leaving either vehicle running while the cables are being installed could cause dangerous sparks and damage the sensitive electronics inside the hybrid.
When both vehicles are turned off, this provides a secure and stable connection, reducing the risk of electrical surges.
This is specially important for hybrid vehicles because their onboard computer systems are highly sensitive and even a small surge of power can generate warning lights or system errors.
3. Avoid touching high-voltage components (orange cables)
Hybrid vehicles have high-voltage systems that are clearly marked with bright orange cables.
These cables connect the hybrid vehicle’s large traction battery to the electric motor and other components.
The voltage passing through them is much higher than that of a standard car battery, often several hundred volts, which can be extremely dangerous if touched.
The good news is that these cables are well protected and do not need to be touched at all during a jump start.
You just have to work with the small 12V battery or the designated jump-start point under the hood.
Staying away from orange cables is one of the most important safety rules when working with hybrid vehicles.
4. Keep metal objects away from the battery terminals
Battery terminals contain an electrical charge and if a metal object touches both the positive and negative sides at the same time, it can cause a short circuit.
This can cause sparks, burns or even damage to the battery.
Therefore, tools, jewelry or any metal objects should not come in contact with the battery part when jump starting.
Accidentally placing a wrench or screwdriver on the battery can cause a dangerous reaction.
Keeping the area free of loose objects ensures that the process remains safe and controlled.
Prepare the Vehicle First
1. Place the donor vehicle close to the hybrid, but without touching it
When preparing to jump start the hybrid, the donor vehicle providing power should be parked close enough that the jumper cables can reach both batteries, but it should never touch the hybrid.
Allowing the vehicles to touch could cause an accidental flow of electricity to the bodies of the cars, which could damage sensitive electronic systems or even cause sparks.
Ideally, the vehicles should be placed face-to-face or side-by-side, depending on where the batteries or jump-start terminals are located.
Having enough room to move around safely is also important, as this reduces the risk of tripping over cables or accidentally dislodging clamps.
2. Turn off all accessories (lights, AC, radio)
Before connecting the jumper cables, all electrical accessories on both cars should be turned off.
This includes headlights, air conditioning, radio, wipers and all charging devices connected to power outlets.
Leaving these accessories on during a jump start can cause a sudden surge of power while the connections are being made, which can blow fuses or damage the hybrid’s sensitive electronic modules.
By turning off all accessories, you ensure that maximum power from the donor vehicle is directed only to recharging the hybrid’s 12V battery.
This also helps protect both vehicles from unnecessary electrical stress.
3. Make sure both vehicles have the parking brakes engaged and the parking brakes are fully engaged
Another important step is to make sure both vehicles are securely in the “park” position and the parking brakes are fully engaged.
Putting the transmission in park prevents the vehicles from moving unexpectedly once the engine is started and using the parking brake provides an extra layer of safety by holding the cars firmly in place.
This is specially important because tension can build up in the jumper cables if either car moves even slightly.
A stable and steady setup ensures that the cables stay connected properly, prevents accidents and allows you to perform the jump-starting process smoothly.
Now, Connect the Jumper Cables
1. Identify the Positive (+) and Negative (–) Terminals
Before connecting the jumper cables, it is very important to correctly identify the positive and negative terminals of both the hybrid vehicle’s 12V battery and the donor vehicle’s battery.
The positive terminal is usually marked with a plus sign and may have a red cover or cap on it, while the negative terminal is marked with a minus sign and is often empty and has a black cable connected to it.
Mixing the two up can cause serious damage to the electrical systems of both vehicles, so it is always advisable to take a few extra seconds to confirm the markings before proceeding.
2. Red cable to the positive terminal of the dead battery
The first cable connection should be the red clamp connected to the positive terminal of the hybrid vehicle’s dead 12V battery.
This step begins the process of creating a path for the electric current to flow, but it is safer because the connection is only being made on one side of the battery in this step.
Making this connection first reduces the chance of sparks near the dead battery.
3. Connecting the red cable to the positive terminal of the donor battery
The other end of the red cable should be connected to the positive terminal of the donor vehicle’s battery.
By connecting both positive terminals, you create the correct path for the electric current to flow when the connection is complete.
This ensures that the hybrid vehicle receives the proper voltage from the donor vehicle without the risk of short-circuiting.
3. Connecting the black cable to the negative terminal of the donor battery
The next step is to connect the black cable to the negative terminal of the donor battery.
This establishes the starting point for the negative or ground connection, which is necessary to complete the electrical circuit.
At this stage, the hybrid is still not fully connected, which helps keep the process safe until the final step is completed correctly.
4. Black cable to grounded metal part of hybrid
Instead of connecting the final black clamp to the hybrid’s battery, it should be connected to a grounded metal part of the car, such as an unpainted bolt or bracket under the hood.
This reduces the risk of sparks directly hitting the battery, which can be dangerous due to the presence of flammable gases emitted from the battery.
Many hybrid vehicles also have a specially marked ground point for this purpose.
One of the safest ways to complete a jump-start circuit is to use a proper ground connection.
5. Double-check connections to avoid sparks
Before starting any vehicle, it is very important to double-check all connections.
Make sure the red cables are on both positive terminals and the black cable coming from the donor is on the negative terminals.
Make sure the final black clamp is connected to a solid metal ground on the hybrid vehicle, not its battery.
Properly installed clamps should not move or slip.
Take a moment to make sure this setup is correct so that sparks don’t occur, sensitive hybrid electronics are protected and the jump-starting process goes smoothly.
Start the Vehicle
1. Start the Donor Vehicle First
The first step is to start the donor vehicle before starting the hybrid vehicle.
This allows the donor battery to begin supplying power via jumper cables.
Starting the donor vehicle first ensures that a steady voltage is available to charge the hybrid’s 12V battery.
It also prevents any sudden electrical surges from affecting the hybrid’s sensitive electronic systems.
Before proceeding to the next step, make sure the engine is running smoothly and the donor vehicle is in park with the parking brake applied.
2. Try Starting the Hybrid Vehicle
After the donor vehicle is running, try starting the hybrid vehicle.
In most cases, the hybrid will go into “Ready” mode, indicating that the 12V battery has received enough power to activate the car’s electronic and computer systems.
If the hybrid starts successfully, leave it running for a few minutes to allow the 12V battery to stabilize.
During this process, avoid pressing the accelerator or turning on electrical accessories, as the priority is to give the small battery enough power to maintain the car’s basic systems.
3. If the hybrid doesn’t start right away, wait a few minutes
If the hybrid doesn’t start right away, be patient and wait a few minutes before trying again.
Some hybrid vehicles require a short charge from the donor vehicle to reach the minimum voltage of the 12V battery needed to operate the system.
Trying to start repeatedly without waiting can put stress on the battery and increase the risk of electrical problems.
Waiting a little longer ensures that the jump-start is successful and that both the hybrid’s electronics and the donor vehicle’s battery are protected.
Disconnect the Jumper Cables
1. Remove the cables in reverse order
After the hybrid vehicle has been successfully started, the jumper cables should be carefully removed in the order they were connected.
This helps prevent accidental sparks or electrical surges that could damage either vehicle.
The reverse order ensures that the circuit is broken safely, starting with the least dangerous connection and ending at the positive terminals.
2. Black cable from hybrid
The first cable to be removed is the black clamp attached to the grounded metal part of the hybrid.
As this is the last connection made during setup, removing it first breaks the circuit safely without directly affecting the battery terminals.
This reduces the risk of sparks near the batteries and ensures a controlled disconnection.
3. Black cable from donor vehicle
Next, the black clamp attached to the negative terminal of the donor battery should be removed.
Removing this cable after the hybrid connection ensures that the electric current on the hybrid side has already been interrupted, making it safe to disconnect the donor vehicle.
This step also protects the donor car’s battery and electronic systems from unnecessary surges.
4. Red cable from donor vehicle
After removing both black cables, the red clamp on the positive terminal of the donor battery can be removed.
At this time, the hybrid is turned on and the donor is no longer delivering current, making it safe to disconnect the positive connection from the donor vehicle.
Handling the positive terminal last protects against short circuits.
5. Red cable from hybrid
The final step is to remove the red clamp from the positive terminal of the hybrid’s 12V battery.
After all other connections have been removed, this step safely completes the disconnection process.
Removing the positive clamp last ensures that the sensitive electronic equipment in the hybrid is protected from any accidental surges or sparks.
6. Avoid cable clamps touching each other
During the disconnection process, it is important to ensure that the cable clamps do not touch each other.
If the positive and negative clamps come into contact, this can cause a direct short circuit, which can cause sparks, heat or even damage to the battery.
Keeping the clamps apart ensures that the process will be safe and protect both the vehicle or the person performing the jump-start from harm.
After the Hybrid Starts
1. Let the hybrid run for at least 15-30 minutes to recharge the 12V battery
After the hybrid has been successfully started, it is important to let the car run for at least 15 to 30 minutes.
This period gives the vehicle’s internal charging system a chance to bring the 12V battery to a stable level.
Unlike high-voltage traction batteries, a 12V battery can drain quickly if the car has been sitting idle for several days without charging or if electrical equipment has been running.
Driving the car ensures that the battery gets enough charge to run all electronic equipment, including computer systems, lights and locks.
This step also prevents the car from stalling if the battery was fully discharged before the jump start.
2. Check for warning lights or error messages on the dashboard
After starting and running the hybrid, always check for any warning lights or error messages on the dashboard.
These indicators can alert you to underlying problems such as low battery voltage, a faulty charging system, or electrical failure caused by a low battery.
Ignoring these warnings can lead to further problems, so it’s important to pay attention to any warnings immediately.
Some hybrid cars perform automatic system checks when you start them, making it easier to identify potential problems immediately.
3. If the hybrid car won’t start again, consider replacing the battery or seeking professional help
If the hybrid car won’t start again after driving for a while or continues to display warning lights, this may be a sign that the 12V battery is damaged or has lost its battery life.
In such cases, battery replacement is often necessary.
Hybrid batteries are sensitive and high-tech, so repairing them without full knowledge can be risky.
Seeking professional help from a certified mechanic or dealership ensures that the replacement is done safely and doesn’t damage the hybrid’s electrical system.
Timely intervention helps maintain the reliability and longevity of the vehicle.
Read More:
Tips and Additional Advice
1. Keep jumper cables in the car
The easiest way to be prepared in case the 12V battery dies is to always keep good quality jumper cables in your vehicle.
Having them readily available can save time and stress in an emergency.
It also allows you to help other drivers if needed, making this a practical and useful safety habit.
It’s also important to make sure the cables are in good condition and free of corrosion to ensure a safe and effective jump-start when needed.
2. Know the owner’s manual’s instructions for jump-starting your hybrid model
Each hybrid model may have slight differences in how to jump-start.
The owner’s manual provides precise instructions, including the exact location of the 12V battery or suggested jump-start terminals.
Following these manufacturer’s guidelines can help you avoid mistakes that could damage sensitive electronics or void the warranty.
Familiarity with the manual also builds confidence, allowing you to jump-start safely and efficiently in real conditions.
3. Check the 12V battery regularly for signs of rust or wear
A preventative measure for hybrid maintenance is to regularly check the 12V battery for signs of rust, loose connections or wear.
Corrosion can block proper electrical flow, making it difficult to start the car even when the battery has a little charge.
Cleaning the terminals and tightening the connections helps maintain reliable performance.
Regular inspections help you fix minor problems before the battery is completely damaged, reducing the risk of being stranded unexpectedly.
4. Avoid jump-starting with the traction battery; it’s dangerous
Never attempt to jump-start a hybrid using a high-voltage traction battery.
This battery is designed to power the electric motor only and is extremely dangerous due to its high voltage, often several hundred volts.
Improper operation can cause serious injury or damage to the vehicle’s electrical system.
Always use a 12V battery or the specified jump-start terminal according to the manufacturer’s instructions.
It is important to understand this difference for safety and to ensure that the jump-start procedure does not put you or the vehicle at risk.
Conclusion – How to Jump Start a Hybrid Car
The 12V battery system of hybrids just works much like a traditional car battery, but not exactly same as the traditional ones which is why you have to do preparation in terms to prevent costly mitakes and to keep your hybrid running smoothly.
Due to the presence of advanced technology and high-voltage components, jump-starting a hybrid car may seem a bit tricky at first, but with the right information and precautions, it is a simple and safe process.
Plus, you also have to understand this simple thing that hybrids are designed to receive, not to supply and not to jump-start as well and when you attempt to use a hybrid’s 12-volt system to jump start another vehicle then it can literally overload the system and that can actually cause the damage as well, so always follow the proper process with hybrid car battery.[¹]
It is important to understand the difference between the 12V auxiliary battery and the main traction battery, as this smaller 12V battery powers the car’s electronics and helps it start.
Following proper safety measures, connecting jumper cables correctly and making sure both vehicles are carefully prepared prevents damage to the hybrid’s sensitive systems and protects you from potential hazards.
Regular maintenance of the 12V battery, knowledge of your hybrid’s specific jump-starting instructions and preparation with quality jumper cables can save time, reduce stress and reduce stress.
Do you want to ask some questions?, then just comment them down below this guide.
Frequently Asked Questions
Q1. What is a hybrid car and how is it different from ordinary cars?
Answer: A hybrid car has a combination of a conventional gasoline engine and an electric motor. It has two types of batteries: a high-voltage traction battery that powers the electric motor to drive the car, and a smaller 12-volt battery that powers the electronic devices and starts the vehicle’s systems. Unlike ordinary cars, which rely on the 12-volt battery only to start the engine, hybrid cars use the 12V battery mainly to power the computers and signals that enable the car to start and go into “ready” mode.
Q2. Why won’t my hybrid car start even when the main battery is fully charged?
Answer: Even if the larger traction battery has a sufficient charge, if the 12-volt battery is weak or off, the hybrid car may not start. The 12V battery provides the initial power needed to activate the car’s electronic devices, control systems and ignition sequence. If this battery is not working properly, the hybrid car cannot enter ready mode, so it will seem as if the car has no power at all.
Q3. Is it safe to jump-start a hybrid car?
Answer: Yes, it is safe to jump-start a hybrid car if you take the right steps and precautions. You should never touch high-voltage parts, which usually have orange cables marked on them, and you should always connect the jumper cables in the correct order. Wearing safety gloves and glasses and following the manufacturer’s instructions ensures that you can jump-start your hybrid car without damaging its sensitive electronics or risking injury.
Q4. Do I need any special techniques to jump-start a hybrid car compared to a regular car?
Answer: Yes, jump-starting a hybrid car is a little different than a regular car. You should always use a 12-volt battery or the designated jump-start terminal. The main difference is that you should never attempt to use a high-voltage traction battery, which is dangerous and can seriously damage the vehicle and you. Other than that, the process of connecting the positive and negative cables, starting the donor car, and then starting the hybrid car is the same as a traditional jump-start.
Q5. Where is the 12V battery on a hybrid car?
Answer: The 12V battery can be in different places depending on the make and model of the car. Some hybrid cars, such as the Toyota Prius, have the 12V battery in the trunk near the rear wheel well. Some others, such as the Honda Hybrid, have it under the back seat. Some also put it under the hood, but it may be less visible than a traditional car battery. The best way to find it or the suggested jump-start terminals is to check your owner’s manual.
Q6. How should I connect jumper cables safely?
Answer: First connect the red cable to the positive terminal of the dead battery, then the red cable to the positive terminal of the donor battery. Next, connect the black cable to the negative terminal of the donor battery and finally connect the last black cable to a grounded metal part of the hybrid, not directly to the battery. Double-check all connections to avoid sparks or damage to electronic components. Always remove the cables in reverse order after the hybrid starts.
Q7. How long should I drive my hybrid car after a jump-start?
Answer: After successfully starting the hybrid car, it is advisable to let the car run for at least 15 to 30 minutes. This allows the 12V battery to fully charge and the electrical system to stabilize. Driving the car for this period also ensures that all electronic components are working properly before shutting the vehicle off again.
Q8. What should I do if the hybrid car still won’t start after a jump-start?
Answer: If the hybrid car won’t start again or a warning light appears on the dashboard, the 12V battery may need to be replaced. It’s important to avoid jump-starting a high-voltage traction battery. In such cases, it’s best to seek help from a certified mechanic or dealership to safely replace the battery and prevent further electrical damage.
Q9. Can I prevent my hybrid car from needing a jump-start?
Answer: Yes, regular 12V battery maintenance can prevent sudden failures. This includes checking the battery for corrosion or loose connections, keeping it clean, and making sure all electrical systems are turned off when the car is parked for long periods of time. Keeping jumper cables in the car and knowing the correct jump-start procedure also helps you be prepared for emergencies.
References:
[1] Is it bad for your hybrid battery to use your Prius to jumpstart another car?
https://www.reddit.com/r/Toyota/comments/sfjftb/is_it_bad_for_your_hybrid_battery_to_use_your/

Guys, I’m a car audio enthusiast and customization expert and I love clear sound and clean installation. Plus, I have spent years helping people build their dream audio setups. And whenever I’m working on cars, I probably listen to music and thinks about the next big upgrade.