Written By: Don Dodi
Fact Checked By: Kristen Brown
Reviewed By: Diego Rosenberg
A clean radiator is not just keeps your car cool, but it also keeps your engine’s health, makes it efficient and ready for the long drives.
Basically, radiator is designed to keep the engine from overheating problem by circulating the coolant and dispersing excess heat as well.
And over the period of time, the dirt, rust mineral deposits and old coolant can build up inside the radiator, that actually blocks the smooth flow of the liquid and reduces the ability to cool the engine effectively.
Along with this, there’s a study that shows that even a partially clogged radiator can actually raise the engine temperature by up to 20% to 30% which is huge, as it reduces the fuel efficiency and also it can even leads to the serious engine damage or gasket failure if you ignore it completely.
Plus, U.S. Department of Energy shows that engines which operates at the optimal temperatures then they performs up to 10% more efficiently and emit fewer pollutants that is shows the huge role play of properly working and clean radiator.
Basically, when you clean the radiator at the regular time intervals then it literally helps you to maintain the proper coolant circulation, prevents any kind of corrosion and extends the life of the radiator and engine components as well.
That’s why you should know How to Clean a Car Radiator, as to ensure that your vehicle runs smoother and won’t be overheat easily.
How to Be In the Safe Side While Cleaning the Car Radiator
1. Ensure the engine is cool before starting the car.
Always ensure the engine is completely cool before touching the radiator or removing the cover.
The radiator and engine contain hot coolant that can suddenly explode and cause serious burns.
Waiting for the engine to cool ensures you can work safely and without injury.
2. Wear gloves and safety glasses
Gloves protect your hands from sharp edges, hot parts and chemical cleaners, while safety glasses protect your eyes from coolant splashes or debris.
Wearing proper protective equipment reduces the risk of cuts, burns and chemical burns during the cleaning process.
3. Park the car on a level surface and apply the parking brake
Always park your car on a level and stable surface to prevent it from rolling or tipping over while you work.
Apply the parking brake to secure the car in place.
This precaution keeps you safe and allows you to concentrate on cleaning the radiator without worrying about accidental movement.
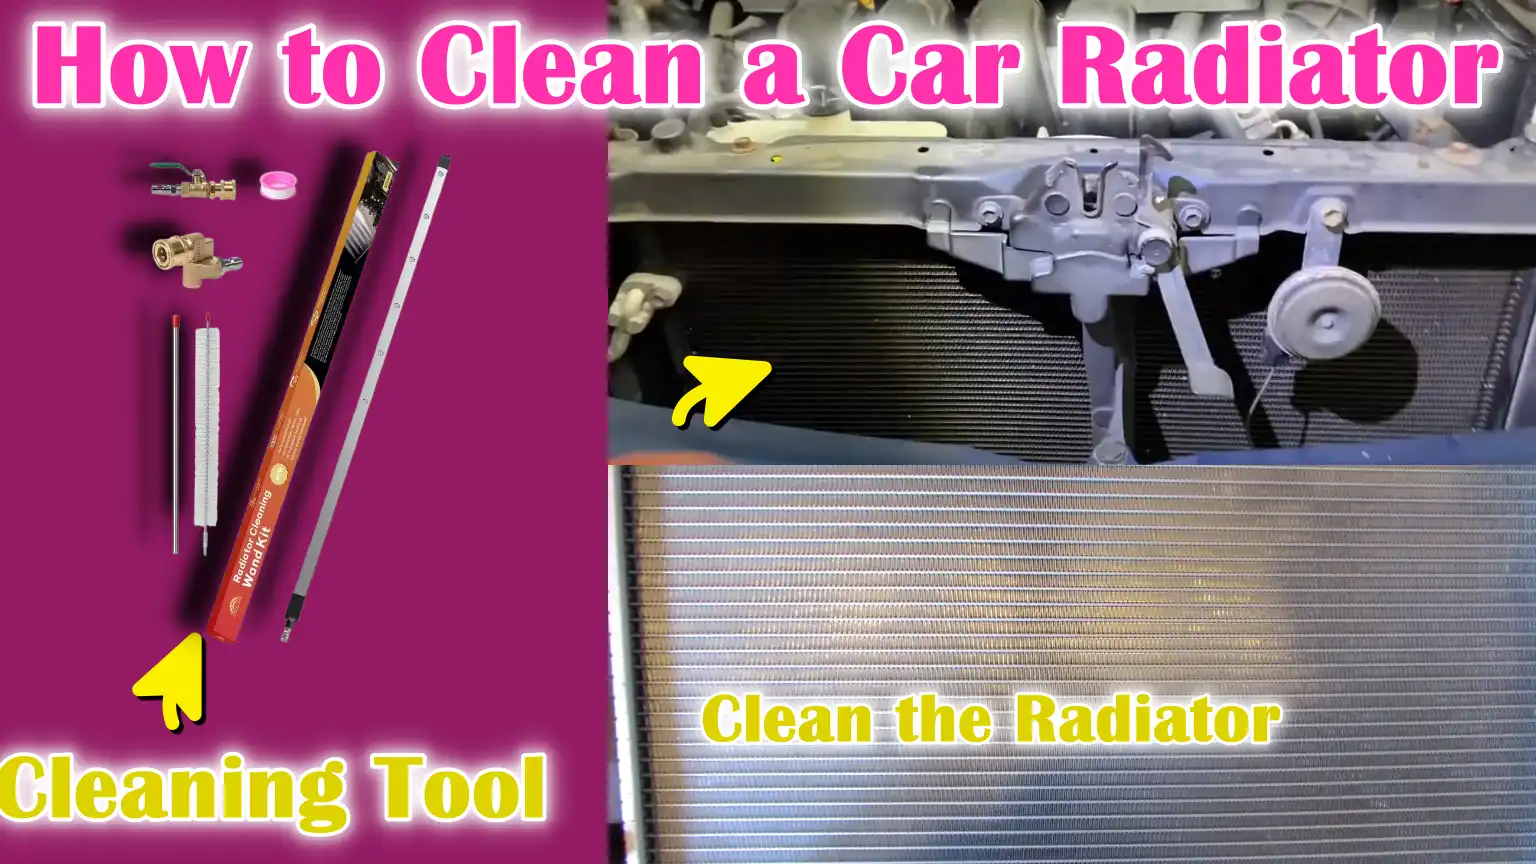
Tools
| Tool / Material | Purpose / Use | Notes / Tips |
|---|---|---|
| Radiator Flush Solution | Helps remove dirt, rust and deposits inside the radiator. | This can be purchased from an auto parts store; follow the instructions on the bottle. |
| Vinegar or Baking Soda | Alternative to commercial flushes for gentle cleaning. | Mix it with water to make a natural cleaning solution. |
| Distilled Water | Used for washing and diluting coolant. | Avoid tap water to prevent mineral deposits. |
| Drain Pan | Old coolant collects when draining the radiator. | Choose a pan that can hold all the liquid. |
| Funnel | Helps in adding fluid to the radiator without spilling it. | Keeps the process clean and easy. |
| Screwdriver | Required to open clamps or remove parts of the radiator. | Make sure it fits snugly into the screw. |
| Hose | Used to flush the radiator with clean water. | Can be connected to a tap or water source. |
| Replacement Coolant | Replaces old coolant after cleaning. | Use the type recommended in your car’s manual. |
How to Locate and Inspect the Radiator
1. Identify the Radiator’s Location
The radiator is usually located at the front of the engine bay, just behind the grille.
Its main function is to dissipate heat from the coolant into the air when the car is running.
Knowing the radiator’s exact location is important because it allows you to safely access it for cleaning and inspection.
Most cars have a rectangular or square radiator with thin metal fins and a lid on top.
Familiarizing yourself with its location ensures you can handle it carefully without accidentally damaging nearby components like fans or hoses.
2. Check for Debris, Rust, or Leaks
Before beginning any cleaning procedures, it’s important to thoroughly inspect the radiator.
Check for any dirt, leaves, or debris trapped between the radiator fins, as this can block airflow and reduce cooling capacity.
Also check for signs of rust, corrosion, or mineral deposits on the metal surfaces, which can weaken the radiator over time.
Check the radiator cap and surrounding hoses for leaks, cracks, or soft spots, as these indicate the system may need repairs in addition to cleaning.
Catching these problems early can prevent engine overheating and costly repairs in the future.
How to Drain the Old Coolant
1. Place a Drain Pan Under the Radiator Drain Plug
Before draining the coolant, place a drain pan directly below the radiator’s drain plug.
The drain pan collects old coolant, which is toxic and should never be poured onto the ground or into drains.
Using a pan ensures a clean and safe process, preventing leaks that could damage surfaces or harm the environment.
It’s important to choose a pan large enough to drain all the coolant from your radiator, as radiators can hold several liters of fluid depending on the vehicle type.
2. Carefully Remove the Radiator Cap
Always remove the radiator cap slowly and carefully before opening the drain plug.
This step allows the system to gradually release pressure, reducing the risk of hot coolant spilling out and causing burns.
If the engine was recently running, ensure it has completely cooled before touching the cap, as even small amounts of hot coolant can be dangerous.
Removing the cap allows the coolant to drain quickly and completely.
3. Open the drain plug and allow all the old coolant to drain completely
After installing the drain pan and removing the cover, open the radiator drain plug.
Allow the old coolant to drain completely.
Old coolant may contain rust, dirt and other debris, which, if left inside, can damage the radiator and engine.
If possible, completely drain both the radiator and drain hose, as remaining old coolant can dilute the new coolant and reduce its effectiveness.
After draining, close the drain plug tightly before beginning the flushing process.
For safety and environmental responsibility, it is important to properly dispose of used coolant at a recycling or hazardous waste disposal center.
How to Flush the Radiator System
1. Close the Drain Plug
After draining the old coolant, securely close the radiator drain plug.
Tightening the plug securely prevents leaks during the flushing process and ensures that the cleaning solution flows effectively through the system.
A tight drain plug is essential to maintain proper fluid flow and avoid leaks that could damage the engine bay or pose a safety hazard.
2. Add Radiator Flush Solution and Fill with Distilled Water
Next, pour the recommended amount of radiator flush solution into the radiator.
If a commercial flush is not available, a mild solution of vinegar or baking soda diluted in water can be used as a gentle alternative.
Fill the rest of the radiator with distilled water to ensure proper circulation and avoid mineral deposits present in tap water.
Using distilled water ensures that the system is protected from scaling and residue buildup, which can reduce cooling efficiency over time.
3. Run the engine to circulate the cleaner
Start the engine and turn the heater to the highest setting.
Let the engine run for 10 to 15 minutes.
This process ensures that the cleaning solution flows throughout the cooling system, reaching all hoses, the radiator core and the water pump.
This solution helps loosen rust, dirt and mineral deposits, improving the radiator’s ability to effectively remove heat from the engine.
4. Stop the engine and let it cool
After flushing with the flush solution, stop the engine and let it cool completely.
Handling the radiator or opening the drain plug while the engine is hot can cause burns from hot liquid or steam.
Cooling the engine ensures that it is safe to continue the draining process.
5. Drain the flush solution completely
Once the engine has cooled, open the drain plug and allow the flush solution and water to drain completely.
It is important to drain all of the cleaning fluid because any remaining residue could mix with the new coolant, reducing its effectiveness and causing corrosion or clogging.
The used flush solution must be disposed of properly following environmental safety guidelines, ensuring that harmful chemicals do not leach into drains or soil.
Read More:
How to Flush the Radiator with Clean Water
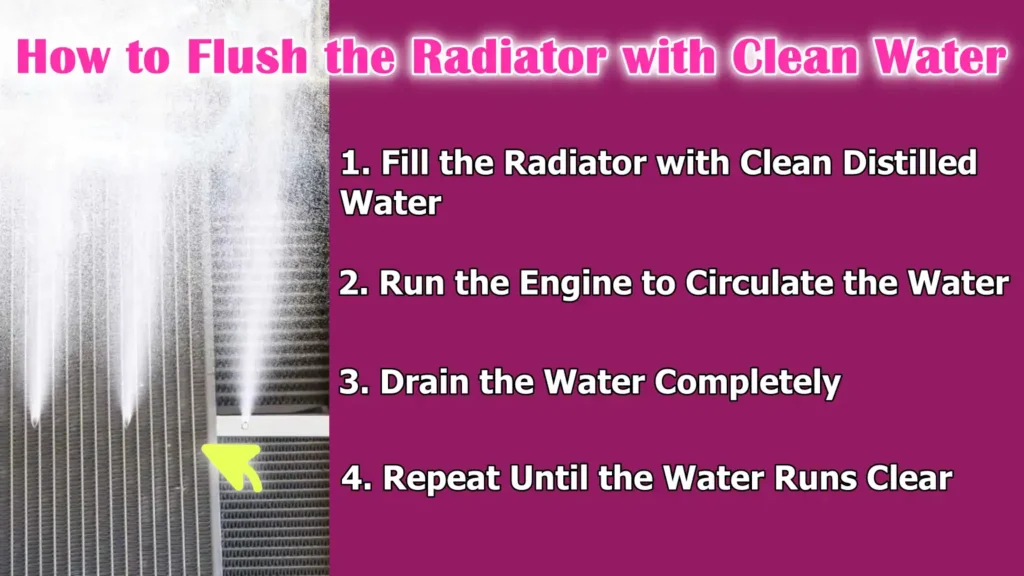
1. Fill the Radiator with Clean Distilled Water
After draining the flush solution, fill the radiator with clean distilled water.
Distilled water is preferred because it doesn’t contain minerals or impurities that could leave deposits in the radiator or corrode the metal.
This step helps remove any remaining dirt, rust, or cleaning solution after the flush, ensuring the system is clean before adding new coolant.
2. Run the Engine to Circulate the Water
Start the engine and let it run for a few minutes with the heater on.
This circulates clean water through the radiator, hoses and engine block, flushing out any remaining residue or debris.
Proper circulation is essential because some particles can remain in hard-to-reach places and running the engine ensures they are effectively flushed out.
3. Drain the Water Completely
After circulating, turn off the engine and let it cool.
Then, open the drain plug and let all the water drain completely.
Draining all the water ensures that the new coolant won’t be diluted and will maintain its protective properties.
4. Repeat Until the Water Runs Clear
If the water coming out of the radiator is still dirty or discolored, repeat the process of filling, running and draining until the water runs clear.
This ensures that the radiator and cooling system are completely clean and free of any residue.
A thoroughly flushed system improves cooling efficiency, prevents corrosion and helps extend the life of the radiator and engine.
How to Fill the Radiator with Fresh Coolant
Basically, there’s a study on corrosion inhibitors and coolant formulations that shows that modern coolants actually have inhibitors that ideally reduces rust and scaling in radiators, which is why it is really important to have the correct coolant chemistry as it matters for the long-term radiator health as it can prevent future rust in the radiator itself.[¹]
1. Mix the new coolant with distilled water
Check your vehicle manufacturer’s instructions to determine the correct type of coolant and whether it needs to be mixed with distilled water.
Many coolants come in concentrated form and must be diluted, usually in a 50:50 ratio, to prevent freezing, boiling and rusting.
Using the correct mixture ensures that the coolant will maintain the proper engine temperature and prevent internal damage.
Distilled water is recommended because it does not contain minerals or impurities that can cause deposits or corrosion inside the radiator.
2. Pour the coolant into the radiator
Using a clean funnel, carefully pour the coolant mixture into the radiator until it reaches the recommended level.
The funnel helps prevent spillage and ensures that the coolant flows directly into the radiator.
Pouring slowly fills the coolant evenly throughout the system, reducing the chance of air pockets forming in the hoses or radiator core, which can interfere with proper cooling.
3. Refill the Overflow Reservoir
After filling the radiator, check the overflow reservoir and fill it to the proper level according to the markings on the reservoir.
The overflow reservoir stores excess coolant that expands as the engine warms up, ensuring the system remains full and maintains proper pressure.
Keeping the reservoir at the correct level keeps the cooling system operating efficiently and can prevent engine overheating or coolant loss.
How to Remove Air Bubbles – Known as System Bleeding
1. Remove the Radiator Cap and Start the Engine
After filling the radiator with fresh coolant, start the engine and leave the radiator cap open.
Running the engine allows the coolant to fully flow through the radiator, hoses and engine block.
This step is important because air bubbles can form in the cooling system during refilling and trapped air can reduce radiator performance, causing the engine to overheat or even overheat.
Allow the engine to reach its normal operating temperature with the cap open.
2. Add More Coolant While Air Is Bleeding
When the engine is running, you may notice air bubbles rising from the radiator.
This is a normal part of the bleeding process, as trapped air is being expelled from the cooling system.
Monitor the coolant level and add more if needed to maintain the proper level.
Keeping the system filled during this process prevents the formation of new air pockets and ensures that coolant reaches every part of the engine.
3. Replace the Radiator Cap Securely
When no air bubbles are visible and the coolant level has stabilized, securely replace the radiator cap.
A well-sealed radiator cap maintains proper pressure in the cooling system, which is essential for efficient operation and prevention of overheating.
After securing the cap, monitor the engine temperature during the first few drives to ensure the system is functioning properly and no air is trapped inside.
This final step completes the bleeding process and ensures that the radiator and cooling system are functioning safely and effectively.
Finally Check for Important Things After Cleaning the Radiator
1. Check for Leaks
After completing the radiator cleaning and refilling process, carefully inspect the radiator, hoses and connections for leaks.
Check for wet spots, drips, or discoloration around the radiator cap, drain plug and hose connections.
Early detection of leaks is crucial because even a small leak can reduce the coolant level over time, causing the engine to overheat and cause damage.
Ensuring all components are secure and leak-free confirms that the cooling system is functioning properly.
2. Monitor the Temperature Gauge During the Next Drive
During your first few drives after cleaning, keep a close eye on the vehicle’s temperature gauge.
A properly cleaned and refilled radiator will keep the engine temperature within normal operating limits.
If the gauge shows unusual spikes or the engine overheats, stop immediately and check the coolant level, radiator cap and hoses.
Monitoring the gauge ensures that the cooling system is working efficiently and there are no air pockets or leaks.
3. Properly Dispose of Old Coolant
Used coolant is toxic to humans, animals and the environment, so it must be disposed of safely.
Take old coolant to a certified recycling center or local hazardous waste collection center.
Never pour coolant into drains, the ground, or water sources.
Proper disposal protects the environment and complies with safety regulations, while also ensuring that harmful chemicals do not contaminate or cause harm.
Conclusion – How to Clean a Car Radiator
One can say that overheating may be the engine’s biggest threat, but you just need a clean radiator and everything will be managed as the cooling properties of radiator makes it strongest defense against it.
A clean radiator allows coolant to flow freely, prevents overheating and reduces the risk of costly engine repairs due to rust, debris, or trapped air.
Regular maintenance, including flushing, rinsing and refilling with fresh coolant, extends the lifespan of both the radiator and engine components.
By carefully following safety precautions, checking for leaks and properly bleeding the system, you maintain optimal cooling performance and protect your vehicle from unexpected breakdowns.
Overall, taking the time to clean your radiator not only improves your car’s performance, but also saves money, increases fuel efficiency and ensures a safe driving experience on every trip.
Plus, you can ask anything related to this guide in the comment section below.
Frequently Asked Questions
Q1. What is a car radiator and why is it important?
Answer: The car radiator is a vital part of a vehicle’s cooling system. Its primary function is to maintain the engine at a proper temperature by circulating coolant and removing excess heat. If the radiator is dirty or clogged, coolant cannot flow properly, which can cause the engine to overheat. Overheating can damage engine components, reduce performance and require costly repairs. Regular radiator cleaning and maintenance keeps the engine running smoothly and efficiently.
Q2. How often should I clean my car’s radiator?
Answer: It’s generally recommended to clean or flush the radiator every 30,000 miles or at least every two years, but this can vary depending on your car model and driving conditions. Cars driven in hot climates or dusty areas may require more frequent cleaning as dirt and debris can accumulate more quickly. Regularly checking the radiator for signs of rust, debris, or low coolant levels can help you determine when it needs cleaning.
Q3. Can I clean my radiator at home?
Answer: Yes, most car owners can clean their radiator at home, provided they follow proper safety precautions and have the right tools. You’ll need to ensure the engine is cool, wear gloves and safety glasses and handle coolant carefully, as it’s toxic. By following steps like draining the old coolant, flushing the system, rinsing with clean water and refilling with fresh coolant, you can effectively clean your radiator without professional help.
Q4. What type of coolant should I use after cleaning the radiator?
Answer: Always use the coolant recommended in your car’s owner’s manual. Some coolants come pre-mixed, while others need to be diluted with distilled water, usually in a 50:50 ratio. Using the correct coolant ensures proper protection against freezing, boiling and rusting inside the radiator. Distilled water is important because tap water contains minerals that can accumulate inside the radiator and reduce its efficiency.
Q5. Are air bubbles in the radiator dangerous?
Answer: Yes, air bubbles in the radiator, also known as air pockets, can reduce the efficiency of the cooling system. They prevent coolant from circulating properly, leading to hot spots and engine overheating. Bleeding the system by removing the radiator cap, running the engine and adding coolant as it drains removes these bubbles and ensures proper radiator performance.
Q6. How do I know if my radiator needs cleaning?
Answer: Some signs that your radiator needs cleaning include frequent engine overheating, rusty or dirty-looking coolant, low coolant levels without any leaks and reduced fuel efficiency. Additionally, debris or dust trapped in the radiator fins can block airflow, causing the engine to overheat. Regular inspections can help you catch these issues before they become major problems.
References:
[1] Study on Corrosion Inhibitors of Eco -Friendly Radiator Coolants
https://www.researchgate.net/publication/338047471_Study_on_Corrosion_Inhibitors_of_Eco_-Friendly_Radiator_Coolants

Guys, I’m a car audio enthusiast and customization expert and I love clear sound and clean installation. Plus, I have spent years helping people build their dream audio setups. And whenever I’m working on cars, I probably listen to music and thinks about the next big upgrade.