Written By: Don Dodi
Fact Checked By: Kristen Brown
Reviewed By: Diego Rosenberg
It is true that even worn out transmission mount can cause the vibrations which can be strong enough to loosen other components under your car as well, then it becomes really concerning factor to replace them as soon as possible.
Basically, it is designed to hold the transmission securely to the frame and other than this it also absorbs the engine vibrations and movement as well.
But it is again true, that over the period of time: because of the constant heat, torque and road vibrations it can cause the rubber or hydraulic components inside the mount to wear out or crack.
And whenever it happens, then you may start to feel some rough vibrations through the floor of the vehicle such as: clunking sounds during the gear changes or even you can notice that the transmission feels slightly out of the place as well.
Plus, according to the Automotive Training Institute, the worn or damaged transmission mounts are on the list of 10 most common causes of drivetrain vibration complaints.
That’s why you actually need to learn How to Replace a Transmission Mount so that you can easily solve that annoying vibration and also it reduces excessive stress on the drivetrain, plus it helps to protect other parts such as: driveshaft, axles and exhaust system from any kind of premature wear as well.
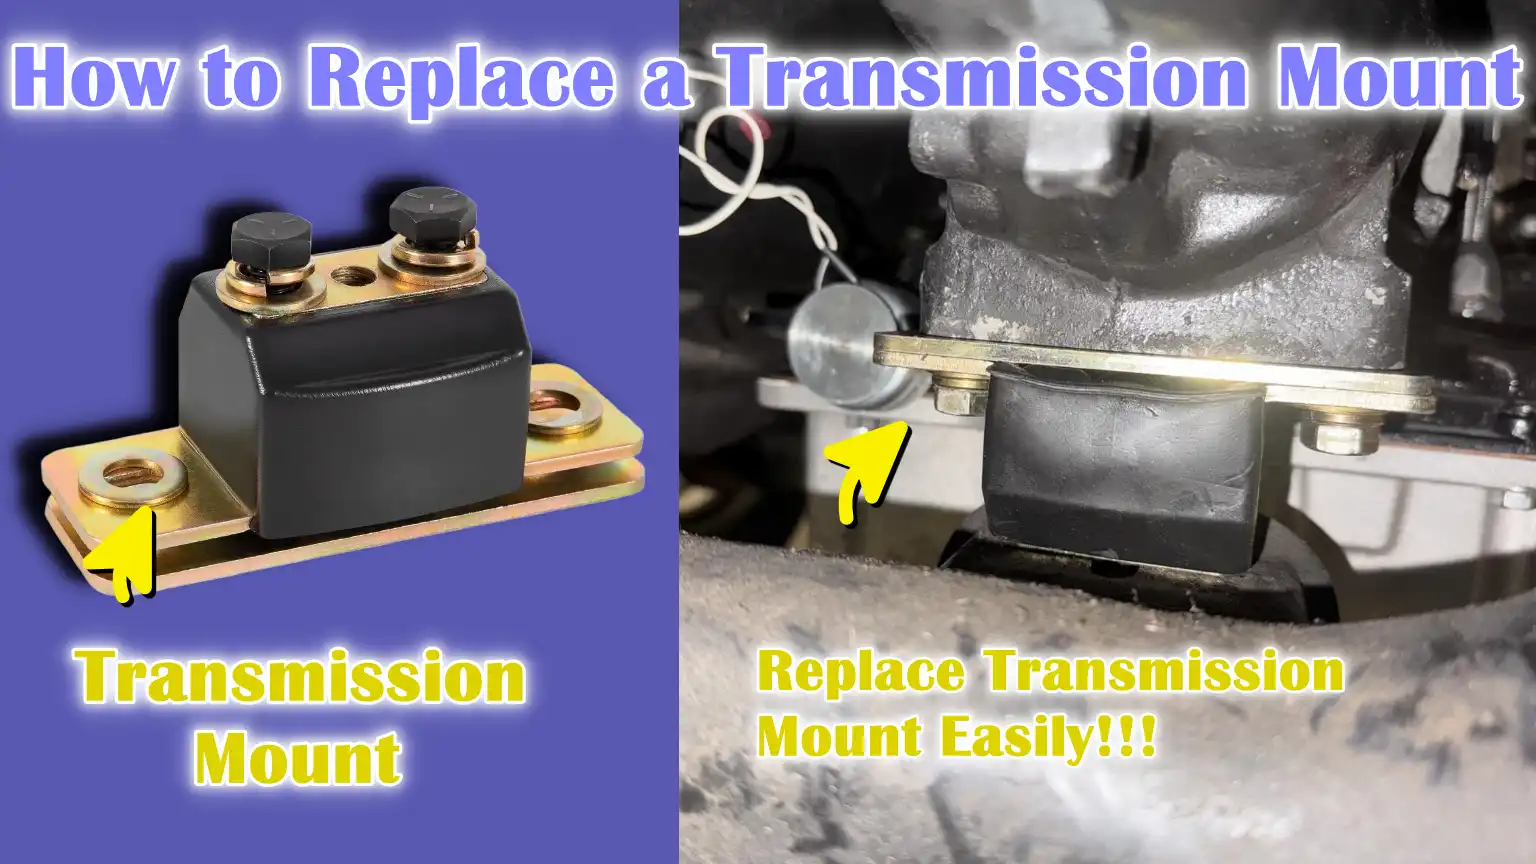
First, You Should Understand the Transmission Mount
1. Objective
The transmission mount is one of the most crucial yet often overlooked components of a vehicle’s drivetrain system.
Its primary function is to securely hold the transmission in place while also providing the necessary flexibility to absorb vibrations and movements from the engine.
During acceleration, deceleration and gear shifting, both the engine and transmission generate torque and vibrations.
Without a proper mount, these forces would be directly transferred to the car’s frame and cabin, resulting in excessive noise, harsh vibrations and long-term structural damage.
By stabilizing the transmission, the mount helps maintain the correct alignment of drivetrain components, leading to smoother gear shifts, quieter operation and an overall more comfortable ride.
2. Location
The transmission mount is typically located underneath the vehicle, between the transmission housing and the vehicle’s frame or crossmember.
In most front-wheel-drive cars, it’s near the rear of the engine bay, connecting the transmission to a metal support bracket or subframe.
In rear-wheel-drive vehicles, the mount is usually located in the middle of the car, where the transmission meets the driveshaft.
Some cars utilize a single mount, while larger or performance vehicles may use multiple mounts for increased stability.
Knowing its exact location is important as accessibility can vary depending on the vehicle’s design, which dictates how the replacement process should be handled.
3. Construction
A transmission mount is designed to handle both strength and flexibility.
It typically consists of a sturdy metal bracket combined with a rubber or rubber-like compound that acts as a cushion.
The metal portion provides structural support, while the rubber absorbs shocks and vibrations from the transmission.
Over time, this rubber material can crack, harden, or separate due to exposure to heat, oil and constant movement, reducing its ability to effectively absorb vibrations.
Some modern mounts utilize advanced materials such as hydraulic fluid or reinforced elastomers to improve damping and minimize vibration transfer to the cabin.
4. Types of Mounts
Transmission mounts come in three main types: hydraulic, solid and polyurethane.
Hydraulic mounts are filled with fluid that helps dampen vibrations more efficiently, making them common in modern cars that prioritize comfort and smoothness.
Solid mounts, typically made of hard rubber or metal, offer maximum stability and are often used in racing or performance applications where durability is more important than vibration isolation.
Polyurethane mounts offer a balance between the two; they are stronger than rubber mounts but still absorb some vibrations, making them a popular aftermarket option for drivers who want improved performance without excessive harshness.
Each type has its own characteristics and choosing the right type depends on the vehicle’s design, driving conditions and comfort preferences.
Basic Signs That Indicate You Need to Replace Your Transmission Mount
1. Excessive Engine or Transmission Movement
One of the first and most noticeable signs of a failing transmission mount is excessive engine or transmission movement.
When the mount weakens or breaks, it can no longer properly support the transmission.
As a result, you may notice the engine or transmission shifting back and forth, specially when changing gears or accelerating.
Under normal circumstances, the transmission should move slightly due to torque, but not enough to cause a noticeable jolt.
If the mount is severely worn, the transmission may sag or shift out of place, potentially damaging other components such as the driveshaft or linkages.
Over time, this uncontrolled movement can also put excessive stress on cables, hoses and even the exhaust system, leading to more costly repairs if ignored.
2. Clunking or Thumping Noises When Shifting Gears
A common symptom of a bad transmission mount is a clunking or thumping noise when shifting from park to drive, drive to reverse, or during sudden acceleration.
This occurs because the loose mount allows the transmission to move abruptly, causing it to hit the frame or surrounding metal components.
The sound may be described as a sudden jolt or bang, specially when shifting gears quickly or applying power after coming to a stop.
In many cases, this noise is mistaken for a transmission or suspension problem, but it’s often due to the mount’s inability to properly dampen the impact.
Ignoring this noise can lead to further wear on the transmission case and other supporting parts that rely on stable alignment.
3. Vibrations felt inside the cabin, specially during acceleration
Another clear warning sign is feeling vibrations through the floorboard, steering wheel, or seats, specially when the vehicle is accelerating or idling in gear.
The rubber inside the transmission mount is designed to absorb and dampen these vibrations.
When the rubber cracks, hardens, or separates from the metal frame, it loses its ability to cushion the transmission.
As a result, vibrations that would normally remain contained beneath the vehicle are felt directly in the cabin.
This not only makes the ride uncomfortable but also indicates that other mounts may soon begin to fail as well, as they are forced to handle more movement than they are designed for.
4. Visible cracks or damage to the mount rubber
If you inspect the transmission mount and see cracks, tears, or deterioration in the rubber portion, it’s a sure sign that it needs replacing.
Over time, engine heat, constant stress and exposure to oil or transmission fluid cause the rubber material to harden.
Once the rubber loses its elasticity, it can no longer properly absorb movement, allowing metal parts to come into direct contact.
If the mounts are of the hydraulic type, they may also show signs of fluid leaks, indicating that the internal damping system has failed.
Regular visual inspections during oil changes or undercarriage maintenance can help you detect this problem before it causes further damage.
5. Misalignment of drivetrain components
When a transmission mount fails, the transmission can sag or shift out of its proper position.
This can lead to misalignment of drivetrain components such as the driveshaft, axles and shift linkage.
Misalignment can cause vibrations at certain speeds, uneven wear on CV joints or universal joints and difficulty shifting gears smoothly.
In more severe cases, it can put stress on the transmission housing or cause leaks from misaligned seals.
Proper alignment is essential for maintaining the balance and efficiency of the drivetrain, so a faulty transmission mount should be replaced as soon as misalignment is detected.
Tools
| Tool / Material | Purpose | Explanation (Easy to Understand) |
|---|---|---|
| Floor Jack and Jack Stands (or a Lift) | To safely raise and support the vehicle | A floor jack is used to raise the vehicle off the ground and jack stands hold it firmly in place while you work underneath. Never rely solely on the jack for support, as it could break under the weight. |
| Transmission Jack or Engine Support Bar | To hold and support the transmission during mount removal | A transmission jack helps support the weight of the transmission when removing or installing mounts. In some front-wheel-drive cars, an engine support bar can hold the engine up. |
| Socket and Wrench Set | To remove and tighten bolts and nuts | These tools are used to loosen and tighten the bolts that hold mounts, brackets and crossmembers in place. A good set of different sizes ensures you can handle all the fasteners correctly. |
| Torque Wrench | To tighten bolts to the correct torque | A torque wrench ensures that the bolts are tightened according to the manufacturer’s instructions. This prevents under- or over-tightening the bolts, as both methods can distort or damage the mount. |
| Pry Bar (Optional) | Gently moving components for alignment helps. | Sometimes the transmission or mounts may not align correctly during installation. A pry bar can be carefully used to adjust the position without stressing or damaging any parts. |
| Replacement Transmission Mount (OEM or High-Quality Aftermarket) | To replace the worn or damaged mount | The new mount should match your vehicle’s make and model exactly. OEM mounts offer factory-level quality, while good aftermarket options may offer improved durability or performance. |
| Safety Gloves and Goggles | To protect your hands and eyes while working | Gloves protect you from cuts, hot surfaces and sharp edges, while goggles prevent dust and debris from getting into your eyes. Safety equipment is essential for safe and comfortable repairs. |
How to Ensure Safety
1. Always Park on a Level Surface and Engage the Parking Brake
Before beginning any work under your vehicle, it is crucial to park it on a level, solid surface, such as a concrete driveway or a flat garage floor.
This prevents the vehicle from rolling or shifting while you are working underneath it.
Engaging the parking brake locks the rear wheels, adding another layer of safety.
If the ground is uneven or soft, such as gravel or dirt, the jack stands could sink or tip over, causing the vehicle to fall unexpectedly.
A stable working surface ensures your safety and helps keep the jacks and stands properly positioned during repairs.
2. Use Jack Stands – Don’t Rely Solely on the Jack
A floor jack is designed to lift a vehicle, not to hold it for extended periods.
Hydraulic jacks can lose pressure over time or fail suddenly, causing the vehicle to fall without warning.
For this reason, always support the vehicle using properly rated jack stands placed under the designated lift points.
After lifting the vehicle, gently shake it before going underneath to ensure it is secure.
Many safety experts, including the National Institute for Automotive Service Excellence (ASE), consider this one of the most important safety rules when performing undercar maintenance.
Correct use of jack stands prevents serious injury and ensures you can confidently focus on your repairs.
3. Allow the Engine and Transmission to Cool Before Working
The transmission and engine can reach temperatures exceeding 200°F while running.
Working on them immediately after driving can cause severe burns or make parts too hot to handle safely.
It’s best to allow the vehicle to cool for at least thirty minutes before touching any parts near the transmission.
This cooling period also allows the metal parts to contract slightly, making it easier to loosen the bolts without damaging the threads or fasteners.
Exercising patience at this stage prevents accidents and ensures a safe and smooth repair process.
4. Wear Safety Equipment – Gloves and Goggles
Even minor repair jobs can expose you to sharp edges, hot surfaces, or falling debris.
Wearing good mechanic’s gloves protects your hands from cuts, scrapes and contact with oil or chemicals.
Safety goggles are equally important, shielding your eyes from rust particles, dirt, or small pieces of metal that might fall while loosening bolts or working under the car.
Additionally, protective clothing or long sleeves can help prevent skin irritation from grease or fluids.
Following these safety steps makes the job cleaner, safer and more comfortable.
5. Disconnect the Battery if Necessary to Avoid Short Circuits
Some transmission mounts are located near electrical wiring, sensors, or metal brackets, which can lead to a short circuit if a tool accidentally comes into contact with live wires.
Disconnecting the negative terminal of the car battery before starting any work eliminates this risk.
This is a simple precaution that prevents electric shocks, accidental engine starts, or damage to the vehicle’s electronic components.
Once the mount replacement is complete and all tools are removed, you can safely reconnect the battery and test the repair.
This small step ensures both your safety and the protection of the vehicle’s electrical system.
How to Replace a Transmission Mount – Proper Method
How to Locate the Transmission Mount
1. Understanding the Mount’s Location
Before beginning the replacement process, it’s crucial to know exactly where the transmission mount is located.
In most vehicles, the transmission mount is situated at the rear of the transmission, where it connects to the crossmember or the vehicle’s frame.
Its function is to secure the transmission while absorbing vibrations and torque from the engine and drivetrain.
Depending on your vehicle’s design, the mount’s location may vary—front-wheel-drive cars typically have the mount on the side or bottom of the transmission, while rear-wheel-drive vehicles have it in the middle of the car, just before the driveshaft connects to the transmission tail housing.
2. Differences Based on Vehicle Type
Front-wheel-drive vehicles often utilize a compact, side-mounted transmission mount due to their transverse engine layout.
This helps save space under the hood and provides better vibration control during shifting.
Rear-wheel-drive vehicles, on the other hand, rely on a rear-mounted mount attached to a crossmember that supports the transmission’s tail shaft.
All-wheel-drive systems may use multiple mounts to handle the additional torque and weight of the drivetrain.
Understanding these differences will help you identify the correct mount and prepare for any variations in design or accessibility.
3. Consulting the Service Manual
Every vehicle is built differently, so consulting your car’s service or repair manual is one of the most important steps before you begin.
The manual will provide precise diagrams of the mount’s location, type and any parts that need to be removed to safely access it.
Some vehicles may have protective covers, brackets, or exhaust components that partially block the mount.
The service guide includes torque specifications for the bolts and safety tips specific to your model.
Following this official reference reduces the risk of errors and makes the process easier and safer.
4. Initial Inspection and Preparation
Before removing anything, carefully inspect the mount and surrounding area.
Look for signs such as cracks in the rubber, oil-soaked or deteriorated material, or separation between the rubber and metal housing.
These are clear indications that the mount is worn out and needs replacing.
Also, check surrounding parts such as the crossmember bolts, shift linkage and exhaust bracket to ensure they won’t interfere with removal.
Properly preparing the workspace and knowing where the mount is located allows you to work more efficiently and reduces the chance of damaging other components during the replacement process.
How to Support the Transmission
1. Why Supporting the Transmission is Crucial
Before removing any transmission mount bolts, it is essential to properly support the transmission.
The transmission is a heavy component, often weighing between 100 and 300 pounds depending on the type of vehicle.
Once you loosen or remove the mounts, there is nothing holding that weight except the jack or stand you are using.
Without proper support, the transmission could suddenly drop, causing significant damage to the transmission casing, driveshaft, or surrounding components.
It could also create a dangerous situation for anyone working underneath the vehicle.
Supporting the transmission ensures that its weight is evenly distributed and that it remains stable while the mounts are being replaced.
2. How to Position the Jack
To safely support the transmission, use a transmission jack if you have one.
These are specifically designed for this purpose and provide a wide, adjustable platform with straps or chains to secure the unit.
However, if you don’t have a transmission jack, a floor jack with a sturdy wooden block can also be used effectively.
The wooden block is crucial because it spreads the load and prevents direct metal-to-metal contact, which could crack the transmission’s aluminum casing.
The jack should be positioned directly under the transmission’s oil pan or main body, depending on the design and make firm and even contact without excessive pressure.
3. Balancing and Aligning the Support
Once the jack is in place, slowly raise it until it makes firm contact with the transmission.
Avoid raising it too high, as this could put stress on or misalign other components such as the engine or driveshaft.
The goal is simply to support the weight of the transmission, not to lift it above its natural position.
Once contact is made, double-check the balance of the jack or stand to ensure the transmission is level.
A slightly tilted jack can shift under pressure after bolts are removed, potentially causing misalignment or slippage.
You can check for stability by gently rocking the transmission – it should feel secure and not wobble from side to side.
4. Checking for Stability Before Proceeding
Before loosening any bolts from the transmission mount, ensure the transmission is completely stable on the jack or support bar.
Take a moment to re-examine your setup from different angles to ensure everything is centered and evenly supported.
If the transmission tilts or shifts after removing some bolts, stop immediately and readjust the jack.
Do not proceed if there is any indication of instability, as even a slight shift in weight can cause a dangerous fall.
Once you are confident the transmission is securely supported, you can begin removing the bolts from the mount.
Proper support during this step prevents accidents, protects your transmission from cracks or stress and keeps the replacement process controlled and safe.
How to Remove Access-Blocking Components
1. Understanding Why Components Need to Be Removed
In many vehicles, the transmission mount is not directly visible or easily accessible because other parts of the undercarriage surround it for structural or safety reasons.
Manufacturers design vehicles this way to keep the frame strong and prevent damage to vital drivetrain components.
However, this also means that before accessing the transmission mount, you may need to temporarily remove parts such as the crossmember, exhaust bracket, or skid plate.
Each of these components plays an important role in the vehicle’s structure.
The crossmember supports both the transmission and chassis, the exhaust bracket securely holds the exhaust pipe sections and the skid plate protects the undercarriage from debris, stones and road shock.
Understanding their purpose will help you handle them carefully when removing them so they don’t bend or move out of place.
2. Identifying Which Parts to Remove
Every vehicle’s design is different, so not all of these parts will need to be removed in every case.
In many front-wheel-drive vehicles, you may only need to remove a protective cover or a portion of the subframe to access the transmission mount.
In rear-wheel-drive or all-wheel-drive vehicles, you may need to completely remove a crossmember or driveshaft support, as they are often located directly below the transmission tail housing.
Before removing anything, it’s best to consult your service manual to confirm which parts are obstructing access.
The manual will also indicate if there are any electrical connections, such as sensors or ground straps, connected to the components that you must safely disconnect first.
3. How to Safely Remove Components
Once you’ve identified what needs to be removed, begin loosening the bolts slowly and carefully.
It’s crucial to support any large components, such as crossmembers, before fully dismantling them, as they may still be supporting some of the transmission’s weight.
Use a transmission jack or other floor jack to gently support the part while removing its fasteners.
This will prevent a sudden fall that could damage the threads or surrounding parts.
When removing the exhaust bracket, allow the exhaust to cool completely, as it can remain hot even long after the engine is off.
Gently separate it from the bracket or rubber hanger to create clearance without bending the pipe.
4. Be mindful of bolts and hardware
During this stage, you’ll be removing numerous bolts, nuts, washers and brackets of different sizes and lengths.
Mixing them up can make reassembly confusing and lead to incorrect fitment later.
To stay organized, it’s a good idea to place the bolts on a clean surface in the order you removed them, or label them with masking tape.
Another helpful tip is to take pictures with your phone before and during the disassembly process, specially if you’re new to vehicle repair.
This visual reference will make it much easier to reinstall everything correctly once the new transmission mount is installed.
5. Final Check Before Proceeding
After removing all blocking components, pause to confirm that the transmission mount is now fully open and accessible.
Check that no wiring harnesses, fluid lines, or brackets are still in the way.
Make sure the transmission is still securely supported by the jack from the previous step, as removing the crossmember or skid plate may slightly alter the weight distribution.
Once you’ve confirmed that everything is clean and stable, you can safely proceed to loosen and remove the old transmission mount.
This preparatory step prevents mistakes, streamlines the workflow and significantly reduces the risk of damaging surrounding parts during the replacement process.
How to Loose the Transmission Mount Bolts
1. Understanding the Importance of This Step
Once you have clear access to the transmission mount and have ensured the transmission is securely supported, the next step is to remove the mounting bolts that hold the mount in place.
These bolts are responsible for securing the transmission to the frame or crossmember and they should be handled carefully to avoid damaging the threads or misaligning the components.
In most vehicles, the transmission mount is secured by two or more bolts – one set attaching the mount to the transmission and another set securing it to the vehicle’s frame or support bracket.
Because these bolts bear the entire weight and torque of the transmission, they are typically very tight and may have thread-locking compound applied during factory installation.
Taking your time and using the correct tools will prevent them from stripping or breaking.
2. Safely and Correctly Loosening the Bolts
Begin by slightly loosening the bolts while supporting the transmission with the jack.
Never remove all the bolts at once, as the transmission could suddenly shift or fall.
Instead, work between the bolts, gradually loosening each one to evenly release the pressure from the mount.
It’s best to use a high-quality socket and wrench that fits snugly to avoid stripping the bolt heads.
If the bolts are stubborn or corroded, a penetrating oil spray applied after soaking for several minutes can help loosen them.
Applying excessive force without proper preparation can cause the bolts to break or damage the threaded holes, making the repair even more difficult.
Throughout this entire step, always ensure the transmission remains balanced and supported to avoid putting unnecessary stress on surrounding components.
3. Removing Bolts from Both Sides
The transmission mount is held in place by bolts on both the transmission side and the chassis or frame side.
Begin by removing the bolts on the chassis side, as this will usually allow the mount to loosen slightly without any problems.
Then, carefully remove the bolts connecting the mount to the transmission housing.
Leave one bolt slightly tightened on each side until you are ready to completely remove the mount.
This keeps the mount stable and prevents it from shifting suddenly when the last bolt is removed.
Once you are certain the mount is fully supported and the transmission is secure, remove the final bolt and take out the old mount.
4. Inspecting Bolts and Mounting Points
After removing the bolts, carefully inspect their condition.
Bolts can corrode, stretch, or weaken over time due to exposure to heat, moisture, or transmission fluid.
A damaged or corroded bolt will not hold the correct torque when reinstalled, which can cause the new mount to loosen prematurely.
If you see any corrosion, damaged threads, or any visible wear and tear, replace the bolt with a new one of the same grade and size.
It’s also a good idea to clean the threaded holes using a wire brush or compressed air to remove any debris from the old bolts or old thread-locking compound.
Also, check the mounting bracket and frame for cracks or deformation, as these parts are subjected to considerable load during vehicle operation.
5. Preparing for the Next Step
Once the bolts are removed and inspected, the old transmission mount should be free from its position.
Before installing the new mount, double-check that the transmission is still properly supported by the jack and that all mounting surfaces are clean and smooth.
This ensures that the new mount will sit correctly and align perfectly with the bolt holes.
Taking these precautions at this stage helps prevent future vibration, uneven wear and alignment problems after installing the new mount.
After safely removing the bolts and checking everything, the transmission system is now ready for the next step: installing the new mount.
How to Remove the Old Transmission Mount
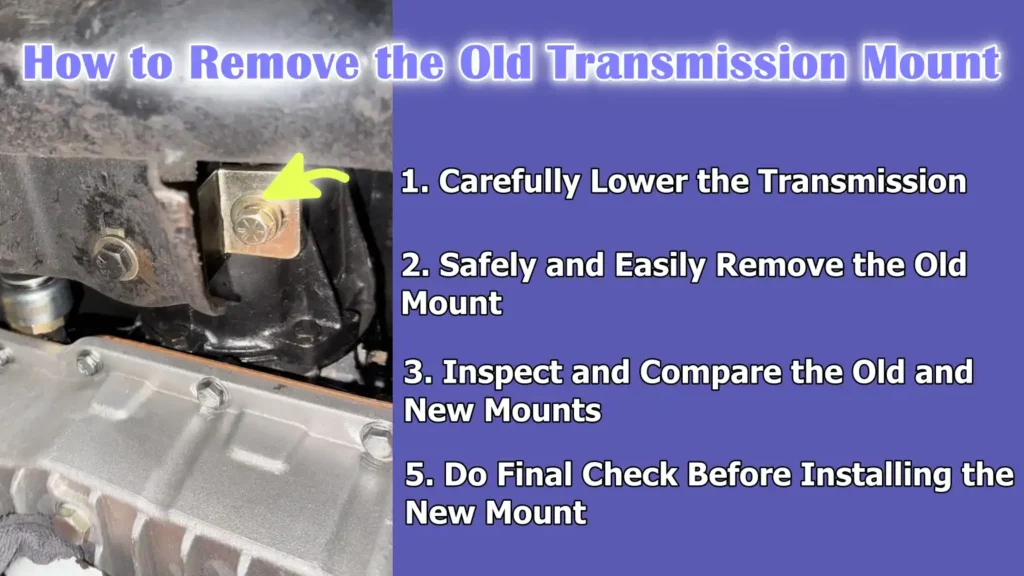
1. Carefully Lower the Transmission
After removing all the mounting bolts, the next step is to remove the old transmission mount.
To do this safely, it may be necessary to slightly lower the transmission to create enough clearance to remove the mount.
Using a transmission jack or a floor jack with wooden blocks, carefully lower the transmission very slowly, only a few inches at most.
This will allow you to relieve any tension between the mount and the crossmember, preventing strain on the transmission housing or other connected components such as the driveshaft, shift linkage, or exhaust system.
Lowering the transmission too much can stretch or bend these parts, potentially leading to leaks, misalignment, or vibration issues later on.
Therefore, always proceed slowly and keep an eye on all surrounding components while lowering the transmission.
2. Safely and Easily Remove the Old Mount
Once the transmission is slightly lowered and stable, gently remove the old mount from its position.
Some mounts may come out easily, while others may require gentle prying or wiggling due to tight spaces or corrosion around the bolt holes.
Be careful not to damage any surrounding metal brackets or rubber components during removal.
If the mount seems stuck, double-check that all bolts have been completely removed and that no hidden retaining clips or brackets are still holding it in place.
It’s also a good idea to inspect the crossmember and surrounding areas for signs of wear, corrosion, or damage while the mount is removed.
These parts are often subjected to stress over time and addressing any issues now can prevent future problems.
3. Inspect and Compare the Old and New Mounts
After removing the old mount, carefully compare it to the new replacement mount.
This step is crucial to confirm compatibility and proper fitment.
Even slight differences in height, bolt spacing, or size can cause misalignment after installation.
The new mount should have the same metal bracket design, rubber density and bolt hole arrangement as the original.
Check the firmness of the rubber or polyurethane insert—this material is what absorbs vibrations and prevents excessive transmission movement.
If the old mount shows signs of cracking, separation, or excessive softness, it confirms that replacing it was the right decision.
Some aftermarket mounts may look slightly different, but they should perfectly match the dimensions and bolt placement specified by the manufacturer.
4. Preparing the Mounting Area for Installation
Before installing the new mount, take a moment to clean the area where the old mount was located.
Use a clean cloth or wire brush to remove any dirt, oil residue, or rust.
This will ensure that the new mount sits properly and that the correct torque is achieved when tightening the bolts later.
Check for any leaks from the transmission or engine mount above, as fluids can soften the rubber components and shorten their lifespan.
Ensuring that the mounting surfaces are clean and smooth provides a solid base for the new mount and prevents unnecessary vibrations or misalignment after installation.
5. Do Final Check Before Installing the New Mount
At this stage, ensure that the transmission is still properly supported and stable on the jack.
Check that no components are compressed or strained due to the jack’s position.
Once you’ve confirmed that everything is clean and secure, you’re ready to install the new transmission mount in its place.
Carefully following these steps will ensure a smooth installation process, a perfect fit for the mount and proper transmission alignment, leading to improved vehicle performance and a smoother driving experience.
How to Install the New Transmission Mount
1. Positioning the New Mount Correctly
After removing the old mount and cleaning the area, the next step is to properly position the new transmission mount in its correct location.
The new mount should align perfectly with the same bolt holes and bracket where the old one was located.
Even slight misalignment can cause stress on the transmission case or frame, leading to vibrations or premature wear.
Use a jack to slightly raise or lower the transmission to achieve perfect alignment between the mount, transmission and crossmember.
In most vehicles, the mount is designed to fit easily without force, so if it doesn’t slide in easily, double-check the orientation or verify that the new part matches your vehicle’s specifications.
Taking the time to properly position the mount ensures that it can effectively absorb vibrations and keep the transmission stable during operation.
2. Hand-Tightening the Bolts to Prevent Damage
Once the new mount is in place, begin hand-tightening the bolts before using any tools.
This step is crucial as it prevents cross-threading, which can damage the bolt threads or the holes in the transmission housing.
Hand-tightening allows you to feel if the bolt is going in smoothly and ensures proper alignment.
If any bolt feels tight from the start, remove it and try again rather than forcing it.
After hand-tightening all the bolts, you can use a ratchet or wrench to snug them up slightly, but do not fully tighten them yet.
Leaving the bolts slightly loose at this stage allows the mount to settle evenly as the weight of the transmission readjusts on it, helping to maintain proper alignment.
3. Aligning the Mount and Transmission Before Final Tightening
Before fully tightening the bolts, check that the transmission and mount are seated evenly without any gaps or twists.
The transmission should rest naturally on the mount, with the rubber or polyurethane section in between and without any stress on it.
If it appears uneven, slightly raise or lower the jack supporting the transmission until everything is perfectly aligned.
This step ensures the mount will function correctly, absorbing movement and vibration rather than transferring it to the chassis.
Correct alignment also prevents future strain on the driveline, driveshaft and CV joints, which could lead to driving difficulties or noises while driving.
4. Tightening the Bolts to Manufacturer Specifications
Once proper alignment is confirmed, tighten all bolts to the torque value specified by the vehicle manufacturer.
This information can be found in the service manual or sometimes printed on the mount’s packaging.
Using a torque wrench is crucial for this step, as overtightening can compress the mount’s rubber or damage the brackets, while undertightening can cause the mount to shift or loosen while driving.
Apply torque gradually and evenly, tightening the bolts in an alternating pattern to ensure pressure is evenly distributed across the mount.
Once all bolts are tightened to the correct specifications, double-check each one to ensure they are secure.
This guarantees a safe and reliable installation that will be able to handle the load of the engine and transmission.
5. Checking the Installation Before Proceeding
After the bolts are properly tightened and the mount is secure, take one final look around the installation area.
Ensure that no wires, hoses, or linkages are pinched or stretched near the mount.
Check that the transmission is properly seated and that there is no contact between the mount and other metal parts that could cause noise or vibration.
If everything appears aligned and stable, the new mount is now correctly installed.
Carefully completing this step ensures that the transmission will operate smoothly, vibrations will be minimized and the vehicle’s overall stability and comfort will be restored.
How to Reinstall Components
1. Reinstalling the Crossmember and Brackets
Once the new transmission mount is securely installed and torqued to the correct specifications, the next step is to reinstall all the components that were previously removed to access the mount.
This typically includes the crossmember, exhaust brackets, skid plate, or any shields that were temporarily removed.
The crossmember is a critical structural component that supports the transmission and helps maintain the rigidity of the vehicle’s frame.
When reinstalling it, ensure it aligns perfectly with the bolt holes and sits properly on the mounting surfaces.
You may need to slightly adjust the transmission height using a jack to ensure proper fitment without putting stress on the bolts.
Each bracket or shield should also be positioned correctly, just as it was before removal, to avoid interference with other parts such as the exhaust system or suspension components.
2. Ensuring Proper Alignment of All Components
Alignment is crucial during reinstallation, as even slight misalignment can lead to vibrations, stress on the drivetrain, or noise while driving.
For example, if the crossmember is slightly misaligned, it can cause the transmission to sit at an incorrect angle, affecting driveshaft alignment and potentially leading to premature wear of universal joints or CV axles.
To avoid this, it’s best to hand-thread all bolts before fully tightening them.
This ensures each bolt goes in smoothly without cross-threading and allows for slight adjustments in position before final tightening.
The correct tightening sequence for the bolts, usually from the center outwards, helps distribute the pressure evenly and ensures the crossmember or bracket sits properly against the frame.
3. Securely and firmly tighten all bolts
Once all components are in place and properly aligned, tighten each bolt according to the torque settings specified by the manufacturer.
Using a torque wrench is crucial, as uneven or overtightening can cause stress fractures in metal parts or crush rubber components such as new mounts.
Double-check each fastener to ensure it is secure and that no bolts were missed during reassembly.
It’s also good practice to inspect each bolt for signs of corrosion, wear, or stretching before reinstalling them – if any appear damaged, replace them immediately to avoid malfunctions while driving.
Taking the time at this stage ensures the transmission system remains stable and all supporting structures are capable of safely supporting the vehicle’s power and weight.
4. Checking surrounding components and connections
Before finishing the job, inspect all surrounding components that may have been temporarily removed or loosened during the repair.
Check any wiring harnesses, vacuum lines, or sensors near the transmission area that may have been disturbed.
Reconnect any clips or retainers holding these components in place so they don’t rub against hot or moving parts.
If the exhaust system was disconnected or removed during this process, inspect it to confirm there are no leaks or contact points with the frame.
Also, ensure that the transmission jack or support equipment did not put excessive pressure on or bend any part of the drivetrain during the work.
5. Final verification before lowering the vehicle
Once everything is reassembled and checked, visually confirm that the transmission is properly seated, the crossmember is level and all bolts are evenly tightened.
There should be no gaps or misalignment between the mounts, frame and transmission housing.
At this point, you can slowly remove the transmission jack or floor jack, allowing the transmission to naturally rest on the new mounts and reinstalled crossmember.
As the weight settles, carefully observe to ensure everything remains aligned and stable.
Completing this step with patience and precision guarantees that your transmission system is fully supported, vibration-free and ready for smooth operation once the vehicle is started and driven.
How to Lower the Transmission and Remove the Support
1. Safely and Gradually Lowering the Transmission
After confirming that all bolts, brackets and crossmembers have been securely reinstalled, the next step is to carefully lower the transmission back into its natural resting position.
This must be done very slowly and steadily to avoid putting sudden stress on the new mounts or surrounding components.
Using a transmission jack or a sturdy floor jack, slowly lower the transmission until it rests completely on the new mounts.
It is crucial to carefully observe the mounts as the weight of the transmission is transferred onto them.
The mounts should compress slightly but remain firm and properly aligned.
Lowering the transmission too quickly or unevenly can cause the mounts to shift, twist, or even break, undoing all the careful work done in the previous steps.
A smooth, controlled movement ensures that the transmission is perfectly aligned with the chassis and that the mounts function as intended.
2. Ensuring Proper Mount Seating
Once the transmission is fully lowered, inspect the mounts to ensure they are properly seated.
The metal brackets should be flush against the frame or crossmember and the bolts should appear straight without any angle or tension.
The rubber or polyurethane portion of the mount should be centered and not unevenly compressed.
If any mount appears crooked or off-center, slightly raise the transmission and realign it before lowering it again.
This small adjustment ensures that the weight of the transmission is evenly distributed and that the mounts can effectively absorb engine and drivetrain vibrations during driving.
An improperly seated mount can cause noticeable vibrations, rattling, or premature wear on other drivetrain parts over time, so accuracy is crucial at this stage.
3. Checking Alignment and Clearance
Once the transmission is in place, check for proper alignment and clearance in the surrounding area.
Inspect the driveshaft, linkages and exhaust system to ensure none of these components are binding, bent, or in contact with the mounts or crossmember.
The transmission tailshaft and driveshaft should form a straight line without any visible offset.
Even a slight misalignment can cause driveline vibrations or uneven wear on bearings and joints over time.
You should also verify that no electrical connectors, fluid lines, or brackets are pinched or compressed under the mounts or support structure.
If any components were moved during installation, now is the time to properly position them before finalizing the installation.
4. Removing Jacks and Support Equipment
Once you have confirmed that the mounts and transmission are properly aligned, you can carefully remove the supporting jacks.
First, relieve the pressure from the transmission jack, then lower the vehicle if you supported it with floor jacks.
Once everything is completely lowered and stable, remove the equipment from under the vehicle.
Before doing so, take one last look to ensure the transmission does not shift or tilt when the supports are removed.
The transmission should now rest firmly and naturally on the new mounts without any visible gaps or movement.
This confirms that the installation was done correctly and the new mount is properly supporting the weight of the transmission.
5. Preparing for Final Inspection and Testing
After removing the support, perform a final inspection to ensure every component is secure and properly aligned.
Check for any remaining tools, bolts, or parts under the vehicle before proceeding.
Gently rock the transmission by hand to verify that it feels stable and there is no unusual movement.
Once you are satisfied with the setup, fully lower the vehicle if it was raised on jack stands.
This careful approach ensures that the new transmission mount will function efficiently, maintain proper alignment and minimize vibrations when the vehicle is back on the road.
Read More:
How to Inspect After Replacement
Basically, it is also shown in the experimental study that evaluates that mount condition and design actually affects the forces sent into the chassis, which means that a worn or damaged mount actually raises the force passes into the car frame, in that way a bad mount lets more engine shake reach to its cabin and other parts of the vehicle as well and that’s why the replacement reduces that noise and stress on related components as well.[¹]
1. Initial Start-up and Visual Inspection
After installing the new transmission mount and removing all supports, the first crucial step is to start the vehicle and carefully observe its behavior during idling.
Allow the engine to run for a few minutes and carefully inspect the transmission area.
The mount should hold the transmission firmly in place without any visible shaking, tilting, or excessive movement.
A properly installed mount will effectively absorb engine and drivetrain vibrations, resulting in stable idling.
If you observe excessive movement in the transmission or vibrations in the engine, it may indicate that the mount is not properly installed or that a bolt has not been tightened to the correct torque specification.
This initial visual inspection helps confirm that the new mount is functioning correctly before taking the vehicle on the road.
2. Listening for and Feeling for Vibrations or Unusual Noises
While the engine is idling, pay attention to any vibrations, rattling, or knocking sounds coming from underneath the vehicle.
A new and properly fitted mount should result in a smooth ride, specially inside the cabin.
If there are still noticeable vibrations in the floor or steering wheel, it may indicate that another mount—such as an engine mount—is also failing or that the transmission mount is slightly misaligned.
Gradually revving the engine can also help you identify whether the mount is functioning correctly; the transmission should remain stable without any sudden jolts or metal-to-metal contact.
Listening for these signs immediately after installation can help detect any minor issues before they escalate into major problems.
3. Taking a Short Test Drive
Once the engine idle test is complete, take the vehicle for a short and cautious test drive.
Start driving slowly and pay attention to how the vehicle behaves while accelerating, decelerating and shifting gears.
With the new transmission mount, gear shifts should feel smoother and more precise as it prevents the transmission from moving out of place under load.
You should also notice a reduction in vibration and noise compared to before the replacement.
If you hear any knocking or rattling noises while shifting gears or going over bumps, it could mean the mount bolts are not fully tightened or another support bracket needs adjustment.
Testing the vehicle under normal driving conditions helps confirm that the mount is properly installed and restoring stability to the drivetrain.
4. Inspecting the Mount During and After the Drive
After your short test drive, park the vehicle on a level surface and inspect the mount again.
Look for any signs of movement, gaps, or loose bolts.
The mount should remain in the same position as it was during installation, without any shifting or loosening.
This step is specially important because the mount may settle slightly due to the weight and heat of the engine.
Rechecking ensures that it continues to properly support the transmission even after normal driving stresses.
If you notice any issues, retighten the bolts to the specified torque value and ensure everything is secure.
5. Rechecking Torque After a Few Miles
Even after a successful installation and test drive, it’s best to recheck the torque on all mounting bolts after driving a few miles or after a day or two of normal use.
This is because the new mount and bolts may shift or compress slightly as they adjust to the load and heat of the transmission.
Retorquing the bolts ensures they remain secure and that the mount continues to function effectively over time.
Skipping this step can cause the bolts to gradually loosen, leading to vibrations, noise, or premature failure of the mount.
By performing this final check, you can ensure that the transmission mount replacement is completed correctly and that the vehicle is safe, smooth and ready for long-term use.
What are Common Mistakes to Avoid
1. Failure to Properly Support the Transmission During Work
One of the most common and serious mistakes people make when replacing a transmission mount is failing to properly support the transmission.
The transmission is a heavy and delicate component that relies on its mounts to stay in place.
If it’s not securely supported with a transmission jack or floor jack and wood blocks when removing it, the entire unit can sag slightly after the old mount is loosened.
Even a slight drop can put stress on the driveshaft, CV joints and linkage connections, or even crack the transmission housing.
Proper support ensures the transmission remains level and stable throughout the process, preventing damage to connected systems and making the installation of the new mount much easier and safer.
It’s always best to take a little extra time to double-check the jack’s placement and stability before removing any bolts.
2. Over-tightening or Under-tightening Mount Bolts
Another very common problem during installation is applying the wrong torque to the mount bolts.
Over-tightening the bolts can crush or deform the metal brackets or over-compress the rubber portion of the mount, reducing its ability to absorb vibrations.
Conversely, under-tightening the bolts can allow the mount to shift slightly during acceleration or gear changes, leading to knocking noises and premature mount failure.
Every vehicle has manufacturer-specified torque values designed to ensure both security and flexibility.
Using a torque wrench to tighten each bolt to the correct specification is the best way to prevent damage or misalignment.
Even small torque errors can significantly affect the mount’s performance, specially over time.
3. Using Cheap or Incorrect Aftermarket Mounts
Choosing low-quality or incorrect replacement mounts is another mistake that can lead to poor performance and wasted effort.
Not all aftermarket mounts are designed to match original factory specifications and some may use softer or weaker materials that degrade quickly under heat and stress.
A poorly manufactured mount can exacerbate vibrations, noise and even driveline misalignment.
In some cases, the bolt holes or bracket shapes on cheaper mounts may not align correctly, forcing the installer to modify or force the fit, compromising the system’s integrity.
Always ensure the replacement part correctly matches the vehicle’s make, model and transmission type and whenever possible, choose an OEM or high-quality aftermarket mount known for durability and proper fitment.
4. Ignoring other worn mounts or related components
Many people make the mistake of replacing only one worn transmission mount while ignoring other worn mounts in the system.
Engine and transmission mounts work together to stabilize and properly position the entire powertrain.
If one is new and strong but others are worn, the system can still experience excessive movement, vibration and stress.
This uneven load distribution can even cause the new mount to fail prematurely.
It’s good practice to inspect all engine and transmission mounts during the replacement process, as they are often exposed to similar levels of heat, oil and stress.
If other mounts show signs of cracking, looseness, or oil contamination, replacing them at the same time ensures balanced performance and extends the lifespan of the drivetrain.
5. Failure to re-inspect and test after installation
Even after a successful installation, failing to perform a final inspection and test is another mistake that can lead to future problems.
After installing the new mount, it’s crucial to start the vehicle, observe the transmission’s behavior and take a short test drive to confirm that vibrations have been reduced and gear shifting feels smooth.
After driving a few miles, it’s crucial to recheck the torque on all the bolts because the new mounting material may settle slightly.
Skipping this step after installation can cause the bolts to gradually loosen or the mount to shift, reducing the effectiveness of the repair.
Taking the time to thoroughly check the installation ensures that the new mount performs as expected and prevents future problems.
Basic Cost and Time Estimate
1. Average Time Required – 1 to 2 hours
Replacing a transmission mount is generally not a very time-consuming repair, but the exact time required depends on the type of vehicle and the location of the mount.
For most front-wheel-drive or rear-wheel-drive cars, if all the tools are ready and there are no complications, the entire process can usually be completed in one to two hours.
However, vehicles with more compact engine bays or those with multiple transmission mounts may take longer, as extra components such as crossmembers or exhaust parts may need to be removed to access the mount.
For DIYers, the process may take a little longer due to the extra care taken in lifting the vehicle and ensuring everything is properly aligned.
Nevertheless, it is a manageable task for those with some mechanical skills and patience.
2. Typical Part Cost – $50 to $200 depending on vehicle model
The cost of a replacement transmission mount can vary significantly depending on the make, model and year of the vehicle.
For smaller sedans or compact cars, a single mount from a reputable aftermarket supplier might cost around $50 to $100.
For larger vehicles like SUVs or trucks, the price can increase to around $150 or $200 because the mount needs to be larger and stronger to handle the increased torque and weight.
Original Equipment Manufacturer (OEM) parts are typically more expensive but often offer the best fit, materials and long-term reliability.
It’s also important to note that cheaper mounts may fail prematurely or cause vibration issues, leading to additional repair costs down the road.
Investing in a well-made mount often saves money in the long run by preventing driveline wear and maintaining smooth performance.
3. Labor Cost – If Professionally Done Then Its $150 to $400
If you have this job done by a professional mechanic, the labor cost can range from $150 to $400, depending on the complexity of the vehicle and local labor rates.
Shops typically charge for one to two hours of labor, but vehicles that are difficult to access the transmission or require lifting the engine support or removing multiple components may incur higher charges.
In some cases, dealerships charge more because they use OEM parts and specialized tools.
However, having the work done by an experienced technician ensures that the mount is properly aligned, the bolts are tightened to specification and no other components are damaged during the process.
This professional precision is specially important for vehicles with complex transmission systems or where proper alignment is critical for smooth shifting and power delivery.
4. Overall Considerations
In summary, replacing a transmission mount is one of the least expensive repairs related to drivetrain support and it significantly improves driving comfort and performance.
A properly installed mount can eliminate vibrations, prevent shifting problems and protect other components from strain.
Whether you do it yourself or hire a professional, the cost and time are well worth it considering the benefits of smooth operation and reduced wear and tear on other transmission and engine parts.
It’s a small but essential investment in maintaining the long-term health and driving experience of your vehicle.
Conclusion – How to Replace a Transmission Mount
It can easily eliminate the vibration you’re feeling right now, yes it is a actually simple rubber and metal mount that can remove that annoying vibration and clunking, even it protects the transmission from destructive vibration and stress as well.
A properly functioning transmission mount securely holds the engine and transmission in place, preventing unwanted movement that could cause vibrations, difficulty shifting gears, or damage to other components.
When the mount wears out or breaks, it creates excessive play, putting stress on the driveshaft, exhaust and even electrical connectors.
Inspecting and replacing a failing mount not only improves comfort but also protects the heart of your vehicle’s power delivery system.
The process of replacing a transmission mount, while mechanical in nature, teaches the importance of precision, patience and attention to detail.
Every step—from safely supporting the transmission to tightening bolts to the manufacturer’s torque specifications—ensures the system remains properly aligned.
Using the correct tools and safety precautions helps prevent accidents and guarantees the new mount will function as intended.
This job may take a few hours, but the benefits are long-lasting: reduced vibrations, smoother gear shifts and less wear and tear on critical transmission components.
In most cases, replacing a worn mount immediately transforms the driving experience.
Vibrations at idle disappear, gear changes become quieter and the drivetrain feels more solid during acceleration.
It’s a satisfying and rewarding maintenance task for both DIY enthusiasts and professionals.
Regularly inspecting the mounts during oil changes or major services allows you to catch wear and tear early, potentially saving you from costly transmission or engine repairs down the line.
So, if you still have confusion about anything related to this guide, just let us know by commenting down below.
Frequently Asked Questions
Q1. What is a transmission mount and why is it important?
Answer: A transmission mount is a small but crucial part that connects the transmission to the vehicle’s frame or crossmember. Its main function is to securely hold the transmission in place while absorbing vibrations and movements that occur when the engine and transmission are running. Most mounts are made from a combination of metal and rubber, making them strong yet flexible enough to dampen vibrations. Without a proper mount, the transmission would move around during acceleration, braking, or gear shifting, leading to noise, excessive vibration and potential damage to other components like the driveshaft or exhaust. Simply put, the transmission mount helps ensure a smooth and comfortable ride while protecting other components from stress.
Q2. How do I know if my transmission mount is bad?
Answer: You can usually tell if your transmission mount is failing if you start hearing clunking or banging noises when shifting gears or accelerating. Another common symptom is feeling vibrations inside the cabin, specially at idle or when driving uphill. You might also notice more movement than usual in the engine or transmission when shifting from park to drive. In some cases, you might even see visible cracks or separation in the rubber portion of the mount. If left unattended, a bad mount can lead to drivetrain misalignment and damage to other components, so it’s best to get it checked as soon as you notice any of these signs.
Q3. Can I drive with a bad transmission mount?
Answer: Driving with a bad or worn-out transmission mount is not recommended. While you might be able to drive for a short distance, doing so for an extended period can lead to serious problems. A bad transmission mount allows the transmission to move excessively, increasing vibrations, affecting gear shifting and potentially stressing surrounding components such as hoses, wiring and even the driveshaft. Over time, this can lead to cracked exhaust pipes or damaged transmission lines. If you suspect your transmission mount is bad, it’s safest to have it inspected and replaced promptly to avoid more expensive repairs later.
Q4. How long does it take to replace a transmission mount?
Answer: Replacing a transmission mount typically takes one to two hours for most vehicles. The exact time depends on your car’s design, how easy it is to access the mount and whether other parts need to be removed to reach the mount. Some vehicles have mounts that are easily accessible from underneath, while others require removing the crossmember, skid plate, or exhaust bracket first. If a professional mechanic performs the job, it’s usually completed within a couple of hours. If you’re doing it yourself, allow extra time to work carefully and double-check each step for safety.
Q5. How much does it cost to replace a transmission mount?
Answer: The cost of replacing a transmission mount depends on your vehicle model and whether you do it yourself or hire a mechanic. The part itself typically costs between $50 and $200. If you go to a repair shop, labor costs can add another $150 to $400, depending on the complexity of the job. In total, a professional replacement can cost you approximately $200 to $600. Doing it yourself saves on labor costs, but you’ll need the right tools, such as a jack, stands and a torque wrench, to do it safely and correctly.
Q6. Can I replace a transmission mount myself?
Answer: Yes, you can replace the transmission mount yourself if you have basic mechanical skills and the right tools. The most important thing is safety, as you’ll need to support the transmission while removing the mount. You can use a transmission jack or a floor jack with wooden blocks to keep the transmission stable. Once it’s securely supported, you can remove the old mount, install the new one and tighten the bolts to the correct torque. It’s crucial to carefully follow your vehicle’s service manual, as each car has slightly different procedures and torque settings. If you’re not completely confident, it’s best to have a professional do the job.
References:
[1] Study on Test and Evaluation of Engine Mounting System Based on Transmission Force
https://www.researchgate.net/publication/352826091_Study_on_Test_and_Evaluation_of_Engine_Mounting_System_Based_on_Transmission_Force

Guys, I’m a car audio enthusiast and customization expert and I love clear sound and clean installation. Plus, I have spent years helping people build their dream audio setups. And whenever I’m working on cars, I probably listen to music and thinks about the next big upgrade.