Written By: Don Dodi
Fact Checked By: Kristen Brown
Reviewed By: Diego Rosenberg
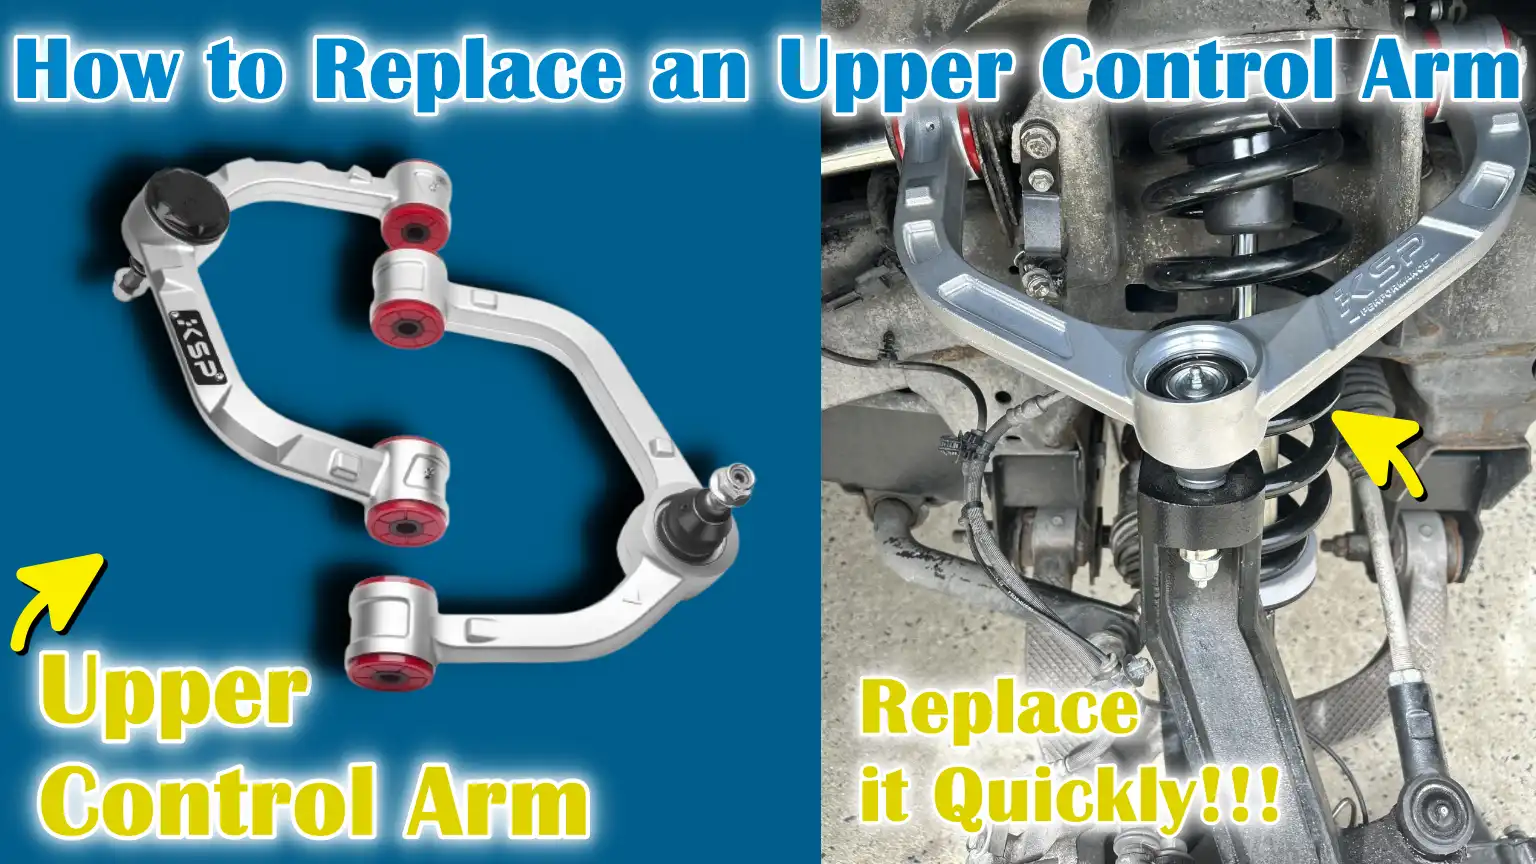
It is the fact that the Upper Control Arm is the key part of your vehicle’s suspension system, which literally helps the front wheels to move up and down in the smooth way and still keeps them totally aligned that result to the stable steering and even tire wear as well.
Plus, most of the vehicles and specially those with an independent front suspension actually uses both upper and lower control arms to connect the wheel hub to the frame, that basically allows controlled motion as the vehicle travels over the bumps or rough surfaces.
But because of the long service and time period, it exposes to the dirt and moisture that leads to the condition that upper control arm and its bushings or ball joints starts to wearing out and there are constant stress as well with the road vibrations.
Whenever it wears out, then it is normal thing to hear clunking noises, have uneven tire wear, feel steering vibration or leads to the difficult handling, so whenever these things happens then you should know that these are all signs that the control arm needs to be replaced or repair.
This guide shows you How to Replace an Upper Control Arm, so that you can maintain proper wheel alignment, braking stability and tire life as well.
Tools
| Tool / Material | Purpose / Why It’s Needed | Tips for Use |
|---|---|---|
| Jack and Jack Stands | Used to lift and safely support the vehicle while working underneath. | Always place jack stands on a solid, level surface and never rely on the jack alone for support. |
| Lug Wrench | Helps remove wheel nuts before taking off the wheel. | Loosen the nut slightly before lifting the car to make it easier to remove. |
| Socket and Ratchet Set | It is necessary to remove the bolts, nuts and fasteners that hold the control arm and suspension parts in place. | Use the correct socket size to prevent stripping bolts; a ratchet with a long handle provides more leverage. |
| Torque Wrench | Ensure bolts and nuts are tightened to manufacturer’s specifications. | Overtightening or undertightening can cause serious suspension problems – always follow torque specifications. |
| Ball Joint Separator / Pickle Fork | Used to separate the control arm’s ball joint from the steering knuckle without damaging other parts. | Apply steady pressure and avoid hitting nearby rubber boots to prevent tearing. |
| Penetrating Oil (like WD-40) | Loosens rusted or stuck bolts, specially on older vehicles. | Spray the bolts a few minutes before removing them to make them easier to unscrew. |
| Replacement Upper Control Arm (OEM or Aftermarket) | The new control arm will replace the damaged one. | OEM (original equipment manufacturer) parts ensure the right fit; aftermarket parts can be cost-effective, but check the quality and fit. |
| Cotter Pins (if required) | The small pin is used to lock the ball joint nut securely in place. | Always use new cotter pins; never reuse old or bent cotter pins. |
| Gloves and Safety Glasses | Protect your hands and eyes when working on suspension parts. | Essential for safety when handling tools or rusty parts. |
| Wheel Chocks | Prevents vehicle from rolling while being lifted. | Place them behind or in front of the wheels on the ground. |
| Shop Rags / Towels | Useful for wiping grease, oil and dirt from parts and hands. | Keep several clean cloths nearby for quick clean-ups. |
| Optional: Impact Wrench | Expedites bolt removal and installation. | This is great for saving time, but always do the tightening with a torque wrench. |
| Optional: Breaker Bar | Provides extra leverage for loosening overly tightened bolts. | Use with care to prevent breaking or rounding the bolts. |
| Optional: Pry Bar | The suspension helps gently move the components into place during installation. | Use slow, even pressure to avoid damaging the rubber bushing or mount. |
Make Sure to Take Safety Precautions
1. Park the vehicle on a level surface and engage the parking brake
Before beginning any repair work on your vehicle, always ensure you have parked it on a flat, level surface.
This step prevents the vehicle from unexpectedly rolling or shifting while you are working underneath it.
Engaging the parking brake locks the rear wheels in place, adding another layer of safety.
If the ground is uneven or sloped, the risk of the vehicle slipping off the jack or stands is significantly increased.
A smooth, stable surface provides a safe and controlled working environment, allowing you to focus on your work without worrying about unexpected movement.
2. Wear safety gloves and eye protection
Working on suspension parts often involves metal components, sharp edges, rust, dirt and oil.
Wearing safety gloves protects your hands from cuts, scrapes and chemical exposure, while safety glasses shield your eyes from debris, dust, or rust particles that may fall when loosening old bolts.
Even a small particle in the eye can cause irritation or injury, so wearing protective gear is not just a precaution – it’s essential for safe and comfortable work.
Choosing gloves with good grip will also help you handle tools and parts more effectively.
3. Always support the vehicle securely with jack stands – never rely solely on the jack
A hydraulic jack is designed to lift the vehicle, not to hold it for extended periods.
Once the car is lifted, always place sturdy jack stands under the designated lifting points on the frame or suspension.
This prevents the vehicle from accidentally falling if the jack pressure decreases or the jack shifts.
Many accidents occur when people rely solely on the jack, but jack stands provide solid, reliable support that can safely hold the vehicle while you work underneath it.
Before beginning any repairs, double-check that both stands are properly positioned and the vehicle is stable.
4. Disconnect the battery if necessary
In some vehicles, you may need to work near electrical components when working on the suspension or under the hood.
Disconnecting the battery helps prevent accidental short circuits, sparking, or damage to sensitive sensors and connectors.
This is specially important when working near wiring harnesses or using any electrical tools during the repair.
To minimize the risk of electric shock or component damage, always disconnect the negative terminal first and connect it last.
This simple step can prevent costly mistakes and keep you safe during the repair process.
How to Prepare The Vehicle First
1. Loosen the Lug Nuts Before Lifting the Vehicle
Before lifting the vehicle off the ground, it’s crucial to slightly loosen the lug nuts on the wheel you intend to remove.
Doing this while the tire is still in contact with the ground prevents the wheel from spinning while you turn the wrench.
This step makes it much easier to completely remove the nuts after the vehicle is lifted.
Many people make the mistake of lifting the vehicle first and then loosening the nuts, which can cause the wheel to spin freely and make the process difficult or unsafe.
Turning each lug nut approximately half a turn before lifting the vehicle is usually sufficient.
This step saves you effort and keeps the wheel stable while you work.
2. Lift the Vehicle Using a Jack and Secure it on Jack Stands
After loosening the lug nuts, carefully position a jack under the correct lifting point of your vehicle, as indicated in your owner’s manual.
Lifting points are designed to safely handle the weight without damaging the frame or suspension.
Once the vehicle is lifted to a comfortable height, place jack stands under the frame or suspension mounting points on both sides and slowly lower the jack until the vehicle rests securely on the stands.
Always ensure the jack stands are evenly spaced and on a flat, solid surface.
Gently shake the vehicle to ensure it is stable before proceeding.
Never rely solely on the jack, as it can lose pressure or tip over.
Properly securing the vehicle ensures you can work safely and confidently without the risk of it falling or shifting.
3. Remove the Wheel for Better Access to Suspension Components
Once the vehicle is securely supported, completely remove the loosened lug nuts and take off the wheel.
Removing the wheel gives you a clear view and full access to the upper control arm, ball joint and other suspension parts you need to work on.
As an added safety precaution, place the wheel flat under the vehicle in case anything slips.
Keeping the wheel nearby also helps protect the lug nuts from damage and makes them easier to reinstall later.
While the wheel is off, take some time to inspect the tire tread and check for uneven wear, as this can indicate suspension or alignment problems related to the control arm.
This step not only clears your workspace but also provides valuable information about the health of your vehicle’s suspension system.
How to Locate the Upper Control Arm
1. Locate the upper control arm, which is connected between the upper part of the steering knuckle and the vehicle’s frame or strut tower
To begin the replacement process, it’s crucial to correctly identify the location of the upper control arm in your vehicle’s suspension system.
The upper control arm is a sturdy, curved piece of metal that connects the upper part of the steering knuckle to the vehicle’s frame or strut tower, depending on your suspension design.
In most cars and trucks with independent front suspension, you’ll find an upper and a lower control arm working together to allow the wheels to move up and down while maintaining proper alignment.
The upper control arm is typically located above the wheel hub area and is easy to identify once the wheel is removed.
It plays a vital role in keeping the wheel in the correct position as the suspension moves, contributing to smooth handling and even tire wear.
This arm often resembles the letter “A” or “V,” with bushings at the ends that connect to the frame and a single ball joint that connects to the steering knuckle.
Taking a moment to locate and understand this component will help you understand how it functions within the overall suspension system, making the removal and installation steps much easier and safer.
2. Show Ball Joint Connection and Frame Bolts
Once you’ve located the upper control arm, carefully examine its two main attachment points.
The first is the ball joint connection, which connects the control arm to the upper part of the steering knuckle.
This ball joint acts as a pivot, allowing the wheel to move freely up and down as it turns left or right.
It’s usually covered by a small rubber boot that protects it from dirt and moisture.
The second attachment point is where the control arm connects to the frame or strut tower using two or more heavy bolts that pass through rubber or polyurethane bushings.
These bushings absorb vibrations and reduce metal-to-metal contact.
When inspecting these bolts, check for signs of wear, corrosion, or damage, as these can cause looseness or noise in the suspension.
It’s also helpful to note the orientation and location of each bolt and washer, as you’ll need to reinstall them in the same order later.
Understanding how the ball joint and frame bolts connect helps you carefully plan your next steps and ensures you can remove the old control arm without damaging surrounding components.
How to Remove the Old Upper Control Arm
How to Disconnect the Ball Joint
1. Use a ball joint separator or pickle fork to loosen the joint from the steering knuckle
The ball joint is one of the most crucial connection points in your vehicle’s suspension system and it plays a vital role in smooth movement and steering control.
When removing the upper control arm, you must first safely and correctly separate this joint.
The ball joint is located at the outer end of the control arm and connects it to the upper part of the steering knuckle.
Because it bears the weight and stress of the vehicle’s movement, it is usually very tightly fitted.
To loosen it, a special tool called a ball joint separator or pickle fork is used.
These tools help separate the joint without damaging the control arm or knuckle.
Begin by placing the separator between the control arm and the steering knuckle.
Apply steady, firm pressure or gently tap the tool with a hammer until the joint loosens and pops out.
This may require several taps as rust, dirt, or years of pressure can make the joint difficult to remove.
If it is extremely tight, applying a little penetrating oil around the joint may make separation easier.
It’s important to be patient and avoid hitting the joint directly with a hammer, as this can damage the stud or threads.
Proper use of the separator tool ensures that the suspension parts are not damaged and are ready for reassembly when the new control arm is installed.
2. Remove the Cotter Pin and Nut
Before completely disconnecting the ball joint, you must remove the cotter pin and the nut that secures it in place.
The cotter pin is a small, bent metal pin that passes through the castellated nut and prevents it from loosening while driving.
This pin is a crucial safety feature and should always be replaced with a new one when reassembling.
To remove it, use pliers to straighten the bent ends and gently pull it out.
Be careful not to break it inside the hole, as this can make removal difficult.
Once the cotter pin is out, use a socket or wrench to loosen and remove the nut holding the ball joint to the steering knuckle.
In some cases, the nut may be tight due to rust or dirt buildup, so applying penetrating oil beforehand can make this process easier.
If the nut is in good condition, set it aside in a safe place, or plan to replace it if it shows any signs of wear or damage.
Properly removing the cotter pin and nut ensures that the ball joint can be safely separated and that no threads are damaged during the disconnection process.
This precaution not only protects the components but also makes installing the new upper control arm much easier and safer later on.
How to Unbolt the Control Arm from the Frame or Mount
1. If the bolts are rusted, apply penetrating oil
Once the ball joint is separated, the next step is to unbolt the control arm from the frame or mounting bracket that holds it in place.
These bolts are often very tight and may have been in place for many years, meaning they can be rusted or seized.
Applying a good penetrating oil like WD-40 or PB Blaster will help loosen the rust and make it easier to remove the bolts without damaging them.
It’s best to spray the oil directly onto the bolt heads and threads, then let it soak for a few minutes before attempting to turn them.
This allows the oil to seep into the small gaps and break down the rust buildup.
Trying to remove rusted bolts without lubrication can strip the heads, break the bolts, or seize the threads, making the repair even more difficult.
If a bolt is heavily rusted, gently work it back and forth with a wrench or breaker bar rather than forcing it in one direction.
This reduces the risk of breaking the bolt inside the mount.
Taking the time to properly loosen these fasteners not only makes the job easier but also prevents unnecessary damage to the control arm mount or the vehicle’s frame.
2. Carefully remove the bolts, noting the orientation of washers and spacers
Once the bolts are loose, carefully remove them one by one, paying close attention to the position of each component.
Many control arms utilize washers, spacers, or alignment shims that help maintain the correct suspension geometry and alignment angles.
These small parts are crucial as they ensure the new control arm will sit in the exact same position as the old one.
While removing the bolts, it’s a good idea to take pictures of the parts or label them so you remember their correct orientation during reassembly.
Some vehicles may have washers or spacers on either side of the bushing that control the arm’s movement and prevent metal-to-metal contact.
Keep these parts clean and organized to avoid confusion later.
Once all the bolts are removed, gently pull the control arm out of its mount.
If it seems stuck, it may be due to suspension pressure or rust buildup.
You can carefully use a pry bar to help remove it, but avoid excessive force that could damage the bushing or mounting bracket.
By removing the bolts slowly and carefully, you ensure that the frame, bushings and mounting hardware remain in good condition and are ready for the installation of the new upper control arm.
How to Remove the Old Arm
Once all the bolts are removed, the old upper control arm can be removed from its position on the frame or mounting bracket.
However, this step often requires patience and careful work, as the arm may still be tightly fitted due to suspension pressure, corrosion, or tight bushings.
The control arm is designed to sit firmly in its mounts to ensure proper suspension alignment and stability, so it may not come out easily.
Begin by gently wiggling the arm back and forth to loosen it from the mounting point.
Do not force it or pull too hard, as this could damage the bushings or bend the brackets.
If it is still stuck, use a small pry bar or flat tool to carefully lift it from its position, applying slow and even pressure rather than quick, jerky movements.
This helps prevent damage to surrounding suspension components and ensures the mounting points remain in their original position.
Once the control arm is loose, take a moment to inspect the condition of the bushings, bolts and frame mounts.
Look for cracks, torn rubber, or signs of corrosion, as these can indicate wear that could affect the performance of the new control arm.
If the old arm shows excessive play in the ball joint or worn bushings, it confirms that replacement was necessary.
It’s also a good idea to clean the mounting surfaces with a wire brush or cloth to remove any dirt, rust, or debris before installing the new arm.
A clean and smooth surface ensures the new control arm fits properly and functions as intended.
By taking your time and handling the parts carefully, you minimize the chance of damaging surrounding components and lay a solid foundation for the safe and effective installation of the new upper control arm.
How to Install the New Upper Control Arm
1. Positioning the New Arm
Once the old control arm has been removed and the mounting area cleaned, the next step is to position the new upper control arm in its correct location.
Carefully align the new arm with the mounting points on the frame or strut tower, ensuring that the bushings and bolt holes are perfectly aligned.
It’s crucial to position the arm at the same angle and orientation as the original arm to maintain proper suspension geometry.
Even slight misalignment during installation can lead to poor handling, uneven tire wear, or premature bushing failure.
Before inserting the bolts, double-check that the arm’s ball joint is facing the steering knuckle and is not twisted in any way.
Many upper control arms are designed to fit only one side of the vehicle, so make sure you are installing the correct one.
Taking a little extra time to ensure proper positioning will make the rest of the process easier and more accurate.
2. Insert and Hand-Tighten the Mounting Bolts
With the control arm in position, insert the mounting bolts through the bushings and frame bracket.
Always start threading the bolts by hand rather than using power tools.
Hand-tightening allows you to feel the bolts properly engaging with the threads, preventing cross-threading or damage.
Leave the bolts slightly loose at this stage to allow the arm some movement when connecting the ball joint.
This flexibility helps in aligning all the parts correctly.
Ensure that any washers, spacers, or alignment shims are placed in the same orientation as they were before removal.
Correct installation of these small components ensures that the suspension maintains its proper alignment angles after the vehicle is lowered.
Once everything is aligned, you can prepare to fully tighten the bolts according to the manufacturer’s specifications later in the process.
3. Reconnect the Ball Joint to the Steering Knuckle
After securing the inner part of the control arm, reconnect the ball joint to the steering knuckle.
Insert the ball joint stud through the hole in the knuckle and ensure it seats properly.
Next, install the retaining nut onto the ball joint stud and tighten it to the specific torque value recommended by the vehicle manufacturer using a torque wrench.
This is crucial because both under-tightening and over-tightening can cause serious problems – too loose and the joint could separate and too tight could damage the stud or restrict movement.
Once the nut is tight, insert a new cotter pin through the hole in the stud and bend it securely to lock the nut in place.
Always use a new cotter pin; never reuse an old one, as reused pins can be weak and unreliable.
This small step ensures the ball joint connection remains secure while the vehicle is in motion.
4. Properly Torque All Bolts According to Service Manual Specifications
After the ball joint is connected, go back to the frame bolts and fully tighten them according to the torque values specified in the vehicle’s service manual.
Using a torque wrench is essential as it ensures each bolt is tightened evenly and to the required pressure.
Over-tightening can damage the bushings and restrict suspension movement, while under-tightening can cause rattling noises and looseness over time.
After torquing the bolts, check that the control arm moves freely without binding or sticking.
The arm should pivot freely within its bushings as the suspension moves.
Once everything is secure, check that no tools or loose parts have been left behind.
Applying the correct torque not only ensures a safe and reliable installation but also helps the suspension function as designed, resulting in consistent handling and even tire wear for thousands of miles.
Read More:
How to Reassemble and Check Everything At Last
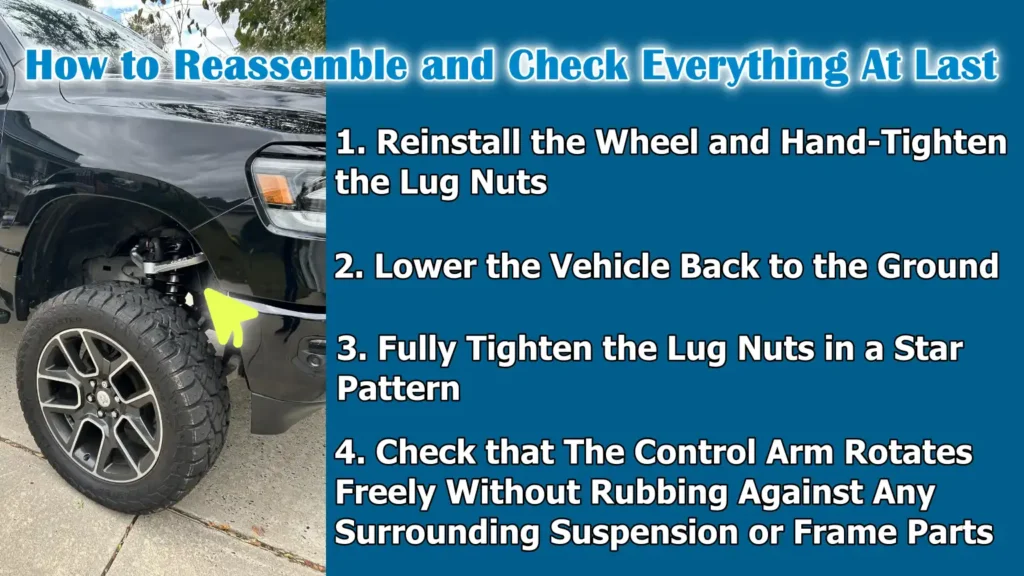
1. Reinstall the Wheel and Hand-Tighten the Lug Nuts
Once the new upper control arm is properly installed and torqued, the next step is to reinstall the wheel.
Carefully align the wheel with the hub bolts and slide it onto the wheel studs.
It’s best to start by hand-tightening each lug nut to ensure they are properly threaded without cross-threading, which can damage the studs or nuts.
Hand-tightening allows you to seat the wheel evenly against the hub surface.
Before lowering the vehicle, ensure all lug nuts are snug enough to hold the wheel securely in place.
This step helps prevent any movement or shifting while lowering, ensuring the wheel is properly seated and balanced after full tightening.
2. Lower the Vehicle Back to the Ground
Once the wheel is hand-tightened, carefully lower the vehicle from the jack stands using the hydraulic jack.
To remove the stands, slightly raise the car, then slowly lower it until all four tires are firmly on the ground.
It’s crucial to perform this step slowly and evenly to avoid sudden drops that could damage suspension components or misalign the newly installed control arms.
Once the car is back on the ground, completely remove the jack and double-check that it is resting on a stable surface.
At this point, the suspension is under its normal weight, allowing you to properly tighten the lug nuts.
3. Fully Tighten the Lug Nuts in a Star Pattern
Now that the car is safely on the ground, fully tighten the lug nuts using a lug wrench or torque wrench in a star or crisscross pattern.
This tightening method ensures that the wheel is pulled evenly against the wheel hub, which helps prevent the brake rotor from warping and uneven pressure on the wheel.
Tighten each nut gradually and evenly until it is fully secure.
If you have a torque wrench, consult your vehicle’s manual for the correct torque specifications and follow them carefully.
Overtightening can damage the threads or warp brake components, while undertightening can cause the wheel to loosen while driving.
A properly tightened wheel guarantees safety, stability and smooth performance on the road.
Verify that all components are properly tightened and that no parts are rubbing or loose.
Before finishing, take a few minutes to inspect all the components you worked on.
Ensure that every bolt, nut and cotter pin is in place and properly tightened according to the manufacturer’s specifications.
4. Check that The Control Arm Rotates Freely Without Rubbing Against Any Surrounding Suspension or Frame Parts
Inspect any brake lines, wiring, or sensors that may have been loosened during the process.
Rotate the wheel by hand to confirm that it spins freely without any obstructions or unusual noises.
A quick inspection at this stage can prevent future problems and ensure that the new control arm and all suspension parts are working together correctly.
This final check confirms that your work is safe, complete and ready for a road test.
What to Do After the Installation of Upper Control Arm
1. Test Drive – Drive slowly to check for noises or handling issues
After installing the new upper control arm and reassembling all components, it’s crucial to perform a careful test drive.
Start by driving slowly on a smooth, level road and pay attention to any unusual noises such as knocking, creaking, or rattling, which could indicate loose bolts or improper installation.
Pay close attention to how the steering feels—it should be smooth and responsive without pulling to one side.
A properly installed upper control arm helps maintain correct suspension geometry, ensuring the tires maintain proper contact with the road surface.
If you experience any vibrations, stiffness, or uneven handling, it may indicate that something isn’t seated correctly or that related suspension components also need attention.
A short and cautious test drive helps verify that the repair has been completed safely and that your vehicle’s suspension system is functioning as expected.
2. Wheel Alignment – Schedule a professional alignment immediately after replacement
One of the most important steps after replacing an upper control arm is scheduling a professional wheel alignment.
The control arm directly affects the vehicle’s suspension angles, including camber and caster, which determine how the tires meet the road.
Even a slight change in these angles can lead to uneven tire wear, poor handling and reduced fuel efficiency.
A proper alignment ensures that the steering wheel remains centered and the tires track straight.
It also improves ride comfort and helps extend the life of both the tires and suspension components.
Failing to get an alignment after replacing a control arm can lead to long-term problems such as premature tire wear or instability during braking and cornering.
Therefore, to maintain both safety and performance, it’s essential to visit a certified alignment shop immediately after installation.
3. Check again after a few days – Recheck the tightness of the bolts and pay attention to any new noises
After driving for a few days, it’s wise to have a follow-up inspection of the work performed.
Over time, new suspension components may settle or shift slightly as they adjust to normal driving conditions.
This settling can cause bolts or nuts to loosen slightly, specially if the control arm bushings weren’t fully loaded during installation.
Recheck all mounting bolts, ball joint nuts and cotter pins to ensure they are still tight and secure.
Also, listen for any new noises such as knocking or creaking that may indicate movement or wear.
Catching minor issues early prevents them from becoming major problems.
Regular inspections after any suspension repair are a good maintenance practice that helps ensure long-term safety, smooth handling and consistent vehicle performance.
Tips and Common Mistakes You Should Avoid
As well as, NHTSA and Manufacturer found that thousands of vehicles where an upper control arm ball-joint nut was not torqued in the correct way, even in some of the cases the control arm separated from the knuckle as well, that is why it is really important to follow manufacturer torque specs, so just fit a new cotter pin when it is required and then verify the fasteners after the installation as well.[¹]
1. Avoid overtightening bolts – always use a torque wrench
One of the most common mistakes during suspension work is overtightening bolts.
While it may seem that more tightness increases security, it can actually damage the threads, stretch the bolt, or crush the bushing – all of which reduce the durability of the components.
Every vehicle manufacturer provides torque specifications for suspension bolts, ensuring the correct clamping force without causing damage.
Using a torque wrench helps achieve these precise values and maintains the correct tension within the suspension assembly.
Overtightening can also make future maintenance difficult, as seized or damaged bolts can be difficult to remove.
By carefully following the torque specifications, you ensure that the components function safely and last longer.
2. Do not reuse damaged cotter pins or worn hardware
Cotter pins and other small pieces of hardware may seem insignificant, but they play a crucial role in securing the suspension system.
A cotter pin locks the castle nut in place on a ball joint, preventing it from loosening during driving.
Reusing old or damaged pins compromises this safety feature, increasing the risk of component separation.
Always replace cotter pins, nuts and washers with new ones that match the manufacturer’s specifications.
New hardware ensures a tight, secure connection and reduces the risk of failure due to corrosion, fatigue, or wear.
These small replacements are inexpensive but critical to the overall reliability of the repair.
3. Ensure that the control arm bushings are not twisted during installation
Control arm bushings are designed to flex and absorb road vibrations while keeping the arm properly aligned.
If the bushings are twisted or not properly installed, it can lead to premature wear, creaking noises and uneven movement in the suspension.
To avoid this, always tighten the control arm bolts when the vehicle is at its normal ride height – this allows the bushings to settle into their natural position.
Installing and tightening them while the suspension is hanging can cause unnecessary stress when the car is lowered.
Ensuring correct bushing alignment helps maintain smooth movement, prevent cracking and extend the life of the new control arm.
4. If both upper arms are worn, consider replacing both sides at the same time for consistent handling
Suspension components like control arms typically wear at the same rate on both sides of the vehicle.
If one upper control arm is worn or damaged, the other side is often close to failing as well.
Replacing both upper arms simultaneously ensures consistent handling, balanced suspension performance and uniform alignment results.
This prevents uneven tire wear and allows the vehicle to steer and brake more predictably.
Doing both sides at once also saves time and effort, as it requires the same steps and tools.
It’s a practical and preventative approach that improves the car’s overall ride quality and safety.
Conclusion – How to Replace an Upper Control Arm
The Upper Control Arm actually ensures your tires grip evenly and even it is responsible for your steering responses in a accurate way because then your vehicle’s suspension geometry stays aligned and that way reduces tire wear as well.
The upper control arm is one of the essential parts that keeps your wheels aligned with the road, ensuring smooth steering response and even tire wear.
Over time, constant movement, heat and road vibrations can cause the bushings and ball joints in the control arm to wear out, leading to poor alignment and unstable handling.
Performing the replacement correctly with the right tools, proper torque and attention to detail at every step restores your suspension system to its original factory precision.
After installation, performing a wheel alignment and regularly checking the system ensures your new control arm is functioning correctly and your tires are wearing evenly.
Taking a test drive to confirm stability, listening for any unusual noises and re-tightening the bolts after a few days of use further enhances the reliability of the repair.
Maintaining your control arms also improves your vehicle’s ability to absorb shocks and maintain proper geometry, which is crucial for driving comfort and safety on all types of roads.
So, that’s all from this guide and if you still have queries left unsolved in the mind then just let us know by commenting down below this guide for more information.
Frequently Asked Questions
Q1. What is an upper control arm and what does it do?
Answer: The upper control arm is a crucial part of a vehicle’s front suspension system. It connects the upper part of the wheel hub or steering knuckle to the vehicle’s frame or body. Its main function is to keep the wheels properly aligned while allowing them to move up and down over bumps and uneven surfaces. It also helps maintain the correct camber and caster angles, which are essential for steering stability and even tire wear. When the upper control arm is functioning correctly, your car handles smoothly and safely, specially when cornering or braking.
Q2. What are the signs of a bad upper control arm?
Answer: A worn or damaged upper control arm can exhibit several clear signs. You might hear knocking or rattling noises, specially when going over bumps. The steering may feel loose or unstable and the vehicle might pull to one side. Uneven or rapid tire wear is also a common indicator, as the control arm directly affects the alignment angles. In some cases, you might also feel vibrations in the steering wheel while driving. These signs mean that the control arm or its bushings and ball joint should be inspected as soon as possible to prevent further damage to the suspension.
Q3. Can I drive with a bad upper control arm?
Answer: Driving with a bad upper control arm is not advisable. When it fails, it compromises your car’s ability to maintain proper alignment and stability, specially during cornering or sudden braking. Continued driving can lead to uneven tire wear, poor steering control and in severe cases, suspension failure. If the ball joint connected to the upper control arm completely fails, the wheel could detach, creating a serious safety hazard. It’s best to replace a faulty control arm as soon as symptoms appear.
Q4. How long does it take to replace an upper control arm?
Answer: For most vehicles, replacing an upper control arm typically takes one to three hours. The time can vary depending on the vehicle’s design, the condition of the bolts and if removal is more difficult due to rust or corrosion. A professional mechanic with the right tools can usually complete the job quickly, while a first-time DIYer might take a bit longer. Proper preparation, including the use of penetrating oil and correct torque specifications, helps make the job easier and safer.
Q5. Is an alignment necessary after replacing an upper control arm?
Answer: Yes, a wheel alignment is always necessary after replacing an upper control arm. This is because the control arm affects the suspension geometry, including the camber and caster angles, which determine how the tires contact the road. Without proper alignment, your tires may wear unevenly and your steering may feel off-center or unstable. A professional alignment ensures that all suspension angles are returned to factory specifications, improving handling, tire life and driving comfort.
Q6. Why do upper control arms fail?
Answer: Upper control arms primarily fail due to normal driving stresses, road vibrations and exposure to dirt, moisture and salt. Over time, the rubber bushings within the control arm harden or crack, while the ball joint may become loose or develop play. Driving on rough roads or frequently hitting potholes can accelerate this wear. Additionally, lack of lubrication or corrosion around the bolts can cause the arm to become less flexible or misaligned. Regular inspections and maintenance can help extend the life of the control arm.
Q7. Can I just replace one upper control arm, or should I replace both?
Answer: However, while it’s possible to replace only one upper control arm if the other side’s control arm is in good condition, it’s often better to replace both control arms at the same time. This ensures balanced suspension performance and consistent handling. As both sides experience similar road conditions and wear over time, if one is failing, the other is usually close to failing as well. Replacing both arms simultaneously helps maintain consistent alignment and reduces the likelihood of uneven tire wear or handling problems later on.
Q8. How much does it cost to replace an upper control arm?
Answer: The cost of replacing an upper control arm depends on your vehicle’s make and model, as well as the labor rates in your area. On average, parts can cost anywhere from $50 to $200 per arm, while labor can add another $100 to $300. Vehicles with more complex suspension systems or those where the control arm is difficult to access may cost more to repair. Performing the replacement yourself can save on labor costs, but it’s essential to have the correct tools and follow proper safety procedures.
References:
[1] Part 573 Safety Recall Report 25V341
https://static.nhtsa.gov/odi/rcl/2025/RCLRPT-25V341-1716.pdf

Guys, I’m a car audio enthusiast and customization expert and I love clear sound and clean installation. Plus, I have spent years helping people build their dream audio setups. And whenever I’m working on cars, I probably listen to music and thinks about the next big upgrade.