Written By: Don Dodi
Fact Checked By: Kristen Brown
Reviewed By: Diego Rosenberg
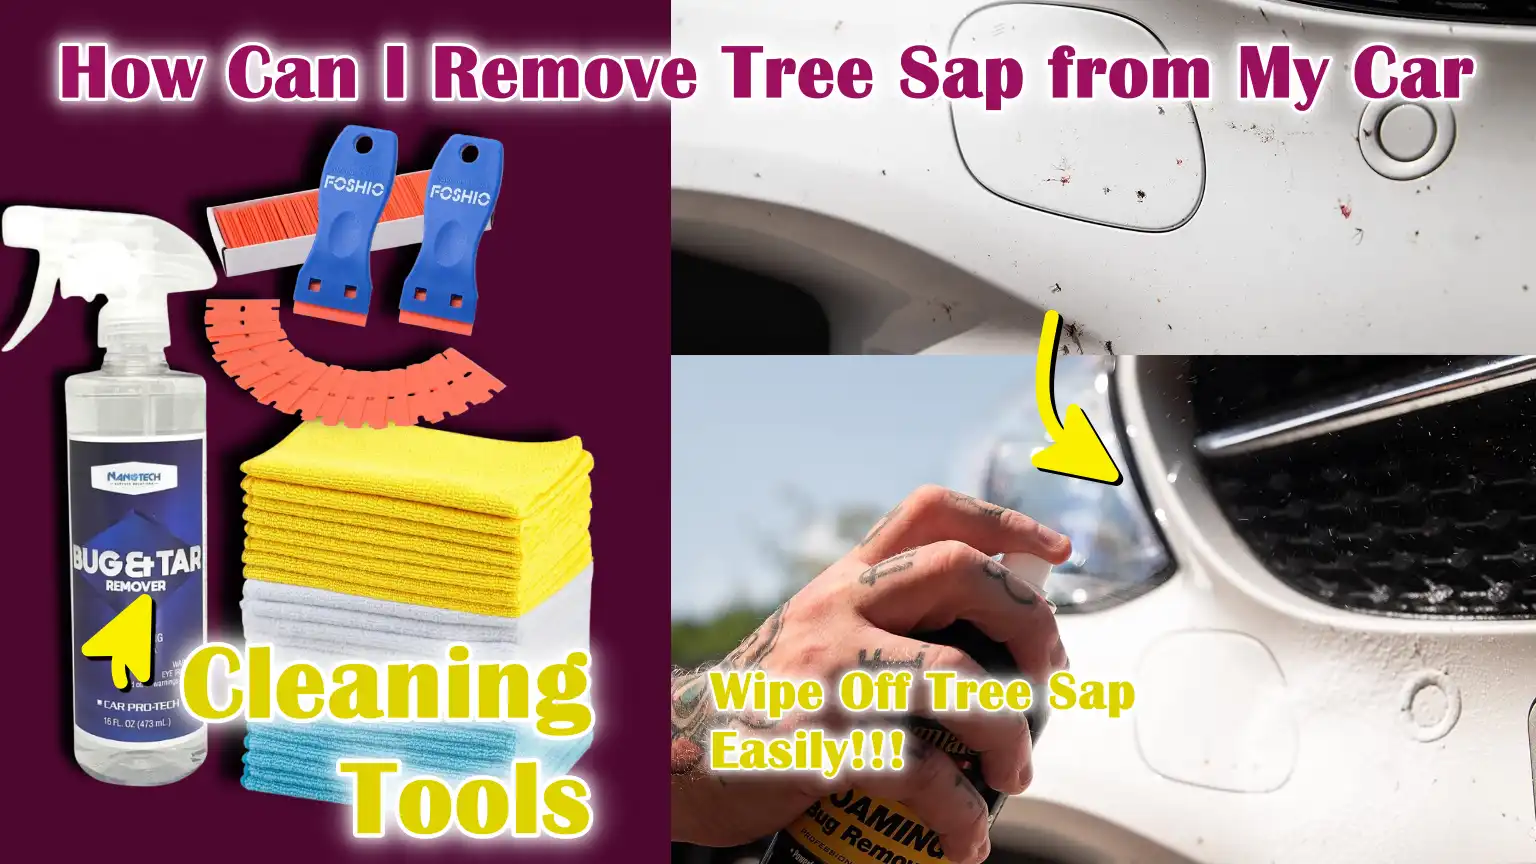
Basically, the faster you remove that ugly tree sap from your car, then the less likely you have to deal with the paint damage, dull spots and other expensive polishing later on.
The sap is just a sticky resin that is released by the trees such as: pine, oak, maple and birch.
And, its the natural job to seal the wounds in the tree, but the problems with them is: when it lands on your car, then it literally acts like a strong glue.
Plus, modern vehicles are protected by a clear coat layer over the paint, but the tree sap can still make the bond tightly to this surface.
Not only this, when it gets exposures to the heat and the sunlight and specially during the hot summer days, then the sap literally hardens and chemically bonds to the clear coat.
Additionally, as temperatures rises, then the sap can penetrate more and more deeper, that makes it really harder to remove without polishing.
Along with this, other the period of time it can gets worse by causing stains, dull spots or even etching that literally damages the protective layers.
That’s why, we have come up with this guide on How Can I Remove Tree Sap from My Car, so that you can remove them properly and early using the safe methods and ultimately protect the surface of your vehicle.
Understand, Why Tree Sap Is Harmful to Car Paint
Tree sap may seem like a simple, sticky liquid, but if left on a surface for too long, it can cause significant damage to your car’s paint.
Modern cars are painted in layers: a primer layer, a color layer and then a clear coat that protects the paint and gives it a shine.
This clear coat is strong, but it’s not indestructible.
Tree sap contains natural sugars, acids and organic compounds designed to seal and protect trees.
When this sticky substance gets on your car, it adheres tightly to the clear coat.
As it dries, it becomes more difficult to remove.
If ignored, the sap can gradually affect the protective layer, causing discoloration, stains and surface damage.
Understanding how sap interacts with your car’s finish helps you understand why it’s so important to remove it quickly.
1. How sap hardens and bonds to the clear coat
When tree sap first gets on your car, it’s soft and sticky.
At this stage, it sits on top of the clear coat and can usually be easily removed.
However, as time passes, the sap begins to dry.
The natural resins in the sap begin to harden and shrink.
As this happens, the sap tightens its grip on the surface.
Because clear coat is slightly porous at the microscopic level, the sap can seep into tiny surface imperfections.
Once hardened, it forms a strong bond that can’t be removed by simply rinsing.
This is why regular car shampoo often fails to remove dried sap.
The longer it remains, the stronger this bond becomes, increasing the risk of surface damage during removal.
2. Heat and Sunlight Accelerate Damage
Heat plays a major role in how harmful tree sap is.
When your car is in direct sunlight, the paint surface temperature can rise much higher than the air temperature.
On hot days, paint surfaces, specially darker colors, can become extremely hot.
This heat softens the clear coat slightly and allows the sap to penetrate deeper.
Furthermore, tree sap becomes more reactive and begins to cure, similar to how glue hardens.
Sunlight also contains ultraviolet rays, which can accelerate chemical reactions.
Because of this, sap that would have been easily removed in cooler weather can become stubborn and damaging within a few hot days.
3. Potential for Staining and Paint Etching
If tree sap remains on paint for a long time, it can cause staining.
Stains occur when the sap remains on the paint or the color remains discolored even after the sap has been removed.
In more severe cases, etching may occur.
Etching means the sap has eaten into or damaged the clear coat surface.
This can create a rough or bumpy spot that reflects light differently, making the area appear dull or faded.
Once etched, cleaning alone won’t repair the finish.
Light polishing or professional paint correction may be necessary to smooth out the damaged layer.
4. Long-Term Effects on Clear Coat and Finish
Over time, repeated exposure to tree sap can weaken the clear coat.
If the sap isn’t treated frequently, the protective layer may lose its smoothness and shine.
Dirt and moisture can accumulate more easily in small damaged areas, causing further surface problems.
In severe cases, prolonged neglect can cause the clear coat to peel or deteriorate, specially if the paint is already worn.
Although this level of damage usually takes time, it highlights the importance of prevention and prompt action.
Regular washing, promptly removing sap and applying wax or sealant can protect the clear coat and keep your car’s finish shiny and well-maintained for many years.
Now, How to Identify Tree Sap on Your Car
Before attempting to remove anything from your car’s surface, it’s important to correctly identify it.
Tree sap can resemble other common dirt, such as bird droppings, road tar, or dried water stains.
If you use the wrong cleaning method, you could scratch or damage the paint.
Tree sap usually appears as small, raised spots on the surface of paint, glass, or plastic trim.
It often comes from trees like pine, maple, or oak, specially when parked under branches.
The sap can fall in small drops or large spots and it tends to fall randomly on the surface.
Knowing what the sap looks and feels like at different stages will help you remove it safely and more easily.
1. What Fresh Sap Looks and Feels Like
Fresh tree sap is usually clear, light yellow, or slightly amber in color.
It often appears shiny and wet, almost like a drop of thick syrup.
When you gently touch it with your finger, it feels very sticky and soft.
When you try to remove your finger, it may stretch slightly, like glue or honey.
At this stage, the sap is mostly on top of the clear coat and hasn’t yet hardened.
Fresh sap is easier to remove because it doesn’t adhere strongly to the paint.
If you notice small, shiny, sticky spots immediately after parking under the tree, you’re probably using fresh sap.
Taking immediate action at this stage can prevent long-term damage.
2. What Dried or Hardened Sap Looks Like
As sap dries, both its color and texture change.
It may turn dark yellow, orange, or even brown.
The shiny, wet appearance disappears and the surface becomes dull and hard.
Hardened sap feels rough or flaky to the touch and is no longer soft or stretchy.
It may appear slightly raised, like a small bump stuck to the paint.
In some cases, you may notice a faint ring or outline around the spot, specially if it has been exposed to heat and sunlight.
Dried sap is very difficult to remove because it adheres more strongly to the clear coat.
If left for weeks, it can leave a shadow or stain even after cleaning.
3. How to Distinguish Sap from Bird Droppings or Tar
Tree sap can sometimes be confused with bird droppings or road tar, but there are clear differences between the two.
Bird droppings are usually white, gray, or a mixture of white and dark colors.
They are often mottled and may contain solid pieces.
Bird droppings also become chalky or crusty when they dry, rather than a smooth, hard lump.
Road tar, on the other hand, is usually black or very dark brown.
It often appears under the car near the wheels and feels thick and rubbery rather than sticky like sap.
Tree sap is usually light in color when fresh and appears sticky before hardening.
It’s also more common on the roof, hood and trunk if the car was parked under trees.
By carefully observing the color, texture, location and feel, you can correctly identify tree sap and choose the safest method to remove it without damaging your car’s paint.
Tools
| Tool / Material | Why You Need It |
|---|---|
| Microfiber Cloths | These cloths are very gentle on your car’s paint and won’t scratch the surface. They safely remove dirt and juice without spreading it. Always use clean microfiber cloths to avoid swirl marks. |
| Warm Water and Car Wash Soap | Warm water helps soften fresh juice, making it easier to remove. Car soap is formulated for paint and won’t harm clear coats. It safely removes dirt before working on the juiced area. |
| Isopropyl Alcohol (Rubbing Alcohol) | When used correctly, it helps dissolve tough juice without damaging the paint. Apply a small amount to a cloth, not directly onto the paint. Always wipe gently and rinse after use. |
| Tree Sap Remover Product | These products are designed to safely break down resin. They work faster and are safer than household chemicals. Always follow the label instructions for best results. |
| Clay Bar Kit | A clay bar removes residual sap that can’t be removed by washing. It removes particles stuck to the surface without breaking the paint. It smooths the surface and prepares it for waxing. |
| Plastic Razor Blade (Paint Safe) | This tool helps remove thick, hardened sap without scratching the paint. It should be used gently and at a low angle. Never use a metal blade on car paint. |
| Car Wax or Paint Sealant | Wax or sealant restores shine and protects the clear coat. It creates a barrier so the sap is less likely to adhere strongly the next time. It also helps protect against sun damage and stains. |
How to Ensure Safety By Taking All the Necessary Precautions Before Removing Tree Sap
Removing tree sap from your car may seem easy, but doing it incorrectly can result in scratches, light spots, or permanent paint damage.
Modern car paint has a clear coat layer that protects the paint underneath, but using too much force or harsh chemicals can scratch or weaken this layer.
Before starting cleaning, it’s important to create a safe environment and use the right method.
Taking a few precautions initially can protect your car’s finish and prevent costly polishing or repairs later.
1. Work in the Shade or a Cool Place
Always remove tree sap when the car’s surface is cool to the touch.
If your car is parked in the sun, the paint can become very hot, specially on dark-colored cars.
Heat softens the clear coat and increases the risk of damage.
It also causes cleaning products to dry too quickly, which can leave marks or stains.
Working in the shade or inside a garage helps keep the surface temperature low and gives you more control.
Cleaning products work better on a cool surface, reducing the risk of spilling sap or damaging the paint.
2. Avoid Scrubbing Hard
It may be tempting to scrub hard when you see sap, but excessive pressure can scratch the clearcoat.
Tree sap often hardens and adheres tightly, so rubbing too hard can cause the dried resin to wear away at the surface like sandpaper.
Even small scratches can cause jagged marks that become visible in the sun.
Instead of applying force, be patient and let the cleaning product soften the sap first.
Wiping gently with light pressure is safer and more effective than vigorous scrubbing.
Saving the clearcoat is more important than removing the sap quickly.
3. Test the product on a small area first
Not all cleaning products react the same way to every car’s finish.
The type of paint, the thickness of the clear coat and previous treatments like wax or sealant can affect how the surface reacts.
Before applying any sap remover, alcohol, or cleaner to a large area, test it on a small, inconspicuous area, such as near the edge of a panel.
Wait a few minutes and check for discoloration, dullness, or a negative reaction.
This simple test helps prevent accidental damage and ensures the product is safe for your specific vehicle.
4. Use a Clean Microfiber Towel
Always use a clean, high-quality microfiber towel when removing sap.
Dirty towels may contain dust or small debris that could scratch the paint when wiped away.
Microfiber cloths are designed with very fine fibers that securely trap dirt without leaving any marks.
Avoid using rough cloths, paper towels, or old rags, as these can damage the clear coat.
It’s also a good idea to use a new towel if it gets sticky or dirty during the process.
Clean tools are just as important as cleaning products for protecting your car’s finish.
How to Remove Fresh Tree Sap – In Quick Way
Fresh tree sap is easier to remove than dried or hardened sap because it hasn’t yet firmly bonded to the clear coat.
When the sap is still soft, it usually sits on top of the paint rather than seeping into it.
Acting quickly can prevent stains, faded spots and the need for more chemicals later.
This method focuses on safe, easy steps that protect your car’s paint and effectively remove the sap.
1. Wash the affected area first
Before directly handling the sap, wash the area with clean water and mild car wash soap.
This step removes loose dirt, dust and debris that can scratch the paint when wiped away.
Even small particles of dirt can act like sandpaper when rubbed against the surface.
Use a soft wash mitt or microfiber cloth and rinse thoroughly.
Cleaning the area first creates a safe surface so you can focus solely on removing the sap, avoiding swirl marks or scratches.
2. Soften the Sap with Warm Water
Warm water helps loosen fresh sap and makes it easier to remove from the paint.
Heat gently softens the sticky resin without damaging the clear coat.
You can soak a microfiber cloth in warm water and place it on the sap-stained area for a few minutes.
This gives the moisture time to reduce the stickiness.
Avoid using very hot water, as excessive heat can affect the paint.
The goal is to soften the sap naturally so it can be removed from the surface with minimal effort.
3. Gently Wipe with a Microfiber Cloth
After softening the sap, use a clean microfiber cloth to gently wipe the area.
Apply light pressure and move in straight lines rather than circular motions to reduce the risk of swirls.
Don’t rub or press hard.
If the sap doesn’t come off easily, repeat the hot water step instead of increasing the force.
Patience is essential, as excessive scrubbing can damage the clear coat, even if the sap is fresh.
4. Wash and dry again
After the sap has been removed, wash the area again with car soap and rinse thoroughly.
This step removes any remaining stickiness that may not be visible.
After washing, dry the surface with a clean microfiber towel to avoid water spots.
Proper drying also allows you to inspect the area under good lighting to ensure the paint looks smooth and shiny.
This final step helps maintain the finish and makes your car look clean and well-maintained.
How to Remove Dried or Hardened Tree Sap – Really Effective
Dried or hardened tree sap requires more care because it’s already tightly adhered to the clear coat.
When sap remains on the paint for several days, specially in heat and sunlight, it hardens and sticks even more strongly.
At this stage, simply rinsing isn’t enough.
However, with the right method and a gentle hand, you can safely remove it without damaging the paint.
The key is to loosen the sap by dissolving it rather than scraping or forcefully removing it.
1. Apply Isopropyl Alcohol or Sap Remover
Isopropyl alcohol, also known as rubbing alcohol, or a specialized tree sap remover works by breaking down the sticky resin within the hardened sap.
These products help dissolve the bond between the sap and the clear coat.
Always apply the liquid to a clean microfiber cloth first, not directly to the paint.
This gives you better control and prevents over-applying.
Gently press the wet cloth onto the area of the sap so the product can begin softening the hardened layer.
2. Let it sit for a few minutes
After applying the product, let it sit on the sap for a few minutes.
This waiting time is important because it gives the solution time to penetrate and loosen the hardened resin.
Trying to wipe it off too quickly can be ineffective and cause unnecessary rubbing.
Keep the surface shaded and cool while waiting so the liquid doesn’t dry too quickly.
Patience during this time reduces later work and preserves the paint.
3. Wipe gently using circular motions
After the sap has softened, gently wipe the area with a microfiber cloth.
Use light pressure and small circular motions to remove any remaining residue.
Avoid pressing hard or scraping with your fingernails or any sharp object.
The softened sap should gradually break down and begin to peel off.
If you feel any blockages, stop and give the product more time to work instead of increasing pressure.
A lighter application is safer for the clear coat and reduces the risk of scratches.
4. Repeat if necessary
Some stubborn juice stains may require more than one application, specially if they’ve been on the car for a long time.
It’s normal to repeat this process two or three times for stubborn stains.
Use a clean section of the microfiber cloth each time to avoid spreading the sticky stain across the surface.
It’s safer to reapply the product than to try to force the juice out.
5. Clean the area thoroughly
After the juice is completely removed, wash the area with car soap and rinse thoroughly.
This step removes any remaining chemical residue and restores the paint’s natural finish.
Dry the surface thoroughly with a clean microfiber towel to avoid water spots.
After cleaning, consider applying wax or sealant to protect the clear coat.
This final step helps prevent future paint leaks and keeps the surface smooth and shiny.
How to Use a Clay Bar for Stubborn Sap
A clay bar is a specialized detailing tool designed to remove surface dirt that regular washing can’t remove.
When tree sap hardens and leaves behind small, rough spots or residue that feels gritty to the touch, a clay bar can safely remove these particles from the clear coat.
Automotive clay is made of a soft, pliable material that, when used correctly, gently removes dirt from the surface without peeling the paint.
This method is commonly used by professional detailers because it restores smoothness and prepares the paint for waxing or sealing.
1. When to Use a Clay Bar
You should only use a clay bar after thoroughly washing your vehicle and trying other common sap removal methods.
If the paint still feels rough when rubbed with a clean hand, specially after drying, it means there is still some adhered dirt.
A clay bar is ideal when the sap leaves a thin film that’s invisible but can be felt.
It’s not suitable for thick, raised stains.
These should be dissolved first with alcohol or sap remover.
Instead of excessive scraping, it’s best to use the clay for final cleaning.
2. Proper Lubrication Technique
Lubrication is crucial for safe use of a clay bar.
The surface should always be kept wet with a clay lubricant spray or a mixture of clean water and car soap.
Lubrication creates a slippery layer between the clay and paint, allowing the clay to glide easily.
Without proper lubrication, the clay can stretch, causing minor scratches or marks.
Spray a generous amount of lubricant on a small area at a time.
The surface should feel smooth, not dry, while working.
Keeping everything well lubricated protects the clear coat and allows any remaining sap particles to be removed safely.
3. How to Glide Clay Safely
Take a small piece of clay and gently flatten it into a soft disk.
Glide it back and forth directly over the lubricated area.
Don’t press hard, as clay grips dirt gently, not forcefully.
You may feel a slight looseness at first, which means it’s lifting debris from the surface.
As the area becomes cleaner, the clay will move more easily.
If the clay becomes dirty, fold it over to reveal a clean area before proceeding.
Always work in small sections and avoid spilling the clay on the ground, as it could get dirt on it, which could scratch the paint.
4. Wipe Down Finally
After applying clay to an area, gently wipe it with a clean microfiber towel to remove excess grease.
The paint should now feel smooth and glassy to the touch.
Once the entire affected area has been treated, it’s recommended to apply wax or sealant, as claying removes some of the surface protection along with the dirt.
Applying new protection restores shine and helps prevent future sap from adhering strongly to the paint.
When used correctly, a clay bar is a safe and very effective way to remove stubborn sap residue and achieve a smooth, clean finish.
How to Remove Tree Sap From Home Remedies – If You Don’t Have a Sap Remover
If you don’t have access to a professional tree sap remover, some common household products can help break down the sap safely when used carefully.
Tree sap is made up of sticky natural resins and sugars that respond well to mild solvents and oils.
However, it’s important to remember that car paint is protected by a clear coat layer that can be damaged by harsh chemicals or rough handling.
Any home remedy should be used slowly, in small quantities and always tested on an inconspicuous area first.
These options can be helpful for small sap spots, but they should be used with patience and caution.
1. Rubbing Alcohol
Rubbing alcohol, also known as isopropyl alcohol, is one of the safest and most effective home remedies for sap removal.
It works by dissolving the sticky resin so that it loosens from the clear coat.
Apply a small amount to a clean microfiber cloth and gently dab the sap for a few minutes.
This gives the alcohol time to soften the hardened area.
Do not apply it directly to the paint and avoid vigorous rubbing.
After removing, wash the area to remove any remaining residue and protect the finish.
2. Hand Sanitizer
Hand sanitizer can also help because it contains alcohol.
The alcohol content helps break down sticky sap, just like rubbing alcohol does.
Instead of applying it directly to the paint, apply a small amount to a cloth.
Let it sit on the sap area for a while so it can begin dissolving the resin.
Gently wipe off the softened sap and then clean the area with car soap.
Make sure the sanitizer does not contain strong dyes or other chemicals that could cause stains.
3. WD-40
WD-40 is a mild oil spray that can loosen sticky substances like sap.
It works by penetrating the hardened resin and weakening its grip on the surface.
Spray a small amount onto a microfiber cloth and dab it onto the juice.
Let it sit for a few minutes and then gently wipe it away.
Afterward, thoroughly wash the area with car soap, as WD-40 leaves an oily residue.
This residue is essential to prevent it from attracting dust or reducing the effectiveness of the wax protection.
4. Baking Soda Paste
Baking soda mixed with a little water forms a light paste that can help remove light juice stains.
Baking soda is a bit rough, so it should be used with caution.
Apply the paste gently with a soft cloth, applying light pressure.
Do not rub vigorously, as even gentle rubbing can cause fine scratches in the clear coat.
This method is best for very small areas and should be thoroughly rinsed to remove any remaining particles.
5. Why Acetone Should Be Avoided
Acetone is a very strong solvent commonly found in nail polish remover and should not be used on car paint.
While it can dissolve sap quickly, it can also damage or soften the clear coat.
Acetone can remove wax, fade the finish, or even discolor the surface if left on for too long.
The risk of damaging the paint far outweighs the benefit of removing the sap quickly.
Therefore, it’s always safer to use milder options like rubbing alcohol or suitable automotive products instead of harsh industrial solvents.
Learn, What Not to Do When Removing Tree Sap
Removing tree sap improperly can cause more damage than the sap itself.
Modern vehicles are protected with a clear coat layer that provides shine and protects the colored paint underneath.
This clear coat is only a thin protective layer and once scratched or damaged by chemicals, it cannot repair itself.
Many people make the mistake of trying to remove sap quickly without understanding how sensitive car paint can be.
Avoiding the following actions will protect your car’s finish and prevent costly repairs like polishing, repainting, or clear coat correction.
1. Don’t Scrape with Metal Objects
Never use metal blades, knives, screwdrivers, or any sharp tools to scrape tree sap.
Even though the sap may appear thick and hard, metal can easily cut the clear coat.
Scraping can cause deep scratches that become visible in the sun.
Repairing these scratches often requires professional polishing or repainting.
Car paint isn’t as strong as metal, so scraping sap before removing it almost always damages the surface.
It’s always safer to soften the sap with the right products rather than trying to peel it off.
2. Avoid Abrasive Pads or Brushes
Rough sponges, stiff brushes and abrasive cleaning pads can cause marks and fine scratches.
Tree sap may seem stubborn, but vigorous scrubbing spreads the damage over a larger area.
Abrasive materials remove not only the sap but also small amounts of clear coat.
Over time, repeated vigorous scrubbing can cause the paint to appear faded and discolored.
Always use a soft microfiber cloth and gentle pressure.
Let the cleaning solution work instead of applying force.
3. Don’t use gasoline or harsh solvents
Gasoline, paint thinner and other strong solvents can dissolve sap quickly, but they can also remove wax, damage clear coats and cause discoloration.
These chemicals are not designed for use on automotive paint.
Harsh solvents can weaken the protective layer and make the surface more vulnerable to sunlight damage and stains.
In some cases, they can even soften or stain the paint.
For the long-term health of the paint, it’s safer to use the right automotive-safe products or a mild solution like rubbing alcohol.
4. Don’t leave chemicals on the paint for too long
Even safe cleaning products can cause problems if left on the paint for too long.
Many sap removers and alcohol-based solutions are designed to work quickly.
If they dry on the surface, they can leave streaks, stains, or light spots.
The sun’s heat can further damage the chemicals by preventing them from evaporating properly.
Always follow the product’s instructions and wipe the area clean after removing the sap.
Rinse thoroughly and dry with a clean microfiber towel to protect the finish.
Careful, timely and proper washing can keep your car’s paint smooth, shiny and free of damage.
Now, How to Restore Shine After Sap Removal
After removing tree sap, your car’s paint may appear clean, but the treated area may appear slightly dull.
This is because cleaning products, alcohol, or clay bars can remove not only the sap but also some of the protective wax layer.
Modern cars are protected by a clear coat that provides shine and protects the colored paint underneath.
However, the clear coat also needs protection from sunlight, moisture, dirt and pollution.
Restoring shine isn’t just about looks; it’s also about rebuilding a protective barrier so the paint stays smooth and healthy for longer.
1. Why Wax Protection Is Important
Car wax forms a thin protective layer over the clear coat.
This layer protects against sunlight, water, dust and sticky substances like tree sap.
Without wax, the clear coat is exposed to direct heat and environmental damage.
Over time, unprotected paint can lose its shine and oxidize, specially in hot weather.
Wax also smooths the surface, meaning dirt doesn’t have to adhere for as long.
This makes subsequent cleaning easier and safer.
Applying wax after removing sap removes any protection removed during cleaning and helps maintain a deep, shiny finish.
2. How to Apply Car Wax Properly
To apply wax correctly, start with a completely clean and dry surface.
Remaining dirt can get trapped under the wax and dull the shine.
Use a soft foam applicator pad and apply a thin, even layer of wax to small areas.
A thin layer works better than a thick one because it adheres better to the surface.
Allow the wax to dry until slightly hazy, according to the product instructions.
Then gently polish the area with a clean microfiber towel until the surface looks smooth and shiny.
Proper application enhances shine, improves color depth and creates a fresh, detailed look.
3. Using a Paint Sealant or Ceramic Coating
In addition to traditional wax, you can also use a paint sealant or ceramic coating for long-lasting protection.
Paint sealants are synthetic products that bond strongly to the clear coat and can last for many months.
They offer better resistance to heat and chemicals than basic waxes.
Ceramic coatings are even better because they create a strong protective layer that can last longer if applied correctly.
These coatings make the surface very smooth, reducing the risk of future sap adhesion.
Although ceramic products may require more careful application, they offer superior protection and a longer-lasting shine for drivers who want stronger protection against environmental damage.
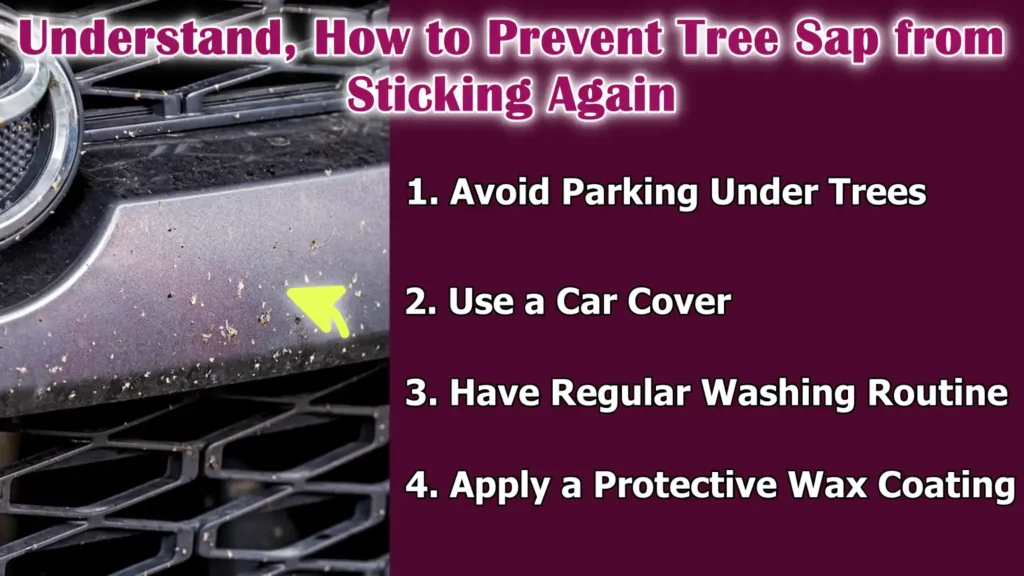
Understand, How to Prevent Tree Sap from Sticking Again
Even, there’s research on automotive coating system that shows that the paint on a car is only as strong as its protective outer layers, so there could be secondary coatings such as wax and ceramic sealants which are designed to extend the life and performance of a vehicle’s clear coat. But, when the tree sap gets contacted with the surface of the vehicle, then these protective layers actually determines how strongly the sap bonds and how easily it can be removed after that, that’s why it becomes really important to apply the quality secondary coatings as it actually helps them to protect the paint against sap and other environmental contaminants as well, that’s how it reduces the likelihood of the permanent marks or degraded finish as well.[¹]
Preventing tree sap from sticking to your car is much easier than removing it after it hardens.
Tree sap drips most often during warmer months, when trees produce more resin, specially from pine, maple and similar trees.
Heat makes sap drip more easily and it also sticks to your car’s clear coat faster.
Because modern automotive paint has a protective clear layer that can be affected by sticky resin and sunlight, adopting simple preventative measures can preserve both the look and long-term health of your car’s finish.
1. Avoid Parking Under Trees
The most effective way to prevent sap damage is to avoid parking directly under trees whenever possible.
Sap often drips from branches without warning, specially on hot or windy days.
Even healthy trees can release resin and small droplets may not be visible until they harden.
Parking a few feet away from tree branches or choosing an open area significantly reduces the risk.
If shade is necessary in the summer, try to find covered parking spaces instead of the natural shade of trees.
2. Use a Car Cover
A good-quality car cover creates a physical barrier between your paint and dripping sap.
Covers are specially helpful when you have to park outside for long periods of time.
They protect against sap, bird droppings, dust and the sun’s UV rays.
Make sure the cover is clean and designed for use on vehicles, as rough or dirty covers can scratch the paint.
A ventilated cover is best because it prevents moisture from accumulating while protecting the surface.
3. Have Regular Washing Routine
Washing your car regularly helps remove fresh sap before it hardens.
When sap is removed in a short time, the likelihood of stains or bonding is much lower.
Washing once a week using the right car shampoo can prevent small drops from turning into stubborn stains.
Regular washing also removes dust and dirt that can mix with the sap, making cleaning more difficult.
Keeping the surface clean reduces the likelihood of long-term paint damage.
4. Apply a Protective Wax Coating
Applying wax or paint sealant creates a smooth protective layer over the clear coat.
This barrier reduces the ability of sap to adhere to the paint.
Wax also makes the surface smooth, making dirt easier to remove during washing.
Additionally, wax protects against sunlight, which can heat the sap and accelerate bonding.
Reapplying wax every few months keeps the protective layer strong and helps maintain shine, while also reducing the risk of future damage from sap.
Read More:
So, When You Should Consult to the Professional
In many cases, if tree sap is treated promptly and handled carefully, it can be safely removed at home.
However, there are some situations where home remedies are not sufficient.
Modern vehicle paint is protected by a thin clear coat layer that provides shine and protects the paint underneath.
If this layer is damaged, cleaning alone will not fix the problem.
Attempting to repair deeper damage without the proper tools or knowledge can worsen the problem.
Knowing when to seek professional help can protect your vehicle’s finish and prevent costly repainting in the future.
1. Sap has Settled on the Clear Coat
Etching occurs when tree sap remains on the paint for too long, specially in hot weather.
Heat can cause the sap’s natural resins and acids to react with the clear coat.
Over time, this reaction can cause minor damage to the surface.
Even after removing the sap, you may notice a slight mark or uneven texture where the stain once was.
If the area feels rough or resembles a small stain that won’t come off easily, it may be etched.
Professional detailers use machine polishers and special compounds to carefully even out the clear coat and restore its smoothness.
Trying to apply a heavy polish at home without experience can cause the clear coat to become too thin, so professional care is safer in such cases.
2. Paint Discoloration
If you notice discoloration after removing the sap, such as fading, dark spots, or hazy spots, it could be a sign of deeper damage.
Discoloration often means the protective clear coat has weakened or worn away slightly.
In some cases, exposure to intense sunlight and sap can cause uneven oxidation, changing the way the paint reflects light.
A professional technician can determine whether the problem can be fixed with polishing or if further repairs are needed.
Ignoring discoloration can cause the damage to spread, specially if the clear coat has thinned.
3. The Need for Polishing or Paint Correction
When sap damage exceeds the remaining surface area, professional paint correction may be necessary.
Paint correction is a controlled polishing process that removes a very thin layer of damaged clear coat to smooth and shine the underlying surface.
This process requires proper machinery, polishing pads and experience to avoid burning or thinning the paint.
Professionals measure the thickness of the paint and use a special compound to safely restore the shine.
If multiple sap spots have caused the paint to peel, fade, or lose its shine, expert polishing can restore the original look more effectively than manual methods.
Seeking professional help at the right time ensures that your vehicle retains its value, shine and long-term paint protection.
Conclusion – How Can I Remove Tree Sap from My Car
It is clear that tree sap not just the small sticky spot, as it can ruin the car’s paint and have the capability to permanently damage your vehicle’s paint, so the only thing that can save it: how quickly and carefully you act upon it.
What starts as a small, sticky drop can harden in heat and sunlight, stick tightly to the clear coat and, if left unattended, can even cause stains or scratches.
But, the important thing to remember is that modern automotive paint is protected by a thin clear coat layer and once that layer is scratched or damaged by chemicals, it cannot repair itself.
Now, that’s all about this guide and if you still have unsolved queries, then you’re most welcome in the comment section.
Frequently Asked Questions
Q1. What is tree sap and why does it stick to car paint?
Answer: Tree sap is a naturally sticky liquid that comes from trees. It’s made up of sugar, water and sticky plant resins. Trees release sap to heal cuts in their bark. When sap falls on your car, it sticks because it’s naturally thick and glue-like. When the sun heats it, the sap first softens and then hardens as it dries. Once dry, it sticks tightly to your car’s clear coat. Therefore, once hardened, it can be difficult to remove.
Q2. Can tree sap permanently damage car paint?
Answer: Yes, tree sap can permanently damage car paint if left on a surface for too long. Fresh sap usually sits on top of the clear coat and is easy to remove. But when exposed to heat and sunlight for several days or weeks, it can harden and damage the clear coat. This can cause stains, light spots, or small marks. If the damage penetrates deep into the clear coat, polishing or professional paint correction may be required.
Q3. How long does it take for tree sap to damage car paint?
Answer: This time depends on the weather and temperature. In cool weather, sap can remain on the surface for several days without causing significant damage. In hot weather, specially in direct sunlight, damage can begin much faster. Intense heat can bind the sap more strongly within a day or two. The hotter the surface, the faster the sap will harden and react with the paint. Therefore, removing sap as quickly as possible is always the safest option.
Q4. What is the safest way to remove fresh tree sap?
Answer: The safest way to remove fresh sap is to first wash the area with car wash soap and water. This removes any dirt that could scratch the paint. Then, soften the sap with a microfiber cloth dampened with warm or lukewarm water. Gently wipe the area with a clean microfiber towel. Avoid vigorous rubbing. Fresh sap usually comes off quickly. After removal, wash and dry the area again and apply wax to protect the surface.
Q5. What’s the best way to remove dried or hardened sap?
Answer: For dried sap, use rubbing alcohol or a product specifically formulated for removing tree sap. Apply a small amount to a microfiber cloth and gently dab it onto the area for a few minutes. This will soften the hardened resin. Then, gently wipe it away without applying force. Repeat if necessary. After removing the sap, rinse the area thoroughly and apply wax or sealant to restore its protection.
Q6. Is rubbing alcohol safe for car paint?
Answer: Rubbing alcohol is generally safe for car paint when used correctly. It helps break down sticky substances like sap. However, it should not be poured directly onto the paint. Instead, apply it to a clean microfiber cloth and gently pat the area. Don’t leave it on for too long and always wash the surface afterward. Using too much or leaving it on for too long can remove the wax protection.
Q7. Can I use WD-40 to remove tree sap?
Answer: Yes, WD-40 can help loosen tree sap because it is oil-based and breaks down sticky stains. Spray it onto a cloth instead of applying it directly to the paint. Let it sit for a while, then gently wipe it off. Afterward, wash the area thoroughly because WD-40 leaves an oily layer. That oily layer can attract dust and reduce paint protection if not cleaned properly.
Q8. Is it safe to scrape off tree sap with a blade?
Answer: It’s unsafe to use a metal blade or sharp object on car paint. Metal can easily scratch or cut the clear coat. Even small scratches can become very visible in sunlight. If scraping is necessary, use only a paint-safe plastic razor blade and use it very gently. Softening the sap with a cleaner first is always safer than scraping.
References:
[1] Development of Car Coating Materials over the Past Decade for Paint Protection Applications – An Overview on the Different Types of Paint Protections
https://www.mdpi.com/2073-4360/17/23/3114

Guys, I’m a car audio enthusiast and customization expert and I love clear sound and clean installation. Plus, I have spent years helping people build their dream audio setups. And whenever I’m working on cars, I probably listen to music and thinks about the next big upgrade.