Written By: Don Dodi
Fact Checked By: Kristen Brown
Reviewed By: Diego Rosenberg
You need to understand this: your engine literally just can’t run for even a few seconds without maintaining steady fuel pressure, so that’s what fuel pump suppose to do to deliver the necessary pressure.
Even, in modern cars most of the fuel pumps are electric and located inside the fuel tank, where they can literally maintain the steady fuel pressure: which is typically between 30 to 80 PSI in many port fuel injection systems and even much higher in the direct injection engines.
So, without having the proper fuel pressure, the engine won’t able to create the correct air-fuel mixture which is needed for combustion, which is why it directly affects the performance, fuel efficiency and emissions as well.
That’s why, we have come up with this guide on How Do You Check a Fuel Pump, so that you can know if your vehicle’s fuel pump is weak or failing, as it literally can cause hard starting, engine hesitation, sudden stalling, poor mileage or even complete engine shutdown can happen.
What is a Fuel Pump and How Does It Work?
1. Basic Function of a Fuel Pump
The fuel pump is an essential part of a vehicle that delivers fuel from the tank to the engine.
Its primary function is to deliver the correct amount of fuel to the engine at the correct pressure for optimal performance.
Without a fuel pump, the engine cannot start, stop, or operate properly.
Essentially, the fuel pump ensures that gasoline or diesel reaches the combustion chamber at the correct amount and time to ensure optimal engine performance.
2. Difference Between Mechanical and Electric Fuel Pumps
There are two main types of fuel pumps: mechanical and electric.
Mechanical fuel pumps are commonly found in older vehicles and are driven by engine movement, often via a camshaft.
They deliver fuel at very low pressure for carbureted engines.
Electric fuel pumps, which are common in modern vehicles, are powered by the vehicle’s battery and provide higher, more consistent pressure for fuel-injected engines.
Electric pumps are more reliable and can maintain consistent fuel flow under all driving conditions, including high speeds and rapid acceleration.
3. Fuel Pump Location in Modern Vehicles
In most modern vehicles, the fuel pump is located inside the fuel tank.
This location helps keep the pump cool, reduces the risk of vapor lock and ensures consistent fuel delivery.
By being immersed in fuel, electric pumps remain naturally lubricated and cool, improving their life and efficiency.
Accessing the pump usually requires removing a panel in the trunk or rear seat, or in some cases, the fuel tank itself may need to be removed for maintenance or replacement.
4. The Role of Fuel Pressure in Engine Combustion
Fuel pressure is crucial for proper engine performance.
The fuel pump must push fuel at a specific pressure, usually measured in pounds per square inch (PSI), so that the fuel injectors can deliver the correct amount of fuel to the combustion chamber.
If the pressure is too low, the engine may misfire, stall, or have trouble accelerating.
Too high a pressure can flood the engine, reduce fuel efficiency, or damage parts.
Proper fuel pressure ensures that the fuel mixes properly with the air, resulting in optimal combustion for power, efficiency and low emissions.
5. How the Fuel Pump Interacts with the Injectors and Fuel Filter
The fuel pump works in conjunction with the fuel injectors and fuel filter to maintain engine performance.
The pump pushes fuel through the fuel filter, removing dirt, debris and debris that could damage the injectors or the engine.
After being filtered, the fuel reaches the injectors, which spray it directly into the combustion chamber.
If the pump is weak, clogged, or malfunctioning, the injectors may not receive enough fuel, which can lead to poor engine performance, stalling, or reduced fuel economy.
This close interaction explains why a healthy fuel pump is essential to the entire fuel system.
Understand About the Common Symptoms of a Bad Fuel Pump
1. Engine Cranks But Won’t Start
The most obvious sign of a bad fuel pump is when the engine cranks but won’t start.
This is because the pump isn’t supplying the engine with enough fuel for combustion.
Even if the battery is fully charged and the starter is working properly, a weak or faulty fuel pump can’t provide the necessary fuel pressure, preventing the engine from igniting.
Drivers may notice repeated attempts to start the car but fail, specially after prolonged idling or in hot weather.
2. Sudden Power Loss While Driving
A bad fuel pump can cause the engine to suddenly lose power while driving.
This can occur during acceleration, climbing hills, or overtaking another vehicle.
The pump struggles to maintain proper fuel flow, causing the engine to jerk or slow down.
This symptom is specially dangerous on highways because it reduces the vehicle’s ability to respond quickly to traffic conditions and can increase the risk of accidents.
3. Engine Stalling at High Speeds
When the fuel pump is weak, the engine may run smoothly at low speeds, but at higher speeds, it may stall or misfire.
This occurs because the pump cannot consistently deliver the required fuel pressure.
Stalling while driving can make the engine seem to be struggling or jerking and it often indicates that the pump is faulty and unable to meet the engine’s fuel needs during rapid or prolonged acceleration.
4. Poor Fuel Efficiency
A worn or defective fuel pump can adversely affect fuel efficiency.
If the pump delivers little or no fuel, the engine may run too lean, meaning there is not enough fuel in the air-fuel mixture.
Running lean reduces engine power, makes the vehicle work harder and increases fuel consumption.
Over time, drivers may notice that they are refueling more frequently than usual, even without changing driving habits.
5. Noises from the Fuel Tank
Any strange noise or buzzing sound coming from the fuel tank could indicate a fuel pump malfunction.
Electric fuel pumps make a quiet noise when operating normally, but loud or strange noises often indicate wear or mechanical stress within the pump.
This noise may occur when the engine is running or the ignition is on, indicating a malfunction in the pump motor.
6. Check Engine Light Activation
A malfunctioning fuel pump can trigger the Check Engine light on the dashboard.
Modern vehicles use sensors to monitor fuel pressure and flow and any malfunction is detected by the engine control unit (ECU).
When the ECU detects a lack of fuel, it stores a trouble code and illuminates the check engine light to alert the driver.
Using an OBD-II scanner to locate the code can help confirm whether the fuel pump is the source of the problem.
How to Take Safety Measures Before Testing Fuel Pump
1. Working in a Well-Ventilated Area
Before testing a fuel pump, it’s crucial to work in a well-ventilated area.
Gasoline and diesel fuel emit flammable vapors that can accumulate in enclosed spaces, posing a serious fire hazard.
Good ventilation ensures that these fumes dissipate quickly and reduces the risk of inhaling harmful chemicals.
It’s recommended to work outside or in a garage with open doors and windows to maintain airflow and a safe environment when handling fuel.
2. Disconnecting the Battery
Disconnecting the vehicle’s battery before performing any fuel system test is an important safety measure.
This prevents electrical sparks, which could ignite fuel vapors and cause a fire or explosion.
It also protects you from short circuits when testing electrical components like fuel pumps, fuses and relays.
Always disconnect the negative terminal first and ensure the battery is completely disconnected before beginning work.
3. Relieving Fuel System Pressure
Fuel systems, specially in fuel-injected vehicles, remain under high pressure even when the engine is off.
Relieving this pressure is essential before opening fuel lines or removing parts.
This prevents fuel from suddenly spraying, which could cause burns, fires, or damage to nearby parts.
Most vehicles have a fuel pressure relief valve, or the service manual will explain how to safely relieve pressure before testing or servicing the fuel pump.
4. Wearing Safety Gloves and Goggles
Wearing proper protective gear is crucial when handling fuel or testing the fuel pump.
Safety gloves protect your hands from contact with gasoline, which can cause skin irritation or chemical burns.
Safety glasses or goggles protect your eyes from splashes, pressurized fuel, or debris.
Using these basic protections ensures you can perform the test safely and reduces the risk of injury while working on the fuel system.
5. Avoid sparks and open flames
Fuel vapors are highly flammable, so it’s important to avoid any sparks, fire, or smoke near the vehicle when testing the fuel pump.
Even a small static discharge or electrical spark from tools or equipment can ignite the fumes and cause a serious fire or explosion.
Always keep ignition sources, open flames and smoke-producing materials away and use spark-free tools when working near the fuel system to maintain a safe environment.
Tools
| Tool | Purpose | Details |
|---|---|---|
| Fuel Pressure Gauge | Measures fuel pressure | This tool helps check whether the fuel pump is supplying the proper pressure to the engine. It shows whether the pump is too weak or too strong. Accurate readings eliminate the need for guesswork. |
| Multimeter | Tests electrical circuits | Used to measure voltage, current and resistance. It helps check whether the fuel pump is receiving sufficient power and whether the wiring is sound. An easy way to diagnose electrical problems. |
| Test Light | Checks power at components | A simple tool for checking whether power is reaching the fuel pump or relay. The light illuminates when there is power. Quick and easy for basic checks. |
| OBD-II Scanner | Reads engine codes | Plugs into the car’s computer to read error codes. This indicates if there are any problems with the fuel system. In some cars, it can display live data such as fuel pressure. |
| Basic Hand Tools | Remove panels and connectors | Includes a screwdriver, wrench and pliers. Necessary for safely accessing the fuel pump or its associated parts. Assists with testing and replacement. |
| Vehicle Service Manual | Provides instructions | Shows the correct steps, diagrams and safety tips for your car. This ensures the test is performed correctly. Prevents mistakes and saves time. |
How to Listen for the Fuel Pump Prime
1. Turn the ignition key to the “ON” position
The first step in testing the fuel pump is to turn the ignition key to the “ON” position without starting the engine.
This action powers the fuel pump and allows the fuel system to build pressure.
Modern vehicles typically run the pump for 2–3 seconds to build pressure before cranking the engine.
Doing this prepares the engine for starting and helps you determine if the fuel pump is working properly.
2. Identifying a 2–3-Second Humming Sound
When the ignition is turned on, a working fuel pump will make a slight humming or wheezing sound for approximately 2–3 seconds.
This sound comes from the pump motor inside the fuel tank as it moves fuel through the lines.
Listening for this sound is an easy and quick way to check if the pump is working without any tools.
If the sound is clear and consistent, it usually indicates that the pump is receiving power and is working.
3. What does it mean if there’s no sound?
If you don’t hear any sound for 2–3 seconds, it could mean the fuel pump isn’t working.
Silence could mean the pump is burned out, mechanically stuck, or unable to pressurize the system.
In some cases, it could also mean that power isn’t reaching the pump.
Identifying this early can help prevent starting problems and allow further testing before a complete replacement is necessary.
4. When silence indicates a relay or wiring problem
In many cases, a silent fuel pump doesn’t always mean the pump itself is faulty.
It could indicate a problem with the fuel pump relay, fuse, or electrical wiring.
The relay controls power to the pump and a blown fuse or broken wire could be preventing it from receiving power.
Checking these parts first can save time and money by fixing the electrical fault rather than replacing the faulty pump.
How to Check the Fuel Pump Fuses and Relays
1. Locating the Fuse Box
The first step in checking the fuel pump’s electrical system is to locate the vehicle’s fuse box.
Most cars have at least two fuse boxes, one under the hood and one inside the cabin.
The owner’s manual or service manual will indicate the exact location.
Finding the correct fuse box is important because it contains the fuses and relays that control power to the fuel pump.
Correct identification ensures safe and accurate testing.
2. Identifying the Fuel Pump Fuses
Once you find the fuse box, you need to identify the fuel pump fuses.
The fuse box cover usually has a diagram showing the location of each fuse, including the fuel pump fuse.
This fuse protects the pump from electrical surges and shorts.
It’s important to know which fuse controls the fuel pump, as blown fuses are a common cause of the pump not working.
3. Testing Fuse Continuity
Testing fuse continuity is the next step.
A good fuse allows electricity to pass, while a blown fuse does not.
Using a multimeter set to continuity mode, you can check if the fuse is working.
If the meter shows no continuity, the fuse is blown and needs to be replaced.
This simple test can quickly determine if the electrical problem is with the fuse rather than the fuel pump.
4. Replacing or Testing the Relay
The fuel pump relay is an electrical switch that sends power to the pump when the ignition is turned on.
If the fuse is fine, the relay may be the problem.
You can test the relay using a multimeter or replace it with a similar relay in the fuse box.
A bad relay will prevent power from reaching the pump, even if the pump and fuse are in good condition.
Testing or replacing the relay is often an inexpensive solution to starting or fuel delivery problems.
5. Signs of Electrical Failure
Signs of electrical failure in the fuel pump system include no humming sound from the pump, intermittent operation, or the pump only working under certain conditions.
Burnt or melted wires, blown fuses, or faulty relays are common signs.
Recognizing these signs helps determine whether the problem is electrical or mechanical.
Correctly diagnosing electrical problems can save time, prevent unnecessary pump replacement and ensure reliable fuel delivery.
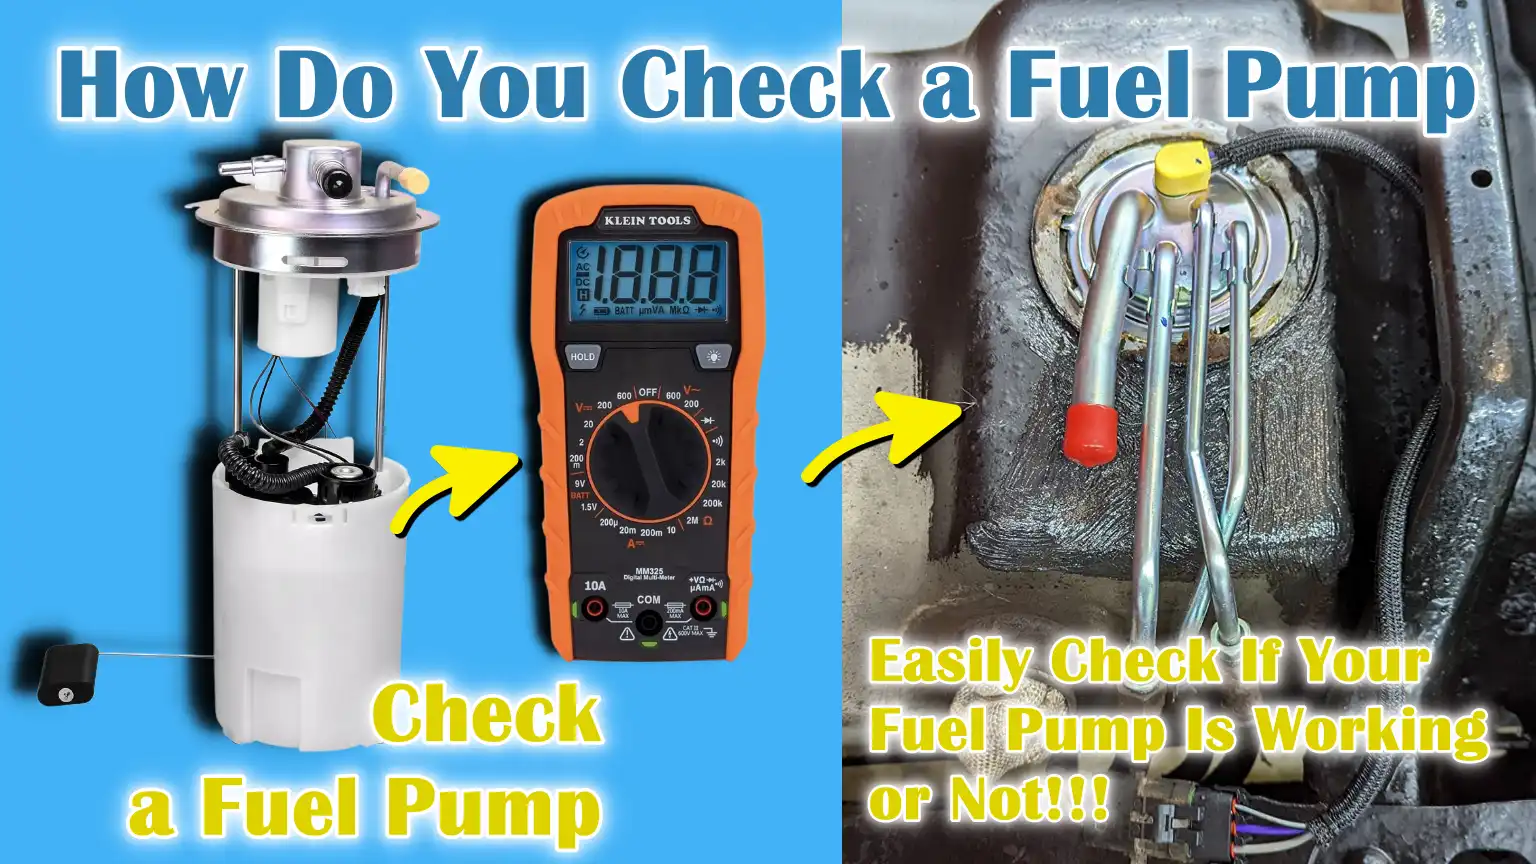
How to Perform a Fuel Pressure Test
1. Connecting a Fuel Pressure Gauge
To perform a fuel pressure test, connect a fuel pressure gauge to the vehicle’s fuel system.
This gauge measures how much pressure the fuel pump is delivering to the engine.
This is a reliable way to check if the pump is functioning properly.
Fuel pressure gauges are designed to safely handle the pressure range of most vehicles and using them provides accurate readings that cannot be determined by sound or guesswork alone.
2. Locating the Schrader Valve on the Fuel Rail
Most fuel-injected vehicles have a Schrader valve on the fuel rail.
This valve resembles a tire valve and allows you to securely attach a fuel pressure gauge.
The Schrader valve provides a direct access point for measuring fuel pressure without opening the fuel line, reducing the risk of fuel leaks or accidents.
It’s usually easy to locate the valve using your vehicle’s service manual, which provides a diagram and its exact location.
3. Compare the PSI reading to the manufacturer’s specifications
Once the gauge is connected, turn the ignition to the “ON” position to build up pressure in the fuel system, then read the PSI value.
Compare the measured pressure to the manufacturer’s specifications for your vehicle.
These specifications may vary depending on the engine type and fuel system, but most service manuals clearly state them.
Matching the pressure to the specifications ensures the engine receives the correct fuel for proper combustion, performance and efficiency.
4. Understanding the Meaning of Low, High, or Fluctuating Pressure
If the fuel pressure is lower than stated, it means the fuel pump is weak or defective, the fuel filter is clogged, or there is a leak in the fuel line.
High pressure could mean the fuel pressure regulator is stuck or there’s a blockage in the return line.
Fluctuating pressure could indicate a pump malfunction or an electrical problem, such as a bad relay or faulty wiring.
Understanding these changes is crucial to accurately diagnosing fuel system issues.
5. What Incorrect Pressure Indicates
Incorrect fuel pressure can cause a variety of engine problems, such as misfires, hesitation, poor acceleration, stalling and reduced fuel efficiency.
Low pressure often causes the engine to run lean, while high pressure can flood the engine and damage parts.
Early detection of incorrect pressure can lead to prompt repairs, whether it’s replacing the fuel pump, cleaning or replacing the fuel filter, or fixing an electrical fault.
Proper pressure testing is one of the most reliable ways to ensure the fuel system is functioning properly and prevent further engine damage.
How to Test the Fuel Pump’s Electrical Power
1. Use a Multimeter to Check Voltage
Testing the fuel pump’s electrical power begins with a multimeter, a tool that measures voltage, current and resistance.
Using a multimeter, you can confirm that the fuel pump is receiving the correct amount of electrical power from the vehicle’s battery and electrical system.
This step is important because even a properly functioning fuel pump will not function properly if it lacks sufficient voltage.
2. Test Power at the Fuel Pump Connector
The next step is to test power directly at the fuel pump connector.
Disconnect the connector and, with the ignition in the “ON” position, use a multimeter to measure voltage.
This test confirms whether power is actually reaching the pump.
If power is not being supplied, the problem may not be with the pump, but rather a blown fuse, a faulty relay, or faulty wiring.
3. Checking the Ground Connection
In addition to checking the positive voltage, it’s also important to verify the ground connection.
A poor or damaged grounding prevents proper power flow to the pump, causing it to run intermittently or fail completely.
To perform a ground test, connect a multimeter between the pump’s ground wire and a known, good ground point in the vehicle.
A positive ground reading confirms that the electrical circuit is complete and can properly power the pump.
4. Expected Voltage Readings
Most fuel pumps in modern vehicles operate at approximately 12 volts when the ignition is turned on, although some high-pressure systems may vary slightly.
If the measured voltage is significantly lower than expected, the pump may not be operating at full capacity, causing a drop in fuel pressure.
A consistently positive voltage reading indicates that the power supply to the pump is functioning properly and any other problems are likely mechanical.
5. Detecting Wiring Problems
If voltage readings are inconsistent, low, or absent, this often indicates wiring problems such as a broken wire, loose connector, or bad terminal.
Detecting and correcting these problems keeps the fuel pump working properly and prevents further damage to the fuel system.
Carefully checking the wiring and connections can save time and money by fixing electrical faults before the pump is replaced unnecessarily.
How to Perform a Fuel Flow Test – If Necessary
1. When to Perform a Flow Test
A fuel flow test is performed when other tests, such as listening to the pump prime, checking fuses and relays, or measuring fuel pressure, indicate that the pump may not be delivering enough fuel.
This test is typically necessary when the engine shows signs of hesitation, stalling, or poor acceleration despite normal pressure readings.
Performing a flow test helps determine whether the pump can deliver the correct amount of fuel over time, which is crucial for engine performance under real driving conditions.
2. Measuring Fuel Delivery Volume
To measure fuel delivery volume, the fuel line is disconnected and fuel is collected in a graduated container while the pump is running.
The pump is typically activated by turning the ignition to the “ON” position, or using the test setup described in the vehicle’s service manual.
Measuring the amount of fuel collected over a specific period of time, usually one minute, directly indicates how much fuel the pump is delivering to the engine.
Accurate measurement ensures that the engine receives the correct amount of fuel for burning.
3. Comparing Output to Specifications
After collecting fuel, the volume is compared to the manufacturer’s specifications for the specific engine and fuel system.
These specifications are provided in the service manual and indicate the minimum acceptable fuel delivery rate.
If the measured volume is less than the stated amount, it confirms that the pump is faulty.
Meeting or exceeding the specifications indicates that the pump is capable of delivering adequate fuel under normal operating conditions.
4. Detecting Poor Pump Performance
Low or uneven fuel flow clearly indicates poor pump performance, which can lead to engine misfires, hiccups, poor fuel efficiency and stalling.
Early identification of a weak pump allows it to be replaced or repaired immediately, preventing further damage to the engine and fuel system.
This test is one of the most reliable ways to determine if the pump is failing mechanically, even if electrical tests reveal no problems.
Proper flow testing ensures that the fuel system is operating as designed.
How to Check the Fuel Pump with an OBD-II Scanner
1. Scanning for Trouble Codes
An OBD-II scanner is a powerful tool for diagnosing fuel pump problems because it connects to the vehicle’s onboard computer.
By scanning for trouble codes, the scanner identifies potential problems in the fuel system, including the pump, sensors and associated electrical components.
Scanning saves time and prevents unnecessary part replacement by pinpointing the exact cause of engine problems.
If the codes indicate fuel delivery problems, it also provides a clear starting point for further testing.
2. Common Fuel Pump Codes – P0087
Some of the most common fuel pump-related trouble codes include P0087, which indicates low fuel rail pressure and P0190 to P0193, which are related to the fuel rail pressure sensor circuit.
These codes are generated when the computer detects that fuel pressure is out of range.
Understanding these codes helps determine whether the problem is a weak pump, a clogged fuel filter, a faulty sensor, or an electrical issue.
Correctly understanding the code ensures a correct diagnosis and can prevent misdiagnosis.
3. Using Live Data for Fuel Pressure Readings
Many OBD-II scanners provide live data, which shows real-time fuel pressure readings while the engine is running.
This feature allows you to monitor how the fuel pump performs under different conditions, such as idling, acceleration, or load.
Observing fuel pressure fluctuations can reveal problems that may be missed during static testing.
Live data also helps verify whether repair or replacement has improved fuel system performance.
4. When Codes Indicate Sensor vs Pump Failure
It’s important to distinguish between sensor and pump problems because a bad fuel pressure sensor can mimic a pump failure.
If the scanner shows abnormal readings but all electrical and fuel flow tests are normal, the problem may be with the sensor rather than the pump.
Conversely, if the readings are low and the flow or electrical tests confirm poor delivery, the pump itself may be faulty.
Correctly identifying the cause of the problem ensures proper repair and avoids unnecessary replacement of working parts.
How to Confirm a Bad Fuel Pump
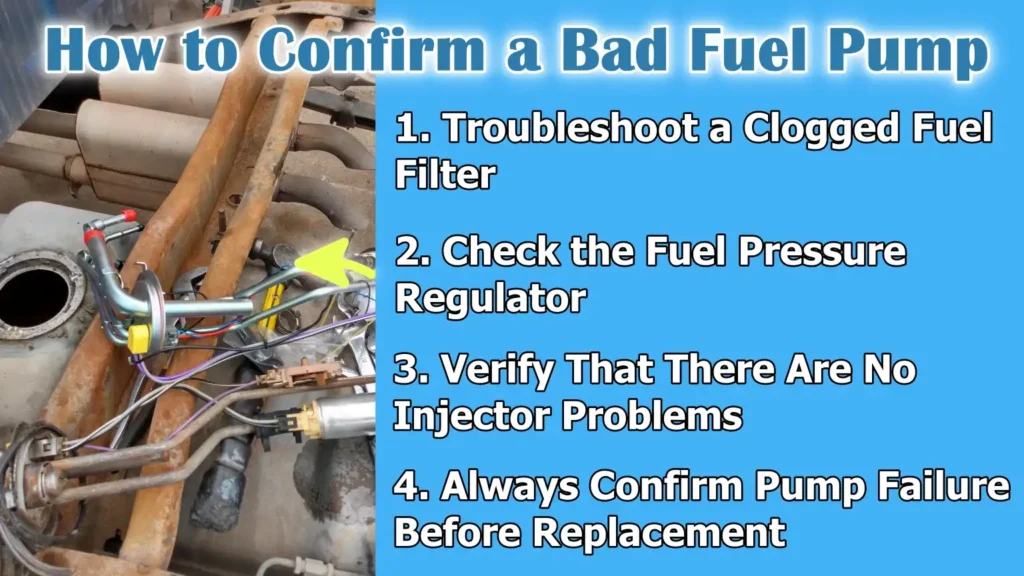
1. Troubleshoot a Clogged Fuel Filter
Before assuming the fuel pump is faulty, it’s important to check for clogs or blockages in the fuel filter.
A clogged fuel filter can reduce fuel flow and pressure, leading to symptoms similar to a bad pump, such as engine hesitation, stalling, or difficulty starting.
Checking and replacing a dirty or worn fuel filter first ensures that the problem isn’t caused by a blockage in fuel flow, which is a common and easily fixable problem.
2. Check the Fuel Pressure Regulator
The fuel pressure regulator maintains constant fuel pressure in the fuel rail.
If the regulator is faulty, it can cause low or constant fuel pressure, which could indicate a bad pump.
Checking the regulator involves measuring the fuel pressure at the rail and verifying that it meets manufacturer specifications.
Ensuring that the regulator is functioning properly helps avoid misdiagnosing the pump and preventing unnecessary replacement.
3. Verify That There Are No Injector Problems
Fuel injectors play a vital role in delivering fuel to the engine and blockages or malfunctions can also cause poor performance.
Before diagnosing a pump problem, it’s important to verify that the injectors are clean and functioning properly.
Testing the injectors for flow and spray pattern ensures that fuel delivery problems are not due to injector problems.
This step helps narrow the cause of engine performance problems to the fuel pump.
4. Always Confirm Pump Failure Before Replacement
After ruling out fuel filter clogs, regulator failure and injector problems, the next step is to confirm that the fuel pump is the cause of the problem.
This includes combining results from fuel pressure tests, electrical tests, flow tests and live data from an OBD-II scanner.
Confirming the pump is faulty before replacement ensures the correct part is replaced, saving time, money and effort, while ensuring reliable engine performance.
Read More:
What Can Be The Fuel Pump Test and Replacement Cost
1. Professional Diagnostic Cost
The cost of having a professional perform a fuel pump test can vary depending on the type of vehicle and the complexity of the fuel system.
Most automotive shops charge between $50 and $150 for a complete diagnostic test.
This fee includes checking fuel pressure, inspecting electrical components and scanning trouble codes.
Professional diagnostics are often worth the expense because they can accurately identify the problem, preventing unnecessary repairs or part replacement.
2. Average Fuel Pump Replacement Cost
Replacing a fuel pump in most modern vehicles typically costs between $400 and $800, including parts and labor.
Luxury or high-performance cars, which have more complex fuel systems and in-tank pumps, can cost over $1,000.
Depending on the brand and quality, the pump typically costs $100 to $400, while labor accounts for the remainder.
Knowing the average cost helps car owners plan repairs and avoid surprises.
3. Calculating Labor vs Parts Costs
The total cost of replacing a fuel pump includes both parts and labor.
Parts include the pump, gasket and sometimes a fuel strainer or fuel filter.
Labor costs depend on the vehicle, the location of the pump and whether the tank needs to be drained.
On average, labor can range from $150 to $400.
Understanding the details between parts and labor can help car owners make informed repair decisions and compare prices between shops.
4. DIY vs Mechanic Comparison
Some experienced DIYers can replace a fuel pump themselves, saving $150 to $400 in labor costs.
However, this requires the right tools, safety precautions and knowledge of fuel system procedures.
For most people, having a trained mechanic perform the replacement is safer and ensure the pump is installed correctly.
DIY replacement may be cheaper, but it carries risks such as fuel leaks, electrical problems, or incorrect installation, which could lead to further engine problems.
When You Should Consult to the Professional Mechanic
Along with this, there’s technical investigation which shows that more than 30% of the internal combustion engine failures actually linked to the fuel system problems, that is why it becomes really important to diagnose fuel pump at the regular time interval and repairs are also essential if due, so this research used the electrical current behavior under the maximum pressure as the key diagnostic indicator, that reinforces the need for having the precise testing methods so that you can prevent some unexpected breakdowns as well.[¹]
1. Difficult Electrical Diagnostics
Some fuel pump problems involve complex electrical systems that require advanced knowledge to diagnose.
Problems with wiring, relays, or control modules may not be detected by basic tests.
Professional mechanics have the tools and expertise to accurately identify these faults.
Attempting to diagnose complex electrical problems without experience can result in incorrect repairs, further damage, or wasted time and money.
2. Risks of Removing In-Tank Fuel Pumps
In many modern vehicles, fuel pumps are located inside the fuel tank, making them more difficult to remove and replace.
Working with in-tank pumps involves handling the fuel safely, relieving system pressure and ensuring proper reconnection.
Mistakes during removal or installation can result in fuel leaks, electrical short circuits, or damage to the tank itself.
Professional service minimizes these risks by following manufacturer-specific procedures and safety standards.
3. High-Pressure Fuel System – Direct Injection
Vehicles equipped with direct injection systems operate at very high fuel pressures, often exceeding 2,000 PSI.
Testing or servicing these pumps requires specialized equipment and careful handling to prevent injury or system damage.
Only trained technicians should work on high-pressure fuel systems, as improper handling can result in injury, engine damage, or void the warranty.
4. Warranty Considerations
For new vehicles with warranties, self-repair or unqualified service may void coverage for the fuel system or related parts.
Professional assistance ensures that repairs are performed according to manufacturer standards and warranty protection is maintained.
This is specially important for expensive parts like fuel pumps, injectors and high-pressure fuel systems, where incorrect installation can lead to costly repairs.
How to Prevent & Maintain the Fuel Pump
1. Keep the fuel tank at one-quarter full
Maintaining a fuel level greater than one-quarter of the tank helps protect the fuel pump and fuel system.
Fuel pumps rely on surrounding fuel for cooling and lubrication.
Running the tank nearly empty can cause the pump to overheat and cause premature failure.
Regularly keeping the tank at a safe level also reduces the risk of dirt or debris from the bottom of the tank entering the tank.
2. Change the fuel filter regularly
The fuel filter removes dirt, rust and other contaminants from the fuel before it reaches the engine.
Over time, a clogged or dirty filter can restrict fuel flow, forcing the pump to work harder and reducing engine performance.
Regularly changing the filter as recommended by the vehicle manufacturer maintains proper fuel flow and extends the life of the fuel pump and injectors.
3. Use Good Quality Fuel
Filling the tank with good quality fuel maintains engine efficiency and protects the fuel system.
Poor quality fuel may contain dirt, water, or additives that can damage the pump, clog filters, or reduce fuel injector performance.
Using a good fuel brand and recommended fuel grade ensures clean combustion, improved fuel efficiency and reduced wear on fuel system parts.
4. Avoid Poor Fuel
Poor fuel, which contains more water, dirt, or ethanol than recommended, can cause serious fuel system problems.
Water in the fuel can damage the pump and injectors, while debris can clog filters and damage parts.
Taking care when refueling, using proper fuel storage and avoiding unknown or questionable fuel sources helps avoid costly repairs and ensures reliable vehicle operation.
5. Regular Vehicle Inspection
Regular fuel system inspections help identify problems early.
Checking hoses, connections and fuel lines for leaks, wear, or damage can prevent problems before they occur.
Periodic inspections also monitor pump performance, pressure levels and filter condition.
Maintaining a regular inspection routine ensures the fuel system remains in good condition, reduces the risk of breakdowns and extends vehicle life.
Conclusion – How Do You Check a Fuel Pump?
Just know this fact that: always maintain a fuel pump as it is needed for powering every start, acceleration and maintains the all the necessary fuel pressure as well.
Also, the fuel pump ensures that the engine receives the correct amount of fuel at the right pressure, ensuring smooth combustion, good power and improved fuel efficiency.
So, by following safe procedures, using the right tools and correctly interpreting electrical and pressure readings, you can identify whether the problem lies with the pump, its associated electrical components, or a clogged filter.
As well as, it is important to consider preventive maintenance such as: keeping the fuel tank well filled, using good quality fuel, regularly changing fuel filters and performing routine inspections, can significantly extend the life of a fuel pump.
Overall, being proactive about fuel pump care not only keeps your vehicle running smoothly, but also prevents minor issues from becoming costly repairs, ensuring reliable performance for years to come.
Now, that’s all from this guide and you can ask related queries in the comment box below.
Frequently Asked Questions
Q1. What is a fuel pump and why is it important?
Answer: The fuel pump is a device in your vehicle that delivers fuel from the fuel tank to the engine. It ensures the engine receives the correct amount of fuel at the correct pressure. Without a properly functioning fuel pump, your engine may fail to start, stall while driving, or suddenly shut down. The pump is essential because it maintains a consistent fuel flow, allowing the engine to burn fuel efficiently for power, fuel economy and smooth performance.
Q2. How do I know if my fuel pump is failing?
Answer: There are several signs of a fuel pump failure. You may notice the engine cranking but not starting, a sudden loss of power while driving, or stalling at high speeds. Poor fuel efficiency and strange noises from the fuel tank are also common signs. Additionally, the check engine light may come on if the car’s computer detects fuel system problems. Recognizing these symptoms early can help prevent major problems and avoid getting stranded.
Q3. Can I test the fuel pump myself?
Answer: Yes, you can test the fuel pump yourself using basic tools like a fuel pressure gauge, multimeter, test light and sometimes an OBD-II scanner. Simple checks, like turning on the ignition and waiting for the pump to prime, or testing the electrical power to the pump, can help you determine if it’s working properly. However, testing fuel flow, working on the in-tank pump, or handling high-pressure systems can be more difficult and risky, so professional help is recommended in these cases.
Q4. How much does it cost to test and replace a fuel pump?
Answer: Professional fuel pump testing typically costs between $50 and $150. For most vehicles, replacing a fuel pump typically costs between $400 and $800, including parts and labor. For some luxury or high-performance vehicles, the cost can be higher. Parts alone typically cost $100 to $400, while labor can range from $150 to $400, depending on the complexity of the job. Do-it-yourself replacement can save money on labor, but requires the right tools and safety precautions.
References:
[1] TEST CONTROL OF FUEL PUMPS OF MODERN AUTOTRACTOR EQUIPMENT
https://www.citedrive.com/en/discovery/test-control-of-fuel-pumps-of-modern-autotractor-equipment/

Guys, I’m a car audio enthusiast and customization expert and I love clear sound and clean installation. Plus, I have spent years helping people build their dream audio setups. And whenever I’m working on cars, I probably listen to music and thinks about the next big upgrade.