Written By: Don Dodi
Fact Checked By: Kristen Brown
Reviewed By: Diego Rosenberg
Literally, remote car starters are designed to start your vehicle in the safe way even from a distance, even when doors are locked by using a key fob or you can use mobile app as well, basically without the diver being inside the car.
So, this system is now widely used in both cold and hot climates as it actually helps it to warm up or cool down the vehicle before driving, that effectively improves comfort and engine efficiency as well.
Additionally, there are studies in automotive engineering that shows that the modern remote starters are designed with the multiple safety features such as: brake detection, hood sensors and there’s immobilizer integration can be available as well, that helps them to prevent accidental movement or unauthorized use as well.
So, in this guide you’ll learn all about How Do You Install a Remote Car Starter that included proper wiring knowledge to connecting the starter module to the vehicle’s ignition power and safety circuits as well.
Tools
| Item | Purpose |
|---|---|
| Remote Car Starter Kit | This system is used to remotely start a car’s engine using a remote control or mobile app. It includes a control module, wiring harness and remote. Vehicle-specific kits are easy to install and integrate seamlessly with the factory system. |
| Screwdrivers | These are used to remove dashboard panels and open covers near the steering area. Most cars require both flathead and Phillips head screwdrivers. |
| Wire Strippers | These tools are used to remove the plastic covering from wires without damaging them. Clean wire ends help create safe and secure electrical connections. |
| Multimeter | It is used to test voltage and identify correct wiring in a vehicle. This tool helps prevent incorrect connections and electrical damage. |
| Soldering Iron | It is used to securely connect wires for long-lasting connections. Soldered joints reduce the risk of loose wires and system failures. |
| Safety Gloves | These gloves are used to protect hands from sharp edges and hot tools. They reduce the risk of injury when working under the dashboard. |
| Eye Protection | It is used to protect the eyes from dust, wire fragments, or solder splashes. Eye protection is essential during wiring and soldering work. |
| Vehicle Compatibility Check | This is used to confirm that the remote starter matches the car’s make, model, year and transmission type. This step prevents installation errors and system failures. |
What are the Safety Precautions You Need to Take Before Installation
1. Disconnecting the Car Battery
Disconnecting the car battery is the first and most crucial safety step before installing a remote car starter.
This is done to prevent electrical damage, accidental short circuits and unwanted sparks while working with the vehicle’s wiring.
When the battery is connected, even a minor wiring mistake can damage sensitive electronic components such as control modules or fuses.
Removing the negative battery terminal interrupts the flow of electricity, ensuring the safety of both the installer and the vehicle during the installation process.
2. Understanding Airbags, Immobilizers and Anti-Theft Systems
Modern vehicles are equipped with advanced safety systems such as airbags, immobilizers and factory anti-theft features.
These systems are integrated into the vehicle’s electrical network and can be affected if the wiring is handled incorrectly.
Airbag wires should never be tested or tampered with, as accidental activation can cause serious injury.
Immobilizers and anti-theft systems are designed to prevent the engine from starting without proper authorization, which is why many vehicles require a bypass module for remote starters.
Understanding these systems helps prevent warning lights, starting problems and safety hazards.
3. Legal Considerations and Local Regulations
The use of remote car starters is regulated in many areas due to safety and environmental concerns.
Some jurisdictions have restrictions on how long a vehicle can be left idling, while others require the car to be locked when remotely started.
In some places, remote starters are not permitted on vehicles with manual transmissions unless specific safety systems are installed.
Checking local laws before installation helps avoid fines, inspection failures, or legal complications.
Legal information also ensures that the remote starter is used responsibly and safely.
4. The Importance of Correct Wiring
Proper wiring is crucial for the safe and reliable operation of a remote car starter.
Incorrect connections can lead to short circuits, blown fuses, battery drain, or even complete system failure.
Loose or poorly insulated wires can overheat over time and damage surrounding components.
Correct wiring ensures that the starter activates only under safe conditions, such as when the brakes are not applied and the hood is closed.
Precise wiring protects the vehicle’s electronics and ensures long-term performance.
Let’s Understand About the Vehicle Wiring System
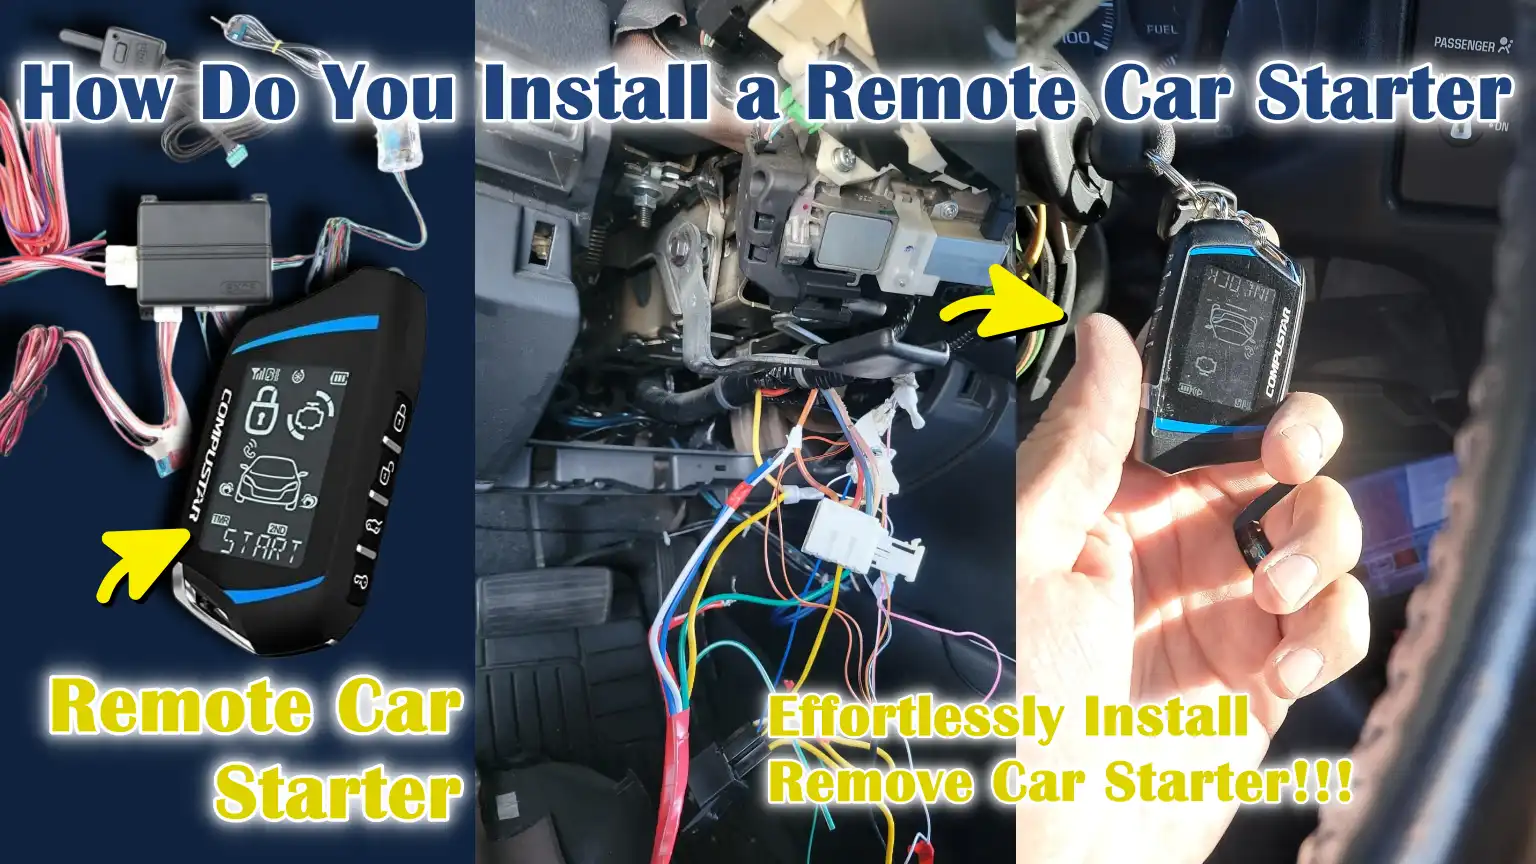
1. Locating the Ignition Switch Wiring Harness
The ignition switch wiring harness is the main group of wires that controls engine starting and power distribution in the vehicle.
It is typically located behind the steering wheel, near the ignition key cylinder or start button area.
This harness consists of several thick and thin wires bundled together and covered with protective wrapping.
Finding the correct harness is crucial, as connecting the remote starter to the wrong wires can prevent the engine from starting or damage electronic components.
Taking the time to carefully access this area ensures a safe and proper installation.
2. Identifying the Key Wires
Every remote car starter relies on several essential wires to function correctly.
The ignition wire keeps the engine running after it starts, the starter wire cranks the engine and the accessory wire powers systems like the radio and climate control.
The ground wire completes the electrical circuit and is usually connected to the car’s metal body.
The brake wire is a safety wire that disables the remote starter when the brake pedal is pressed.
Correctly identifying these wires ensures the vehicle starts safely and shuts off properly when needed.
3. Using a Wiring Diagram or Vehicle-Specific Guide
A wiring diagram or vehicle-specific installation guide shows the correct wire colors, locations and functions for a particular car model.
These guides are created using factory information and are far more reliable than guessing wire colors.
Because wire colors can vary by model year, using the correct guide helps avoid mistakes and saves time.
Following a reliable diagram ensures that each connection is made to the correct wire and minimizes the risk of electrical problems.
4. Verifying Wire Functionality with a Multimeter
Before making any connections, a multimeter is used to confirm that each wire is functioning as expected.
It measures voltage and helps verify when a wire becomes active, such as when the engine is started or the ignition is turned on.
Testing the wires with a multimeter prevents accidental connections to incorrect circuits, which could lead to system failure or malfunction.
This step adds an extra layer of safety and accuracy, making the remote starter installation more reliable.
How to Prepare the Remote Starter Module
1. Configuring Remote Starter Settings and Features
Configuring the remote starter settings ensures the system operates correctly according to the vehicle and driver’s needs.
These settings control features such as engine run time, door lock behavior, safety shutdown and climate control activation.
Most remote starter modules come with default settings, but they often need adjustment to match the vehicle’s electrical system.
Proper configuration ensures the engine starts smoothly, shuts down safely and prevents unnecessary battery drain.
Correct setup also prevents warning lights and system errors after installation.
2. Programming the Module for Manual or Automatic Transmission
Programming the remote starter for the correct transmission type is a crucial safety step.
In vehicles with automatic transmissions, remote starting only occurs when the gear selector is in the park position, preventing the vehicle from moving.
In vehicles with manual transmissions, special programming and safety measures, such as neutral detection and reservation mode, are required to prevent the vehicle from unexpectedly moving.
If the wrong transmission mode is selected, the remote starter may not function or could create a safety hazard.
Correct programming ensures safe operation and proper system behavior.
3. Pairing the Remote Control with the Starter Unit
Pairing the remote control connects the key fob or mobile device to the remote starter module.
This process allows the remote to send start, lock and stop commands to the vehicle.
Pairing is typically done through a simple programming sequence using the ignition key or control buttons on the module.
Correct pairing ensures reliable signal communication and proper response from the vehicle.
Without proper pairing, the remote starter may not respond or may function erratically.
4. Securely Mounting the Control Module Under the Dashboard
Securely mounting the control module under the dashboard protects it from movement, vibration and heat.
To avoid interference, the module should be kept away from pedals, steering components and the airbag system.
A stable mounting location prevents loose wiring and long-term damage caused by constant movement.
A secure location also improves signal strength and makes future servicing easier.
Proper mounting helps ensure that the remote starter system operates reliably for many years.
How to Connect Power and Ground Wires
1. Connecting the Constant Power Wire
The constant power wire provides continuous power to the remote starter module, allowing it to function at all times.
This wire is typically connected directly to the vehicle’s battery or to a high-capacity fuse box terminal designed for constant power.
The correct fuse should always be used to protect the system from overload and power surges.
Properly connecting this wire ensures the remote starter receives stable power without battery drain or system failure.
Incorrect power connections are one of the most common causes of remote starter malfunctions.
2. Proper Grounding Techniques
Grounding completes the electrical circuit and allows the remote starter to function reliably.
A good ground connection is achieved by securely attaching the ground wire to a clean, bare metal surface on the vehicle’s body or frame.
Paint, rust and dirt should be removed to ensure a strong electrical contact.
Poor grounding can lead to weak signals, intermittent operation, or complete system failure.
Proper grounding improves system stability and protects sensitive electronic components.
3. Securing Electrical Connections
Securing electrical connections is crucial for long-term reliability and performance.
Soldering creates a strong and permanent bond between wires, reducing resistance and preventing loose connections.
High-quality connectors can also be used if properly installed and securely tightened.
Weak or loose connections can lead to intermittent starting problems or electrical short circuits.
Secure connections ensure consistent power flow and reliable remote starter operation.
4. Insulating Wires
Insulating wires protects them from moisture, heat and physical damage.
Electrical tape, heat shrink tubing, or protective wire sleeves are commonly used to cover exposed connections.
Proper insulation prevents corrosion, short circuits and accidental contact with metal components.
Well-insulated wiring also improves the overall appearance and safety of the installation.
This step helps extend the lifespan of the remote starter system.
How to Wire the Ignition, Starter and Accessory Circuit
1. Connecting the Ignition Wires
The ignition wires are responsible for keeping the engine running after it starts.
When the remote starter sends a signal, the ignition wires power essential engine systems such as fuel injection and the engine control unit.
If this wire is not connected correctly, the engine may start and then immediately shut off.
Correct ignition wiring ensures the engine runs smoothly during remote start and functions correctly when the key is inserted.
Proper connections protect the vehicle’s electronics and prevent engine stalling issues.
2. Wiring the Starter Circuit
The starter circuit is the wire that cranks the engine during startup.
This wire receives power only for a short time to crank the engine.
Connecting it correctly allows the remote starter to start the engine without excessive cranking or damage to the starter motor.
Incorrect wiring can result in grinding noises or a failure to start the engine.
Proper starter circuit connections ensure smooth and reliable engine cranking.
3. Connecting the Accessory Wires
The accessory wires power the vehicle’s systems such as the heater, air conditioner, radio and power windows.
These wires help pre-condition the cabin before the driver enters the vehicle.
The accessory wiring is designed to shut off during engine cranking to protect sensitive electronics.
Correct connections ensure that comfort systems function properly during remote start without any electrical stress.
This step enhances driver comfort and system reliability.
4. Double-Checking All Wiring Connections
Double-checking all wiring connections against the wiring diagram is a crucial final step.
This process ensures that every wire is connected to the correct circuit and matches the vehicle’s specifications.
Errors in wiring can lead to blown fuses, illuminated warning lights, or system failures.
Verifying the connections reduces troubleshooting time and can prevent long-term electrical problems.
Careful inspection ensures that the remote starter operates safely and reliably.
How to Integrate the Safety and Control Inputs
1. Connecting the Brake Switch
The brake switch is a crucial safety feature that disables the remote starter when the brake pedal is pressed.
This prevents the vehicle from being driven without the key in the ignition.
The brake switch wire is typically located near the brake pedal and sends a signal when the pedal is pressed.
If this wire is not connected correctly, the vehicle can still be driven when it should be disabled, creating a safety hazard.
Correct connection of the brake switch ensures that the engine shuts off immediately when the driver is in the vehicle and applies the brakes.
2. Wiring the Hood Pin Switch
The hood pin switch prevents the engine from starting when the hood is open.
This is essential during vehicle maintenance as it prevents accidental engine starts while someone is working under the hood.
The switch works by detecting whether the hood is closed and sends a safety signal to the remote starter module.
If the hood is open, the remote starter is disabled.
Proper installation of the hood pin switch adds an extra layer of safety and prevents serious injury.
3. Integrating Door Locks and Security Systems
Many remote starter systems can be connected to the vehicle’s power door locks and factory or aftermarket security systems.
This allows the doors to automatically lock when the engine is started remotely and unlock when the vehicle is accessed properly.
The integration must be done carefully to avoid triggering the alarm system or disabling security features.
When connected correctly, the system enhances convenience while maintaining vehicle security.
Proper integration ensures the vehicle remains secure at all times.
4. Installing a Bypass Module for the Factory Immobilizer
Modern vehicles often have factory immobilizer systems that prevent the engine from starting without a coded key or signal.
A bypass module temporarily sends the correct signal to allow remote starting, while the immobilizer remains active when the vehicle is running normally.
Without the bypass module, the engine may crank but will not start.
Proper bypass installation allows the remote starter to function without compromising the vehicle’s security system.
This step is necessary for compatibility with newer vehicles.
How to Test the Remote Starter System
1. Reconnecting the Vehicle Battery
Reconnecting the vehicle battery provides electrical power to the remote starter and the vehicle’s systems.
This step should be performed carefully to avoid sparks or loose connections.
A secure battery connection ensures stable voltage and prevents system malfunctions.
If the battery terminals are not properly tightened, the remote starter may not function or may behave erratically.
Correct connections prepare the vehicle for safe system testing.
2. Performing Initial Power-Up Test
The initial power-up test verifies that the remote starter module powers on and communicates with the vehicle.
When power is restored, indicator lights or signals on the module confirm that it is active.
This test helps quickly identify wiring or programming issues before attempting to start the engine.
If warning lights appear on the dashboard, it may indicate incorrect connections.
Initial testing helps prevent further problems.
3. Testing Remote Start, Shutdown and Range
Testing the remote start function confirms that the engine starts smoothly and runs for the programmed duration.
The shutdown function should also be tested to ensure the engine turns off when commanded or when a safety condition is triggered.
Range testing verifies how far the remote control can operate from the vehicle without losing the signal.
Reliable performance in these tests indicates that communication between the remote and the module is functioning correctly.
This step confirms the system’s usability in everyday situations.
4. Verifying Safety Shut-Off Functions
Safety shut-off functions protect the vehicle and its occupants during remote starting.
These include shutting off the engine when the brake pedal is pressed, the hood is opened, or any unsafe condition is detected.
Testing these functions ensures that the remote starter responds promptly and correctly.
If any safety feature fails, the system should not be used until it is repaired.
Proper safety verification confirms that the remote starter operates reliably and safely.
Now, How to Do Final Assembly and Manage Wire
1. Securing All Wiring
Securing all wiring is crucial for the long-term safety and reliability of the remote starter system.
Zip ties are used to neatly bundle wires and prevent them from moving while the vehicle is in motion.
Loose wires can rub against sharp edges, become damaged, or disconnect over time.
Properly secured wiring reduces noise, enhances safety and helps prevent electrical malfunctions.
This step ensures the longevity of the installation.
2. Reinstalling Dashboard and Trim Panels
Reinstalling the dashboard and trim panels restores the vehicle’s interior to its original condition.
The panels must be carefully reinstalled to avoid pinching or crushing any wires.
Proper alignment ensures that clips and screws fit securely without force.
Forcing the panels can damage hidden wiring.
Careful reassembly protects both the wiring and the interior components.
3. Ensuring No Obstruction to Pedals or Steering
Ensuring that no wires obstruct the pedals or steering system is a critical safety check.
Wires must be kept clear of the brake pedal, accelerator, clutch and steering column.
Even slight obstruction can impair pedal movement or steering response.
This check prevents hazardous driving situations and ensures the smooth operation of the vehicle.
Safety should always be the top priority during the final inspection.
4. Cleaning the Installation Area
Cleaning the installation area removes any loose tools, wire scraps and protective coverings.
A clean workspace helps identify any missed connections or unsecured components.
It also prevents rattling noises and distractions while driving.
The final cleaning completes the installation and prepares the vehicle for safe daily use.
A clean finish demonstrates a professional-quality installation.
How to Solve Common Remote Car Starter Problems

1. Engine Does Not Start or Shuts Off Immediately
When the engine does not start or shuts off immediately after starting, the problem is usually related to the ignition or starter wiring.
The remote starter may not be providing continuous power to the ignition circuit, causing the engine to shut down.
This problem can also occur if the immobilizer bypass is not functioning correctly.
Checking wire connections and confirming correct programming often resolves this issue.
Proper ignition signal timing is essential for smooth engine operation.
2. Remote Range or Signal Problems
Remote range or signal problems occur when the remote control cannot effectively communicate with the starter module.
This can be due to poor antenna placement, metal interference, or low remote battery power.
The antenna should be mounted high and away from metal surfaces to improve signal strength.
Environmental factors such as buildings and electronic interference can also reduce range.
Proper antenna positioning ensures reliable remote operation.
3. Warning Lights on the Dashboard After Installation
Warning lights on the dashboard after installation typically indicate wiring or communication problems.
Modern vehicles use computer systems that closely monitor electrical signals.
If a wire is incorrectly connected or a sensor signal is interrupted, warning lights may illuminate.
Scanning the vehicle for error codes helps identify the affected system.
Correcting the wiring and resetting the system often clears the warnings.
4. Diagnosing Wiring or Programming Errors
Diagnosing wiring or programming errors requires careful inspection and testing.
Loose connections, incorrect wire identification, or incorrect software settings can prevent the system from functioning properly.
Using a multimeter to verify wire function helps pinpoint mistakes.
Double-checking the programming steps ensures that the remote starter matches the vehicle’s specifications.
Accurate diagnosis saves time and prevents recurring failures.
Read More:
How to Maintain Remote Car Starter
Plus, there’s automotive reference material that shows that the remote car starter is a radio-controlled device that starts a vehicle’s engine from a distance, that literally allows the interior to warm up in cold weather or cool down in the hot conditions before entry, so when you enable pre-conditioning; then the remote starters actually helps the drivers to avoid uncomfortable wits and it improves the visibility as it defrost the windows as well, also there’s many systems that automatically locks doors when the engine is started remotely that contributes to the great safety.[¹]
1. Periodic Inspection of Wiring Connections
Regular inspection of wiring connections helps ensure the remote starter operates safely and reliably.
Over time, vehicle vibrations, heat and moisture can cause wires to loosen or corrode.
Checking connections ensures they remain tight, insulated and free from corrosion.
Early detection of faulty or loose wiring prevents system failures and reduces the risk of electrical problems.
Regular inspections contribute to the system’s longevity.
2. Battery Maintenance for Remote Starter Performance
Battery maintenance is crucial for proper remote starter operation.
Remote starters rely on a strong and stable battery to send and receive signals.
A weak battery can lead to slow starting, reduced remote range, or complete failure.
Keeping battery terminals clean and the battery fully charged optimizes performance.
A healthy battery ensures consistent and reliable remote starting.
3. Firmware Updates and Remote Reprogramming
Updating firmware and reprogramming the remote ensures compatibility with the vehicle’s electronic systems.
Manufacturers release updates to improve performance, fix bugs and support new vehicles.
Outdated software can lead to connectivity issues or limited features.
Reprogramming the remote after battery replacement also restores functionality.
Keeping the software updated maintains system reliability.
4. Knowing When to Seek Professional Help
Knowing when to seek professional help prevents costly mistakes.
If wiring issues, warning lights, or system failures persist, a trained technician can accurately diagnose problems.
Professionals have specialized tools and vehicle-specific data.
Seeking assistance when needed ensures safety and protects the vehicle’s electronic systems.
Expert help can save time and prevent damage.
Conclusion – How Do You Install a Remote Car Starter
Now, you have understood that when you ideally install the remote starter then it literally enhances your everyday driving comfort that leads to the effortless driving experience, even it preserves vehicle safety and electronics as well.
Plus, modern remote starters are designed to work with advanced vehicle electronics, immobilizers and security systems, which is why careful installation and regular maintenance are crucial.
So, When all connections are properly made and safety checks are verified, a remote starter can enhance daily driving convenience without damaging the engine or battery.
Along with this, a well-installed system not only provides comfort in bad weather but also maintains the vehicle’s safety and long-term reliability.
Now, that’s all from this guide and if you still have confusion related to this guide, then you’re welcome in the comment below.
Frequently Asked Questions
Q1. What is a remote car starter and how does it work?
Answer: A remote car starter is a system that allows you to start your car’s engine from a distance using a remote control or a mobile app. It works by sending a signal to a control module installed inside the vehicle. This module temporarily takes control of the ignition and starter circuits while keeping the safety systems active. The car remains locked and cannot be driven until the key is present. This system is primarily used to warm up or cool down the vehicle before driving.
Q2. Is it safe to install a remote car starter?
Answer: Yes, a remote car starter is safe if installed correctly. Modern remote starters are designed with several safety features such as brake detection, hood sensors and automatic shut-off systems. These features prevent the vehicle from starting or running in unsafe conditions. Problems typically only arise when the wiring is incorrect or safety inputs are bypassed. Proper installation and testing ensure safe operation.
Q3. Can I install a remote car starter myself?
Answer: A remote car starter can be installed by anyone with basic electrical knowledge and experience working with automotive wiring. The process involves identifying the correct wires, using wiring diagrams and testing connections with a multimeter. Due to the complexity of modern vehicle electronics and security systems, this can be challenging for beginners. If you have any doubts or difficulties working with wiring, professional installation is recommended to avoid damage.
Q4. Does installing a remote starter damage the engine or battery?
Answer: A properly installed remote car starter does not damage the engine or battery. In fact, modern engines are designed to handle cold starts efficiently. The remote starter runs the engine for a limited time and then shuts off automatically. Battery problems usually occur when the car battery is already weak or the wiring is faulty. Regular battery maintenance ensures smooth operation.
Q5. Do all cars support remote car starters?
Answer: Not all cars support remote car starters in the same way. Most automatic transmission vehicles are compatible, while manual transmission vehicles require special safety programming. Newer vehicles with factory immobilizers often require a bypass module. The car’s make, model, year and transmission type all affect compatibility. Checking compatibility before installation can prevent system failures.
Q6. Why do some cars require a bypass module?
Answer: Vehicles with factory immobilizer systems require a bypass module. These systems prevent the engine from starting without a coded key signal. The bypass module sends the correct signal during remote start, while security remains active during normal driving. Without it, the engine may crank but will not start. The bypass module allows for remote starting without compromising the vehicle’s security.
Q7. What should I do if my car starts and then shuts off?
Answer: If your car starts and then shuts off, the problem is usually related to the ignition wiring or immobilizer bypass programming. The engine may not be receiving continuous ignition power. This can also happen if the remote starter is not properly programmed for the vehicle. Rechecking the wiring and programming usually resolves this issue.
Q8. Are remote car starters legal everywhere?
Answer: Laws regarding remote car starters vary by location. Some places have idling time limits or require the vehicle to be locked while running. Some jurisdictions may prohibit remote starters on manual transmission vehicles. Checking local laws before installation helps avoid legal issues. Adhering to legal regulations ensures safe and responsible use.
References:
[1] Remote starter
https://en.wikipedia.org/wiki/Remote_starter

Guys, I’m a car audio enthusiast and customization expert and I love clear sound and clean installation. Plus, I have spent years helping people build their dream audio setups. And whenever I’m working on cars, I probably listen to music and thinks about the next big upgrade.