Written By: Don Dodi
Fact Checked By: Kristen Brown
Reviewed By: Diego Rosenberg
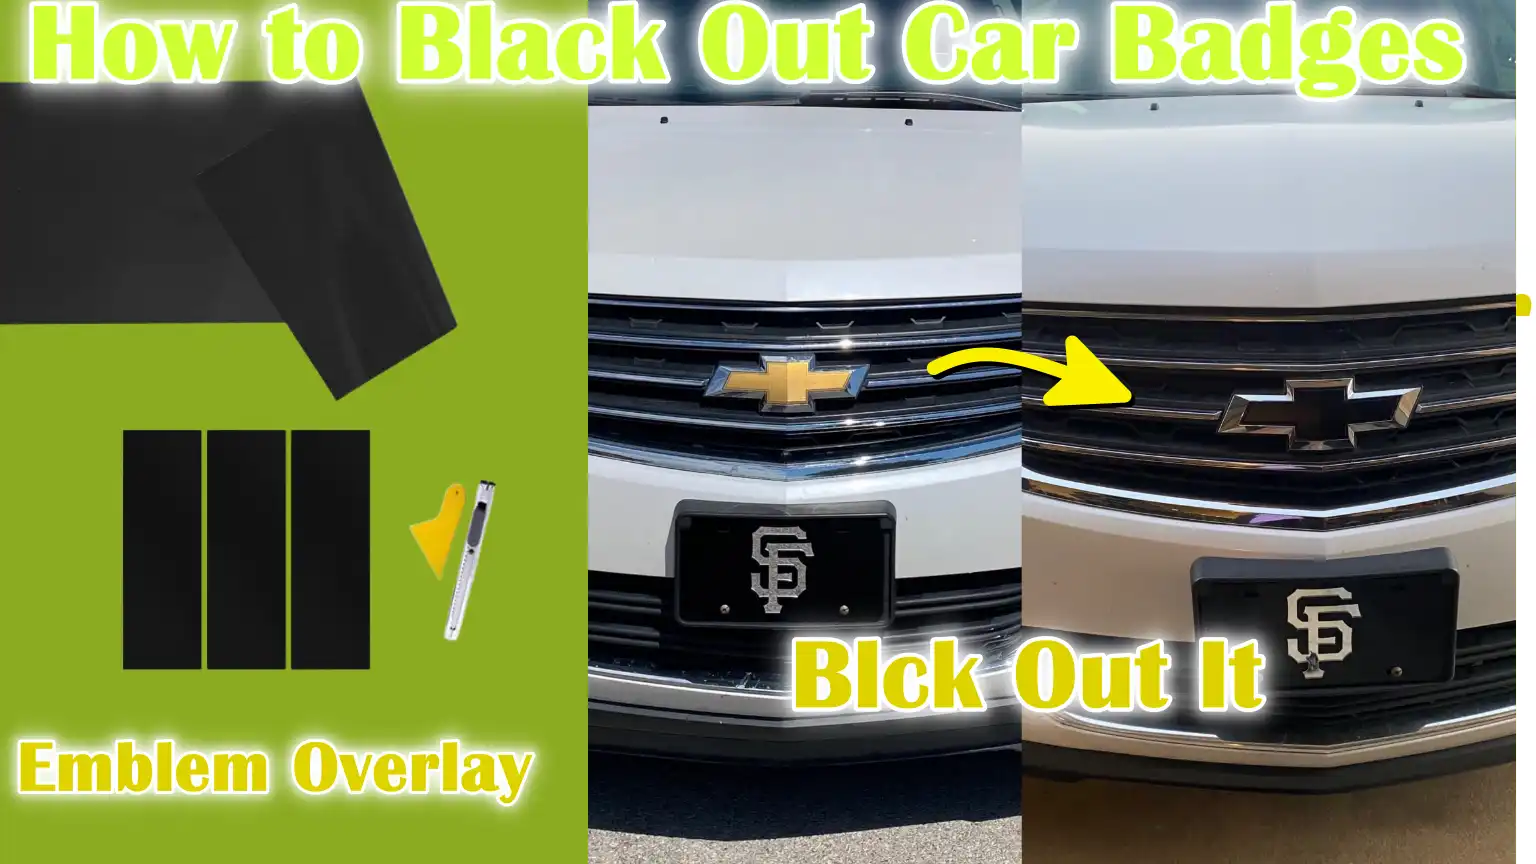
When you wanted to give your vehicle a bold and custom touch then removing the badges can actually makes a big difference and yes it is really the affordable ways to give your vehicle a sleek and custom look without spending thousands on major modifications.
Car badges are also known as the emblems or nameplates: and they are basically are the manufacturer’s logo or model name which displayed on your car’s exterior and these are usually made of chrome-plated plastic or metal.
Additionally, according to the automotive customization industry, the visual modifications such as badge blackouts can actually increase a vehicle’s perceived value as it makes it look newer and more premium.
And the best part is that this mod doesn’t actually just enhance the style: but it can also hide the faded, scratched or sun-damaged chrome that extends the badge’s lifespan as well.
Now, in this guide you’ll know all about How to Black Out Car Badges and it contains tools, methods and some important tips as well.
Tools
| Tool / Material | Purpose | Extra Tips for Use |
|---|---|---|
| Black Spray Paint (Automotive-Grade or Plasti Dip) | Used to color badges black. Plasti Dip is removable, while automotive paint is permanent. | Shake can well before use; apply thin layers for a smooth look. |
| Vinyl Wrap | An adhesive film to cover the badge in clear black without dyeing it. | Use heat (such as a hair dryer) to make the vinyl adhere easier to the bends. |
| Masking Tape & Painter’s Tape | Protects surrounding areas of the car from paint or adhesive. | Painter’s tape removes easily without leaving a sticky residue. |
| Sandpaper or Scuff Pad (Optional) | Lightly scratching glossy surfaces helps the paint adhere better. | Use a finer grit (600-800) for a smoother preparation without deep scratches. |
| Plastic Trim Removal Tool | Removes badges from car without scratching the paint. | Avoid metal tools, as they can damage the surface. |
| Cleaning Supplies (Soap, Water, Rubbing Alcohol) | Removes dirt, grease and wax prior to painting or wrapping. | Always allow the badge to dry completely before painting. |
| Microfiber Cloths | Soft cloth for cleaning and drying without scratching. | Wash them frequently to avoid dirt accumulation. |
| Clear Coat (Optional) | It adds shine and protects the paint from cracking and fading. | For best results apply after paint has completely dried. |
| Gloves & Safety Mask | It protects your hands from chemicals and protects you from paint fumes. | Always work in a ventilated area for safety. |
Choose the Method
1. The Plasti Dip Method – Temporary and Peelable
Plasti Dip is a rubber-based spray coating that has become popular among car enthusiasts who want to change the look of their vehicle without making any permanent changes.
One of its biggest advantages is that it is completely removable—if you ever change your mind, you can simply peel it off without damaging the badges underneath.
It creates a smooth, matte or satin finish that can last from one to three years, depending on the weather, frequency of car washing and number of coats applied.
The more coats you spray, the easier it will be to peel off later.
Plasti Dip is also affordable and easy to apply at home, making it a great option for beginners who want to experiment with different styles.
However, it is less durable than paint and can peel off if not applied properly or exposed to harsh chemicals.
2. Vinyl Wrap Method – Clean, Professional Look Without Paint
Vinyl wrapping changes the color and finish of a badge by applying a thin, adhesive film directly to it.
This method is often chosen by those who want a precise, professional look without any paint or spray.
High-quality automotive vinyl is UV-resistant, waterproof and can last three to five years with proper care.
It is available in a variety of finishes, including matte, gloss, satin and even textured designs such as carbon fiber.
Vinyl wrap is also completely removable, so it offers flexibility if you want to go back to the original chrome or try a different color later.
The downside is that small, detailed emblems can be difficult to wrap, specially for beginners and may require a heat gun and patience to achieve a wrinkle-free result.
3. The Paint Method – Permanent, Durable Finish
Painting a badge is the longest-lasting way to make it look brighter and is preferred by those who want a change that will last through years of weather, sun and car washes.
Automotive spray paint, when applied correctly, permanently bonds to the badge’s surface and can maintain its shine for many years without fading.
This method usually requires more preparation, such as sanding the badge so the paint will adhere properly and coating the surrounding areas to protect the car’s finish.
A clear coat can be applied over the top to enhance the shine and protect it from scratches and damage from UV rays.
While this method produces the most durable results, it is also permanent, meaning you can’t easily restore the original chrome look without repainting or replacing the badge entirely.
It is best suited for those who are confident in their judgment and application skills.
Preparation
1. Wash the car thoroughly, paying attention to the badge
Before beginning any modifications, it is important to thoroughly clean your car.
Dirt, dust and debris on or around the badge can affect the adhesion of the paint, Plasti Dip or vinyl wrap.
Using mild car soap and water, thoroughly wash the areas around the badge to remove all surface dirt.
Pay particular attention to the edges and small crevices of the badge, as dirt tends to accumulate in these areas.
A clean surface ensures that the coating or wrap adheres evenly and prevents bumps or uneven spots in the final finish.
2. Remove wax, dirt and grease with rubbing alcohol
Even after washing, wax residue, oil from your hands and grease may remain on the surface of the badge.
These substances can prevent the coating or vinyl from adhering properly.
Using rubbing alcohol on a clean microfiber cloth, carefully wipe the badge to remove all traces of wax, oil and contaminants.
This step also roughens the surface on a microscopic level, which helps the paint or Plasti Dip adhere better.
Ensuring that the badge is completely dry and free of any residue is important for a professional look.
3. Decide whether to remove the badge or leave it painted
An important decision to make before you begin is whether to remove the badge completely or leave it on the car while you repaint.
Removing the badge allows for easier access from all sides, reduces the risk of overspray or accidental damage to surrounding paint and creates a cleaner look.
Leaving it in place may be quicker and easier for beginners, but extra care is needed to cover and protect surrounding areas.
This decision depends largely on your comfort level, tools and how you want to deepen the badge.
4. If Removing: Use trim removal tools and fishing line to separate the badge from the surface
If you choose to remove the badge, it’s important to use the right tools to avoid damaging the car’s paint or the badge.
A plastic trim removal tool helps gently remove the edges without scratching the surface, while fishing line or thin wire can be used to slide behind the badge and carefully cut away the adhesive.
Work slowly and evenly across the entire badge, applying light pressure until it comes off.
Once removed, clean off any remaining adhesive with rubbing alcohol or a mild adhesive remover.
Proper removal ensures a smooth, professional-looking surface that’s ready for painting or wrapping.
How to Do Mask and Protect
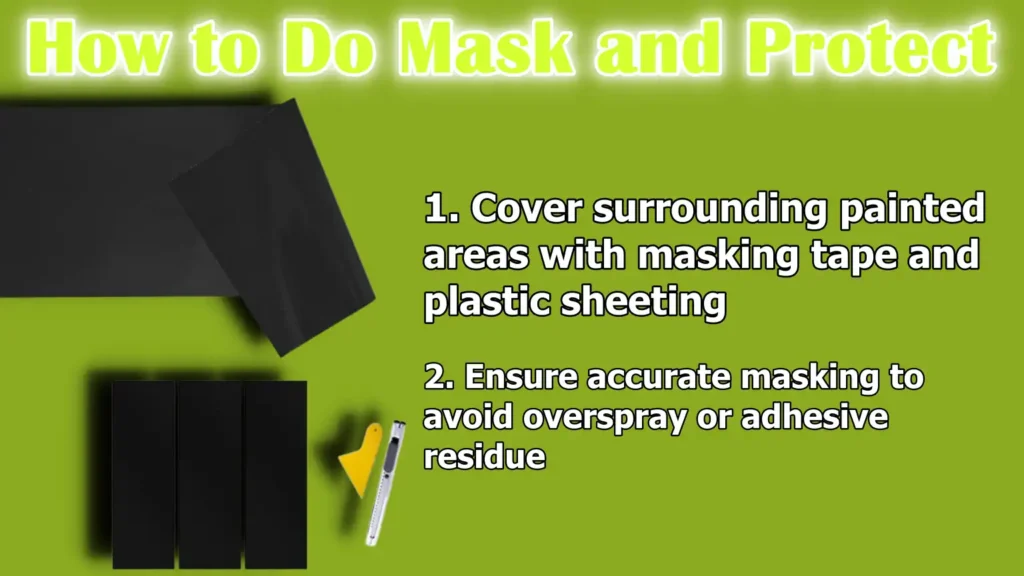
1. Cover surrounding painted areas with masking tape and plastic sheeting
Before using any blacking out method, it is important to protect the surrounding areas of your car.
Even the slightest overspray of paint or Plasti Dip, or excess adhesive from vinyl can damage the car’s original finish.
Using painter’s tape or masking tape, carefully cover the edges around the badge, including surrounding panels and trim.
For larger areas, plastic sheets or newspaper can be used to cover the surface.
Ensuring that no unprotected paint is exposed reduces the risk of accidental marks or sticky residue, which can be difficult and time-consuming to remove later.
2. Ensure accurate masking to avoid overspray or adhesive residue
Precision is important when masking the area around the badge.
Small gaps or uneven areas of tape can also cause overspray of paint or Plasti Dip to settle onto the car’s finish, causing dirty edges.
Take extra time to press the tape firmly along the contours of the badge and double-check that all surfaces that should remain untouched are completely covered.
For vinyl wraps, careful masking prevents the adhesive from sticking to unwanted areas, ensuring a clean and professional-looking result.
Proper masking not only protects the car, but also makes the final finish of the badge look sharp, uniform and visually appealing.
How to Black Out Car Badges – Best Method
1. Plasti Dip or Spray Paint
Applying Plasti Dip or automotive spray paint requires patience and precision to achieve a smooth, professional-looking finish.
Begin by holding the can at the recommended distance, usually about six to eight inches from the surface and spray in steady, even strokes.
It’s important to apply thin coats rather than one thick layer, because several thin coats—usually three to five—adhere better, dry more evenly and reduce the risk of dripping or running.
Allow adequate drying time between each coat according to the product instructions, which is usually 15 to 30 minutes for Plasti Dip and slightly more for automotive paint.
After all coats have been applied and completely dried, an optional clear coat can be applied to enhance gloss, protect against UV rays and provide additional protection from scratches and chipping.
Proper application ensures a durable and visually appealing Black Badge that can last for years, depending on the method used.
2. Vinyl Wrap
Be careful when applying the vinyl wrap so that there are no wrinkles or air bubbles on the surface.
Cut the vinyl slightly larger than the badge to allow for adjustment when applying.
Using a heat gun or hair dryer, gently warm the vinyl so it becomes more pliable and stretches easily over bends and contours.
Smooth the vinyl onto the surface using your fingers or a soft tool, making sure it adheres well to all crevices and edges of the badge.
Carefully trim away any excess material with a sharp knife or precision cutting tool, making sure the edges are clean and level with the surface of the badge.
Correctly applied vinyl wrap is durable, removable and gives a clean, professional look without the need for paint, making it an excellent choice for beginners or lovers of temporary modifications.
Drying and Curing
1. Dry paint or Plasti Dip according to manufacturer’s instructions
After applying Plasti Dip or automotive paint, it is important to allow the coating to dry completely before touching, handling or exposing it to harsh conditions.
Drying is a chemical process that hardens the material, bonds well to the surface and provides maximum durability.
Exact drying times can vary depending on the product, temperature, humidity and number of coats applied, but most Plasti Dip coatings typically take 24 hours to dry completely, while automotive paint can take 48 hours or more to dry completely.
Following the manufacturer’s instructions ensures that the coating adheres well, resists chipping and maintains its desired finish over time.
Skipping or shortening the drying period can result in uneven surfaces, blemishes or premature wear.
2. Avoid washing the car for at least 24-48 hours after application
During the drying period, it is important to avoid washing the newly coated badge or exposing it to water, soap or chemicals.
Early contact with moisture or cleaning products can affect adhesion, create streaks or damage the finish.
Waiting at least 24 to 48 hours gives the coating enough time to dry completely and achieve maximum durability.
For Plasti Dip, gentle hand washing may be allowed after this period, but vigorous rubbing should be avoided.
For painted badges, professional-grade paint may take even longer to dry before cleaning or waxing.
By adhering to drying and curing timelines, readers can ensure a smooth, long-lasting and professional-looking black badge.
Reinstallation (if badge removed)
1. Reinstallation using automotive-grade double-sided tape or adhesive
After the badge has been completely blackened and fully cured, reinstallation is the next important step to ensure it looks clean and stays securely in place.
Automotive-grade double-sided tape or high-quality adhesive is recommended because it is specifically designed to withstand outdoor conditions, such as heat, rain and car washes.
These adhesives adhere firmly without damaging the car paint or the badge.
Before application, ensure the badge and car surface are completely clean and dry.
Press the badge firmly into place to ensure full contact with the adhesive, which helps create a durable and long-lasting hold.
2. Make sure the alignment matches the original location
Proper alignment is essential for a professional-looking finish and maintaining the aesthetic balance of the car.
Carefully measure or compare the badge to its original position.
The slightest imperfection can make the modification look clumsy or unprofessional.
Using a straight edge or reference points on the car’s body can help ensure that the badge is perfectly level and centered.
Checking the alignment before installing the badge will result in a clean, precise and visually appealing look that enhances the overall look of the black-out modification.
Read More:
Maintenance Tips
1. Hand Washing to Maintain the Finish
After you’ve blackened your car badges, proper cleaning is essential to maintaining their beauty and durability.
Hand washing is the safest method because it allows you to control the pressure and avoid harsh contact with the badges.
Using a soft cloth or sponge and mild car soap helps remove dirt, dust and road grime without damaging the finish.
Automatic car washes with rotating brushes or a strong stream of water can scratch or peel the coating, specially if it’s Plasti Dip or vinyl wrap, so these should be avoided.
Regular light cleaning not only keeps the badges looking fresh, but also extends the life of the black badges.
2. Avoid abrasive cleaning tools
Using abrasive tools, scrubbing pads, or harsh cleaning chemicals can damage the coating, peel off the Plasti Dip, scratch the vinyl wrap, or fade painted badges.
Even small scratches can make the finish look uneven and reduce its durability.
Always use a microfiber cloth, soft sponge, or gentle brush when cleaning.
Do not use cleaners with strong solvents, unless they are specifically designed for automotive paint or vinyl.
Taking care during cleaning protects the badge, maintains its color and shine and keeps its professional appearance for years.
3. Chaling or chipping from touch-ups
Over time, exposure to sun, rain, road debris, or car washes can cause minor chipping, scratching, or chipping, specially on Plasti Dip or painted badges.
Inspect the badge regularly and if any damage occurs, address it immediately to prevent further deterioration.
Minor chipping can be repaired with new pieces of matching paint, Plasti Dip, or vinyl.
Timely touch-ups can maintain badge consistency and prevent damage from spreading, keeping darkened badges looking clean, fresh and visually appealing.
Conclusion – How to Black Out Car Badges
The blacked out badge is simply an upgrade that actually blends style, provide protection and gives the aesthetic appeal with practical benefits as it gives that modern look to your car.
So, if you would like to have a non-paint solution then the premium vinyl such as: 3M’s 2080 series actually useful as it gives a factory-clean look with the engineered removability as well. And the official bulletin and warranty maps actually shows you how durability depends on the climate zones and the proper installation as well, which is why you should set some realistic expectations for how long a wrap will last on badges in your region.[¹]
Whether you choose Plasti Dip for a temporary and flexible finish, vinyl wrap for a clean, professional look, or automotive paint for a permanent and durable option, each method has its own unique benefits that can suit both beginners and experienced car enthusiasts.
The process involves careful preparation, precise application and proper maintenance, which are essential to achieving a long-lasting, high-quality finish.
Regular cleaning, gentle handling and timely touch-ups ensure that badges look attractive while also protecting them from wear, sun damage and road debris.
Ultimately, blackening badges not only enhances your car’s visual appeal, but also allows for personalization that reflects your style, making your vehicle stand out on the road in a subtle and sophisticated way.
So, now it is the time to answer your unanswered questions and let’s us know by the comment section.
Frequently Asked Questions
Q1. Is car debadging illegal?
Answer: Car debadging, which means removing the manufacturer’s logos or emblems from a vehicle, is generally not illegal in most countries. It is considered a cosmetic modification and does not affect the car’s safety, emissions or roadworthiness. However, there are some important things to keep in mind. In some regions, it is mandatory to display certain identifying marks or information, such as the manufacturer’s name, model or fuel type, on vehicles for inspection or law enforcement purposes. Removing these distinctive markings can result in fines or problems during inspection. It is also important to note that insurance policies do not usually prohibit cosmetic changes such as debadging, but it is always wise to check with your local regulations and insurance provider before making any permanent modifications. In short, for most everyday driving and personal use, debadging is legal, safe and a popular way to customize the look of a car.
Q2. Why do people blacken their car logos?
Answer: People blacken their car logos mainly for style and personalization. Compared to shiny chrome or stock finishes, black badges give the car a sleek, modern and often more aggressive look. It offers vehicle owners a unique look that stands out on the road and reflects their personal taste. Aside from the aesthetics, painting the badges black also protects them from sun damage, fading or corrosion that can take place on chrome or metal finishes over time. Many enthusiasts appreciate that this modification is relatively simple, affordable and reversible using options like Plasti Dip or vinyl wrap. It is a subtle but extremely effective way to upgrade the overall look of the vehicle without investing in any major customization. The combination of visual appeal, protection and customization makes black badges one of the most popular car modifications among enthusiasts.
References:
[1] 3M™ Wrap Film Series 2080
https://multimedia.3m.com/mws/media/1733396O/product-bulletin-2080-series.pdf

Guys, I’m a car audio enthusiast and customization expert and I love clear sound and clean installation. Plus, I have spent years helping people build their dream audio setups. And whenever I’m working on cars, I probably listen to music and thinks about the next big upgrade.