Written By: Don Dodi
Fact Checked By: Kristen Brown
Reviewed By: Diego Rosenberg
Actually if you are feeling that your brake pedal is becoming spongy or soft then there is the high changes that air bubbles are trapped in the brake lines and in this particular case the only option to fix this is by bleeding the car brakes.
And it is the fact that over the period of time, the tiny air bubbles can enter the brake lines through the normal wear, moisture in the system or after the repairs.
Because of these air pockets it drastically reduces the braking efficiency as there will be unlike brake fluid, air can be compressed as well and that really makes your brake pedal feel soft or spongy types.
As well as, according to the NHTSA, the faulty braking system are linked to the thousands of the accidents every year: and many of them can be preventable with the proper maintenance.
Plus, the brake fluid itself is hygroscopic: which literally means that it naturally absorbs the moisture from the air and this again lowers its boiling point as well and that can actually cause the brake fade during the heavy use.
And because of all these reasons it is recommended that flushing and bleeding the brakes should be done every 2 to 3 years of time-span.
So, this guide is all about How to Bleed Car Brakes, so that you can eaisly restore that firm pedal feel and reliable stopping power of your car again.
Tools
| Tool / Material | What It Is | Why You Need It | Easy Tip for Use |
|---|---|---|---|
| Wrench (right size for bleeder screws) | A small hand tool used for turning nuts and bolts. | Open and close the bleeder screw on each brake. | Check your car’s manual for the exact size; it’s usually between 8mm-11mm. |
| Brake Fluid (recommended by car maker) | A special fluid that transfers force from the brake pedal to the wheels. | Replenishing and replacing old or lost fluid during bleeding. | Always use the exact type listed in your owner’s manual (DOT 3, DOT 4 or DOT 5.1). |
| Clear Tubing & Container | A small transparent plastic hose and a bottle or jar. | To expel old brake fluid and air bubbles, while allowing you to see the flow. | Use a container that won’t tip over easily and keep the end of the hose below the liquid level. |
| Jack & Jack Stands | The jack raises the car; the jack stands hold it securely in place. | Raise and keep the vehicle steady while braking. | Never rely solely on a jack – always use stands for safety. |
| Brake Bleeder Kit (optional) | A set of devices that uses vacuum or pressure to remove air from brakes. | This speeds up the bleeding process and makes it possible to do it alone. | This is useful if you work on cars often, but not essential for beginners. |
| Protective Gloves & Safety Glasses | Safety gear for your hands and eyes. | Brake fluid is toxic and can damage skin, eyes and paint. | Always wear these and wipe up spills immediately. |
How to Prepare The Vehicle First
1. Park the Vehicle on Level Ground and Apply the Parking Brake
Before you begin working on your car’s brake system, make sure the vehicle is on solid and level ground.
A level surface keeps the car stable and prevents it from rolling while you work.
After parking, always fully engage the parking brake.
This provides an extra layer of safety and ensures the car doesn’t move unexpectedly.
Safety experts emphasize that working on a sloped or uneven surface is a major cause of accidents when doing brake repairs at home, so it’s important to start with a level and secure foundation.
2. Raise and Secure the Vehicle with Jack Stands
Once the car is safely parked, the next step is to raise it so you can access the wheels and brake components.
Use the hydraulic jack provided in your owner’s manual to raise the vehicle to the proper jacking point.
However, don’t rely solely on the jack, as jacks are only for lifting, not lifting weights.
Once lifted, always place jack stands underneath the car to hold it securely.
This prevents the vehicle from falling if the jack malfunctions, which is a common safety hazard.
Professional mechanics always emphasize that jack stands are essential for brake work.
3. Find the Brake Master Cylinder and Check the Fluid Level
Before bleeding the brakes, it’s important to locate the brake master cylinder, which is usually located in the engine bay near the firewall on the driver’s side.
The master cylinder contains brake fluid that travels through the brake lines when the brake pedal is pressed.
Checking the fluid level is important because if it’s too low, air can enter the system, making the brakes less effective.
Most reservoirs are made of transparent plastic, allowing you to see the fluid level against the minimum and maximum markings.
Always make sure the fluid is around the recommended level before you begin and only use the fluid type specified in your car’s manual.
4. Clean the bleeder valve to avoid dirt
The final step in preparation is to clean the bleeder valves on each wheel.
Bleeder valves are small screws mounted near the brake calipers or wheel cylinders that allow old fluid and air to escape during the bleeding process.
If dirt or debris enters the system during bleeding, it can damage brake parts or block the lines, making braking unsafe.
Gently removing dirt around the valves with a clean cloth and small wire brush ensures that only clean brake fluid escapes.
This small but important step helps keep the braking system in good condition and the entire bleeding process running smoothly.
Basic Brake Bleeding Order
1. Why Order Matters
When bleeding brakes, the order in which you work on the wheels is very important.
This is because it is important to remove air bubbles and old brake fluid from the system as cleanly and completely as possible.
Brake lines run from the master cylinder to each wheel and the farther the line is, the more likely it is that air bubbles will form.
If the wrong order is followed, you could trap air inside or waste time repeating the process.
Following the correct order makes the brakes feel strong and responsive and it prevents uneven braking that can occur if there is air in the system.
2. Normal Brake Bleeding Order
In most vehicles, the correct order is to start with the wheel farthest from the master cylinder and then gradually move closer.
The usual order is the right rear wheel, then the left rear wheel, then the right front wheel and finally the left front wheel.
This order is based on the distance from the master cylinder, which is usually located near the firewall on the driver’s side.
Starting at the farthest end clears the longest lines first and by the time you get to the closest wheel, brake fluid is flowing with fewer bubbles, making the process more efficient.
3. Checking vehicle-specific instructions
Although the order of right rear wheel to left front wheel is the most common, not all cars follow the same pattern.
Some vehicles, specially those with advanced braking systems such as ABS or diagonal split systems, may have a different recommended order.
For example, some cars may require bleeding the left rear wheel before the right rear wheel.
The best way to be sure is to consult the vehicle’s owner’s manual or service guide.
Car manufacturers provide these instructions because the design of their brake systems can vary and following the exact recommendation ensures the safest and most efficient results.
3 Bleeding Methods
1. Manual Two-Person Method
The manual two-person method is the most traditional and widely used way to bleed brakes.
In this process, one person sits inside the car and presses the brake pedal several times to build up pressure in the system.
They then hold the pedal down firmly while the other person opens the bleeder valve at the wheel.
As the valve opens, a mixture of air and old fluid escapes through the attached transparent tube.
The other person then closes the valve before releasing the pedal, making sure no air goes back into the system.
This cycle is repeated until the fluid runs clear and no bubbles appear.
This method is reliable, but requires teamwork and clear communication between the two people to avoid mistakes.
2. One-Person or Gravity Method
The one-person or gravity method uses the natural pull of gravity to flow brake fluid into the system.
In this method, a transparent tube is attached to the bleeder valve and the other end is placed in a container partially filled with brake fluid.
Once the valve opens, gravity slowly pulls the fluid downward through the brake lines, forcing out the trapped air.
This process is simple because it does not require another person to press the brake pedal.
However, it can take longer and it is necessary to keep the vehicle at a steady angle so that the fluid can flow smoothly.
This method is best suited for people who are working alone and want a less expensive way to bleed brakes, although patience is required to completely clear the system.
3. Vacuum or pressure bleeder method
The vacuum or pressure bleeder method uses special tools to make the process faster and more efficient.
A vacuum bleeder attaches to the bleeder valve and draws fluid and air out of the system, while a pressure bleeder puts new fluid into the master cylinder and pushes it through the brake lines.
Both methods reduce the risk of air backing into the system and they allow a single person to bleed brakes without assistance.
Professional mechanics often prefer this approach because it saves time and gives very consistent results.
Although these tools can be expensive compared to other methods, they are extremely useful for those who regularly maintain their vehicles or want the cleanest brake bleeding process possible.
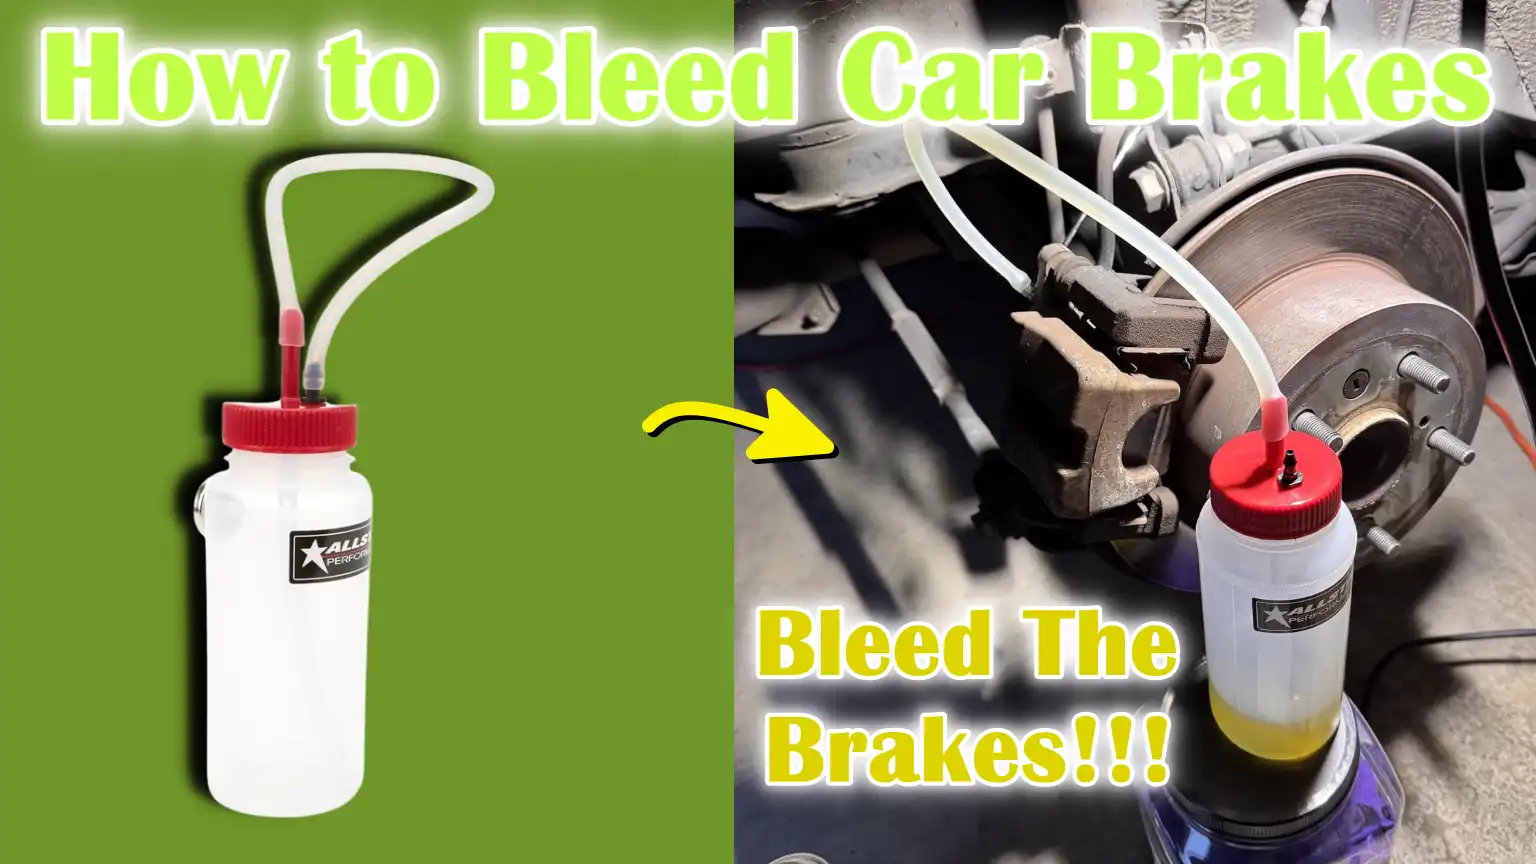
How to Bleed Car Brakes – Complete Steps
1. Put a transparent tube on the bleeder screw and place the other end in a container
This process begins by placing a transparent plastic tube on the bleeder screw on the brake caliper or wheel cylinder.
Place the other end of the tube in a container that already has a little bit of clean brake fluid filled at the bottom.
This arrangement ensures that when the bleeder screw is opened, air and old fluid can be seen escaping, while preventing new air from flowing back into the system.
Using a transparent tube is important because it allows you to see bubbles and know if the line is completely clear.
2. Have a helper hold down the brake pedal
Once the tube and container are in place, a helper should sit in the driver’s seat and press the brake pedal several times to build up pressure, then hold it down firmly.
Holding the pedal is important because this creates pressure inside the brake lines, which will push the air and old fluid out when the bleeder screw is opened.
If the pedal is released too quickly, air can be forced back into the system, so good communication between the two people is essential in this step.
3. Open the bleeder screw, allow fluid and air to escape, then close the screw
With the pedal depressed, carefully open the bleeder screw using the correct size wrench.
As the screw loosens, you will see old brake fluid and air bubbles escape through the transparent tube into the container.
When the flow slows, the assistant should tighten the bleeder screw again before releasing the brake pedal.
This prevents air from entering back into the system.
This opening and closing process is repeated several times until a steady stream of bubble-free transparent fluid appears on the line.
4. Repeat this process until no air bubbles appear
Each wheel should be bled in the proper order, starting with the wheel farthest from the master cylinder and working toward the one closest.
The process of pressing the pedal, opening the screw, watching for bubbles and closing the screw should be repeated until the fluid flows smoothly and no air bubbles are visible in the tube.
Air-free fluid ensures that the brake pedal remains firm and the braking system works effectively while driving.
5. Refill the master cylinder as needed to prevent air from entering
During the entire bleeding process, it is important to keep checking the fluid level in the brake master cylinder.
If the fluid level drops too low, air can enter the system, undoing all the work already done.
After draining the fluid from each wheel, the master cylinder must be filled with the correct type of brake fluid so that it remains above the minimum level.
This step ensures a constant supply of fluid through the lines and prevents new air pockets from forming.
What Are The Final Check
1. Make sure all bleeder screws are properly tightened
After removing the bleeders from each wheel, it is important to make sure each bleeder screw is properly tightened.
If any bleeder screw is even slightly loose, air can back up into the brake lines and halt the bleeding process.
Also, loose valves can cause brake fluid to leak, which not only lowers the fluid level but can also damage paint and surrounding parts as brake fluid is highly corrosive.
It is best to install it tightly, but not too tightly, as overtightening can strip the threads or damage the screw.
Taking a few extra seconds to double-check each bleeder screw is a small step that ensures long-lasting results.
2. Fill brake fluid to the correct level
After removing the bleeders from all wheels, the brake master cylinder should be checked and filled with the correct type of brake fluid.
The reservoir usually has “min” and “max” markings that make it easy to see the safe operating level.
It is very important to keep the fluid at the correct level because low fluid can cause air to re-enter the system, causing a soft brake pedal.
Experts recommend using only fresh fluid from a sealed container, because brake fluid absorbs moisture over time and loses its effectiveness.
Filling the fluid to the proper level will set the system up for reliable operation.
3. Check the Brake Pedal Firmness by Pressing It
The best indication that the bleeding procedure was successful is that the brake pedal feels firm.
When all the bleeder screws are off and the reservoir is full, press the brake pedal several times to build up pressure in the system.
The pedal should feel firm and not sink to the ground.
If the pedal feels spongy or soft, this means there may still be air trapped in the lines and the bleeding procedure should be repeated.
A firm and consistent pedal feel ensures that the brakes will work properly under real driving conditions.
4. Check for leaks around the bleeder screw and lines
The final step is to carefully inspect the entire brake system for signs of any leaks.
Pay particular attention to the bleeder screw, brake hoses and metal lines near each wheel.
Even a small drop of fluid can weaken the system and lead to dangerous brake failure over time.
Brake fluid leaks also lead to dirt accumulation, which can damage moving parts like calipers.
Wiping the area clean and rechecking after driving for a while is a good way to make sure there are no leaks.
Making sure the system is completely sealed not only protects the brakes, but also keeps the vehicle safe for everyday driving.
Read More:
How to Perform Test Drive and Ensure About Safety
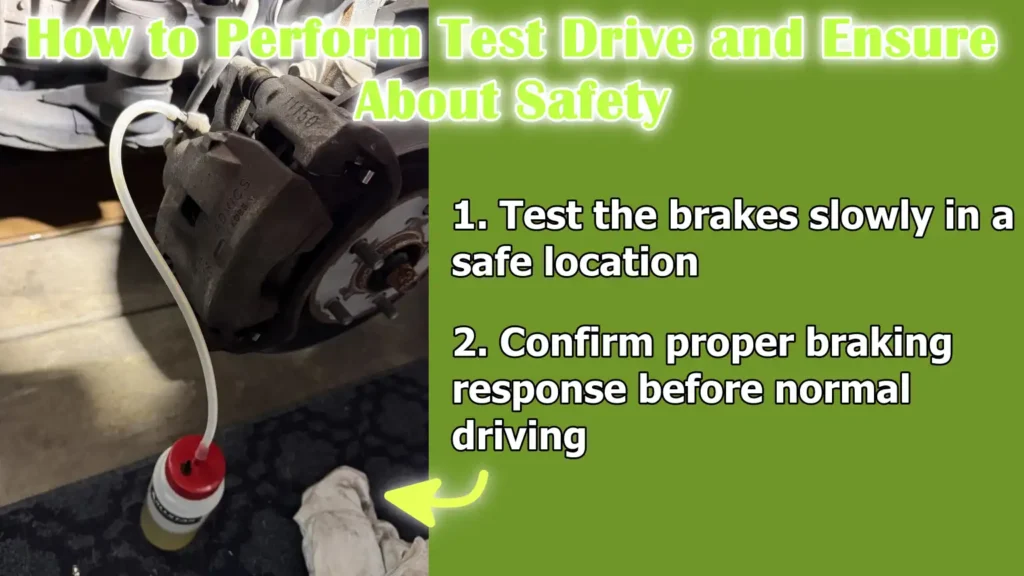
1. Test the brakes slowly in a safe location
After the bleeding procedure is complete and all final checks have been made, it is important to test the brakes in a controlled and safe environment before driving normally on public roads.
Choose an empty parking lot, a quiet road or an open area with little or no traffic.
Start the car and at a slow speed, such as 5 to 10 mph, gently press the brake pedal.
This will allow you to make sure that the brakes engage smoothly, without any sudden pull, noise or feeling of the pedal becoming soft.
These slow tests help give you confidence in the system’s performance and minimize the risk if a problem still persists.
2. Confirm proper braking response before normal driving
After the initial slow speed test, gradually increase speed and apply the brakes more firmly to make sure the system is responding correctly under normal conditions.
The pedal should feel steady and firm and the car should stop in a straight line without leaning in any direction.
If the pedal feels spongy, sinks into the ground, or the car does not stop as expected, this may indicate that there is still air in the system or that there is a hidden leak.
In such cases, the bleeding procedure should be repeated or the system should be further inspected before driving.
It is extremely important to confirm proper brake response, as brakes are the most important safety feature of any vehicle.
Only when you are completely confident that the system is working properly should you resume regular driving on busy roads.
Basic Maintenance Tips
Not only this, NHTSA National Motor Vehicle Crash Causation Survey also shows about braking system failures as a documented vehicle-related critical reason, as this crash study actually reports that: when a vehicle system was identified as the critical reason that tire/wheel problems were most frequent and in them braking system failures are common one, which is actually the evidence that neglecting the brake maintenance can have real consequences.[¹]
1. Change Brake Fluid as Recommended
Brake fluid is not a permanent fluid and needs to be changed at regular intervals to keep the braking system safe and effective.
Most car manufacturers and experts recommend changing it every two to three years, even if the brakes are working properly.
This is because brake fluid is hygroscopic, meaning it absorbs moisture from the air over time.
As the amount of water increases, the boiling point of the fluid decreases, which can cause the brakes to become sluggish or even fail completely when braking hard, specially in hot weather.
Changing the fluid on time prevents corrosion inside the brake lines and calipers and ensures that the system can stop the car quickly when needed.
2. Check for leaks, worn hoses or soft pedals regularly
Regular inspections are just as important as regular fluid changes.
Brake systems operate under high pressure and even a small leak can cause serious problems.
Checking for damp spots around brake lines, hoses or calipers helps detect leaks early before they cause a dangerous failure.
Worn rubber hoses can crack or bulge over time, weakening the system.
The feel of the brake pedal is another important sign to pay attention to.
If the pedal feels soft, spongy or slowly sinks under pressure, this often means there is air or moisture in the system.
Detecting these problems early keeps the vehicle safe and can prevent costly repairs later.
3. Store Leftover Brake Fluid Properly
If you have extra brake fluid left over after bleeding or replacing, store it carefully.
Brake fluid should always be kept in a tightly sealed container because it easily absorbs moisture from the air, even through a partially closed lid.
When contaminated with water, the fluid loses its effectiveness and should not be reused.
Store the container in a cool, dry place, away from direct sunlight and out of reach of children or pets as brake fluid is toxic.
Many experts recommend using freshly opened fluid only for essential purposes, as even a small amount of moisture in the remaining fluid can reduce braking performance.
Proper storage ensures that the fluid remains clean and safe for future use.
Conclusion – How to Bleed Car Brakes
When you bleed the brakes then it actually has a huge impact on the road safety as it literally gives you more control over your vehicle.
Bleeding your car’s brakes isn’t just another maintenance task—it’s one of the most important steps in keeping your vehicle safe and reliable.
A properly bled brake system ensures that your pedal stays firm, your stopping power is strong and your car responds exactly when you need it to.
Air bubbles or old fluid inside brake lines can turn a safe vehicle into a serious hazard on the road, as air is easily compressed and reduces the effectiveness of the hydraulic system.
By following the correct sequence, using the right tools and checking for leaks and fluid levels, you’re protecting yourself, your passengers and everyone else on the road.
Industry experts and safety organizations recommend changing brake fluid every two to three years, as its ability to withstand heat and pressure is reduced when it absorbs moisture.
This simple procedure significantly reduces the risk of brake failure, corrosion, or complete system failure.
Whether you use the manual method, the gravity method, or a pressure bleeder, the key is patience and attention to detail.
Bleeding your brakes correctly isn’t about speed—it’s about accuracy and safety.
Do you still have confusion about anything, just let us known by the comment section below.
Frequently Asked Questions
Q1. What does it mean to bleed car brakes?
Answer: Bleeding car brakes means removing air bubbles and old fluid from the brake lines so that the braking system works properly. Brake systems rely on hydraulic pressure, which means that fluid transmits force from the pedal to the wheels. Air inside the lines reduces this pressure because unlike brake fluid, air can be compressed. When you bleed the brakes, you replace the old fluid with new fluid and allow the trapped air to escape, making the brake pedal feel firmer and ensuring that the car stops quickly when you press the brakes.
Q2. How often should I bleed my brakes?
Answer: Most experts recommend bleeding brakes every two to three years, even if the brakes seem fine. This is because brake fluid naturally absorbs moisture from the air over time, which lowers its boiling point and makes it less effective. If you drive in very wet or humid conditions, or if you notice your brake pedal feels soft or spongy, you may need to bleed your brakes sooner. Also, whenever you replace brake parts such as calipers, hoses or the master cylinder, it is important to bleed the system to remove air introduced during the repair.
Q3. What are the signs that my brakes need to be bled?
Answer: One of the most obvious signs that your brakes need to be bled is the brake pedal becoming soft or spongy. If the pedal is pressed too hard before braking, air can get trapped in the lines. Another sign is reduced stopping power, where the car takes longer to stop even if the brake pads and rotors are in good condition. In some cases, if the fluid level is too low, the brake warning light may come on, which can also mean that air has entered the system. If you notice any of these symptoms, it is best to bleed the brakes as soon as possible.
Q4. Can I bleed my own brakes?
Answer: Yes, you can bleed your own brakes, but the method you use depends on the tools you have. The traditional two-person method requires help, but if you’re working alone, you can use a gravity method, vacuum or pressure bleeder. These tools are designed so that one person can remove air and fluid without assistance. The gravity method is slow but simple, while the pressure bleeder makes the job faster and cleaner. With patience and the right tools, bleeding brakes alone is possible and safe.
Q5. What happens if I don’t bleed the brakes when needed?
Answer: If the brakes aren’t bled when needed, air bubbles will remain inside the system and this reduces the brakes’ ability to stop the car effectively. In severe cases, this can lead to brake failure, specially during emergency stops or when braking on steep roads. Old brake fluid also absorbs water, which can lead to corrosion of metal parts like brake lines and calipers, leading to costly repairs. Neglecting this simple maintenance step can put you, your passengers and other road users at risk. Proper bleeding ensures that the system remains reliable and robust whenever you need to stop.
Q6. Are brake bleeding and brake fluid flushing the same thing?
Answer: No, bleeding and flushing are not exactly the same thing, although they are very similar. Bleeding removes air bubbles from the system and replaces some of the old fluid with new fluid, which is usually done after repairs or when symptoms appear. Flushing, on the other hand, completely replaces all the brake fluid in the system. Flushing is usually done every two to three years to keep the fluid fresh and effective, while bleeding can also be done in between flushings if air has entered the system or the pedal feels soft. Both are important to keep brakes in good condition.
Q7. What type of brake fluid should I use when bleeding brakes?
Answer: The type of brake fluid depends on what your car manufacturer recommends. The most common types are DOT 3, DOT 4 and DOT 5.1, which are glycol-based fluids. These can be mixed together in an emergency, but it’s always best to use the type specified in your owner’s manual. DOT 5, which is silicone-based, should never be mixed with glycol fluids and is only used in certain vehicles. Using the wrong type of fluid can damage seals and reduce performance, so always double-check before filling.
Q8. How long does it take to bleed brakes?
Answer: The time it takes to bleed brakes depends on the method used and whether you’re working alone or with help. If done carefully, the two-person manual method usually takes about 30 to 60 minutes for all four wheels. The gravity method can take longer, sometimes more than an hour, because it relies on natural fluid flow. Using a pressure or vacuum bleeder can complete the process in less than 30 minutes. Whichever method you use, it’s a good idea to consider the process.
References:
[1] National Motor Vehicle Crash Causation Survey
https://crashstats.nhtsa.dot.gov/Api/Public/ViewPublication/811059

Guys, I’m a car audio enthusiast and customization expert and I love clear sound and clean installation. Plus, I have spent years helping people build their dream audio setups. And whenever I’m working on cars, I probably listen to music and thinks about the next big upgrade.