 Skip to content
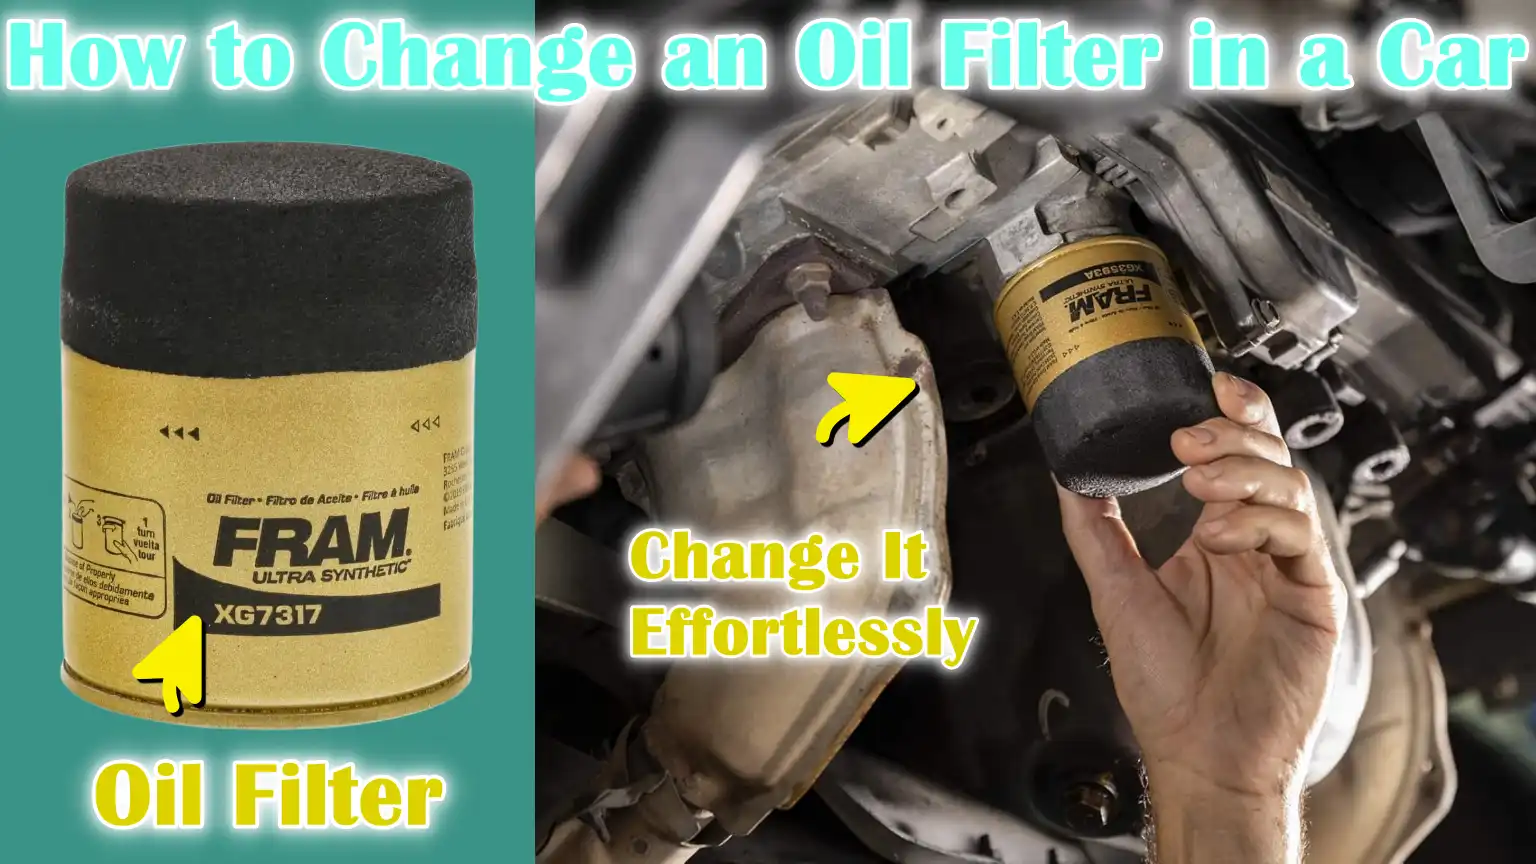
Written By: Don Dodi
Fact Checked By: Kristen Brown
Reviewed By: Diego Rosenberg
The significance of the oil filter is can be understandable by this fact that: every drop of the engine oil actually passes through it, which is like huge thing as it is ideally protectors of your car’s performance and lifespan as well.
Without a doubt, oil filter plays a crucial role that protects your engine as it traps dirt, metallic particles and carbon deposits as well that build up as a oil circulates through the system.
And over the period of time, this filter actually becomes clogged and that reduces the oil’s ability to flow freely as well and doesn’t lubricate the engine properly as well.
As well as, automotive studies shows that a dirty oil filter can really decrease engine efficiency by up to 10% and that can also shorten the engine’s life span if you keep it unchanged for the longer period of time.
Plus, most of the manufacturers actually recommends to replace the oil filter every time you change your engine oil: which is usually every 5,000 to 7,500 miles that again depends on the driving habits and your oil type of course.
But keep this thing in mind, that when you regularly change the oil filter then it actually prevents costly engine damage and also helps to maintain better fuel economy throughout the journey.
And that’s why, this guide shows you How to Change an Oil Filter in a Car so that you easily replace it without any kind of problem.
Tools
| Item | Purpose / Description |
|---|---|
| Oil Filter Wrench | Helps in easy removal of old oil filter without damaging it. |
| Socket Set & Ratchet | Used to remove and tighten drain plugs and other bolts. |
| Funnel | Makes adding new engine oil clean and easy. |
| Drain Pan | Collects used oil to prevent oil spills and mess. |
| Rags or Shop Towels | Used to wipe up oil spills and clean parts. |
| Adjustable Wrench (Optional) | Useful for hard-to-reach bolts or filter housings. |
| New Oil Filter | Replace the old filter to keep the oil clean. |
| Fresh Engine Oil | Replaces old oil for proper engine lubrication. |
| Oil Filter Gasket / O-ring | Ensures a strong seal between the filter and the engine, if not included with the filter. |
| Gloves | Protects hands from hot oil and dirt. |
| Safety Glasses | Protects eyes from oil splashes. |
| Jack Stands or Ramps | Securely elevates and holds the car while you’re working underneath. |
| Wheel Chocks (Optional) | Prevents the car from rolling when lifted. |
How to Prepare the Vehicle First for Oil Filter Replacement
1. Ensure the car is parked on a level surface
Before beginning any work on your car, it’s important to ensure the car is parked on a level and stable surface.
A level surface ensures that the engine oil drains completely and evenly from the oil pan, preventing oil leaks and accurately measuring the oil level when refilling.
Working on sloping or uneven ground can be dangerous and may result in accidents or incomplete oil drains.
2. Let the engine cool slightly
Engines can be very hot after running and touching the oil pan or oil filter immediately can cause burns.
Allowing the engine to cool for at least 15 to 30 minutes makes this process safer and more comfortable.
Even hot oil can be handled safely with proper care, but giving the engine some time to cool reduces the risk of injury and makes handling tools easier.
3. Apply the parking brake and raise the car safely.
Safety is the most important part of preparation.
Always apply the parking brake to prevent the car from rolling.
If you must lift the car, use ramps or sturdy jack stands to firmly support the weight.
Never rely solely on a car jack, as it could fall or tip over.
Lifting properly ensures you have enough space to safely access the oil filter and drain plug without injury.
4. Locate the Oil Filter and Oil Drain Plug
Before removing any parts, identify the location of the oil filter and oil drain plug.
The oil filter is usually located on the side or bottom of the engine block, while the drain plug is located under the oil pan.
Knowing their locations in advance saves time, prevents mistakes and helps you plan where to place the drain pan so that all used oil is effectively collected.
How to Drain the Old Oil
1. Place the Drain Pan Under the Oil Pan
Before draining the oil, it’s important to place a drain pan directly below the oil pan located at the bottom of the engine.
The drain pan catches all the used oil and prevents oil spills that could damage garage floors or cause slippery surfaces.
Choosing a large-capacity pan ensures it can hold all the oil without overflowing, as most car engines hold four to six quarts of oil, depending on the model.
2. Remove the oil drain plug and allow the oil to drain completely
After installing the drain pan, carefully unscrew the oil drain plug using a socket or wrench.
It’s normal for the oil to be hot or lukewarm, so be careful to avoid burns.
Allow the engine oil to drain completely into the pan, which may take a few minutes.
Completely draining the old oil ensures that dirt, metal particles and old additives are removed, providing a clean start for the new oil.
Incomplete draining can leave contaminants in the engine, which can reduce engine performance and shorten engine life.
3. Install and tighten the drain plug properly
After the old oil has completely drained, place the drain plug back into the oil pan and tighten it securely, but do not overtighten, as this could strip the threads or damage the oil pan.
A properly installed drain plug prevents leaks, which can damage the engine and pose environmental hazards.
Ensuring the plug is properly installed, but not overtightened, ensures a safe and clean oil change, keeping the engine safe and ready for new oil.
How to Remove the Old Oil Filter
1. Locate and loosen the oil filter with an oil filter wrench
The oil filter is typically mounted on the side or bottom of the engine and is a cylindrical component that collects dirt, metal particles and carbon deposits from the circulating engine oil.
To remove it, first locate it and loosen it with an oil filter wrench.
The wrench holds the filter firmly, allowing you to turn it without slipping or damaging it.
Filters can sometimes become tight due to heat or pre-installation, so using the correct tool ensures safe and efficient removal.
2. Carefully remove the old filter to prevent leakage
Once the oil filter is loose, carefully unscrew it by hand and place a drain pan underneath to collect any remaining oil.
Remaining engine oil inside the filter may spill during a leak and handling it carefully can prevent mess and potential burns.
Removing the filter by twisting it slowly reduces the risk of oil dripping onto engine parts or the ground, making the process cleaner and safer for both you and your workspace.
3. Check that the old rubber gasket is still in place and remove it if necessary
Many oil filters have a rubber gasket or O-ring that creates a seal between the filter and the engine.
When removing the old filter, it’s important to check that the gasket isn’t stuck to the engine surface.
If so, remove it carefully to avoid double-gasketing, as this can cause leaks and reduce oil pressure.
Ensuring the surface is clean and free of the old gasket helps the new filter seal properly and maintain optimal engine performance.
Prepare the New Oil Filter First
1. Apply a thin layer of new engine oil to the rubber gasket of the new filter
Before installing the new oil filter, it’s important to lubricate the rubber gasket or O-ring with a thin layer of fresh engine oil.
This simple step helps create a proper seal between the filter and the engine, preventing leakage during operation.
Lubricating the gasket also makes it easier to remove the filter the next time you change the oil, reducing the risk of damage to engine parts.
Skipping this step can damage the seal, cause oil leaks and over time, lead to engine damage, which can be costly to repair.
2. Confirm that the new filter matches your car’s specifications
Not all oil filters are the same, so it’s important to check that the new filter is the correct model for your specific vehicle.
Filters vary in size, thread type and capacity and using the wrong filter can lead to improper sealing, reduced oil flow and even engine failure.
Consult the vehicle owner’s manual or the filter manufacturer’s guide to confirm compatibility.
Ensuring the correct filter is used protects the engine, maintains proper lubrication and helps the car function efficiently throughout its lifespan.
How to Install the New Oil Filter
1. Turn the new oil filter in by hand until it fits snugly
After preparing the new oil filter, carefully tighten it onto the engine by hand.
Hand-tightening ensures that the filter threads are properly seated without cross-threading, which could damage the engine or filter.
A properly installed filter allows oil to flow properly and prevents leaks, thereby preventing engine damage.
Avoid using tools during this step, as they can easily overtighten and strip the threads.
2. Turn it an additional ¾ turn – do not overtighten
Once the filter is securely fitted, turn it in three-quarters of a turn by hand.
This provides a secure seal while avoiding excessive pressure on the rubber gasket or filter housing.
Overtightening could damage the gasket, cause a leak, or make it extremely difficult to remove the filter the next time you change the oil.
Following the recommended hand-tightening instructions ensures a proper seal and maintains safe engine performance.
3. Wipe Up Spilled Oil from the Surrounding Area
During installation, some engine oil may spill around the filter area.
It is important to clean this oil immediately with a cloth or towel.
Wiping the surrounding area prevents dirt and debris from accumulating on the filter and keeps the engine bay clean.
This allows any leaks to be easily detected while the engine is running, ensuring the filter is properly installed and functioning as intended.
Also, research by SAE testing confirms that if there’s a better filtration then it actually reduces the tiny particles that causes the metal-on-metal wear inside the engine, which shows that using the right quality filter and changing it on time is a direct way to protect your car’s engine life and keep its performance intact.[¹]
How to Fill It with Fresh Oil
1. Remove the oil filler cap and add the recommended amount and type of engine oil
After draining the old oil and installing the new filter, the next step is to fill the engine with fresh oil.
First, remove the oil filler cap, which is usually located on top of the engine.
Add the recommended type and amount of oil as directed in your vehicle’s user manual.
Using the correct grade of oil is crucial as it ensures proper lubrication, reduces friction and protects engine parts from wear and overheating.
Overfilling or underfilling can impair engine performance, cause foaming, or even damage the engine over time.
2. Check the oil level with the dipstick and adjust if necessary
After adding oil, wait a few minutes for the oil to settle in the engine.
Check the oil level with the dipstick, clean it thoroughly before refilling and then read the level.
Adjust the oil amount as needed to bring it within the recommended range marked on the dipstick.
Proper oil levels ensure that all engine parts are effectively lubricated, which improves efficiency, prevents engine overheating and extends engine life.
3. Reinstall the filler cap securely
Finally, securely reinstall the oil filler cap to prevent oil leaks and contamination from dirt or debris.
A tightly closed cap maintains proper pressure within the engine and prevents oil leaks while the car is running.
Keeping the cap completely closed is a simple but essential step to keeping the engine clean, safe and operating efficiently after an oil change.
Read More:
How to Start the Engine and Check for Leaks
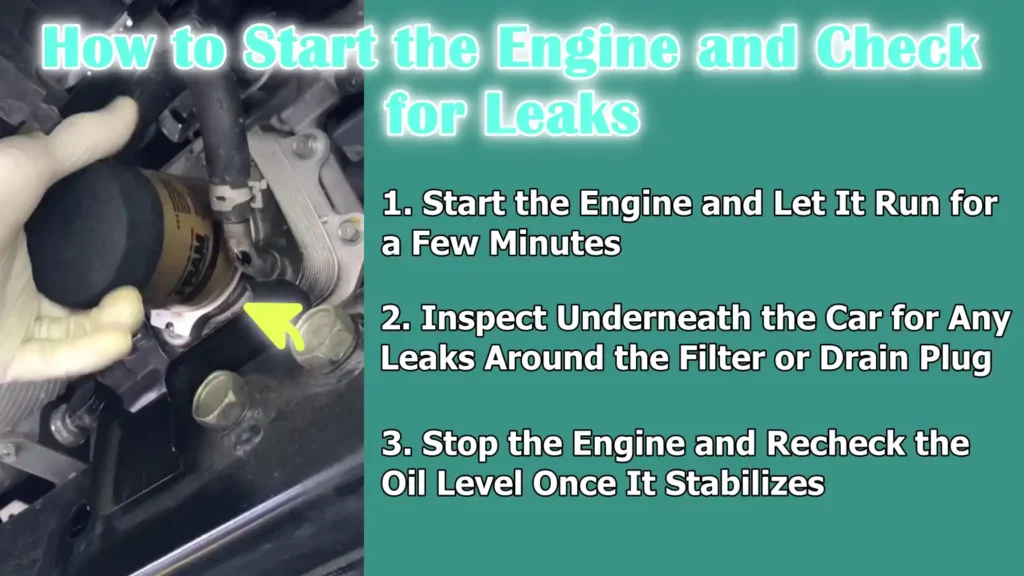
1. Start the Engine and Let It Run for a Few Minutes
After changing the oil and installing the new filter, start the engine and let it run for a few minutes.
This circulation helps deliver fresh oil to all engine parts, lubricate essential parts and maintain proper oil pressure.
Running the engine for a while also allows you to check the installation of the oil filter and drain plug, ensuring everything is working properly before driving.
2. Inspect Underneath the Car for Any Leaks Around the Filter or Drain Plug
While the engine is running, carefully inspect under the car for any signs of oil leaks around the oil filter or drain plug.
Even a small leak could indicate that the filter wasn’t tightened properly or the drain plug is loose.
Detecting leaks early prevents oil loss, reduces the risk of engine damage and can prevent dangerous and messy conditions in your garage or driveway.
3. Stop the Engine and Recheck the Oil Level Once It Stabilizes
After ensuring there are no leaks, stop the engine and wait a few minutes for the oil to settle in the oil pan.
Recheck the oil level using the dipstick and adjust it if necessary to keep it within the recommended range.
This final check ensures the engine has the correct amount of oil for optimal engine performance, efficiency and long-term component protection.
How to Dispose and Clean It Perfectly
1. Properly dispose of used oil and filters at a recycling or auto service center
After changing the oil, it’s important to dispose of old engine oil and used oil filters responsibly.
Used oil contains harmful chemicals, metals and contaminants that can harm the environment if released into drains, soil, or water systems.
Most auto service centers, recycling facilities and some local government programs accept used oil and filters for safe recycling.
Recycling not only protects the environment but also allows the oil to be recycled and reused, thereby conserving natural resources and reducing pollution.
2. Clean All Tools and Work Area
After disposal is complete, thoroughly clean all tools and the work area.
Wipe off any remaining oil from the wrench, funnel, cloth and oil drain pan to avoid slipping hazards and maintain tool longevity.
Cleaning the work area ensures that future maintenance tasks are easier and safer and it also keeps the garage or driveway free of oil stains and contamination.
A clean and organized environment contributes to safer, more efficient and more professional car maintenance practices.
Conclusion – How to Change an Oil Filter in a Car
Actually, a clean oil and a well-fitted filter works silently together to ensure your engine always be strong, smooth and ready for every journey without giving up.
A clean oil filter keeps the engine oil free of dirt, metal particles and other contaminants, which helps the engine run smoothly, reduces wear and improves fuel efficiency.
With proper preparation, including safely removing the old filter, correctly installing the new filter and carefully filling with fresh oil, car owners can avoid costly repairs and extend the life of their vehicle.
Regular oil and filter changes reduce emissions and keep the environment clean, making this small maintenance task both practical and responsible.
With the right tools, knowledge and attention to detail, changing the oil filter isn’t just maintenance—it’s an investment in your car’s reliability, efficiency and longevity.
Now, you can comment down below for more information about this guide.
Frequently Asked Questions
Q1. Can I change the oil filter without draining the oil?
Answer: Changing the oil filter without draining the engine oil is not recommended. Removing the filter can spill old oil into the engine and filter, spreading dirt and even posing a burn hazard if the engine is hot. Draining the oil first ensures a clean and safe oil change, allowing the engine to restart with clean oil that has passed through the new filter. Changing the filter without draining the oil can also reduce the efficiency of the new filter and leave contaminants inside the engine.
Q2. How to Remove the Oil Filter Without Tools?
Answer: If you don’t have an oil filter wrench, in many cases you can remove the filter by hand. Make sure the engine is cool and the car is safely elevated. Grip the filter firmly and turn it anti-clockwise. Some filters are tight, so wearing cloth or rubber gloves can improve grip and prevent slippage. In difficult situations, some people use a rubber strap or adjustable pliers carefully, but it’s important not to crush or damage the filter, as this can make it difficult to remove. For most standard oil filters, hand strength and patience are often sufficient.
Q3. How often should the oil filter be changed?
Answer: Generally, the oil filter should be changed every time the engine oil is changed, which for modern vehicles is typically every 5,000 to 7,500 miles, depending on the car manufacturer and the type of oil used. Some cars and driving conditions, such as frequent stop-and-go traffic or extreme temperatures, may require more frequent oil filter changes. Regularly changing the oil filter ensures that contaminants are removed from the engine oil, ensuring smooth engine operation, preventing engine wear and extending engine life. Following the car manufacturer’s advice is the safest way to maintain engine health.
References:
[1] Correlating Lube Oil Filtration Efficiencies with Engine Wear 881825
https://www.sae.org/papers/correlating-lube-oil-filtration-efficiencies-engine-wear-881825

Guys, I’m a car audio enthusiast and customization expert and I love clear sound and clean installation. Plus, I have spent years helping people build their dream audio setups. And whenever I’m working on cars, I probably listen to music and thinks about the next big upgrade.
