Written By: Don Dodi
Fact Checked By: Kristen Brown
Reviewed By: Diego Rosenberg
It is just like oil keeps an engine alive, quick and flawless; the clutch fluid also keeps your clutch system working with a smooth and effortless motion as low or dirty clutch fluid level often leads to the sudden breakdowns which is real concern of your safety.
It is actually a type of hydraulic fluid, which often the same as brake fluid which is usually DOT 3 or DOT 4, which actually transfers the pressure from the clutch pedal to the clutch system, in that way it allows the gears to shift in the proper way.
Not only this, it is also true that is the fluid level becomes very low, contaminated or starts to leak somehow then it literally leads to the symptoms such as: you’ll feel difficulty in changing gears, a soft or spongy clutch pedal or you even have to face total clutch failure as well.
That’s why it is really important to check the clutch fluid level at the regular time interval to prevent costly repairs and failures as well.
Plus, the clutch systems are actually sealed hydraulic units, that’s why if you seen sudden drop in fluid level then it often shows that it has some leak on it that should be repaired in time.
So, this is the guide which shows you How to Check Clutch Fluid Level, that keeps the clutch fluid clean and at the proper level that ensures smooth gear shifts, also it prevents premature wear of clutch components and it literally extends the life of both the master and slave cylinders as well.
Ensure the Safety During Check-Up of Clutch Fluid
1. Park the Vehicle on a Level Surface
Always begin by parking your vehicle on a flat, level surface.
This ensures the car remains stable while checking the clutch fluid level and allows you to get an accurate reading of the fluid inside the reservoir.
Fluid can shift on an inclined surface, leading to an inaccurate reading or even a safety hazard if the vehicle were to unexpectedly roll.
2. Turn Off the Engine and Allow it to Cool
Before opening the hood, ensure the engine is completely off and has had ample time to cool down.
The clutch master cylinder and surrounding parts can become very hot after driving.
Allowing the engine bay to cool for at least 15-20 minutes helps prevent burns and makes it safer to handle the parts around the reservoir.
3. Engage the Parking Brake for Safety
Firmly engaging the parking brake is a crucial safety step that prevents the vehicle from moving while you are working on it.
This is specially important when checking or adding fluid, as even slight movement could lead to an accident.
Double-check that the brake is fully engaged before you begin.
4. Wear Gloves and Safety Glasses
Safety gear is essential when handling clutch fluid as it is corrosive and can harm your skin or eyes.
Wearing gloves protects your hands from direct contact with the fluid, while safety glasses shield your eyes from accidental splashes when opening or filling the reservoir.
These simple precautions can prevent burns and injuries.
5. Clean the Area Around the Reservoir Cap
Before opening the clutch fluid reservoir, take a moment to clean the cap and the surrounding area.
Dirt or debris can easily fall into the reservoir, contaminating the fluid and potentially damaging the internal hydraulic components.
Wiping around the cap with a clean cloth or paper towel helps maintain the purity of the fluid and results in a more accurate test.
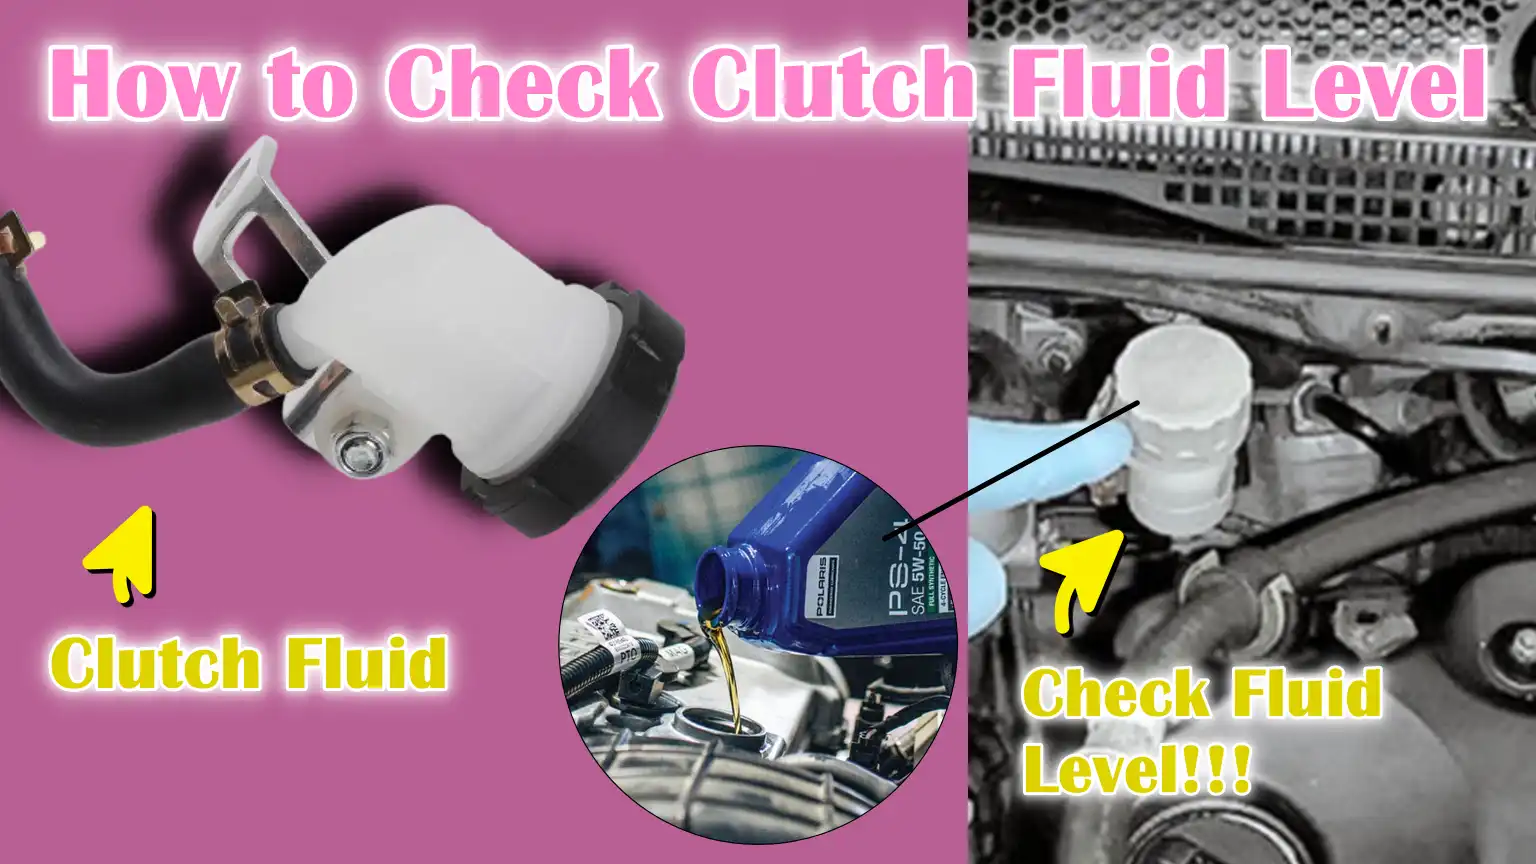
How to Locate the Clutch Fluid Reservoir
1. Understanding the Clutch Fluid Reservoir
The clutch fluid reservoir is a small but crucial part of your vehicle’s hydraulic clutch system.
Its main function is to store the hydraulic fluid that transfers force from the clutch pedal to the clutch assembly, allowing you to easily change gears.
This reservoir ensures that there is always enough fluid in the clutch master cylinder to generate hydraulic pressure.
If this fluid level gets too low, air can enter the system, causing the clutch pedal to feel spongy or stop working properly.
Locating this reservoir is the first and most important step before checking or adding clutch fluid.
2. Common Locations in Most Vehicles
In most cars, the clutch fluid reservoir is located in the engine compartment, towards the back, under the hood on the driver’s side.
It’s usually near the brake master cylinder because both systems often use the same type of hydraulic fluid – either DOT 3 or DOT 4 brake fluid.
The clutch reservoir is typically smaller than the brake reservoir and may be made of translucent plastic so you can easily see the fluid level without opening the cap.
Some vehicles, specially newer or compact models, may combine the brake and clutch systems into a single shared reservoir to save space and simplify maintenance.
3. How to Correctly Identify the Reservoir
You can identify the clutch fluid reservoir by looking for a small, round or rectangular container with a screw-on or snap-on cap.
The cap will usually be labeled “Clutch Fluid” or have symbols indicating the use of hydraulic fluid.
If the vehicle has a shared reservoir, you will typically see two fluid lines coming out of it – one going to the brakes and the other to the clutch master cylinder.
Always consult your vehicle’s owner’s manual to confirm the correct location and design, as the location may vary depending on your car’s make, model and year.
4. Why Finding the Correct Location is Important
Finding the correct reservoir is crucial because mixing clutch and brake fluid reservoirs or adding fluid to the wrong reservoir can cause serious damage to the system.
Using the correct reservoir ensures the clutch system receives the proper hydraulic pressure and remains free from contaminants.
It also allows you to accurately monitor the fluid level and quickly detect leaks if the reservoir appears unusually low.
Regularly checking the location of this reservoir can help you identify problems such as fluid discoloration, low levels, or small leaks around the master cylinder before they lead to clutch failure.
How to Identify the Type of Fluid Used
1. The Importance of Using the Correct Fluid
Choosing the correct type of clutch fluid is one of the most important steps in maintaining a healthy and long-lasting clutch system.
This fluid acts as the lifeblood of the hydraulic clutch, transferring pressure from the clutch pedal to the clutch slave cylinder.
Because it operates under high pressure and temperature, it requires very specific properties to function correctly.
Using the wrong fluid can lead to serious problems such as seal damage, corrosion and poor clutch performance.
This can ultimately result in leaks or complete system failure, leading to costly repairs.
2. Common Types of Clutch Fluid
Most vehicles use the same type of hydraulic fluid as their braking system—typically DOT 3 or DOT 4 brake fluid.
These fluids are glycol-based and designed to handle high temperatures and pressures without boiling or degrading easily.
DOT 3 fluid has a lower boiling point, which is fine for normal driving conditions, while DOT 4 has a higher boiling point, making it more suitable for vehicles that operate under heavier loads or higher temperatures.
Some high-performance or European cars may also use DOT 5.
1 fluid, which offers even greater temperature resistance but is also glycol-based like DOT 3 and DOT 4.
However, DOT 5 fluid, which is silicone-based, should never be used in systems designed for DOT 3 or DOT 4, as it is incompatible and can cause internal damage.
3. How to Confirm the Correct Type
The best way to confirm the correct clutch fluid type is to check your vehicle’s owner’s manual.
The manufacturer specifies the correct fluid type required for your vehicle and this information is often printed on the clutch or brake reservoir cap.
If the manual states, “Use only DOT 3 or DOT 4 brake fluid,” follow that instruction precisely.
Mixing different types of brake or clutch fluid can cause chemical reactions that damage seals and hoses, leading to leaks or fluid contamination.
4. Consequences of Using the Wrong Fluid
Using the wrong type of fluid can have long-term effects on your clutch system.
For example, silicone-based fluids like DOT 5 can swell or degrade rubber seals designed for glycol-based fluids.
This leads to leaks and a loss of hydraulic pressure, making it difficult to shift gears smoothly.
Additionally, incompatible fluids can corrode metal parts inside the master and slave cylinders, reducing their efficiency and lifespan.
Once contamination occurs, the entire hydraulic system may need to be flushed or replaced to function correctly.
How to Inspect the Reservoir
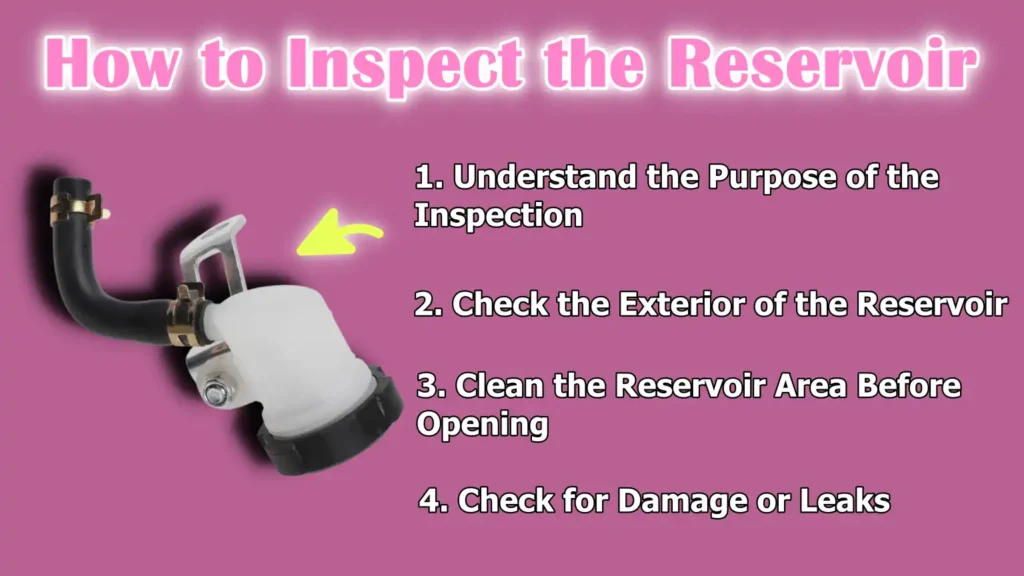
1. Understand the Purpose of the Inspection
Inspecting the clutch fluid reservoir is one of the simplest yet most crucial steps in maintaining a healthy clutch system.
The reservoir acts as a storage container for the hydraulic fluid that powers the clutch operation.
By checking it regularly, you can quickly identify early signs of fluid depletion, contamination, or damage.
As the clutch system relies on fluid pressure to function correctly, even a minor issue in the reservoir—such as dirt, leaks, or cracks—can lead to bigger problems over time.
Proper inspection helps ensure the hydraulic system remains sealed, clean and reliable, allowing the clutch pedal to operate efficiently without any interruptions.
2. Check the Exterior of the Reservoir
Most clutch fluid reservoirs are made of durable, transparent plastic, allowing you to easily see the fluid level inside without removing the cap.
On the side of the reservoir, you’ll typically find markings labeled “MIN” and “MAX” to indicate the correct fluid range.
The fluid level should always be between these two marks.
If the level is below the minimum line, it could indicate a fluid leak from the clutch system, possibly due to leaks or faulty components such as the master or slave cylinder seals.
On the other hand, if the level is above the maximum mark, the fluid could overflow when it heats up during operation.
Maintaining the fluid level within this range ensures that the system maintains the correct pressure and that air does not enter the lines.
3. Clean the Reservoir Area Before Opening
Before opening the reservoir cap, it’s essential to carefully clean the surrounding area.
Over time, dust, dirt and grease can accumulate on the cap and the surrounding surfaces of the reservoir.
If dirt falls inside when the cap is removed, it can mix with the clutch fluid and cause blockages or internal damage to the hydraulic system.
A clean cloth or paper towel should be used to wipe away any dirt.
It’s also a good idea to avoid using water or any chemical cleaners, as these can introduce moisture into the system.
Moisture is particularly harmful because clutch fluid is hygroscopic, meaning it absorbs water from the air, which can lower its boiling point and cause corrosion to metal components inside the system.
4. Check for Damage or Leaks
When inspecting the reservoir, carefully examine its condition.
Any cracks, discoloration, or wet spots around the base could indicate a leak or that the reservoir is aging and may need replacing.
Leaks around the reservoir cap or hose connections can allow air or moisture to enter, resulting in a spongy clutch pedal and difficulty shifting gears properly.
The cap should always fit tightly and have a good condition rubber seal to prevent contaminants from entering.
A quick visual inspection every few weeks or during regular maintenance can help identify these problems before they become serious.
How to Check Clutch Fluid Level – Full Guide
1. Understand Why Fluid Level is Important
Checking the clutch fluid level is one of the most crucial steps in maintaining a smooth and reliable clutch system.
Clutch fluid is a hydraulic medium that transfers pressure from the clutch pedal to the clutch slave cylinder, which engages and disengages the clutch plates.
For this process to function correctly, there must always be enough fluid in the hydraulic circuit to maintain pressure.
If the fluid level drops too low, the clutch may not disengage properly, leading to grinding gears, difficulty shifting, or even complete clutch failure.
Maintaining the correct level ensures the system remains sealed and pressurized, preventing air from entering and affecting pedal performance.
2. How to Properly Read the Fluid Level
Most clutch reservoirs are made of translucent plastic, making it easy to see the fluid inside without removing the cap.
On the side of the reservoir, you will find two markings labeled “MIN” and “MAX”.
The fluid level should always be between these two lines when the vehicle is on a level surface.
If the level is near or below the minimum line, it indicates that fluid has been lost from the system.
This can happen naturally over time due to wear on the clutch disc or small leaks in the master or slave cylinder seals.
When the level is low, the hydraulic pressure is reduced, which can cause the clutch pedal to feel spongy or soft.
Keeping the level within the correct range ensures smooth operation and consistent pedal pressure.
3. What a Low Fluid Level Indicates
If you notice that the clutch fluid level is below the “MIN” mark, it’s a clear indication that something in the system needs attention.
Low fluid levels are often caused by leaks in the hydraulic lines, master cylinder, or slave cylinder.
In some cases, a gradual decrease in fluid level can also indicate that the clutch friction material is wearing down, as the slave cylinder draws in more fluid to compensate for this wear.
However, a sudden or rapid drop in fluid level almost always means there is a leak that needs to be addressed immediately.
Ignoring a low fluid level can allow air into the system, making it difficult to build pressure and potentially causing the clutch pedal to stick to the floor.
4. The Importance of Regular Monitoring
Checking the clutch fluid level regularly is a good practice, ideally every few months or whenever you change the oil.
Like engine oil or coolant, clutch fluid does not get consumed or evaporate under normal conditions, so any decrease indicates a problem.
Regular monitoring allows you to detect early signs of leaks or wear before they become costly repairs.
It’s also important to remember that overfilling the reservoir can cause the fluid to overflow when it heats up during operation, potentially damaging surrounding parts or painted surfaces.
How to Check the Fluid Condition
1. Understanding Why Fluid Condition is Important
The condition of your clutch fluid is just as important as its level because it directly impacts the performance, lifespan and reliability of your vehicle’s hydraulic clutch system.
Over time, clutch fluid degrades due to exposure to heat, pressure and moisture in the air.
As most clutch fluids are glycol-based (like DOT 3 or DOT 4 brake fluid), they are hygroscopic, meaning they absorb moisture from the air even when the system is sealed.
This moisture lowers the fluid’s boiling point, reducing its ability to effectively transfer hydraulic pressure.
As a result, the clutch pedal may feel spongy and shifting gears may become difficult or less responsive.
Regularly checking the fluid condition helps identify early signs of contamination or degradation so the system can be serviced before serious problems occur.
2. How to Visually Check the Fluid
To check the fluid condition, carefully observe its color and clarity through the reservoir.
Fresh clutch fluid is typically clear to light amber in color and should appear clean and transparent.
If you notice the fluid is dark, cloudy, or has a brownish tint, it indicates that it has absorbed moisture, dirt, or other contaminants.
Contaminated fluid can corrode metal components inside the master and slave cylinders, weaken seals and eventually lead to leaks.
Furthermore, dark fluid can thicken over time, restricting fluid flow and causing the clutch pedal to feel heavy or inconsistent.
3. Signs of Contaminated or Old Fluid
When clutch fluid starts to darken or appear dirty, it usually means it’s time to replace the fluid or completely flush the clutch hydraulic system.
If small particles are floating in the fluid or it feels sticky to the touch, it indicates that dirt or rubber residue from worn seals has contaminated the fluid.
In some cases, the fluid may also have a burnt smell, which can occur from overheating due to excessive use or heavy driving conditions.
Ignoring these warning signs can lead to gradual hydraulic failure, reduced clutch efficiency and costly repairs.
4. When to Change the Fluid
Most automotive experts recommend changing the clutch fluid every two to three years, or sooner if the vehicle is driven in high-stress conditions such as city traffic, towing, or hot weather.
However, this may vary depending on the vehicle manufacturer’s recommendations.
Regular fluid changes remove moisture and contaminants, keeping the hydraulic system clean and responsive.
When changing the fluid, it’s also a good opportunity to inspect the condition of the reservoir, master cylinder and slave cylinder to ensure there are no leaks or faulty components.
How to Add Clutch Fluid – If It Actually Needed
1. Understanding When to Add Clutch Fluid
If, after checking the clutch fluid reservoir, you find the level is below the “MIN” mark, it’s time to add more fluid.
The clutch hydraulic system requires a specific amount of fluid to generate the necessary pressure for smooth clutch operation.
When the fluid level is too low, the system cannot build sufficient pressure, resulting in a spongy or soft clutch pedal and difficulty shifting gears.
However, before adding fluid, it’s crucial to ensure there are no leaks in the system.
Simply topping up the fluid without addressing any leaks will only provide a temporary fix.
Low fluid levels often indicate worn seals in the master or slave cylinder, so it’s best to check for leaks before refilling.
2. Choosing the Correct Fluid Type
Always use the fluid specified by the vehicle manufacturer, which is usually listed in the owner’s manual or printed on the reservoir cap.
Most vehicles use DOT 3 or DOT 4 brake fluid as clutch fluid, as both possess the necessary hydraulic properties to handle heat and pressure.
Mixing different types of fluids can cause chemical reactions that can damage seals, reduce performance, or cause internal corrosion.
Using the wrong fluid can cause the rubber components inside the hydraulic system to swell or deteriorate, leading to fluid leaks and ultimately clutch failure.
For best results, use a new, sealed container of the correct fluid type and never reuse old or previously opened fluid.
3. Properly Filling the Reservoir
When adding fluid, pour slowly and carefully to avoid spilling fluid and introducing air bubbles into the system.
The reservoir is typically small, so pouring too quickly can cause it to overflow or trap air, both of which can affect clutch performance.
It’s best to add the fluid in small increments, checking the level frequently until it reaches just below the “MAX” line.
Overfilling the reservoir can also cause problems, as clutch fluid expands when heated and can overflow, potentially damaging surrounding components or painted surfaces.
Once the correct level is reached, gently tap the side of the reservoir to help any trapped air bubbles rise to the surface.
4. Securing the Reservoir After Filling
After adding the fluid, always securely replace the reservoir cap to keep the system sealed.
The cap often has a rubber gasket that prevents air and moisture from entering, so make sure it’s properly seated and tightly fitted.
A loose or improperly closed cap can allow moisture and contaminants to enter, degrading the fluid and potentially causing corrosion over time.
Before closing the hood, also wipe up any spilled fluid with a clean cloth, as brake and clutch fluids are corrosive and can damage paint and plastic parts.
How to Check for Leaks or Air in the System
1. Understanding the Importance of Checking for Leaks and Air
Checking for leaks or trapped air in the clutch hydraulic system is one of the most crucial steps in maintaining proper clutch performance and safety.
The clutch system operates using hydraulic pressure, which relies on an airtight and leak-free circuit between the master cylinder, slave cylinder and connecting fluid lines.
Even a small leak or air bubble in this system can cause clutch malfunction, leading to difficulty shifting gears, reduced pedal pressure, or complete clutch failure.
Regular checks not only help identify early signs of wear or damage but also prevent further problems that could result in costly repairs or unsafe driving conditions.
2. Checking for Fluid Leaks in the Hydraulic System
To begin your inspection, perform a visual inspection of the clutch master cylinder, slave cylinder and all connecting fluid lines.
These components are typically located in or near the engine bay and transmission area.
Look for any wet spots, dark fluid stains, or accumulations of dirt and grime, which often indicate a fluid leak.
The master cylinder, usually located near the clutch pedal or firewall, can leak internally or around its seals, resulting in a loss of fluid.
The slave cylinder, found near the clutch housing, is another common area for leaks due to worn seals or faulty fittings.
Even small leaks can allow air to enter the system, reducing hydraulic pressure and impairing clutch performance.
If you notice a consistent drop in the fluid level in the reservoir, it’s a strong indication of a leak somewhere in the system.
3. Identifying Signs of Air in the System
The presence of air in the clutch hydraulic system can be just as problematic as fluid loss.
Unlike fluid, air is compressible, meaning it can reduce the amount of pressure transmitted through the system when the clutch pedal is pressed.
This can cause the pedal to feel spongy, soft, or inconsistent and sometimes it may even go all the way to the floor without fully disengaging the clutch.
Trapped air can enter the system through leaks, during fluid changes, or when the reservoir cap is left open for too long.
In some cases, you might also hear a slight gurgling or sucking sound when pressing the clutch pedal, which is another indication of air being present.
4. When and Why to Bleed the Clutch System
If you detect air in the hydraulic lines or experience irregularities in clutch engagement, bleeding the clutch system becomes necessary.
Bleeding is a process that removes trapped air from the system, restoring full hydraulic pressure.
This can be done manually using the bleeder valve located on the slave cylinder or with the help of a vacuum or pressure bleeder.
This process ensures that only clean fluid remains in the lines and that the clutch pedal returns to its firm and consistent feel.
Bleeding the system is also recommended whenever new clutch fluid is added or any component, such as the master or slave cylinder, is replaced.
Read More:
- How Do You Bleed a Clutch Master Cylinder
- How to Adjust Clutch Pedal Height
- How Do You Bleed a Clutch Slave Cylinder
- How to Change a Clutch Slave Cylinder
Checks You Should Follow Up and Maintain It With Tips
Not only this, the clutch fluid actually changes with their age and their corrosivity can also increase over the time, as the NIST report shows that aged fluid can actually leads to the metallic corrosion inside the hydraulic components and it shows that mechanisms by which fluid degradation actually harms the seals and metallic parts as well, which is why it is really important to check the level of clutch fluid and refill it if necessary.[¹]
1. Performing a Final Inspection After Filling
Once you’ve added the correct clutch fluid and securely closed the reservoir cap, it’s crucial to perform a thorough final inspection.
Wipe up any spilled fluid around the engine bay.
Clutch fluid, which is typically DOT 3 or DOT 4 brake fluid, is highly corrosive to paint and some plastics, so even a small spill can cause damage if not cleaned up.
Wipe the affected area with a clean, dry cloth or paper towel and if necessary, rinse with a little water to remove any remaining residue.
This simple step not only keeps your vehicle clean but also prevents long-term corrosion or paint damage.
After cleaning, ensure the reservoir cap is tightly closed to prevent moisture or air from entering the system, as both can degrade the fluid quality over time.
2. Rechecking the Fluid Level After Driving
Once the inspection is complete, start your vehicle and drive it for about 5 to 10 minutes, ideally in a location where you can use the clutch several times.
This allows the fluid to circulate evenly throughout the hydraulic system and helps confirm that there are no leaks or air bubbles.
After the drive, park the vehicle on a level surface, allow the engine to cool slightly and recheck the clutch fluid level in the reservoir.
The fluid should still be between the “MIN” and “MAX” lines.
If it has dropped significantly, it could be an early indication of a small leak or improper bleeding, which may require further attention.
Continuously monitoring the fluid level in the days following the refill ensures the system is fully sealed and functioning correctly.
3. Establishing a Regular Maintenance Schedule
Regular maintenance of your clutch fluid is the easiest and most effective way to extend the life of your clutch system.
For most vehicles, it’s recommended to check the clutch fluid every few months or at least during routine service intervals, such as during an oil change.
This frequency may vary depending on the age of the vehicle, driving conditions and manufacturer recommendations.
For example, vehicles driven in heavy traffic, mountainous terrain, or hot climates may require more frequent checks due to increased clutch usage and faster fluid degradation.
Over time, clutch fluid absorbs moisture from the air, lowering its boiling point and potentially leading to reduced clutch performance or internal corrosion in the master and slave cylinders.
4. Ensuring Long-Term System Health
Replacing the clutch fluid every two to three years, or as specified in the owner’s manual, is an excellent preventative measure.
When replacing the fluid, always use new, unopened bottles, as brake and clutch fluids are hygroscopic and absorb moisture when exposed to air.
During regular vehicle servicing, take a moment to check the feel of the clutch pedal – if it becomes soft, requires excessive travel, or feels inconsistent, it may indicate that the system needs bleeding or a fluid change.
Being proactive about clutch fluid maintenance not only ensures smooth gear engagement and consistent pedal pressure but can also prevent costly hydraulic component replacements down the line.
By taking a few extra minutes to check, top up and maintain your clutch fluid, you preserve the overall performance, safety and lifespan of your vehicle’s clutch system.
Conclusion – How to Check Clutch Fluid Level
When you drive your vehicle’s nicely that means you are operating your clutch flawlessly as well, but it also need the small amount of fluid as it powers its precision every time you press that clutch pedal.
Not only this, you should check and maintain your clutch fluid level might seem like a minor task, but it’s crucial for the smooth performance and longevity of your vehicle’s clutch system.
The clutch hydraulic system relies on fluid pressure to transmit force from the pedal to the clutch assembly and even a slight deficiency or contamination in the fluid can lead to poor engagement, slipping, or complete clutch failure.
By regularly checking the fluid level, inspecting its condition and refilling with the correct type of fluid, you ensure the system operates correctly every time you shift gears.
Clean, properly filled fluid keeps internal seals lubricated, prevents corrosion inside the master and slave cylinders and maintains consistent hydraulic pressure under all driving conditions.
Routine maintenance also helps detect early signs of leaks or wear and tear before they escalate into costly repairs.
Many drivers overlook this simple inspection, yet it can prevent major clutch problems that might otherwise require a complete replacement.
Always follow the manufacturer’s recommendations, use only the specified DOT-rated fluid and avoid mixing different types of fluid.
Over time, this practice not only saves money but also makes your vehicle safer and more reliable on the road.
Whether you drive a manual car daily or only occasionally, regularly checking your clutch fluid ensures smooth shifting, extended component life and the peace of mind that your vehicle’s performance is always at its best.
So, you can write your thoughts about this guide on the comment section or you can ask some useful questions that bothers you related to this guide.
Frequently Asked Questions
Q1. What is clutch fluid and why is it important?
Answer: Clutch fluid is a type of hydraulic fluid used in vehicles with manual transmissions. It helps transfer force from your clutch pedal to the clutch system, allowing you to shift gears smoothly. When you press the clutch pedal, the fluid transmits pressure from the clutch master cylinder to the slave cylinder, disengaging the clutch. If the clutch fluid is low or contaminated, you may experience difficulty shifting gears, a spongy pedal feel, or even complete clutch failure. Maintaining the correct fluid level ensures proper system operation and protects the hydraulic components from damage.
Q2. How often should I check my clutch fluid level?
Answer: It’s best to check your clutch fluid level every few months or during regular maintenance, such as during an oil change. For older vehicles or cars frequently driven in heavy traffic, it should be checked even more often – approximately once a month. Over time, clutch fluid can absorb moisture and contaminants, reducing its performance. Regular checks allow you to detect low levels or contaminated fluid before major clutch problems or expensive repairs occur.
Q3. Where can I find the clutch fluid reservoir in my car?
Answer: The clutch fluid reservoir is typically located in the engine bay, near the firewall on the driver’s side. It’s often right next to or slightly behind the brake fluid reservoir. In some vehicles, the clutch and brake systems share the same fluid reservoir. The reservoir is usually made of transparent plastic and has “MIN” and “MAX” markings to indicate the fluid level. Always consult your owner’s manual if you have trouble locating it, as the location can vary between different car models. What type of fluid should I use for my clutch system? Most vehicles use brake fluid—typically DOT 3 or DOT 4—as clutch fluid. However, always consult your owner’s manual to determine the specific fluid required for your vehicle. Using the wrong fluid can damage rubber seals and internal components of the hydraulic system. DOT 3 and DOT 4 fluids look similar but have different boiling points and moisture absorption levels. DOT 4 fluid is better suited for high-performance vehicles or those driven in hot climates because it can withstand higher temperatures without degrading. Never mix different types of brake or clutch fluid, as this can lead to performance issues or system failure.
Q4. What happens if my clutch fluid is low?
Answer: If your clutch fluid level is low, you may experience difficulty shifting gears, the clutch pedal may feel soft or spongy, or the pedal may go all the way to the floor. A low fluid level indicates a leak somewhere in the system, such as in the clutch master cylinder, slave cylinder, or connecting lines. Ignoring a low fluid level can allow air into the system, reducing hydraulic pressure and potentially causing your clutch to stop working altogether. If you notice a sudden drop in fluid level, it’s crucial to inspect the system for leaks and top it up immediately with the correct fluid.
Q5. What does dirty or dark-colored clutch fluid mean?
Answer: Clean clutch fluid is typically clear to light amber in color. If the fluid appears dark, cloudy, or dirty, it means it has absorbed moisture or become contaminated with dirt or rubber particles from internal seals. Contaminated fluid can reduce clutch performance and cause corrosion or damage to the hydraulic cylinders. If the fluid appears dirty, it should be replaced as soon as possible. Flushing the clutch system removes old fluid and air bubbles, resulting in smoother operation and improved clutch response.
Q6. Can I drive with low clutch fluid?
Answer: Driving with low clutch fluid is unsafe and can cause serious damage to your vehicle’s clutch system. Without sufficient fluid, the hydraulic pressure will not be enough to fully disengage the clutch, making gear changes difficult or causing grinding noises when shifting gears. Continuously driving in this condition can wear down the clutch plates or even cause the clutch to fail completely. If you notice a low fluid level, stop driving as soon as possible, refill it with the correct fluid and have your vehicle checked for leaks.
References:
[1] Preliminary Investigations Into Corrosion in Anti-Lock Braking Systems
https://nvlpubs.nist.gov/nistpubs/ir/1998/NIST.IR.6233.pdf

Guys, I’m a car audio enthusiast and customization expert and I love clear sound and clean installation. Plus, I have spent years helping people build their dream audio setups. And whenever I’m working on cars, I probably listen to music and thinks about the next big upgrade.