Written By: Don Dodi
Fact Checked By: Kristen Brown
Reviewed By: Diego Rosenberg
You should always maintain the quality and quantity of the oil in a car, as it actually lubricates moving parts, reduces friction, cleans away dirt and debris as well, plus it even regulate engine temperature as well.
So, without the right amount of clean oil, it is seen that even the best kinds of engines car become overheat, wear out or simply fail completely.
Not only this, there’s a study by the Car Care Council and that actually shows that nearly 20% of the vehicles on the road actually have low or dirty engine oil, which literally have the capability to shorten engine life by up to 25% which is huge.
That’s why you need to check your oil at the regular time interval to ensure your car runs always smoothly, efficiently and safely as well.
And it also helps you to detect any kind of early signs of troubles such as: leaks or oil contamination, before they turn into expensive ones.
Now, this guide actually shows you How to Check Oil Level in a Car in the easiest and quickest way.
Why Checking the Oil Level Is Actually Important
1. Preventing Engine Overheating and Friction
Engine oil is the lifeblood of your car’s engine.
It lubricates all moving parts, reduces friction and prevents metal parts from rubbing against each other.
When the oil level drops too low, the engine lacks sufficient lubrication, causing parts to overheat and wear out faster.
In severe cases, low oil can cause engine stalling, requiring costly repairs or even a complete engine replacement.
2. Preventing Damage Caused by Excess Oil
Low oil is dangerous, but excess oil can also damage the engine.
Excess oil creates excess pressure inside the engine, which can damage seals and cause leaks.
It can also cause foaming, where the oil mixes with air, reducing its effective lubricating ability.
Both conditions—too little or too much oil—can affect engine performance and lifespan.
3. Oil Neglect and Vehicle Maintenance Statistics
Neglecting regular oil checks is more common than many drivers realize.
Car Care Council studies show that approximately 20% of vehicles on the road have inadequate oil levels.
Vehicles with low or excess oil often experience a 20-25% reduction in engine life.
Regular oil checks ensure your engine runs efficiently, prevent costly repairs and keep your car reliable and safe on the road.
When You Should Check Your Car’s Oil?
1. Regular Oil Check Intervals
To keep your engine in good condition, it’s important to check your car’s oil regularly.
Experts recommend checking the oil at least once a month.
For older vehicles or vehicles driven in harsh conditions like city traffic, towing, or hot weather, more frequent checks are recommended.
Checking before long trips is also recommended, as this ensures your engine has adequate lubrication to handle long drives without the risk of overheating or damage.
2. Specific Times for Oil Checks
In addition to regular intervals, there are certain situations when checking the oil is specially important.
After a long drive, the engine may be hotter than usual and checking the oil immediately after turning off the engine can help detect leaks or a sudden drop in oil level.
To ensure the correct amount of oil has been added, the oil should also be checked before and after an oil change.
Additionally, if your dashboard warning light indicates low oil pressure or level, it’s important to check the oil immediately to prevent potential engine damage.
3. Best Conditions for Accurate Readings
For the most accurate results, always check your oil under proper conditions.
Turn off the engine and let it cool for a few minutes to allow the oil to settle in the oil pan.
Checking on a flat, level surface ensures accurate readings, as slopes can cause inaccurate readings.
Wiping the dipstick with a clean cloth before reinserting it also helps prevent inaccurate results.
Following these conditions allows you to accurately assess the oil level and condition, ensuring your engine remains healthy and operates efficiently.
Tools
| Tool / Item | Purpose | Additional Notes |
|---|---|---|
| Clean rag or paper towel | Used to clean the dipstick before checking the oil. | A soft, lint-free cloth works best to avoid leaving fibers on the dipstick. |
| Gloves (optional) | Protect your hands from oil and dirt when handling the dipstick or adding oil. | Disposable or reusable gloves can be used as per your choice. |
| Flashlight (if needed) | Helps to clearly see the dipstick and oil reservoir, specially in low light conditions. | Useful for checking oil in the morning, evening or in a poorly lit garage. |
| Owner’s manual | Provides precise dipstick location, recommended oil type and correct level markings. | Always follow the manufacturer’s guidelines to avoid mistakes or engine damage. |
How to Check Oil Level in a Car – Complete Steps In Simple Way
1. Park the car on a level surface and turn off the engine
For accurate oil readings, always park your car on a flat, level surface.
It’s important to turn off the engine because the oil needs time to settle in the oil pan.
Checking the oil on a slope or while the car is moving can give an inaccurate reading, leading to overfilling or underfilling.
2. Wait a few minutes for the oil to settle
After turning off the engine, wait at least 5 to 10 minutes.
This allows oil from the engine’s moving parts to flow back into the oil pan, giving you an accurate measurement of the actual oil level.
Skipping this step can result in an inaccurate reading.
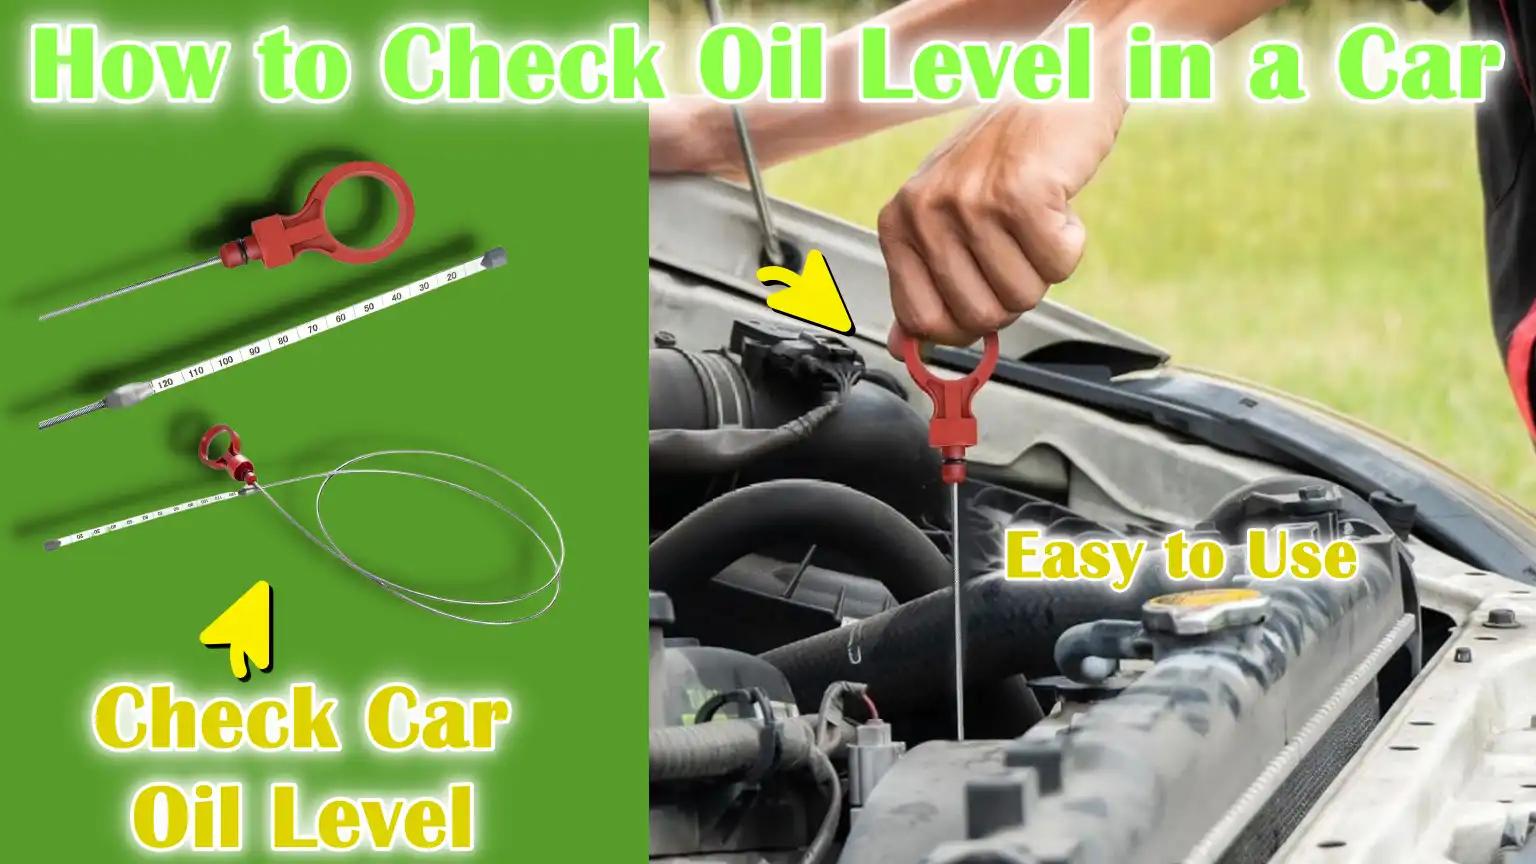
3. Open the Hood and Find the Dipstick
Lift the hood and locate the oil dipstick, which is usually marked with a bright color like yellow or orange.
If you’re unsure of its exact location, the owner’s manual can guide you.
The dipstick is the main tool for checking your engine’s oil level and condition.
4. Remove and clean the dipstick
Remove the dipstick from the tube and wipe it thoroughly with a clean cloth or paper towel.
Cleaning the dipstick ensures that old oil doesn’t obstruct the measurement and provides an accurate reading of the current oil level.
5. Insert the dipstick all the way back in and then remove it again.
Once the dipstick is clean, insert it all the way back into the tube and remove it again.
This second reading shows the correct oil level after the oil has settled.
6. Check the oil level markings
Check where the oil reaches between the “min” and “max” marks on the dipstick.
The oil level should be close to the maximum mark, but not higher.
A level below the minimum line indicates the need for a top-up, while a level above the maximum line can cause engine problems due to excess pressure.
7. Check the Oil Color and Viscosity
Finally, pay attention to the oil’s color and texture.
Healthy oil is typically clear, amber-colored and smooth in texture.
Dark, thick, or rough oil may indicate contamination, old oil, or engine problems that need attention.
Regularly monitoring the oil’s condition helps prevent engine damage and keep your car running efficiently.
How to Interpret Oil Levels and Condition
1. Understanding Low Oil Levels
If the oil level drops below the minimum mark on the dipstick, it indicates that the engine lacks adequate lubrication.
Low oil levels increase friction between engine parts, which can lead to engine overheating, accelerated wear and, in severe cases, even engine failure.
It’s important to address a low oil problem immediately by adding the correct type of oil as recommended in the owner’s manual.
Neglecting this can lead to costly repairs and a reduced engine life.
2. Recognizing Signs of Oil Contamination or Aging
Dirty, dark, thick, or cloudy oil indicates contamination or age.
Clean, healthy engine oil is typically clear and amber in color.
Contaminants such as dirt, metal particles, or coolant can get into the oil, reducing its ability to lubricate effectively.
Furthermore, old or deteriorated oil loses its protective properties, increasing engine wear and heat buildup.
Regularly checking the oil can help you detect these problems early and prevent damage.
3. When to Fill or Change the Oil
If the oil level is slightly below the maximum limit, but the oil is still clear, simply filling the recommended amount of oil is sufficient.
However, if the oil is low and appears dirty, thick, or contaminated, it’s time for a complete oil change.
Adhering to the manufacturer’s recommended oil change intervals and using the correct type of oil ensures the engine remains safe and operates efficiently.
Regular monitoring and timely interventions help extend the life of your car’s engine and maintain its reliability.
How to Add Engine Oil – If It Is Necessary
1. Identify the Correct Oil Type
Before adding engine oil, it’s important to use the type recommended by your car’s manufacturer.
The owner’s manual provides the correct viscosity, grade and specifications for the oil suitable for your engine.
Using the wrong type of oil can reduce lubrication, cause excessive engine wear, or even damage it over time.
To maintain engine performance and longevity, always check the recommended oil type.
2. Slowly Adding Oil and Rechecking
When adding oil, add a little at a time, allowing it to settle before rechecking the level with the dipstick.
This gradual approach ensures you don’t accidentally overfill the engine.
Recheck the oil level after each addition to ensure it reaches the optimal range between the “minimum” and “maximum” marks.
Careful measurement prevents underfilling and overfilling, protecting the engine from unnecessary stress or damage.
3. Tips to Avoid Overfilling the Engine
Overfilling the engine can create excessive pressure inside the engine, leading to leaks, seal damage, or foaming, which reduces lubrication efficiency.
To avoid this, always add oil slowly, use a funnel to control the flow and check the dipstick frequently.
If you accidentally overfill, you may need to drain some oil to restore the oil level.
Proper oil filling habits help maintain smooth engine operation and extend the life of your vehicle.
Read More:
Common Mistakes You Should Avoid While Checking The Oil Level
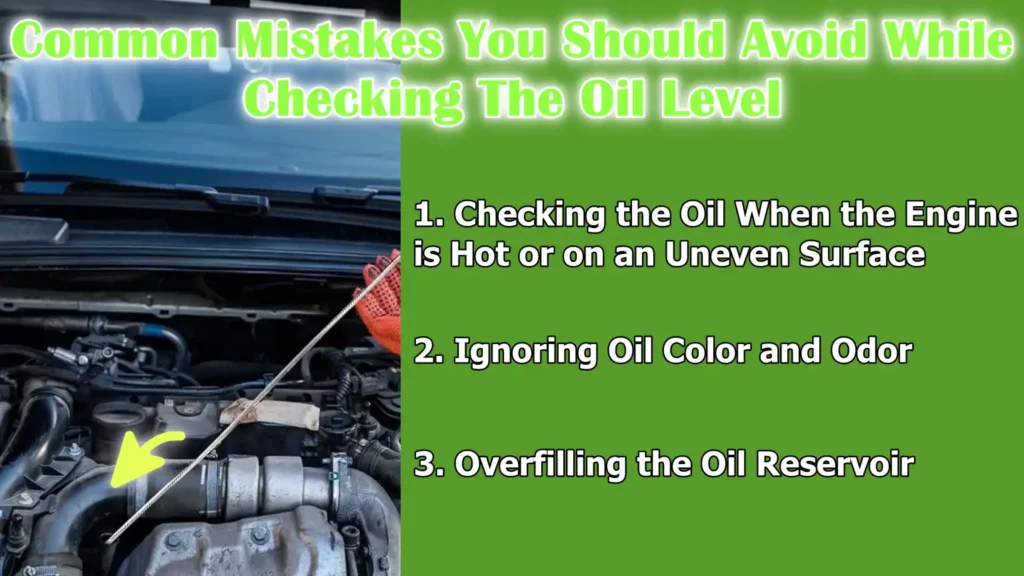
1. Checking the Oil When the Engine is Hot or on an Uneven Surface
One of the most common mistakes drivers make is checking the oil immediately after running the engine or on a slope.
Hot oil can give an inaccurate reading because it hasn’t yet settled in the oil pan.
Similarly, movement of the oil on an uneven surface can cause the oil level on the dipstick to be inaccurate.
Always check the oil after the engine has cooled for a few minutes and ensure the car is parked on a flat, level surface.
This simple precaution ensures accurate measurements and prevents overestimating or underestimating the oil level.
2. Ignoring Oil Color and Odor
Another common mistake is focusing solely on the oil level and ignoring its color and odor.
Healthy engine oil should be clear, amber and smooth.
Dark, thick, or rough oil may indicate contamination, old oil, or internal engine problems.
A burnt smell may indicate overheating or other mechanical problems.
Regularly monitoring these characteristics can help drivers detect potential engine problems early and take corrective action before serious damage occurs.
3. Overfilling the Oil Reservoir
Overfilling the oil reservoir is a mistake that can increase engine pressure, cause leaks and foaming.
Excess oil can damage seals and reduce the oil’s ability to effectively lubricate moving parts.
To avoid overfilling, always add oil slowly and check the dipstick frequently.
If too much oil has been added, drain the excess oil to restore the level.
Proper oil filling helps maintain engine performance, prevent leaks and extend vehicle life.
Basic Signs of Oil Problems that Requres Professional Attention
1. Persistently Low Oil Levels
If you notice that the oil level repeatedly drops below the minimum level despite regular oil refills, it could be a sign of a leak or excessive oil consumption.
Leaks can be caused by worn gaskets, seals, or a damaged oil pan, while burning oil inside the engine could indicate internal problems such as worn piston rings or valve seals.
Ignoring a persistently low oil level can lead to serious engine damage, overheating and ultimately, the need for expensive repairs.
2. Milky Oil
Milky or foamy oil often indicates that coolant is mixing with the engine oil, which typically indicates a head gasket problem, a crack in the engine block, or other serious engine problems.
This contamination reduces the oil’s ability to lubricate moving parts and can cause corrosion inside the engine.
Cloudy oil needs to be detected early, as ignoring it can cause serious engine damage.
3. Metal particles or sludge in the oil
Metal particles, dust, or thick sludge in the oil indicate abnormal wear or malfunction of internal engine components.
Sludge can also accumulate if the oil is left unchanged for a long time or if substandard oil is used.
Both conditions reduce lubrication, increase friction and can cause the engine to overheat or suffer serious damage.
Prompt professional inspection is essential to avoid costly repairs and maintain engine reliability.
Basic Tips to Maintain Proper Oil Condition
1. Regular Oil Changes Based on Manufacturer Recommendations
One of the most important steps in maintaining engine condition is changing the oil at the vehicle manufacturer’s recommended intervals.
These intervals are typically based on mileage or time, such as every 5,000 to 10,000 kilometers or every six months, depending on the type of oil used.
Regular oil changes remove contaminants, prevent sludge buildup and ensure the engine is properly lubricated.
Neglecting this maintenance can reduce engine efficiency, cause engine overheating and lead to long-term damage.
2. Use Quality Oil and Filters
The type and quality of oil and filters used have a significant impact on engine performance and longevity.
High-quality oils provide better lubrication, prevent heat breakdown and contain additives that help protect engine parts.
Similarly, using a recommended oil filter ensures that dirt, metal particles and other contaminants are effectively removed.
Using substandard oil or filters can impair engine condition, reduce fuel efficiency and increase wear on moving parts.
Plus, there is American Petroleum Institute’s Motor Oil Guide that actually explains about oil grades, viscosity behavior and certification marks such as: API/ILSAC and that actually shows that you should always use the correct oil type as it matters in terms of protection and measurement. And also viscosity and additive packages affects how oil behaves at the certain temperature, which also affects how oil “reads” on a dipstick when it is warm vs after settling.[¹]
3. Tracking Oil Changes with a Maintenance Log
Keeping a written or digital record of all oil changes and inspections helps drivers keep track of their vehicle’s maintenance schedule.
A maintenance log can include the date, mileage, type of oil used and any problems observed during the oil check.
This record not only ensures timely oil changes but also helps detect patterns such as abnormal oil consumption or recurring engine problems.
Tracking maintenance improves reliability, prevents costly repairs and extends your vehicle’s lifespan.
Conclusion – How to Check Oil Level in a Car
Now, you have already understood about the importance of having enough oil as it is crucial for vehicle’s engine and performance as well.
Engine oil not only lubricates moving parts, but also helps regulate temperature, reduce friction and prevent wear and corrosion.
By checking your oil regularly, recognizing warning signs and using the right type of oil, you can avoid costly repairs and keep your car running smoothly.
Simple habits like keeping a maintenance log, adding oil gradually when needed and following manufacturer recommendations make a significant difference in performance and reliability.
Taking just a few minutes each month to inspect and maintain your engine oil ensures your vehicle remains safe, efficient and road-ready for years to come.
Now, you can ask some unsolved questions regarding this guide.
Frequently Asked Questions
Q1. Should I check the oil when the engine is hot or cold?
Answer: It’s best to check your car’s oil when the engine is slightly warm or completely cool. Checking immediately after turning off an overheated engine can give an inaccurate reading because the oil is still circulating and hasn’t settled in the oil pan. Waiting 5 to 10 minutes after turning off the engine allows the oil to flow back and settle, giving you the most accurate oil level measurement. If the engine has been off for a long time and the oil is very cold, it’s still okay to check, but for accuracy, make sure the car is on a level surface.
Q2. Do you check the oil with the car on or off?
Answer: The engine should always be off when checking the oil level. Running the engine while measuring the oil can give an inaccurate reading because the oil is circulating in the engine and hasn’t settled in the oil pan. Furthermore, checking with the engine running can be unsafe, specially around hot parts like the radiator or exhaust. Turn off the engine, wait a few minutes for the oil to settle and then safely and accurately measure the level using the dipstick.
Q3. Can you overfill your car with oil?
Answer: Yes, overfilling can be harmful to the engine. Overfilling creates excess pressure inside the engine, which can damage seals and gaskets and cause leaks. Excess oil can also foam and mix with air, reducing its ability to properly lubricate engine parts. Over time, this can increase friction, overheat and cause engine damage. To avoid overfilling, always add oil slowly, check the dipstick frequently and stop when the level reaches the maximum mark.
Q4. What is the correct oil level on the dipstick?
Answer: The correct oil level is usually between the “minimum” and “maximum” marks on the dipstick. The oil should be close to the maximum mark, but not above it. If the level is below the minimum mark, the engine doesn’t have enough oil, which can cause friction, overheating and possible engine damage. If the level is above the maximum mark, it can cause pressure surges, leaks, or foaming. Checking the oil regularly and maintaining it within this range ensures proper lubrication and keeps your engine running efficiently.
References:
[1] API’S MOTOR OIL GUIDE
https://www.api.org/-/media/files/certification/engine-oil-diesel/publications/motor%20oil%20guide%201020.pdf

Guys, I’m a car audio enthusiast and customization expert and I love clear sound and clean installation. Plus, I have spent years helping people build their dream audio setups. And whenever I’m working on cars, I probably listen to music and thinks about the next big upgrade.