Written By: Don Dodi
Fact Checked By: Kristen Brown
Reviewed By: Diego Rosenberg
It is really disgusting to hear that but the inside of your car can be dirtier than a public toilet and that is the also the basic reason that you should clean the interior regularly; other than just managing the looks.
Yes, it does helps to keep the interior looks clean and neat and it’s plus point is it also takes care of your health, comfort and the car’s long-term value as well.
Not only this, according to the National Center of Biotechnology shows the steering wheels alone can carry over 700 harmful bacteria per square inch.
And over the period of time your cabin can contains dust, food crumbs, spilled drinks, pet hair and even skin particles as well and that’s how it makes the cabin really unhealthy to breath in.
So, whenever you perform regular interior detailing then it really helps to remove the allergens, bacteria and unpleasant odors that makes the car much safer and more pleasant for driver and passengers as well.
Additionally, it can helps to preserve the materials such as: leather, vinyl and fabric, as they can be wear down faster when you do not clean the interior properly.
Another bingo is that, it is found that according to the car market experts – if you are planning to sell your car: then a clean interior literally increase the resale value by 10 to 15% that is something to grind for.
Now, in this guide you’ll know every kind of information and step-by-step instruction about: How to Detail a Car Interior so that you can keeps your kinds and pets away from any possible germs.
The Preparation Before You Begin
Before you begin cleaning your car’s interior, proper preparation is essential to get the best results. Cleaning in the wrong environment or without the right tools can make the process more difficult or even damage the materials in your car’s interior.
1. Choose the right location
Start by parking your car in a shady and well-ventilated area.
Direct sunlight can cause cleaning products to dry too quickly, leaving stains, streaks or spots on surfaces like glass, plastic or leather.
A shady spot also keeps the car cool, making it easier and more comfortable to work inside for long periods of time.
Good ventilation is also important, specially when using spray or chemical-based cleaners, as it helps prevent strong fumes from accumulating inside the cabin.
2. Remove all personal belongings and trash
Take a few minutes to remove anything from inside the car that shouldn’t be there.
This includes bags, papers, toys, food wrappers, electronics and other personal belongings.
Vacuum the glove box, door pockets, center console, cup holders and under the seats.
Vacuuming helps you reach every corner and ensures that you don’t damage or stain any of your personal belongings while cleaning.
It also lets you know which areas need more attention.
3. Gather all the necessary items
Having all the items ready before you begin saves time and keeps the job running smoothly.
A vacuum cleaner with multiple attachments is a must for cleaning tight spaces like carpets, mats, between seats and seatbacks and under pedals.
Microfiber cloths are essential for wiping surfaces without scratching them and are better than paper towels because they don’t leave lint.
Interior cleaner or all-purpose cleaner (commonly called APC) helps remove dirt, stains and oils from plastic, vinyl and other surfaces.
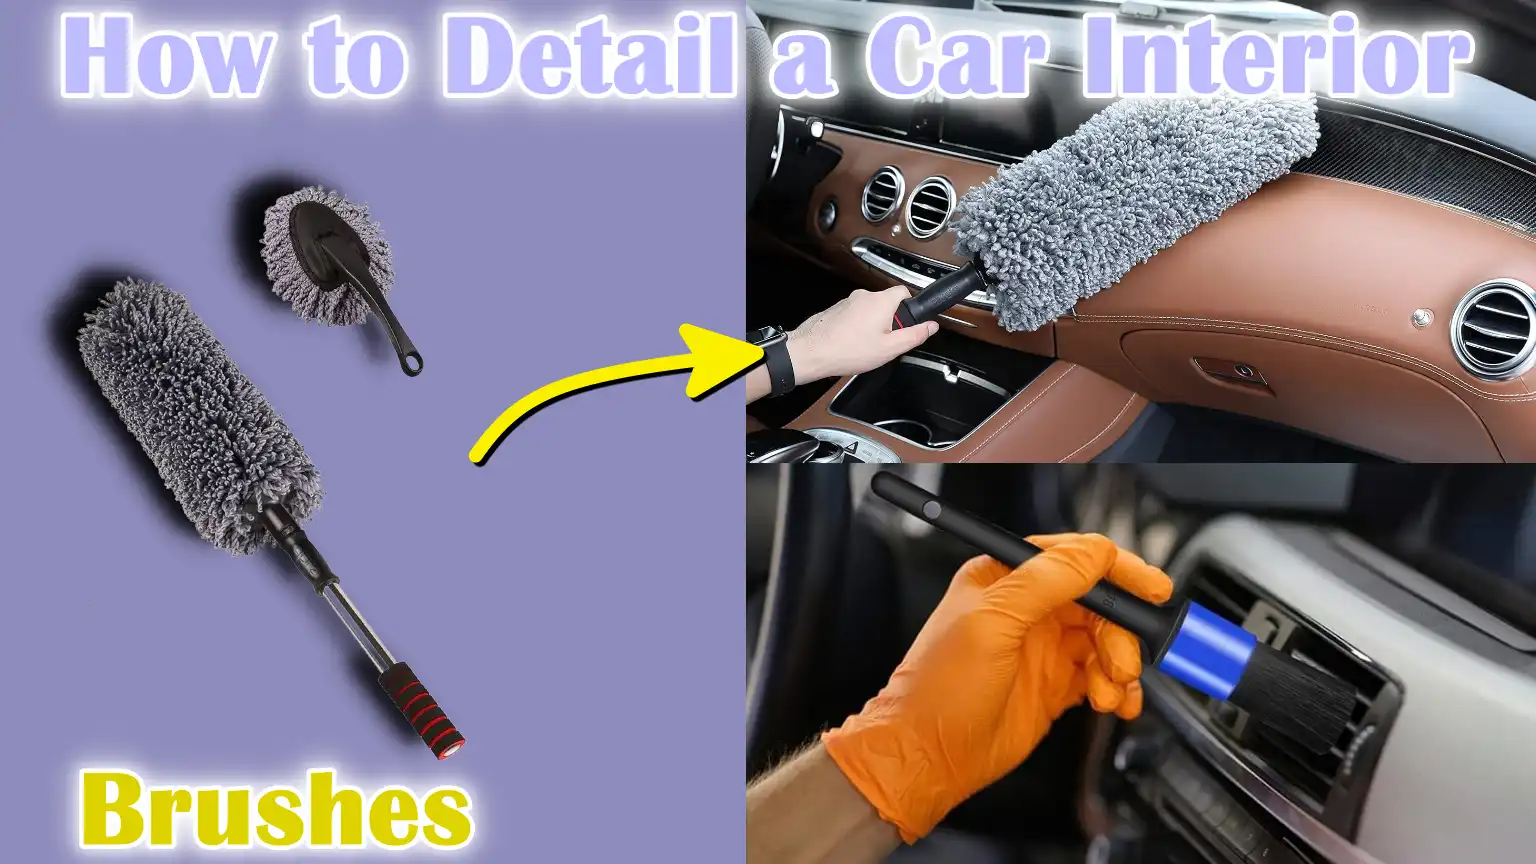
To remove dust from vents or clean seams, use a soft-bristled brush or special detailing brush that is gentle on delicate materials.
If your car has cloth seats or fabric carpets, you may need an upholstery shampoo or steam cleaner to deep clean and remove odors or stains.
For leather seats or trim, use a leather conditioner followed by a leather cleaner to keep the fabric soft and prevent cracking.
Be sure to use glass cleaner for your windows and mirrors—make sure it’s ammonia-free so it won’t harm the window tint.
Finally, an odor remover or fabric deodorizer can help remove any lingering food, pet, or smoke odors, leaving your car feeling fresh.
Now, Take the Initial Cleaning and Vacuuming
Before deep cleaning the surfaces inside your car, it’s important to vacuum thoroughly.
This step removes loose dirt, dust, hair and debris that have accumulated over time.
Starting with vacuuming also allows you to avoid rubbing this dirt onto surfaces during subsequent cleanings, which can scratch the material or make stains worse.
1. Remove Floor Mats and Shake Them Out
Start by removing all floor mats from the front and rear of the vehicle.
Most mats accumulate a large amount of dirt, dust, dried mud, food crumbs and other debris from daily use.
Shaking them out removes loose dirt that your vacuum can’t easily reach.
If the mats are rubber or plastic, you can rinse them with water later, but shaking them out is a quick first step that shouldn’t be skipped.
2. Vacuum the Seats, Including Crevices
Next, vacuum the seats thoroughly.
If your seats are cloth, vacuuming removes dust, lint and even allergens from the surface and inside the fibers.
If your seats are leather or vinyl, vacuuming removes dust and particles that can cause scratches when you wipe them down later.
Pay special attention to the spaces between the seats and backrests, where food, wrappers and other small items often fall and hide.
These crevices can be cleaned more effectively with a crevice tool or narrow vacuum attachment.
3. Vacuum the carpets
Vacuuming carpets is important because they hold a lot of dirt and dust that can affect the air quality inside the car.
Carpets also absorb moisture, which can lead to mold and odors if not cleaned regularly.
Move the front seats back and forth so you can reach the entire floor, including the area underneath the seats and around the foot pedals.
A clean carpet makes the whole car feel fresh and clean.
4. Vacuum the floor mats
After shaking them out, vacuum the floor mats thoroughly.
Car mats are usually the first to get dirty, specially in rainy or dusty weather.
Vacuuming them before washing helps remove sand and dirt that can scratch them when scrubbed or washed with water.
Whether carpet or rubber, the right vacuum cleaner gets them ready for a deep cleaning.
5. Vacuum the door pockets, dashboard and console areas
Door pockets often collect wrappers, coins, receipts and dirt.
Vacuuming them removes all the dirt and makes the next step of wiping them down easier.
Vacuum the dashboard, gear shifter and center console areas as well.
These areas tend to collect dust, crumbs and hair.
Using a soft brush can protect delicate surfaces from scratches and also remove fine dust from tight corners and around buttons or dials.
6. Vacuum the trunk (optional but recommended)
Although it might not be the first place you think of, the trunk should be vacuumed as well.
It collects dust, leaves, pet hair and dirt from the things you store or carry in it.
If you use your trunk often or have pets, it’s a good idea to include this in your cleaning routine.
A clean trunk not only looks nice, but it also keeps the things inside cleaner and less smelly.
Cleaning Interior Surfaces
After removing loose dirt and debris with a vacuum, the next important step is to clean all hard interior surfaces inside the car.
These include the dashboard, center console, door panels, armrests, cupholders and storage compartments.
These areas are constantly touched, making them more likely to accumulate bacteria, dust, oil and grime.
According to cleaning studies done by microbiologists, high-touch surfaces like the dashboard and gearshift can harbor hundreds of bacteria per square inch if not cleaned regularly.
Proper cleaning of these surfaces not only improves the appearance, but also protects your health and keeps the interior contents safe.
1. Dashboard and Center Console
Start by cleaning the dashboard and center console area, as these are often the first parts you see when entering the car.
Use a clean microfiber cloth with a suitable interior cleaner designed for automotive use.
Microfibre cloths are ideal as they absorb dirt without scratching surfaces and do not leave lint.
Spray the cleaner onto the cloth rather than directly onto surfaces to avoid overspraying screens or sensitive parts.
Pay special attention to buttons, knobs, air vents and touchscreens.
These areas tend to collect dust, body oils and germs from frequent use.
A small detailing brush or cotton swab can be used to reach tight spaces between buttons and air vent fins.
If your car has a touchscreen or infotainment display, use a screen-safe cleaner and wipe gently to avoid damaging the surface.
2. Door panels and armrests
Door panels and armrests are often overlooked, but they can collect dirt from hands, elbows and even outside dust when you open the door.
Spray the cleaner onto your microfiber cloth rather than directly onto the surface to avoid getting the cleaner on electronic parts, such as window switches or door lock buttons.
Wipe down door handles, window controls, trim pieces and armrests thoroughly.
If the surface has leather or a soft-touch material, make sure the cleaner is safe for that material.
This preserves color and prevents discoloration or cracking over time.
3. Cup holders and compartments
Cum holders and small storage areas, such as center console bins and the glove compartment, tend to collect sticky substances, crumbs and small debris.
If your cup holders have removable rubber inserts or liners, clean them separately with soap and water.
Use a soft brush and mild cleaner to scrub away sticky residue or dried liquid spills.
Dry the area completely before putting anything back in.
Compartments such as the center console or glove box should also be emptied and wiped down, specially if food, receipts or pens have been stored there.
Cleaning these areas helps prevent bacteria from building up and removes potential odor sources that can affect the entire cabin.
Read More:
5. Cleaning the seats
Cleaning car seats is one of the most important aspects of interior design.
Seats are in constant contact with your body, clothing and sometimes food and drinks, which can lead to the accumulation of dirt, sweat, oils, stains and even bacteria.
According to automotive hygiene studies, car seats—specially cloth ones—can accumulate allergens, dust mites and odor-causing particles that affect indoor air quality.
Whether your seats are cloth or leather, regular and proper cleaning not only improves comfort and hygiene, but also helps extend the life of the fabric.
1. Cloth seats
Cloth seats are more absorbent than leather or vinyl, making them more prone to stains and odor accumulation.
Start by spraying a high-quality upholstery cleaner directly onto the fabric.
Choose a product that is safe for automotive use and is not too harsh, as harsh chemicals can fade or weaken the fabric.
Use a soft-bristled brush to gently scrub the surface, working in small sections.
This helps to loosen dirt and remove stains deep in the fibers.
After scrubbing, wipe the area with a clean microfiber towel to absorb loosened dirt and excess moisture.
Repeat this process for more deep-seated stains if needed.
For deeper cleaning or stubborn odors, using a steam cleaner can be very effective.
Steam not only helps remove deep-set dirt, but also disinfects the fabric without using harsh chemicals.
Keep the windows open or a fan on to allow the seats to dry completely, as damp seats can cause mold or mildew.
2. Leather seats
Leather seats require a different approach because leather is a natural material that can crack, dry out or discolor if not properly cared for.
First, wipe the surface with a clean microfiber cloth and a leather-safe cleaner.
Avoid using household cleaners, as these can strip the leather of its protective layer.
After cleaning, gently scrub seams, stitching and textured areas, where dirt often hides, with a soft detailing brush.
Once the surface is clean, apply a leather conditioner to restore moisture and keep the leather soft and supple.
Conditioning also protects the leather from damage caused by UV rays and wear over time.
For best results, let the conditioner sit for a few minutes and then lightly polish the surface with a dry microfiber cloth.
Regular care of leather helps maintain its beauty, prevent cracks and extend the life of the seats.
Read More:
Carpets and Floor Mats
Your car’s carpets and floor mats are the most vulnerable as they are constantly exposed to dirt, mud, dust, food and drink, water and even road salt.
Over time, these things not only make the car look dirty, but also cause bad odors and poor air quality inside the cabin.
According to environmental hygiene reports, if car carpets remain dirty for a long time, they can accumulate allergens, bacteria and mold spores.
So deep cleaning carpets and mats is not just for looks—it’s also important for the health and long-term care of the vehicle.
1. Vacuum thoroughly
Start by thoroughly vacuuming the entire carpeted area and floor mats.
This includes the front, back, under the seats and around the edges where dirt can accumulate in corners.
Use a vacuum cleaner with a crevice tool or brush attachment to remove embedded particles.
Removing all loose debris first makes the next cleaning steps more effective and prevents the mud from turning into a paste when wet.
2. Shampoo or use a steam cleaner
After vacuuming, use a carpet cleaner made for cars to remove stains and freshen the fabric.
Spray the cleaner on the carpet and leave it for a few minutes so it can loosen dirt trapped in the fibers.
For a deeper cleaning, a steam cleaner can be used.
Steam cleaning not only removes visible dirt, but also eliminates bacteria and odors using heat and moisture without relying heavily on chemicals.
A steam cleaner is specially helpful if you have children or pets who often travel in the car.
3. Brush and remove dirt
Use a stiff-bristled brush to scrub carpets and mats in a circular motion.
This helps remove stains and dry substances such as mud or food spills.
After scrubbing, use a wet-dry vacuum or carpet extractor to remove moisture and loose dirt.
Removing dirty water prevents mold and speeds drying.
4. Let mats and carpets dry completely before replacing them.
One of the most important steps is to let the mats dry completely before putting them back in the car or driving them.
Wet carpets can cause mold, odors and damage the padding underneath.
Keep doors open or turn on fans to speed up the drying process.
If the floor mats are removable, let them dry outside in a clean, shady area.
When everything is completely dry, put the mats back on and enjoy a fresh, clean interior.
Interior Mirrors and Mirrors
Cleaning your car’s interior mirrors and mirrors is an important part of your car’s interior design that directly affects your visibility, safety and the overall appearance of the cabin.
Dust, fingerprints, smudges, smoke residue and even oils from your skin can accumulate on the inside of windows and mirrors.
According to automotive safety research, a dirty windshield can reduce visibility by up to 20 percent, specially when driving at night or when sunlight hits the glass at an angle.
So proper cleaning of these surfaces is not only an aesthetic consideration but also a safety measure.
1. Use an ammonia-free glass cleaner
It’s important to use a glass cleaner that does not contain ammonia.
Ammonia-based cleaners can damage colored windows and leave a strong odor that lingers in the car.
They can also cause eye and skin irritation when used in small, confined spaces like the vehicle’s interior.
Ammonia-free cleaners are made specifically for automotive glass and are safe for all types of windows, including factory or aftermarket tinted windows.
These cleaners also evaporate quickly, helping to prevent stains and residue.
2. Wipe in vertical and then horizontal strokes to avoid stains.
When cleaning any glass surface, the technique you use is just as important as the cleaner.
Spray the product onto a clean microfiber cloth rather than directly onto the glass to avoid overspraying your dashboard or trim.
Start by wiping the glass in vertical strokes from top to bottom.
Then switch to horizontal strokes from side to side.
This method helps reduce stains and ensures that all areas are covered evenly.
Microfiber cloths are recommended because they are gentle, don’t leave lint behind and won’t scratch the surface.
3. Clean all windows, including the windshield and rear window.
Don’t forget to clean every window inside the car, including the front windshield, rear window, side windows and all small glass panels.
The windshield and rear window are specially important because they are essential for forward and rearward visibility.
Due to air conditioning, humidity and even gases emitted from interior materials, the front windshield can become cloudy over time, causing glare and eye strain.
Carefully reach the corners and edges of the glass where dirt often hides.
If your car has a sunroof or interior mirrors, clean them as well to complete this process.
Clean, streak-free glass improves driving safety and gives your car a polished, professional look.
Air vents and tight spaces
Air vents and small, hard-to-reach spaces inside your car often collect dust and dirt, yet they play a vital role in maintaining a clean and healthy cabin environment.
Over time, vents can accumulate dust, pollen, pet hair and even mold spores.
According to automotive air quality studies, dirty air vents can reduce airflow efficiency and cause unpleasant odors when the air conditioning or heater is on.
So cleaning these spaces is important not just for looks, but also for the quality of air you and your passengers breathe.
1. Use a detailing brush or compressed air
To properly clean air vents, you need tools that can reach tight edges and delicate corners without damaging them.
A soft detailing brush is ideal because it can remove fine dust and dirt from inside the vent without scratching the surface.
The brush’s bristles may be flexible to reach plastic fins and edges.
Alternatively, compressed air can be used to blow out loose dust and debris trapped inside ducting.
This is particularly useful in cars that haven’t been cleaned for a long time or that are driven in dusty environments.
Always use compressed air for short, controlled bursts to prevent dust from being blown back into the cabin or previously cleaned areas.
2. Clean with a small foam swab or soft brush
For tight spaces between buttons, switches, seams and interior panels, small foam swabs or soft brushes work great.
These tools allow you to clean without leaving scratches or marks.
Foam swabs can reach tight spaces, such as the space between the dashboard and windshield or around the edges of touchscreens and trim.
Soft brushes are also great for dusting around speaker grilles, seat rails and interior crevices that are beyond the reach of a vacuum cleaner.
Cleaning these hidden parts helps remove bacteria, allergens and dirt that can slowly spread throughout your interior if left unattended.
It also puts the finishing touches on your detailing job, leaving the entire car looking clean and spotless.
Removing Odors
Removing odors from your car is an important part of interior decoration because odors not only ruin the driving experience, but can also be a sign of hidden bacteria, mold or moisture problems.
Odors from food, pets, smoke, mold or spills can seep into soft surfaces such as carpet, seats, headliner and seatbelts.
According to Environmental Hygiene Research, if the fabric and foam of a vehicle’s interior are not properly treated, they can retain odor-causing particles for weeks or months.
Regular vacuuming and surface cleaning help, but they may not be enough to remove deep odors, so removing odors is a must for a fresh interior.
1. Use a fabric-safe deodorizer or spray deodorizer
The first step to dealing with odors is to use a fabric-safe deodorizer spray or deodorizer specifically designed for automotive use.
These products are designed to neutralize odors, not just mask them with scent.
Spray the deodorizer lightly on cloth seats, carpets, floor mats and headliners.
Make sure the product reaches places where odors are likely to be trapped, such as footwells or between seat cushions.
Always allow surfaces to dry completely after spraying to avoid trapping moisture, which can lead to mold.
2. Options: Use an ozone generator or cabin air bomb
For vehicles with persistent or strong odors, intensive treatment may be needed.
One highly effective method is to use an ozone generator.
Ozone is a gas that can destroy odor-causing molecules, bacteria and mold spores by breaking them down at a chemical level.
Professional detailers often use ozone treatments for smoke-damaged or flood-affected cars.
Another option is a cabin air bomb, also called a fogger, which releases a deodorizing mist throughout the interior.
These products work by traveling through the car’s ventilation system to reach hidden areas such as ducts and air vents.
Although effective, these methods must be used with caution and usually require the vehicle to be empty and sealed during treatment.
3. Replace the cabin air filter when needed
An often overlooked but important step in odor removal is to check and replace the cabin air filter.
This filter is responsible for cleaning the air that is drawn into the passenger area through the HVAC system.
Over time, it can become clogged with dirt, dust, pollen and moisture, causing a foul odor every time you turn on the fan.
If the filter is dirty or smells of mold, replacing it with a new one can immediately improve air quality and prevent future odors.
Most car manufacturers recommend changing the cabin air filter every 12,000 to 15,000 miles, but dusty or humid environments may require replacement sooner.
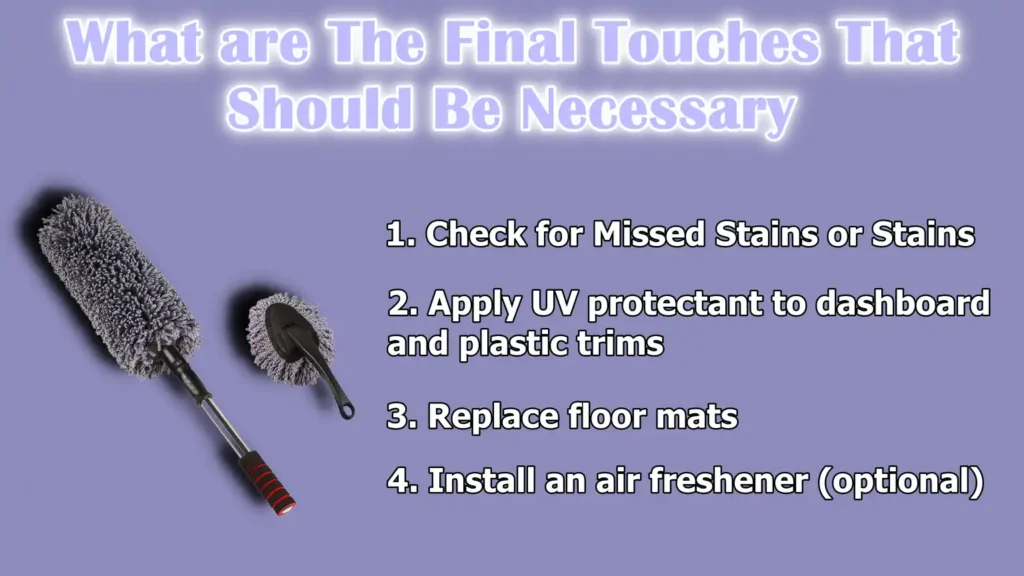
What are The Final Touches That Should Be Necessary
After you’ve cleaned every major part of the car’s interior, it’s important to do some final touches.
These small but important steps help solidify your work, protect the interior’s materials and give the cabin a refined look.
Skipping this step can reduce the long-term effectiveness of your detailing job and allow dirt, sun damage, or odors to return quickly.
Final touches also give you a chance to inspect your work and fix anything you may have missed.
1. Check for Missed Stains or Stains
Start by slowly walking around the car and checking all surfaces in good light.
Pay attention to places you may have missed, such as fingerprints on the screen, dust in the cup holders, or stains on the windows.
Use a clean microfiber cloth to wipe away any remaining marks.
Some places, such as the glossy plastic trim or infotainment screen, may show streaks after drying.
Double-checking these areas and lightly polishing them ensures that the interior looks refined and professional.
Even a small stain that goes unnoticed can diminish the fresh, clean feeling you’ve worked so hard to achieve.
2. Apply UV protectant to dashboard and plastic trims
After cleaning surfaces, it’s a good idea to apply a UV protectant to plastic, vinyl and rubber parts, such as the dashboard, door panels and console.
These materials are constantly exposed to sunlight from the windshield and side windows.
Over time, ultraviolet rays can cause them to become faded, cracked, or brittle.
A good UV protectant helps block harmful rays, preserves the original color and leaves a smooth, satin-like finish.
Some protectants are also anti-static, helping to repel dust and keep surfaces cleaner for longer.
Apply the protectant with a clean applicator or cloth and allow it to dry before touching the surface again.
3. Replace floor mats
After the carpet and mats are completely dry, place the floor mats back in their proper place.
Make sure they are aligned and secured using any built-in clips or anchors so they don’t slide around while driving.
Properly installed mats not only make the interior look neat, but also protect the carpet from future wear, moisture and dirt.
If you used sturdy rubber mats, double-check that they fit correctly and don’t interfere with pedal or seat movement.
4. Install an air freshener (optional)
As a final step, you can install an air freshener to give your car a pleasant scent.
This is completely optional, but it can add a sense of freshness and cleanliness to your new spacious cabin.
Choose a lightly scented air freshener of your choice and place it where it won’t obstruct air flow or visibility.
Just be careful not to use too strong or too harsh products, as these can cause headaches or discomfort in closed spaces.
A mild fragrance is usually enough to create a pleasant atmosphere without overwhelming the senses.
What are The Basic Maintenance Tips
After you’ve thoroughly cleaned your car’s interior, keeping it clean is much easier if you follow a few smart maintenance habits.
A well-maintained interior not only looks better, but also lasts longer, smells fresher and promotes better health by preventing the buildup of dirt, allergens and bacteria.
According to studies on vehicle hygiene, small everyday habits can have a big impact on how quickly a car gets dirty again.
By taking preventive steps, you can increase the results of your hard work and reduce the need for frequent deep cleanings.
1. Use Seat Covers and Floor Mats
Installing seat covers and high-quality floor mats is one of the most effective ways to protect your car’s interior.
Seat covers help protect fabric or leather seats from spills, body oils, pet hair and sun damage.
They’re specially helpful if you have kids or pets, or you regularly carry tools or equipment.
Floor mats prevent mud, sand and water from reaching carpets.
All-weather rubber mats are ideal for wet or muddy weather, while carpet mats provide a softer look for dry weather.
Both types of mats are easier to remove and clean than factory-installed carpet, protecting the vehicle’s original materials and resale value.
2. Avoid eating inside the car
One of the easiest and most effective habits to reduce clutter inside the car is to not keep food and drinks in the car.
Eating in the car can lead to crumbs, grease stains, wrappers and accidental spills, which attract insects and cause unpleasant odors.
According to hygiene surveys, food and drink spills are the leading cause of bad odors in cars.
By keeping snacks and food out of the car, you can avoid the most common source of dirt accumulation inside the car and reduce the chances of long-term stains or damage.
3. Keep a small dustbin and wipes
Keeping a small dustbin or disposable bag in your car is a great way to manage trash before it piles up.
You can easily throw away tissue paper, receipts, snack wrappers or disposable masks instead of letting them accumulate in door pockets or on the floor.
Keeping a pack of cleaning wipes or microfibre cloths in the glove box or centre console makes cleaning up even minor messes quicker.
Cleaning up spills or fingerprints immediately prevents them from becoming permanent stains or sticky spots, specially on plastic trim or upholstery.
4. Do light cleaning every week to extend deep cleaning intervals
Doing light cleaning every week can make a big difference in keeping your interior looking brand new.
This can include vacuuming loose dirt, wiping down high-touch surfaces like the steering wheel and dashboard and removing trash.
Regular light maintenance takes just a few minutes, but it prevents dirt and dust from building up to the point where a vigorous cleaning is needed.
It also helps keep bacteria and allergens under control.
Studies show that cars that are cleaned once a week have better air quality and fewer odor problems than cars that are cleaned only occasionally.
By taking a few minutes each week you can save hours of effort later and maintain the clean, detailed look you’ve worked hard to achieve.
Conclusion – How to Detail a Car Interior
So, the point is to have the shiny interior so that it won’t feels like a dustbin anyway possible: and it is more like a smart way to maintain the value, comfort and hygiene of your vehicle.
Not only this, research has actually shown that everyday car surfaces such as: The Steering Wheel, Gear Shift, Seat Belts and Door Handles can actually has the big amount of bacteria on them and not kidding they sometimes more than public toilet seats as well, which is why cleaning these high-touch spots with an interior-safe disinfectant isn’t just to make the appearance bright but it literally helps to reduce the germs that you possibly touches every time you drive your lovely car.[¹]
Properly done interior detailing removes grime, dust, allergens, food particles and bacteria that can accumulate over time in hidden places like seat crevices, floor mats and air vents.
According to studies by the National Center for Biotechnology Information (NCBI), vehicle interiors can contain as many bacteria as public toilets, specially if not cleaned regularly.
Interior cleaning not only improves the appearance, but also promotes better air quality and a healthier environment for you and your passengers.
With regular care, such as weekly mopping, use of protective accessories like seat covers and floor mats and timely odor control, your car can look like new for years.
So, it is time to checkout your unsolved queries and you can ask them on the comment section easily.
Frequently Asked Questions
Q1. How much does car interior detailing cost?
Answer: The cost of car interior detailing depends on several factors, such as the size of the vehicle, how dirty the interior is, where you live and whether you go to a professional detailer or a mobile service. On average, a basic interior detailing service usually costs between 1,500 and 3,500 Indian Rupees or about 30 to 75 US dollars. This basic package usually includes vacuuming, wiping surfaces, cleaning the dashboard and cleaning the inside windows. If your car is larger like an SUV or the interior is very dirty with stains, pet hair, or odors, the cost can be higher. A deep cleaning service, which includes shampooing the carpets, steam cleaning the seats, treating the leather and odor removal, can cost 5,000 to 7,000 Indian Rupees or even more at premium service centers. Some detailers also offer additional services, such as ozone treatment to remove odors, changing cabin air filters, or applying special fabric protectants, which can increase the final price. Mobile detailing services may also charge a little more because they come to your home or office for convenience. If you decide to detail your car yourself, you can save money, but you will need to purchase cleaning products and equipment and invest some time yourself. Overall, although prices can vary depending on location and services chosen, interior detailing is usually affordable and worth the investment to keep your car looking clean, fresh and well-maintained.
References:
[1] Stephenson RE, Gutierrez D, Peters C, Nichols M, Boles BR. Elucidation of bacteria found in car interiors and strategies to reduce the presence of potential pathogens.
https://pmc.ncbi.nlm.nih.gov/articles/PMC3962071/

Guys, I’m a car audio enthusiast and customization expert and I love clear sound and clean installation. Plus, I have spent years helping people build their dream audio setups. And whenever I’m working on cars, I probably listen to music and thinks about the next big upgrade.