Written By: Don Dodi
Fact Checked By: Kristen Brown
Reviewed By: Diego Rosenberg
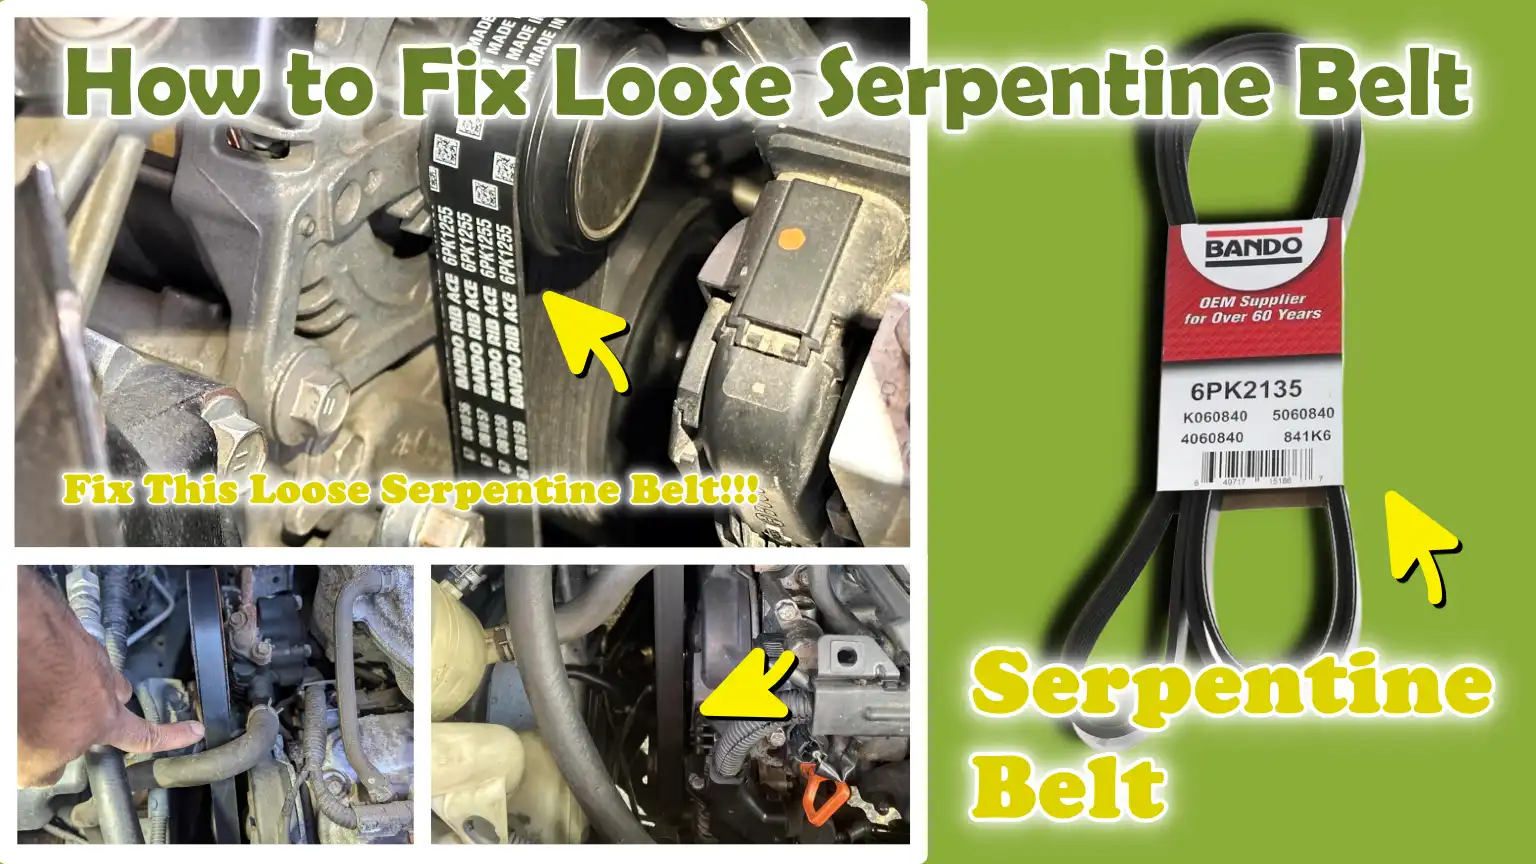
Even most of the drivers never ever think about the tightness of serpentine belt, until a small squeal turns into a serious problem later on.
So, this single belt quietly powers some of the most critical systems in your car that includes the alternator that literally charges your battery, also the water pump that keeps your engine cool in hot temperature out there and the power steering pump that literally to ensure effortless driving.
Also, there’s studies in the automotive maintenance that shows that a worn out or loose belt is one of the most common cause of having unexpected roadside breakdowns, specially in vehicles with the higher mileage.
So, the problem is not just about that annoying noise: there’s even efficiency can be lost, overheating risk and even it could lead to complete engine shutdown if you ignore it for long.
But, you can learn How to Fix Loose Serpentine Belt, so that you can avoid costly repairs and dangerous driving situations ahead.
Now, Let’s Understand About the Serpentine Belt System
The serpentine belt system is one of the most critical, yet often overlooked, components of modern vehicles.
It is designed to transmit power from the engine’s crankshaft to various essential components, ensuring that the vehicle operates smoothly and without interruption.
In older vehicles, multiple belts were used for different components; however, modern vehicles rely on a single, continuous belt.
This design enhances efficiency, reduces weight and simplifies maintenance.
Because so many vital systems depend on this single belt, even a minor issue such as: a loose belt, as it can simultaneously compromise the functionality of multiple operations.
Understanding how this system works helps drivers identify potential problems early, prevent vehicle breakdowns and keep the engine in optimal condition.
1. What is a Serpentine Belt?
A serpentine belt is a long, flexible and durable rubber belt featuring a series of grooves running along its entire length.
It is engineered to grip pulleys effectively and transmit mechanical energy efficiently.
Its primary function is to connect the engine’s crankshaft to various accessories, enabling them to utilize the engine’s rotational power to perform their respective tasks.
Typically, this belt drives specific components such as the alternator (which charges the battery and powers the electrical system), the power steering pump (which makes steering easier and more comfortable), the air conditioning compressor (which keeps the cabin cool) and, in many vehicles, the water pump (which regulates the engine’s temperature).
By managing multiple tasks simultaneously, the serpentine belt plays a crucial role in ensuring that both performance-related and comfort-related systems within the vehicle function correctly.
2. How Does the Serpentine Belt Work?
The serpentine belt operates by continuously looping around a series of pulleys connected to various components of the engine.
The primary rotational power driving this system is derived from the crankshaft pulley; as the engine runs, this pulley rotates and, in turn, drives the belt.
As the belt travels along its path, it rotates other pulleys such as: those connected to the alternator and compressor, thereby enabling these components to function without requiring a separate power source.
A vital element of this system is the belt tensioner.
Typically spring-loaded, it automatically maintains the precise amount of tension within the belt.
This ensures that the belt remains sufficiently taut to prevent slippage, yet not so tight that it suffers from premature wear or damage.
The uninterrupted and continuous rotation of the belt facilitates the efficient distribution of power, ensuring that all connected components receive the necessary energy exactly when they require it.
3. The Importance of Correct Belt Tension
Maintaining the correct belt tension is paramount for the proper and reliable operation of the entire system.
If the belt is too loose, it may slip on the pulleys; this reduces the power transmitted to critical components and can lead to issues such as dimming lights, improper battery charging, engine overheating, or difficulties with the steering system.
Conversely, if the belt is excessively tight, it places undue strain on the bearings and pulleys, accelerating their wear and increasing the risk of mechanical failure.
Proper tension ensures that the belt maintains a firm grip on the pulley, allowing the engine to run smoothly and maintaining consistent performance.
Maintaining the correct belt tension not only enhances the engine’s operational efficiency but also extends the lifespan of the belt and its associated components.
In this way, you can avoid sudden breakdowns and costly repairs.
Know, Signs of a Loose Serpentine Belt

A loose serpentine belt often provides clear warning signs before causing serious problems; yet, many drivers overlook these early symptoms.
Because this single belt powers several critical systems, even a slight looseness can simultaneously impact engine performance, electrical supply, cooling and steering.
These signs typically manifest gradually; initially, there may be faint noises or minor changes in performance, which become more pronounced over time.
Understanding these symptoms in simple terms allows you to take immediate action before the issue escalates into a major breakdown or necessitates costly repairs.
1. Squealing or Chirping Sounds
One of the earliest and most common signs of a loose serpentine belt is a loud squealing or chirping sound emanating from the engine compartment.
This noise occurs when the belt begins to slip over the pulleys rather than maintaining a firm grip on them.
This sound is often most audible when starting the engine, as the belt must suddenly transition from a stationary state to high speed, thereby increasing the likelihood of slippage.
This noise may also occur when you accelerate the vehicle, as the engine demands greater power and places additional strain on the belt.
In wet or humid weather, this sound often intensifies, as moisture reduces friction, making it even easier for a loose belt to slip.
This sound is not merely a nuisance; it is a clear indication that the belt tension is incorrect and requires immediate attention.
2. Visible Looseness or Belt Misalignment
A loose serpentine belt can present clear visual cues that you can identify through a simple inspection.
With the engine turned off, you can inspect the belt to determine whether it is loose, uneven, or properly seated on the pulleys.
A properly tensioned belt should feel taut and exhibit minimal deflection when pressed lightly.
If the belt appears wavy, loose, or even slightly misaligned, it may indicate a loss of belt tension or a pulley that has shifted out of place.
In some instances, the belt may fail to seat correctly on all pulleys, leading to uneven wear and a reduction in its operational efficiency.
Regular visual inspection is the simplest method for identifying this issue in its early stages, thereby preventing further damage.
3. Electrical Issues
As the serpentine belt drives the alternator, any looseness in the belt can have a direct impact on your vehicle’s electrical system.
When the belt slips, the alternator is unable to rotate at the necessary speed, preventing the battery from charging properly.
This can result in dimming headlights, sluggish power windows, or difficulty starting the engine.
In many vehicles, a battery warning light may illuminate on the dashboard, signaling that the charging system is not functioning correctly.
These electrical issues may initially occur intermittently, particularly when accelerating or operating multiple electrical accessories simultaneously, but as the condition of the belt deteriorates, these problems often become persistent.
4. Engine Overheating
In many vehicles, the serpentine belt also drives the water pump, which circulates coolant through the engine to maintain the engine temperature at a safe operating level.
If the belt is loose, the water pump will be unable to function properly; this reduces the flow of coolant, causing the engine to heat up faster than usual.
Consequently, the temperature gauge on the dashboard may rise and if left unaddressed, the engine could overheat.
Engine overheating is a serious issue that can damage critical engine components, such as the cylinder head or gaskets; therefore, it is imperative to immediately rectify any belt-related issues as soon as these warning signs appear.
5. Power Steering Malfunction
A loose serpentine belt can also adversely affect the power steering system, making the vehicle difficult to control.
This belt drives the power steering pump, which generates the hydraulic pressure necessary for smooth, effortless steering.
When the belt slips, the pump fails to generate the required pressure, causing the steering wheel to feel stiff or heavy.
This issue is particularly noticeable at low speeds or while parking, when turning the steering wheel requires greater physical effort.
Steering difficulties not only compromise driving comfort but can also jeopardize safety; therefore, it is crucial to resolve this problem immediately to regain proper control over the vehicle.
Know, Common Causes of a Loose Serpentine Belt
A serpentine belt does not become loose without a reason; therefore, understanding its root cause is crucial for properly resolving the issue.
In most cases, this problem arises due to gradual wear and tear, poor maintenance, or malfunctions in associated components such as the tensioner or pulleys.
As this belt operates under constant motion, heat and pressure, even a slight change in its condition can impact its tension and the efficiency with which it transfers power.
Identifying the root cause helps prevent recurring problems and ensures that the entire system continues to operate reliably over the long term.
1. Worn or Stretched Belt
One of the most common causes of a loose serpentine belt is the natural wear and stretching that occurs over time.
Although the belt is constructed from rubber and reinforced fibers, constant exposure to heat, friction and engine vibrations gradually diminishes its structural integrity.
As the belt ages, it may lose its original shape and elasticity, resulting in a slight elongation.
Even a minor amount of stretching can reduce the belt’s tension and cause it to slip.
In many vehicles, the belt is designed to last between 60,000 and 100,000 kilometers, although this lifespan can vary depending on driving conditions and maintenance practices.
A worn belt may exhibit visible cracks, a glazed surface, or frayed edges, all of which compromise its ability to maintain a proper grip on the pulleys.
2. Faulty Belt Tensioner
The belt tensioner plays a critical role in maintaining the correct tension (tightness) of the serpentine belt; If this component fails, the belt can quickly become loose.
Most modern vehicles are equipped with an automatic tensioner featuring a spring mechanism that continuously exerts pressure to keep the belt taut.
Over time, this spring may weaken or lose its tensioning force, particularly due to exposure to heat and constant use.
In some instances, the tensioner pulley itself may wear out or its bearings may fail, preventing it from rotating freely.
When the tensioner fails to maintain adequate pressure, the belt’s grip loosens and it begins to slip, even if the belt itself is in good condition.
3. Misaligned or Damaged Pulleys
Pulleys guide the serpentine belt and ensure that it runs smoothly across the various components of the engine.
If a pulley becomes misaligned, bent, or damaged, it can adversely affect how the belt seats and tracks upon it.
A misaligned pulley can cause the belt to deviate slightly from its intended path, thereby reducing the contact area between the belt and the pulley surface, resulting in a loose or unevenly tensioned belt.
A damaged pulley may also feature worn grooves or a rough surface, which hinders the establishment of proper grip.
In some cases, failing pulley bearings can induce vibrations in the belt, further compromising its alignment and increasing the risk of slipping or premature wear.
4. Oil or Coolant Contamination on the Belt
Fluid leaks are another common cause of a loose or slipping serpentine belt.
When oil, coolant, or other fluids come into contact with the belt, they reduce the friction between the belt and the pulleys.
This makes it difficult for the belt to maintain a firm grip, even if its tension is set correctly.
Over time, exposure to these fluids can also degrade the rubber material, causing the belt to soften and become less effective.
Leaks may originate from adjacent components such as the engine, radiator, or hoses; if not addressed immediately, even a small amount of fluid can lead to serious belt slippage issues.
5. Improper Installation
Improper installation is a preventable cause of serpentine belt looseness, yet it is often overlooked.
If the belt is not routed correctly around the pulleys, or if its tension is not properly adjusted during installation, the belt may become loose, either immediately or gradually over time.
In vehicles equipped with manual tensioners, incorrect tightening can result in the belt being either too loose or excessively tight, both of which lead to operational difficulties.
Even in systems utilizing automatic tensioners, failing to properly seat the belt within the pulley grooves can compromise its alignment and reduce its tension.
Proper installation, specifically, utilizing the correct routing diagrams and tools, is crucial to ensure that the belt functions correctly and to avoid unnecessary complications.
Tools
| Item | Details |
|---|---|
| Socket wrench set | Used to easily loosen and tighten bolts. It helps you access various parts of the engine. Available in different sizes to ensure a proper fit. |
| Serpentine belt tool or breaker bar | Helps safely relieve tension in the belt. Assists in applying the extra force needed to maneuver tight components. Makes removing and installing the belt easier. |
| Torque wrench | Used to tighten bolts with the precise amount of pressure. Prevents overtightening and damage. Ensures a safe and accurate installation. |
| New serpentine belt | Replaces old or worn-out belts. Restores proper grip and smooth operation. Essential for long-lasting performance. |
| Belt tensioner | Keeps the belt taut at all times. It is replaced if the spring becomes weak or damaged. Helps prevent the belt from slipping. |
| Idler pulley | Supports and guides the movement of the belt. Keeps the belt correctly aligned on its track. Should be replaced if it becomes noisy or shows signs of wear. |
| Gloves | Protects hands from dirt and sharp edges. Provides a better grip while working. Reduces the risk of injury. |
| Safety glasses | Protects the eyes from dust and debris. Crucial when working in close proximity to engine components. Keeps the eyes safe during repair work. |
How to Ensure Safety Before Starting Work
Before working on a serpentine belt, safety must always be your top priority, as you are working with an active engine system that involves heat, moving parts and electrical components.
If basic precautions are overlooked, even a minor repair can become dangerous.
Taking a few minutes to prepare properly can prevent injuries, protect your vehicle from damage and make the repair process much easier and more manageable.
These precautions are simple to adopt, yet they are absolutely essential for everyone, whether a novice learner or an experienced mechanic.
1. Turn Off the Engine and Let It Cool Down
Before beginning any work, the engine must always be completely shut off, as a running engine keeps the serpentine belt and pulleys in constant motion, components that can cause serious injury if touched.
Furthermore, the engine generates a significant amount of heat while running and many components surrounding the belt system can become extremely hot.
Touching these parts too soon poses a risk of burns.
It is best to wait at least 20 to 30 minutes after turning off the engine to allow it to cool down to a safe temperature; this ensures that you can work comfortably and safely.
2. Disconnect the Battery
Disconnecting the battery is a crucial safety step that is often overlooked.
The battery powers the vehicle’s electrical system; leaving it connected while working can accidentally trigger the engine or cause an electrical short circuit.
By disconnecting the negative terminal of the battery, you minimize the risk of sudden movement in engine components and prevent electrical hazards.
This step is particularly crucial when you are working near the alternator or other belt-driven components that are connected to the electrical system.
3. Keep Your Hands Away from Moving Parts
Even if the engine is turned off, it remains absolutely essential to exercise caution around moving components and rotating parts.
If the engine were to accidentally start or if parts were to shift suddenly, your hands could get trapped in the tight spaces between belts and pulleys.
These components are designed to operate with immense force and even momentary contact with them can result in serious injury.
Always keep your hands clear of the belt’s path and only touch components when you are absolutely certain that everything has come to a complete stop and is safe.
4. Work on a Level and Stable Surface
To maintain control and balance while performing repair work, it is vital to work on a level and stable surface.
Uneven or sloped surfaces can cause the vehicle to shift slightly or roll, a situation that can be extremely dangerous when your hands are inside the engine compartment.
Parking the vehicle on level ground and engaging the parking brake ensures that the vehicle remains stationary throughout the entire process.
A stable working environment also helps you maintain better focus, utilize tools correctly and complete the task more safely and efficiently.
How to Fix Loose Serpentine Belt – Beginner Friendly Working Method
Fixing a loose serpentine belt requires a meticulous and systematic approach to ensure that the root cause of the problem is correctly identified and properly resolved.
This process involves not merely tightening the belt, but also thoroughly inspecting its overall condition, ensuring proper alignment and verifying that all associated components are functioning correctly.
A proper inspection conducted right at the outset saves time and helps prevent recurring issues in the future.
By following each step sequentially, even a novice can safely diagnose what needs fixing and avoid causing unnecessary damage to the engine system.
1. Inspect the Belt’s Condition
The first and most crucial step is to carefully inspect the condition of the serpentine belt, as a worn-out belt cannot be fixed simply by tightening it.
Over time, the belt is exposed to heat, friction and constant motion, which can lead to visible signs of wear and tear.
Look closely for cracks on the belt’s surface, as these indicate that the rubber is drying out and losing its structural integrity.
Fraying at the edges signals that the belt’s internal fibers are breaking down, thereby compromising its durability and grip.
A shiny or smooth surface, known as “glazing”, is another indication that the belt has hardened and is slipping over the pulleys rather than gripping them properly.
If any of these signs are present, the best course of action is to replace the belt rather than attempting to adjust it, as a worn belt will continue to cause problems even after being tightened.
2. Locate the Belt Tensioner
After confirming the condition of the belt, the next step is to locate the belt tensioner; this is the component responsible for maintaining the correct tension of the serpentine belt.
In most modern vehicles, the tensioner is automatic and utilizes a spring mechanism to maintain constant pressure on the belt.
This type of tensioner typically features a pulley that, using a wrench or a specialized tool, as it can be rotated to release the belt tension when necessary.
In some older vehicles, a manual tensioner may be used, where the belt tension is adjusted by loosening or tightening a bolt.
It is crucial to identify whether your vehicle is equipped with an automatic or a manual tensioner, as the procedure for servicing the belt depends on this distinction.
A faulty or weak tensioner can also be a primary cause of belt looseness; therefore, it should be inspected carefully to ensure that it rotates freely and maintains the correct pressure.
3. Check the Belt Routing
The final step of this stage is to check the belt routing to ensure that it follows the correct path around all the pulleys.
The serpentine belt is designed to run in a specific pattern to efficiently drive multiple components.
In most vehicles, a belt routing diagram is provided under the hood or in the owner’s manual, illustrating the correct path for the belt.
If the belt is installed incorrectly or is not seated properly within the pulley grooves, it can lead to belt looseness, slippage and uneven wear.
Carefully compare the current position of the belt against the diagram to ensure that it is seated correctly on each pulley.
Proper belt routing is extremely important, as even a minor error can affect the performance of the entire system and lead to recurring problems.
4. Adjusting Belt Tension
When servicing a loose serpentine belt, adjusting the belt tension is a critical step, as proper tension ensures that the belt can efficiently transfer power without slipping or sustaining damage.
A properly tensioned belt should feel taut, sit securely on all pulleys and operate smoothly.
If the tension is too loose, the belt will slip and produce a squealing sound, resulting in reduced performance and negatively impacting systems such as charging and cooling.
Conversely, if the tension is too tight, it can exert excessive pressure on bearings and pulleys, leading to premature wear and component failure.
The correct adjustment procedure depends on whether the vehicle is equipped with an automatic tensioner or a manual tensioner; therefore, it is essential to identify which system is installed in the vehicle before attempting any adjustments.
1. For Automatic Tensioners
Automatic tensioners are designed to automatically maintain the correct belt tension using an internal spring mechanism; however, it is necessary to temporarily disengage them when adjusting or replacing the belt.
This type of tensioner typically features a square opening or a bolt head where a wrench or breaker bar can be inserted to safely control its movement.
Use a Wrench to Relieve Tension
To begin, position the appropriate wrench or serpentine belt tool onto the tensioner and apply steady pressure in the correct direction to relieve the tension.
This action compresses the internal spring and loosens the belt, allowing it to be removed or replaced.
Applying pressure correctly and with control is crucial, as the tensioner spring is very strong and, if not handled with care, can snap back rapidly.
Maintaining a firm grip on the tool provides better control and helps prevent sudden, unintended movements.
Seat the Belt Correctly
Once the tension has been relieved, the belt can be adjusted or reseated onto the pulleys.
At this stage, ensure that the belt is properly seated within the grooves of every pulley and is following the correct routing path.
A properly seated belt should run in a straight line without twisting or deviating from its path.
Taking the time to check the belt’s alignment at this stage is essential; if the belt is not seated correctly, it may continue to slip even after tension has been restored.
Slowly Release the Tensioner
After properly seating the belt, slowly release the tensioner back to its original position.
This allows the spring to reapply the correct amount of tension to the belt.
Releasing it slowly is critical, as a sudden release could dislodge the belt or damage the tensioner mechanism.
Once released, verify that the belt feels taut and secure and confirm that it remains properly seated on all the pulleys.
2. For Manual Tensioners
In manual tensioner systems, manual adjustments are required to set the correct belt tension; this means the user has direct control over how tight the belt will be.
This system is typically found in older vehicles and involves adjusting the position of a specific component such as: the alternator, or a dedicated adjustment bracket.
Loosen the Mounting Bolts
Begin by loosening the mounting bolts that secure the adjustable component in place.
These bolts provide the necessary clearance for movement, allowing the belt tension to be altered.
It is crucial that you loosen them just enough to facilitate adjustment, do not remove them completely.
Proper loosening provides the flexibility required to reposition the component while ensuring it remains securely seated.
Adjust Tension Manually
With the bolts loosened, move the component outward to increase the belt tension, or inward to decrease it.
This adjustment should be performed gradually, while continuously checking the belt’s tightness by applying light manual pressure.
A properly tensioned belt should exhibit minimal slack and should not deflect excessively when pressed.
Striking the right balance is essential, as both over-tightening and under-tightening the belt can lead to operational issues.
Firmly Tighten the Bolts
Once the correct tension has been achieved, firmly tighten all the mounting bolts to secure the component in position.
This step ensures that the adjustment remains fixed, even while the engine is running.
It is vital to tighten the bolts evenly and securely so that the component remains stable despite the operational stresses it face.
After tightening, re-check the belt tension and alignment to confirm that everything is properly set and ready for operation.
5. Replace the Belt – If Necessary
Replacing the serpentine belt becomes necessary when the existing belt shows clear signs of wear such as: cracks, fraying edges, glazing, or stretching, because a compromised belt, even after adjustment, cannot maintain proper grip or tension.
A worn belt diminishes the efficiency of critical systems like the alternator, water pump and power steering; furthermore, in many cases, it can fail suddenly and without warning.
Most manufacturers recommend replacing the serpentine belt within a range of 60,000 to 100,000 kilometers, depending on driving conditions and the vehicle type.
Timely belt replacement ensures smooth engine operation, prevents sudden breakdowns and protects other connected components from damage caused by slipping or erratic movement.
Remove the Old Belt
The first step in the replacement process is to safely remove the old belt by releasing the tension from the tensioner.
In vehicles equipped with an automatic tensioner, a wrench or a specialized serpentine belt tool is used to pivot the tensioner and loosen the belt; conversely, in manual systems, specific bolts are loosened to reduce the tension.
Once the tension has been released, the belt can be carefully disengaged from the pulleys.
It is essential to remove the belt gradually and, before pulling it off completely, to carefully observe how it is routed around each individual pulley.
This helps in understanding the correct routing pattern and prevents any confusion during the installation process.
While removing the belt, inspect its condition closely to help identify the root cause of any issues.
Additionally, inspect the surrounding pulleys for any signs of damage, debris, or fluid leaks that could adversely affect the new belt.
Install the New Belt Following the Routing Diagram
Once the old belt has been removed, the new serpentine belt must be installed carefully, strictly adhering to the correct routing diagram provided by the vehicle manufacturer.
This diagram is typically located under the hood or within the owner’s manual and it illustrates the precise path the belt must follow as it winds around each pulley.
The belt should be wrapped around the pulleys step-by-step, ensuring that it seats properly within the grooves and maintains correct alignment throughout the entire system.
Once the belt is in the correct position, appropriate tension is applied using the tensioner, thereby securing the belt firmly in place.
Before starting the engine, it is essential to double-check the belt’s alignment to ensure that it is neither twisted nor dislodged from its proper position.
A correctly installed belt will operate without obstruction, produce no unusual noises and deliver reliable performance to all associated components.
6. Inspect Pulleys and Their Components
When a serpentine belt becomes loose, inspecting the pulleys and their associated components is a crucial step, as the belt itself is often not the sole cause of the problem.
The serpentine system relies on a network of pulleys and rotating parts that work in unison to ensure the system operates smoothly; even a minor defect in a single component can cause the belt to loosen, slip, or wear unevenly.
Pulleys guide the belt along its proper path and facilitate the transmission of power from one location to another; therefore, issues such as misalignment, worn surfaces, or faulty bearings can compromise system performance and significantly reduce the lifespan of a new belt.
A thorough inspection ensures that the entire system is functioning correctly and helps prevent the recurrence of the same problem following repairs.
Check for Wobble or Defects
Each pulley must be inspected meticulously to ensure that it rotates smoothly and stably.
With the engine turned off, you can manually rotate the pulleys to verify whether they spin freely without any resistance or noise.
A properly functioning pulley should rotate smoothly, without any sensation of roughness or grinding.
If a pulley wobbles, shakes, or fails to maintain proper alignment, it may indicate that its bearings are worn out or failing.
You should also check the pulleys for visible defects such as: cracks, chipped edges, or uneven surfaces, as these can prevent the belt from seating correctly and lead to belt slippage.
If an unusual noise such as: a grinding or rattling sound, is heard while rotating the pulley, it is a definitive indication that the internal bearings are worn out and require immediate attention.
Even a slight misalignment can cause the belt to deviate from its intended path, leading to accelerated wear and a reduction in the system’s operational efficiency.
Replace Defective Components
If a pulley or component exhibits signs of damage or poor performance, it is crucial to replace it rather than attempting to reuse it.
Defective parts such as: a worn idler pulley, a faulty tensioner pulley, or weak bearings, as it can rapidly compromise the tension of even a brand-new belt.
Replacing these components ensures that the belt system continues to operate smoothly and maintains proper tension.
It is always preferable to address and fully resolve the root cause of a problem rather than merely treating its visible symptoms.
Utilizing high-quality replacement parts enhances the system’s durability and ensures consistent performance over time.
Once all defective components have been replaced, the system should be re-inspected to verify that everything is properly installed and ready for safe operation.
7. Inspect the Belt
Inspecting the belt after adjusting or replacing it is a crucial final step, as it ensures that everything is functioning correctly under actual operating conditions.
Even if the belt appears to be installed correctly, minor issues such as: misalignment, incorrect tension, or defective components, often only become apparent when the engine is running.
A thorough inspection helps verify that the belt is effectively transmitting power to all connected systems, such as the alternator, water pump and power steering pump.
This step not only validates the success of the repair but also helps prevent future complications by identifying any lingering issues early on.
Start the Engine
Once all tools have been removed and everything is securely in place, the engine should be carefully started.
Upon starting, the serpentine belt begins to rotate at its normal operating speed, which is essential for evaluating its actual performance.
While the engine is running, it is critical to maintain a safe distance and keep your hands clear of the belt.
As soon as the engine starts, observe how smoothly it runs and check for any unusual vibrations.
A correctly installed belt with proper tension will engage immediately without any hesitation or slippage.
Monitor the Belt’s Movement
While the engine is running, carefully observe how the belt tracks over the pulleys.
The belt should run in a straight and steady line, without any jerking, bouncing, or wandering from its path.
It should sit correctly within the grooves of each pulley and maintain constant contact throughout its entire rotation.
Any wobbling, irregular movement, or lateral shifting of the belt is an indication of a potential issue such as: pulley misalignment or incorrect tension.
The smooth and steady movement of the belt is a clear indication that the belt system is functioning correctly and effectively.
Pay Attention to Sound
Carefully listening to the sounds emanating from the engine compartment is another crucial aspect of belt inspection.
A properly functioning serpentine belt should operate quietly, without any loud squealing, chirping, or grinding noises.
If any unusual sounds are heard, it may indicate that the belt is slipping, is too loose, is too tight, or is misaligned.
These sounds may also point to issues with the pulleys or bearings that have not been fully resolved.
Identifying and addressing these noises early on ensures the long-term, proper functioning of the belt system and its associated components, thereby preventing future damage.
Understand, Common Mistakes to Avoid During Fixing Loose Serpentine Belt
Fixing a loose serpentine belt may seem simple, but many people make minor errors that can lead to major problems down the road.
These mistakes often result in a shortened belt lifespan, damage to engine components, or a recurrence of the original issue.
The serpentine belt system operates under constant motion and tension; therefore, even the slightest oversight during installation or adjustment can compromise its functionality.
Understanding these common mistakes in plain language can help you avoid unnecessary repairs, save money and ensure that the belt system continues to operate reliably and without interruption for the long term.
1. Overtightening the Belt
One of the most common mistakes is overtightening the belt in an attempt to prevent it from slipping.
While a loose belt can certainly cause problems, an excessively tight belt creates a different set of issues.
Excessive tension places undue stress on pulleys, bearings and other associated components such as: the alternator and water pump.
This added pressure can cause these parts to wear out prematurely, generate noise, or even fail completely.
A properly tensioned belt should be snug, but not so tight that it places an unnecessary burden on the system; it requires sufficient flexibility to rotate freely.
2. Ignoring a Worn Tensioner
Many people focus solely on the belt itself and neglect to check the condition of the tensioner, even though the tensioner plays a crucial role in maintaining the correct belt tension.
A worn or weakened tensioner fails to exert the necessary pressure to keep the belt taut, causing it to slip repeatedly, even after it has been adjusted.
Over time, the internal spring tension of an automatic tensioner may diminish and the pulley’s bearing may also wear out.
Ignoring this issue means the problem will soon resurface, even if you have installed a brand-new belt.
Inspecting and replacing a faulty tensioner ensures that the belt remains reliable and continues to function correctly for the long term.
3. Improper Belt Installation
Incorrect belt installation is another common error that can lead to belt-related problems, whether immediately or gradually.
A serpentine belt must follow a specific routing path around the pulleys; even a slight deviation from this path can negatively impact the belt’s performance.
If the belt is not seated properly within the pulley grooves, or if it becomes twisted during installation, it may slip, wear unevenly on one side, or generate noise.
Carefully installing the belt while adhering to the correct routing diagram ensures the proper alignment of all associated components and guarantees smooth, uninterrupted operation.
4. Neglecting Pulley Inspection
Failing to inspect the pulleys and other associated components is a mistake that frequently leads to recurring belt-related issues.
Even if the belt is new or has been properly adjusted, it will not function correctly if the pulleys are damaged or misaligned.
Faulty bearings, rough surfaces, or even a minor misalignment can cause the belt to slip or wear out prematurely.
Taking the time to inspect each pulley, to ensure that it rotates smoothly and is correctly aligned, helps identify hidden issues and ensures that the entire system functions exactly as intended.
This step is crucial for preventing future malfunctions and maintaining consistent, optimal performance.
When You Should Replace the Belt Instead of Repairing It
There are many situations where simply adjusting or tightening the serpentine belt is insufficient and replacing it entirely proves to be the safer and more effective solution.
The serpentine belt is composed of rubber and reinforced fibers; over time, due to constant exposure to heat, friction and mechanical stress, it naturally begins to undergo wear and tear.
Once the belt loses its structural integrity and flexibility, it can no longer function properly, even if its tension has been adjusted.
Attempting to repair a severely worn belt can lead to recurring issues, diminished engine performance and the risk of sudden mechanical failure while driving.
Understanding when to replace the belt rather than repairing it helps prevent vehicle breakdowns, protects critical engine components and ensures the reliable operation of the vehicle.
1. Deep Cracks or Fraying
If deep cracks appear in the serpentine belt, which are clear indicators of deterioration, or if fibers are fraying from its edges, it is a definitive sign that the belt’s material has degraded beyond repair.
Cracks typically form due to heat exposure and aging, while fraying occurs when the belt’s internal fibers begin to break down.
These conditions compromise the belt’s strength and grip, significantly increasing the likelihood of it slipping or snapping under load.
A compromised belt cannot maintain proper contact with the pulleys, thereby negatively impacting the performance of critical systems such as the alternator and water pump.
In such situations, replacing the belt is the only safe course of action, as continued use could lead to sudden mechanical failure and potential damage to the engine.
2. Recurring Slippage Issues
If a belt continues to slip repeatedly even after being properly adjusted, it typically signals an underlying internal issue that cannot be resolved merely by tightening.
Persistent belt slippage can occur when the belt’s surface becomes smooth and hardened, thereby diminishing its ability to grip the pulleys.
It may also indicate internal wear and tear that is not always visible from the outside.
Such problems often manifest as persistent squealing or chirping noises, poor performance of engine components and irregular vehicle operation.
In such situations, replacing the belt provides a fresh surface with proper grip, helping to restore the vehicle’s smooth and reliable performance.
3. High-Mileage Belts – 60,000 to 100,000 km
Mileage is one of the most critical factors to consider when determining when to replace a serpentine belt.
Most manufacturers recommend replacing the belt between 60,000 and 100,000 kilometers, depending on driving conditions and the type of vehicle.
Even if the belt appears to be in good visual condition, prolonged use can lead to internal deterioration.
As a belt ages, it loses its elasticity and structural integrity, increasing the risk of sudden failure.
Replacing the belt within the recommended mileage range serves as a preventive measure, helping to avoid sudden breakdowns and ensuring that all engine-driven systems continue to function properly.
Read More:
Estimated Cost of Fixing a Loose Serpentine Belt
The cost of fixing a loose serpentine belt depends on whether you perform the work yourself or hire a professional mechanic.
The total expense is contingent upon several factors, such as the type of vehicle, the condition of associated components and whether any other parts require replacement.
In most cases, fixing a loose belt is considered a significantly less expensive task compared to major engine repairs specially if the issue is detected early.
Understanding these costs in simple terms allows you to plan more effectively and choose the option that best aligns with your budget and technical capabilities.
1. Estimated Cost of DIY Repair
Fixing a serpentine belt yourself is generally the most economical option, particularly if you already possess a basic set of tools.
In this scenario, the primary expense is the cost of the belt itself, which is typically available at a reasonable price depending on its quality and the specific vehicle model.
It is crucial to select a high-quality belt, as it offers greater longevity and performs more reliably under conditions of heat and tension.
Beyond the belt, you may also incur costs for tools if you do not already own them.
Items such as socket wrench sets or specialized serpentine belt tools are often one-time purchases that can be utilized for future repairs as well.
Overall, the DIY approach eliminates labor costs and allows you to complete the repair at your own pace, making it a practical choice for many vehicle owners.
2. Cost of Professional Repair
Opting for professional repair entails a higher cost, primarily due to labor charges, but offers the distinct advantage of having the work performed by experts, along with the benefit of prompt service.
Mechanics typically determine their fees based on the estimated time required for the job and the complexity of the vehicle’s engine design.
In addition to labor costs, the total expense may increase further if other components such as: the belt tensioner or idler pulley, require replacement.
These parts are often inspected during the repair process and replacing them at that time can help prevent future issues.
Although professional service entails a higher cost compared to performing the work yourself, it ensures proper belt installation, precise tension adjustment and a comprehensive inspection of the entire system, factors that can be highly beneficial for the longevity of your vehicle and your own peace of mind.
How to Prevent & Maintain Loose Serpentine Belt
Preventive maintenance is the best way to avoid issues related to the serpentine belt and to ensure that your vehicle runs smoothly and without interruption for the long term.
The serpentine belt operates under constant tension, heat and motion; this means that even if immediate signs of trouble are not visible, it continues to wear down gradually.
By adopting simple and regular maintenance practices, you can detect problems early, minimize the risk of sudden breakdowns and enhance your engine’s overall performance.
Small, timely interventions not only save money but also help prevent unexpected failures and ensure that all interconnected systems continue to function efficiently.
As well as, there’s study that explains that one of the main reasons that serpentine belts fail is due to the cracking in the rubber ribs, which actually develops over the period of time as repeated stress and heat exposure, as researchers used advanced fracture mechanics and finite element that analyses to study how cracks start and grow in the belt material, so this study actually confirms that even small cracks can expand under the continuous engine load, eventually leading to belt failure, so that shows how important it is to inspect early and replace that in time before any visible damage that becomes costly.[¹]
1. Regular Belt Inspections
Regular inspections of the serpentine belt help identify early signs of wear before they escalate into serious problems.
It is crucial to check the belt’s surface for cracks, fraying, or a glossy appearance, as these are clear indicators that the belt is losing its strength and grip.
A quick visual check every few weeks, or during routine servicing, as it can make a significant difference.
Detecting these issues early allows you to repair or replace the belt before it begins to slip or causes damage to other engine components.
2. Keep Engine Components Leak-Free
Keeping engine components clean and free from oil or coolant leaks is essential for maintaining the belt’s proper performance.
Leaking fluids can reduce the friction between the belt and the pulleys, potentially causing the belt to slip, even if its tension has been set correctly.
Over time, these fluids can also degrade the rubber material of the belt, thereby reducing its overall durability.
Regularly checking for leaks and repairing them immediately helps safeguard the belt and ensures the uninterrupted operation of the entire system.
3. Replace the Belt at Recommended Intervals
Replacing the serpentine belt at the recommended mileage intervals is one of the most effective ways to prevent sudden breakdowns.
Most belts are designed to last between 60,000 and 100,000 kilometers, although this can vary depending on driving conditions and the type of vehicle.
Even if the belt appears to be in good condition externally, its internal structure may weaken over time.
Replacing the belt at the appropriate time ensures that it continues to deliver reliable performance and minimizes the risk of sudden failure while driving.
4. Periodically Inspect the Tensioner
The belt tensioner plays a crucial role in keeping the serpentine belt properly taut; therefore, its condition should be checked regularly.
A weak or worn-out tensioner cannot maintain the correct pressure, causing the belt to slip and resulting in uneven wear.
Over time, the tensioner’s spring may lose its tension and the pulley’s bearing may also wear out.
Periodically inspecting it ensures that the tensioner is functioning correctly and applying the appropriate amount of tension, a critical factor for the long-term reliability of the belt system.
Conclusion – How to Fix Loose Serpentine Belt
Just, understand and fix a serpentine belt issue, as it fixes how it works and eliminates the dangers of bigger problems as well.
This single belt connects and powers several vital systems; consequently, even a minor malfunction within it can simultaneously compromise engine cooling, battery charging and steering performance.
What makes this issue even more critical is that it often begins with subtle, easily overlooked symptoms such as: a faint chirping sound or slight slippage, yet, if left unaddressed, it can lead to major breakdowns or severe engine damage.
Understanding how the serpentine belt system operates, recognizing early warning signs and knowing when to adjust or replace the belt can go a long way in helping you avoid significant complications.
By adopting proper inspection techniques, maintaining correct belt tension and examining associated components such as: pulleys and tensioners, you ensure that the entire system functions smoothly and without interruption.
Regular maintenance and timely belt replacement, whether based on mileage or the belt’s physical condition, as it can significantly extend the lifespan of your engine and minimize unexpected repair costs.
Whether you choose to perform the repairs yourself or seek the assistance of a professional, the most critical aspect is taking timely action to address the root cause of the problem, rather than relying solely on temporary, stopgap measures.
Now, that’s it from this guide and you can comment for more.
Frequently Asked Questions
Q1. Can I drive with a loose serpentine belt?
Answer: Driving with a loose serpentine belt is not advisable, as it can quickly lead to major problems. When the belt is loose, it may slip on the pulleys, reducing its ability to power essential components such as the alternator, water pump and power steering pump. This can result in issues such as a discharged battery, engine overheating, or difficulty steering. In some cases, the belt may completely dislodge or snap while driving, potentially causing the engine to stall or leaving you stranded on the road. Even if the vehicle appears to run normally for a while, the risk of sudden breakdown is significant; therefore, it is best to have this issue repaired as soon as possible.
Q2. How tight should a serpentine belt be?
Answer: A serpentine belt should be tight enough to remain firmly seated in place and transmit power effectively, yet not so tight that it places excessive strain on the engine components. In most modern vehicles, the correct tension is automatically maintained by a spring-loaded tensioner, eliminating the need for manual adjustment. If you are inspecting it yourself, the belt should feel taut and should not deflect significantly when you apply light pressure with your finger. If it is too loose, the belt may slip and produce squealing or chirping noises; conversely, if it is too tight, it can lead to premature wear of the pulleys and bearings. The goal is to maintain a balanced tension that allows the belt to rotate smoothly and consistently without subjecting the system to unnecessary stress.
Q3. How long does it take to fix a loose serpentine belt?
Answer: Fixing a loose serpentine belt typically takes anywhere from 15 minutes to an hour, depending on the type of vehicle and the condition of the belt system. If the issue simply involves adjusting the belt’s tension, the task can be completed quickly and easily. However, if the belt needs to be replaced, or if there is a fault with the tensioner or pulley, the process may take longer. Those attempting this task for the first time may require a little extra time to understand the belt’s routing and to handle the tools with care. Overall, compared to many other engine-related repairs, this is considered a relatively quick procedure.
Q4. What happens if the serpentine belt breaks?
Answer: If the serpentine belt snaps while the engine is running, several critical systems will immediately cease to function. The alternator will stop charging the battery, which can lead to malfunctions within the vehicle’s electrical system. If the water pump is driven by the belt, the engine may begin to overheat, as the coolant will no longer be circulating properly. Operating the power steering will also become difficult, making it even harder to control the vehicle. In many cases, these failures can ultimately cause the engine to shut down completely. This is why a broken belt is considered a serious issue; for safe driving, it is crucial to replace a worn or loose belt before it fails.
References:
[1] Failure Analysis of Serpentine V-ribbed Belt Drive System
https://saemobilus.sae.org/papers/failure-analysis-serpentine-v-ribbed-belt-drive-system-2004-01-0993

Guys, I’m a car audio enthusiast and customization expert and I love clear sound and clean installation. Plus, I have spent years helping people build their dream audio setups. And whenever I’m working on cars, I probably listen to music and thinks about the next big upgrade.