Written By: Don Dodi
Fact Checked By: Kristen Brown
Reviewed By: Diego Rosenberg
Basically the fabric on your car’s roof actually tells about the condition and age of your vehicle.
Yes, a sagging car headliner is one of the most common interior problems that drivers have to face, specially in the vehicles that are more than 8 to 10 years old.
Not only this, The Headliner: which is the fabric-covered panel which is fixed to the roof of the car, it not just only improves the interior’s look but it actually helps in noise reduction, insulation and overall driving comfort as well.
It is natural that over the period of time, because of the constant exposure to heat, humidity and UV rays breaks down the glue and foam which is beneath the fabric and that actually cause it to detach and droop.
And according to the automotive upholstery experts: if you usually parks your vehicle on the excessive heat then it can rise to over 60°C on hot days and indeed it is the reason for headliner failures.
Plus, sagging headliner may also start as a small bubble or loose corner, but it can quickly spread across the roof and then it makes the interior look untidy and even obstruct the visibility if it drops low enough.
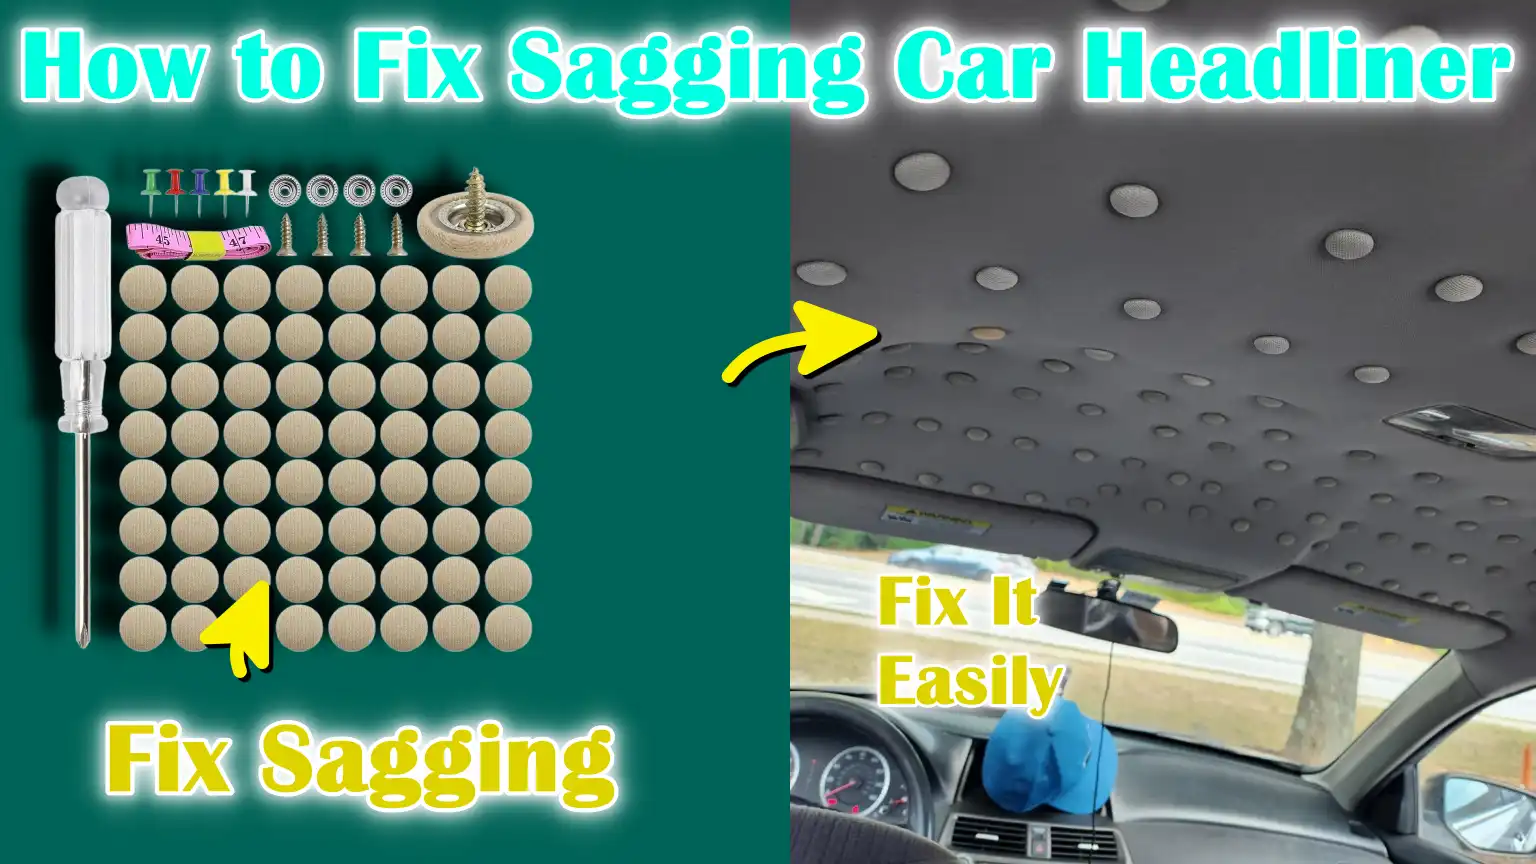
Along with this, if you go to the professional workshop to replace a headliner then it can cost you between $150 to $500, so all these you can save with just simple quick techniques.
This guide is all about How to Fix Sagging Car Headliner and it is also the budget-friendly option to keep your car interior neat, comfortable and safe.
How to Diagnose the Damage
Before repairing a loose car headliner, it’s important to carefully assess the severity of the problem.
Headliners can become loose due to a variety of reasons, such as age, heat, moisture, or poor-quality adhesive.
Understanding the severity of the damage will help determine the correct repair method.
In some cases, the fabric may only begin to loosen in a small area, which is usually easy to fix with simple adhesive techniques.
In other cases, the headliner may partially loosen across a large portion of the roof, indicating that the foam backing has deteriorated and requires more attention.
In severe cases, the entire headliner may break, affecting not only the car’s interior appearance but also visibility while driving.
1. Identify the Severity
To determine the severity of the looseness, inspect the headliner closely.
Small loose or loose corners can often be temporarily repaired or reattached with spray adhesive.
Partial sagging may require removing trim pieces along the edges to access the fabric and perform a more extensive adhesive repair.
Complete sagging usually indicates that the headliner’s foam has completely broken down and can no longer hold the fabric in place.
Observing how much the fabric has torn and whether the foam underneath is peeling away provides a clear indication of its severity.
This assessment is important because minor repairs to a completely torn headliner may not last long and could worsen the problem.
2. Deciding to Repair Yourself or Replacing It Completely
Once the severity is determined, it’s important to decide whether self-repair is possible or whether a complete replacement is necessary.
Minor sagging can often be repaired at home with adhesive spray, pins, or clips, restoring the headliner’s appearance and functionality at a low cost.
Partial sagging can also be repaired yourself, although more patience and careful handling are required to avoid wrinkles or uneven surfaces.
However, complete loosening almost always requires removing the headliner board and replacing the fabric entirely.
This is a time-consuming and complex process, often requiring professional equipment or assistance to achieve a smooth, long-lasting finish.
Making the right decisions at this stage ensures that the repair will be effective and durable, saving time, effort and money in the long run.
Tools
| Tools/Materials | Description | Purpose/Use |
|---|---|---|
| Adhesives (spray glue, headliner adhesive, or fabric glue) | Specialty glue made for car fabric and foam. | Used to attach headliner fabric to the foam backing and roof surface, ensuring a smooth, long-lasting fix. |
| Thumbtacks, twist pins, or upholstery pins | Small pins designed to temporarily hold fabric in place. | Useful for holding small sagging in place until permanent adhesive sets or for temporary repairs to minor sagging. |
| Screwdrivers and trim removal tools | Basic hand tools for removing car panels and trim. | Helps carefully remove trim pieces, lights and headliner edges without damaging the interior. |
| New headliner fabric and foam backing | Replacement layer of fabric and foam. | Essential for completely replacing a headliner when the old fabric or foam becomes severely damaged or worn. |
| Utility knife, scissors and brush/roller | Cutting and smoothing tools. | Used to trim fabric, cut foam to size and evenly adhere for a wrinkle-free surface. |
What are The Quick and Temporary Solutions
When the headliner begins to loosen in small areas, there are some easy ways to make quick repairs without removing the entire headliner.
These temporary solutions are often used when the damage is minor or when a long-term solution is planned for later.
They are usually quick, inexpensive and don’t require advanced equipment, making them suitable for DIY enthusiasts.
Quick solutions can restore the headliner’s appearance and prevent further loosening until a permanent repair is possible.
1. Using Double-Sided Tape or Glue on Small Areas
A common temporary solution is to use double-sided tape or a small amount of fabric adhesive on the areas where the headliner is beginning to loosen.
Double-sided tape is easy to apply and provides instant grip, temporarily adhering the fabric to the foam or ceiling.
Fabric glue or spray adhesive is slightly stronger and works by gluing the fabric back to the foam surface.
When applying glue, it’s important to gently lift the fabric and spread the adhesive evenly to avoid lumps or wrinkles.
These methods work best with slight bends and small bubbles, specially at the edges or corners of the ceiling.
2. Using Twist Pins or Upholstery Tacks to Hold the Fabric in Place
Another temporary solution is to use twist pins or upholstery tacks to hold loose fabric in place.
These pins are designed to be pushed between the fabric and foam, securing loose parts without the need for adhesive.
This method is specially helpful when adhesive is not available or when repairs need to be done in advance.
Twist pins can provide immediate support and prevent the fabric from bending further, giving the manufacturer more time to plan for a permanent repair.
3. Advantages and Disadvantages of Temporary Methods
Temporary solutions are convenient because they are quick and inexpensive and often don’t require removing trim or panels.
These can instantly improve the look of an interior and prevent further deterioration of loose surfaces in a short period of time.
However, they also have limitations.
Adhesives can lose their strength over time, specially in high heat or humidity, which can cause the fabric to peel.
Pins or tacks can create small holes in the fabric or foam and they do not address the underlying problem of damaged foam or adhesive.
Therefore, while temporary solutions may be useful in emergencies or for minor wrinkles, permanent repair or complete replacement is recommended for long-term results.
Permanent Solution Without Complete Replacement
For headliners that have begun to sag but are not completely damaged, a permanent solution is possible without replacing the entire headliner.
This method re-attaches the existing fabric to the foam backing and roof structure using special adhesives.
Permanent adhesives are more reliable than temporary solutions and can extend the headliner’s lifespan by several years.
They are ideal for vehicles where the fabric is still intact and the foam backing has not completely worn away.
1. Re-gluing the Fabric with Spray Adhesive
Spray adhesives designed for automobile fabrics are one of the most effective ways to permanently repair a sagging headliner.
These adhesives create a strong bond between the fabric and foam, providing protection from the heat and moisture that often cause sagging.
It is important to use an adhesive specifically formulated for headliners, as household adhesives cannot withstand the temperature changes inside a car.
Spray adhesives provide even coverage and a quick drying time, making the repair process smoother and more durable than temporary adhesives.
2. Remove Trim, Apply Adhesive & Smooth the Fabric – Complete Steps
The repair process begins by carefully removing all trim pieces, lights and panels around the headliner to access the loose part.
Once the part is visible, the fabric is gently lifted to avoid tearing.
Spray adhesive is then applied evenly to the foam backing or ceiling surface according to the manufacturer’s instructions.
Once applied, the fabric is pressed back into place and smoothed with your hands or a soft roller to remove air pockets and wrinkles.
It’s important to work in small sections and ensure the fabric is firmly adhered before proceeding to the next step.
Once all the parts are glued, the trim and panels are reapplied to restore the headliner’s original appearance.
3. Tips to Avoid Wrinkles and Uneven Application
To achieve a smooth and professional-looking result, it’s essential to follow several important tips.
First, always work in a well-ventilated area and avoid using too much adhesive, as this can create lumps or clumps.
Smooth the fabric gradually from the center outward to remove air bubbles and prevent wrinkles.
If the fabric has slight wrinkles, gently lifting the adhesive and reapplying it while it’s still tacky can help.
Using a soft brush or roller can help press the fabric evenly into place without damaging it.
Finally, before reapplying trim and panels, allow the adhesive to dry sufficiently according to the instructions to ensure a strong and long-lasting adhesive bond.
How to Replace the Entire Headliner
In some cases, repairing a loose headliner may not be sufficient, specially when the fabric is torn, the foam backing is completely worn out, or the looseness covers a large area.
In such situations, replacing the entire headliner becomes necessary to restore the car’s interior appearance, maintain insulation and noise reduction and ensure driving safety.
Vehicles with high heat and humidity, or vehicles that are many years old, often require this complete replacement for a long-lasting solution.
1. When Replacement is Necessary
Complete replacement is necessary when the headliner fabric no longer adheres to the foam or roof surface, or when temporary and permanent re-gluing methods fail.
Signs for replacement include large sections of loose fabric, crumbling foam, or stains and damage that cannot be repaired.
Attempting to patch or glue severely damaged headliners usually provides short-term solutions that quickly fail, making replacement the most reliable and durable option.
2. Safely Removing the Headliner Board
The first step in replacing the headliner is carefully removing the headliner board from the vehicle.
This involves removing trim pieces, dome lights, visors and other accessories that hold the headliner in place.
It’s important to work slowly and avoid applying force to any parts, as this could break the trim or damage interior panels.
Once all attachments are removed, the headliner board can be gently removed from the car, usually through a door or hatch, depending on the vehicle type.
3. Cleaning Old Fabric and Adhesive
After removing the headliner board, the old fabric and adhesive must be thoroughly cleaned.
This process involves peeling off the fabric and scraping or brushing away any remaining foam and glue.
It’s important to ensure the surface is clean and smooth, as leftover adhesive or debris can prevent the new fabric from adhering properly and cause lumps or wrinkles.
Cleaning also provides an opportunity to inspect the board for any cracks or damage that may need repair before re-covering.
4. Installing New Foam-Backed Fabric
Once the board is clean, a new foam-backed headliner fabric is applied using high-quality spray adhesive or headliner glue.
The foam provides structure and insulation and prevents future sagging by evenly adhering the fabric to the roof.
The fabric should be applied gradually, starting from the center and smoothing outward to remove air bubbles and wrinkles.
It is important to ensure that the edges are completely secure and that the fabric fits snugly around the cutouts for lights, visors and other attachments.
5. Reinstalling the Headliner
Once the new fabric is securely in place, the headliner board is carefully reinstalled in the vehicle.
Trim pieces, lights, visors and other components are then reinstalled to secure the headliner firmly in place.
Ensuring a snug and proper fit is essential to prevent future loosening or movement.
Once reinstalled, the headliner should be smooth, clean and fit well, leaving the car’s interior looking like new, while maintaining insulation, noise reduction and overall driving comfort.
Read More:
How to Prevent Future Sagging
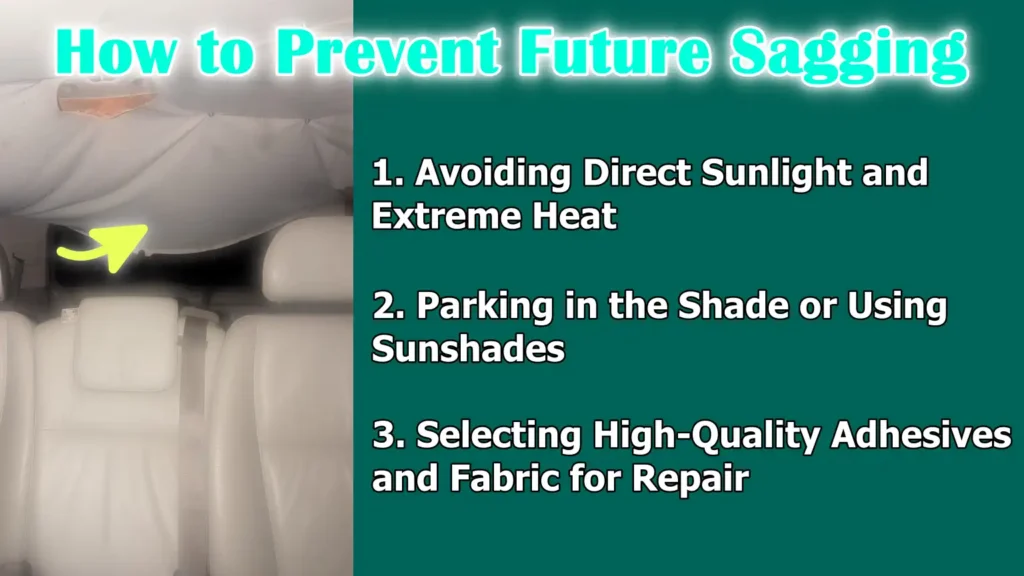
After repairing or replacing a car’s headliner, taking steps to prevent future sagging is crucial to maintaining the interior’s aesthetics, comfort and durability.
Headliners are particularly sensitive to heat, moisture and prolonged exposure to sunlight, which can weaken adhesives and foam over time.
By following a few simple repair methods and using high-quality materials, car owners can significantly extend the lifespan of their headliner and prevent recurrent sagging.
1. Avoiding Direct Sunlight and Extreme Heat
Excessive heat is a major cause of headliner sagging.
In summer, temperatures inside a parked car can exceed 60 degrees Celsius (140 degrees Fahrenheit), softening the adhesive and breaking down the foam backing.
To prevent this, it’s important to keep the car out of direct sunlight and extreme heat whenever possible.
Parking in shady areas or indoors reduces stress on the headliner and maintains the integrity of both the fabric and adhesive.
2. Parking in the Shade or Using Sunshades
Another practical way to protect the headliner is to use sunshades on the windshield and windows when parking outdoors.
Sunshades reflect sunlight and reduce the car’s internal temperature, reducing the risk of heat damage to the headliner.
Partial shade can also play an important role in protecting the fabric and foam from deterioration.
Regularly using sunshades or choosing a parking spot in the shade of trees, buildings, or a carport is a simple but highly effective preventative measure.
3. Selecting High-Quality Adhesives and Fabric for Repair
The materials used during repair or replacement play a crucial role in long-term durability.
Using high-quality spray adhesives specifically designed for automotive headliners ensures a strong bond that resists heat and moisture.
Similarly, choosing a durable, foam-based fabric provides better support and prevents future sagging.
Investing in high-quality materials may cost a little more initially during the repair process, but it significantly reduces the likelihood of recurring problems and extends the headliner’s lifespan.
Basic Estimated Cost and Time
Understanding the time and cost of repairing or replacing a car’s headliner is essential for effective repair planning.
Costs can vary significantly depending on the car’s molding, the quality of the materials used and whether the repair is done at home or by a professional.
Time is also an important factor, as some repairs can be completed in less than an hour, while a full repair can take several hours or even a full day.
Knowing these factors helps car owners make informed decisions and be prepared for the effort and expense involved.
1. Do-It-Yourself Repair Cost vs Professional Replacement
For cars with a slightly or partially molded headliner, DIY repair is often the most cost-effective solution.
Using spray adhesive, double-sided tape, or twist pins typically costs between $10 and $50, depending on the material chosen.
This is a fraction of the cost of professional repairs, which can range from $150 to $500 for re-gluing or a complete replacement, depending on the make and model of the car.
Although self-repair requires effort and attention to detail, it’s an affordable option for those willing to invest some time.
Professional services deliver shiny, long-lasting results and save time, but they cost significantly more due to labor and materials.
2. Minor Repairs and Complete Replacement Time
Headliner repair time varies depending on the complexity of the damage.
Minor fixes, such as re-gluing small sections or using pins, are often completed in one to two hours, including preparation and drying time.
A complete headliner replacement takes longer, involving removing the trim, cleaning off the old fabric, applying new foam-backed material and reinstalling the boards.
This process typically takes four to six hours for an experienced repairman and may take longer for first-time DIYers.
Planning the repair around the available time ensures a careful and thorough job, reducing the risk of mistakes and future loosening.
As well as, when research have been done on Polyurethane foam that actually shows that the foam backing can become brittle and lose shape after years of heat and moisture exposure and it is the natural thing to happen, so whenever the foam fails: then the re-gluing the fabric is only the temporary kind of fix, as the foam must be replaced for a lasting repair.[¹]
Conclusion – How to Fix Sagging Car Headliner
Basically you have to repair a headliner as it is more like a investment in the interior quality, comfort, value of your car and it keeps its beauty intact.
Whether you choose a quick temporary fix, a permanent re-glue solution, or a complete headliner replacement, understanding the causes, materials and proper techniques is key to achieving long-term results.
Minor scratches can often be repaired at home with inexpensive tools and adhesives, while more serious damage may require professional expertise and high-quality materials to ensure durability.
Preventing future scratches by avoiding extreme heat, parking in shady areas, using sunshades and choosing high-quality adhesives and fabrics significantly increases the repair lifespan.
By carefully assessing the damage, choosing the right repair method and following the proper steps, any car owner can effectively repair their headliner, save money and enjoy a cleaner, more comfortable driving experience.
Also, if you wanted to ask something about this topic more, then you’re more than welcome in the comment.
Frequently Asked Questions
Q1. What is a car headliner and why does it sag?
Answer: A car headliner is a fabric-covered panel that is applied to the interior ceiling of a vehicle. It provides a sophisticated look to the interior, helps with insulation, reduces road noise and provides comfort. Over time, the glue or adhesive that attaches the fabric to the foam backing can deteriorate due to heat, moisture, or aging. High temperatures inside parked cars, specially on sunny days, can weaken the adhesive, while humidity can deteriorate the foam. When this happens, the fabric begins to sag or warp, causing bubbles or loose areas on the ceiling.
Q2. Can a loose headliner be fixed at home?
Answer: Yes, many minor sagging problems can be fixed at home with simple tools and adhesives. Minor sagging or loose corners can be reattached using spray adhesive, double-sided tape, or twist pins. These DIY methods are cost-effective and, if done carefully, can ensure the fabric’s long-term durability. However, if the fabric or foam is severely damaged or the looseness covers a large area, it may be necessary to replace the entire headliner, which may require more time, effort and professional assistance.
Q3. How long does it take to repair yourself?
Answer: The time required depends on the severity of the looseness. Minor repairs, such as re-gluing small areas or using pins, are usually completed in one to two hours, including preparation and drying time. More extensive repairs, such as re-gluing large areas, can take three to four hours. Replacing the entire headliner, which involves removing the boards, cleaning the old material, applying new fabric and re-attaching the boards, can take four to six hours or more, specially for first-time DIYers.
Q4. What tools and materials are needed to repair a loose headliner?
Answer: To fix a loose headliner, you typically need tools like spray adhesive or fabric glue, double-sided tape for temporary repairs, twist pins or upholstery pins to hold the fabric in place and a screwdriver and trim removal tool to remove the panels. For a complete replacement, you’ll need a new headliner fabric with a foam backing, a knife or scissors to cut the fabric and a soft brush or roller to smooth the fabric. Using high-quality adhesive and durable fabric ensures a long-lasting repair and prevents future loosening.
Q5. Do temporary fixes last?
Answer: Temporary fixes like twist pins or double-sided tape are meant to provide a short-term solution and prevent further loosening. While effective for minor areas, they don’t withstand heat, moisture, or the car’s natural wear and tear over time. These methods are helpful if you need a quick fix or plan to make a permanent repair later. Permanent solutions, such as re-gluing with the proper adhesive or replacing the entire headliner, are more durable and long-lasting.
References:
[1] Study on Degradation of a Commercial Rigid Polyurethane Foam Used for Filling of Process Gas Equipment (PGE) and Pipes and Corrosion Behavior of Pipes at K-25/K-27
https://www.nrc.gov/docs/ML0735/ML073532159.pdf

Guys, I’m a car audio enthusiast and customization expert and I love clear sound and clean installation. Plus, I have spent years helping people build their dream audio setups. And whenever I’m working on cars, I probably listen to music and thinks about the next big upgrade.