Written By: Don Dodi
Fact Checked By: Kristen Brown
Reviewed By: Diego Rosenberg
So, the tachometer is the dashboard gauge that has work of measuring your engine’s revolutions per minute which is famously known for RPM, that actually shows that how fast the crankshaft is spinning in real time.
As, in most of the modern vehicles, the tachometer receives electronic pulse signals from the ignition system or the Engine Control Unit itself, while in older vehicles may use a mechanical cable system which is connected to the engine.
The thing is: accurate RPM readings are really important as excessive engine speed can increase the heat, have the capability to wear internal components, reduces fuel efficiency and in the extreme cases it can literally cause the damage to your vehicles engine as well.
And, with the help of properly working tachometer you can easily shift gears at the right time, maintain the performance and avoid any unnecessary strain on the engine.
As well as, the reason of malfunctioning tachometer could be anything related to blown fuses, faulty wiring, bad ground connections, defective ignition coils, crankshaft position sensors or it can be instrument cluster issues as well.
So, just understand how the tachometer receives and displays RPM signals as it makes the fixing of it really easy and that’s how you’ll learn How to Fix Tachometer Not Working, so that you can identify the actual problem and fix them on easily.
How to Check Working of Tachometer
Before undertaking any complex repairs, it is crucial to perform a few simple preliminary checks, as many tachometer issues stem from minor electrical glitches rather than the failure of a major component.
The tachometer relies on a stable power supply, proper grounding and a clean signal from the engine system; therefore, even a minor fault such as: a loose wire or a blown fuse, as it can prevent it from functioning.
Spending a little time carefully examining these basics will save you effort, reduce repair costs and allow you to quickly pinpoint the root cause of the problem without unnecessarily replacing parts.
These checks are easy to understand, require minimal tools and are suitable even for beginners.
1. Visual Inspection
The first step is to carefully inspect the tachometer and the surrounding dashboard area for any signs of damage.
Check if the gauge glass is cracked, if the needle is stuck, or if the display appears dim or lifeless.
Sometimes, the issue is quite minor such as: a loose connection behind the instrument cluster, which is particularly common if the vehicle has recently been driven over rough terrain or if work has recently been performed on the dashboard.
Additionally, look for signs of electrical issues on the dashboard, such as a burning smell, melted plastic, or discoloration; these indicators may point to overheating wires or a short circuit.
Even subtle visual cues can help you determine whether the problem is mechanical, electrical, or an internal fault within the tachometer unit itself.
2. Fuse and Relay Checks
The tachometer operates on electricity and this power supply is protected by a fuse and controlled by a relay.
A blown fuse is one of the most common, and easily remedied, reasons why a tachometer stops working.
Locate your vehicle’s fuse box, typically situated under the dashboard or within the engine compartment, and, using the diagram printed on the fuse box cover, identify the specific fuse associated with the instrument cluster or tachometer.
If the fuse appears burnt out or broken internally, replace it with a new fuse of the exact same rating to prevent any further damage.
In some vehicles, relays also play a crucial role in power distribution; therefore, checking for faulty or loose relays is equally important.
This simple step often immediately restores the tachometer’s functionality, provided that the issue is related to the power supply.
3. Checking Battery and Ground Connections
A stable battery and proper grounding are essential for all dashboard instruments, including the tachometer.
If the battery voltage is low or unstable, the tachometer may fail to function correctly, display inaccurate readings, or stop working altogether.
First, ensure that the battery terminals are tight and free of any dirt or corrosion, as buildup on the terminals can obstruct the proper flow of electricity.
Ground connections are equally critical, as they complete the electrical circuit; a loose or corroded ground wire can disrupt signals and cause the tachometer to malfunction.
By cleaning the terminals and ensuring that all connections are secure, a consistent power supply is maintained and many minor tachometer issues are often resolved without the need for any further repairs.
How to Identify the Problem With Tachometer
Identifying a tachometer issue involves understanding how the RPM signal travels from the engine to the dashboard and pinpointing exactly where the signal is being interrupted.
A tachometer does not function autonomously; it relies on signals generated by the engine’s rotation, which are subsequently converted into readable RPM values.
If the signal is absent, weak, or erratic, the tachometer will fail to display an accurate reading.
By carefully examining the type of tachometer, its signal source and the quality of the electrical signal, you can identify the precise root cause of the problem rather than unnecessarily replacing parts.
This step is crucial because it enables you to employ simple, reliable troubleshooting methods, allowing you to move beyond mere guesswork and arrive at an accurate diagnosis.
1. Determine the Type of Tachometer
The first step in identifying the problem is to determine whether your vehicle is equipped with a mechanical or an electronic tachometer, as these two types operate on fundamentally different principles.
Mechanical tachometers are typically found in older vehicles and utilize a rotating cable connected directly to the engine; this cable physically drives the needle based on the engine’s speed.
If this cable becomes worn, broken, or loose, the tachometer will cease to function entirely.
Electronic tachometers, which are standard in most modern vehicles, rely on electrical signals generated by the ignition system or various sensors, which are subsequently processed by the Engine Control Unit (ECU).
Knowing the specific type of tachometer helps you focus your diagnostic efforts in the right direction, whether that involves inspecting physical components such as cables or examining electrical systems like wiring and sensors.
2. Check the Signal Source
Once you have identified the type of tachometer, the next step is to confirm the origin of the RPM signal and ensure that it is successfully reaching the gauge.
In electronic systems, the tachometer typically receives its signal from the ignition coil, the crankshaft position sensor, or directly from the Engine Control Unit (ECU).
Any loose wires, faulty connectors, or corrosion within these connections can interrupt the signal, causing the tachometer to stop working or behave erratically.
Carefully inspect the wiring for any cuts, loose connections, or dirt accumulation.
In older mechanical systems, check the cable running from the engine to the tachometer to ensure it is securely attached, free from wear and tear and devoid of any kinks or obstructions.
A smooth and uninterrupted signal path is essential for an accurate RPM display.
3. Check with a Multimeter
Using a multimeter is one of the most reliable methods for verifying whether the tachometer is receiving the correct signal.
With the engine running, you can determine if the signal is active by measuring the voltage or pulse signal on the tachometer’s input wire.
A proper signal should yield consistent readings that fluctuate in tandem with increases or decreases in engine speed.
If no reading appears at all, it indicates that the signal is not reaching the tachometer whatsoever.
If the signal is weak or intermittent, it may be a sign of faulty wiring, loose connections, or a failing sensor.
This diagnostic check helps pinpoint whether the issue lies within the signal supply or within the tachometer unit itself.
4. Scan for Engine Codes – If Applicable
In modern vehicles, the Engine Control Unit (ECU) constantly monitors various sensors and systems, including those related to the RPM signal.
If a component, such as the crankshaft position sensor or the ignition system, malfunctions, the ECU often stores a corresponding error code.
By using an OBD-II scanner, you can quickly check these codes and identify hidden issues that might not be apparent during a manual inspection.
These codes provide vital information and can pinpoint the specific faulty component that is affecting the tachometer signal.
Scanning for codes saves time and ensures that you do not overlook internal electronic issues that could impact both the engine’s overall performance and the functionality of the tachometer.
Know, About The Common Causes of Tachometer Failure
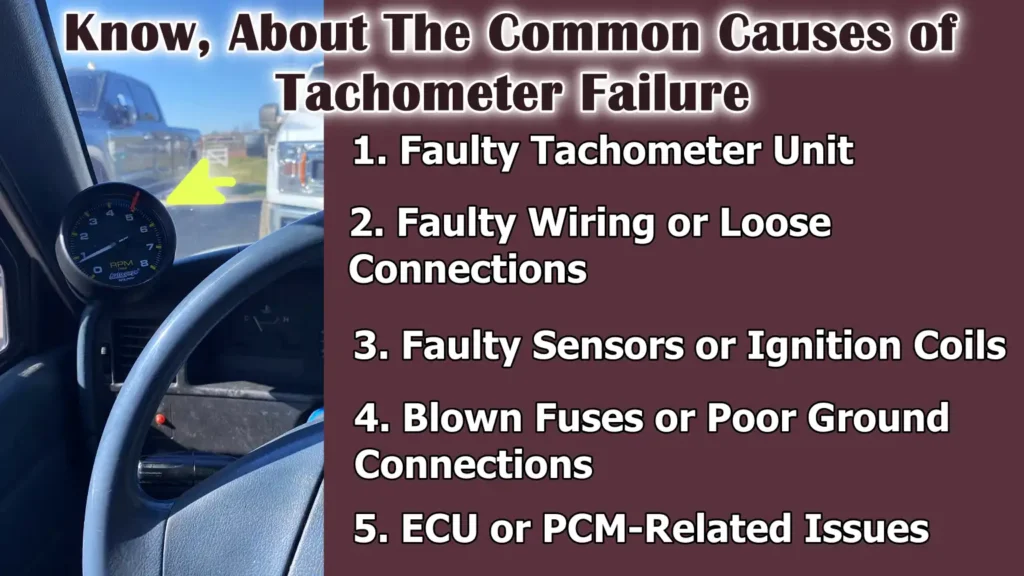
A tachometer relies on the coordinated operation of several components, including sensors, wiring, the power supply and the gauge itself.
If any single link in this chain fails, the RPM reading may become inaccurate, unstable, or cease entirely.
Understanding the most common causes of tachometer failure helps you diagnose the problem quickly and avoid replacing parts that are still functioning correctly.
Most issues stem from simple electrical faults; however, in some instances, deeper problems within the vehicle’s control systems can also disrupt the signal.
Grasping these causes in clear, simple terms enables you to perform repairs with confidence and precision.
1. Faulty Tachometer Unit
The tachometer unit itself can fail due to internal electrical or mechanical malfunctions.
An electronic tachometer contains miniature circuits that process the signal and drive the needle or digital display.
Over time, these components can wear out, particularly due to heat, vibration, or general aging.
When this occurs, the tachometer may stop working completely, display inaccurate RPM readings, or behave erratically, even if all external connections are intact.
In such cases, the issue lies not with the engine or wiring, but within the gauge itself, typically necessitating the replacement or repair of the unit.
2. Faulty Wiring or Loose Connections
Wiring plays a crucial role in transmitting the RPM signal from the engine to the tachometer.
If the wires become damaged, severed, or loosely connected, the signal cannot reach the gauge properly.
Corrosion on the connectors can also impede electrical flow and create resistance, thereby weakening the signal.
This can cause the tachometer needle to bounce erratically, fluctuate wildly, or stop functioning altogether.
Since vehicles are exposed to heat, moisture and vibration, wiring issues are quite common and should always be carefully inspected during diagnostics.
3. Faulty Sensors or Ignition Coils
The tachometer relies on signals generated by components such as ignition coils or engine sensors (such as the crankshaft position sensor).
These components generate the pulses that indicate engine speed.
If a sensor or ignition coil malfunctions, it may transmit an incorrect signal or fail to send any signal at all.
Consequently, the tachometer will not display the correct RPM value.
In many cases, a failing sensor can also adversely affect engine performance, leading to issues such as rough running or difficulty starting, thereby making it easier to identify the root cause of the problem.
4. Blown Fuses or Poor Ground Connections
A proper power supply is essential for the tachometer to function correctly.
Fuses protect the system from electrical overloads; if a fuse blows, it interrupts the power supply reaching the tachometer.
Similarly, ground connections are crucial as they complete the electrical circuit.
If a ground connection becomes loose, dirty, or corroded, the flow of electricity becomes unstable.
This can cause the tachometer to shut down completely or display inaccurate readings.
Although these issues may seem minor, they are quite common; resolving them often restores the tachometer to normal operation.
5. ECU or PCM-Related Issues
In modern vehicles, the Engine Control Unit (ECU) or Powertrain Control Module (PCM) plays a pivotal role in processing RPM data and transmitting it to the tachometer.
Although malfunctions in these systems are relatively rare, issues can still arise due to software glitches, internal component failures, or communication errors.
If the ECU transmits an incorrect signal, or fails to send any signal at all, the tachometer will not function correctly, even if all other components are in perfect working order.
Diagnosing such problems typically requires the use of scanning tools and, at times, the assistance of a specialist; however, keeping this possibility in mind ensures that no potential cause of the issue is overlooked.
How to Fix Tachometer Not Working – Easy to Follow Guide
How to Solve Wiring and Connection Issues
Wiring and connections are among the most common reasons why a tachometer may stop working or provide inaccurate readings.
The tachometer relies on receiving a clean and stable electrical signal from the engine system; even minor damage to the wiring, a loose connection, or corrosion can disrupt this signal.
Vehicles operate in environments where heat, vibration, dust and moisture are constantly present, factors that gradually degrade wires and connectors over time.
Therefore, carefully inspecting and repairing wiring issues is one of the most effective and practical steps toward restoring the tachometer’s proper functionality.
This process does not always require advanced tools, but it does demand close attention to detail and a clear understanding of how electrical connections should appear and function.
1. Tighten Loose Wires
Loose wires can easily interrupt the flow of electrical signals, causing the tachometer to behave erratically or cease functioning entirely.
Over time, constant vibrations from the engine and road travel can cause connectors to loosen slightly, even if they appear to be firmly attached at first glance.
When a wire is not securely connected, the signal repeatedly cuts in and out, causing the tachometer needle to fluctuate or flicker.
Carefully inspect all visible wiring associated with the tachometer, particularly behind the instrument cluster, as well as around the ignition system and engine sensors.
Ensure that every connector is firmly seated and properly locked into place.
A secure connection guarantees a stable signal flow, which is essential for accurate RPM readings.
2. Replace Worn or Corroded Wires and Connectors
Damaged wiring is another primary cause of tachometer malfunctions.
Wiring can become worn due to aging, exposure to heat, or abrasion against sharp edges within the engine bay.
When moisture or dirt infiltrates the connection points, corrosion can also develop on the connectors, creating a blockage that weakens the electrical signal.
When this occurs, the tachometer may receive incomplete or distorted signals, resulting in inaccurate readings or the complete failure of the device.
Carefully inspect the wiring for cracks, exposed metal, or traces of green corrosion on the connectors.
If any faults are detected, replacing the affected wire or connector is the safest and most reliable solution.
Utilizing clean, undamaged wiring helps restore proper signal strength and improves overall electrical reliability.
3. Ensure Proper Grounding
In any electrical system, ground connections are just as critical as the power supply, as they complete the circuit and facilitate the proper flow of current.
A poor ground connection can cause voltage levels to become unstable, directly impacting how the tachometer interprets RPM signals.
If the ground wire is loose, dirty, or corroded, the tachometer readings may fluctuate erratically, or the unit may cease functioning entirely.
Locate the ground points connected to the dashboard or engine and ensure they are securely fastened to a clean metal surface.
If dirt, rust, or corrosion is present, thoroughly clean the area to ensure a solid electrical contact.
A robust and stable ground connection helps maintain a consistent electrical flow, which is essential for the accurate and reliable performance of the tachometer.
How to Test and Replace the Tachometer Unit
Once all external components such as: wiring, fuses, sensors and the power supply, have been inspected and found to be functioning correctly, the issue may lie within the tachometer unit itself.
The tachometer is a sensitive device containing small electronic circuits or mechanical parts that convert engine signals into readable RPM values.
Over time, these internal components can degrade due to heat, vibration, aging, or electrical stress.
When this occurs, the tachometer may cease to function, display inaccurate readings, or behave erratically despite receiving the correct input signals.
Testing the tachometer in isolation helps confirm whether the unit itself is defective and requires replacement, thereby avoiding unnecessary repairs to other vehicle components.
1. Remove the Instrument Cluster – If Necessary
In most modern vehicles, the tachometer is integrated into the instrument cluster, the panel housing all the gauges on the dashboard.
To properly test or replace the tachometer, you may need to carefully remove this cluster.
This typically involves removing screws, clips, or trim panels from the area surrounding the dashboard.
It is crucial to handle the cluster with care and disconnect it correctly to avoid damaging the connectors or other gauges.
Once removed, you gain easy access to the back of the tachometer and its electrical connections.
Removing the instrument cluster allows for a more detailed inspection and makes it possible to test the tachometer outside of the vehicle’s interior environment.
2. Test the Tachometer Independently Using a 12V Pulse Signal
After removing the tachometer or accessing its connections, the next step is to test it independently using a controlled signal.
A tachometer operates by interpreting pulse signals that indicate engine speed; therefore, supplying a 12V pulse signal provides it with the exact same input it would receive from the engine.
When this signal is applied, the tachometer’s needle or digital display should respond smoothly and accurately, corresponding to the frequency of the pulses.
If the tachometer fails to respond at all, behaves erratically, or operates in a delayed or unstable manner, it signals an internal malfunction.
This type of testing helps verify whether the tachometer is capable of functioning correctly when receiving the proper input signal.
3. If the Tachometer Fails Independent Testing, Replace It
If the tachometer fails to respond correctly during independent testing, the most reliable solution is to replace the entire unit.
Repairing internal components such as: the circuit board or motor, is typically difficult and attempting to fix them may not yield a long-term solution.
Replacing the tachometer ensures accurate RPM readings and restores full dashboard functionality.
When installing a new or replacement unit, it is crucial to verify that it is compatible with your specific vehicle model and correctly connected to the existing wiring system.
Once replaced, the tachometer should provide stable and accurate readings, allowing you to monitor engine performance and drive with complete confidence.
How to Replace Sensors or Coils
The tachometer relies heavily on precise signals received from engine components such as: ignition coils and RPM-related sensors (typically the crankshaft position sensor).
These components generate electrical pulses that indicate how rapidly the engine is rotating and the tachometer translates these pulses into an RPM reading.
If these components malfunction or transmit erroneous signals, the tachometer will fail to display accurate information or may cease functioning entirely.
In many instances, a faulty sensor or ignition coil adversely affects not only the tachometer but also the engine’s overall performance, potentially leading to issues such as rough idling, poor acceleration, or difficulty starting the engine.
Understanding the operational mechanics of these components and conducting a thorough inspection is a crucial step toward restoring the tachometer to proper working order.
1. Inspect and Test the Ignition Coil or Engine RPM Sensor
The initial step involves carefully inspecting the ignition coil and the engine RPM sensor to identify any visible defects or connection-related issues.
The function of the ignition coil is to generate the high voltage required for the spark plugs; in certain systems, it also produces electrical pulses that the tachometer can utilize.
The RPM sensor (typically the crankshaft position sensor) monitors the engine’s rotational speed and transmits this data to the vehicle’s control system.
Inspect the area surrounding these components for loose connectors, damaged wiring, accumulated dirt, or traces of oil.
To verify whether a sensor or coil is transmitting the correct signal, it can be tested using a multimeter or a specialized diagnostic tool.
If the signal is weak, erratic, or entirely absent, it indicates that the component is not functioning properly.
2. Replace the Faulty Sensor or Coil
If testing reveals that the ignition coil or RPM sensor is defective, replacing it is the most effective solution.
These components are engineered to operate using precise electrical signals; even a minor internal fault can result in inaccurate readings or a complete loss of signal.
When replacing a component, it is crucial to select a high-quality part that is specifically compatible with your vehicle to ensure optimal engine performance and longevity.
Great care must be exercised during installation to ensure that all connections are secure and properly seated.
Replacing a faulty sensor or coil not only restores the tachometer signal but also enhances the overall functionality and reliability of the engine.
3. Re-verify Tachometer Functionality After Replacement
After installing the new sensor or ignition coil, it is essential to re-verify the tachometer to confirm that the issue has been resolved.
Start the engine and observe how the tachometer responds as the engine speed changes.
The needle or display should move smoothly, without any sudden surges or delays, and consistently display accurate RPM values.
This final check ensures that the new component is functioning correctly and that the signal is reaching the tachometer exactly as intended.
Re-examining also helps confirm that no other underlying issues remain, giving you the confidence that the repair work has been successfully completed.
How to Solve ECU or PCM Issues
In modern vehicles, the Engine Control Unit (ECU) or Powertrain Control Module (PCM) functions as a central computer that regulates engine performance and transmits essential data, including RPM signals, to the tachometer.
In many newer cars, the tachometer does not directly measure engine speed; instead, it relies on processed data received from this control unit.
If the ECU or PCM develops a fault, experiences a software glitch, or faced a communication issue, it may send incorrect or delayed signals to the tachometer, or it may fail to send any signal at all.
Although ECU-related problems are less common than wiring or sensor issues, they can still occur due to electrical surges, battery-related faults, or internal software errors.
Understanding how to safely troubleshoot problems within this system helps ensure that no underlying electronic issues go undetected.
1. Reset the ECU by Disconnecting the Battery
The simplest method for resolving minor ECU-related issues is to reset the unit.
This can be accomplished by disconnecting the vehicle’s battery for a short period, typically 10 to 15 minutes.
Doing so clears any temporarily stored data and restores the system to its default state.
Occasionally, minor software glitches or signal errors can cause the tachometer to malfunction; a reset helps re-establish normal communication between the ECU and the instrument cluster.
Before disconnecting the battery, it is crucial to ensure that the vehicle is turned off and that all necessary safety precautions have been observed.
After reconnecting the battery, the system may require a brief period to relearn its normal operating parameters.
2. If Possible, Update the ECU Software
Vehicle manufacturers occasionally release software updates for the ECU to enhance performance, fix bugs and correct signal processing errors.
If the tachometer issue is being caused by outdated or faulty software, updating the ECU may resolve the problem without the need to replace any physical components.
These updates are typically performed using specialized diagnostic tools and may be available through authorized service centers or professional mechanics.
Updated software ensures that RPM data is processed accurately and transmitted correctly to the tachometer, thereby improving both the reliability of the engine system and overall performance.
3. If a Fault in the ECU Output is Suspected, Consult a Professional
If basic checks and system resets fail to resolve the issue, and all other components, such as wiring, sensors and the tachometer unit, are functioning correctly, the problem may lie within the ECU’s internal hardware or signal output.
Diagnosing such issues requires advanced equipment and technical expertise, as the ECU controls multiple systems and communicates through complex electronic networks.
A professional technician can conduct a detailed inspection, read live data and accurately test the ECU’s output.
In such situations, seeking the assistance of an expert helps prevent unnecessary damage and ensures that the problem is resolved safely and correctly, particularly when dealing with sensitive electronic systems.
How to Perform Post-Repair Testing
After completing any repairs on the tachometer system, it is crucial to thoroughly test every component to ensure that the original problem has been completely resolved.
A tachometer should display smooth and accurate RPM readings, as it serves as a direct indicator of the engine’s real-time performance.
Even if the repair appears successful, minor issues such as: weak signals, loose connections, or incorrect calibration, as it can still lead to inaccurate readings.
Post-repair testing helps verify that all components are functioning correctly in unison and that the tachometer remains reliable under actual driving conditions.
This step ensures safety, instills confidence and prevents potential future problems from going unnoticed.
1. Start the Engine and Observe the Tachometer’s Behavior
The first step is to start the engine and carefully observe how the tachometer responds.
As soon as the engine fires up, the tachometer needle should sweep smoothly from zero to the normal idle RPM range, which, for most vehicles, typically falls between 600 and 1000 RPM.
The needle or digital display should remain steady, free from any sudden surges, delays, or flickering.
If the tachometer responds sluggishly, exhibits erratic movement, or fails to respond at all, it may indicate that the original problem has not been fully resolved.
Careful observation during this stage helps identify any residual faults remaining within the system.
2. Test Across Different RPM Ranges
Once the tachometer displays a steady reading at idle, the next step is to test it at various engine speeds.
Gradually increase the engine RPM by pressing the accelerator and observe how the tachometer responds.
As the engine speed rises, the needle should sweep upward smoothly; Conversely, as the speed decreases, the needle should descend just as smoothly.
Testing across low, medium and high RPM ranges helps ensure that the tachometer receives consistent and accurate signals under all operating conditions.
If readings become erratic or inconsistent at certain speeds, it may indicate a weak signal, a sensor issue, or a wiring problem that still requires attention.
3. Ensure Accuracy Aligns with Engine Performance
The final step is to ensure that the tachometer readings correspond with the actual behavior of the engine.
For instance, when the engine feels more responsive or powerful, the RPM reading should rise accordingly; conversely, when the engine slows down, the reading should also decrease in a natural and predictable manner.
Inaccurate readings such as: RPM values that are excessively high or low, as it can mislead the driver and influence driving-related decisions, such as when to shift gears.
In some cases, cross-referencing the tachometer readings with a diagnostic tool can help validate its accuracy.
Ensuring that the tachometer accurately reflects the engine’s true performance is crucial for safe driving, proper engine maintenance and long-term durability.
How to Take Some Preventive Measures
Rather than fixing tachometer problems after they occur, it is far easier and more cost-effective to prevent them from arising in the first place.
Since the tachometer relies on clean electrical signals, a stable power supply and properly functioning components, paying regular attention to these elements significantly reduces the likelihood of malfunctions.
Many tachometer issues develop gradually over time, stemming from wear and tear, dirt, moisture, or minor electrical faults, and are often overlooked until the gauge ceases to function entirely.
By adopting a few simple preventive measures and inspecting key system components at regular intervals, you can maintain accurate RPM readings, protect your engine from unnecessary stress and ensure the long-term reliability of your vehicle’s dashboard instruments.
Even, there’s study that shows that the tachometers are actually designed for precision and reliability, as it can work even in the extreme conditions very well, that’s why if your tachometer is not working properly, then it can be a serious issue as these devices are built to provide the consistent and accurate data under the real time operating conditions.[¹]
1. Regularly Inspect Wiring and Connectors
Wiring and connectors serve as the conduits that transmit electrical signals, enabling the tachometer to display accurate RPM readings; therefore, keeping them in good condition is paramount.
Over time, vibrations can cause wires to loosen, or they may sustain damage from the heat and abrasion generated within the engine compartment.
Dirt or moisture can also accumulate inside connectors, leading to corrosion and a degradation of signal flow.
Regularly inspecting these components allows you to identify minor issues before they escalate into major problems.
Ensuring that all connections remain secure, clean and free from damage helps maintain a robust and stable signal reaching the tachometer.
2. Keep Dashboard Components Clean and Dry
The instrument cluster (which includes the tachometer) is sensitive to dust, moisture and temperature fluctuations.
If water or moisture enters the dashboard area, it can damage the internal circuitry and cause the tachometer to malfunction.
Over time, the accumulation of dust can also adversely affect the electrical contacts.
Keeping the dashboard clean and dry helps protect these delicate components and ensures their smooth operation.
Avoid spilling any liquids near the dashboard and ensure that any signs of moisture inside the vehicle are addressed immediately to prevent long-term damage.
3. Avoid Aftermarket Modifications That Affect the Tachometer Signal
Aftermarket modifications such as: installing performance parts, custom ignition systems, or additional electronic accessories, as it can sometimes interfere with the tachometer signal.
These modifications can alter how electrical signals are generated or transmitted, potentially resulting in inaccurate RPM readings or causing the tachometer to fail completely.
It is crucial to ensure that any modifications you make are fully compatible with your vehicle’s electrical system and are installed correctly.
By avoiding unnecessary or improperly executed modifications, you preserve the integrity of the original signal and prevent sudden operational issues.
4. Periodically Check Fuses and Ground Connections
Fuses and ground connections are vital for stable electrical operation and checking them regularly can prevent sudden tachometer failures.
Over time, minor electrical faults can cause a fuse to weaken or blow, thereby cutting off the power supply to the tachometer.
Ground connections can also become loose or corroded, affecting the flow of electricity and leading to unstable readings.
Periodic inspection and maintenance of these components ensure that the electrical system remains reliable.
Keeping the fuse in good condition and maintaining clean and secure ground connections ensures that the tachometer operates accurately and consistently.
Read More:
Conclusion – How to Fix Tachometer Not Working
It is not about repairing a gauge, as tachometer literally helps you to drive in smarter way by reducing engine stress and extends the life of your vehicle as well.
It indicates how fast the engine is rotating, thereby assisting you in making better driving decisions, preventing the engine from over-revving and maintaining its overall health.
When a tachometer stops working, it often signals a fault within the electrical system, the sensor network, or the signal flow.
Fortunately, most tachometer-related issues are not overly complex; they can be diagnosed using a step-by-step approach, starting with basic components such as wiring, fuses, sensors and connections and subsequently moving on to more advanced components like the instrument cluster or the ECU.
By adopting a systematic approach, beginning with simple visual inspections and progressing toward deeper diagnostics, you can accurately pinpoint the root cause of the problem without wasting time or money.
Every component of the system, from the ignition coil to the ground connections, plays a role in delivering a clean and stable RPM signal.
Even minor issues, such as a loose wire or a corroded connector, can disrupt this signal and cause the tachometer to malfunction.
So, that’s all about this guide and if you still have confusion, just ask them in the comment box below.
Frequently Asked Questions
Q1. Why does a tachometer stop working?
A tachometer can stop working for several common reasons, most of which involve electrical or signal-related issues. The most common causes include a blown fuse, faulty or loose wiring, a defective ignition coil, or a malfunctioning crankshaft position sensor, which fails to transmit the correct RPM signal. In some cases, the problem may lie within the tachometer unit itself, particularly if its internal circuitry has degraded over time. In modern vehicles, a tachometer malfunction can also stem from signal-related issues involving the ECU (Engine Control Unit). Since the tachometer relies on the coordinated operation of multiple components, even a minor fault in a single part can prevent it from functioning correctly.
Q2. Can I drive my car if the tachometer isn’t working?
Yes, you can still drive your car even if the tachometer is not working, although doing so for extended periods is not recommended. The tachometer helps you monitor the engine speed, which is crucial for smooth gear shifting and for preventing the engine from over-revving. Without it, you must rely entirely on the sound of the engine, which does not always provide an accurate indication, specially for inexperienced drivers. Driving with a faulty tachometer can place unnecessary strain on the engine, reduce fuel efficiency and if the engine is repeatedly operated beyond its safe RPM limit, potentially cause long-term engine damage.
Q3. How can I determine whether my tachometer is faulty or if the problem lies elsewhere?
To determine whether the tachometer itself is defective, you must verify whether it is receiving the correct signal from the engine system. If the wiring, fuses, ignition components and sensors are all functioning correctly, yet the tachometer remains inoperative or displays inaccurate readings, the problem most likely lies within the tachometer unit itself. You can determine whether the issue is external or internal by checking the signal using a multimeter or a diagnostic scanner. If the tachometer fails to operate even after receiving a proper signal, it generally indicates that the unit requires repair or replacement.
Q4. What role does the crankshaft position sensor play in the operation of the tachometer?
The crankshaft position sensor plays a crucial role, as it monitors the engine’s rotational speed and transmits this information to the vehicle’s control system. The ECU then utilizes this data to calculate the RPM and relay it to the tachometer. If this sensor malfunctions or sends an erroneous signal, the tachometer will be unable to display accurate readings, or in some instances, may cease functioning entirely. In many cases, a faulty crankshaft sensor also adversely affects engine performance, potentially leading to issues such as rough idling or difficulty starting the engine.
Q5. Can a blown fuse cause the tachometer to stop working?
Yes, a blown fuse is one of the most common and straightforward causes of tachometer failure. The function of a fuse is to protect the electrical circuit; if it blows, it interrupts the power supply to the tachometer, and in some cases, to the entire instrument cluster as well. When this occurs, the tachometer will not function at all. Replacing the blown fuse with a new one of the correct amperage rating often resolves this issue. However, if the fuse blows again, it may indicate a larger underlying electrical problem that requires further investigation.
Q6. How do I check the tachometer signal?
You can check the tachometer signal using a multimeter or a diagnostic tool. With the engine running, the multimeter can measure the voltage or pulse signals traveling from the ignition system or sensors to the tachometer. A healthy signal should fluctuate smoothly as the engine speed increases or decreases. If no signal is detected, or if the signal is weak or erratic, it indicates a problem with the wiring, sensors, or ignition system. This diagnostic check helps determine whether the tachometer is receiving the correct input.
Q7. Can a faulty ignition coil affect the tachometer?
Yes, a faulty ignition coil can affect the tachometer, as it is often involved in generating the pulse signals used to calculate RPM. If the ignition coil is not functioning correctly, it may send a weak or erratic signal, causing the tachometer needle to fluctuate erratically, display inaccurate readings, or stop working entirely. In addition to tachometer-related issues, a faulty ignition coil can also cause problems such as engine misfires, poor performance and difficulty starting the vehicle.
References:
[1] Wide-Temperature-Range Tachometer Based on a Magnetoelectric Composite
https://www.mdpi.com/1424-8220/25/3/829

Guys, I’m a car audio enthusiast and customization expert and I love clear sound and clean installation. Plus, I have spent years helping people build their dream audio setups. And whenever I’m working on cars, I probably listen to music and thinks about the next big upgrade.