Written By: Don Dodi
Fact Checked By: Kristen Brown
Reviewed By: Diego Rosenberg
Driving without having properly functional tail light is really risky, as the others can face to guess your braking, taking turns and could cost you a traffic ticket as well.
Basically, these are the red lights at the back of your car that actually illuminate whenever the headlights are on and signal other drivers when you are actually slowing down or turning.
That’s why, proper working of tail lights of the headlights are really crucial to prevent accidents, specially at the night time, in heavy rain, fog or low-visibility conditions as well.
Also, there’s studies from road safety that shows that faulty rear lights increase the risk of the rear-end collisions in significant way.
Plus, you need to know more than just blinking tail lights, as there are combination of bulbs or LEDs, wiring, fuses and switches are available that works together to make this system useful.
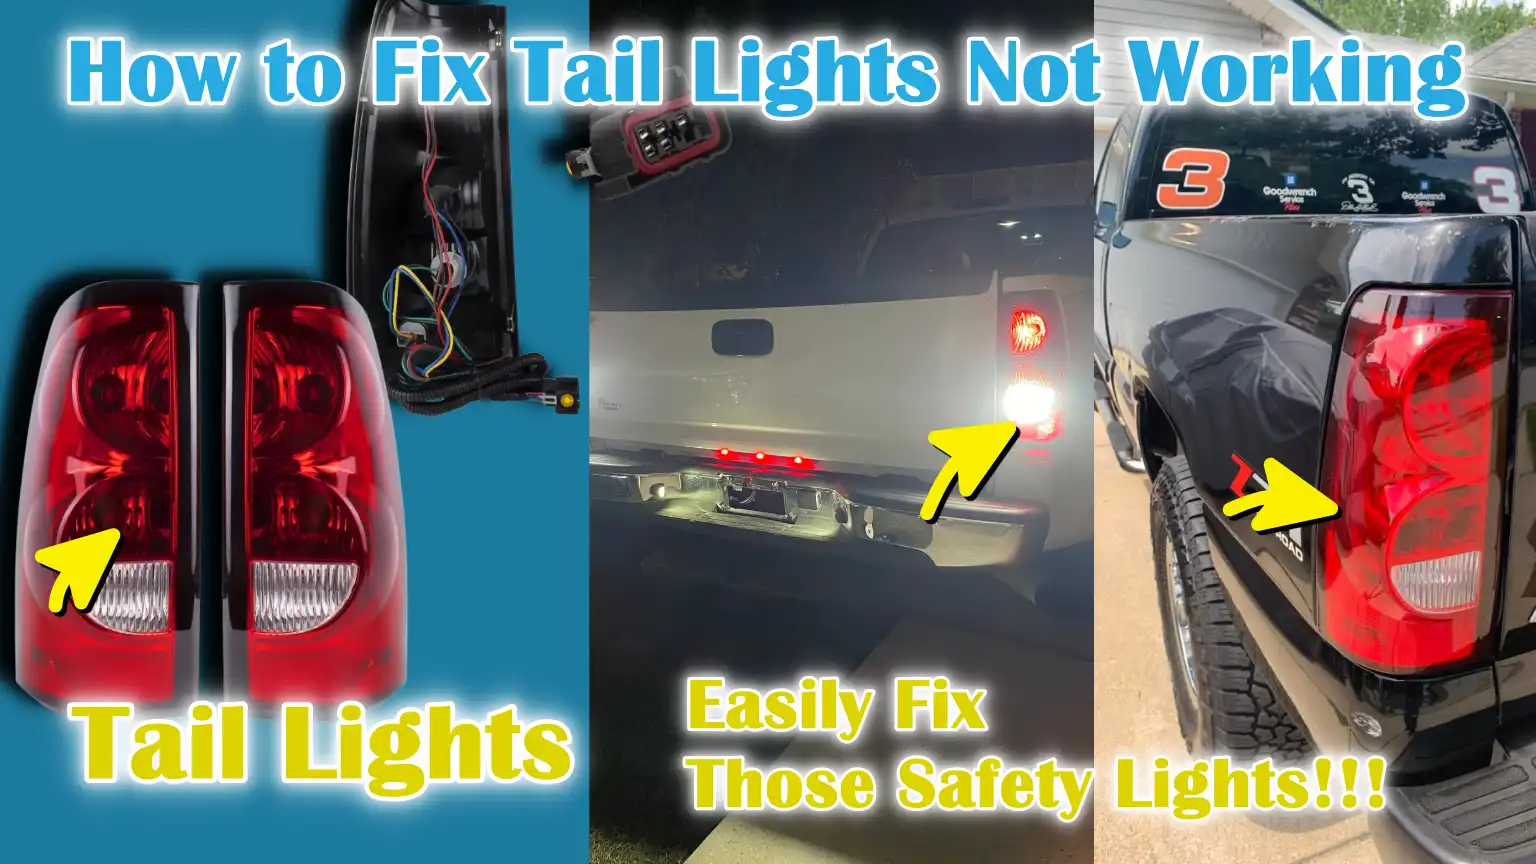
So, this is the guide that shows you How to Fix Tail Lights Not Working, so that you can easily fix the problem and save money on repairs as well.
Now, Let’s Understand How Taillights Actually Works
1. Differences Between Taillights, Brake Lights and Turn Signals
Taillights, brake lights and turn signals are all installed at the back of your car, but they perform different functions.
Taillights are red lights that illuminate when your headlights are on, helping other drivers see your car in the dark or in bad weather.
Brakelights are brighter red lights that activate when the brake pedal is pressed, signaling to drivers behind you that your car is slowing down or stopping.
Turn signals, which are usually amber or yellow, flash on one side of the vehicle to indicate that you are planning to turn or change lanes.
It’s important to understand these differences because if one system malfunctions, it can cause road confusion and increase the risk of accidents.
2. How the Lighting Circuit Works – Battery to Fuse to Switch to Wiring to Bulb
The taillight system operates on a simple electrical circuit.
Electricity comes from the car’s battery and passes through a fuse, which protects the system from overload.
From the fuse, current flows to the headlight switch or brake light switch, depending on whether the lights are for driving or braking.
Electricity then travels through wiring to the taillight bulb, which lights it.
If any part of this circuit fails such as: blown fuse, a broken wire, or a faulty switch, then the taillights will stop working.
Understanding this flow helps drivers troubleshoot and identify where the problem may be.
3. The Role of the Headlight Switch and Brake Pedal Switch
When you turn on the headlights, parking lights, or automatic lights in modern cars, the headlight switch controls the taillights.
If this switch is faulty, your taillights may not turn on even if the bulbs are working properly.
The brake pedal switch operates when you press the brake pedal, providing power to the brake lights.
A worn or misaligned brake switch can cause the brake lights to malfunction or remain on continuously.
Both switches are small but essential parts that control the flow of electricity to the lights and ensure their proper functioning.
4. Overview of Traditional Halogen Bulbs vs LED Taillight Systems
Most older cars use halogen bulbs for taillights, which produce light by heating a small filament inside the bulb.
These bulbs are inexpensive, easy to replace and provide good visibility.
Modern cars are increasingly using LED taillights, which are brighter, use less energy and last longer.
LEDs light up faster than halogen bulbs, giving drivers behind you more time to react.
However, LED systems can be more complex and often require replacing the entire assembly if even a single LED fails.
Knowing which type of system your car uses helps with troubleshooting and ensures the correct replacement or repair approach.
Know Common Symptoms of Taillight Failure
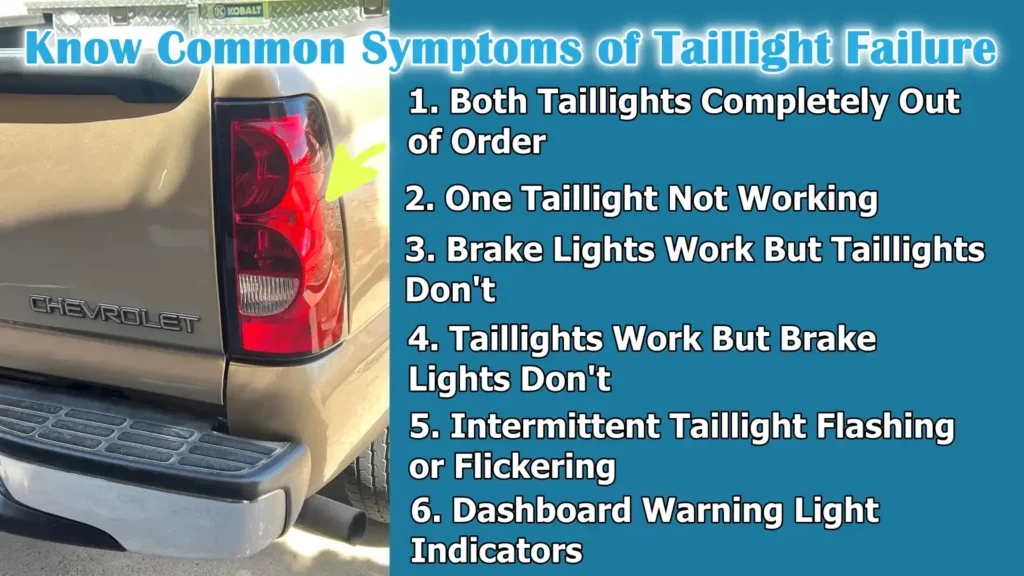
1. Both Taillights Completely Out of Order
When both taillights fail, it usually indicates a problem with the entire lighting circuit.
This could be a blown fuse, a faulty headlight switch, or a wiring problem that prevents power from reaching both bulbs.
Driving with both taillights out is very dangerous, specially at night or in bad weather, as other drivers may not be able to see your car.
Recognizing this symptom early can prevent accidents and traffic violations.
2. One Taillight Not Working
If only one taillight is not working, the problem is often located on one side of the vehicle.
Common causes include a burnt bulb, a loose or corroded connector, or a fault in the wiring of that light.
Working taillights provide visibility, but the lack of a consistent lighting system can confuse other drivers and result in traffic tickets in many areas.
3. Brake Lights Work But Taillights Don’t
In some cases, the brake lights turn on when the brake pedal is pressed, but the taillights don’t turn on when the headlights are on.
This usually indicates a problem with the headlight switch, specifically a blown taillight fuse, or a wiring problem between the fuse and the taillight bulb.
Understanding this symptom helps narrow the problem down to the parts responsible for the taillights, saving time and money on repairs.
4. Taillights Work But Brake Lights Don’t
If the taillights turn on normally when the headlights are on, but the brake lights don’t, the problem is likely with the brake light switch or the wiring that connects it to the brake lights.
A misaligned or worn brake switch can prevent the brake lights from turning on even when the pedal is pressed, posing a serious hazard to cars behind you.
5. Intermittent Taillight Flashing or Flickering
Intermittent taillight flashing or flashing is often caused by loose connections, worn terminals, or faulty bulbs.
In vehicles with LED taillights, the problem may be related to the LED module or driver circuitry.
This symptom is difficult to detect because the lights sometimes work and sometimes fail, making it dangerous and unpredictable.
Early detection of flickering can allow preventive repairs before a complete failure occurs.
6. Dashboard Warning Light Indicators
Many modern vehicles are equipped with dashboard warning lights that indicate a problem with the taillights or other exterior lights.
If a warning light comes on, it means one or more bulbs are faulty or there is a problem with the electrical system.
It is important to pay attention to these indicators because they provide warning before the entire taillight fails, helping maintain safety and avoid legal issues.
Tools
| Tool / Material | Description |
|---|---|
| Replacement Bulbs | These are the bulbs that power your taillights. Make sure you use the correct type and size bulbs for your car. Replacing burned-out bulbs is the most common method. |
| Screwdrivers – Phillips & Flathead | Used to remove screws on the taillight housing. Phillips heads are cross-shaped, while flathead heads have a straight slot. This provides safe access to the bulb and wiring. |
| Socket Wrench Set | Helps remove bolts holding the taillight assembly in place. Comes in different sizes to fit different cars. Makes removing tight bolts much easier. |
| Multimeter or Test Light | Measures power in wires and fuses. This helps check if a bulb, fuse, or switch is working. Essential for diagnosing electrical problems. |
| Electrical Contact Cleaner | Cleans dirt and corrosion from wiring connections. This ensures the taillight is receiving the proper power. Prevents flickering or dim light. |
| Replacement Fuses | Fuses protect your taillights from electrical damage. If a fuse blows, the light won’t work. Always replace a fuse with the same amperage. |
| Dielectric Grease | Keeps electrical connections dry and prevents corrosion. Used on bulb sockets and wiring terminals. Extends the life of your taillight system. |
| Owner’s Manual | Contains vehicle-specific information, such as fuse locations and bulb types. Guides you safely during repairs. Helps avoid mistakes when fixing lights. |
How to Fix Tail Lights Not Working – Easy & Complete Guide
1. Check the Tail Light Bulb
Remove the Tail Light Housing
To access the tail light bulb, you’ll need to remove the tail light housing.
This usually requires unscrewing a few bolts or clips.
Carefully removing the housing avoids damaging the surrounding body panels.
This step allows you to view the bulb and wiring directly.
Check the Filament – For Halogen Bulbs
For traditional halogen bulbs, the filament inside the glass produces light when heated.
Inspect the filament carefully for cracks or burns.
A broken filament means the bulb won’t light.
Checking it carefully will ensure you don’t have to replace the bulb unnecessarily.
Check for Blackened Glass or a Broken Filament
Even if the filament appears intact, check for blackened glass inside the bulb.
Blackened or cloudy glass is a clear sign that the bulb has overheated or burned out and needs to be replaced.
Identifying this early can save time and prevent repeated failures.
Replace the Right Type of Bulb
Always use the correct replacement bulb for your vehicle.
Using the wrong type of bulb can cause electrical problems or dim light.
Consult your owner’s manual to verify the bulb type and wattage before installing the bulb.
Test the Lights After Replacement
After installing the new bulb, turn on your headlights or press the brake pedal to test the lights.
Make sure they light properly.
Testing at this stage confirms that replacing the bulb has fixed the problem.
2. Check the Fuses
Locate the Fuse Box – Dashboard or Under the Hood
The fuse box contains small fuses that protect your taillights from electrical damage.
Find it using your owner’s manual.
Some vehicles have the fuse box under the dashboard, while others have it in the engine compartment.
Identify the Taillight Fuse Using the Owner’s Manual
Find the fuse specifically for the taillights.
Your manual will list the fuse number and location.
Correct identification is crucial, as replacing the wrong fuse won’t solve the problem.
Remove the Fuse and Check for a Broken Fuse
Remove the fuse and check for a broken metal strip inside.
A broken strip means the fuse has blown and can’t conduct electricity.
Checking the fuse can prevent unnecessary problems with other parts.
Replace the fuse with the same amperage rating
If the fuse is blown, replace it with a new fuse with the same amperage rating.
Using a higher or lower rating can damage your car’s electrical system or cause frequent malfunctions.
Test the lights again
Turn on your headlights or brake lights to see if the replaced fuse fixed the problem.
A properly working fuse confirms that the fuse was the cause.
3. Check the headlight switch
Turn on the headlights and check the dashboard lights
The headlight switch sends power to the taillights.
Turn on the headlights and check if the dashboard indicator lights are working.
If the dashboard lights are not working properly, the switch may be faulty.
Test the switch function
Turn the headlight switch to all settings, including parking lights, low beam and high beam.
Check that the taillights work in each setting.
This step confirms whether the switch is supplying power properly.
Check for loose or worn switch contacts
Look for loose wires or worn internal contacts in the switch.
Worn contacts can prevent power from reaching the taillight, even if the switch is working.
Replace a faulty headlight switch if necessary
If testing reveals a faulty switch, replace it with a new one.
A working switch is essential for your taillights to remain on whenever your headlights are on.
4. Check the wiring and connectors
Check for corrosion in the connector
Corrosion in the taillight connector can prevent power flow.
Check for corrosion, dirt, or moisture buildup in the connector.
Cleaning the connector should restore proper contact and the light will stop flickering or dimming.
Check for frayed or damaged wires
Check for frayed or broken wires in the wiring harness.
Frayed wires can prevent power from reaching the taillight.
Early detection can prevent recurring faults and potential electrical hazards.
Clean damaged terminals with contact cleaner
Use electrical contact cleaner to remove dirt and corrosion from the terminals.
Clean connections improve conductivity and reduce the risk of intermittent faults.
Repair or replace damaged wires
If wires are severely damaged, repair them using wire connectors or replace the part entirely.
Proper wiring ensures reliable power flow to your taillight.
5. Test the Brake Light Switch – If Connected
Locate the Brake Pedal Switch
When you press the pedal, the brake pedal switch sends electricity to the brake lights.
According to your car’s manual, locate it near the brake pedal assembly.
Test Switch Operation
Press the brake pedal and see if the brake lights illuminate.
If they don’t, the switch may be misaligned or defective.
Replace If Defective
If the brake light switch doesn’t work, replace it.
A working switch is crucial for safety, as it signals to drivers behind you that you’re stopping.
6. Check the Ground Connection
Locate the Grounding Wire Near the Taillight Housing
The ground wire completes the electrical circuit for the taillights.
Locate the grounding wire and its connection point near the taillight housing.
Check for rust or loose bolts
Check for rust, corrosion, or loose bolts at the grounding point.
A poor ground can block the flow of electricity, causing the taillights to dim or not work.
Clean the grounding surface and tighten it properly
Clean the grounding surface to remove rust and debris, then tighten the bolts properly.
A solid ground ensures that the taillights work properly and prevents flickering or intermittent malfunctions.
What are the Basic Key Points for LED Taillights
1. Diagnosing a Bad LED Module
LED taillights differ from older halogen bulbs because they use multiple small light-emitting diodes in a single module.
When an LED taillight fails, it’s not always just one diode that’s bad; often, the entire LED module can fail.
Diagnosing a bad LED module involves checking whether the taillight is lit, whether parts of the light are dimmed, or whether it’s flickering.
Using a multimeter or test light can help determine whether power is reaching the LED module.
This is important to understand because LED systems are more complex than regular bulbs and require a different approach to repair.
2. Checking the LED Driver Module
LED taillights rely on a small electronic component called a driver module, which regulates voltage and current to the LEDs.
If the driver module is damaged, LED taillights may not work, even if the diodes themselves are fine.
Checking the LED driver module usually involves following the wiring from the fuse and headlight switch to the module and testing it with a multimeter.
Identifying problems in the driver module can save time and prevent unnecessary replacement of the entire LED assembly.
3. When the Entire Assembly Needs to Be Replaced
In many modern vehicles, LED taillights are housed in a sealed unit and individual LEDs or driver modules cannot be replaced separately.
When an LED module or driver fails and cannot be serviced, the entire taillight assembly must be replaced.
While this may be more expensive than replacing a single bulb, it ensures that the LED system operates reliably and safely.
Knowing when a complete replacement is necessary prevents hassle and repeated repairs.
4. Consider the cost compared to replacing bulbs
Replacing LED taillights is typically more expensive than replacing halogen bulbs.
A single halogen bulb can cost just a few dollars, while a complete LED taillight assembly can cost hundreds of dollars, depending on the make and model of vehicle.
However, LED lights last longer, use less energy and are brighter, providing better visibility and increased safety.
Understanding the cost difference helps vehicle owners make informed repair and maintenance decisions.
When You Should Go for the Professional Help
Plus, there’s research in human perception that shows that the design of the taillights literally influences how quickly drivers behind can notice a vehicle and recognize the any potential hazards as well. So, it is study in Transportation Research Part F that demonstrated that the specific taillight shapes are detected more rapidly in the night driving scenarios, which actually helps the drivers to respond sooner and more safely, that actually shows that fully working and effective tail light design also plays a direct role in crash prevention, as it is not just lights that turn on when needed, but the safety feature.[¹]
1. Persistent Electrical Problems
If your taillights continue to fail even after checking the bulbs, fuses, switches and wiring, it could be a sign of a deeper electrical problem that requires professional diagnosis.
Persistent problems could be caused by hidden wiring faults, poor grounding, or internal circuit problems.
A professional mechanic can accurately diagnose the electrical system using specialized tools to ensure the problem is repaired safely and effectively.
Attempting to fix complex electrical problems without experience can sometimes worsen the problem or pose a safety hazard.
2. Frequent Fuses Blown
If you notice that your taillight fuses are blowing repeatedly, it could be a sign of an internal electrical problem rather than just a bad fuse.
Persistent fuse blowing could be caused by a short circuit, faulty wiring, or faulty parts drawing too much power.
A trained technician can identify the cause of the problem, preventing recurring breakdowns, the risk of fire and damage to the vehicle’s electrical system.
3. Body Control Module (BCM) Problems
Modern vehicles use the Body Control Module (BCM) to manage all lighting systems, including the taillights.
If the BCM is faulty, it can cause the taillights to run intermittently, flicker, or fail completely.
Diagnosing BCM problems requires specialized equipment and knowledge of the vehicle’s electronic systems.
In such cases, professional assistance is essential, as the BCM is a vital component that controls many electrical functions beyond just the taillights.
4. Serious Damage to the Wiring Harness
Sometimes, taillight problems are caused by serious damage to the wiring harness, which carries power from the fuse box and switch to the taillights.
Serious damage to the harness can involve multiple wires, connectors, or corroded areas that are difficult to identify and repair without experience.
Professionals can safely repair or replace the wiring, restoring full functionality and ensuring the vehicle’s electrical system remains reliable and safe.
How to Maintain Tail Lights Efficient Working for Long Term
1. Check the Lights Regularly
Regularly checking your taillights can catch problems before they become serious.
Every few weeks or during your regular car wash, check that all lights, including brake lights and turn signals, are working.
Early detection of dim or non-functioning lights ensures your vehicle is safe and compliant.
2. Keep Taillight Covers Clean
Dirt, dust and grime on taillight covers can reduce the brightness of your lights, making your vehicle less visible at night or in bad weather.
To keep the lights clean, clean the covers regularly with mild soap and water.
Clean taillight covers improve visibility for you and other drivers, improving overall road safety.
3. Prevent moisture from accumulating in the housing
Moisture inside the taillight housing can damage the bulbs, corrode the wires, or short-circuit the connectors.
Ensure the seals around the taillights are intact and check for cracks in the housing.
Keeping the interior dry protects the electrical parts and extends the life of the lights.
4. Replace Bulbs in Pairs
Replacing bulbs in pairs, even if only one is bad, maintains consistent light output and reduces the risk of one side losing light.
Taillights typically age at the same rate, so replacing bulbs in pairs may not result in consistent light output.
This simple method maintains optimal visibility and increases driving safety.
5. Check Lights Before a Long Journey
Before any long trip, check all taillights, brake lights and turn signals.
Ensure the bulbs are bright, the housings are clean and the electrical connections are secure.
A quick check before driving ensures your vehicle is clearly visible to others, reducing the risk of accidents and roadside emergencies.
Read More:
Conclusion – How to Fix Tail Lights Not Working
Yes, now you have understand that tail lights are not just the showcasing red lights, as they are safety system that communicates your intentions to every driver who is behind you.
Actually, when taillights properly works then it literally prevent accidents by making your car visible at night, in rain, fog, or other low-visibility conditions.
Along with this, they also signal to drivers behind you that you’re braking or turning.
And, many taillight problems, such as burned-out bulbs, blown fuses, faulty wiring, or faulty switches, can be diagnosed and fixed with simple tools and careful inspection.
However, modern vehicles with LED taillights or complex electrical systems may require professional help for some repairs.
Now, that’s all from this guide, if you still have confusion related to this guide just let us know by commenting below this guide.
Frequently Asked Questions
Q1. Why don’t my taillights work even though the brake lights are working?
Answer: This usually happens when there’s a problem with the headlight switch, a blown fuse, or a wiring problem that only affects the taillights. Brake lights have a separate circuit that’s activated when the brake pedal is pressed, so they may not be working. Checking the bulb, fuse and switch can help determine the cause and fix it.
Q2. Can I drive with one taillight off?
Answer: Technically, you can drive with one taillight off, but it’s not safe or recommended. Having even one taillight off makes your vehicle less visible to other drivers at night or in bad weather. This can lead to traffic fines or legal issues. The safest option is to replace the faulty bulb immediately or repair the circuit.
Q3. How long do taillight bulbs typically last?
Answer: Traditional halogen taillight bulbs typically last 1 to 2 years, depending on how often you drive and how long the lights are used. LED taillights last longer, often 10 to 20 years, because they use less electricity and don’t have a filament that can burn out. Regular inspections help ensure the bulbs are working properly before they fail.
Q4. Why do taillight fuses frequently blow?
Answer: Repeated blown fuses are usually a sign of a deeper electrical problem, such as a short circuit, faulty wiring, or a faulty component that’s drawing too much power. Simply replacing the fuse without fixing the underlying problem won’t solve the problem. A professional inspection may be required to determine and correct the cause of the electrical failure.
Q5. Are LED taillights more difficult to repair than older bulbs?
Answer: Yes, LED taillights can be more difficult to repair. Unlike older halogen bulbs, LEDs often come as part of a sealed module that contains a driver that regulates power. If an LED fails, the entire assembly sometimes needs to be replaced. Although LEDs last longer and are brighter, repairing them may require more specialized knowledge and tools.
Q6. Why do my taillights flicker intermittently?
Answer: Flickering taillights are usually caused by loose or corroded connections, bad wires, or a bad bulb. In cars with LED taillights, flickering can also be caused by a fault in the LED driver module. Checking and cleaning the connector or repairing faulty wires often resolves this issue. Intermittent flickering should not be ignored, as it could be a sign of a larger electrical problem.
References:
[1] The effect of taillight shapes and vehicle distance on rearward drivers’ hazard perception
https://www.sciencedirect.com/science/article/abs/pii/S1369847824001633

Guys, I’m a car audio enthusiast and customization expert and I love clear sound and clean installation. Plus, I have spent years helping people build their dream audio setups. And whenever I’m working on cars, I probably listen to music and thinks about the next big upgrade.