Written By: Don Dodi
Fact Checked By: Kristen Brown
Reviewed By: Diego Rosenberg
Your car’s exhaust system is not about just to make some noise: as it actually keeps the harmful gases away and it also helps your engine to perform at its best.
Basically the exhaust system carries harmful gases from the engine out of the vehicle and that reduces the engine noise as well and even it helps to improve the overall engine performance as well.
And over the period of time, the exhaust parts can wear out, rust or become damaged which may later cause the louder noise, also it reduces the fuel economy or it can leak the dangerous gas.
When you upgrade or replace your exhaust then it can not only restore your car’s efficiency but also it improves its sound and appearance.
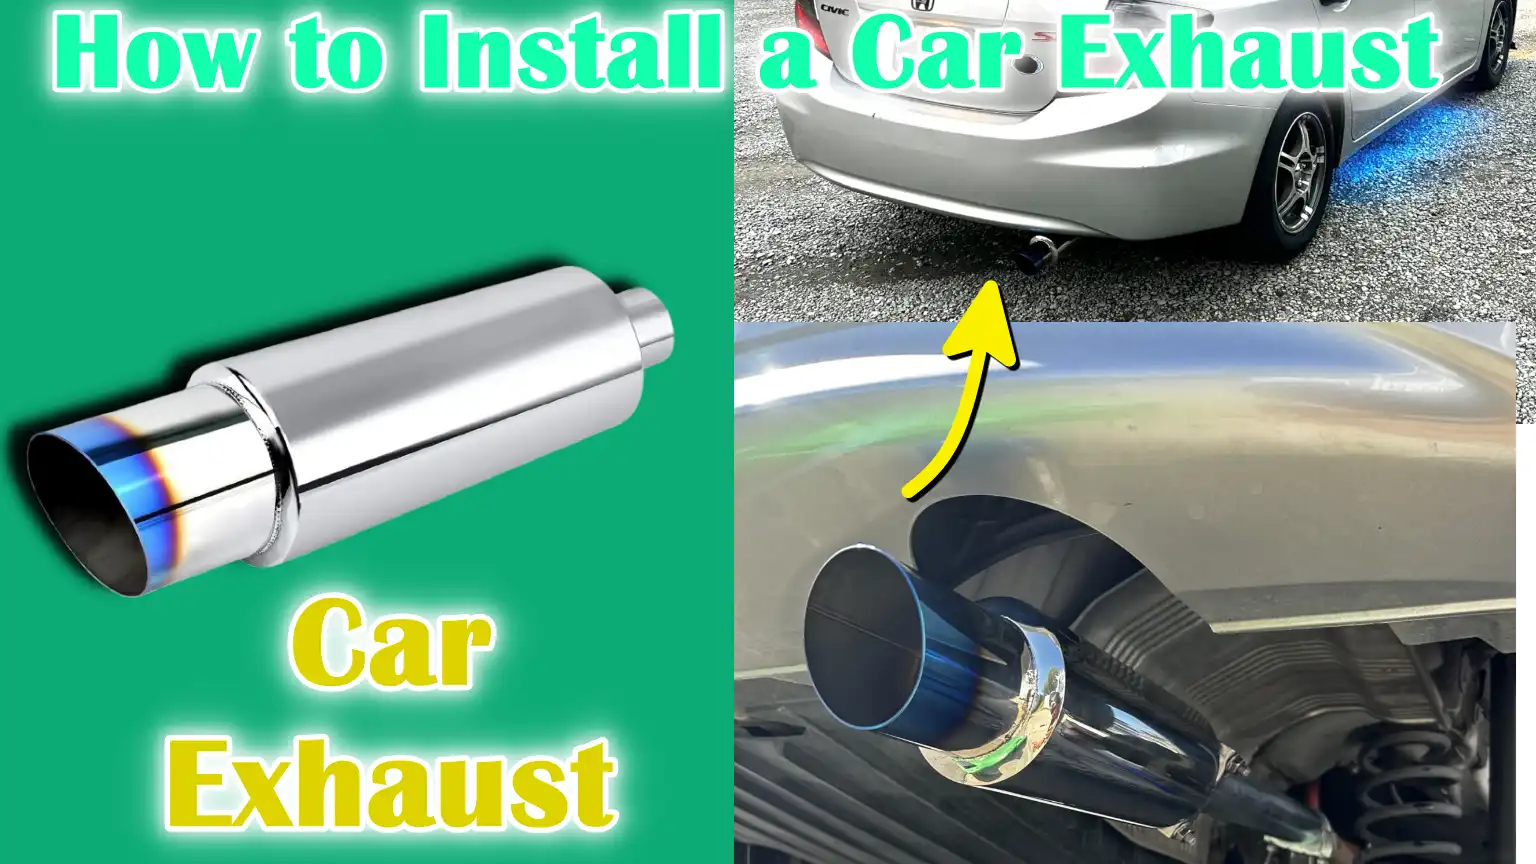
Plus, this guide is all about How to Install a Car Exhaust, as it includes safety precautions, the right tools and the proper installation process: and these are actually crucial to ensure the system works effectively and it lasts for longer period of time.
Tools
| Tool / Material | Purpose | Tips for Use |
|---|---|---|
| Jack and Jack Stands | Lifts car off ground and holds it securely while working underneath. | Always use on a level surface; never rely on a jack alone – always use a stand. |
| Hydraulic Lift | Alternative to jack/stands, used in professional garages for easy access. | Make sure the lift is suitable for the weight of your car; follow safety instructions. |
| Socket Wrench Set & Extensions | To remove and tighten bolts on exhaust components. | Use the right size socket to avoid rounding the bolt; extensions help reach tight spots. |
| Penetrating Oil (e.g., WD-40) | To loosen rusted or stuck bolts and nuts. | Spray and wait a few minutes before loosening the bolts for easier removal. |
| Safety Glasses & Gloves | To protect eyes and hands from debris, chemicals and hot surfaces. | Always wear gloves when working under a car; they protect against burns and cuts. |
| Exhaust Sealant or Gaskets | To seal joints and prevent exhaust leakage. | Install according to manufacturer’s instructions; make sure no gas escapes from the connections. |
| Torque Wrench | To tighten bolts to the correct pressure. | Prevents overtightening or undertightening, which could cause leakage or damage. |
| Rubber Exhaust Hangers | To hold the exhaust in place and reduce vibration. | Replace it if worn or broken; this helps maintain proper alignment and reduce noise. |
What are The Basic Preparation You Have to Do
1. Park the vehicle on a level surface and apply the parking brake
Before starting any work on your car’s exhaust system, it is important to park the vehicle on a level and stable surface.
A level surface prevents the car from rolling or moving while working underneath, which can cause serious accidents.
Always apply the parking brake to securely lock the wheels.
This simple step is one of the most important safety measures when working underneath a vehicle and ensures that your car remains completely stationary throughout the entire installation process.
2. Allow the exhaust system to cool completely
The exhaust system can be very hot after running the engine and touching it immediately can cause burns or injury.
It is important to wait until the entire system has cooled down before starting any work.
This includes the exhaust pipes, muffler, catalytic converter and other connected parts.
Waiting for the system to cool down not only protects you from burns, but also makes it easier to handle parts and remove bolts without causing any damage.
3. Gather All Tools and Parts Before You Begin
Having all necessary tools and replacement parts ready before you begin will make the installation process easier and faster.
This includes wrenches, sockets, jack stands, gaskets, sealant and all replacement exhaust components.
Organizing everything beforehand will prevent you from having to stop to look for tools or materials in the middle of the job.
Proper preparation reduces mistakes, saves time and helps ensure the installation is done safely and correctly the first time.
Raise and secure the vehicle
1. Raise the vehicle safely using a jack
Raising your vehicle safely is the first important step to working underneath it.
Use a reliable hydraulic or scissor jack that is suitable for the weight of your car.
Place the jack at the manufacturer’s recommended lifting points, which are usually located near the vehicle’s frame or designated jacking locations.
Placing the jack incorrectly can damage the car’s body or cause the vehicle to slide, which is extremely dangerous.
Slowly press down on the jack to raise the vehicle, making sure it rises evenly and stays balanced.
This careful method ensures a stable lift and protects both you and your vehicle from potential accidents.
2. Secure it with jack stands for stability
When the car has reached a safe height, it is important to support it with good quality jack stands.
Jack stands are designed to safely support the weight of the vehicle, while jacks are only meant for lifting.
Place the stands under the solid frame points of the vehicle and adjust them to the proper height.
Carefully lower the car onto the stands, making sure the weight is evenly distributed.
Using jack stands greatly reduces the risk of the vehicle falling over and creates a safer workspace underneath the vehicle.
3. Double-check the stability of the vehicle before going under it
Before going under the vehicle, always make sure it is stable and firmly in place.
Gently rock the vehicle on the jack stands to avoid movement or vibration.
Make sure the jack stands are in the correct position and the vehicle is level.
It is important to take these precautions because the slightest mistake can cause serious injury.
By thoroughly checking the stability, you create a safe environment to confidently perform the exhaust installation, without unnecessary risk.
How to Remove the Old Exhaust System
1. Apply penetrating oil to all bolts and connections
Before attempting to remove the old exhaust, it is important to loosen any rusted or tightened bolts and connections.
Spraying a high-quality penetrating oil, such as WD-40, on all bolts, nuts and clamps helps reduce rust and corrosion.
Allow the oil to sit for a few minutes so it can penetrate deeply.
This step makes removing the fasteners much easier and reduces the risk of stripping the bolts or damaging surrounding parts.
Using penetrating oil correctly makes the removal process easier and safer.
2. Disconnect the exhaust from the catalytic converter or downpipe
The exhaust system is usually connected to the engine via a catalytic converter or downpipe.
Carefully unscrew this connection while supporting the exhaust system so it doesn’t fall off.
Disconnecting the exhaust from the catalytic converter is a delicate step because improper removal can damage the converter or the exhaust flange.
Careful and controlled disconnection protects both the vehicle’s emissions system and the integrity of the exhaust components.
3. Remove the bolts, clamps and hangers holding the system in place
After disconnecting the exhaust from its front connections, remove all bolts, clamps and rubber hangers securing the system underneath the vehicle.
All of these fasteners hold the exhaust components in place, so it is important to remove them methodically to avoid bending or damaging the pipes.
If any bolts are stuck, apply more penetrating oil or use the correct wrench with sufficient leverage.
Careful removal of the system can prevent damage to the car’s frame, suspension components or surrounding parts.
4. Carefully lower the old exhaust
After all connections have been removed, carefully lower the old exhaust system from the vehicle.
Exhaust components can be heavy and awkwardly shaped, so it’s important to handle them slowly and carefully to avoid hitting the car or yourself.
Having a helper help you can make this process easier and safer.
Properly lowering the old exhaust can prevent scratches, dents or damage to surrounding parts and ensures a smooth transition when installing the new exhaust system.
Preparing for the Installation of the New Exhaust
1. Clean the Flange Surfaces and Remove Old Gasket Material
Before installing the new exhaust, it is important to thoroughly clean all flange surfaces.
Flanges are flat surfaces where exhaust components join together and remaining gasket material, rust or debris can interfere with a proper seal.
Use a wire brush or scraper to remove all old gasket material, dirt and rust.
A clean flange ensures that the new exhaust fits properly and prevents exhaust gas leaks, which can affect engine performance and cause noise or harmful fumes inside the vehicle.
2. Check for Rust or Damage at Connection Points
Carefully inspect all connection points before installing the new exhaust.
Check for signs of rust, corrosion or physical damage to the pipes, flanges and mounting points.
Any weak or damaged areas can affect the stability and effectiveness of the new system.
If rust or damage is found, the exhaust may need to be cleaned, strengthened or replaced to ensure it works properly and lasts a long time.
Proper inspection at this stage saves time and prevents problems after installation.
3. Test-fit the new exhaust to ensure proper alignment
Before permanently installing the new exhaust, test-fit it by placing it on the underside of the car.
Check that each part is correctly aligned with the catalytic converter, hangers and mounting points.
Proper alignment ensures that there is enough space between the car’s frame, suspension and other components to avoid rattling or contact while driving.
Test-fitting also helps you identify necessary adjustments before tightening bolts or applying sealant, making the final installation more smooth and precise.
How to Install a Car Exhaust – Easy Method
1. Connect the exhaust to the catalytic converter or downpipe using a new gasket
Begin the installation by connecting the new exhaust system to the catalytic converter or downpipe using a new gasket.
Gaskets are extremely important for creating a strong seal between exhaust components, preventing the leakage of harmful gases and ensuring proper engine performance.
Make sure the gasket is in the correct position and that the bolts are initially hand-tightened.
Correct installation at this stage will keep the exhaust working efficiently and reduce the risk of leaks, which can affect fuel efficiency and create unwanted noise.
2. Connect the exhaust sections together from front to rear
Once the front connection is secure, connect the remaining exhaust sections together, moving from the front to the rear of the vehicle.
Carefully align each section to maintain a straight and level path.
Tighten the bolts slowly and evenly to avoid twisting or misalignment.
Securing the parts correctly ensures smooth exhaust flow, reduces vibration and keeps the system stable under all driving conditions.
3. Use rubber hangers to support each part
Rubber hangers are used to hold the exhaust system in place, while also providing some flexibility to absorb engine vibrations.
Attach each part to the hangers moving toward the rear of the vehicle.
Make sure the exhaust is properly resting and not putting pressure on any one point, which can cause stretching or cracking over time.
Proper use of hangers also helps reduce noise and movement while driving, increasing the overall lifespan of the system.
4. Apply exhaust sealant to manufacturer-recommended locations
Some exhaust systems require sealant at specific joints to prevent leaks.
Apply sealant as recommended by the manufacturer, usually around flanges or joints where gaskets are used.
The sealant helps create an airtight connection and improves the overall efficiency of the exhaust system.
Carefully following the manufacturer’s instructions ensures that the installation is durable, safe and long-lasting.
How to Tighten and Align
1. Check the alignment to ensure the exhaust sits straight and has clearance from the body/frame
After the exhaust is loosely installed, it’s important to carefully check its alignment.
The exhaust system should run straight along the underside of the vehicle without touching the car’s body, frame or any suspension components.
Proper clearance prevents vibration, rattling and potential damage to the exhaust or other vehicle components during driving.
Ensuring proper alignment also keeps the exhaust flowing smoothly, which can help improve engine efficiency, reduce noise and prevent premature wear of exhaust components.
Before fully tightening anything, thoroughly inspect the entire system and make minor adjustments.
2. Tighten bolts and clamps to manufacturer’s torque specifications
Once alignment is confirmed, all bolts, clamps and fasteners must be tightened to the manufacturer’s torque specifications.
Using a torque wrench ensures that each connection is neither too loose nor too tight, which is important to prevent leaks, warping of flanges or breaking of threads.
Proper torque guarantees a safe and long-lasting installation, maintains the exhaust system’s efficiency and holds it securely in place under all driving conditions.
Following the correct specifications also protects warranties on aftermarket components and ensures optimal vehicle performance.
How to Lower the Vehicle
1. Carefully Remove the Jack Stands
Before lowering the vehicle, make sure all tools and parts are clear from underneath.
Slowly raise the vehicle slightly with the jack to take the load off the jack stands.
Then carefully remove each jack stand from underneath the vehicle.
Patience and safety are important in this step, as sudden movements or uneven lifting can cause the vehicle to move unexpectedly.
Properly removing the stands ensures that the vehicle remains stable and prevents accidental damage to the exhaust system or injury to you.
2. Lower the Vehicle Back to the Ground
After removing the jack stands, slowly lower the vehicle with the jack until all wheels are securely on the ground.
Make sure the vehicle is level and fully resting before completely removing the jack.
Lowering the car slowly can prevent a sudden fall that could damage the newly installed exhaust or other parts.
After completely stripping the vehicle down, double-check that all exhaust sections are properly aligned and securely mounted.
This careful process ensures the installation is stable, secure and ready for testing.
How to Check The New Exhaust
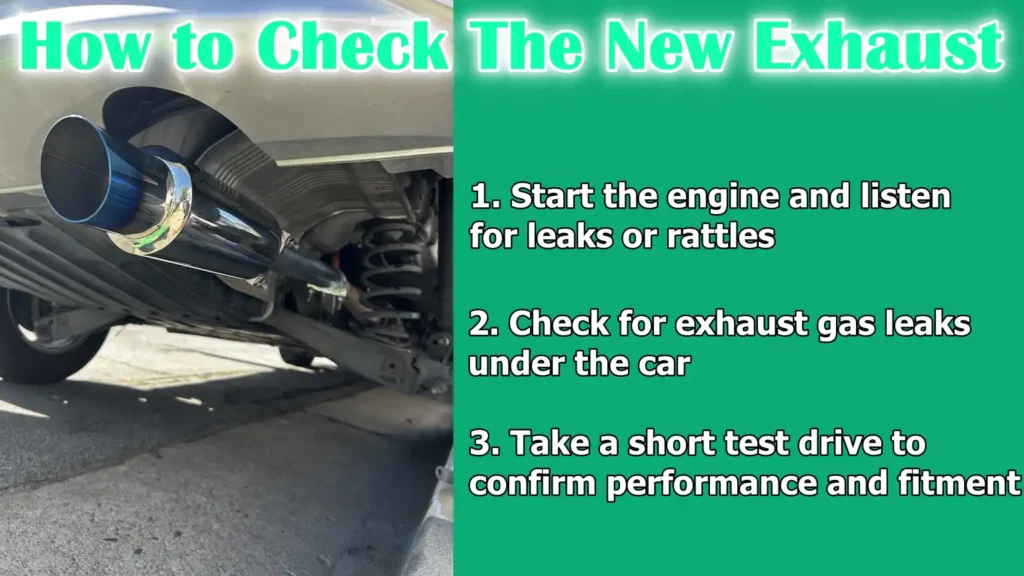
1. Start the engine and listen for leaks or rattles
After all the parts have been removed from the vehicle, start the engine and pay attention to the sound coming from the new exhaust system.
A properly installed exhaust system should operate quietly without any interruptions.
Listen carefully for any unusual rattles, hisses or whistles, which could indicate loose bolts, misaligned parts or leaks.
Detecting these problems early allows you to make adjustments before you have to drive too long, which will keep the exhaust system working safely and efficiently.
2. Check for exhaust gas leaks under the car
While the engine is running, carefully check for any signs of exhaust gas escaping from joints or connections under the vehicle.
You may feel air movement near flanges and clamps, but never touch hot surfaces because the exhaust can reach very high temperatures.
Identifying and repairing leaks at this time can prevent harmful gases from entering the cabin, protect engine performance and ensure the exhaust system works effectively.
3. Take a short test drive to confirm performance and fitment
Finally, take the vehicle on a short test drive at low to moderate speeds to ensure the exhaust system is secure and aligned.
Pay attention to the sound and feel of the car during acceleration, cruising and deceleration.
A properly fitted exhaust should not vibrate, rattle, or make unusual sounds.
This actual test confirms that all parts are properly installed, supported by hangers and functioning as expected, giving you confidence in the durability and safety of your new exhaust system.
What are The Basic Maintenance Tips
1. Periodically Check Clamp and Bolt Tightness
To keep your exhaust system working properly, it’s important to regularly check all of its clamps, bolts and fasteners.
Over time, vibrations from driving can cause these connections to loosen, leading to exhaust leaks, excessive noise or misalignment.
Using a torque wrench to tighten bolts according to the manufacturer’s instructions ensures a secure fit and extends the life of the exhaust system.
Regular inspection prevents minor problems from turning into costly repairs.
2. Check for Wear in the Hangers
Exhaust hangers support the weight of the system and help absorb engine vibrations.
With use, the rubber hangers can crack, stretch or break, causing the exhaust to come loose or move excessively.
Check the hangers regularly and replace any that show signs of wear.
Maintaining healthy hangers keeps the exhaust properly aligned, reduces noise and reduces stress on pipes and connections, ensuring smooth performance and durability.
3. Keep an eye out for unusual sounds or performance changes
Pay attention to your car’s sound and driving over time.
Changes such as rattling, hissing, or decreased engine performance can be signs of problems in the exhaust system such as leaks or blockages.
Timely detection allows you to address problems immediately, preventing further damage to the system or engine.
Being alert to these signs ensures that your vehicle remains safe, efficient and reliable while also extending the life of your exhaust system.
Read More:
Conclusion – How to Install a Car Exhaust
In short, if you installed the exhaust system perfectly then it actually protects your car, improves the fuel efficiency and also keeps the harmful gases away from the cabin and in installation process every bolt, gasket and hanger matters so pay attention to details.
As well as, actually you should also have to confirm that the exhaust upgrade you wanna do should not disable emissions control, because the EPA actually treats removal or defeat of catalytic converters, O2 sensors or any related hardware they consider them as a tampering under the Clean Air Act. Which is why you have to choose components with proof of emissions compliance and keep OEM controls in place so that it remains legal and also protect air quality as well.[¹]
A properly installed exhaust helps keep harmful gases away from the cabin, reduce engine noise and ensure smooth engine operation.
By following careful preparation, correct alignment and secure fastening, you not only prevent damage to the vehicle but also enhance its overall performance and reliability.
Regular maintenance, such as checking bolts, clamps and hangers, ensures that your exhaust system continues to function effectively for years.
Taking the time to properly install and care for your exhaust results in a safer driving experience, improved fuel efficiency and the confidence that your vehicle is running at its best.
That’s it from this guide and if you still have queries then comment down below those.
Frequently Asked Questions
Q1. Is it difficult to install a car exhaust?
Answer: If you don’t have much experience with car maintenance, installing an exhaust may seem daunting, but with the right preparation and tools, it’s not impossible. The difficulty depends on the type of vehicle and the exhaust system you’re installing. Many modern exhausts are designed to fit directly with clamps and gaskets, making installation easy even for those with basic mechanical skills. The main steps include safely raising the vehicle, removing the old exhaust, cleaning the connection points and correctly aligning the new exhaust. With the right tools, such as a socket set, jack stands and penetrating oil, and following step-by-step instructions, this process can be easy even for beginners. Although it requires patience and attention to safety, it’s a job that most DIY enthusiasts can complete successfully.
Q2. Does exhaust installation require welding?
Answer: Welding isn’t always required to install an exhaust, but it depends on the type of exhaust system and the vehicle. Many aftermarket exhaust systems are designed to be installed using clamps, bolts and gaskets, meaning you can install them without any welding. However, some custom or performance exhaust setups may require welding to securely connect pipes or fit the system correctly. Welding provides a permanent seal and can prevent leaks, but it requires special equipment and skills. For most standard replacements, welding isn’t necessary, and you can complete the installation with simple hand tools and still get a secure, leak-free connection.
References:
[1] EPA Tampering Policy: The EPA Enforcement Policy on Vehicle and Engine Tampering and Aftermarket Defeat Devices under the Clean Air Act
https://www.epa.gov/sites/default/files/2020-12/documents/epatamperingpolicy-enforcementpolicyonvehicleandenginetampering.pdf

Guys, I’m a car audio enthusiast and customization expert and I love clear sound and clean installation. Plus, I have spent years helping people build their dream audio setups. And whenever I’m working on cars, I probably listen to music and thinks about the next big upgrade.