 Skip to content
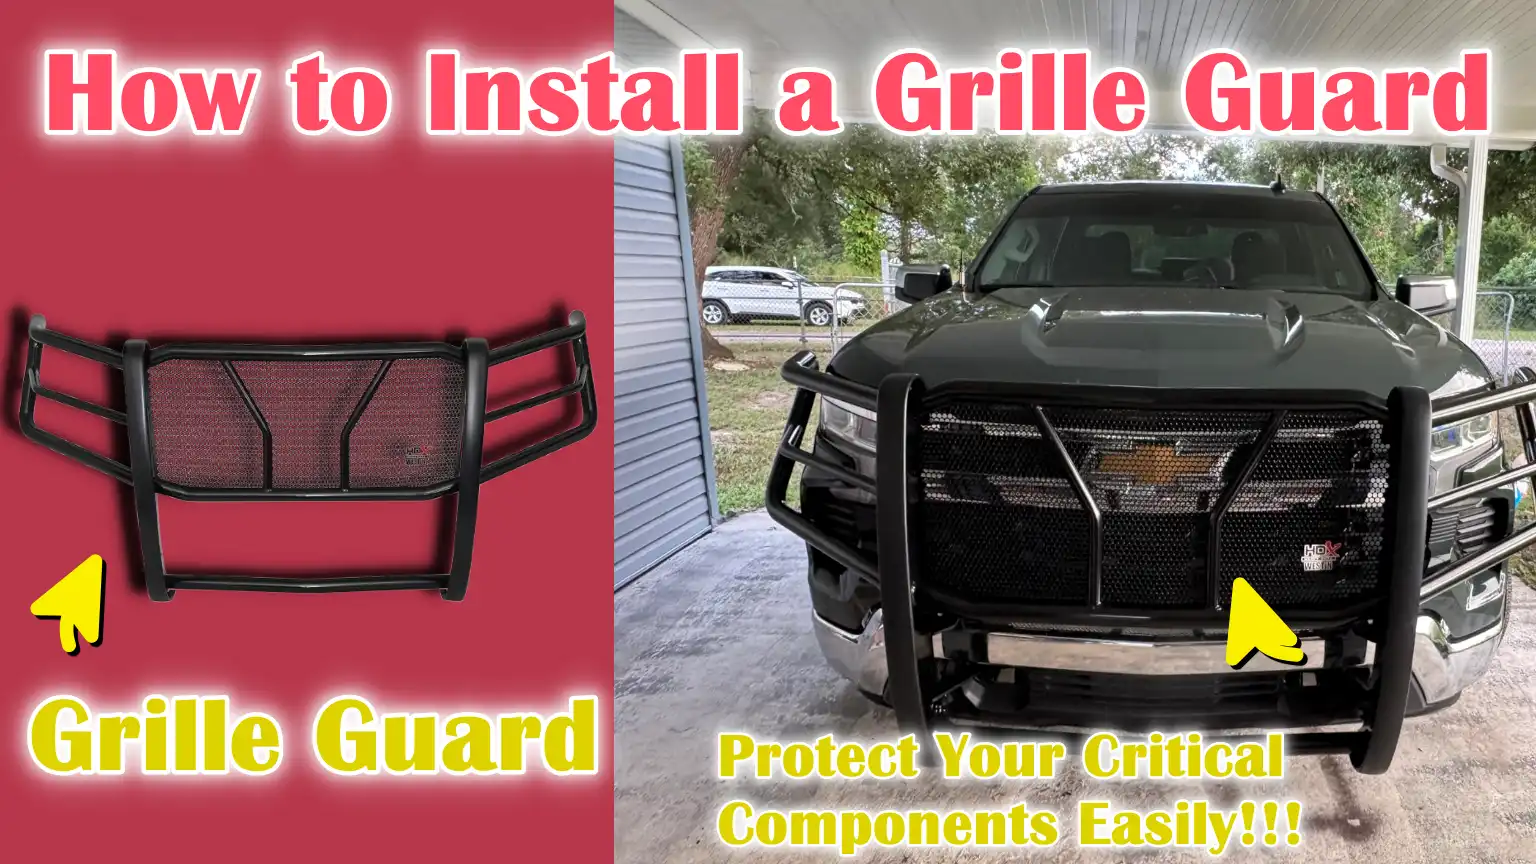
Written By: Don Dodi
Fact Checked By: Kristen Brown
Reviewed By: Diego Rosenberg
The grille guard is great upgrade that gives you freedom to drive on highways, rural roads or rough terrain without worry about your vehicle’s critical parts such as: grille, headlights, radiator and front bumper from any possible damage.
So, basically a grille guard is a strong metallic frame which can be mounted to the front of the vehicle that provides the ultimate protection by preventing them from any possible damage caused by the road debris, minor collisions, animals or off-road obstacles.
As well as, it is true that now-a-days modern vehicles literally relies heavily on the front-end components for cooling, safety sensors and structural support, that’s why it becomes extremely important to have something like: “Grille Guard”.
And, to make sure to maintain the factory safety standards, you should learn How to Install a Grille Guard, so that you can easily install them and improve the overall durability and even add a rugged appearance to your vehicle.
How to Check the Vehicle Compatibility Before Installation
1. Vehicle Make, Model and Year Fitment Verification
Before installing a grille guard, it’s crucial to ensure the product is specifically designed for your vehicle’s make, model and year.
Different vehicles have varying front-end designs, mounting points and dimensions and using a non-compatible grille guard can lead to improper fitment, reduced protection, or interference with other components.
Most manufacturers provide detailed fitment charts or online guides specifying which vehicles their grille guards are compatible with.
Verifying fitment beforehand saves time, ensures a secure installation and prevents potential damage to your vehicle.
2. Frame-Mounted vs Bumper-Mounted Grille Guard Designs
Grille guards typically attach to the vehicle in two ways: frame-mounted or bumper-mounted.
Frame-mounted guards bolt directly to the vehicle’s frame, offering the strongest protection and stability, specially for off-road driving or heavy-duty use.
Bumper-mounted guards attach to the front bumper or fascia, which may be easier to install but generally offer less structural strength and protection.
Choosing the right type depends on your vehicle’s design, intended use and whether you prioritize strength, aesthetics, or ease of installation.
3. Considering Airbag Sensor and Safety System Compatibility
Modern vehicles often have airbags, parking assistance and collision detection sensors located in the front bumper or grille area.
Installing a grille guard without checking compatibility with these sensors can interfere with their operation, potentially compromising safety or triggering false warnings.
It’s crucial to ensure that the grille guard’s design is compatible with these sensors and that the mounting process doesn’t block or interfere with them.
Consulting your vehicle’s owner’s manual, the manufacturer’s instructions, or a professional installer will help ensure effective front-end protection without compromising the safety systems.
Tools
| Item | Purpose / Notes |
|---|---|
| Socket wrench set | It is used to tighten bolts and nuts firmly. |
| Adjustable wrench | It helps to grip or turn bolts that do not fit into standard sockets. |
| Screwdriver set – flathead and Phillips | It is used to remove small screws or trim when necessary. |
| Torque wrench | This ensures that the bolts are tightened to the manufacturer’s recommended strength. |
| Mounting brackets | This attaches the grille guard to the vehicle’s frame or bumper. |
| Bolts and nuts | This firmly connects the grill guard and bracket. |
| Spacers / washers | Maintain correct distance and alignment, avoid scratches. |
| Flat, solid surface | This ensures precise placement and prevents damage to the vehicle. |
| Safety gloves | Protect your hands from sharp objects or hot surfaces. |
| Vehicle blocks or wheel chocks | Keeps the vehicle stable even when the grille guard is engaged. |
How to Remove Factory Components – When it is Necessary
1. Identifying Factory Tow Hooks or Trim Panels That May Interfere
Before beginning the grill guard installation, it is crucial to carefully inspect the front of the vehicle to identify any factory tow hooks, trim panels, or other components that may interfere with the grill guard or mounting brackets.
Some vehicles have plastic or metal trim pieces covering the mounting points and these may need to be removed or adjusted for proper access.
Identifying these components beforehand prevents errors, reduces installation time and ensures the grill guard fits correctly without obstruction.
2. Properly Removing Skid Plates or Bumper Covers If Necessary
Many vehicles have skid plates or front bumper covers that protect the undercarriage or enhance the vehicle’s appearance.
These parts can sometimes prevent the mounting brackets from fitting correctly.
Carefully remove these components using the appropriate tools and following the instructions in the vehicle’s manual.
Avoid excessive force to prevent bending, breaking, or damaging plastic covers and metal parts.
Proper removal ensures the grill guard is securely mounted while maintaining the vehicle’s structural integrity and factory safety features.
3. Storing Removed Hardware Safely for Future Use
After removing any factory parts, it is essential to organize and store the bolts, nuts, screws, or panels in a safe place.
Many of these parts may be needed later if the grill guard is removed or if certain components need to be reinstalled.
Storing hardware in a clean, organized manner with proper labeling prevents damage, confusion, or malfunction, making future vehicle maintenance easier and eliminating unnecessary trips to the parts store.
Proper storage also ensures that reinstallation doesn’t compromise the vehicle’s safety or appearance.
How to Loate and Prepare Mounting Points on the Vehicle
1. Identifying Frame Mounting Holes or Tow Hook Mounts
The first step in installing a grille guard is locating the correct mounting points on the vehicle.
Most grille guards are designed to attach directly to the vehicle’s frame or to existing tow hook mounts.
These points provide the strongest support as they connect to the vehicle’s main structural components, rather than the bumper cover or fascia, which are not designed to bear heavy loads.
Carefully inspecting the underside or front frame area of the vehicle will help identify these holes or mounts.
Consulting the vehicle’s manual or the grille guard manufacturer’s instructions ensures that the correct points are used, preventing misalignment or a weak installation.
2. Cleaning and Inspecting Mounting Points for Rust or Damage
Once the mounting points are identified, it’s crucial to thoroughly clean them to remove any dirt, grease, or rust.
Rust or corrosion can weaken the connection and compromise the protective strength of the grille guard.
It’s equally important to inspect for any cracks, bends, or damaged threads, as installing the grille guard on compromised points can lead to vibrations, misalignment, or even structural failure during driving.
Using a wire brush or clean cloth helps prepare the surface for secure attachment and ensures a long-lasting, stable installation.
3. Test-fitting the Brackets to Confirm Alignment
Before fully tightening any bolts, it’s essential to test-fit the grille guard brackets.
Placing the brackets on the mounting points and loosely securing them allows you to check the alignment with the vehicle’s grille, headlights and front fascia.
This step ensures that the grille guard sits evenly on both sides and that all bolts align correctly with the mounting holes.
Test-fitting also helps identify any necessary adjustments to spacing, angles, or bracket positions, reducing the risk of damage during final installation and ensuring the grille guard functions as intended while maintaining the vehicle’s aesthetics.
How to Install the Grille Guard Mounting Brackets
1. Attaching the Driver-Side and Passenger-Side Brackets
Installing the mounting brackets is a crucial step to ensure the grille guard is securely and correctly fitted.
Most grille guards come with two main brackets, one for the driver’s side and one for the passenger’s side.
These brackets need to be attached to pre-determined mounting points on the vehicle’s frame or tow hook mounts.
It’s essential to carefully follow the manufacturer’s instructions, as each bracket is designed for a specific side of the vehicle and must be installed in the correct orientation.
Proper bracket placement ensures the grille guard fits evenly across the front of the vehicle and provides maximum protection without obstructing the hood, headlights, or front sensors.
2. Using Spacers and Washers to Maintain Proper Clearance
Spacers and washers are essential components that help maintain the correct clearance between the brackets and the vehicle’s frame.
They prevent metal-to-metal contact, reduce vibration during driving and protect the vehicle’s paint and surfaces from scratches or damage.
The correct placement of spacers and washers is specified in each grille guard design and their improper use can lead to misalignment or uneven load distribution.
Properly installed spacers and washers ensure the brackets remain stable, distribute forces evenly and allow the grille guard to function as intended, while also maintaining a clean, professional look.
3. Hand-Tightening Bolts for Adjustment
When initially installing the brackets, all bolts should be hand-tightened rather than fully tightened.
Hand-tightening allows for minor adjustments in position, alignment and angle, making it easier to ensure the grille guard is perfectly centered and equidistant from the vehicle’s grille, headlights and bumper.
This step is crucial to avoid misalignment, uneven pressure, or stress on the mounting points.
Once the brackets are in the correct position and all clearances are verified, the bolts can be fully tightened according to the torque specifications provided by the manufacturer to ensure the grille guard is securely and firmly attached.
How to Position and Attach the Grille Guard Assembly
1. Lifting and Aligning the Grille Guard onto the Brackets
Once the mounting brackets are securely in place, the next step is to lift and position the grille guard onto the brackets.
Grille guards are typically heavy and a second person may be needed to help stabilize them during installation.
Proper alignment of the guard is crucial to ensure that all attachment points on the guard match the bolt holes on the brackets.
Careful alignment prevents unnecessary stress on the bolts or brackets and ensures the grille guard sits flush against the front of the vehicle.
Correct alignment also reduces the risk of vibration, rattling, or damage while driving.
2. Ensuring Equal Distance from Headlights and Grille
After positioning the grille guard on the brackets, it’s important to verify that the distance from the headlights, grille and bumper is equal on both sides.
Uneven spacing can result in a poor-looking installation and may interfere with the function of lights or sensors.
Symmetry can be achieved by using a measuring tape or visually inspecting the distance on both sides.
Correct spacing also ensures that the grille guard doesn’t rub against the vehicle while driving, preventing scratches or dents on both the guard and the vehicle.
3. Temporarily Securing the Guard Before Final Tightening
Before fully tightening the bolts, temporarily securing the grille guard is a crucial step.
Hand-tightening all fasteners allows for minor adjustments to the guard’s angle, height and alignment.
This ensures the grille guard is perfectly centered and level, providing maximum protection and a clean, finished look.
Once the position is confirmed and all clearances are verified, the bolts can be fully tightened according to the manufacturer’s specifications to safely complete the installation.
How to Align the Grille Guard for Having Proper Fit and Clearance
1. Centering the Grille Guard on the Vehicle
Proper alignment begins with centering the grille guard on the front of the vehicle.
This ensures the guard appears symmetrical and that the weight is distributed evenly across the mounting points.
Centering the guard prevents uneven stress on one side compared to the other, which could lead to loose bolts or damaged brackets over time.
Using visual reference points such as the edges of the grille, bumper and headlights helps in achieving precise centering.
Ensuring the guard is perfectly centered maintains the vehicle’s aesthetics and provides optimal protection to the front end.
2. Checking Hood, Grille and Sensor Clearance
After centering, it’s crucial to check the clearance around the hood, grille and any front sensors, such as parking sensors, collision detection systems, or cameras.
The grille guard should not touch or obstruct these components, as interference can affect their functionality, trigger false alerts, or cause damage during driving.
Maintaining adequate clearance ensures proper airflow to the radiator, prevents rubbing against painted surfaces and allows all sensors and lights to function safely.
3. Adjusting Angle and Height for Visual and Functional Balance
Finally, the angle and height of the grille guard should be adjusted for both visual appeal and functional performance.
The guard should conform to the shape of the vehicle’s front end, align with the headlights and maintain an even distance from the bumper and grille.
The correct height and angle prevent the guard from striking obstacles, scraping the ground, or obstructing the driver’s view.
Careful adjustment also ensures that the guard can effectively absorb impact, providing maximum protection while complementing the vehicle’s design.
Now, Finally Learn How to Ensure Perfect Tightening and Torque Specifications
1. Tightening the Bolts in the Correct Sequence
After positioning and aligning the grille guard correctly, it is crucial to tighten the bolts in the specified sequence.
Following the recommended sequence prevents uneven stress on the brackets and mounting points, thus avoiding misalignment, vibrations, or damage to the vehicle’s frame.
Typically, the bolts on one side are tightened slightly first, followed by the bolts on the other side and then final adjustments are made before fully tightening them.
This method ensures that the grille guard is secured evenly and fits properly with the mounting brackets, providing both strength and stability.
2. Using Manufacturer-Specified Torque Values
For a secure and long-lasting installation, it is essential to use a torque wrench to apply the manufacturer-specified torque values.
Overtightening the bolts can strip the threads, damage the mounting points, or warp the brackets, while undertightening can lead to loose fasteners and rattling.
The torque specifications are provided by the grille guard manufacturer and are based on the size and grade of the bolts, as well as the structural capacity of the vehicle’s frame.
Following these values precisely ensures that the grille guard can withstand shocks and vibrations without compromising the vehicle’s safety or durability.
3. Rechecking All Fasteners for Secure Fitment
Once all the bolts have been tightened to the correct torque, it is important to recheck each fastener for security.
This includes all the hardware connecting the brackets, spacers and the grille guard to the vehicle.
A final check ensures that nothing has come loose during the installation process and that all components are aligned and stable.
Rechecking the fasteners helps prevent future problems such as rattling, misalignment, or potential detachment, ensuring that the grille guard continues to provide reliable protection to the front of the vehicle over time.
How to Reinstall the Removed Components
1. Reinstalling Skid Plates, Trim Panels, or Tow Hooks
After installing and securely tightening the grille guard, it is essential to reinstall all removed factory components, such as skid plates, trim panels, or tow hooks.
These parts protect the vehicle’s undercarriage, maintain its original appearance and contribute to structural integrity.
Reinstalling them correctly ensures they function properly in conjunction with the grille guard installation.
Following the vehicle manufacturer’s instructions for reinstalling these components is crucial to avoid any misalignment or interference with the new grille guard.
2. Ensuring No Contact Between the Grille Guard and Other Components During Operation
When reinstalling components, particular attention should be paid to ensuring they do not come into contact with the grille guard.
Any contact during driving can lead to scratches, dents, or rattling noises.
Proper clearance and alignment prevent rubbing against the grille guard and ensure that both the factory parts and the grille guard function safely without interference.
This step is specially important for components that are flexible, such as plastic trim panels, or parts that may shift slightly due to road vibrations.
3. Verifying That Factory Components Are Fully Functional
Finally, it is crucial to verify that all reinstalled components are fully functional after the grille guard installation.
Skid plates should still provide undercarriage protection, tow hooks should be fully functional for towing or recovery and any trim panels should be securely and properly aligned.
Additionally, any sensors or electrical components that were removed or adjusted during installation should be tested to ensure they are functioning correctly.
Verifying full functionality ensures that the vehicle’s safety systems, aesthetics and security features remain intact, while the grille guard provides added protection to the front end.
What are the Important Post-Installation Inspection and Safety Checks
1. Checking for Vibrations, Looseness, or Misalignment
After installing the grille guard, it’s crucial to check the entire assembly for any signs of vibration, looseness, or misalignment.
Even minor gaps or improperly tightened bolts can cause rattling in the grille guard while driving, leading to noise, uneven wear on the brackets, or potential damage to the vehicle’s frame over time.
A careful physical inspection, along with gently shaking the guard to detect any movement, ensures that all fasteners are secure and the guard is firmly mounted.
Addressing any minor misalignments at this stage ensures long-term stability and performance.
2. Confirming Proper Airflow to the Radiator and Intercooler
The grille guard should not obstruct airflow to the vehicle’s radiator, intercooler, or engine bay, as restricted airflow can lead to overheating and reduced engine efficiency.
Inspect the front of the vehicle to ensure that the guard’s frame or crossbars do not block any critical areas where air needs to pass through.
Unobstructed airflow ensures proper cooling, prevents potential strain on the engine and helps the vehicle operate safely in both city and highway conditions, specially under heavy loads or in hot weather.
3. Ensuring Unobstructed Operation of Headlights and Sensors
Finally, it’s essential to verify that the headlights, fog lights and any forward-facing sensors, such as parking sensors, collision detection systems, or cameras, are fully functional and unobstructed.
Improperly installed grille guards can partially block these components, potentially affecting visibility, triggering false warnings, or reducing the effectiveness of safety systems.
Checking these components after installation ensures that the vehicle remains fully functional, safe and compliant with the manufacturer’s safety standards, while the grille guard provides added protection to the front of the vehicle.
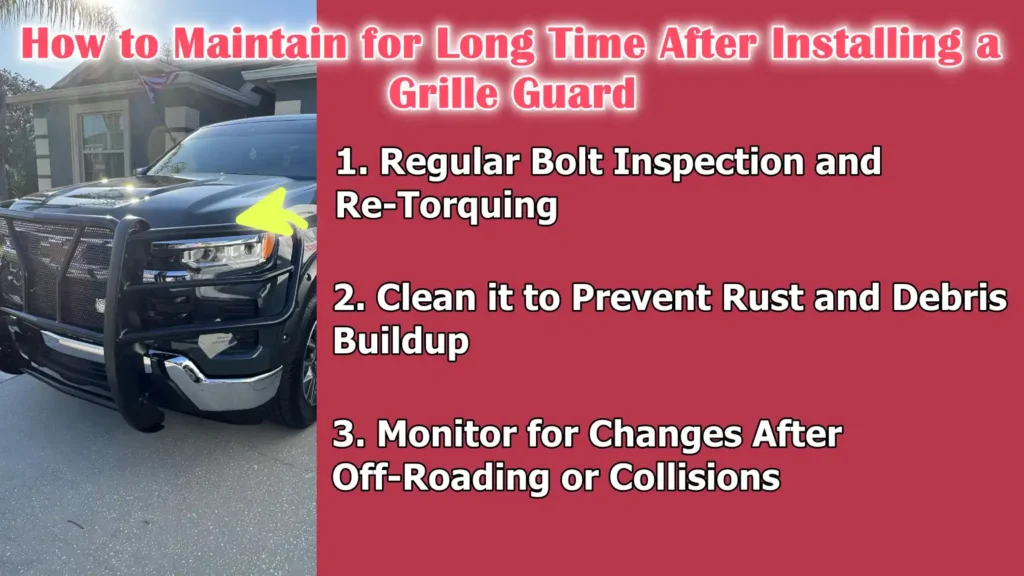
How to Maintain for Long Time After Installing a Grille Guard
Not only this, there’s industry fleet data that shows that installation of grille guard significantly cuts front-end repair coats and even the vehicle downtime as well, so with the reported reductions of up to the 80% in towable incidents after the installation, the fleets literally saves thousands of dollars in repair bills and successfully avoids service downtime every year, even grille guards often pay for themselves after just 1 or 2 avoided repairs, additionally their longevity can add to the vehicle’s resale value as well.[¹]
1. Regular Bolt Inspection and Re-Torquing
After installing a grille guard, it’s crucial to regularly check all bolts and fasteners to ensure they remain tight and secure.
Over time, vibrations from driving, road shocks, or even light off-road use can cause bolts to loosen slightly.
Re-torquing the bolts to the manufacturer’s specified values using a torque wrench ensures the grille guard remains firmly attached and provides maximum protection.
Regular inspections prevent rattling, misalignment, or damage to the mounting points, extending the lifespan of both the guard and the vehicle’s frame.
2. Clean it to Prevent Rust and Debris Buildup
Keeping the grille guard clean is essential to prevent the buildup of rust, dirt, mud, or road salt.
Metal surfaces, specially when exposed to moisture or salt, can corrode over time, compromising the guard’s structural integrity.
Washing the grille guard with mild soap and water and then drying it helps maintain its appearance and durability.
Periodically checking for scratches or paint chips allows for touch-up protection, reducing the risk of rust and ensuring the grille guard continues to function effectively.
3. Monitor for Changes After Off-Roading or Collisions
If the vehicle is used for off-road driving or experiences a minor collision, it’s vital to monitor the grille guard and its mounting points for any changes.
Look for bent brackets, loose fasteners, or changes in alignment that could affect both appearance and safety.
Early detection of these issues allows for corrective measures before safety is compromised or more serious damage occurs.
Inspection is necessary after off-road use or a collision to ensure that the grille guard maintains proper fit and function and provides effective protection to the vehicle.
Read More:
Conclusion – How to Install a Grille Guard
Now, you have clearly understood that a grille guard is not just a piece of metal, but it is a frontlines shield that literally absorbs impact and protects your vital components and that’s how it keeps your investment safe and ensure proper airflow to the important components.
Yes, if you properly installed grille guard then it provides robust protection to essential front-end components such as the grille, headlights, bumper and radiator from everyday obstacles like road debris, minor collisions and off-road obstacles as well.
Without a doubt, a regular inspection, cleaning and maintenance is necessary after installation to extend the lifespan of both the grille guard and your vehicle’s front end, that prevents rust, misalignment, or damage from impacts.
Overall, a well-installed grille guard is a blend of practicality, safety and style, offering peace of mind on every journey while enhancing the vehicle’s rugged appearance.
So, that’s all from this guide and if you have any kind of questions related to this guide, just let us know by commenting below.
Frequently Asked Questions
Q1. What is a grille guard and why should I install one?
Answer: A grille guard is a metal frame that attaches to the front of your vehicle to protect essential parts such as the grille, headlights, bumper and radiator. It provides protection against road debris, minor collisions, animal strikes and off-road obstacles. Installing a grille guard not only enhances your vehicle’s protection but also gives it a rugged and robust look. It can prevent costly damage and maintain the integrity of crucial components.
Q2. How do I know if a grille guard is compatible with my vehicle?
Answer: Grille guards are designed for specific makes, models and years of vehicles. To check compatibility, you should consult the product description or fitment chart provided by the manufacturer. You will also need to determine if your vehicle has a frame that can support a frame-mounted guard or if it can only accommodate a bumper-mounted guard. It’s also crucial to check for any sensors, airbags, or other safety systems located at the front of your vehicle to ensure the grille guard doesn’t interfere with their operation.
Q3. What tools and hardware are needed to install a grille guard?
Answer: Typically, installation requires basic hand tools such as a socket wrench set, adjustable wrench, screwdriver set and torque wrench. The grille guard usually comes with mounting brackets, bolts, nuts, spacers and washers. A clean, flat workspace is essential for proper alignment and safe handling. Gloves and wheel chocks are also helpful for safety during the installation process.
Q4. Will I need to remove any parts of my vehicle to install a grille guard?
Answer: In some cases, yes. Some vehicles may have skid plates, trim panels, or tow hooks that might need to be removed or adjusted to accommodate the grille guard brackets. Carefully removing these parts and organizing the bolts or screws for later use will ensure easy installation without damaging the vehicle or the guard.
Q5. How do I properly attach the grille guard to my vehicle?
Answer: First, attach the driver-side and passenger-side mounting brackets to the vehicle’s frame or tow hook mounts. Spacers and washers are used to maintain proper clearance and prevent scratching. Initially, hand-tighten the bolts for adjustment. Next, lift the grille guard onto the brackets, align it so it is centered and evenly spaced between the headlights and grille and temporarily secure it. Finally, check the height and angle, make adjustments for proper fit and clearance and then fully tighten all bolts to the manufacturer’s specified torque.
Q6. How do I ensure the grille guard doesn’t interfere with my vehicle’s safety systems?
Answer: Before final tightening, always check that the grille guard is not blocking the headlights, parking sensors, cameras, or airbag sensors. Proper alignment, spacing and clearance prevent interference and ensure all safety systems function correctly. After installation, test the lights and sensors to confirm they are working as expected.
Q7. Does the grille guard require maintenance after installation?
Answer: Yes, maintenance is necessary to keep the grille guard functioning properly and looking good. Periodically check all bolts and fasteners to ensure they are tight. To prevent rust, regularly clean the guard to remove dirt, road salt, or debris. After off-road driving or minor collisions, inspect the brackets and guard for bending or damage. Taking these steps will provide long-term protection and help prevent damage to both the guard and your vehicle.
Q8. Can I install a grille guard myself, or will I need a professional?
Answer: Many grille guards are designed for bolt-on installation and can be installed by someone with basic mechanical knowledge and tools. However, because the guard is heavy and requires precise alignment, it’s best to have a second person assist. If your vehicle has complex safety systems, sensors, or airbag components, consulting a professional installer may be the safest option to avoid damage or safety issues.
Q9. What is the difference between frame-mounted and bumper-mounted grille guards?
Answer: Frame-mounted grille guards attach directly to the vehicle’s frame, providing the strongest protection and stability. This is ideal for off-road use or vehicles that may face heavy impacts. Bumper-mounted grille guards attach to the bumper itself, making them easier to install but typically offering less structural strength. The choice between the two depends on your vehicle’s design, intended use and the level of protection required.
References:
[1] Grille guards’ value extends far beyond deer defense
https://www.fleetmaintenance.com/equipment/chassis-body-and-cab/article/55302276/ex-guard-industries-how-grille-guards-help-with-preventative-maintenance

Guys, I’m a car audio enthusiast and customization expert and I love clear sound and clean installation. Plus, I have spent years helping people build their dream audio setups. And whenever I’m working on cars, I probably listen to music and thinks about the next big upgrade.
