Written By: Don Dodi
Fact Checked By: Kristen Brown
Reviewed By: Diego Rosenberg
It is really the simple upgrade that can actually add power, improved efficiency, as car engines loves cool air.
As well as, it is really affordable and one of the most popular upgrades that car owners choose to improve the performance, fuel efficiency and even the sound of their vehicle.
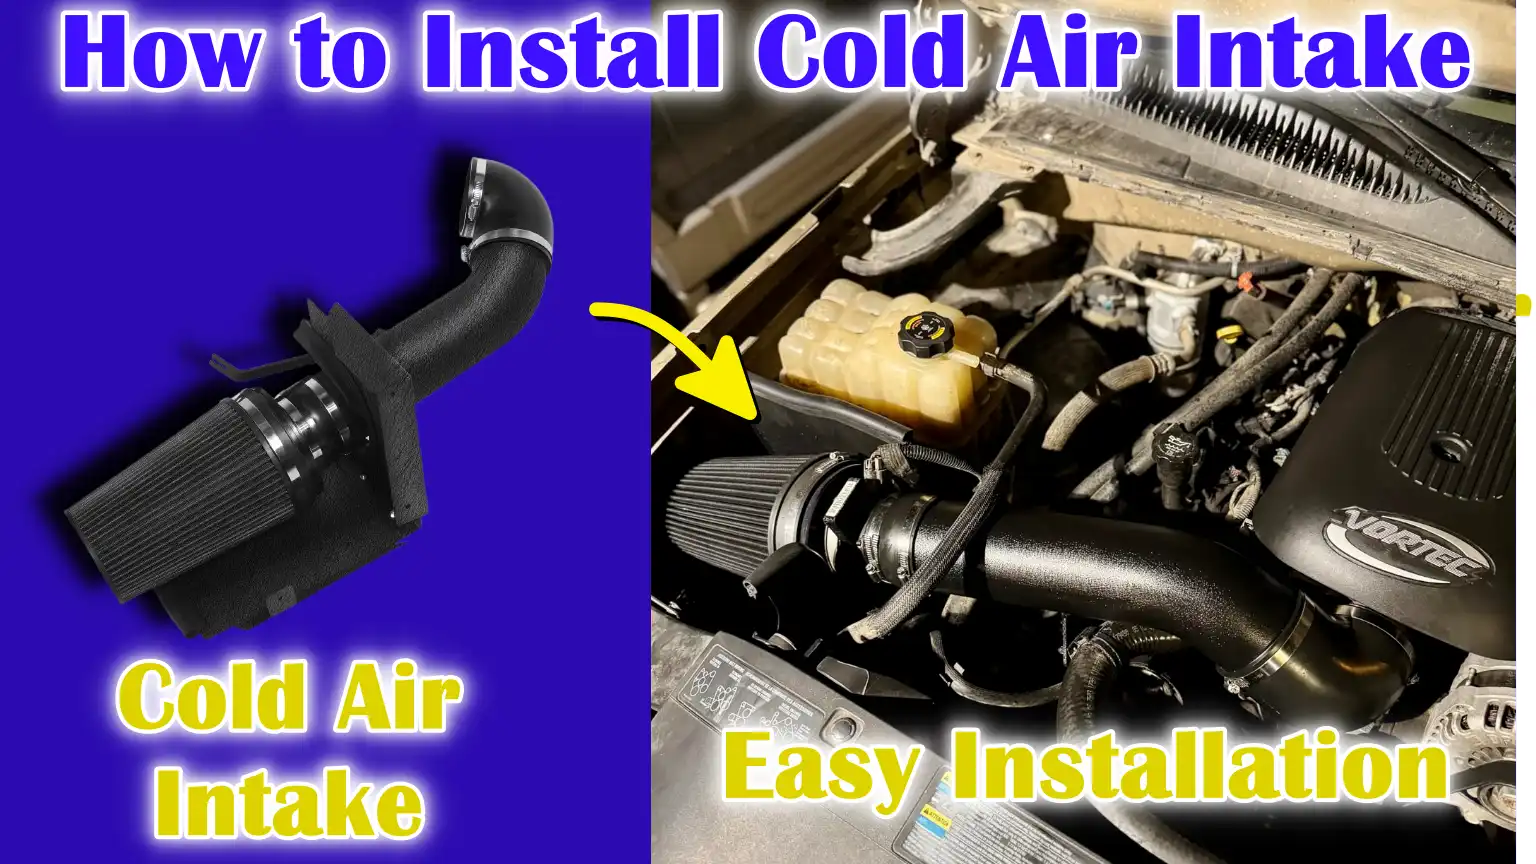
So, simply it replaces your stock air filter box and intake tube with a system that actually pulls in cooler, denser air from the outside the engine bay.
Plus, it is the fact that cooler air contains more oxygen molecules and the more oxygen literally means better combustion inside the engine: which directly responsible for increased in horsepower and torque.
Not only this, according to the several automotive performance studies shows that a well-designed cold air intake can literally improve airflow by up to 50% compared to the factory systems and true for specially at higher speeds.
Now, it is the complete guide that specifically designed someone who wanted to know How to Install Cold Air Intake, as it has the safe process that you can enjoy the benefits without damaging your engine or voiding your warranty at all.
Tools
| Item Name | Purpose / Why You Need It | Tips for Use |
|---|---|---|
| Screwdrivers (Flathead & Phillips) | Used to loosen or tighten screws and clamps on the intake system. | Use the correct size to avoid damaging the screw head. |
| Socket set (with ratchet) | Helps to remove bolts holding the stock air intake and related parts. | Keep sockets organized to save time during installation. |
| Pliers | Used to remove hose clamps or pull off stubborn hose. | Wrap the jaws in a cloth to avoid scratching the metal parts. |
| Adjustable wrench | This is useful for different sizes of bolts and nuts if you don’t have the exact socket size. | Tighten the bolts gently to avoid overtightening them. |
| Allen wrenches (Hex keys) | Some cold air intake kits use Allen bolts for brackets or clamps. | Select the correct size to avoid stripping the bolt head. |
| Cold air intake kit | Complete system that replaces the stock intake to improve air flow. | Before purchasing, check that it matches the make, model and year of your car. |
| Gloves | Protects your hands from cuts, dirt and heat. | Use thin, flexible gloves for a better grip on the tools. |
| Flashlight or work light | This helps you see bolts, clamps and connections in low-light engine areas. | The headlamp is useful to keep both hands free. |
| Torque wrench | This ensures that the bolts are tightened to the manufacturer’s recommended torque settings. | Prevents damage caused by over-tightening. |
| Cleaning cloth or microfiber towel | Wipe dust, oil or grease from surfaces before installing the new intake. | Use a clean, lint-free cloth to avoid getting debris into the intake. |
| Zip ties | Helps secure loose hoses or wires after installation. | To avoid damaging the wires, do not overtighten them. |
Basic Safety Precautions Before You Begin
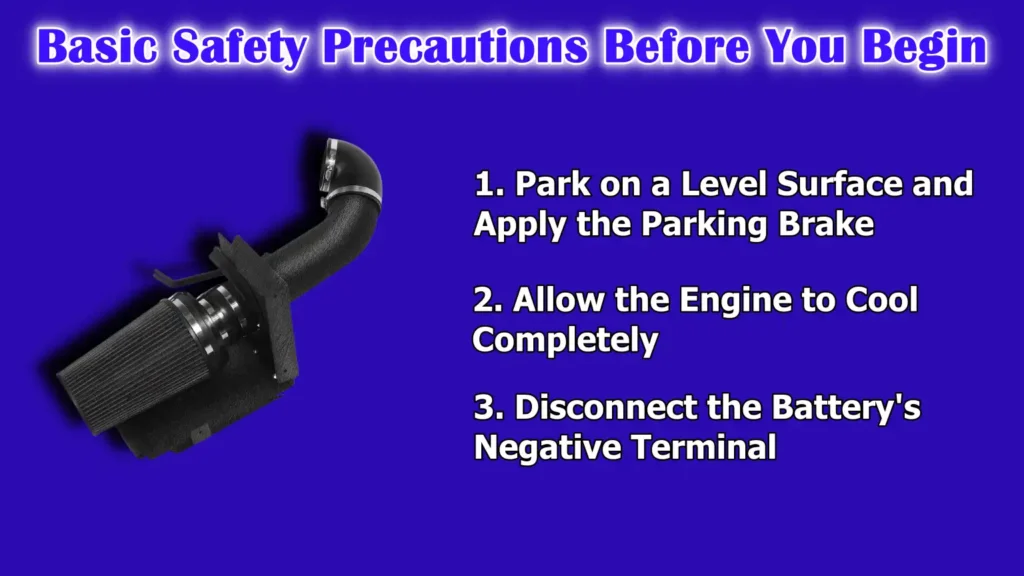
1. Park on a Level Surface and Apply the Parking Brake
Before you begin the installation, make sure your car is parked on a completely level and stable surface.
A level surface reduces the risk of the vehicle rolling or moving while working under the hood.
Applying the parking brake is important because it locks the wheels in place, adding an extra layer of safety.
Whether you’re working in a driveway or garage, this step ensures that the car stays firmly in place, preventing unexpected movement that could cause injury or damage.
2. Allow the Engine to Cool Completely
Engine temperatures after driving can exceed 200 degrees Fahrenheit, hot enough to cause severe burns when touched.
Cold air intake installation often involves working around metal parts and hoses that retain heat for long periods of time.
Waiting at least 30-60 minutes after turning off the engine allows all parts to cool, making it safe to handle parts without risk of injury.
It also prevents accidental bending or cracking from cold tools or hands touching extremely hot surfaces.
3. Disconnect the Battery’s Negative Terminal
Before disassembling any part of the intake system, disconnect the battery’s negative terminal to stop the flow of electricity to your vehicle.
This is a standard safety step in most car maintenance jobs because it prevents accidental short circuits, sparks, or the Check Engine light coming on.
It also helps protect sensitive electronic components like the mass airflow sensor, which you may need to unplug during installation.
Disconnecting the negative terminal is quick, taking less than a minute and is one of the easiest ways to avoid costly electrical damage.
Preparation
1. Open the Hood and Locate the Stock Air Intake System
First, raise your vehicle’s hood and secure it in place to hold it open securely.
The stock air intake system is usually located at the front or side of the engine bay and consists of the air filter housing, intake tubes and sometimes a resonator box.
Knowing the exact location of the stock intake helps you understand the steps to follow when removing it.
Most intake housings are made of black plastic and have visible clamps or screws.
Taking a few minutes to study its attachment to the engine and other parts will make the replacement process much easier.
2. Take pictures for reference before removing anything
One of the best preparation steps is to take clear pictures of the stock air intake with your phone or camera before removing it.
These pictures will serve as a visual reference if you forget how certain parts were attached.
These pictures can also be useful if you have to revert to the stock setup later.
Make sure your photos show the hose connections, the position of the clamps, the position of the sensor and the position of the bracket from different angles.
This simple habit can save you a lot of time and hassle during reassembly.
3. Gather all tools and parts in one place for convenience
Before you begin the installation, place all necessary tools, replacement parts and accessories in one place that is easily accessible.
This will help you work faster and reduce the risk of losing small items like bolts, screws, or washers.
Having everything within arm’s reach means you won’t have to stop repeatedly to look for tools, which can lead to distractions and mistakes.
If possible, place your tools in the order you plan to use them.
This organized approach makes the entire process more efficient and ensures that you don’t overlook any important steps.
Removing the Stock Air Intake System
1. Disconnect the Mass Airflow Sensor
If your vehicle is equipped with a mass airflow sensor, it will usually be located between the air filter housing and the intake tubing.
This sensor measures the amount of air entering the engine and is very sensitive.
Before removing it, carefully unplug the electrical connector by pressing or sliding the locking tab.
Never pull the wires straight out, as this can damage the internal parts of the sensor.
In some vehicles, the sensor is mounted directly in the tubing and may need to be unscrewed or clipped.
Handle it with care and place it in a safe, clean place to avoid dirt.
2. Loosen the Hose Clamps and Remove the Intake Tubing
Most stock intake systems are connected by rubber or silicone couplers that are secured with metal hose clamps.
Use a screwdriver or socket wrench to loosen these clamps until the tubing can be easily removed.
Work slowly to avoid tearing the couplers, as they can be reused for another installation or if you ever revert to the stock system.
Intake tubing is often made of hard plastic that can become brittle over time, so avoid bending it forcefully.
Removing this tubing will create the space needed to separate the air filter housing.
3. Open and Remove the Air Filter Housing
The air filter housing is usually held in place by bolts or screws and in some cases plastic clips.
Use the appropriate screwdriver or socket size to remove these without stripping the heads.
After removing the fasteners, carefully pull the housing out of the engine bay.
The housing may also be attached to a resonator box or ducting that runs to the front grille.
If so, separate these gently to avoid breaking any clips or mounting points.
Removing the housing opens up the space where the new cold air intake will be installed.
4. Be careful not to damage any wiring or hoses
Throughout the removal process, pay attention to nearby wiring, vacuum lines and coolant hoses that may be around or underneath the intake system.
These components are essential to the proper operation of the engine and other systems.
Accidentally pulling, bending or pinching them could cause performance problems or even engine damage.
If necessary, remove them a little at a time and secure them with zip ties until installation is complete.
Careful and patient effort ensures that everything is intact and ready for the new intake system.
Installing a Cold Air Intake
1. Follow the manufacturer’s instructions for your specific kit
Each cold air intake kit is designed differently depending on the brand, model and type of vehicle for which it is made.
Although the general installation procedure is the same, the exact positioning of the parts, mounting brackets and connection points may vary.
Always read the instructions provided with your kit before you begin, as they often contain diagrams, torque specifications and tips on avoiding common mistakes.
Following these guidelines ensures a correct fit and helps maintain the performance benefits the intake provides.
2. Attach the New Intake Tube to the Throttle Body
The throttle body controls the air entering the engine and the intake tube is the passageway for that air.
Install the new intake tube according to the kit’s instructions, making sure the coupler is snugly seated over the throttle body opening.
This connection must be airtight so that unmetered air cannot enter the system, which could impair engine performance or cause warning lights to come on.
Make sure the tube is properly aligned and not bent, as this will make it easier to connect the rest of the parts.
3. Secure the heat shield (if included)
Many cold air intake kits include a heat shield that blocks hot air from the engine bay and allows only cool outside air to reach the filter.
Cold air is denser and contains more oxygen, which helps improve combustion and performance.
Place the heat shield in the designated mounting location, often at the front of the engine bay and secure it using the provided hardware.
Make sure it does not touch moving engine parts or rub against any wires or hoses.
4. Install the new air filter
Place the new air filter on the end of the intake tube, making sure it is firmly and evenly seated.
Most performance filters are reusable and can be cleaned instead of replaced, but they must be installed correctly to prevent dust or debris from entering the engine.
Make sure the filter’s clamp is tight enough to hold it in place, but not so tight as to damage the filter neck.
A properly installed filter will protect the engine and allow maximum airflow.
5. Connect the mass airflow sensor (if applicable)
If your car has a mass airflow sensor, it will need to be reinstalled in the correct direction in the new intake system.
This sensor is responsible for sending air volume and temperature data to the engine’s computer for proper fuel delivery.
Double-check the arrow on the sensor housing, as it should point in the direction of airflow toward the engine.
Once installed, firmly reattach the electrical connector to avoid error codes.
6. Tighten all clamps and bolts firmly
The final step is to check every connection, clamp and bolt to make sure everything is in place.
Loose fittings can cause air leaks, rattling noises or parts coming loose while driving.
Use a screwdriver, socket wrench or torque wrench as recommended to secure each fastener.
This step is critical to the safety, performance and longevity of the new cold air intake system.
A final visual inspection will confirm that nothing is out of place and that the installation is complete.
Reassembly and Final Checks
1. Reconnect the Battery’s Negative Terminal
After the cold air intake system is fully installed, reconnect your car’s battery’s negative terminal to restore power.
This step is important because disconnecting the battery beforehand helps avoid accidental short circuits or electrical problems during installation.
When reconnecting the cables, make sure the connections are clean and corrosion-free, as poor contact can cause weak electrical current or intermittent electrical problems.
Tighten the terminals firmly, but avoid overtightening to prevent damaging the battery posts.
2. Check for any loose connections or gaps in the system
After reassembling the battery, carefully inspect the entire cold air intake setup to make sure all clamps, bolts and couplers are tight and secure.
Even a small gap or loose fitting can cause unfiltered air to bypass the filter and enter the engine, which can lead to reduced engine performance, reduced fuel consumption or engine damage over time.
A well-sealed system ensures that only clean, filtered air enters your engine for optimal combustion and efficiency.
3. Make sure no hoses or wires are pinched or obstructed
Before starting the engine, make sure no hoses, wires or cables in the engine bay are bent, twisted or pinched by sharp edges.
Pinched hoses can interfere with air flow or fluid movement and damaged wires can cause electrical malfunctions or warning lights on your dashboard.
If you have to move any hoses or wires during installation, return them to their correct position and secure with zip ties or clips if needed.
A clean, unobstructed engine bay not only increases safety, but also makes future maintenance easier.
Test the installation
1. Start the engine and listen for any unusual sounds
After completing the installation, start the engine and let it idle for a minute.
Listen carefully for any strange sounds, such as whistles, hisses, rattles or knocks.
A slight hiss in a cold air intake is normal, as it indicates improved airflow.
However, a loud hiss or knock may indicate a loose clamp, an air leak or vibration from another component.
Identifying and correcting unusual sounds at this stage can prevent decreased performance or possible damage later.
2. Rev lightly to check airflow response
When the engine begins to run smoothly, press the accelerator gently to increase engine speed slightly.
Pay attention to the engine response – you will hear a faster response to the throttle and possibly a deep, sporty sound from the intake.
Avoid revving hard when the vehicle is stationary, as this can put unnecessary stress on the engine and components.
The goal here is to make sure the new intake is flowing air smoothly without any blockages, misfires, or warning lights.
3. Take a short test drive to confirm smooth performance and no warning lights
When the initial checks look good, take the car on a short and careful test drive.
During this drive, monitor acceleration, listen for any unusual sounds and keep an eye on warning lights on the dashboard, specially the check engine light.
A properly installed cold air intake should not produce any error codes or unusual behavior.
If you notice reduced power, warning lights, or strange noises while driving, stop the vehicle safely and double-check all clamps, bolts and sensor connections.
A smooth test drive with no problems confirms that the installation is complete and successful.
Not only this, a cold air intake system can actually help to optimize the air intake pressure and by ensuring a consistent and optimal air supply: these systems can actually enhance the engine performance and fuel economy.[¹]
Read More:
Maintenance Tips
1. Clean or replace the filter according to the manufacturer’s schedule
The air filter in your cold air intake plays a vital role in protecting your engine from dirt, dust and debris.
Over time, the filter will become clogged, reducing air flow and performance.
Most performance filters are reusable and can be cleaned instead of replaced, but they must be serviced according to the manufacturer’s recommended schedule, which is often every 10,000 to 15,000 miles.
Cleaning the filter with the proper cleaning solution and allowing it to dry completely before reinstalling it ensures that it works efficiently.
If your filter is not reusable, replace it with a filter of the same model to maintain its fit and filtration quality.
2. Periodically check the tightness of clamps and connections
Vibration caused by the engine and road conditions can loosen clamps, bolts and couplers in your intake system over time.
Even a small gap can allow unfiltered air to enter the engine or cause the system to rattle.
Every few months, open the hood and check the tightness and alignment of each connection.
Tighten any loose parts with the proper tools, but avoid overtightening, as this can damage plastic or rubber parts.
A well-installed intake system ensures maximum air flow and increases its life.
3. Avoid driving through deep water as this can damage the intake
Cold-air intakes often draw air from the bottom of the engine bay, which means they are more likely to come into contact with water during heavy rain or when driving through flooded areas.
If water enters the intake tubes and reaches the engine, it can cause a dangerous condition called hydro-lock, where water prevents the pistons from moving, causing serious engine damage.
To protect your intake and engine, avoid driving through deep puddles or standing water.
If you must drive through water, drive slowly and carefully, keeping the water level well below the intake opening.
Conclusion – How to Install Cold Air Intake
It is really important for your car engine to have fresh and cool air regularly and this thing can be easily achieved by installing cold air intake, as it seems small upgrade but it has the positive impact on performance, sound and driving enjoyment and you’ll find these surprisingly big.
This not only improves airflow to your engine, but can also provide better throttle response, increased horsepower and a more satisfying driving experience.
By carefully following each step, from preparation and safe removal of the stock system to precise installation and final testing, you ensure that your new intake performs at its best.
Regular maintenance, such as cleaning or replacing filters and checking connections, will keep the system working efficiently for years.
Although the gains in performance vary depending on your vehicle and driving style, the benefits of a properly installed cold air intake go far beyond the numbers; it can make your engine more powerful, run more smoothly and breathe more freely.
So, it is the time to take your questions: so just ask questions in the comment section below.
Frequently Asked Questions
Q1. Do you need to do anything else after installing the cold air intake?
Answer: After installing the cold air intake, the first thing you should do is check that everything is installed correctly and properly. Make sure all clamps, bolts and connections are firmly in place so that there are no air leaks. Start the engine and pay attention to any unusual sounds such as rattles, hisses or vibrations, as these sounds can be a sign that something is loose or misaligned. It’s a good idea to take a short test drive to make sure the car is running smoothly and that no warning lights are flashing on the dashboard. In some vehicles, it may take a little while for the engine’s computer to adjust to the new air flow, but usually no special tuning is needed unless there are any other changes in your performance. Over the next few weeks, keep an eye on the system to make sure there have been no changes and check the filter periodically to make sure it’s clean. Regular filter maintenance and periodic tightening of connections will keep a cold air intake performing at its best for a long time.
Q2. Are there any disadvantages to a cold air intake?
Answer: Although a cold air intake can provide better air flow, a sporty sound and potential performance improvements, there are some potential disadvantages that should be considered. One problem is that if the intake draws air from below near the front bumper, the chance of water exposure increases. In deep water or heavy rain, this can cause a problem called hydro-lock, which can cause serious engine damage. Some cold air intakes can also interfere with engine operation if not installed properly, causing reduced performance or a check engine light to come on. In some cases, low-quality kits can allow unfiltered air in if the filter is not properly sealed, which can damage engine parts over time. Another concern is noise – although many drivers enjoy the deep sound, some may find it too loud for everyday driving. Overall, a good quality cold air intake that is installed correctly and maintained regularly is unlikely to cause problems, but it’s important to be aware of these risks before upgrading.
References:
[1] Effects of Air Intake Pressure on the Engine Performance, Fuel Economy and Exhaust Emissions of A Small Gasoline Engine
https://www.researchgate.net/publication/273665146_Effects_of_Air_Intake_Pressure_on_the_Engine_Performance_Fuel_Economy_and_Exhaust_Emissions_of_A_Small_Gasoline_Engine

Guys, I’m a car audio enthusiast and customization expert and I love clear sound and clean installation. Plus, I have spent years helping people build their dream audio setups. And whenever I’m working on cars, I probably listen to music and thinks about the next big upgrade.