 Skip to content
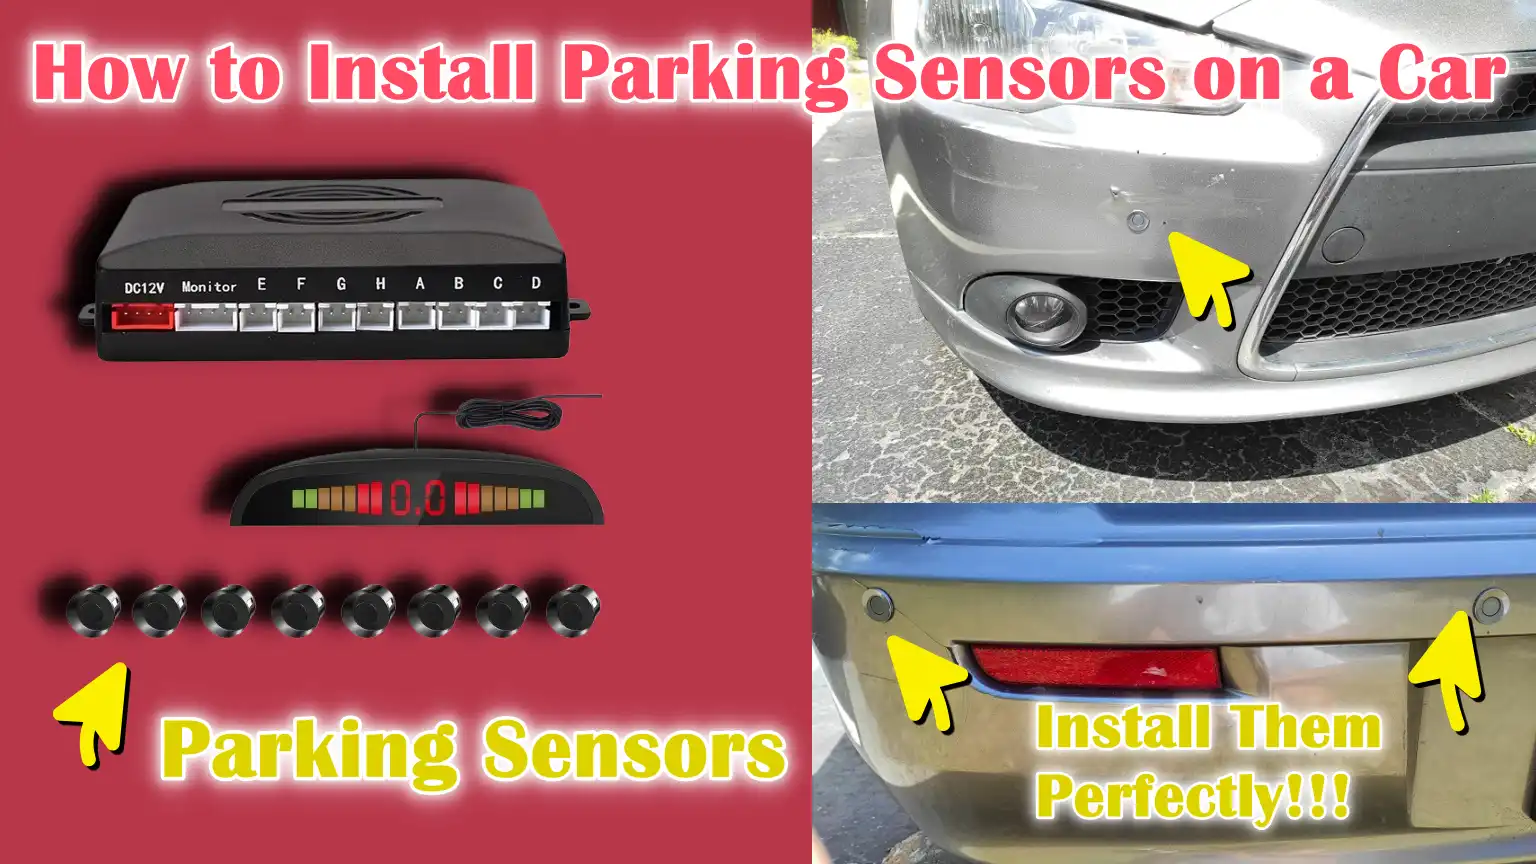
Written By: Don Dodi
Fact Checked By: Kristen Brown
Reviewed By: Diego Rosenberg
You won’t have to worry about the bumper damage as when you add the PARKING SENSORS to your car, then you won’t have to guess the distance anymore, as it gives you safety, more visibility and that makes your car smarter as well.
Without a doubt, now-a-days parking sensors becomes one of the most valuable safety features in modern cars and you can add this feature to your car without purchasing a brand-new vehicle.
Basically these are the ultrasonic devices and they usually installed in the rear or front bumper and it basically detects the obstacles and then it alert the drivers through the beeps or a display.
And studies also shows that the low-speed collisions, if we be more specific then while parking, the account for nearly 30% of the all reported car accidents worldwide and that costs drivers huge amount.
As well as, the parking sensors actually helps to reduce these kinds of accidents as it literally gives drivers an “extra set of eyes” and it is particularly useful in tight spaces or when the visibility is really poor.
Not only this, you have to learn that How to Install Parking Sensors on a Car, so that you can have accurately placed and well functional sensors.
Tools
| Tools / Materials | Purpose / Usage | Notes / Tips |
|---|---|---|
| Parking Sensor Kit | Includes sensor, control module, buzzer/display and wiring harness. Used to detect obstacles while parking. | Choose the kit that suits your car; read instructions carefully. |
| Drill with Hole Saw | Drill holes in bumper to install sensors. | Use correct size hole saw provided in kit to avoid loose sensors. |
| Masking Tape | To mark sensor position on bumper before drilling. | Helps prevent scratches and ensures precise placement. |
| Marker / Pen | To mark exact drill spots on bumper. | Use a fine tipped marker for precise markings. |
| Measuring Tape | To measure equal distances for sensor placement. | Make sure sensors are equidistant for accurate identification. |
| Panel Removal Tools | To remove trunk liner, bumper cover, or interior panel without damaging it. | Plastic pry tools are preferred to avoid scratches. |
| Multimeter | To check electrical connections and locate reverse light wire. | Required for safe and correct wiring of sensors. |
| Electrical Tape | To insulate wires and secure connections. | Optional: can be replaced with heat shrink tubing for better durability. |
| Connectors / Solder / Heat Shrink Tubing | To securely connect wires. | Soldering gives the most reliable connection; heat shrink prevents corrosion. |
| Zip Ties | To securely secure sensor wires inside bumper and trunk. | Prevents loose wires from moving or getting damaged. |
| Silicone Sealant | To waterproof drilled holes and protect sensors. | Optional, but recommended in wet climates for longer durability. |
How to Do Preparation and Planning to Install the Parking Sensors Correctly
1. Parking the car and ensuring safety
Before starting any installation, make sure your car is parked on a completely level surface so that it does not roll or move during the work.
Apply the handbrake fully to keep the vehicle secure.
For safety, disconnect the car battery, specially if you are working with electrical wiring.
This can prevent any accidental short circuits, sparks or damage to the vehicle’s electronic devices, which is specially important when connecting the parking sensor system to the reverse light wiring.
2. Reading the instructions
Even if you have experience with car modification, it is important to read the instructions provided with the parking sensor kit carefully.
Different kits may have different wiring, sensor orientation or calibration methods.
Understanding the manufacturer’s guidelines ensures that the sensors work correctly, reduces the risk of mistakes in installation and helps you avoid costly mistakes.
3. Deciding where to place the sensors
The correct placement of the parking sensors is critical for accurate performance.
Most parking sensors are mounted around 50 to 70 cm above the ground, allowing them to detect obstacles of normal height, such as curbs, pillars or small vehicles.
Uneven placement can cause blind spots or false alarms.
To ensure that the sensors cover the full width of the bumper evenly, it is important to pay attention to both their height and distance.
4. Marking the sensor positions
Use masking tape and a marker to carefully mark where each sensor will be mounted on the bumper.
Measuring the distance accurately ensures that the sensors are evenly spaced, which improves accuracy and prevents some areas from being missed.
Double-check the markings before drilling, as even small mistakes can affect the sensor’s ability to detect obstacles.
5. Checking for obstacles behind the bumper
Before drilling or installing the sensors, check for any obstacles in the area behind the bumper, such as supports, brackets, lights or wiring.
Placing the sensor in a location where structural elements block it may cause it to not function properly and may even damage the sensor or the car.
Ensuring there is a clear path behind each sensor is a critical step for reliable detection and long-term performance.
How to Access the Bumper Area
1. Removing the Trunk Liner or Bumper Cover
To properly install the parking sensors, it is often necessary to access the inside of the bumper.
Depending on your vehicle design, start by carefully removing the trunk liner or bumper cover.
The trunk liner is usually held in place with clips or screws that can be easily removed with plastic trim removal tools to avoid damaging the panel.
For vehicles with a partially removed bumper, loosen the fasteners in the wheel arch and under the bumper.
Accessing this area is important because it clears the path for the sensor wires and ensures that the sensors are installed in the correct location without obstruction.
2. Confirming Marked Locations
After accessing the inside of the bumper, check the previously marked sensor locations from the rear side.
It is important to make sure that there are no structural supports, wiring, brackets, or other obstructions behind the marked points.
Any obstruction may prevent the sensors from being level or working properly.
This step also allows you to plan the route for the sensor wires, ensuring they can reach the control module without being pinched or pulled.
Proper access and verification at this step can prevent installation errors and ensure the parking sensors work reliably once they are reinstalled in the car.
How to Drill and Install the Parking Sensors
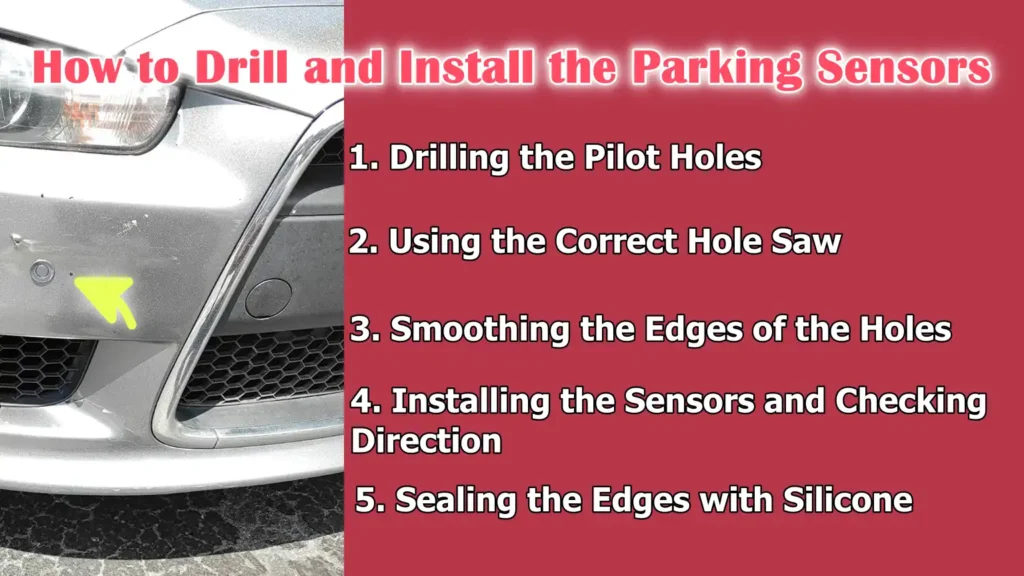
1. Drilling the Pilot Holes
The first step in installing the parking sensors is to carefully drill pilot holes at previously marked locations on the bumper.
Pilot holes are small, starting holes that serve as guides for the larger hole saw.
Drilling pilot holes ensures accuracy and reduces the risk of cracking or damaging the bumper, specially if it is made of plastic or composite materials.
It is important to drill slowly and steadily to maintain control and avoid slippage, which can cause uneven holes or scratches on the vehicle’s surface.
2. Using the Correct Hole Saw
After drilling the pilot holes, use the hole saw that matches the diameter of the sensor provided in your kit.
Hole saws are designed to make precise, round holes that allow the sensor to fit snugly.
Ensuring the correct size prevents the sensor from becoming loose or misaligned, which can cause malfunction or misdetection.
Double-check the sensor diameter in the kit instructions before drilling to avoid mistakes.
3. Smoothing the Edges of the Holes
Once the holes are drilled, it is important to smooth the edges with sandpaper or a deburring tool.
Rough or sharp edges can damage the sensor wires or sensor casing over time.
Smoothing the edges also ensures that the sensors are flush with the bumper, which is important for both aesthetics and accurate detection of obstacles.
4. Installing the Sensors and Checking Direction
Next, firmly insert the sensors into the prepared holes.
Most sensors have a specific direction, often marked “up” or directional arrows, which must be correctly aligned to function properly.
The correct direction enables the sensors to accurately detect obstacles at the correct angle and distance.
Press the sensors in gently but firmly to ensure they are firmly in place without loosening or bending.
5. Sealing the Edges with Silicone
In many kits, it is recommended to apply a small amount of silicone sealant around the edges of the sensors.
This step helps to waterproof the area, keeping both the sensors and wiring protected from moisture, dust and debris.
Proper sealing increases the lifespan of the sensors and prevents potential malfunctions caused by water ingress, specially in wet or humid climates.
How to Route and Connect the Wires
1. Routing the Sensor Wires
After the sensors are installed, the next step is to carefully route the sensor wires from the bumper to the control module’s location, usually inside the trunk or behind the bumper.
Proper routing ensures that the wires are protected from sharp edges, moving parts and heat sources that can damage them over time.
Take the time to route the wires cleanly and without obstructions.
Avoid excessive bending or pulling on the wires, as this can lead to breakage or malfunction.
2. Securing the Wires with Zip Ties
After routing the wires, it’s important to secure them with zip ties.
This will prevent the wires from coming loose inside the bumper or trunk, causing them to rub against metal parts or get caught in moving parts.
Well-secured wires reduce the risk of electrical short circuits, interference with other car systems and accidental connection breaks.
Keeping wires organized also makes future maintenance or troubleshooting much easier.
3. Installing the Control Module
The control module acts as the brain of the parking sensor system and processes the signals coming from all the sensors.
Install it in a dry, safe place, away from moisture, excessive heat or impact.
It is usually installed on the trunk floor, behind the trunk liner or just inside the rear bumper.
A correctly installed control module ensures reliable performance of the sensors and extends the life of the electronic components.
4. Connecting the Sensor Wires to the Control Module
Finally, following the instructions in the kit, connect the sensor wires to the designated ports on the control module.
Each sensor has a specific connection point and ensuring the correct connections is important for accurate obstacle detection.
Make sure the connectors are fully seated and secured, as loose connections can damage the sensors or cause false alerts.
Correct connections ensure that the system works efficiently and reliably alerts the driver when parking.
How to Do Power Supply and Electrical Connections
1. Locating the Reverse Light Wiring
The first step in connecting the parking sensor system to your car’s electrical system is to identify the reverse light wiring.
This can be done safely by using a multimeter, which measures voltage and ensures you are connected to the correct wire.
The positive wire of the reverse light only carries current when the car is in reverse, causing the parking sensors to activate automatically.
Locating the correct wire is important, as connecting to the wrong circuit can damage the sensor or even your car’s electrical system.
2. Connecting the Positive Wire
Once the positive wire of the reverse light is identified, connect the positive wire of the control module to it.
This allows the parking sensor system to receive power only when the car is in reverse, preventing unnecessary battery consumption.
Make sure the connection is secure by soldering in the correct connector or heat shrink tubing, as a loose connection can cause the sensor to work intermittently or fail completely.
Correct installation ensures that the sensors activate reliably every time the vehicle is put into reverse.
3. Connecting the ground wire
The ground wire completes the electrical circuit and must be connected to solid chassis ground.
This is usually a clean, unpainted metal part of the car body.
A secure ground connection is essential for stable performance of the sensors and prevents electrical interference or erratic signals.
Ensuring a reliable ground connection also protects both the control module and the sensors from potential short circuits.
4. Connecting the buzzer or display
If your parking sensor kit includes a buzzer or display unit, attach its cable to a location in the cabin where it is clearly visible or audible to the driver.
Mount the device securely in a convenient location, such as on the dashboard or near the rearview mirror, so that alerts are displayed immediately.
Proper placement of the display or buzzer ensures that the driver receives timely warnings of obstacles, which increases safety and can avoid potential collisions when parking.
Read More:
How to Test the System
1. Reconnecting the Battery
After all sensors have been installed and wired, the first step in testing the parking sensor system is to reconnect the car’s battery.
Reconnecting the battery restores power to the vehicle’s electrical system and gets the control module and sensors working.
It’s important to make sure all connections are properly insulated and secured before restoring power to prevent short circuits or damage to the sensors.
2. Activating the Sensors
After reconnecting the battery, put the car in reverse gear with the ignition on.
Most parking sensor systems are designed to activate automatically when the vehicle is in reverse, using a signal from the reverse lights.
This step allows the sensors to begin detecting obstacles and ensures the system is working as expected.
3. Testing Detection Accuracy
Walk slowly behind the car and observe how the sensors react to obstacles.
The sensors should indicate the distance to objects behind the vehicle via a buzzer or visual feedback on the display.
Test multiple angles and positions to ensure all sensors are consistently detecting obstacles.
Accurate detection is extremely important to prevent collisions and ensure reliable performance while parking.
4. Checking for Blind Spots and False Alerts
During testing, watch carefully for blind spots or persistent beeping sounds, which may indicate misaligned or obstructed sensors.
Adjust the position or angle of any sensors that are not functioning properly.
Ensuring proper alignment and spacing of all sensors eliminates the possibility of false alarms and blind zones, allowing the parking sensor system to provide accurate and reliable guidance.
The thorough testing in this phase ensures the system is safe, effective and ready for daily use.
How to Do Final Adjustments and Reassembly
1. Securing All Wires
After testing the parking sensor system, it is important to ensure that all wires are properly secured with zip ties.
Properly tying the wires prevents them from moving, rubbing against metal parts, or being pinched when reassembling the panel.
Proper management of wires also reduces the risk of short circuits, accidental disconnections and interference with other electrical components, which contributes to the long-term reliability of the parking sensors.
2. Reinstalling the Bumper Panel or Trunk Liner
After securing the wires, carefully reinstall the bumper panel or trunk liner.
Make sure all clips, screws and fasteners are returned to their original positions to maintain the vehicle’s structural integrity and appearance.
Proper reassembly ensures that the sensors remain aligned, protected from external damage and that the vehicle looks as clean and professional as it did before installation.
3. Ensuring everything fits cleanly and smoothly
After reassembly, inspect the position of the bumper and sensors to ensure everything fits perfectly and there are no gaps, misalignments or loose parts.
The sensors must be seated evenly in their drilled holes without protruding or tilting, as this affects both aesthetics and detection accuracy.
Clean fingerprints, dust or silicone residue from the installation area to maintain a professional finish.
4. Final functional testing in real parking conditions
The final step is to perform a final functional test by parking the car in real conditions.
Slowly back towards obstacles of different sizes such as walls, curbs or pillars and see how the sensors react.
This ensures that all sensors are working correctly, alerts are clear and there are no blind spots.
Testing in real parking conditions confirms that the system is fully operational, reliable and ready for daily use, giving the driver confidence and improved safety.
How to Solve the Common Problems – If Necessary
Yes, you should be really aware during the installation of aftermarket parking sensors as it can vary in real-world performance, also NHTSA testing shows that some of the systems miss small or low objects, which is why you have to select a really reputable kit and test detection thoroughly after mounting it, also you should carefully place and real-world checks should be done like: walking tests and tests with different obstacles so that the blind spots should be reduced and safety should be improved.[¹]
1. Check for no power
If the parking sensor system does not activate, the first step is to check the reverse light connections and ground wire.
Use a multimeter to make sure the control module is getting power when the car is reversing.
Make sure the positive wire is correctly connected to the reverse light circuit and the ground wire is connected to a solid, unpainted part of the chassis.
Loose or corroded connections can prevent the sensor from turning on, so secure all connections and check for continuity to ensure proper operation.
2. Constant beeping problem
Constant or frequent beeping sounds usually indicate that the sensor is misaligned, blocked or dirty.
Check the correct direction of each sensor, make sure they are mounted flat in the bumper and remove dirt, mud or debris from the sensor surfaces.
Even a small blockage can cause false alerts, so careful cleaning and adjustment of the sensors ensures accurate detection and prevents unnecessary warnings while parking.
3. Troubleshooting a non-functioning sensor
If one sensor is not working while all others are working properly, it is important to identify whether the problem is in the sensor or the control module.
Replace the suspect sensor with another working sensor on the module.
If the problem is also in the sensor, the sensor is defective and must be replaced.
If the problem persists in the same port of the module, the control module may have a faulty output that needs repair or replacement.
Proper diagnostics ensures that the system operates reliably and all sensors provide accurate detection.
Conclusion – How to Install Parking Sensors on a Car
Yes, without a second doubt the parking sensors are smart investment that gives you convenience during the parking time and it protects both you and your vehicle as well.
By following a careful process—which includes preparing the car, marking sensor locations, drilling precisely, routing and connecting the wires correctly and thoroughly testing the system—you can ensure the system operates reliably and lasts for years.
Proper placement and secure connections are crucial, as misplaced sensors or loose wiring can impair performance and trigger false alerts.
Modern parking sensor kits are designed for DIY installation, making this upgrade easy, affordable and practical, without the need for professional service.
Once installed, the system provides clear audio and visual warnings, helping you avoid curbs, posts and other obstacles, while protecting both your vehicle and your wallet.
Overall, a well-installed parking sensor system offers convenience, safety and peace of mind, making everyday parking a simple and stress-free experience.
So, that’s all from this guide and if you still have confusion related to this guide, just let us known by commenting below.
Frequently Asked Questions
Q1. Can I install parking sensors myself?
Answer: Yes, most modern parking sensor kits are designed for self-installation and can be installed without professional help. The process involves marking the location of the sensors, drilling holes in the bumper, connecting wires to the control module and reverse lights and testing the system. If you follow the instructions carefully and take safety precautions, such as disconnecting the battery when working with electrical connections, you can successfully install the sensors yourself.
Q2. What tools do I need to install parking sensors?
Answer: You will need a parking sensor kit, a drill with the correct size hole saw, masking tape, a marker, measuring tape and panel removal tools. A multimeter is helpful for locating the reverse light wire. Electrical tape, connectors, solder and heat shrink tubing can be used to securely connect the wires and zip ties help keep the wires organized. Silicone sealant is optional but recommended for waterproofing. These devices are usually easy to find and affordable.
Q3. How high should I install parking sensors on my bumper?
Answer: Parking sensors are usually installed 50 to 70 centimeters above the ground. This height helps the sensors detect common obstacles such as curbs, pillars and small objects without obstructions. Installing the sensors too high or too low can reduce their effectiveness, causing blind spots or false alerts. It is important to take careful measurements and place the sensors evenly across the entire width of the bumper.
Q4. Will installing parking sensors damage my car?
Answer: If installed correctly, installing parking sensors will not damage the car. Precise holes and smooth edges from the correct hole saw prevent cracks or scratches. Following the kit’s instructions ensures that the wiring is securely connected and routed so that there is no interference with other car systems. Using the right tools and taking your time during installation will keep your car safe and maintain its beauty.
Q5. Do parking sensors work in all weather conditions?
Answer: Yes, most parking sensors are designed to work in a wide range of weather conditions, including rain, snow and fog. However, heavy dirt, ice or mud on the sensor can reduce accuracy. Regular cleaning of sensor surfaces and proper sealing at the edges help maintain reliable performance in all weather conditions.
Q6. Why is the sensor not working after installation?
Answer: If a sensor is not working, it may be that the sensor is bad or the connection is loose. You can replace the suspect sensor with another sensor installed on the control module. If the problem is in the sensor, the sensor itself is bad and must be replaced. If the problem persists in the same module port, the control module may be bad. It is also important to check for any damage to the wiring and ensure the correct connection.
Q7. What should I do if the sensor keeps beeping continuously?
Answer: Continuous beeping usually indicates that the sensor is installed in the wrong direction, blocked or dirty. Check each sensor to make sure it is mounted in the correct direction and level with the bumper. Remove dirt or debris from the sensors and make sure there are no obstacles directly in front of them. Correct alignment and cleaning prevent false alarms and ensure accurate detection.
Q8. Can parking sensors be installed in any car?
Answer: Most cars, both older and newer models, can be equipped with aftermarket parking sensors. However, some modern vehicles with advanced electronics or metal bumpers may require specific kits or professional installation. It is important to check that the sensor kit is compatible with your vehicle and that you have the appropriate mounting location and wiring connections available.
Q9. How long does it take to install parking sensors?
Answer: Installation time depends on your experience, tools and vehicle type. On average, self installation can take two to four hours. Taking the time to carefully measure, drill and route wires ensures that the sensors work correctly and reduces the risk of mistakes. Rushing this process could result in misalignment of the sensors or wiring problems.
References:
[1] Vehicle Backover Avoidance Technology Study
https://www.nhtsa.gov/sites/nhtsa.gov/files/backoveravoidancetechstudy.pdf

Guys, I’m a car audio enthusiast and customization expert and I love clear sound and clean installation. Plus, I have spent years helping people build their dream audio setups. And whenever I’m working on cars, I probably listen to music and thinks about the next big upgrade.
