 Skip to content
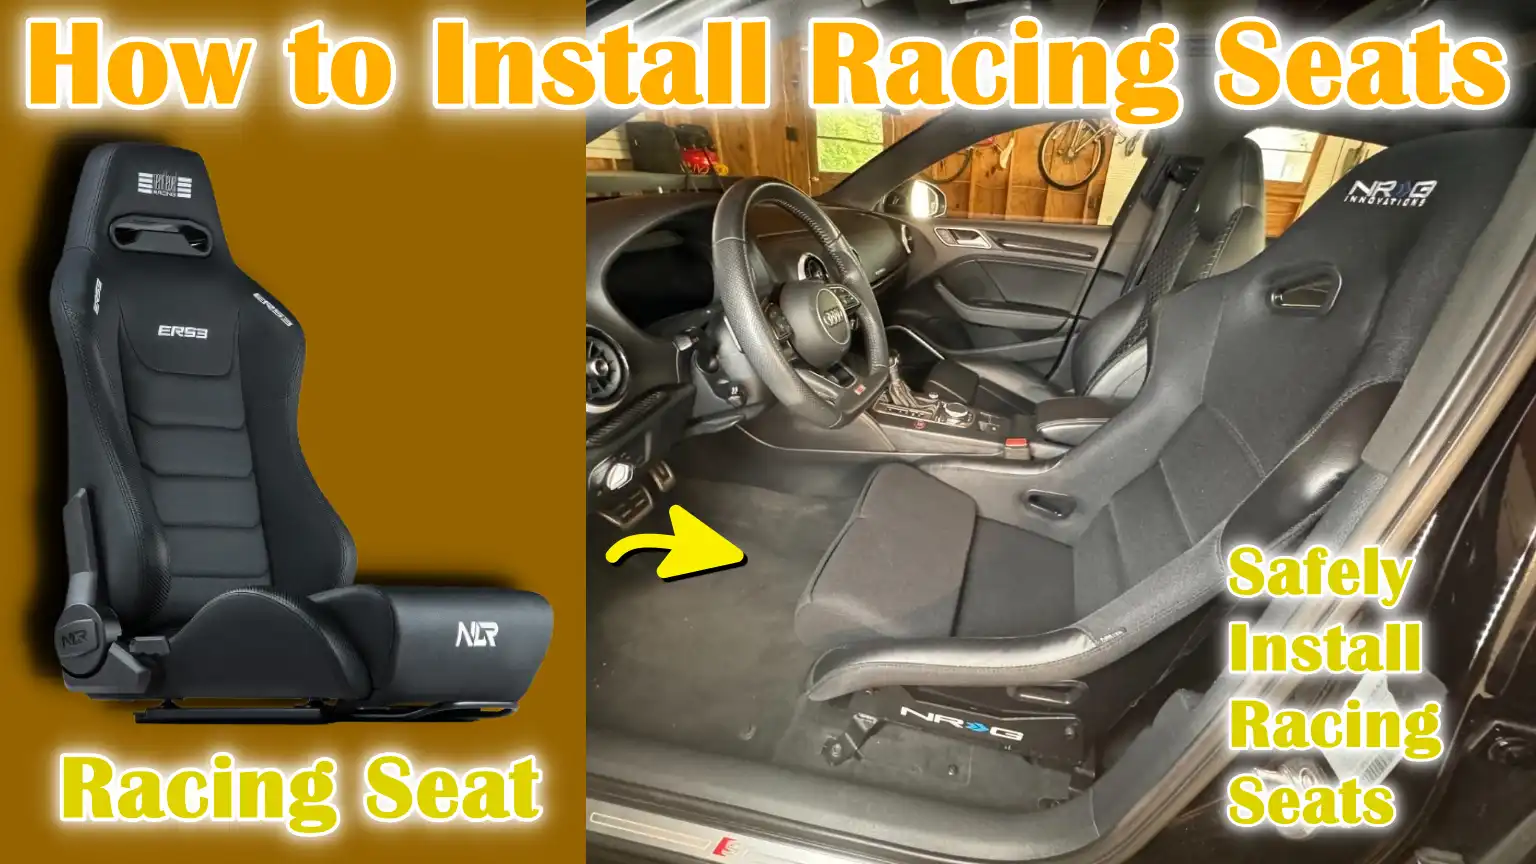
Written By: Don Dodi
Fact Checked By: Kristen Brown
Reviewed By: Diego Rosenberg
Don’t think that racing seats are just stylish upgrade, as they are safety-tested performance parts and that are purposefully built to keep the driver stable, that gives them control and make them secure.
Also, normally it is seen that standard factory seats are actually designed for comfort and mass use only, but racing seats are actually engineered with stronger side bolsters, durable materials and ergonomic shapes as well that keeps the driver firmly in place during sharp turns, hard braking and quick acceleration as well.
Along with this, many racing seats are actually made from the lightweight materials such as: carbon fiber or reinforced fiberglass: and that kind of material actually reduces the overall weight of the car and slightly improve the performance and fuel efficiency as well.
Plus, there are multi-point racing harnesses are available that proves greater safety in high-speed driving condition when we compare it to the regular seat belts.
However, you have to know How to Install Racing Seats first, so that you can effectively improve the driving posture, enhance car control and actually enjoy a more secure and thrilling driving experience.
Tools
| Item | Purpose / Use | Tips |
|---|---|---|
| Socket Wrench Set | For removing and tightening bolts on stock and racing seats. | Use the correct size socket to avoid stripping the bolts. |
| Screwdrivers (Flathead & Phillips) | To remove panels, covers and screws. | Have different sizes of screws ready for smaller screws. |
| Torque Wrench | Tighten the bolts to the manufacturer’s recommended torque. | This ensures that the bolts are secure without being overtightened. |
| Allen Wrench / Hex Key Set | For bolts or screws that use a hex head. | See bracket or slider instructions for sizes. |
| Ratchet Extension | Helps access hard-to-reach bolts under the seat. | Makes installation fast and easy. |
| Pliers | For gripping nuts, removing clips, or turning small parts. | Needle-tipped pliers are specially useful. |
| Utility Knife / Box Cutter | For cutting zip ties or trimming the mat, if necessary. | Be careful to avoid damaging the carpet. |
| Seat Brackets | Attaches racing seat to car mounting point. | Make sure they match your car model and seat type. |
| Seat Sliders | Allows the racing seat to be adjusted fore and aft. | Some sliders come with built-in brackets. |
| Bolts & Nuts | Store the brackets, sliders and seat in a safe place. | Use grade 8 or higher for strength and durability. |
| Washers | Distribute the pressure of the bolts and prevent damage. | Properly match bolt sizes. |
| Loctite (Thread Locker) | Prevents loosening of bolts due to vibration. | Medium power is usually sufficient. |
| Racing Harness | Provides additional safety and keeps the driver safe. | Usually a 4, 5, or 6-point harness; check car compatibility. |
| Side Mounts / Mounting Plates | Additional support for some seat models. | Make sure they fit the seat and the car floor. |
| Seat Covers / Padding | Protects seat material and increases comfort. | Can be used on racing seats made of suede or leather. |
How to Be Fully Prepare First to Install Racing Seats
1. Removing the Car Battery
Before beginning any work on your car seats, the first and most important step is to remove the car battery.
This is essential because modern vehicles have electrical systems connected to the seats, such as airbags, seatbelt sensors and seat heaters.
If these systems are accidentally activated during installation, warning lights may appear on your dashboard, electronic components may be damaged, or the airbags may even deploy unexpectedly.
To avoid this, locate the battery’s negative terminal and carefully disconnect it with a wrench.
After removing the battery, wait at least ten to fifteen minutes before touching any part of the seat to ensure that all electrical systems are completely off.
2. Cleaning the Workplace
Once the battery is safely disconnected, it’s important to prepare the area around your car.
Remove any floor mats, loose objects, or obstacles that may interfere with the installation process.
This not only protects your car’s interior from scratches or damage, but also gives you enough space to maneuver the new seat and bracket.
A clean and organized workspace ensures that bolts, tools and small parts are easily accessible, reducing the risk of accidentally dropping or misplacing important components.
3. Reviewing the Manufacturer’s Instructions
Before installing a racing seat or bracket, carefully read the manufacturer’s instructions.
Different seats and brackets may have specific requirements for bolt placement, torque settings and installation angles.
Following the instructions precisely is crucial to ensuring a safe installation.
Pay attention to details such as the correct orientation of the sliders, the compatibility of the bracket with your car model and the recommended tightening order.
Reviewing the instructions in advance will save time, prevent mistakes and ensure the seat is installed correctly the first time.
How to Remove Old Seats
1. Locating and Unscrewing Seat Mounting Bolts
The first step in removing your old car seat is to remove the mounting bolts that secure it to the ground.
Most vehicles have four main bolts, one at each corner of the seat base, although some larger vehicles may have additional mounting points.
Carefully slide the seat back and forth to access the bolts hidden under the seat track.
It’s important to use the correct-sized socket wrench to avoid stripping the bolt heads.
Be sure to loosen all bolts evenly and secure them securely, as these will be needed for installing the new racing seat.
2. Removing Electrical Connectors
Modern car seats often contain electrical components such as airbags, seatbelt sensors and seat heaters.
Before lifting the seat, locate all electrical connectors connected to the seat.
These connectors are usually located under the seat or on the side panel and may require a gentle press of a tab or lever to remove them.
It’s important to disconnect these wires carefully, as cutting or applying force to them could trigger airbag warnings, damage sensors, or result in costly repairs.
To avoid accidental short circuits or electric shock, it’s also important to double-check that the battery is disconnected before touching any electrical connectors.
3. Lifting and Removing the Stock Seat
Once all bolts have been removed and the electrical connectors safely disconnected, the seat can be removed from the vehicle.
Seats are often heavier and bulkier than they appear, specially if they have built-in motors or heaters.
Proper lifting techniques are essential to prevent injury or damage to the car’s interior.
Having a second person help you safely and easily lift the seat out of tight spaces.
Carefully tilt the seat as needed to avoid scratching the door frame, center console, or carpet edges.
Once the seat is removed, the vehicle floor should be inspected and cleaned before installing the new racing seat.
How to Install the Seat Bracket and Slider
1. Installing the Slider on the Racing Seat
Many racing seats come equipped with seat sliders, which allow you to move the seat back and forth for a comfortable driving position.
Before installing the slider, ensure you have the correct model that fits both your seat and vehicle.
Place the slider under the seat base and carefully align the mounting holes.
Using the bolts provided by the manufacturer, tighten them just enough so that the slider stays in place without being fully engaged.
This step ensures that minor adjustments can be made later to achieve proper alignment and smooth movement.
Properly installed sliders not only increase comfort but also make entering and exiting the car safely easier.
2. Installing the Seat Bracket on the Seat Base
Seat brackets serve as the connection between the racing seat and your car’s mounting points.
After installing the slider, securely secure the seat bracket to the seat base.
Make sure you’re using the correct bolts and hardware recommended by the seat manufacturer.
Tighten the bolts slowly and evenly to avoid misalignment or stress on the bracket material.
Using a thread locker like Loctite on the bolts can prevent them from loosening over time due to vibration during driving.
Correctly fitted brackets are crucial for safety, as they hold the seat firmly in place even during sharp turns or sudden stops.
3. Ensuring Correct Alignment
Before installing the seat in the vehicle, double-check that the slider and bracket are properly aligned.
Misalignment can make the seat unstable, cause uneven wear on the mounting points, or hinder seat movement.
The seat should be level on the bracket and slider and all bolt holes should be exactly the same.
Test the slider by moving the seat back and forth to ensure smooth operation without any obstruction.
Correct alignment at this stage saves time and prevents potential safety hazards after the seat is installed.
Ensuring that everything fits correctly also improves comfort, stability and the overall driving experience.
Read More:
How to Install Racing Seats – In a Perfect Way
1. Positioning the Seat in the Vehicle
Once the brackets and sliders are properly installed, the next step is to carefully install the racing seat inside the car.
It’s important to proceed slowly and adjust the angle as needed to avoid scratching interior surfaces, such as door frames, the edges of the center console, or carpet.
Racing seats are often heavier and bulkier than standard seats, specially if they have side bolsters or integrated harnesses, so handling them carefully is essential.
It may be helpful to have a second person assist you to ensure the seat is raised evenly and placed gently on the floor without tilting or straining.
Correct positioning during this step ensures the seat fits securely and makes all subsequent steps easier.
2. Aligning the Bracket Holes with the Factory Mounting Points
Once the seat is installed, the mounting bracket holes must be carefully aligned with the original factory mounting points on the vehicle floor.
This step is crucial, as misalignment can cause the seat to become unstable, cause the bolts to wear unevenly, or make it difficult to secure the seat properly.
Check both the front and rear bolts to ensure all holes are correctly aligned.
Taking the time to align everything correctly will make installation easier and prevent problems when tightening the bolts.
Correct alignment also ensures the seat maintains the correct driving position and stability for both safety and comfort.
3. Installing and Tightening the Bolts
After alignment, insert the bolts through the seat brackets into the car’s mounting points.
It is important to use the correct bolt sizes recommended by the seat manufacturer, as incorrect bolts can compromise security.
Tighten the bolts slowly in a crisscross pattern to ensure even pressure and stability.
Using a torque wrench to tighten the bolts to the manufacturer’s specified torque is highly recommended.
This prevents overtightening, which could damage the threads or brackets and undertightening, which could cause the seat to move during driving.
Properly secured bolts are crucial for safety, as they keep the seat firmly attached to the vehicle and provide stability during everyday driving and more aggressive maneuvers.
How to Reconnect Electrical Components – If Applicable
1. Adding Seat Belt Sensors, Airbag Connectors, or Bypass Modules
Modern vehicles often have electrical components integrated into the seats, such as seat belt sensors, airbags and heated seat modules.
After installing racing seats, it’s important to carefully reconnect these components if your vehicle requires them.
Seat belt sensors connect to the car’s safety systems to ensure proper airbag operation and proper seatbelt warnings.
Airbag connectors must be handled with extreme care, as incorrect connections can cause airbags to malfunction or trigger warning lights.
In some cases, a bypass module may be required to maintain proper system functionality when replacing seats without airbags or sensors.
Always follow the manufacturer’s instructions for each connector to prevent damage to electrical systems and ensure full operation of safety features.
2. Ensuring there are no warning lights on the dashboard
After all electrical connections have been made, reconnect the car’s battery and turn on the ignition to check the dashboard.
Ideally, there should be no warning lights related to the airbag, seat belt, or other seat components.
If any warning lights appear, it could indicate loose connections, incorrect wiring, or an incompatible seat module.
Double-check all connectors and tighten any loose ones and if necessary, consult the manufacturer’s troubleshooting guide.
Ensuring all systems are functioning properly not only maintains the car’s safety features but also provides peace of mind that the racing seat is properly and securely installed.
How to Do Adjustments and Final Checks
1. Testing the Seat Position, Slider Movement and Recline
Once the racing seat is installed, it’s essential to test all adjustable features to ensure proper function.
If the seat has a slider, move it fully forward and backward to ensure smooth and continuous movement without any obstructions or unusual resistance.
For seats with a recline feature, adjust the backrest to multiple positions to ensure it locks securely at every angle.
Proper functioning of the slider and recline mechanisms is crucial not only for comfort but also for safety, as they help the driver maintain an optimal position for vehicle control while keeping the seat firmly in place.
2. Ensuring the Seat is Securely Secured
After testing the adjustable features, double-check that the seat is securely in place.
Gently push and pull on various parts of the seat to ensure there is no vibration or movement.
Even the slightest movement can compromise safety, specially during sudden stops, sharp turns, or emergencies.
Use a torque wrench to ensure all bolts are tightened to the manufacturer’s specifications and inspect the brackets and mounting points for any bends or looseness.
A firmly secured seat provides stability, improves driving control and prevents potential injury in the event of an accident.
3. Checking Visibility, Comfort and Access
Finally, sit in the racing seat and evaluate your overall driving position.
Ensure you have a clear view of the mirrors, dashboard instruments and the road ahead.
Ensure your arms can comfortably reach the steering wheel and your legs can operate the pedals without strain.
Consider whether the seat provides adequate support to your back, arms and thighs, as proper comfort helps reduce fatigue during long drives or performance driving.
The adjustments made in this stage improve both safety and comfort, ensuring that the racing seat not only looks good but also improves your driving experience.
Basic Safety Considerations
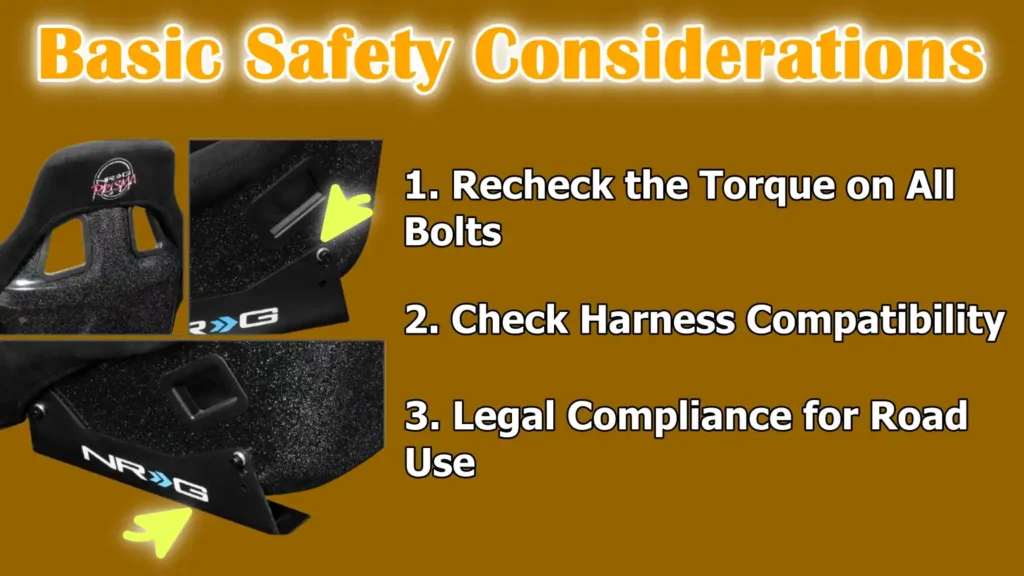
Plus, you need to ensure that racing seats are mounted securely or not, as it is crucial for safety of yours, basically proper mounting involves securing the seat only on the bottom and the back surfaces, you should avoid side mounts. Plus, when you use large washers on aluminum seats then it actually helps to distribute the load evenly and in that way it reduces the risk of material failure, so these are the practices that are essential to maintain the structural integrity of the seat and that ensures drivers safety as well during the high-impact situations.[¹]
1. Recheck the Torque on All Bolts
After completing the installation, it is important to ensure that all bolts are tightened to the manufacturer’s recommended torque.
Using a torque wrench, check each mounting bolt, slider bolt and bracket bolt for overtightening, as this could strip the threads or damage the mounting points, or for undertightening, as this could cause the seat to move or detach during driving.
Proper torque ensures that the racing seat remains firmly attached to the vehicle, maintaining stability and protecting both the driver and passengers in the event of a sudden stop, sharp turn, or collision.
2. Check Harness Compatibility
For drivers using racing seats with multi-point harnesses, it is important to ensure that the seat is compatible with the harness system.
Not all racing seats are designed for 4-, 5-, or 6-point harnesses and improper installation can reduce safety or damage the harness during high-speed driving.
To ensure the harness functions correctly and securely holds the rider, check the manufacturer’s specifications for proper mounting points, angles and clearances.
Proper compatibility is crucial for both track performance and crash safety.
3. Legal Compliance for Road Use
Before driving on public roads, it’s important to consider legal compliance.
Some racing seats are designed specifically for track or off-road use and may not meet road safety regulations in certain areas.
This may include requirements for airbags, seatbelt sensors, or seat material standards.
Installing a non-compliant seat may result in a vehicle inspection failure, insurance coverage cancellation, or legal penalties.
Always verify that the chosen racing seat is approved for road use in your area to ensure full compliance while maintaining safety and peace of mind.
Conclusion – How to Install Racing Seats
It is also necessary to install the racing seat properly as to ensure every turn, brake and acceleration to be secure, it improves the comfort, posture and overall vehicle control as well.
Because properly installed racing seats provide better support during sharp turns, sudden stops and high speeds, reducing fatigue and improving driver control.
Following the correct steps—preparing the workspace, safely removing the old seats, installing the brackets and sliders, securing the seat with the proper torque and reconnecting the electrical components—ensures a stable and reliable installation.
Additionally, checking harness compatibility and adhering to legal compliance guarantees both safety and roadworthiness.
By carefully following these procedures, drivers can not only enjoy a more sporty and comfortable driving experience, but also be safer, increasing their confidence on the road or track.
Now, you can ask questions and related queries in the comment section below.
Frequently Asked Questions
Q1. Are racing seats safe for street use?
Answer: Racing seats can be safe for street use, provided they are installed correctly and comply with local vehicle safety regulations. Some racing seats are designed specifically for track use and may not have features such as airbags or seatbelt sensors required for street use. It’s important to check that the seat model you choose is approved for street use in your area. Proper installation, including correctly torqued bolts and alignment with factory mounting points, is also essential to ensure safety.
Q2. Do I need special tools to install racing seats?
Answer: Yes, installing racing seats requires basic automotive tools such as a socket wrench set, screwdriver, torque wrench and possibly an Allen key set. You may also need bolts, washers, brackets, sliders and thread locker such as Loctite. While these tools are common, it’s important to follow the correct steps and manufacturer’s instructions to install the seat securely.
Q3. Can I install racing seats myself or should I hire a professional?
Answer: Many car enthusiasts can install racing seats themselves, provided they follow the correct instructions, have the right tools and take safety precautions. However, if the seat has complex electrical connections, harness systems, or is designed for high-performance driving, it may be safer to hire a professional. Professional installation ensures that the seat is installed correctly, aligned correctly and fully complies with safety standards, preventing costly mistakes or accidents.
Q4. How do I know if my racing seat is compatible with my car?
Answer: Seat compatibility depends on your car model and seat manufacturer. You need to ensure that the seat brackets and sliders match your car’s mounting points and floor layout. Checking the manufacturer’s specifications and using adapter brackets, if needed, will help ensure the seat fits correctly. If your stock seat has airbags, sensors or seat heaters, compatibility also includes checking the electrical connectors, as some racing seats don’t have these features.
References:
[1] Proper Seat Mounting – Racing Safe
https://www.hotrod.com/how-to/ctrp-0302-proper-seat-mounting

Guys, I’m a car audio enthusiast and customization expert and I love clear sound and clean installation. Plus, I have spent years helping people build their dream audio setups. And whenever I’m working on cars, I probably listen to music and thinks about the next big upgrade.
