 Skip to content
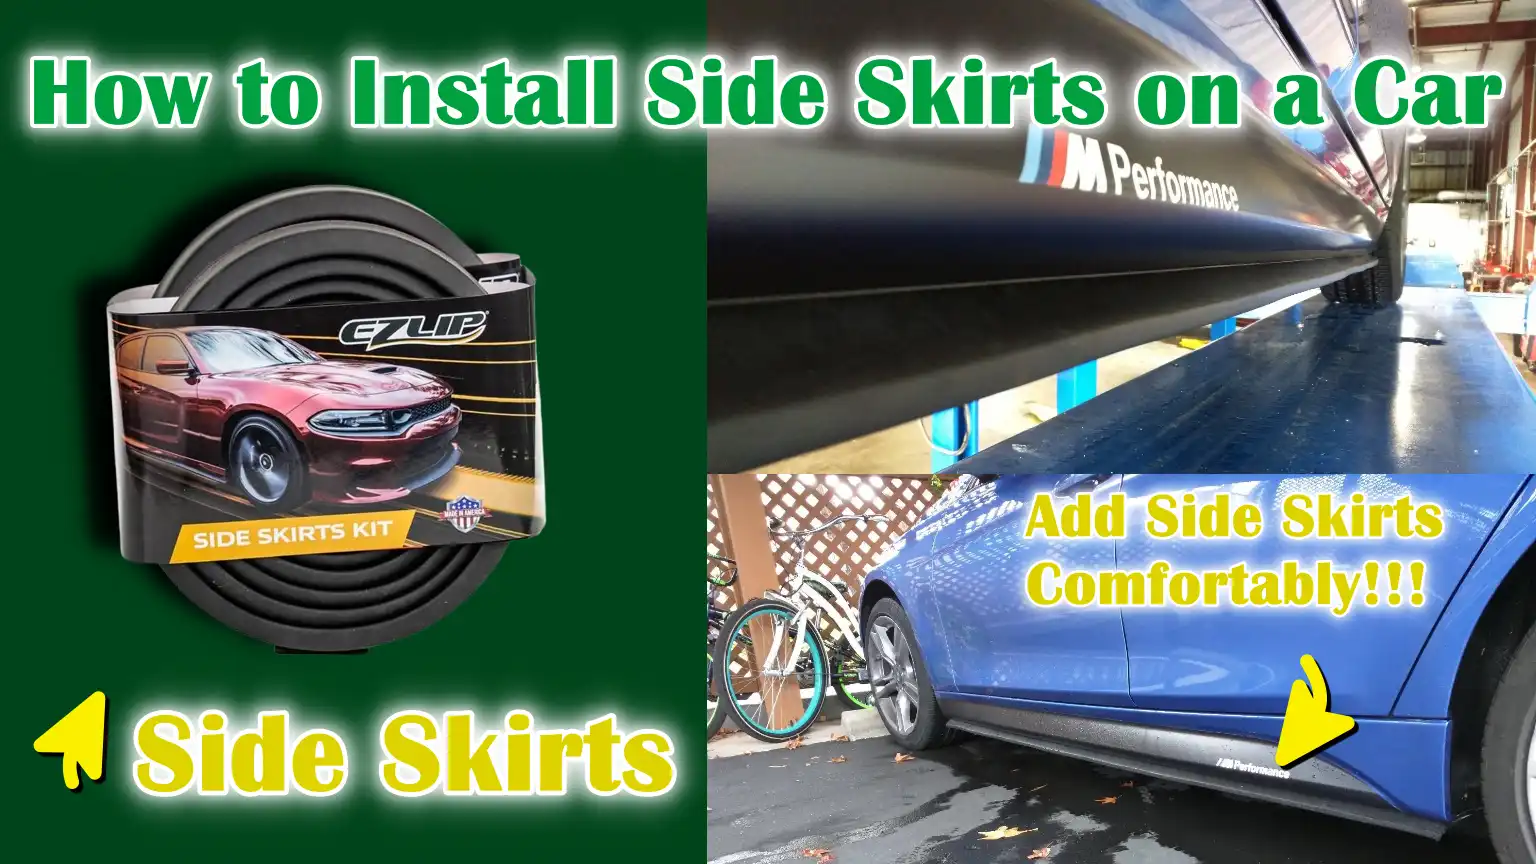
Written By: Don Dodi
Fact Checked By: Kristen Brown
Reviewed By: Diego Rosenberg
If you perfectly install that side skirts then it also helps to reduce the dirt, water splash and stone impact along the vehicle’s side panels as well, that’s how it provides protection in all-driving conditions.
Not only this, it also improves the vehicle’s appearance and aerodynamic behavior, basically it is positioned along the lower sides of a vehicle between the front and the rear wheels, as side skirts also it the vehicle to manage the airflow as it reduces the amount of air that travels underneath the car at the speed.
Even, it can improve the high-speed stability, fuel efficiency and overall road grip as well, that becomes really helpful specially on highways.
So, from the structural perspective; the side skirts also acts as a protective barrier for the rocker panels, as it shields them from the road debris, water spray, salt and minor impacts as well that can lead to the rust over the time.
Now-a-days, modern side skirts are designed by using vehicle-specific measurements, that makes the installation possible without any adjustment, cutting or welding when you have proper tools and methods.
That’s why, we have explained everything in this guide about How to Install Side Skirts on a Car, so that you can securely attach and ensure that the side skirts can sticks with the vehicle’s body.
Tools
| Item Name | Why It Is Needed |
|---|---|
| Socket set | It is used to tighten the bolts evenly so that the side skirts are firmly attached to the main body of the car. |
| Screwdrivers | This helps in installing the screws straight without damaging the side skirts or car panels. |
| Trim removal tool | This prevents scratching or chipping the factory trim when working near the rocker panels. |
| Electric drill | It is needed to drill clean holes in metal or plastic where the side skirt mounts |
| Drill bits – metal/plastic | The right drill bits prevent cracks and ensure that the screws fit firmly. |
| Self-tapping screws | These screws tighten into the metal automatically, making them strong and easy to install. |
| Bolts and nuts | It is used where greater strength is required, specially on long or heavy side skirts. |
| Plastic clips | This helps absorb vibration and keeps the skirt secure without putting pressure on the panel. |
| Mounting brackets | This keeps the side skirts in the correct position and improves overall stability. |
| Automotive double-sided tape | It provides strong support at the edges and reduces vibration and rattles. |
| Body sealant – if required | The seals are perforated to prevent water from entering and rusting. |
| Work gloves | This protects hands from sharp edges and injuries during drilling. |
| Safety glasses | This prevents dust or metal particles from entering the eyes. |
| Jack stands or ramps | It keeps vehicle stable while working underneath. |
| Isopropyl alcohol | This removes oil, dirt and wax, allowing the tape and hardware to adhere properly. |
| Microfiber cloth | It cleans surfaces without scratching paint. |
How to Prepare Vehicle, Side Skirts and Work Area to Avoid Installation Errors
1. Verifying Side Skirt Compatibility with Vehicle Make, Model and Year
Before beginning installation, it’s crucial to ensure that the side skirts are designed specifically for the correct make, model and year of your vehicle.
Even slight differences in body shape, rocker panel length, or mounting points can affect the fit of the side skirts.
Side skirts designed for a different year or trim level may result in gaps, uneven appearance, or require unsafe modifications.
Checking compatibility ensures that the mounting holes are properly aligned, the length matches the door and wheel well areas and the side skirts adhere to the factory body lines.
This step helps prevent poor fit, wasted time and potential damage to the vehicle’s underbody.
2. Checking Side Skirts for Damage, Curvature, or Missing Hardware
Side skirts should always be thoroughly inspected before installation.
Carefully check for cracks, bends, uneven edges, or warping that may have occurred during shipping or storage.
A warped side skirt can cause alignment problems and prevent them from properly attaching to the body.
It’s also important to ensure that all necessary mounting hardware, such as screws, clips, or brackets, is included.
Missing or damaged hardware can hamper installation and cause looseness or rattling during driving.
Identifying problems early allows them to be corrected before the side skirts are attached to the car.
3. Carefully Read the Manufacturer’s Installation Instructions
The manufacturer’s installation instructions provide important information about the vehicle that should never be overlooked.
These instructions often provide information on the correct mounting locations, recommended fasteners, torque specifications and whether adhesive backing is required.
Some side skirts require installation in a specific order for proper alignment and secure attachment.
Carefully reading the instructions helps avoid mistakes like drilling in the wrong place or using the wrong hardware.
Following the manufacturer’s instructions also maintains the product warranty and ensures that the side skirts perform as designed.
4. Choosing a Flat, Well-Lit and Safe Location
Choosing the right workspace makes the installation process safer and more accurate.
A flat surface helps keep the vehicle level, which is crucial for proper alignment of the side skirts on both sides.
Good lighting helps clearly see mounting points, drilling locations and body lines, reducing the risk of mistakes.
A clean and organized space also reduces the chance of losing hardware or tripping over tools.
Working in a stable and safe environment improves accuracy and reduces installation time.
5. Safely Lifting the Vehicle Using Proper Support Methods
Properly lifting the vehicle is one of the most important safety measures when installing side skirts.
To avoid damage to the body or frame, the vehicle should be lifted only using the jack points specified by the manufacturer.
Ramps or jack stands should be placed on solid ground to stabilize the vehicle while working underneath.
Never rely solely on a jack, as it could tip over or become damaged.
Proper lifting provides adequate space for easy access to mounting locations and ensures the safety of the installer throughout the process.
How to Clean and Inspect the Vehicle Surface to Ensure Strong Attachment and Long-Term Fitment
1. Cleaning the Rocker Panels and Lower Body Area
Thorough surface cleaning is one of the most crucial steps before installing side skirts.
The rocker panels and lower body area accumulate significant amounts of dirt, mud and road grime due to their proximity to the ground.
If these areas are not properly cleaned, the side skirts will not sit flush against the body.
Thorough cleaning reveals the true condition of the surface and ensures that the mounting points are clearly visible.
A clean surface also prevents trapped dirt from rubbing against the paint after installation, which can cause scratches over time.
2. Removing Dirt, Grease, Wax and Road Residue
In addition to visible dirt, the lower body panels often have grease, wax, oil residue and road chemicals that are not easily visible.
These substances reduce friction and weaken the grip of screws, clips and adhesive tape.
Removing grease and wax is specially important as many vehicles have protective coatings that interfere with proper bonding.
Cleaning the surface until it is completely free of oily residue ensures that the mounting hardware remains securely attached and that adhesives achieve maximum strength.
3. Thoroughly Drying Surfaces for Proper Adhesion
After cleaning, it is essential that all surfaces are completely dry before installation begins.
Moisture trapped between the side skirts and the car body can weaken adhesive tape, loosen fasteners and lead to corrosion over time.
Even a small amount of moisture can compromise the effectiveness of bonding materials.
Allowing the surface to air dry or wiping it thoroughly ensures that the side skirts remain securely attached and stable in varying weather conditions.
4. Inspecting for Rust, Damage, or Uneven Surfaces
Once the surface is clean and dry, it becomes easier to inspect the rocker panel for rust, dents, or uneven areas.
Rust weakens the metal and can spread rapidly if left untreated.
Dents or uneven surfaces can prevent the side skirts from sitting properly, creating gaps or stress points.
Identifying these issues early helps prevent misalignment and reduces the risk of the side skirts coming loose while driving.
5. Treating Rust or Corrosion Before Installation
Any rust or corrosion found during the inspection should be treated before installing the side skirts.
Ignoring rust will allow it to continue spreading beneath the side skirts, potentially damaging the vehicle’s structure over time.
Treating the rust strengthens the mounting area and ensures a secure hold for the fasteners.
This step extends the lifespan of both the vehicle and the side skirts, making the installation more durable and reliable in the long run.
How to Perform Test Fitting Side Skirts to Confirm Proper Alignment, Clearance and Symmetry Before Mounting
1. Positioning the Side Skirts Without Permanent Attachments
The test fitting process begins by positioning the side skirts on the vehicle without any permanent attachments such as screws, bolts, or adhesives.
This temporary positioning helps you understand how the side skirts follow the contours of the rocker panel and where they naturally fit with the body.
Holding the side skirts in place or providing light support allows you to identify any gaps, pressure points, or discrepancies in length before permanent fixing.
This step is crucial because mistakes are difficult to correct once holes have been drilled.
Correct initial positioning ensures that the side skirts complement the vehicle’s design and fit seamlessly with the lower body.
2. Checking Alignment with Doors, Wheel Arches and Body Lines
Proper alignment is essential for both aesthetics and functionality.
The side skirts should align smoothly with the lower edge of the doors, blend seamlessly into the front and rear wheel arches and follow the factory body lines without any abrupt changes.
Misalignment in these areas can make the side skirts look uneven and potentially interfere with door movement.
Taking the time to view the alignment from different angles ensures a clean, factory-like finish after installation.
3. Ensuring Symmetrical Fit on Both Sides of the Vehicle
For balance and a professional look, the alignment should be symmetrical on both sides of the vehicle.
Even a slight difference in height or angle between the left and right side skirts can be noticeable when the car is on the ground.
Using fixed reference points, such as the lower edge of the doors or measurements from the ground, helps confirm that both side skirts are at the same level.
Symmetrical fitting also ensures even airflow and prevents one side from experiencing more stress or vibration than the other.
4. Precisely Marking Drill Points and Mounting Locations
After confirming proper alignment, the next step is to accurately mark the precise locations where the side skirts will be mounted.
Accurate marking ensures that the drilled holes align perfectly with the side skirt mounting points.
Incorrectly placed holes can weaken the attachment and cause the side skirts to loosen over time.
Clean and precise marking helps maintain alignment during the final installation and reduces the risk of structural or cosmetic damage to the vehicle.
5. Checking Door Clearance and Ground Clearance
Before proceeding with drilling or fastening, it’s crucial to check that the doors open and close smoothly without touching the side skirts.
Even slight contact can damage the paint or hinder door movement over time.
Ground clearance should also be checked to ensure the side skirts are not too low, specially for vehicles that frequently travel on uneven roads or over speed bumps.
Proper clearance helps prevent scratches, cracks, or premature wear under normal driving conditions.
How to Mark and Drill Mounting Points Accurately to Prevent Misalignment and Body Damage
1. Confirming Hole Locations Based on Test Fit
Before drilling any holes, it’s crucial to ensure all marked locations match the final test fit position of the side skirts.
These marks should align perfectly with the mounting points on the side skirts and follow the vehicle’s body lines.
Even a slight error in hole placement can lead to misalignment, gaps, or stress on the side skirts after tightening.
Taking the time to confirm each location ensures the side skirts sit straight, are balanced on both sides and require no further adjustments later.
2. Using Masking Tape to Protect the Paint
Applying masking tape to the marked drilling locations protects the vehicle’s paint during drilling.
The tape reduces the risk of the drill bit slipping and prevents chipping or flaking of the paint around the holes.
Damage to the paint around the mounting holes can lead to rust over time, specially in areas exposed to water and road salt.
Masking tape also makes the drill marks easier to see, resulting in cleaner and more controlled drilling.
3. Choosing the Correct Drill Bit Size for the Fasteners
Selecting the correct drill bit size is essential for a secure and long-lasting installation.
A drill bit that is too small can jam the screw and damage the metal, while a bit that is too large can weaken the mounting point and reduce holding strength.
The drill bit size should match the diameter of the fasteners being used, allowing for a snug fit without excessive force.
The correct size ensures a strong attachment and helps prevent loosening or vibration during driving.
4. Drilling Slowly and Evenly to Prevent Body Damage
Drilling should always be done at a slow and steady pace to maintain control and protect the vehicle’s body.
Applying too much pressure or drilling too quickly can cause the drill bit to bind, the metal to warp, or result in uneven holes.
Controlled drilling allows the bit to cut through the surface smoothly without tearing the paint or metal.
This careful approach minimizes the risk of damage and creates cleaner, more precise holes for mounting.
5. Deburring the Holes to Ensure Flush Mounting
After drilling, the edges of each hole may have sharp metal fragments or rough surfaces called burrs.
These burrs can prevent the side skirts from sitting flush against the body and can damage the mounting hardware.
Removing the burrs smooths the edges, allowing the fasteners to seat properly and resulting in a better overall fit.
Clean hole edges also reduce the risk of corrosion and help maintain a professional and durable installation.
How to Correctly Install Mounting Hardware to Create a Stable and Adjustable Base
1. Attaching Brackets or Clips – If Provided
Some side skirts come with brackets or plastic clips that help support the skirt and ensure proper alignment with the vehicle’s body.
These parts distribute the load across multiple mounting points, reducing stress on any single area.
Properly attaching the brackets or clips ensures the side skirt is securely fastened to the rocker panel and remains stable while driving.
Correct attachment at this stage increases durability, minimizes vibration and allows the side skirt to withstand road conditions without shifting.
2. Loosely Tightening Hardware for Adjustment
When installing screws, bolts, or clips, it’s crucial to loosely tighten them first, rather than fully tightening them immediately.
Loose tightening allows for slight movement of the side skirt, enabling final alignment adjustments.
This flexibility helps correct minor gaps, uneven edges, or alignment issues before everything is locked into place.
Tightening the hardware too quickly can lock the side skirt into an incorrect position, making corrections difficult or impossible.
3. Ensuring Even Spacing Between Fasteners
Even spacing between fasteners is essential for balanced support and long-term durability.
Fasteners spaced too far apart can cause the side skirt to sag, while uneven spacing can create pressure points that may lead to cracks or loosening over time.
Correct spacing distributes stress evenly along the length of the side skirt and helps keep it secure while driving, specially at high speeds or on rough roads.
This step also improves the overall appearance of the side skirt by keeping it straight and flat.
4. Avoid overtightening to prevent cracks or deformation.
Overtightening is one of the most common installation mistakes and can damage both the side skirts and the vehicle’s body.
Applying too much force can cause cracks in the side skirts, strip the threads, or damage the mounting surface.
Tightening should be done gradually until the side skirt feels secure without bending or being pulled inward.
The correct torque ensures a firm hold while allowing the material to flex naturally with temperature changes and road vibrations.
How to Firmly Attach the Side Skirt – So That It Remains Stable, Level and Vibration-Free
1. Applying Automotive Double-Sided Tape Where Necessary
Automotive double-sided tape is often used along the upper edge of side skirts to provide extra adhesion and reduce vibration.
This tape is designed to withstand heat, moisture and road conditions, making it ideal for exterior use.
Proper application of the tape ensures that the side skirts fit snugly against the body and support the mounting hardware by sharing the load.
Correct tape application also seals the gap between the side skirt and the vehicle, preventing dirt and water from accumulating behind it.
2. Carefully Aligning Side Skirts Before Final Tightening
Before tightening any hardware, the side skirts should be carefully aligned with the rocker panel.
The skirts should smoothly follow the body lines of the vehicle and sit evenly from front to back.
Minor adjustments at this stage make a significant difference in the final look and fit.
Proper alignment ensures that the side skirts appear balanced, do not interfere with door movement and maintain a consistent gap along their entire length.
3. Securing Side Skirts Using Screws or Bolts in a Balanced Sequence
When tightening the side skirts, the screws or bolts should be tightened in a balanced sequence rather than fully tightening one side at a time.
This method helps to pull the side skirt evenly against the body and prevents it from twisting or shifting out of place.
Balanced tightening also reduces stress on individual mounting points, resulting in better strength and stability.
Even pressure distribution is crucial for long-term durability and a clean finish.
4. Gradually Tightening Fasteners for Even Pressure
The fasteners should be tightened gradually and in stages to ensure even pressure is applied to the side skirt.
Tightening too quickly or unevenly can lead to gaps, misalignment, or stress on the material.
Tightening gradually allows the side skirt to settle naturally against the body and ensures that all mounting points share the load evenly.
This method helps maintain proper alignment and prevents damage to both the side skirt and the vehicle.
5. Checking for Secure and Vibration-Free Attachment
After tightening all fasteners, the stability of the side skirt should be checked by applying light pressure along its length.
A properly installed side skirt should feel solid, with no movement, rattling, or loose parts.
Confirming a secure and vibration-free attachment ensures that the side skirt will remain securely in place during driving and will not loosen over time.
This final check helps confirm that the installation is secure, durable and aesthetically pleasing.
Make Final Adjustments to Ensure the Side Skirt Fits Snugly to the Body
1. Re-checking Alignment Along the Entire Length
Once the side skirts are fully installed, it’s crucial to carefully re-check the alignment from the front to the back of the vehicle.
Viewing the side skirts from different angles ensures they follow the natural lines of the body and maintain a consistent height along the rocker panel.
Minor alignment issues may become apparent once the vehicle is on the ground.
A final visual inspection confirms that the side skirts appear straight, balanced and professionally installed.
2. Adjusting Positioning if Gaps or Unevenness are Present
If any gaps, waves, or uneven areas are visible, minor adjustments should be made before completing the installation.
Slightly loosening the fasteners allows the side skirts to be repositioned for a flush fit against the body.
Addressing these issues at this stage prevents long-term stress on the mounting points and eliminates visible imperfections.
Proper adjustment ensures that the side skirts maintain both structural integrity and a clean appearance over time.
3. Ensuring Doors Open and Close Without Obstruction
After alignment adjustments, all doors should be fully opened and closed to ensure there is no contact with the side skirts.
Any obstruction could damage the paint or hinder the normal movement of the doors.
The side skirts should maintain sufficient clearance around the door edges, specially in areas where the door curves inward.
Confirming the smooth operation of the doors ensures that the installation does not negatively impact the vehicle’s daily use.
4. Ensuring the side skirts are perfectly flush with the body
The final step is to verify that the side skirts are perfectly flush with the vehicle’s body, without any visible gaps or raised edges.
A flush fit improves aerodynamics, reduces wind noise and prevents dirt and moisture from accumulating behind the side skirts.
Proper contact across the entire mounting surface also improves durability and minimizes vibrations.
A tight, uniform fit ensures that the side skirts are securely installed and ready for regular driving.
How to Perform Sealing and Finishing Work to Protect the Vehicle and Improve Its Appearance
1. Applying sealant to drilled holes as instructed
Applying sealant to the drilled holes, as recommended by the manufacturer, is a crucial finishing step.
The sealant prevents water, dirt and road salt from entering the exposed metal around the holes.
Moisture trapped in these areas can lead to corrosion and weaken the mounting points over time.
Using sealant enhances long-term durability and protects the vehicle’s body, specially in areas regularly exposed to rain and road spray.
This step helps protect both the side skirts and the car’s original structure.
2. Cleaning off fingerprints, adhesive residue, or dust
After installation, side skirts and surrounding areas often have fingerprints, dust, or adhesive residue from tape or handling.
Cleaning these surfaces improves the final appearance and reflects the quality of the installation.
Removing residue also prevents dirt from sticking to tacky areas, which can degrade the finish over time.
A clean surface showcases proper alignment and gives the side skirts a factory-finished look.
3. Touching up exposed fasteners if necessary
In some cases, fasteners such as screw or bolt heads may remain visible after installation.
Touching up these exposed fasteners helps protect them from corrosion and improves visual consistency.
A protective coating or paint can prevent rust and minimize glare.
This step is particularly useful for maintaining a clean and uniform look, specially on vehicles where the underbody is easily visible.
4. Inspecting the overall look from multiple angles
The final inspection should include viewing the vehicle from different angles and distances.
Inspecting the vehicle from the front, rear and sides can reveal any misalignments, gaps, or uneven sections that might not be immediately apparent upon closer inspection.
This step ensures that the side skirts blend seamlessly with the body lines and enhance the overall look of the vehicle.
A thorough final inspection confirms that the installation is complete, secure and aesthetically balanced.
How to Do Post-Installation Inspection and Testing
1. Applying Light Pressure to Confirm Secure Fitment
After installation is complete, applying light pressure along the entire length of the side skirts confirms that they are securely attached.
The side skirts should feel solid and stable, without bending, wobbling, or making any noise.
This simple check helps identify loose mounting points that might not be easily visible during a visual inspection.
A firm fit indicates that the hardware, tape and brackets are working together to hold the side skirts in place.
2. Short Test Drive to Check for Rattling or Movement
A short test drive is a crucial step to confirm that the side skirts remain stable under real-world driving conditions.
Driving at low to moderate speeds allows you to listen for any rattling, vibrations, or unusual noises that might indicate loose hardware or uneven mounting.
Changes in road surface, such as small bumps or turns, help reveal any movement that might not be apparent when the vehicle is stationary.
This test ensures that the side skirts function securely during normal use.
3. Re-tightening Fasteners After the First Drive, if Necessary
After the test drive, the fasteners should be checked and re-tightened if necessary.
During the first drive, the materials may settle slightly as the side skirts adjust to road vibrations and temperature changes.
Re-tightening ensures that all fasteners maintain the correct tension and do not loosen over time.
This step improves long-term stability and reduces the risk of hardware failure during extended driving.
4. Monitoring the Installation for the First Few Days
The first few days after installation are critical for observing how the side skirts hold up under daily use.
Regular checks for loose fasteners, gaps, or movement help catch minor problems before they escalate into major issues.
Changes in weather, road conditions and regular driving can affect newly installed parts.
Consistent monitoring ensures that the side skirts remain secure, properly positioned and reliable, confirming a successful installation.
Common Installation Mistakes that Can Lead to Poor Fitting, Damage or Premature Failure
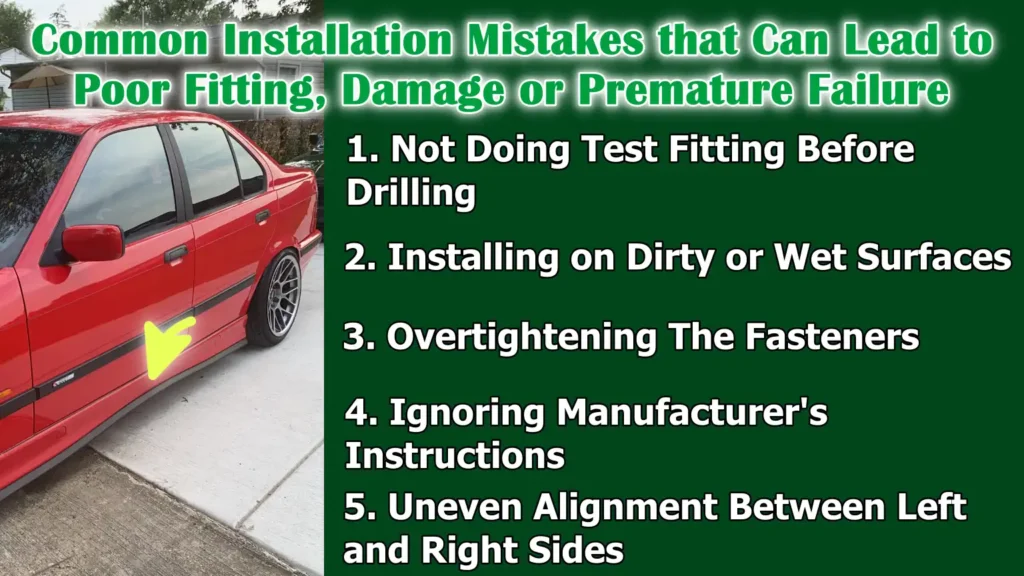
1. Not Doing Test Fitting Before Drilling
Skipping the test fitting stage when installing side skirts is one of the most common and costly mistakes.
Without a test fit, it’s easy to drill holes in the wrong places, leading to misalignment and potentially permanent damage to the vehicle’s body.
A test fit allows you to confirm the correct positioning, check clearances and ensure the side skirts follow the vehicle’s natural body lines.
Taking the time for a test fit helps avoid unnecessary rework and ensures a cleaner, more precise installation.
2. Installing on Dirty or Wet Surfaces
Installing side skirts on dirty or wet surfaces significantly reduces the strength of the mounting hardware and adhesives.
Dirt, grease and moisture prevent proper bonding and the side skirts may loosen over time.
Wet surfaces also increase the risk of corrosion around drilled holes.
Thoroughly cleaning and drying the installation area ensures a strong attachment and improves long-term durability.
3. Overtightening The Fasteners
Overtightening fasteners can cause significant damage to both the side skirts and the vehicle’s body.
Excessive force can crack the side skirt material, strip threads, or warp the mounting surface.
Fasteners should only be tightened until they are secure, allowing the material to retain its natural flexibility.
Proper tightening helps prevent stress damage and ensures the side skirts remain stable during driving.
4. Ignoring Manufacturer’s Instructions
Manufacturer’s instructions are specifically designed for the side skirts and the vehicle they are intended for.
Ignoring these instructions can lead to incorrect mounting, reduced durability, or voiding the warranty.
The instructions often include crucial details such as the mounting sequence, recommended hardware and adhesive application method.
Following these guidelines ensures that the side skirts are securely installed and function as intended.
5. Uneven Alignment Between Left and Right Sides
Uneven alignment between the left and right side skirts affects both the look and performance.
Differences in height or angle are easily noticeable once the vehicle is on the ground.
Uneven alignment can also lead to uneven airflow and increased stress on one side.
Ensuring that both side skirts are aligned evenly provides a balanced look and helps maintain long-term stability.
Read More:
How to Maintain Side Skirts On a Car
1. Regular Inspection of Mounting Points
Regular inspection of the mounting points helps ensure that the side skirts remain securely attached over time.
Road vibrations, temperature changes and normal driving can gradually loosen the hardware, specially on vehicles driven daily.
Checking the mounting points allows you to identify loose screws, worn clips, or wobbly brackets before they become noticeable through rattling or movement.
Early detection maintains structural integrity and prevents damage to both the side skirts and the vehicle’s underbody.
2. Cleaning Techniques to Prevent Debris Buildup Around Side Skirts
Due to their low position, side skirts are exposed to dirt, mud, water and road chemicals.
If debris is allowed to accumulate behind or around the side skirts, it can trap moisture and lead to corrosion or surface wear.
Regular cleaning removes this debris, which can cause scratches or reduce the effectiveness of the mounting points.
Keeping the area clean also maintains the appearance of the side skirts and ensures they fit properly against the body.
3. Checking Fasteners After Driving on Rough Roads or After an Impact
Driving on rough roads, over speed bumps, or on uneven surfaces can put extra stress on the side skirt mounting hardware.
After such conditions, the fasteners should be checked to ensure they remain tight and secure.
Even minor impacts can cause slight loosening over time.
Checking the fasteners after rough driving helps prevent gradual wear and reduces the risk of sudden failure while driving.
4. Prompt Repair of Minor Damage to Avoid Complete Replacement
Minor cracks, chips, or loose parts should be repaired immediately as soon as they appear.
If minor damage is left unrepaired, it can quickly spread, specially when exposed to vibrations and weather elements.
Prompt repairs maintain structural integrity and appearance and prevent more serious structural problems.
Taking quick action reduces long-term costs and allows the side skirts to last longer without requiring complete replacement.
What are the Situations Where Professional Installation Is Necessary for Safety and Correct Fitting
1. Complex designs requiring body modifications
Some side skirts have complex shapes or extended lengths that cannot be properly fitted without minor modifications to the vehicle’s body.
In such cases, the panels may need to be cut, trimmed, or reshaped for a proper fit.
Attempting these modifications without professional experience can lead to misalignment, damage to the car’s body, or weakened mounting points.
Professional installers possess the tools and expertise to safely handle complex designs while maintaining the vehicle’s structural integrity and aesthetics.
2. Vehicles with factory side air curtains or sensors
Modern vehicles often have factory-installed side air curtains, sensors, or other electronic systems in the lower body.
These components can interfere with standard side skirt installation if not handled correctly.
Professionals are trained to identify these systems and install side skirts without damaging sensors or affecting the vehicle’s aerodynamics.
Attempting installation without this knowledge can result in costly repairs, malfunctioning safety systems, or reduced vehicle performance.
3. Carbon fiber or delicate materials requiring careful handling
Side skirts made from carbon fiber, fiberglass, or other delicate materials require careful handling and precise installation techniques.
These materials are lightweight and strong, but they can crack or break if drilled, tightened, or aligned incorrectly.
Professional installers have the experience and specialized tools to safely handle these materials, ensuring a secure fit while preserving the side skirts’ structural integrity and finish.
4. Lack of Tools or Installation Experience
Installing side skirts requires specific hand tools, power tools and safety equipment, as well as knowledge of the vehicle’s body structure and mounting techniques.
Attempting installation without the proper tools or experience can lead to mistakes such as improper skirt alignment, faulty fasteners, or damage to the vehicle’s body.
Professional installation ensures the job is done efficiently, safely and correctly, resulting in long-lasting results and avoiding unnecessary hassle or expense.
Conclusion – How to Install Side Skirts on a Car
Now, you have understand that very well-installed side skirts does more than the change the look of your car, as it acts as a shield that also protects the vital lower body panels from the daily wear and it improves the aerodynamic performance as well.
Even, there is official studies for the regulatory and environmental programs that shows that the side skirts not only enhances the appearance of the vehicle, but it also delivers the measurable aerodynamic benefits.As it is seen in the large road vehicles: the skirts have been associated with 4% to 7% reductions in fuel consumption, so with the optimized spacing from the ground that can amplify these effects, so that clearly shows that it improves underbody airflow control on the passenger cars for the improved efficiency as well.[¹]
Not only this, every step of the installation process, from compatibility checks to post-installation inspections, plays a crucial role in ensuring durability, proper alignment and long-term stability.
Even, seems like minor steps such as test fitting, cleaning the mounting surface, or carefully tightening the hardware, are essential; neglecting them can lead to misalignment, vibrations, or damage over time.
Also, it is really important to consult to the professional installation if it is necessary, specially for complex designs, delicate materials, or vehicles with sensors, so that you can easily avoid costly mistakes and ensures that the final result is safe, functional and aesthetically pleasing.
Now, you can ask related questions in the comment box.
Frequently Asked Questions
Q1. What are side skirts and why should I install them on my car?
Answer: Side skirts are panels installed along the lower edges of a vehicle, between the front and rear wheels. They offer several benefits. First, they enhance the car’s appearance by giving it a lower, more streamlined look. Second, they help manage airflow along the sides of the vehicle, improving stability at higher speeds and slightly reducing aerodynamic drag. Third, they protect the rocker panels and lower body areas from dirt, stones, water and road chemicals that can cause damage or corrosion. Proper installation of side skirts ensures they remain secure, functional and aesthetically pleasing over time.
Q2. How do I know if side skirts will fit my car?
Answer: Side skirts are often designed for specific makes, models and years. To check compatibility, you need to verify that the side skirts’ length, mounting points and shape match your vehicle. Even minor differences in body style or trim can affect the fit. The best way to ensure compatibility is to consult the manufacturer’s specifications, compare the side skirts to your car’s rocker panels and perform a test fit before drilling or tightening anything. A proper fit ensures the side skirts sit correctly, maintain alignment and avoid unnecessary modifications.
Q3. Can I install side skirts myself, or should I hire a professional?
Answer: Many side skirts can be installed by car owners themselves, provided they carefully follow the step-by-step process and have the necessary tools. However, professional installation is recommended in some cases. These include complex designs that may require trimming or adjustments, cars with factory side sensors or air curtains, or side skirts made from delicate materials like carbon fiber. Professionals also offer assistance if you lack the tools or experience, ensuring the installation is safe, precise and durable.
Q4. Why is test fitting so important before drilling?
Answer: Test fitting ensures that the side skirts are in the correct position before making permanent modifications to your vehicle. Incorrect drilling can lead to misalignment, gaps, or damage to the car’s body. By test fitting first, you can check alignment with the doors, wheel arches and body lines, verify clearance and mark precise drilling points. This step prevents mistakes, reduces the risk of damage and ensures that the side skirts fit evenly and correctly after installation.
Q5. How do I maintain side skirts after installation?
Answer: Regular maintenance is crucial for longevity. Periodically inspect the mounting points to ensure that screws, bolts and clips remain tight. Clean the area behind and around the side skirts to remove dirt, mud and road chemicals that can cause corrosion. After driving on rough roads or over speed bumps, check that the fasteners are still secure. Any minor damage, such as small cracks or loose edges, should be repaired promptly to prevent larger problems. Proper maintenance ensures that the side skirts look good and function safely for years to come.
Q6. What can go wrong if side skirts are installed incorrectly?
Answer: Incorrect installation can lead to several problems. Skipping steps like test fitting or cleaning can result in poor alignment, gaps, or uneven sides. Overtightening fasteners can crack the side skirts or damage the mounting points. Installing on wet or dirty surfaces can reduce adhesive strength and cause them to loosen over time. Ignoring the manufacturer’s instructions can void the warranty and affect performance. Uneven installation between the left and right sides can look unsightly and affect airflow or stress distribution. Proper preparation and careful installation prevent these issues.
References:
[1] Trailer skirts, Semi-trailer aerodynamic device
https://en.wikipedia.org/wiki/Semi-trailer_aerodynamic_device

Guys, I’m a car audio enthusiast and customization expert and I love clear sound and clean installation. Plus, I have spent years helping people build their dream audio setups. And whenever I’m working on cars, I probably listen to music and thinks about the next big upgrade.
