Written By: Don Dodi
Fact Checked By: Kristen Brown
Reviewed By: Diego Rosenberg
It is actually the simple upgrade that can be most effective to reduce all the unwanted road noise, vibrations and rattles while driving.
Also, studies shows that the road noise even inside the vehicles can reach up to 70 to 80 decibels at the highway speeds, which is literally as loud as right next to your there’s a vacuum cleaner is running, which is really irritating.
Plus, over the time, this constant exposure to the noise causes the driver fatigue and that reduces the clarity of music and disturbs the conversations inside the cabin.
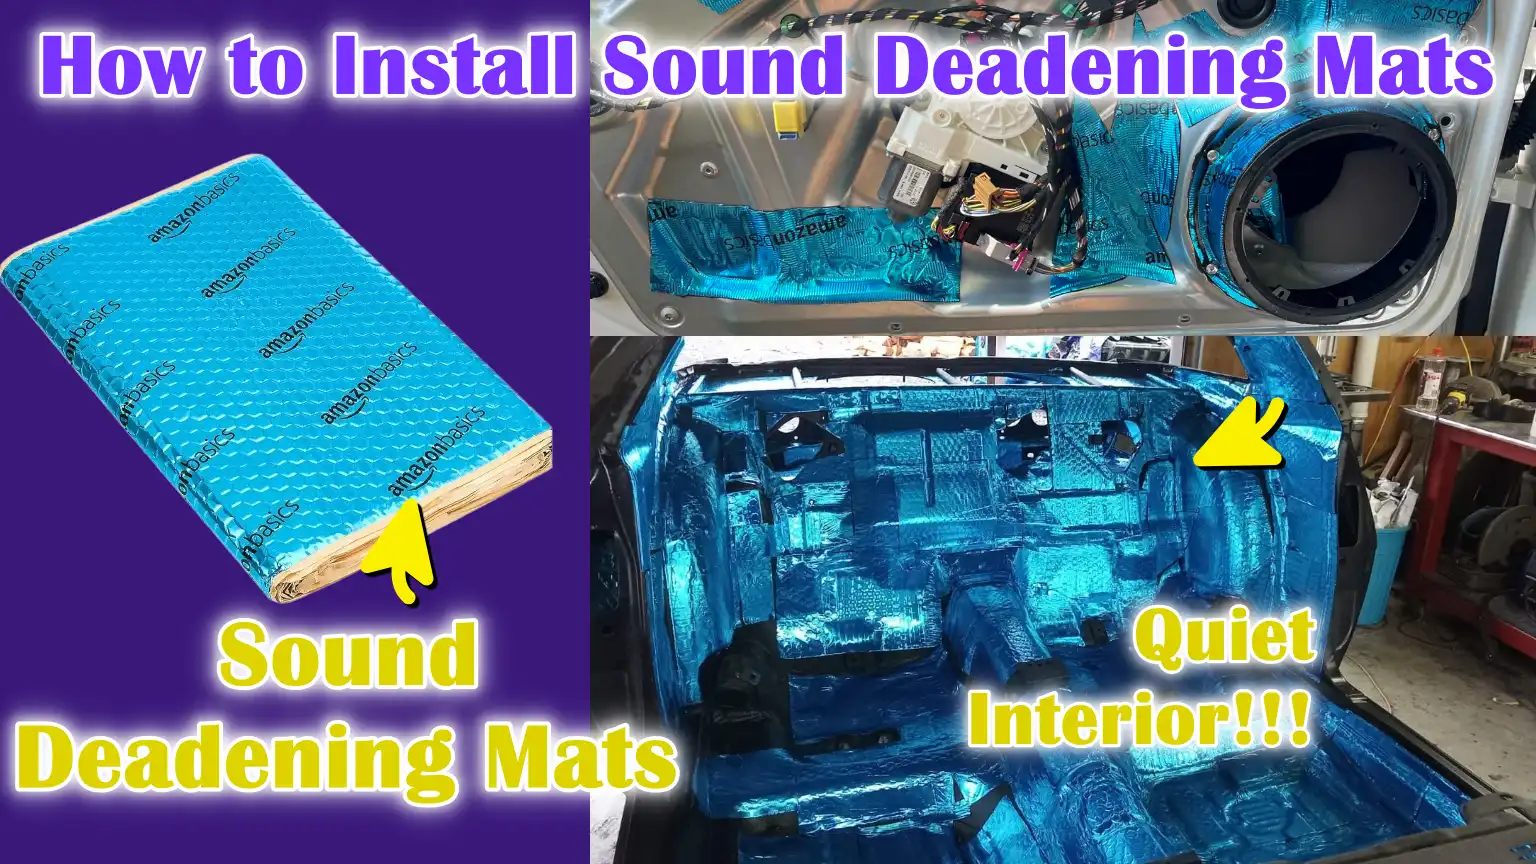
Basically, sound deadening mats are made from materials such as: butyl rubber, asphalt or foam which actually converts vibration energy into the heat and that’s how they works and that significantly lowers the noise levels.
As an example: the independent tests also shows that the quality mats can even cut noise levels by up to 10 to 15 decibels, that makes the car interior nearly twice as quiet to the human ear.
Along with this, it also improves the audio performance as it maintains the quiet and stable environment for speakers by preventing distortion and boosts the bass response as well and this guide shows you exact step-by-step ways on How to Install Sound Deadening Mats.
Tools
| Tools/Materials | Purpose/Use | Notes/Tips |
|---|---|---|
| Sound Deadening Mat | Main material for reducing noise, vibration and rattling inside the car. | Popular brands: Dynamat, Kilmat, Noico. Choose the thickness based on the area of the car. |
| Utility Knife/Heavy Scissors | Cutting the mat to the correct size and shape. | A sharp knife works best for precise cuts. Scissors are useful for smaller pieces. |
| Roller Tool | Pressing the mat firmly onto the surfaces for strong adhesion. | This ensures there are no air bubbles and maximum contact with the metal surface. |
| Cleaning Supplies (Rags, Rubbing Alcohol, Degreaser) | Prepares the car’s surfaces by removing dust, grease and moisture. | Clean surfaces help the mat adhere better and last longer. |
| Gloves | Protect hands from adhesive and sharp edges. | Use thick work gloves for safety and comfort. |
| Safety Equipment (Optional) | Extra protection when handling cutting or sharp tools. | Eye protection is recommended to avoid any injury. |
How to Preparation First
1. Disconnect the Car Battery
Before beginning any installation, it’s essential to disconnect the car’s battery.
This simple step prevents accidental short circuits, sparks, or damage to the vehicle’s electrical system when working with metal panels or tools.
It also ensures your safety, specially if you’re removing parts like door panels that contain speaker, light, or power window wires.
Always remove the negative terminal first during the installation process and keep the cables away from the battery.
2. Remove Seats, Carpets, Door Panels and Trim
To access the areas where the soundproof mats will be installed, you’ll need to remove the seats, carpets, door panels and any trim pieces covering metal surfaces.
Seats are usually attached with bolts that can be easily unscrewed, while door panels may have clips and screws.
Removing these parts provides full access to the car’s interior, allowing you to properly install the mats on the floors, doors and other panels.
This step may take some time, but careful removal will prevent damage to clips, wires, or upholstery.
3. Clean all surfaces thoroughly
After removing the necessary parts, it’s important to clean all surfaces where the mats will be installed.
Dust, dirt, grease and moisture can prevent the adhesive from sticking properly, reducing the mat’s effectiveness.
Use a clean cloth dampened with rubbing alcohol or a mild degreaser to wipe down all metal surfaces.
For stubborn grease or dirt, it may take several wipes to completely clean the surface.
4. Ensure the panels are completely dry.
After cleaning all surfaces, let them dry completely before applying any soundproofing material.
Even a small amount of moisture trapped beneath the mats can weaken the adhesion over time and cause the material to peel.
Drying also prevents mold or mildew from growing under the mats, ensuring a long-lasting and effective installation.
You can leave the car in a well-ventilated area or use a clean, dry cloth to speed up the drying process.
How to Measure and Cutting the Mats
1. Measure Each Part
Accurate measurements are the first and most important step in installing soundproofing mats.
Each part of your car, including the floor, doors, trunk, roof and wheel wells, has different shapes and sizes.
Measuring these parts carefully ensures that the mats fit snugly without any gaps that could allow noise and vibration to enter.
Use a measuring tape to measure the length and width of each panel and note any irregular shapes, bends, or obstacles like seat brackets or wires that could affect the fit.
Accurate measurements save time and prevent mistakes during installation.
2. Cut the Mats to Size with Extra Space for Overlap
After measuring all parts, the mats should be cut according to the dimensions.
It’s advisable to add a little extra space on each edge for overlap.
This ensures complete coverage and prevents gaps between pieces that could reduce the mats’ effectiveness.
Using a sharp utility knife or heavy scissors makes clean and precise cuts, which is specially important for tight corners and curved areas.
Proper cutting also prevents material waste and makes the mats easier to handle during installation.
3. Plan the Layout to Maximize Coverage and Minimize Waste
Before installing any mats, it’s helpful to plan the layout.
Laying all the pieces out on the floor or temporarily placing them on the intended surfaces helps visualize coverage and ensure the entire area is protected.
Efficient planning minimizes wastage by using leftover pieces for small or irregular areas.
It also helps you identify areas where additional mats may be needed, such as around wheel wells or under the dashboard.
A thoughtful layout not only saves money but also guarantees optimal noise reduction and vibration control throughout the car.
How to Apply the Mat
1. Remove the Backing and Carefully Apply the Mat
After cutting the mat to the correct size, begin applying it by removing the protective backing.
This will expose the adhesive, which will adhere directly to the metal surfaces of the car.
It’s important to apply the mat carefully and slowly, aligning it to the measurements and shape of the panel.
Placing it in the correct position from the beginning reduces the need to lift and reposition it, which can weaken the adhesive.
Taking your time ensures that the mat properly covers the intended area and prevents future noise and vibration leaks.
2. Press and Smooth by Hand
After applying the mat, press it firmly to the surface to establish initial adhesion.
Smooth the mat by hand to remove any wrinkles and ensure it makes contact with every part of the metal panel.
Applying consistent pressure ensures that the adhesive adheres quickly and reduces the risk of air bubbles forming underneath.
This step is specially important in corners and curved areas, as mats may not adhere properly if not pressed firmly.
3. Use a Roller to Remove Air Bubbles and Ensure Strong Adhesion
For best results, use a roller tool to press the mats firmly.
Rolling ensures even adhesion across the entire surface and removes trapped air bubbles that can affect the mat’s performance.
Studies and manufacturer tests show that properly rolled mats achieve maximum vibration absorption, significantly reducing road noise.
Using a roller also strengthens adhesion, ensuring the mats stay in place despite changes in heat or humidity inside the car.
4. Overlap the Edges Slightly to Prevent Gaps
When installing multiple pieces of mat, it’s important to overlap the edges slightly.
This prevents gaps between the parts where noise or vibration can penetrate.
Overlapping also strengthens weak points along the seams, making the overall coverage more durable.
Correctly overlapped mats provide consistent noise reduction, improve speaker performance and enhance the overall comfort and quietness of the vehicle interior.
What are the Main Installation Areas
1. Doors
Installing soundproofing mats behind door panels is one of the most effective ways to reduce rattles and vibrations caused by road bumps and door movement.
Doors often have thin metal structures that easily transmit sound, which can impair the clarity of car speakers.
Installing mats in this area makes the panels more stable and the speakers perform better with less distortion.
This results in clearer sound, deeper bass and an overall more enjoyable listening experience inside the vehicle.
2. Floors
Car floors are directly exposed to road noise, engine vibrations and tire screeching.
Installing soundproofing mats under carpets can significantly reduce these unwanted sounds.
Studies show that insulating the floor can reduce interior noise by several decibels, making conversations and music clearer and reducing driver fatigue on long journeys.
The floor is one of the largest areas in a car, so covering it thoroughly ensures maximum noise reduction throughout the cabin.
3. Trunk
The trunk is another important area, specially for cars with powerful subwoofers or aftermarket audio systems.
Vibrations from low-frequency sounds can rattle panels, reducing audio quality.
Installing sound-deadening mats in the trunk helps control these vibrations, improving bass response and making music sound clearer and more precise.
It also blocks additional noise from loose panels when driving on rough roads.
4. Roof and Wheel Wells
The roof and wheel wells are often overlooked, but they are major sources of wind and tire noise.
The roof transmits external noise, specially at high speeds, while the wheel wells absorb vibrations caused by tires rolling over rough surfaces.
Installing sound-deadening mats in these areas reduces these sounds and creates a quieter cabin environment.
This makes driving more comfortable and allows audio systems to perform at their best without interference from external noise.
How to Perform Reassembly
1. Reinstall the Carpet, Seats and Panels
Once all soundproofing mats are properly installed and firmly adhered to metal surfaces, the next step is to carefully reinstall the carpet, seats and interior panels.
Start with the carpet, ensuring it lies flat on the mats without any wrinkles or folds that could reduce coverage or create uneven pressure.
Then, reinstall the seats, tightening all bolts to prevent rattling or creaking.
Finally, reinstall the door panels, trim pieces and other interior components, ensuring they fit snugly to the mats.
Proper reassembly maintains the integrity of the soundproofing and preserves the original appearance and comfort of the vehicle’s interior.
2. Recheck Secure Fittings and Electronics
Once everything is back in place, it’s essential to inspect all fittings and connections to ensure they are secure.
Check that screws, clips and bolts are tight and that no parts are loose.
Also, make sure that all electronic components, such as power windows, door locks and speakers, are working properly and are not being obstructed by the mat.
Confirming these details can prevent future rattles, electrical problems, or disruptions to vehicle systems and ensure that the soundproofing installation remains effective and durable over time.
Read More:
How to Test the Results

1. Reconnect the Battery
After completing the installation and reassembly, the first step is to securely reconnect the car’s battery.
Reconnection restores power to all electrical systems, such as lights, audio components and power-operated seats or windows.
It’s important to ensure that the battery terminals are securely in place and free of corrosion.
This step not only provides power to the vehicle but also prepares the car for testing the effectiveness of the sound-deadening mats.
2. Test Drive to Check Noise Reduction
Once the battery is reconnected, take the car for a test drive on different roads and at different speeds.
Pay attention to common sources of cabin noise, such as engine vibration, tire squeal and wind noise.
Most drivers notice a significant reduction in these noises, often by 10-15 decibels, after proper installation.
Experiencing this difference firsthand helps you identify areas where additional mats or adjustments may be needed and confirms that the installation has been successful in creating a quieter and more comfortable driving environment.
3. Play Music to Evaluate Improved Sound Clarity
After observing a reduction in road noise, evaluate audio performance by playing music at normal listening levels.
Sound-deadening mats improve music clarity and depth by reducing vibration and preventing panel rattles.
Speakers produce clear highs, strong mids and deep bass without the distortion caused by loose surfaces.
This step demonstrates the full benefits of the installation, showing how a quiet cabin environment improves the listening experience and makes every journey more enjoyable and comfortable.
Basic Maintenance Tips
1. Check for Loose Parts Periodically
Even after careful installation, it’s important to periodically inspect sound-blocking mats.
Over time, heat, vibration and changes in humidity can cause parts to loosen or become slightly loose.
Checking the mats every few months ensures that loose parts are promptly tightened or re-secured.
This regular inspection helps maintain the mat’s effectiveness, keep noise levels low and prevent rattling or vibration problems that can affect both comfort and sound quality.
2. Avoid Water Leaks to Prevent Weakening of the Adhesive
Moisture is one of the main factors that can reduce the lifespan and performance of sound-blocking mats.
Water leaks from windows, doors, or the car roof can seep under the mats and weaken the adhesive, causing them to peel or slip.
Ensuring that seals, gaskets and weatherstripping are intact helps protect the mat from water damage.
Avoid spills of liquids inside the vehicle and dry any wet areas immediately to maintain adhesion, prevent mold growth and maintain noise reduction over time.
Conclusion – How to Install Sound Deadening Mats
So, sound deadening mats actually reduces the cabin noise and in that way it improves safety and focus by allowing drivers to hear important sounds clearly, such as horns, sirens and other alerts during the drive.
By carefully preparing surfaces, accurately measuring and cutting the mats and applying them to key areas like the doors, floor, trunk, roof and wheels, drivers can reduce road noise by 10-15 decibels.
This not only makes music sound clearer and speakers perform better, but also reduces fatigue and stress by creating a quieter cabin environment during long drives.
Regular maintenance, such as checking for loose parts and preventing water leaks, ensures the mats remain durable and effective for years.
Overall, soundproofing mats provide an affordable upgrade that transforms a car’s interior into a quieter, more enjoyable and acoustically optimized space.
Plus, there is research on Acoustic Materials in Automobile Noise Reduction and it shows that there are common acoustic materials such as: butyl rubber mats, foam and layered systems that literally reduces the airborne and structure-borne noise inside the cars as it actually absorbs and converts the vibration energy into heat.[¹]
Now, that’s it from this one and you can comment down below for more information about this guide.
Frequently Asked Questions
Q1. What are sound-blocking mats and why are they important?
Answer: Sound-blocking mats are materials that reduce noise, vibration and rattles inside a car. They’re typically made of butyl rubber, asphalt, or foam, which absorb and block sound waves. Installing these mats significantly quiets the interior, reduces engine and road noise and improves speaker performance because the panels don’t vibrate. This improves comfort, music quality and makes driving less tiring, specially on long journeys.
Q2. Can I install sound-blocking mats myself, or do I need a professional?
Answer: Yes, most people can install sound-blocking mats themselves with basic tools and a little patience. The process involves measuring, cutting, cleaning and carefully applying the mats to key parts of the car. However, it’s important to follow instructions carefully, take your time and ensure that the surfaces are clean and dry. If you have any doubts, a professional can help ensure complete coverage and proper adhesion.
Q3. Where should I install sound-blocking mats for best results?
Answer: The most effective areas are doors, floors, trunk, ceiling and wheel wells. Doors reduce rattling and improve speaker performance. Floors block road noise and vibration. The trunk helps subwoofers perform better and reduces low-frequency vibrations. The roof and wheel wells reduce wind and tire noise. Installing mats in these key areas provides maximum noise reduction and a quieter cabin environment.
Q4. How much noise reduction can I expect after installation?
Answer: High-quality sound-blocking mats can reduce interior noise by approximately 10-15 decibels. This is a noticeable difference, making the cabin feel noticeably quieter. Music sounds clearer, engine rumble is reduced and vibrations and rattles are reduced. The exact improvement depends on the car model, the type of mat used and the installation process.
References:
[1] Research on Application of Acoustic Materials in Automobile Noise Reduction
https://www.researchgate.net/publication/331356111_Research_on_Application_of_Acoustic_Materials_in_Automobile_Noise_Reduction

Guys, I’m a car audio enthusiast and customization expert and I love clear sound and clean installation. Plus, I have spent years helping people build their dream audio setups. And whenever I’m working on cars, I probably listen to music and thinks about the next big upgrade.