Written By: Don Dodi
Fact Checked By: Kristen Brown
Reviewed By: Diego Rosenberg
The lifted truck actually the style statement with it’s enhanced ability to clear the higher ground with its bigger tires and you can confidently unlock the new adventures with it.
Yes, indeed lifting a truck is one of the most popular kind of modifications among the truck owners: and whether it’s that they wanted to enjoy the rugged off-road trails for fun, wanted to fit the larger tires or simply they know it can give the vehicle a commanding presence on the road.
So, in the simple words, a truck lift actually involves raising the body or the suspension so that it can increase the ground clearance and that’s how it improves the approach and departure angles as well and because of all these things it enhances its overall capability as well.
And generally lift kits range from 1 to over 12 inches, but there’s exception as most of the everyday drivers opt for the moderate 2 to 6 inches as it properly goes with the balance performance, safety and the cost angle as well.
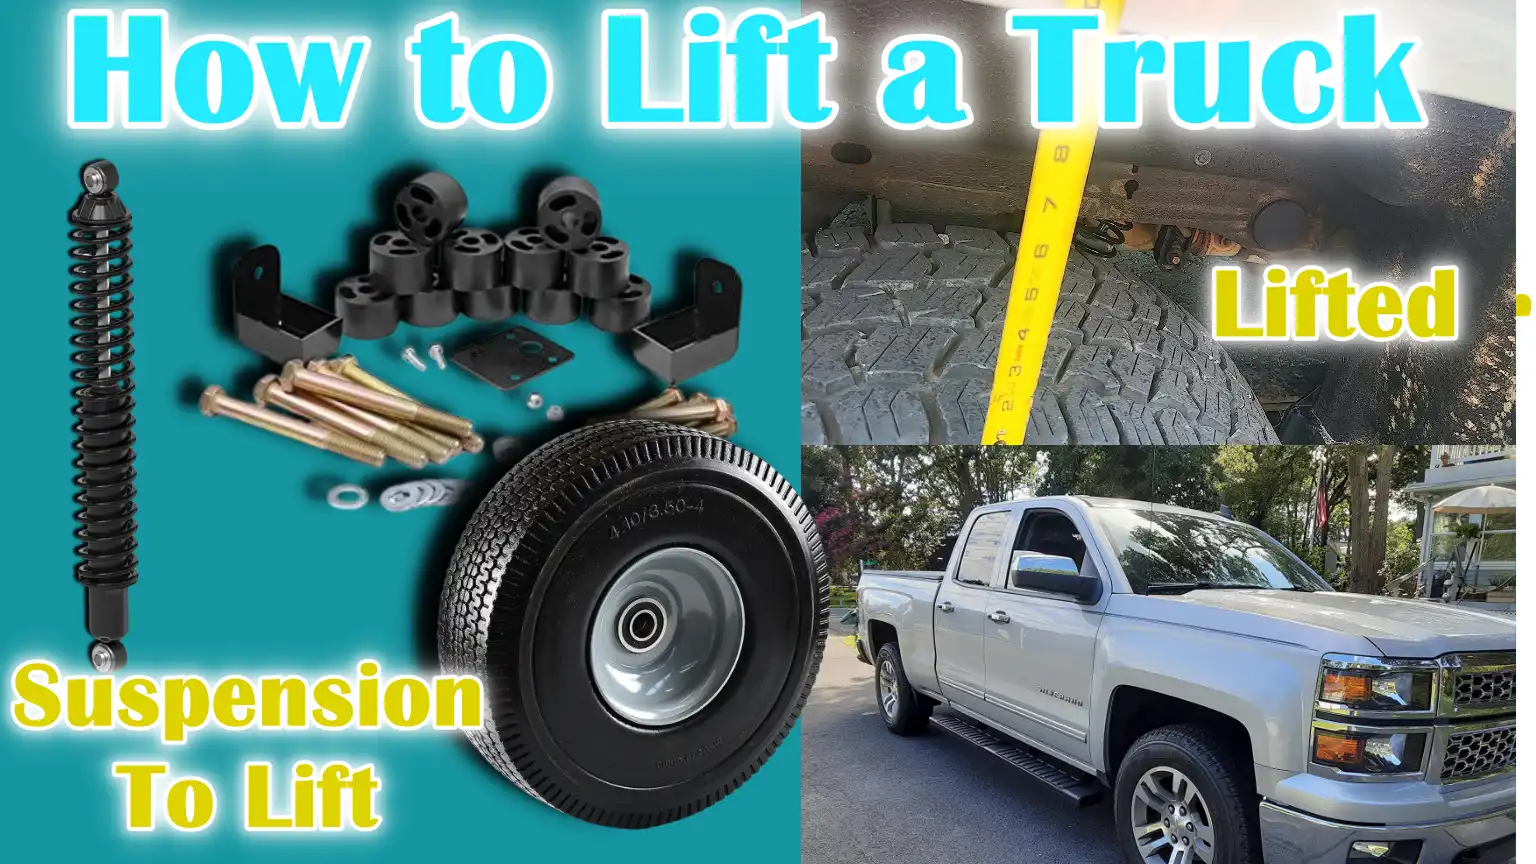
Additionally, there’s two kinds of lift kits are available: Body Lifts & Suspension lifts and both are great, as they do their work and that’s what everything matters.
When you lift the truck then it also changes the center of gravity which can literally affects the handling and braking performance which is why you should follow this clear step-by-step guide on How to Lift a Truck, as guidelines are really crucial.
Safety Precautions
1. The Importance of Working on a Flat, Stable Surface
Before lifting a truck, the ground you’re working on is just as important as the equipment you use.
A flat and stable surface, such as a concrete garage floor or a level driveway, prevents the vehicle from moving or rolling unexpectedly.
If the ground is uneven or soft, jack stands can sink or tilt, creating a dangerous situation.
Even a slight tilt can cause the lifted vehicle to roll, so always double-check that the area is level before you begin.
A solid, stable foundation ensures that the truck’s weight is evenly distributed, reducing the risk of accidents.
2. Using Wheel Chocks, Jack Stands and Proper Lifting Equipment
Wheel chocks are small wedges placed behind or in front of the tires that hold the truck to the ground and prevent it from moving.
Using high-quality, weight-rated chocks is essential for safety.
After the truck is lifted, jack stands should be placed under strong frame points to hold the weight, rather than relying solely on a hydraulic jack, which can wear out over time.
The jack should be appropriate for the weight of your truck—weaker equipment used to lift the load can collapse suddenly.
Always choose equipment specifically designed for trucks, as these have greater weight and clearance than smaller vehicles.
3. Wearing gloves and eye protection
Lifting a truck often requires loosening rusted bolts, handling heavy parts and working underneath the vehicle where dust and debris may fall.
Wearing gloves protects your hands from cuts, bruises and abrasions, while safety glasses or goggles keep dust, metal fragments and small parts from injuring your eyes.
Even a small piece of debris can cause serious damage if it gets into your eyes, so eye protection is an important safety measure.
Comfort is also important—choose gloves that provide both grip and flexibility so you can handle tools with precision.
4. Checking the manufacturer’s guidelines and local lift laws
Every truck is built differently and lifting without understanding its design could result in damage or unsafe handling.
The manufacturer’s guidelines detail where the vehicle can be safely placed, what modifications are allowed and the maximum recommended lift height.
In addition to the manufacturer’s advice, many areas have specific laws about how high a vehicle can be lifted.
These rules are meant to keep vehicles safe on public roads and prevent problems such as reduced visibility for other drivers.
Before starting any lift project, be sure to check your local regulations to avoid being fined or forced to reverse the modification.
Tools
| Tool / Material | What It Does | Why It’s Important |
|---|---|---|
| Floor Jack and Jack Stands Rated for Truck Weight | The floor jack raises the truck off the ground and the jack stands keep it in a safe place while you work. | Selecting a jack and stands that match or exceed your truck’s weight rating prevents the vehicle from falling and keeps the vehicle stable during installation. |
| Socket and Wrench Set | These are hand-held tools used to loosen and tighten nuts and bolts. | Trucks have different sizes of bolts, so a complete set ensures that you can remove and reattach all necessary parts without causing damage. |
| Torque Wrench | A device that tightens a bolt with a specific force measured in “foot-pounds.” | Using the correct torque secures bolts without overtightening them, which can damage threads or warp parts. |
| Lift Kit Components | The parts and hardware that raise your truck, such as spacers, springs, brackets and shocks. | The kit must be designed specifically for your truck model to fit correctly and maintain handling and safety. |
| Penetrating Oil, Safety Gear and Grease | Oil ingress loosens stuck or rusted bolts, safety equipment such as gloves and goggles protect you and grease reduces friction in moving parts. | These items make work smoother, safer and longer lasting by preventing injuries and ensuring free movement of parts. |
Choosing the Right Lift Kit
1. Difference Between Body Lift Kits and Suspension Lift Kits
Body lift kits raise the body of the truck above its frame by using spacers or blocks between the two.
This type of lift does not alter the suspension or wheel alignment, which means ride comfort and handling remain roughly the same.
Body lifts are typically more affordable and can provide two to three inches of height, enough to fit slightly larger tires without major modifications.
Suspension lift kits, on the other hand, raise both the frame and body together by replacing the truck’s suspension components such as springs, shocks and control arms.
This type of lift can range from a slight increase to an extreme lift of over a foot, providing more ground clearance and off-road capability.
However, suspension lifts are more expensive and often require additional adjustments to maintain safe handling.
2. How lift height affects handling and driving ability
The higher you lift the truck, the more its center of gravity will shift.
A higher center of gravity can make the truck feel less stable when making sharp turns or sudden movements.
A moderate lift, such as two to four inches, usually has minimal impact on everyday driving, while excessive lift can make the vehicle more sensitive to body roll and slower to respond to steering inputs.
Lift height can also change suspension movement, which can affect ride comfort and braking distances.
For most drivers, the best approach is to choose a height that gives them the clearance they need, without sacrificing too much stability or comfort.
3. Considerations: Tire size, intended use and budget
Before choosing a lift kit, think about what size tires you want to use, how you want to use the truck and how much you want to spend.
Larger tires require more lift to keep them from rubbing against the fenders when cornering or on rough roads.
If your main goal is off-road driving, a suspension lift may be worth the investment for the extra clearance and better suspension travel.
If you’re lifting mainly for looks or to fit slightly larger tires, a body lift may be sufficient.
Budgeting is also important because the cost of the kit is only a portion of the total expense—you may also have to pay for professional installation, wheel alignment and additional parts such as extended brake lines or driveshaft adjustments.
4. Reading Manufacturer Compatibility Charts
Each lift kit is designed for a specific truck brand, model and year and using the wrong kit can cause serious problems.
Manufacturer compatibility charts clearly list which kit will fit which vehicle, taking into account differences in frame design, suspension layout and weight.
Reading and understanding these charts ensures that you choose a kit that bolts on without making any risky modifications.
The right fitment not only saves time during installation, but also helps maintain the safety, handling and durability of the truck.
Preparing the Truck
1. Removing the Battery for Safety
Before starting any work on the truck, removing the battery is one of the most important safety precautions.
When working on suspension and lift components, you may need to remove or reposition wires, sensors or electrical connectors.
Removing the battery can prevent accidental short circuits, sparks or inadvertent switching on of electrical components while you work.
This is specially important if you are handling metal tools near the engine bay or electrical harnesses, as even a slight electrical contact can cause burns, damage components or trigger the airbag system.
2. Removing the Wheels for Easier Access
Removing the wheels before installing the lift gives you easier access to the truck’s suspension, frame and other mounting points.
Not only does it speed up the process, but you can also inspect components such as brake lines, control arms and shock absorbers for wear.
If any of these parts are worn, it is more convenient to replace them during the lift installation process rather than waiting until later.
Doing the job with the wheels removed also provides more room for carrying tools and installing lift kit components without obstruction.
3. Spray Bolts with Penetrating Oil to Keep Them From Loosening
Many bolts and nuts on a truck’s suspension are exposed to water, dirt and road salt over the years, which can cause them to rust and become stuck in place.
Spraying a penetrating oil, such as WD-40 or PB Blaster, helps loosen these stubborn fasteners by reducing rust and corrosion.
Spraying bolts at least 15 to 30 minutes before loosening them can save time and reduce the risk of stripping bolts or damaging threads.
In some cases, applying penetrating oil the day before and letting it soak overnight can make bolt removal even easier.
4. Measure Baseline Height for Reference
Before lifting the truck, it’s important to measure its current height at specific points, such as from the ground to the bottom of the fender above each wheel.
These baseline measurements give you a reference to compare before and after the lift, ensuring the installation achieves the expected height increase.
This also helps determine if one side of the truck is lower than the other, which could be a sign of worn suspension parts or uneven weight distribution.
Recording these numbers can also be useful when making future adjustments or checking that the lift kit is installed evenly and correctly.
Installing a Body Lift Kit (If Applicable)
1. Step-by-Step Body Mount Bolt Removal
The first step in installing a body lift kit is removing the bolts that secure the truck’s body to its frame.
These bolts are often located on the sides of the truck’s frame and may be hidden under trim pieces or carpet inside the cabin.
As they have been in place for many years, they may be rusted or tightly seated, so it’s a good idea to apply penetrating oil beforehand.
It’s important to remove the bolts in sequence so that the body doesn’t move unevenly.
Many installers work on one side at a time and loosen the bolts on the other side slightly so that the body remains stable when lifted.
Working slowly and methodically reduces the risk of damaging the body mounts or frame threads.
2. Installing Lift Blocks or Spacers
After removing the body mount bolts, lift blocks or spacers are installed at each mounting point between the frame and the body.
These blocks are usually made of strong materials such as high-density polyurethane or aluminum to withstand the truck’s weight and vibration over time.
The purpose of the spacers is to raise the body without changing the suspension geometry, thereby maintaining the truck’s original ride quality.
The blocks must be installed exactly where specified by the kit manufacturer, as the slightest misalignment can move or gap the body panels.
3. Replacing Bolts and Torque to Specifications
After the lift blocks are installed, new longer bolts provided in the kit are inserted into the frame through the body mounts.
These bolts must be tightened to the torque specifications given in the manufacturer’s instructions.
Correct torque is important because overtightening can crush the lift blocks or damage the mounts, while undertightening can cause the body to loosen over time.
A torque wrench should always be used to ensure accuracy and it is advisable to double-check torque after driving a few miles to make sure everything is secure.
4. Steering Shaft Extension, Radiator Relocation and Bumper Adjustment
The body lift raises the body on the frame, which may slightly alter the position of some of the attached components.
The steering shaft may require extension to maintain proper length and steering function.
In some cases, it is necessary to return the radiator to its original airflow position to avoid cooling problems.
Bumpers, which are usually mounted on the frame, may also require relocation brackets so they can align correctly with the raised body.
These adjustments ensure that the truck looks correct after the lift is applied, drives safely and all mechanical systems function as expected.
Installing a Suspension Lift Kit (If Applicable)
1. Removing Shocks, Springs and Control Arms If Needed
The first step in installing a suspension lift kit is removing the existing suspension components that will be replaced or modified.
This often includes shocks, springs and sometimes control arms, depending on the design of the lift kit.
Before you begin, the truck should be firmly supported on jack stands to ensure stability.
Removing these components requires caution, as suspension components may be under tension and may suddenly release force if not handled properly.
In many cases, special tools, such as a spring compressor, may be needed to safely remove coil springs.
Taking the time to label or note the original position of the components can make reassembling them much easier and ensure correct alignment later.
2. Installing New Suspension Components
After removing the old parts, the new suspension components provided in the lift kit—such as lifted springs, longer shocks and extended control arms—are installed.
Lifted springs raise ride height, while longer shock absorbers maintain proper suspension travel so the truck can handle bumps without bottoming out.
If the kit includes replacement control arms or brackets, these parts adjust the suspension geometry so the truck handles more smoothly and reduces wear on steering and drivetrain components.
Each part must be installed according to the manufacturer’s instructions to ensure both safety and performance.
3. Adjusting Sway Bars, Driveshaft Angles and Brake Line Extensions
Raising the suspension changes the angles and distances between different parts of the truck’s undercarriage.
Sway bars, which help control body roll during turns, may need to be re-installed or attached to extended links to maintain stability.
Driveshaft angles may need to be adjusted to prevent vibration or stress on universal joints.
Additionally, brake lines must be long enough to handle the increased suspension travel; if they are too short, they can stretch or break during operation, causing a dangerous reduction in braking ability.
Many suspension lift kits include extended brake lines or relocation brackets to address this problem.
4. Torque all bolts to manufacturer’s specifications
After installation and adjustment are complete, all bolts and fasteners must be tightened using a torque wrench to the exact specifications provided by the lift kit manufacturer.
Proper torque ensures that parts are secure without overtightening, as this can damage parts or threads.
It is important to follow the recommended tightening sequence, specially for suspension parts that work together under load.
After the first few hundred miles of driving, it’s worth double-checking the torque on all suspension components to make sure everything is set correctly and safe for long-term use.
Wheel and Tire Installation
1. Installing Larger Tires (if part of an upgrade)
When a lift kit is installed, many truck owners choose to install larger tires to take advantage of the increased clearance.
Larger tires provide better grip on rough terrain, better ground clearance and give the truck a more aggressive look.
However, new tires must be compatible with the truck’s wheel size and load capacity to ensure safe operation.
It’s important to choose tires that are designed for the type of driving you do most often—off-road tires have deeper tread patterns for better grip on mud, slush, or rocks, while all-terrain or highway tires are better for mixed or paved roads.
Tires should be installed using proper tire machines to prevent damage to the wheel rim or tire bead.
2. Ensuring Proper Lug Nut Torque
After the wheels are installed on the truck, the lug nuts must be tightened to the torque specifications provided by the manufacturer.
Proper torque ensures that the wheel stays in place and that the studs are not stretched or damaged by overtightening, or the wheel is not loosened by undertightening.
A torque wrench is the most reliable tool for this job, as it applies the correct amount of force.
It is also advisable to recheck the lug nut torque after 50 to 100 miles of driving, as wheels can sometimes settle slightly after initial installation.
3. Checking Clearance for Turning Radius
Before driving the truck, it is important to check that the new tires have adequate clearance when fully rotated in both directions.
If tires are too large or mounted too close to suspension components, they may rub against fenders, inner wheel wells or control arms during turns or suspension movement.
This can damage tires and affect steering performance.
In some cases, it may be necessary to trim fender liners or adjust wheel offset with spacers to obtain proper clearance.
Ensuring the ability to turn completely without any contact is important for both safety and maneuverability, specially in tight spaces or off-road situations.
Alignment and Suspension Checks
1. The Importance of a Professional Wheel Alignment After a Lift
After a lift kit is installed, the angles of the wheels and suspension components change, which can affect truck handling and tire wear.
A professional wheel alignment ensures that camber, caster and toe settings are adjusted to the optimum position for safe driving.
Without proper alignment, you may notice uneven tire wear, pulling to one side or loss of steering control.
This can significantly reduce tire life and increase the risk of handling problems, specially at high speeds.
It is important that the alignment is performed by a qualified professional who understands lifted vehicles, as they can make specific adjustments to your truck’s new suspension geometry.
2. Check for Any Unusual Sounds or Handling Problems
After the truck is lifted, it is important to listen and feel to make sure everything is installed correctly.
Rattling, crunching or creaking sounds could mean that bolts are loose, parts are rubbing, or parts are under stress.
Problems such as excessive body roll, vibration, or unstable steering should be addressed immediately before driving further.
These symptoms may indicate problems such as unbalanced tires, misaligned suspension parts, or incorrect installation of lift components.
Timely inspections help prevent major problems and keep the truck operating safely.
3. Checking Suspension Geometry and Ride Height
Lift kits change the way suspension components sit and move, so checking suspension geometry ensures everything is operating within safe limits.
Incorrect geometry can cause premature wear on ball joints, tie rods and control arms.
It can also affect the way the truck absorbs bumps and maintains traction.
It’s also important to measure the ride height at all four corners of the truck to ensure the lift is equal and within expected specifications.
If the height is lower on one side, it could be a sign of missing spacers, worn components, or uneven spring tension, all of which must be corrected for safe and stable driving.
Test Drive and Final Inspection
1. Short, Slow Test Drive to Check Stability
After the lift installation is complete, it is best to start with a short and slow test drive to assess the truck’s behavior.
Driving at low speeds in a controlled area, such as a parking lot or quiet road, allows you to check for any unusual handling changes without putting yourself or the vehicle at risk.
Pay attention to how the steering responds, how the suspension feels over small bumps and whether the truck stays stable during light braking.
This first drive is not about a performance test, but about making sure the lift kit and all related components are working safely before normal use.
2. Listen for Rattles, Clunks, or Vibrations
While driving, keep the windows slightly open so you can hear any unusual sounds.
Rattling sounds may indicate that bolts are loose or a component is moving under load.
Rattling can come from parts that have not been tightened properly or accessories that have been disturbed during the lift process.
Vibrations, specially at certain speeds, can be a sign of problems such as unbalanced tires, misaligned driveshafts, or incorrect suspension geometry.
Detecting these problems early allows you to fix them before they cause further damage or unsafe driving conditions.
3. Torque Bolts After the First 50-100 Miles
Newly installed lift parts may shrink slightly after the truck has been driven, causing some initial tightening of bolts and fasteners.
For this reason, it is important to torque all suspension, body mount and wheel fasteners after the first 50 to 100 miles of driving.
Using a torque wrench ensures that each bolt is tightened to the manufacturer’s exact specifications, maintaining both safety and performance.
Neglecting this step can cause parts to become loose over time, causing alignment problems, premature wear, or even part failure while driving.
What are The Maintenance Tips
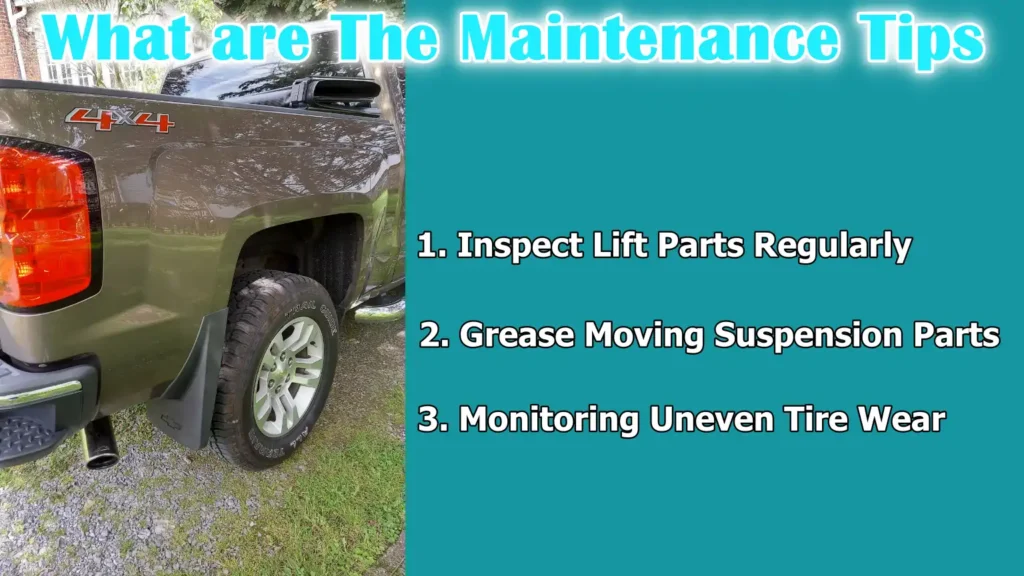
1. Inspect Lift Parts Regularly
After installing a lift kit, it’s important to regularly inspect all parts to make sure they remain in good condition.
Over time, vibration can loosen bolts, wear bushings and form stress cracks or fatigue brackets.
A visual inspection every few months or after long off-road trips helps catch problems before they become a safety hazard.
Look for signs of rust, abnormal bending, or worn mounting points.
Even high-quality lift kits can deteriorate if not maintained, so regular inspection is important to keep the truck safe and performing well.
2. Grease Moving Suspension Parts
Many suspension parts, such as ball joints, control arms and sway bar links, rely on grease to move smoothly and reduce wear.
Lifting the truck changes the angle of operation of these parts, which can sometimes lead to more stress and faster wear.
Applying fresh grease at regular service intervals reduces friction, prevents premature damage and keeps the suspension running quietly.
Using a grease gun with a manufacturer-recommended lubricant ensures that seals remain intact and parts last longer.
3. Monitoring Uneven Tire Wear
If a lifted truck’s suspension and alignment settings aren’t closely monitored, tires can develop uneven wear.
Uneven wear patterns—such as more wear on the inside or outside edges—can be a sign of alignment problems or unbalanced suspension parts.
Regularly checking the tire tread depth can help you spot these problems early and fix them before the tires are permanently damaged.
Rotating tires at recommended intervals and keeping them inflated to the correct pressure also helps maintain even wear and extend tire life.
Read More:
Conclusion – How to Lift a Truck
You should be aware of the fact that every inch that you lift your truck and make changes, it actually affects how the truck moves, handles and even ages so just make sure to follow this guide carefully.
Lifting a truck isn’t just a cosmetic change—it’s a modification that completely transforms your vehicle’s performance, handling and roadworthiness.
Done correctly, it can improve ground clearance, make room for bigger tires and increase off-road capability.
However, it also alters the suspension geometry, raises the center of gravity and can affect braking and steering.
So planning, choosing the right lift kit and following the right installation procedures are important for both safety and performance.
From preparing your workspace and using the right tools to ensuring proper alignment and post-installation checks, every step plays a critical role in the end result.
Skipping some of the little things—like re-torqueing bolts or checking clearances—may seem minor at the time, but could pose a serious safety hazard later on.
Regular post-lift maintenance is just as important, as even high-quality parts wear out over time, specially when exposed to off-road stress or heavy loads.
A lifted truck offers new possibilities—tackling tough terrain, hauling bigger loads, or simply enjoying a better view of the road.
But the key to enjoying these benefits is a balanced approach: understanding the compromises, following safety guidelines and caring for your investment over the long term.
With the right preparation, precision and ongoing maintenance, your lifted truck can serve as both a capable workhorse and a reliable adventure companion for years to come.
Plus, federal report shows that in single-vehicle crashes, about 18% of the pickup trucks rolled over when we compare it with 10% of the cars and SUVs were even higher, so all these data shows that how a higher center of gravity actually raises rollover risk and this directly relevant when a truck is lifted as well: and that is the real reason that you should be really careful about it and make sure to have all the safety facts checked.[¹]
Now, you can ask the questions in the comment section below: Thank You!
Frequently Asked Questions
Q1. How much will it cost to lift your truck?
Answer: The cost of lifting a truck can vary greatly depending on the type of lift kit you choose, the size of the lift, and whether you install it yourself or pay a professional. A basic body lift kit, which raises the truck body off the frame without changing the suspension, can cost anywhere from ₹300 to ₹800 for the kit alone. A suspension lift kit, which replaces parts such as shocks, springs, and control arms, can cost anywhere from ₹1,000 to ₹5,000, depending on the quality, brand, and lift height. In addition to the kit, you should also consider installation costs if you’re not doing it yourself. Professional installation can cost anywhere from ₹500 to ₹2,000 or more because it requires specialized tools, a lot of time, and precise adjustments. There may also be additional costs for new tires, wheels, alignment services, and other necessary modifications to keep the lift operating safely. Overall, the total cost can range from a few hundred dollars for a basic do-it-yourself setup to over $10,000 for a high-end lift with professional installation and accessories.
Q2. How difficult is it to install a lift on a truck?
Answer: Installing a lift on a truck can range from fairly easy to very challenging, depending on the type of lift kit you choose and your mechanical skills. A small body lift kit is usually easy as it mostly involves installing spacers between the body and frame, replacing bolts, and making some minor adjustments. However, a suspension lift kit is more complicated as it involves removing and replacing parts such as shocks, springs, and control arms, as well as adjusting steering and brake lines. This type of work requires specialized tools, a good understanding of how the truck’s suspension works, and the ability to follow detailed instructions. Small mistakes, such as not tightening a bolt correctly or forgetting to check the angle of the driveshaft, can cause handling problems or safety hazards. For a person with basic mechanical experience, a body lift can take a full day, while a suspension lift can take two or more. For beginners or those who don’t have the right tools, it’s usually better and safer to have the installation done by a professional.
References:
[1] Federal Motor Vehicle Safety Standards; Rollover Resistance
https://www.nhtsa.gov/sites/nhtsa.gov/files/rolloverresistance.pdf

Guys, I’m a car audio enthusiast and customization expert and I love clear sound and clean installation. Plus, I have spent years helping people build their dream audio setups. And whenever I’m working on cars, I probably listen to music and thinks about the next big upgrade.