Written By: Don Dodi
Fact Checked By: Kristen Brown
Reviewed By: Diego Rosenberg
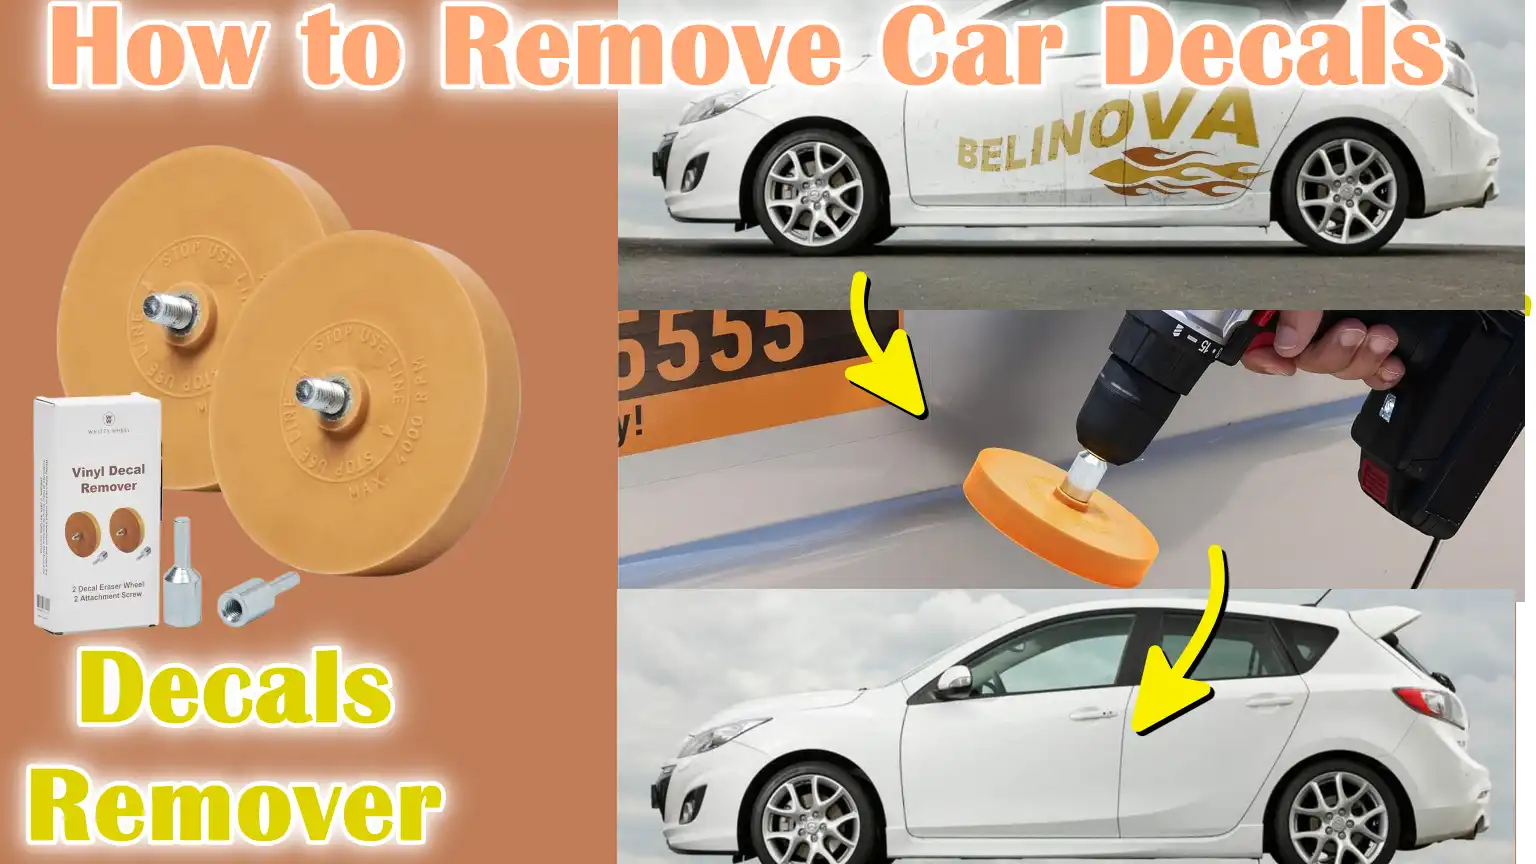
When you wanted to give personality to your dashing car then you can go with the car decals, but when you wanted to remove them after the time then you have to do this work with some delicate etiquette so that you keep your paint perfect.
So, it is really common thing to remove a car decals for many vehicle owners who actually wanted to refresh the look of their car or just wanted to prepare it for resale.
And decals are typically made from vinyl or similar kind of materials that basically stick firmly to your car’s surface with the help of strong adhesives for some obvious reasons.
Plus, as always these adhesives can harden over the period of time and that makes the removal a bit tricky part as you have to do it with some perfection, otherwise you can risk your car’s paint glory and then it becomes a costly repair as well.
Also, there are methods and right kind of tools are available by with you can easily done this job by yourself.
So, let’s understand How to Remove Car Decals and in this guide you’ll know careful removal methods that can save you time, money and frustration as well.
Tools
| Tool / Material | Purpose | Additional Notes |
|---|---|---|
| Hair Dryer or Heat Gun | Gently heat the decal and soften the glue so it comes off easily. | Use a lower temperature to avoid damaging the paint and keep going. |
| Plastic Scraper or Old Credit Card | Lifting and peeling off the decal without scratching the car surface. | Avoid metal tools as they can scratch the paint. |
| Adhesive Remover (e.g., Goo Gone, Rubbing Alcohol, WD-40) | To dissolve the sticky glue left after peeling off the decal. | Test it on a small area first to make sure it’s safe. |
| Microfiber Cloths | Gently wipe away the adhesive and clean the surface without scratching. | Soft and reusable, ideal for car surfaces. |
| Car-Safe Soap and Water | Clean the car surface before and after decal removal for best results. | Use a mild soap designed for cars to protect the paint. |
| Masking Tape (Optional) | To protect areas around the decal during removal and heating. | Helps prevent accidental damage to surrounding paint. |
| Protective Gloves (Optional) | To protect your hands from chemicals and sticky residue during the process. | This is useful if you have sensitive skin or use powerful removers. |
Preparation
Before removing a decal from a car, it is important to prepare the area well so that the process is easy and safe for your car’s paint.
First, wash the area around the decal with mild soap and water.
This step helps remove any dirt, dust, or grease that may interfere with the removal process or scratch the paint when the decal is peeled off.
Clean surfaces allow the heat and adhesive remover to work more effectively.
Next, park your car in a shady and ventilated area.
Direct sunlight can make the car’s surface very hot, making the decal and adhesive difficult to handle.
A shady area keeps the temperature stable and helps prevent damage or uneven heating during the process.
Good ventilation is also important, specially if you are using a chemical adhesive remover, as this can help avoid breathing in fumes.
Finally, before applying any adhesive remover or chemical, test it on a small, hidden area of the car near the decal.
This patch test is important to ensure that the product will not damage or discolor your car’s paint.
Different cars and paint finishes react differently to chemicals, so this simple test helps to avoid accidental damage and protect your car’s surface during decal removal.
Heating the Decal
Heating the decal is a very important step that makes it easier and safer for your car’s paint.
When you apply gentle heat, it softens the glue underneath the decal, allowing it to stick firmly to the car’s surface.
The softened glue peels off easily, reducing the chance of the decal tearing or damaging the paint.
To do this, set a hair dryer or heat gun to a low temperature.
These devices heat the decal without overheating the paint.
It’s important to keep the heat source about six to eight inches away from the car.
This distance provides enough heat to soften the adhesive, without overheating the paint, which can cause discoloration or damage.
When heating, move the hair dryer or heat gun slowly back and forth over the decal.
This even motion ensures that the entire decal is heated evenly, avoiding damaging the paint in hot spots.
Take your time with this step, as rushing or overheating can cause problems.
Once the decal is warm and the adhesive has softened, you can carefully begin peeling it off.
Removing a decal
Removing a decal from your car requires patience and care so as not to damage the paint or peel off any adhesive.
Start by lifting a corner of the decal.
Starting at the corner is easier because it allows you to gently remove the edge without removing the entire decal at once.
Use a plastic scraper or your fingernail to carefully lift the edge of the decal.
Plastic tools are preferred because they are less likely to scratch or damage the car’s paint than metal tools.
After lifting the edge, slowly remove the decal at a shallow angle, almost level with the car’s surface.
Removing at this low angle reduces the chance of tearing the decal or peeling off the adhesive.
If you find stubborn spots where the decal won’t come off, don’t force it off.
Instead, reapply heat to those spots to soften the adhesive further.
This extra heat helps dissolve the glue, making peeling easier and cleaner.
Taking time with this step prevents damage and ensures that the decal comes off easily and completely.
Removing Adhesive Residue
After removing the deck, it’s common for sticky glue to remain on the surface of your car.
This adhesive residue can attract dirt and make your car look dirty, so it’s important to remove it carefully.
To do this, apply a little adhesive remover to the area where the glue is left.
Adhesive removers are specifically formulated to break down sticky substances without harming your car’s paint.
After applying the remover, let it sit on the residue for one to two minutes.
This resting time allows the remover to soften and dissolve the glue, making it much easier to wipe off.
After waiting, gently rub the area with a clean microfiber cloth until the adhesive is gone.
Microfiber cloths are soft and non-abrasive, so they clean effectively without scratching the paint.
If some sticky spots remain, repeat the process by applying more adhesive remover and wiping again.
It may take a few rounds to completely clean the surface, specially with old or thick glue.
Taking your time during this step ensures that your car’s paint will remain protected and will still look smooth and clean after the decal is removed.
How to Do Cleaning and Polishing After Decals Removal
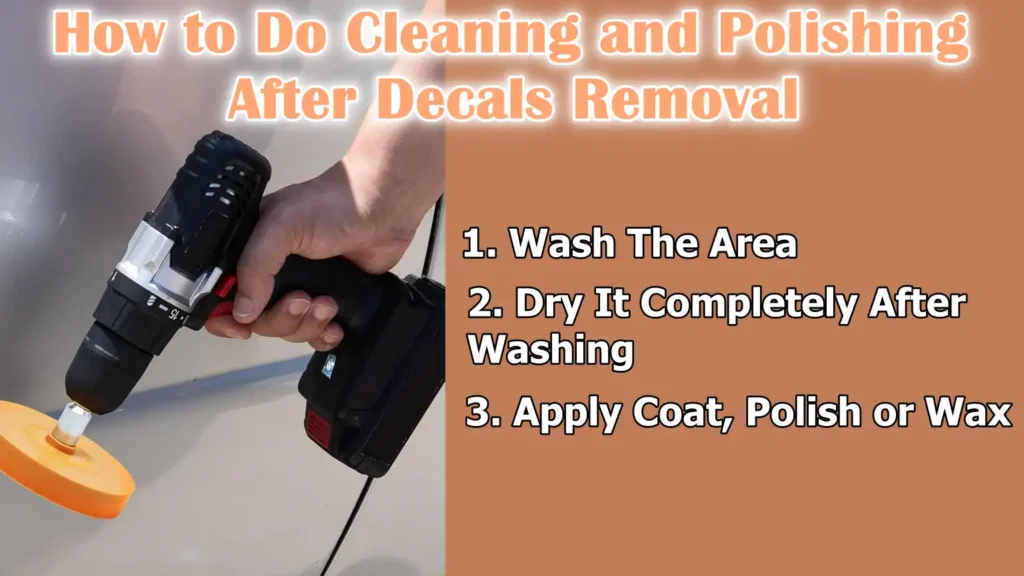
After removing the decal and cleaning off the adhesive, it’s important to wash the area again.
Washing helps remove adhesive chemicals or dirt loosened during the removal process.
Gently clean the surface with mild car soap and water, making sure no harmful residues are left that can damage the paint over time.
After washing, dry the area thoroughly with a soft microfiber towel.
Microfiber towels are designed to absorb moisture without scratching the paint, prevent water spots and keep the surface smooth.
Proper drying also prepares the surface for the next step.
Finally, apply a coat of car polish or wax to the cleaned area.
Car polish helps restore the paint’s shine by removing minor scratches or discoloration caused by decal removal.
Wax forms a protective layer that protects the paint from dirt, water and UV rays, keeping your car’s surface looking shiny and healthy for a long time.
Regular polishing and waxing maintains the beauty of the car and protects your investment by preventing paint damage.
Special Tips and Considerations
When removing car decals, it’s important to take certain precautions to protect your vehicle’s surface and ensure a smooth process.
One important tip is to avoid using metal tools like knives or metal scrapers.
These can easily scratch or damage the paint, leading to costly repairs.
Instead, use plastic scrapers or old credit cards that are gentle on the surface but effective at removing decals.
If you need to remove decals from glass surfaces like windows, a razor blade can be used with caution.
Razor blades are sharp and effective at cutting through the adhesive on glass, but they should be used slowly and at a flat angle to avoid scratching or breaking the glass.
Another important thing to consider is not to use too much heat.
Although heating the decal softens the adhesive, too much heat or placing the heat source too close can damage the paint or cause bubbles.
It is best to keep moving the heat source and keep it at a low to medium temperature.
Finally, larger or older decals may be more stubborn due to a stronger or dried adhesive.
These decals may require multiple heating and peeling to be removed cleanly.
Patience and gentleness during multiple heating will prevent damage and make removal easier.
Read More:
Conclusion – How to Remove Car Decals
Actually a well-removed decals doesn’t leave any traces behind, as it only has a clean, smooth car surface which is truly ready for a new look or simply to shine as if fresh from the showroom.
By properly preparing the surface, heating the decal slightly and peeling it off slowly, you reduce the risk of damage and make the process easier.
Carefully using adhesive removal products helps remove any sticky residue, leaving your car clean and ready for polishing.
Thorough washing and waxing restores shine and protects the paint for the future.
Taking time with each step ensures that your car looks great without costly repairs or scratches.
Not only this, according to Avery Dennison you should warm the entire decal fro about 30 to 60 seconds with a heat source held roughly 6 to 12 inches away and then you have to peel slowly at <90° and then again reheat if you feel resistance increases.[¹]
Whether you’re removing old decals or preparing your car for a new design, following these steps can save you time, money and hassle while keeping your vehicle in good condition.
Also, you can ask the questions in the comment section below.
Frequently Asked Questions
Q1. What is the easiest way to remove car decals?
Answer: The easiest way to remove car decals is to heat them for a long time and carefully. First, heat the decal at a low temperature with a hair styling or heat gun. This will make the bottom of the decal golden, making it easier to work without any documentation. After heating the decal, slowly peel it off from the corner of the nose with the help of a plastic grater or your nose. If the decal is not sticky, contacting the company’s helpline may help. After removing the decal, clean off any sticky layer using adhesive decals or rubbing skaters. If done patiently and with the right tools, this method is safe for your car’s paint.
Q2. How to Remove WD-40 Decals?
Answer: Yes, WD-40 can help remove decals as it acts as a lubricant and a component. When applied to sticky decals, WD-40 breaks down the glue, making it easier to remove by rubbing or scraping. However, WD-40 is not specifically designed for car paint, so it should be applied to small, sensitive areas first to ensure it does not discolor or damage the paint. After using WD-40, wash the area thoroughly with soap and water to remove any oily residue. WD-40 is a useful option, but it should be used carefully and only in small amounts.
Q3. What is the use of a rubbing trowel on small decals?
Answer: Using a rubbing trowel on small decals has advantages because they can be easily removed with a variety of sprays. Furniture made of harder materials will be easier to remove by letting it sit for a minute. It is safe to use a limited amount of WD-40 on car paint. However, care must be taken when using a rubbing trowel as it can dry out the plastic and rubber surrounding the decal. Always use a rubbing trowel to remove any small, broken pieces before using a larger amount. After cleaning, rinse the area with water and dry to avoid any further damage.
References:
[1] Removal Instructions for Avery Dennison™ Cast, Calendered, Reflective and Polyester Films
https://graphics.averydennison.com/content/dam/averydennison/graphics/na/en/documents/Instructional-Bulletins/Application-and-Removal-Information/ib410-removal-films.pdf

Guys, I’m a car audio enthusiast and customization expert and I love clear sound and clean installation. Plus, I have spent years helping people build their dream audio setups. And whenever I’m working on cars, I probably listen to music and thinks about the next big upgrade.