 Skip to content
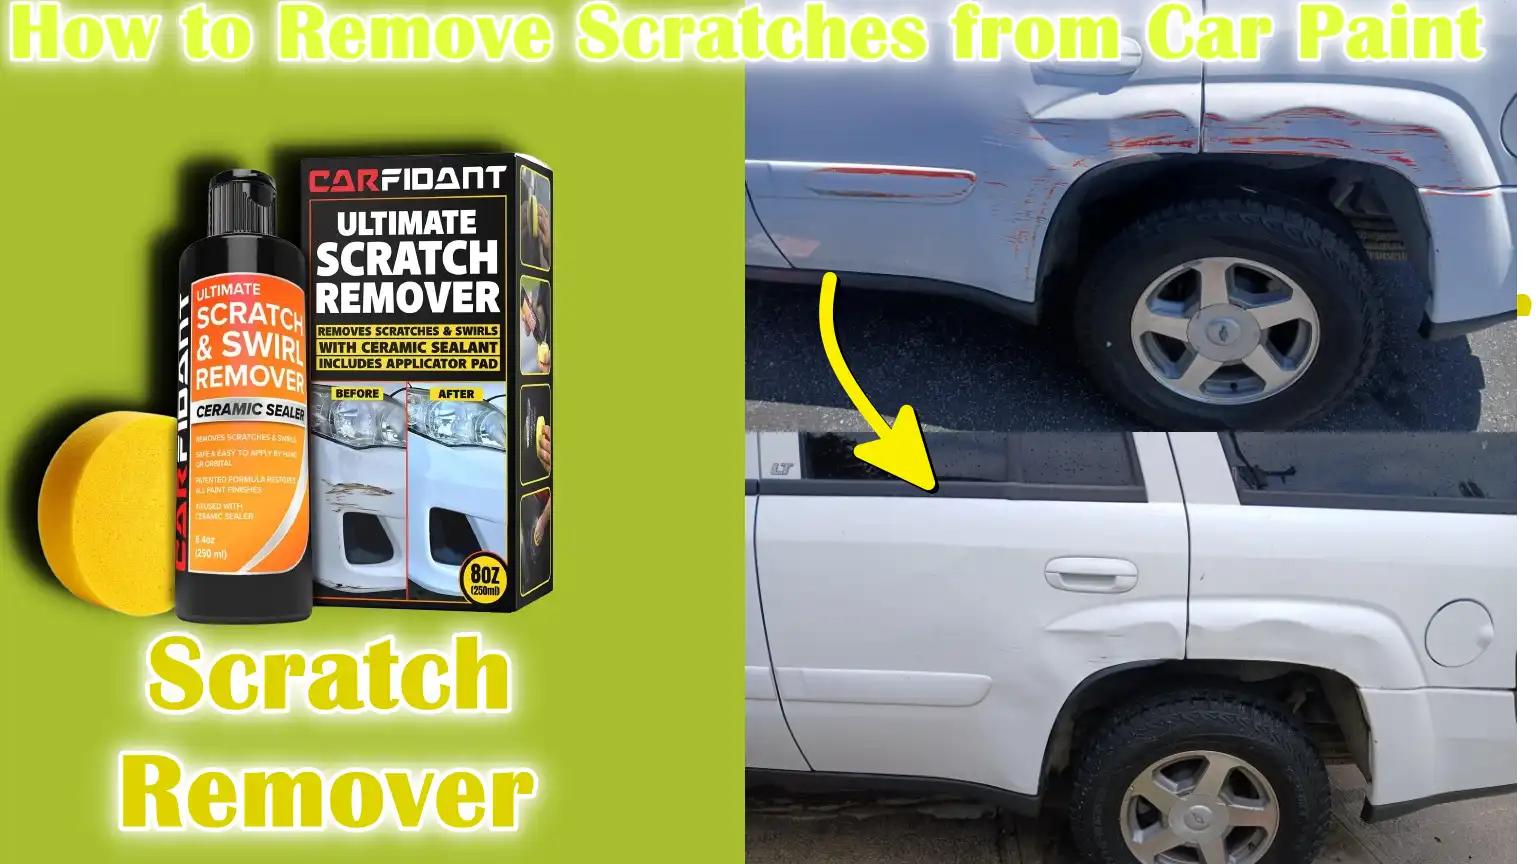
Written By: Don Dodi
Fact Checked By: Kristen Brown
Reviewed By: Diego Rosenberg
When you spot tiny scratch anywhere in your car then it may not seem you a big deal, but believe it or not it is often the beginning of bigger paint problems later on.
Yes, it is the fact that car paint scratches are one of the most common problems which almost every vehicle owner has to face it, also it can happen in countless ways: whether it can happen from brushing against a bush, careless parking, shopping carts or even improper washing techniques also do it for your car.
As well as, according to the automotive detailing experts: more than 80% of the cars on the road today actually have the visible surface scratches and many of which actually go unnoticed until they begin to dull the finish or expose the paint beneath.
And do you know that car paint is actually made up of several layers: as there’s a clear coat layer is available then the base color coat, primer and metal body panel as well.
And everyday scratches actually affects most of the time top layer or the clear coat: and that you can easily repair it at home.
However, when you see there’s a deeper scratches that cut into the paint or primer then you may require more attention and have to be quick to fix it.
So, in this guide on How to Remove Scratches from Car Paint; you’ll also learn how to know wheat type of scratch you are actually dealing with, followed treatment, preventing and protection with really affordable means.
Understanding the Types of Car Scratches
At first glance, all car scratches may look the same, but in reality they are very different in terms of depth, damage and how to fix them.
Your car’s paint is made up of several layers: the top layer is the clear coat, below that is the color coat (also called the base coat), then the primer layer and finally the metal body of the car. When a scratch occurs, it may affect only the surface or reach the metal.
Knowing what type of scratch you have is the first and most important step in deciding how to fix it correctly.
Here is a simple and factual description of each type of car scratch.
1. Clear coat scratches
Clear coat scratches are the most common and least harmful type of car scratches. These scratches only affect the topmost transparent layer of paint, called the clear coat.
This layer is there to protect the colored paint underneath and give the car a shiny and glossy look. Clear coat scratches are often caused by minor, everyday things, such as rubbing against tree branches, washing the car with a dirty cloth, or careless dusting.
Because these scratches are not deep, they can often be repaired at home with a polishing compound or scratch remover.
Repairing clear coat scratches quickly can prevent further damage and keep your car looking clean and polished.
2. Paint Scratches
Paint scratches are deeper than clear coat scratches. These scratches penetrate the clear coat to the colored paint layer underneath.
This type of damage is often caused by keys rubbing against the paint, car doors banging against objects, or sharp objects such as shopping carts.
Paint scratches are more noticeable because they often reveal a different color or rough texture beneath the surface.
These scratches are more difficult to repair than superficial scratches and may require touch-up paint or a more complicated repair process.
If left untreated, these scratches can get worse over time, specially if water or dirt gets into the damaged area.
3. Primer or Base Coat Scratches
Primer scratches are more serious because they go deeper than the paint layer. On most cars, underneath the colored paint, there is a layer called the primer or base coat.
This layer helps the paint adhere to the car and also protects the metal body from rust and damage.
When a scratch reaches the primer layer, it usually means that the paint has completely peeled off in that area. These types of scratches are often caused by accidents, collisions, or a hard impact.
Primer scratches usually require the area to be sanded, repainted and properly sealed. Ignoring these scratches can lead to rust over time, specially if the car is exposed to moisture or humidity.
4. Bare Metal or Deep Scratches
Deep scratches that penetrate the clear coat, paint and primer layers and expose the car’s metal surface are the most serious type.
These scratches can be caused by major accidents, sharp metal objects, or rubbing against rough concrete or metal poles.
Once the metal is exposed, it is extremely vulnerable to rust and corrosion, specially if water gets in. Rust can spread beneath the paint and cause more serious damage to the car’s body over time. Repairing deep scratches usually requires professional equipment and techniques.
The process often involves cleaning the area, applying a primer, repainting with a matching color and sealing it with a clear coat to protect it.
Inspecting and Assessing the Depth of the Scratch
Before you can fix a scratch on your car, it’s important to know how deep the damage is. Not all scratches are the same and mistaking a deep scratch for a light one can lead to poor results or even worse damage.
Carefully inspecting the scratch can help you choose the right repair method, save time, avoid costly mistakes and decide whether it can be fixed at home or should be done by a professional.
This section will help you learn how to properly inspect scratches using simple techniques.
1. Using the Nail Test
One of the easiest and most reliable ways to check the depth of a car scratch is called the nail test. For this, gently run your fingernail over the scratch.
If your nail gets stuck or feels resistance, it means the scratch is deeper than the clear coat and needs more than just polishing.
If your fingernail slides through easily and doesn’t get stuck, the scratch is probably just on the surface and can usually be repaired with a scratch remover or polish.
This test is widely used by both professional detailers and car owners because it gives a quick and useful estimate of the severity of the scratch without using any tools.
2. Inspect in natural light
Good lighting is very important when inspecting scratches. Natural daylight is the best option because it shows the true appearance of the car’s surface.
Artificial lighting in a garage or parking lot can sometimes hide fine scratches or make them look different than they really are.
To properly inspect, take the car to a sunny open area and look at the scratch from different angles. This helps you determine if the scratch is shallow, deep, or has damaged more than one layer.
Professionals often recommend inspecting in daylight because you’re able to see many things you can’t in indoor light.
3. Clean the area to see the scratch clearly
Before any inspection, it’s important to thoroughly clean the scratched area. Dirt, dust and grime can hide the true depth and size of the scratch or make it look worse than it really is.
Use clean water and mild car wash soap to clean the surface, then dry it completely with a microfiber towel.
You can also use a little rubbing alcohol or surface prep spray to remove wax or oil from the area. This will ensure that you see the actual scratch, not dirt or fingerprints.
A clean surface most accurately shows you what you’re dealing with.
4. Deciding Whether to Do It Yourself or Seek Professional Help
After using your fingernail, natural light and cleaning the area, you’ll have an idea of the severity of the scratch.
If the scratch only affects the clear coat, you can usually repair it yourself with basic tools like polish, a microfiber cloth, or a scratch repair kit.
However, if the scratch penetrates the paint, primer or metal, the repair becomes more complicated and may require sanding, painting and sealing. In such cases, it is often better to go to a professional body shop or detailer to prevent further damage to the car.
It is important to know your limits because a poor repair can reduce the value of the car or cause long-term paint problems. Properly evaluating the scratch helps you make the right decision about the next step.
Tools
| Tool or Material | What It Is | Why It’s Used | When to Use It |
|---|---|---|---|
| Microfiber Cloths | Soft cleaning cloth made of fine fibers. | Gently cleans surfaces without scratching paint. | Use for cleaning, drying and applying polish. |
| Scratch Remover or Polish | Cream or liquid that removes small surface scratches. | Helps remove light scratches from clear coat and improves gloss. | Use for clear coat scratches. |
| Dual-Action Polisher (Optional) | Electric polishing machine that moves in a circular and back-and-forth motion. | Makes polishing faster and more uniform, specially for large or multiple scratches. | Optional, but useful for deep polishing. |
| Sandpaper (1500–3000 Grit) | Fine abrasive paper used for smoothing surfaces. | Evens out the surface by gently removing damaged paint layers. | Use for deep scratches before applying touch-up paint. |
| Touch-Up Paint | Small bottle of car paint that matches your vehicle’s color. | Fills in deep scratches with paint so it blends in with the rest of the car. | Use when scratches reach paint or primer layers. |
| Rubbing Alcohol or Prep Spray | A cleaning liquid used to remove oils, waxes amp; and dirt. | Preparing the surface for repair by making sure the surface is clean and free of contaminants. | Use before polishing or painting. |
| Masking Tape | Sticky tape that won’t damage paint. | Protects areas around the scratch so you only work on the damaged area. | Use for sanding, painting or polishing small parts. |
| Wax or Sealant | Protective product applied after scratch repair. | Seals the repaired area, provides shine amp; and protects paint from sun, water amp; and dirt. | Use at the end of the repair process. |
How to Remove Scratches from Car Paint – Blasting (Large Clear Coat)
Blasting chemicals are the most common damages to the car surface and are found.
These most common damages are caused by the effect of pesticides on the clear coat.
These pesticides are reportedly caused by improper washing, contact with tree soil, litter piles or the use of dust products.
The following are not limited to colored paints only, so they can usually be fixed at home without the help of a professional.
The purpose of treating pesticides is to smooth the clear coat with salt so that the surface reflects light evenly again. Below is a complete and easy process to fix a dirty clear coat.
1. Dry the affected area by covering it up
The first and most important step before any type of clear coat repair is to thoroughly dry the area. This includes removing any debris, dirt or debris and liquids generated during the process.
Clean water, ultra-balanced car wash soap and a microcloth or splint are used. After washing, dry the area completely, about as much as soaking a fish.
A clean and dry surface ensures that sewing or scratch scissors work effectively and do not dig into the smartphone, which can make the general situation even worse.
2. Tips
Once the surface is clean, apply a small amount of Scratching Florida Company or Stone directly to the scratched area.
This product is specifically designed to remove or reduce scratches by lightly rubbing a portion of the clear coat and smoothing the surface.
Pay attention to the words on the product, as some of the material may need to be shaken or collected. You do not need to use too much – just enough is enough for the desired effect.
Using too much can damage the product and make it difficult to replace.
3. Polish for a few minutes with a microfiber cloth or a washing pad.
According to the company, a microfiber cloth or pad can be used on the area. Rub the product with the tool in short, quick movements with medium pressure.
This type of scrubbing is even and works best on clear coats. If you are using a cleaner, use the lowest speed setting and scrub at that speed. Leave for a few minutes until the product dries and the crumbs subside.
Always make sure the cloth or pad is clean to avoid new crumb build-up.
4. Check for crumbs and make changes.
After buffing, begin removing the remaining product with a clean microfiber cloth. Check the area in natural light or bright sunlight to see if there are any crumb build-up.
If the crushing has taken effect but is still visible, you can repeat this process one or two more times for better results.
However, if the crushing does not improve after several attempts, expect that it may be deeper and may require a more advanced clash method.
Continue to care for the paint and avoid over-marinating, as too much clear removal coat can damage the paint over time.
5. Apply wax or sealant to protect the area.
After the crusher treatment is done, cover the area securely with wax or paint sealant. This helps restore shine and remove discolored color from new paint.
Apply a layer of wax or sealant using a small applicator pad, then remove it depending on the product. Finally, buff it with a microfiber tool. This last step not only improves the car’s appearance, but also makes it easier to watch short films in the future.
How to Remove Medium Scratches (Down to the Paint Layer)
Medium-deep scratches are more serious than light scratches because they penetrate the clear coat and reach the paint layer of the car.
These scratches are often caused by sharp objects like keys, frequent car washing or minor accidents. When the scratch penetrates the top protective layer and damages the paint layer, the repair process becomes more complicated and requires extra care.
Repairing these scratches involves not only polishing and buffing but also repainting and sealing the damaged area. Below is a complete description of how to fix medium-deep scratches at home using the right techniques and materials.
1. Clean and dry the scratched area.
Before starting any repair, the first step is to thoroughly clean and dry the area around the scratch.
Use a pH-balanced car wash soap and clean water to wash off all dirt, grease and debris from the surface. Cleaning ensures that you don’t rub dirt into the scratch, which can make it worse.
After washing, dry the area completely with a soft microfiber towel. Repair materials such as sandpaper, paint or polish adhere better to a clean surface and work more effectively.
2. If necessary, wet-sand with fine-grit sandpaper
If the scratch is deep enough to create an obvious groove in the paint, it may need to be sanded lightly.
Use very fine-grit sandpaper, usually between 1500 and 3000 grit and soak it in water for a few minutes before use.
Wet-sanding helps smooth the damaged edges and blend the scratch into the surrounding paint. It’s important to sand very carefully and in only one direction to avoid worsening the damage.
Check your work frequently and stop when the scratch is level with the surrounding surface. This step should only be taken if the scratch is quite deep but hasn’t penetrated the metal.
3. Use rubbing compound
After sanding, apply rubbing compound to the area. Rubbing compound is more effective than regular polish and is used to smooth out sanding marks and reduce visible damage to the paint layer.
Apply a small amount of rubbing compound to a clean microfiber cloth or polishing pad and rub it over the area in a steady, circular motion.
This step helps restore shine and blend the scratched area with the rest of the car’s surface. After application, wipe off excess product with a clean towel.
4. Polish the area
After using rubbing compound, polish the surface to restore shine and remove any dullness left by the compound.
Use a high-quality car polish and a soft applicator pad or microfiber cloth. Apply the polish in a circular motion until the surface is smooth and shiny.
Polishing is an important step because it improves the overall look and blends the repair with the rest of the car’s surface.
5. Repaint with touch-up paint (if color is affected)
If the scratch has removed visible paint and you can see a different color underneath, such as primer or a gray layer, you’ll need to apply touch-up paint.
Make sure the paint matches your car’s color code exactly, which is usually located on the inside of the driver’s door or in the owner’s manual.
Use a small applicator brush or toothpick to apply thin layers of paint to the scratch.
Let each layer dry and then apply another layer, continuing until the scratch is filled and level with the surrounding surface.
6. Apply a clear coat (if necessary)
After the touch-up paint has completely dried, apply a clear coat to seal and protect the new paint.
The clear coat is the top transparent layer that gives your car a shiny look and protects it from sun, water and dirt.
Apply it gently to the repaired area with a fine brush or the included applicator, making sure to cover a little beyond the edges of the scratch.
Allow it to dry completely, which may take a few hours depending on the product.
7. Polish and protect with wax
The final step is to polish the repaired area and apply a protective wax. Polishing removes any remaining unevenness and enhances the repair’s shine. After polishing, apply a coat of car wax to seal the area and provide long-lasting protection.
The wax forms a waterproof layer and prevents new scratches from forming. Apply the wax in a circular motion, let it dry and then wipe it off with a clean microfiber towel. This final coat protects your repair work and keeps your car looking shiny and tidy.
How to Repair Deep Scratches (Primer or Down to Metal)
Deep scratches cause the most damage to a car’s paint.
These scratches penetrate all layers—the clear coat, the paint and sometimes even the primer—to expose the bare metal underneath.
This type of damage is often caused by accidents, rubbing against concrete walls, or sharp objects like nails and metal tools. If left untreated, these deep scratches can lead to further rust, corrosion and chipping of the surrounding paint.
Repairing them takes more time and care and usually involves several steps, including painting and sealing. Below is a detailed and simple guide to properly repairing these types of scratches.
1. Clean and Sand the Area
Before repairing a deep scratch, it’s important to thoroughly clean the damaged area. Use car wash soap and clean water to remove all dust, dirt and grease. After cleaning, dry the area completely with a microfiber towel.
Once the surface is dry, use fine-grit sandpaper, usually around 1000 to 1500 grit, to carefully sand the scratched area.
Sanding removes any loose paint or rust, smooths the surface and allows the new paint and primer to adhere better.
If there is rust, it should be completely removed during this step to prevent it from spreading underneath the new paint.
2. Apply a primer (if bare metal is exposed)
If sanding exposes the car’s bare metal, it’s important to apply a primer before applying paint. A primer is a special coating that protects the metal from moisture, rust and corrosion and also helps the paint adhere properly.
Use a small brush or the included applicator to apply a thin layer of primer directly to the exposed metal. Allow it to dry completely according to the product’s instructions, which can take anywhere from 30 minutes to a few hours.
Never apply paint directly to bare metal without using a primer, as it won’t adhere properly and can cause cracks or bubbles.
3. Apply matching touch-up paint in layers
After the primer has dried, apply a touch-up paint that matches your car’s original color.
Your car’s paint code is usually located on the inside of the driver-side door or in the owner’s manual. Apply the paint slowly and carefully with a small brush, toothpick, or fine applicator.
The paint should be applied in thin and even layers rather than one thick layer. Allow each layer to dry completely before applying another layer.
Continue applying paint until the scratch is completely filled and the surface is roughly even with the surrounding paint.
4. Apply a clear coat after the paint dries
After the colored paint has completely dried, the next step is to apply a clear coat. This is a clear top coat that protects the paint from sun, dirt and water.
It also gives a glossy finish that matches the rest of your car. Use a clean applicator to apply the clear coat to the repaired area, trying to slightly overlap the surrounding paint so it blends in well. Allow the clear coat to dry completely, following the instructions on the product label.
This step is important to make the repair last longer and look professionally done.
5. Wet sand and polish to blend
After the clear coat dries, the surface may look a little uneven or rough. Wet sanding can help blend the repaired area into the original paint.
Use very fine grit sandpaper—usually 2000 to 3000 grit—moistened with water to lightly sand the repaired area.
Use light, smooth strokes. When the area looks even, use a rubbing compound followed by a polish to restore the surface’s shine and smoothness. Polishing helps remove any dullness caused by sanding and gives the paint a clean, even finish.
6. Seal with wax or a ceramic coating
The final step is to protect the repaired area with wax or a ceramic coating. Applying wax seals the paint and clear coat, protects the surface from UV rays and moisture and increases the shine.
Apply a thin, even layer of wax with a soft cloth, let it dry and then wipe it off with a clean microfiber towel.
For long-term protection, you can also apply a ceramic coating, which provides strong and durable protection from weather, water and dirt.
This step helps extend the life of your repair and keeps your car looking great.
IMPORTANT – Plus, according to the axalta’s paint-defects manual and troubleshooting guides actually tells that the deeper scratches which literally reached to the primer or exposed the metal then it will actually require multi-step repairs such as: you have to clean the surface properly, then you have to remove the rust if there’s any, then apply the primer first, and then you have to first match the basecoat color and apply it and at last you have to carefully apply clearcoat by blending and finishing it in the nice way to ensure the seamless match.[¹]
Read More:
Tips and Best Practices
Following the right techniques when repairing car paint scratches is just as important as using the right tools. Many people make minor mistakes that can cause further damage, waste materials or unsatisfactory results.
The following best practices are based on proven detailing methods and are designed to help both beginners and experienced car owners achieve professional-quality results while avoiding common problems.
These practical tips will also help you stay safe and make the repair process easier from start to finish.
1. Always work in a shady, clean area
It’s important to always repair scratches in a shady, dust-free area. Direct sunlight can cause products such as polish, paint or rubbing compound to dry too quickly, making them difficult to apply and remove.
A clean environment prevents dust, dirt or debris from settling on the surface while you work, which can get trapped in the paint or cause new scratches.
A garage, carport or shady driveway on a calm day is usually the best place to work.
2. Try the product on a small area first
Before applying any scratch remover, polish or paint to a larger area, it’s wise to test the product on a small, hidden part of the car.
This ensures that the product works well with your car’s paint and doesn’t cause unexpected reactions such as discoloration, staining or chipping.
Every car’s paint may react slightly differently depending on its age, condition or previous treatments, so testing first is a simple step that can save time and avoid mistakes.
3. Avoid excessive sanding or excessive pressure
When sanding or polishing, it’s important to use only light to moderate pressure. Sanding too hard or for too long can remove too much of the clear coat or paint, exposing the primer or metal underneath.
Over-sanding can also cause permanent damage that is difficult or impossible to repair without a complete repaint.
Always use fine-grit sandpaper and follow sanding instructions carefully to avoid doing more harm than good.
4. Match the paint code exactly
If the scratch has penetrated a layer of colored paint, it’s important to use the correct touch-up paint. Car manufacturers assign a specific paint code to each vehicle, which can usually be found on the inside of the driver’s side door, under the hood, or in the owner’s manual.
Using the wrong color, no matter how nice it looks, will create a patch that won’t blend in properly.
Accurately matching the paint code ensures that the repair blends in easily and is nearly invisible when done correctly.
5. Use protective gloves and goggles when needed.
Some products used in scratch repair—such as rubbing compounds, touch-up paint, primers and clear coats—contain chemicals that can irritate skin or eyes. To stay safe, it’s a good idea to wear protective gloves and safety glasses while working.
This is specially important if you’re sanding or working with any spray products, as they can release fine particles into the air. Protection keeps the process safer and allows you to work more confidently without worrying about accidental contact.
When to Seek Professional Help
Although many car scratches can be safely repaired at home with the right tools and methods, in some situations, seeking professional help is a better and safer option.
Professional auto body shops and certified detailers have specialized tools, advanced techniques and high-quality materials available that can produce factory-level results. If the scratch can’t be repaired with a simple home kit or you’re not sure how to proceed, you’re better off having the job done by trained technicians. Knowing when to stop and ask for help can avoid costly mistakes and preserve your car’s beauty and value.
1. Multiple deep scratches or dents
If your vehicle has more than one deep scratch or visible dent along with paint damage, it’s usually not practical to fix everything by hand.
Deep scratches that expose primer or metal require multiple steps such as sanding, priming, painting and sealing.
Doing this in multiple places increases the risk of an uneven repair or mismatched finish.
In such cases, a professional shop can repair all areas at once using specialized equipment such as a spray booth and color-matching technology, ensuring uniform and long-lasting results.
2. Complex paint types (e.g., pearlescent, metallic)
Some vehicles come with complex types of paint that are difficult to mix and apply without professional equipment.
Pearlescent, metallic and tri-coat finishes require multiple layers of paint and a clear coat applied in a specific way to achieve the correct color depth and gloss.
These finishes are often light-sensitive and may appear different depending on the viewing angle.
Repairing these types of paint at home can result in mismatched or blurry spots.
Professionals have the training and spray systems to apply these paints correctly and match them to the original finish.
3. If you are unsure about sanding or polishing techniques
If you are new to car detailing or are unsure about how much pressure to apply when sanding or polishing, it is safe to consult a professional.
Incorrect sanding can remove too much paint or even damage the metal body underneath.
Incorrect application of a compound can leave swirl marks, pits or an uneven finish.
Professionals use machine polishers, proper lighting and paint thickness measuring devices to ensure the job is done without damaging the vehicle.
If you have any doubts about doing it yourself, it is better to avoid the risk and seek help from an expert.
4. Luxury or vintage cars with special finishes
Luxury cars and vintage cars often have unique paint, hand-applied finishes or original factory paint that increases their value.
Repairing these cars yourself can reduce their resale value or ruin historically significant finishes.
Some luxury car brands use paint formulas that are difficult to match without factory-approved materials.
If your vehicle falls into this category, professional detailing or body repair is the surest way to restore the look of the car without affecting its integrity or value.
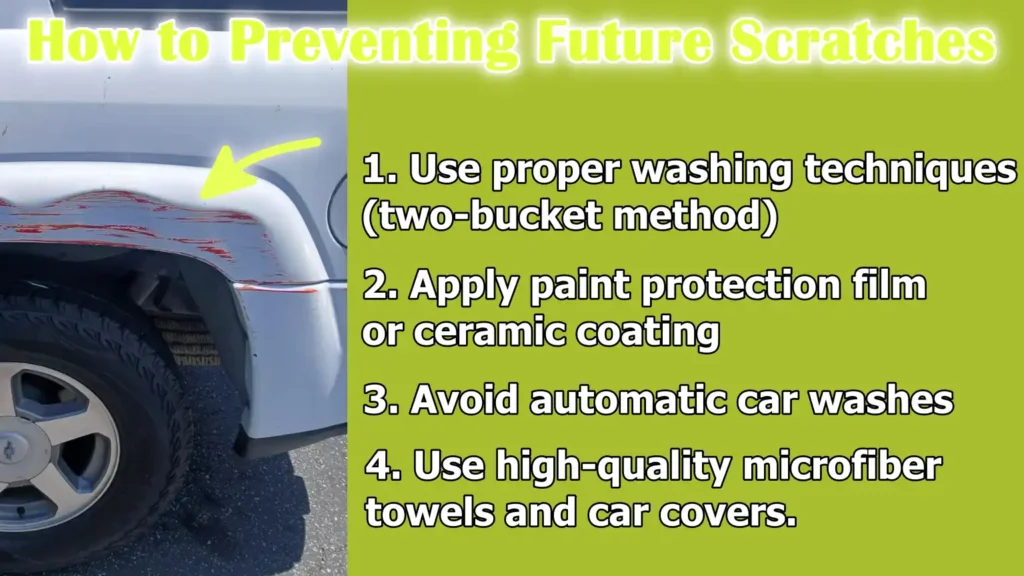
How to Preventing Future Scratches
Preventing scratches is not only easier than repairing them, but also more cost-effective in the long run.
By using smart techniques and protective products, you can keep your car looking new for longer.
Many scratches are not caused by accidents, but by simple, everyday activities like washing, drying or parking.
Learning the right methods and using the right tools will go a long way in keeping your car’s paint in good condition.
Prevention also helps maintain the vehicle’s resale value, preserve its beauty and reduce the need for frequent repairs.
1. Use proper washing techniques (two-bucket method)
One of the most common causes of minor scratches is improper washing.
Using the two-bucket method—one bucket for clean soapy water and one for rinsing your dirty wash mitt—prevents dirt and debris from rubbing back onto the paint.
This method reduces the risk of getting swirl marks or fine scratches during washing.
Always start at the top of the car and work your way down, as lower parts tend to collect more dust and dirt.
This simple habit is one of the most effective ways to protect your clear coat.
2. Apply paint protection film or ceramic coating
For long-term protection, applying paint protection film (PPF) or ceramic coating is a good option.
PPF is a transparent, durable layer that is applied over the paint, specially on high-risk areas like the hood, bumpers and side mirrors.
It acts as a physical barrier against stone chips, road debris and scratches.
Ceramic coatings, on the other hand, are liquid polymers that adhere to the paint surface, making it more resistant to minor abrasions and easier to clean.
Both options greatly reduce the likelihood of future damage and keep the car sparkling for longer.
3. Avoid automatic car washes
Automatic car washes, specially older ones with rotating brushes, can leave fine scratches and dents on your paint over time.
These brushes often pick up dirt from older vehicles, which then rubs against your paint like sandpaper.
Touch-free washing can also cause water spots and may not remove all contaminants.
Whenever possible, washing your car by hand or by a professional touch-free detailer will provide a safer and more effective cleaning.
4. Use high-quality microfiber towels and car covers.
Using the right drying and cleaning materials also plays a key role in preventing scratches.
High-quality microfiber towels are soft, non-abrasive and absorbent, making them ideal for drying and polishing your car without damaging its surface.
Always make sure the towel is clean and free of any dirt before using it.
Also, if your car is parked outside or in a dusty garage, using a breathable and paint-protective car cover can protect it from scratches caused by falling debris, animal contact or accidental brushing.
Conclusion – How to Remove Scratches from Car Paint
Actually when you care for your car’s paint then it is the sign that you actually care for your hard earned lifetime investment, so it is important whether you wanted to drive with it daily or just wanted to store it as a your pride
Fortunately, with the right knowledge, tools and attention, most scratches—whether light or deep—can be repaired at home.
From identifying the type of scratch to using the right polishing, sanding or repainting techniques, each step plays a vital role in restoring your vehicle’s beauty.
But just as important as repairing scratches is learning how to prevent them from occurring in the first place.
Using high-quality products, proper washing methods and paying special attention to how and where you park your car can greatly reduce the likelihood of future damage.
For deep scratches or a brilliant finish, professional help ensures precise and long-lasting results.
As cars are often one of our biggest investments, keeping paintwork in good condition isn’t just about looks—it’s about maintaining value, protection and pride of ownership.
A scratch-free car reflects not only its beauty, but also your care and responsibility as an owner.
Now, it is time for your feedback or your questions, so please give your thoughts in the comment section below.
Frequently Asked Questions
Q1. What do car detailers use to remove scratches?
Answer: Professional car detailers use a variety of tools and products to remove scratches, depending on the depth of the scratch. For light superficial scratches that only affect the clear coat, detailers typically use a scratch remover compound or polishing compound. These are special creams that gently remove a thin layer of the clear coat and blend the scratch into the surrounding paint. They often apply this compound using a dual-action polisher, which is a machine that polishes the surface evenly without damaging the paint. If the scratch reaches deep into the paint layer, detailers may use very fine grit wet sandpaper, usually between 1500 and 3000, to smooth the surface around the scratch. After sanding, they polish the area with a rubbing compound to bring back the shine. In some cases, if the scratch has chipped off the paint or penetrated the primer or metal, detailers use touch-up paint that matches the car’s original color. After the paint dries, they apply a clear coat to protect it and blend it in with the rest of the car’s finish. To finish the job, most professionals use a high-quality wax or sealant. This not only adds shine but also protects the repaired area from sun, rain and dirt. Detailers always clean the area thoroughly before starting work and they often use rubbing alcohol or a surface prep spray to ensure no oil or residue remains. Their experience helps them choose the best method quickly, which is why their results are often smoother and longer-lasting than DIY jobs.
References:
[1] Axalta Coating Systems Paint Defects Manual
https://www.axalta.com/content/dam/NA/HQ/Public/Axalta/Documents/Brochures/Axalta-Paint-Defects-Manual.pdf

Guys, I’m a car audio enthusiast and customization expert and I love clear sound and clean installation. Plus, I have spent years helping people build their dream audio setups. And whenever I’m working on cars, I probably listen to music and thinks about the next big upgrade.
