 Skip to content
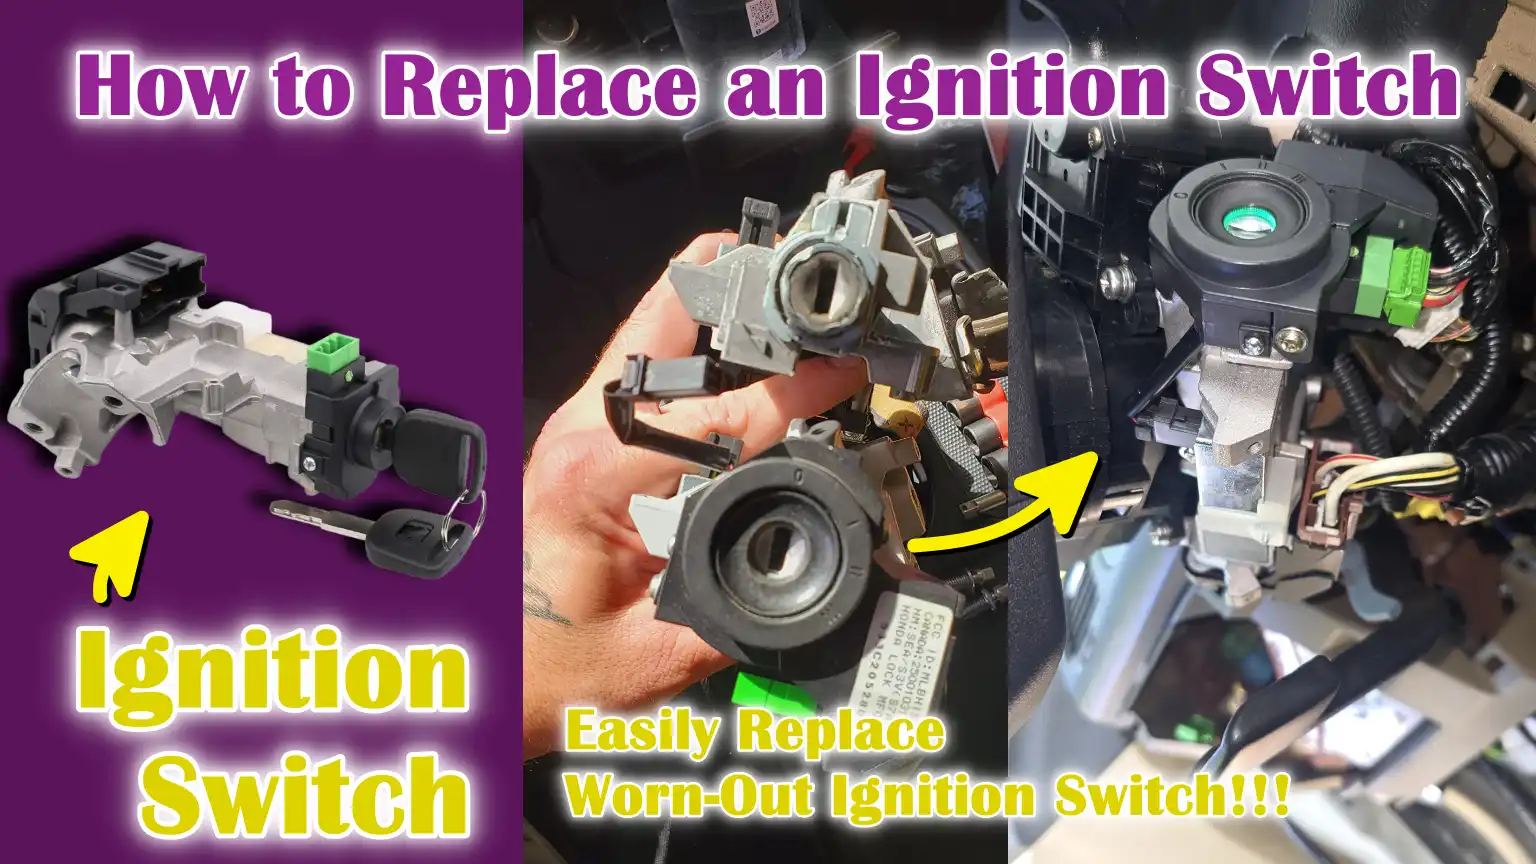
Written By: Don Dodi
Fact Checked By: Kristen Brown
Reviewed By: Diego Rosenberg
Basically, the ignition switch is the gateway that literally allows your car’s battery to power the engine and every major electrical system as well.
Plus, it acts as the main control point that sends the power from the battery to all the essential systems such as: starter motor, engine control unit, fuel system and dashboard electronics as well.
So, whenever driver turns the key or presses the start button, then it is the ignition switch that manages multiple electrical circuits in a perfect sequence that start and run the vehicle in the safe way.
But over the time, the normal wear, electrical load, vibration, dust and even internal contact failure can cause the ignition switch to malfunction; that basically leads to the problems such as: no-start conditions, sudden engine stalling, there could be loss of accessory power or even it can flicker the dashboard lights as well.
Not only this, there’s studies from the automotive service data that shows that the ignition switch failures are really common cause of intermittent electrical issues: specially in the older vehicles or cars that has heavy keychains that can strain the switch mechanism.
So, the simple solution of all these misery is: just learn How to Replace an Ignition Switch, so that you can easily restore the convenience, as it directly affects the vehicle reliability, electrical safety and prevent any unexpected breakdown.
Common Signs that Show the Ignition Switch Needs Replacement
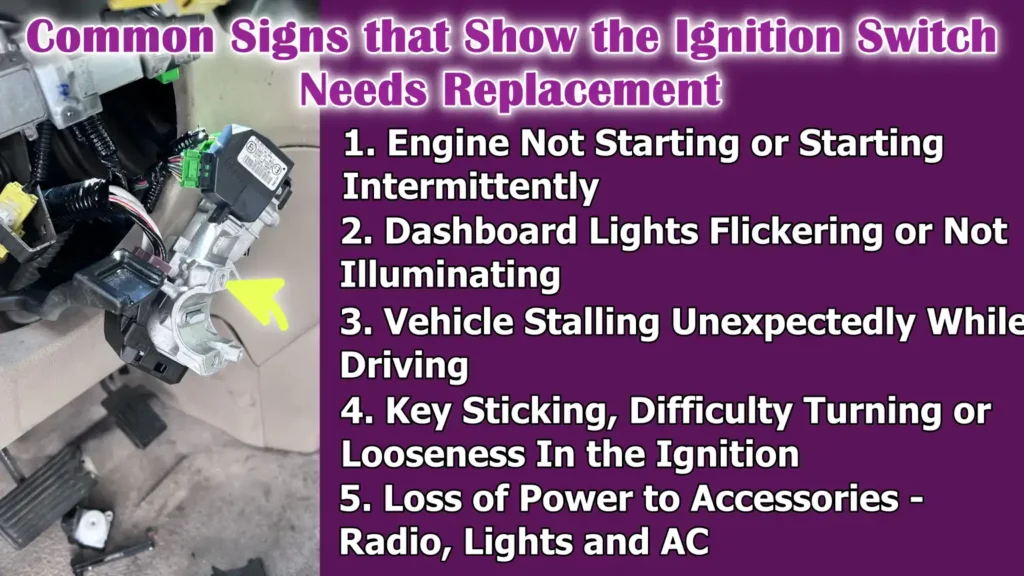
1. Engine Not Starting or Starting Intermittently
One of the earliest and most noticeable signs of a faulty ignition switch is difficulty starting the engine.
When the ignition switch is faulty or malfunctioning, it may fail to send the correct electrical signal to the starter motor.
This can result in the engine cranking slowly, starting intermittently, or not starting at all.
Many car owners mistakenly assume the problem lies with the battery or starter, but studies and automotive repair data show that a faulty ignition switch is a common cause, specially in vehicles older than five years or those with high mileage.
2. Dashboard Lights Flickering or Not Illuminating
The ignition switch also controls the flow of electricity to the dashboard instruments.
If the ignition switch is faulty, the dashboard lights may flicker, dim, or fail to illuminate when the key is turned or the start button is pressed.
This is because the contacts inside the switch are unable to maintain a consistent electrical flow.
Therefore, a faulty ignition switch can create uncertainty about the status of the fuel level, engine warning lights and other crucial indicators, compromising vehicle safety.
3. Vehicle Stalling Unexpectedly While Driving
A dangerous symptom of a faulty ignition switch is the vehicle stalling unexpectedly while driving.
If the ignition switch contacts are intermittently breaking, the power to the engine and fuel system can be interrupted, causing the vehicle to suddenly shut down.
Automotive safety reports have shown that ignition switch malfunctions can lead to sudden vehicle stalls, increasing the risk of accidents, specially on busy roads or highways.
Timely replacement of the ignition switch can prevent such dangerous situations.
4. Key Sticking, Difficulty Turning or Looseness In the Ignition
Mechanical wear inside the ignition switch or cylinder can cause difficulty inserting, turning, or removing the key.
In some cases, the key may feel loose and fail to engage properly to start the engine.
This not only inconveniences drivers but also indicates that the internal components of the switch are worn and could fail completely if ignored.
Repairing or replacing the ignition switch at this stage can prevent further damage to the steering column and lock cylinder.
5. Loss of Power to Accessories – Radio, Lights and AC
The ignition switch controls not only the starter motor but also the accessory circuits.
A faulty switch can cut power to essential electrical systems such as the radio, air conditioning, lights, or windshield wipers, even while the engine is running.
This can be inconvenient, reduce driving comfort and also indicate that the switch is about to fail completely.
Technicians often confirm this problem by testing the electrical flow through the ignition switch before recommending a replacement.
Tools
| Tool / Material | Description |
|---|---|
| Replacement Ignition Switch | A new switch that will replace the old one. This can be an OEM (original) or a compatible aftermarket version. It ensures proper engine starting and electrical function. |
| Screwdrivers (Phillips & Flathead) | This is used to remove screws on panels or covers. Both types of tools are needed for the various fasteners around the steering column. |
| Socket Set and Ratchet | This helps in removing the bolts that secure the ignition switch and other components. This makes loosening and tightening them faster and safer. |
| Trim Removal Tools | Plastic tools designed to safely remove dashboard and steering column panels without scratching or breaking them. |
| Multimeter | This device measures electrical voltage and continuity. It is useful for testing the ignition switch and wiring before and after replacement. |
| Safety Gloves and Eye Protection | This protects your hands from sharp edges and your eyes from dust or debris while you work. It’s always recommended for any car repair job. |
What are the Important Safety Precautions Before Replacing Ignition Switch
1. Disconnecting the Negative Battery Terminal
Before beginning any work on the ignition switch, it is crucial to disconnect the negative battery terminal.
This stops the flow of electricity and prevents accidental short circuits, sparks, or electric shocks while working on the vehicle’s electrical system.
Disconnecting the battery also ensures that sensitive components such as the engine control unit and dashboard electronics are not damaged during the replacement process.
2. Disabling the Airbag System – If Applicable
Modern vehicles are equipped with airbags, which can accidentally deploy if there is a malfunction in the electrical system.
Disabling the airbag system before working around the steering column or dashboard is essential for safety.
This step minimizes the risk of serious injury and ensures that you can safely remove panels and the ignition switch without triggering the airbags.
3. Parking the Vehicle on a Level Surface
Always park the vehicle on a flat, level surface and engage the parking brake.
This prevents the vehicle from rolling or shifting while you are working under the steering column or dashboard.
Working on a stable vehicle reduces the risk of accidents and provides better control when handling tools and parts.
4. Using Proper Lighting and Safety Equipment
Good lighting is essential to clearly see screws, wiring and connectors when working on the ignition system.
Wearing safety gloves protects your hands from sharp edges and small components, while eye protection keeps debris or accidental sparks away from your eyes.
Proper lighting and safety equipment make the replacement process safer and more precise.
5. Consulting the Vehicle’s Service Manual
The procedure for replacing the ignition switch may vary slightly depending on the vehicle.
Reviewing the service manual beforehand helps you understand the correct steps, the location of screws and connectors and any necessary special tools.
Following the manufacturer’s instructions minimizes errors, prevents damage to the vehicle and ensures a proper and safe installation.
How to Locate the Ignition Switch
1. Common Locations of the Ignition Switch in Different Vehicles
The ignition switch is typically located near the steering column or dashboard, depending on the vehicle model.
In most cars, it’s behind the key cylinder or start button, where the driver usually inserts the key.
In newer vehicles with push-button start, the ignition switch is electronically integrated and may be part of the steering column module.
Knowing the common locations helps in preparing for its removal and avoids unnecessary disassembly of other components.
2. Column-Mounted vs Dashboard-Mounted Switches
Ignition switches can be either column-mounted or dashboard-mounted.
Column-mounted switches are directly attached to the steering column and are common in most cars and trucks.
Dashboard-mounted switches are typically located on the dashboard near the steering wheel and are more common in some modern vehicles and luxury models.
Identifying the type of switch in your vehicle is crucial as it determines which panels or covers need to be removed and what tools will be required.
3. Removing Lower Dash or Steering Column Covers
Accessing the ignition switch often requires removing the lower dashboard or steering column covers.
These panels are usually secured with screws or clips and may require careful handling to avoid damage.
Using the correct trim removal tools or screwdrivers ensures that the covers are safely removed, providing clear access to the ignition switch and its associated wiring.
4. Identifying the Ignition Switch Wiring Connector
The ignition switch is connected to the vehicle’s electrical system via a wiring harness or connector.
Identifying this connector is essential as it needs to be disconnected before removing the old switch and properly reconnected when installing the new one.
Wiring connectors typically contain multiple wires of different colors and consulting the vehicle’s service manual helps confirm the correct orientation and connections.
Proper identification prevents electrical short circuits and ensures that the new ignition switch functions correctly.
How to Remove the Old Ignition Switch
1. Removing the Trim Panel and Steering Column Cover
The first step in removing the ignition switch is to carefully remove the trim panel and steering column cover that protect the switch and wiring.
These panels are usually secured with screws, clips, or fasteners.
Using the correct tools and handling the panels gently can prevent damage to the plastic, clips, or dashboard finish.
Removing these covers provides clear access to the ignition switch and ensures you can safely work on the components behind them.
2. Removing the Ignition Lock Cylinder – If It is Necessary
In many vehicles, it’s necessary to remove the ignition lock cylinder before accessing the ignition switch.
The cylinder is the part where the key is inserted and may be secured with a retaining pin or small screw.
Carefully following the vehicle’s service manual ensures that the cylinder is removed without damaging the steering column or key mechanism.
In some modern vehicles with push-button start, this step may not be necessary, but it’s important to confirm your vehicle’s design.
3. Safely Disconnecting the Electrical Connector
The ignition switch is connected to the car’s electrical system via a wiring harness.
Before removing the switch, it’s crucial to safely disconnect the connector to avoid electrical shorts or sparks.
This usually involves pressing a release tab and gently pulling the connector apart.
After disconnecting, inspecting the connector for corrosion, dirt, or damage ensures that the new ignition switch can be installed securely and functions correctly.
4. Removing the Ignition Switch from Its Bolts or Clips
Once the connectors are disconnected, the ignition switch can be removed from its mounting position by removing the bolts or clips holding it in place.
Depending on the vehicle, the switch may be secured with small screws, bolts, or retaining clips.
Using the correct tools and loosening them carefully will prevent damage to the fasteners.
Removing the switch without force ensures that surrounding components, such as the steering column or dashboard, are not damaged.
5. Checking for Damage to Wiring and Connectors
After removing the old ignition switch, it’s crucial to inspect the surrounding wiring and connectors.
Look for signs of wear, breakage, corrosion, or loose connections.
Any damaged wires should be repaired or replaced before installing the new ignition switch.
This step ensures a safe and reliable electrical connection, reduces the risk of future malfunctions and contributes to the longevity of the vehicle’s ignition system.
How to Install a New Ignition Switch
1. Properly Aligning the New Ignition Switch
The first step in installing a new ignition switch is to properly align it in its mounting position.
The ignition switch has a specific orientation to ensure that the key positions correspond to the internal electrical contacts.
Incorrect alignment can lead to difficulties starting the engine, malfunctions in electrical accessories, or damage to the switch itself.
Consulting the vehicle’s service manual helps in identifying the correct alignment and ensures the switch functions properly.
2. Securing the Switch in Place with Mounting Bolts
Once aligned, the ignition switch should be securely fastened using the mounting bolts or screws.
Properly tightening these bolts ensures that the switch does not loosen or shift over time, which could lead to electrical interruptions or mechanical problems.
Using the correct torque and tools prevents damage to the bolts and protects surrounding components in the steering column or dashboard.
3. Properly Reconnecting the Wiring Harness
After the switch is secured, the wiring connectors must be properly reconnected.
Each connector should click firmly into place and it’s crucial to ensure that the wires are not strained or pinched.
Correct connections restore power to the starter motor, dashboard and accessory circuits, ensuring the vehicle operates safely and reliably.
Loose or incorrect connections can result in intermittent starting problems or electrical malfunctions.
4. Reinstalling the Ignition Lock Cylinder
If the ignition lock cylinder was previously removed, it should now be carefully reinstalled.
Ensure that the cylinder engages smoothly with the switch mechanism and that any retaining pins or screws are securely fastened.
Proper installation of the lock cylinder guarantees that the key can rotate smoothly through all positions such as: off, accessory and start; and without any resistance or sticking.
5. Ensuring Smooth Key Rotation
Finally, test the key by rotating it through all positions several times to ensure smooth rotation.
The key should move easily from off to accessory to start without any resistance or sticking.
Smooth key movement confirms that the ignition switch and lock cylinder are properly installed and functioning correctly.
This step helps prevent future damage to the key or switch and ensures safe and reliable vehicle operation.
How to Reassemble the Steering Column or Dashboard
1. Reinstalling Trim Panels and Covers
After installing the new ignition switch, the next step is to carefully reinstall the trim panels and steering column covers.
These panels protect the ignition switch, wiring and other components from dust, dirt and accidental damage.
Proper installation ensures a clean interior appearance and prevents rattles or obstructions in the steering column.
Using gentle pressure and properly aligning the clips or edges will prevent cracking or damaging the plastic panels.
2. Tightening Screws and Clips Correctly
Once the panels are in place, all screws, bolts and clips should be securely tightened.
Loose fasteners can cause panels to vibrate, rattle, or even fall off while driving.
Ensuring that every screw and clip is properly tightened restores the structural integrity of the steering column cover and dashboard.
Using the correct tools and torque is crucial to avoid stripping screws or damaging the mounting points.
3. Verifying That No Components Are Loose
Before finishing, it’s essential to check that no components are loose or out of place.
Loose wiring, connectors, or panels can interfere with the operation of the steering column, ignition switch, or other electrical systems.
A thorough inspection ensures that all parts are properly seated, connectors are fully engaged and no tools or fasteners have been left inside the dashboard or steering column.
4. Checking Steering Wheel Movement and Clearance
Finally, check the steering wheel’s movement to ensure it rotates smoothly without any obstructions.
Ensure there is sufficient clearance between the steering wheel, ignition switch and surrounding panels.
Proper functioning of the steering wheel is crucial for safe driving and checking it after reassembly confirms that the ignition switch installation and dashboard reassembly have been completed correctly.
Any obstructions or problems should be addressed immediately before driving the vehicle.
How to Test the New Ignition Switch
1. Reconnecting the Battery
After installing the new ignition switch and reassembling the steering column or dashboard, the first step is to reconnect the negative battery terminal.
Reconnecting the battery restores power to the vehicle’s electrical system, allowing you to test the functionality of the ignition switch.
It’s crucial to ensure the connection is secure and free of corrosion to prevent poor electrical contact or intermittent problems.
2. Verifying Engine Start and Stop Operation
Next, test the ignition switch by turning the key or pressing the start button to start the engine.
Ensure the engine starts smoothly without any hesitation or unusual noises.
Then, turn the key back to the off position or press the stop button and verify that the engine shuts off completely.
This step verifies that the ignition switch correctly controls the starter motor and engine power.
3. Testing the Accessory and ON Positions
The ignition switch also controls accessory circuits such as the radio, lights and air conditioning.
Test the accessory position to ensure these systems activate correctly without the engine running.
Then, check the ON position to confirm that all electrical systems and dashboard instruments are receiving power correctly.
Proper operation in these positions confirms that the new ignition switch is functioning reliably.
4. Checking Dashboard Warning Lights
While testing the ignition switch, pay attention to the dashboard warning lights.
All lights, including the check engine, battery, ABS and airbag indicators, should illuminate briefly when the key is in the ON position and then turn off if there are no malfunctions.
Flickering, dim, or irregular lights can indicate wiring problems or incorrect installation that need to be fixed before driving.
5. Confirming that no electrical problems remain
Finally, ensure that no electrical problems remain by observing the operation of all systems and listening for any unusual noises such as clicking or buzzing.
Verify that there is no intermittent loss of power from the ignition switch or any malfunction in any of the accessories.
Thorough testing ensures that the new ignition switch is properly installed, fully functional and safe for everyday driving.
Know, What are the Common Mistakes to Avoid During Ignition Switch Replacement Process
Even, there’s automotive safety research that shows that the ignition switch failures are not just the mechanical nuisances but it can lead to some serious real-world consequences, as there’s detailed case study of the General Motors ignition-switch recall that shows that how its design flaws in the switch literally led to the unintentional shut-offs during journey and massive recalls as well, that’s why it is really important to have proper switch function and quality control in the vehicle safety systems as well.[¹]
1. Forgetting to Disconnect the Battery
One of the most common mistakes when replacing an ignition switch is failing to disconnect the negative battery terminal.
Leaving the battery connected can lead to accidental electrical short circuits, sparks, or minor shocks while working on the ignition system.
This can also damage sensitive components such as the engine control unit, dashboard electronics, or airbags.
Always disconnect the battery first to ensure safety and avoid costly repairs.
2. Forcing the Ignition Switch into Place
Attempting to force the ignition switch or lock cylinder into place can damage both the switch and surrounding components.
The ignition switch must be properly aligned with the mounting points and lock mechanism.
Forcing it can bend connectors, strip screws, or result in a misaligned switch that won’t function correctly.
Proper alignment and gentle installation are crucial for long-term reliability.
3. Mixing Up Wiring Connections
The ignition switch relies on multiple electrical connectors to control the starter, engine and accessory systems.
Incorrectly connecting the wires can prevent the engine from starting, cause accessories to malfunction, or even lead to a short circuit.
It’s essential to use the vehicle’s service manual to identify the correct wiring connections.
Checking each connector before securing the switch ensures proper function and prevents electrical damage.
4. Skipping Airbag Safety Procedures
Many vehicles have airbags located near the steering column or dashboard.
Failing to disable the airbag system before working in these areas can lead to accidental airbag deployment, resulting in serious injury.
Before removing or installing the ignition switch, it’s crucial to follow airbag safety procedures, such as disconnecting the battery and waiting the specified time for the system to discharge.
4. Using the Wrong Ignition Switch
Using the wrong type of ignition switch, whether it’s the wrong model or a low-quality aftermarket replacement, can lead to improper operation or premature failure.
An incorrect switch may not align properly with the lock cylinder, may have incorrect electrical connections, or may fail to handle the necessary current.
To ensure safe and reliable operation, always choose a switch that matches your vehicle’s make, model and year.
Learn About Average Costs, How Much Time Take and When It Professional Considerations Needed
1. Average Time Required for DIY Replacement
The time it takes to replace an ignition switch yourself depends on your vehicle’s make and model, as well as your familiarity with automotive repair.
On average, a DIY replacement takes one to three hours, including time for removing trim panels, disconnecting wiring and installing the new switch.
Vehicles with more complex steering columns, integrated electronics, or push-button start systems may take longer.
Planning sufficient time allows for careful and precise work without rushing, minimizing the risk of errors.
2. Estimated Cost of Ignition Switch Replacement
The cost of replacing an ignition switch depends on whether you choose an Original Equipment Manufacturer (OEM) part or an aftermarket alternative.
OEM switches typically range from $50 to $200, while compatible aftermarket switches may be slightly less expensive, usually between $30 and $120.
Additional costs may include tools if you don’t already own them or minor replacement hardware.
Understanding these costs helps you plan your budget and avoid unexpected expenses during the replacement process.
3. When Professional Installation is Recommended
Professional installation is recommended in several situations, such as for vehicles with integrated electronic ignition systems, complex wiring, or steering column airbags.
A mechanic has the experience, tools and diagnostic equipment to safely remove and install the ignition switch, while also preventing damage to surrounding components.
Choosing professional help can also save time, reduce the risk of errors and ensure the switch functions correctly with all electrical systems.
4. Warranty and Quality Considerations
When purchasing a new ignition switch, it’s crucial to consider quality and warranty.
OEM parts often come with a manufacturer’s warranty that guarantees performance and reliability, while aftermarket switches may offer shorter warranties.
Choosing a high-quality switch from a reputable supplier reduces the risk of premature failure, ensures compatibility with your vehicle and provides peace of mind.
Checking warranty terms and product reviews will help you make an informed decision for a safe and long-lasting repair.
Read More:
How to Maintain Ignition Switch After Successful Replacement
1. Avoid Heavy Keychains
One of the most common causes of premature ignition switch failure is using heavy keychains.
The extra weight puts constant stress on the internal components of the ignition switch and lock cylinder.
Over time, this can lead to a loose switch, a stuck key, or damaged electrical contacts.
Keeping your keychain light reduces mechanical stress and significantly extends the lifespan of your ignition switch.
2. Keep the Ignition Clean and Free of Debris
Dust, dirt and small particles can accumulate inside the ignition lock cylinder and around the switch contacts.
This buildup can prevent the key from turning smoothly, interfere with electrical connections and cause the switch to malfunction.
Regularly cleaning the ignition area with a soft cloth and using compressed air or electrical contact cleaner as recommended helps maintain proper operation and prevents premature wear.
3. Address Electrical Problems Promptly
Electrical issues such as flickering dashboard lights, intermittent accessory operation, or slow engine starting can be early signs of ignition switch failure or wiring problems.
Addressing these issues promptly by inspecting and repairing the switch or related circuits can prevent more serious malfunctions.
Timely action ensures reliable vehicle operation and reduces the risk of being stranded due to a sudden ignition switch failure.
4. Regular Inspection of the Vehicle’s Electrical System
Regular inspection of the vehicle’s electrical system, including battery health, wiring condition and connector integrity, plays a crucial role in extending the life of the ignition switch.
Proper voltage, clean connections and the absence of corrosion reduce the electrical load on the switch and prevent overheating or contact failure.
Having the ignition system checked periodically by a professional mechanic or checking it yourself according to the service manual helps ensure its long-term reliability.
Conclusion – How to Replace an Ignition Switch
Now, you have proper knowledge that how important it is to well-maintain the ignition switch, as it literally prevents from unexpected brakdows and also protects the elctrical system and key components from early wear as well.
Not only this, the ignition switch controls essential systems, including the starter motor, engine power and electrical accessories, making it a crucial part of daily driving.
When you find out early signs of wear, following proper safety precautions, using the correct tools and performing the replacement carefully can prevent costly repairs and dangerous situations such as engine stalling or electrical failures.
And, yes regular maintenance is crucial such as: keeping the ignition clean, avoiding heavy keychains and inspecting the wiring, further extends the switch’s lifespan.
Now, you can ask questions related to this guide in the comment box.
Frequently Asked Questions
Q1. What is an ignition switch and why is it important?
Answer: The ignition switch is a crucial part of your vehicle that controls the flow of electricity from the battery to the engine and other electrical systems. It helps start the car, powers accessories like the radio and air conditioning and ensures that the engine and safety systems function correctly. Without a working ignition switch, the car won’t start or may experience sudden electrical problems, making it an essential component for safe and reliable driving.
Q2. How do I know if my ignition switch is failing?
Answer: Signs of a failing ignition switch include difficulty starting the engine, intermittent starting problems, or the engine stalling while driving. You might also notice flickering dashboard lights, accessories like the radio or air conditioning not working properly, or the key feeling loose, stuck, or difficult to turn. Recognizing these signs early allows you to address the problem before it causes further damage or leaves you stranded.
Q3. Can I replace the ignition switch myself?
Answer: Yes, many car owners can replace the ignition switch themselves if they have basic mechanical skills and the right tools. However, it’s crucial to follow safety precautions, such as disconnecting the battery and disabling the airbag if necessary. Removing trim panels, disconnecting wiring and properly installing the new switch are all part of the process. Carefully reading your vehicle’s service manual and taking your time are essential for a successful DIY replacement.
Q4. How much does it cost to replace an ignition switch?
Answer: The cost of replacing an ignition switch depends on the type of switch and the vehicle model. A new OEM switch typically costs between $50 and $200, while a compatible aftermarket switch may range from $30 to $120. If you hire a professional, the labor cost can range from $50 to $150, depending on the complexity of the installation. Understanding these costs helps you plan your budget and decide whether to do it yourself or seek professional help.
Q5. How long does it take to replace an ignition switch?
Answer: Replacing an ignition switch typically takes one to three hours for most vehicles. The exact time depends on the car’s make, model and the complexity of the steering column or dashboard design. Vehicles with integrated electronics or push-button start systems may take longer. Taking your time ensures careful work, minimizes errors and helps prevent damage to other components.
Q6. Can a faulty ignition switch damage other parts of my car?
Answer: Yes, a faulty ignition switch can affect other parts of the vehicle. It can cause the engine to stall, electrical accessories to malfunction, or the starter motor to receive irregular power supply. Over time, repeated problems with a faulty switch can put a strain on the wiring, battery, or starter, potentially leading to more expensive repairs. Addressing ignition switch problems promptly helps protect the entire electrical system.
Q7. How can I extend the life of my ignition switch?
Answer: You can significantly extend the life of your ignition switch with simple maintenance practices. Avoid using heavy keychains that put stress on the lock cylinder, keep the ignition area clean and free of dust, address electrical problems as soon as they arise and have your vehicle’s electrical system checked regularly. These small steps help prevent mechanical and electrical wear and tear, ensuring smooth operation and fewer unexpected malfunctions.
Q8. What should I check after installing a new ignition switch?
Answer: After installing a new ignition switch, it’s crucial to reconnect the battery and test the engine start and stop functions. Check all key positions, including the accessory and ON positions, to ensure that electrical systems such as the radio, lights and air conditioning are working correctly. Check for any warning lights on the dashboard and confirm that the steering wheel turns smoothly without any resistance. Thoroughly test all functions.
References:
[1] General Motors Ignition-Switch Recall Crisis
https://www.researchgate.net/publication/287205286_General_Motors_Ignition-Switch_Recall_Crisis

Guys, I’m a car audio enthusiast and customization expert and I love clear sound and clean installation. Plus, I have spent years helping people build their dream audio setups. And whenever I’m working on cars, I probably listen to music and thinks about the next big upgrade.
