
Written By: Don Dodi
Fact Checked By: Kristen Brown
Reviewed By: Diego Rosenberg
Inside your car’s steering wheel you can simply find this Clock Spring which is also known as a Spiral Cable, yes it is the small but crucial component as it literally allows the electrical signals to pass between the steering wheel and the car’s systems while it still lets the wheel to turn freely.
And that clearly means that it controls essential functions such as: airbag, horn and steering wheel buttons as well.
As well as, it is the natural phenomenon that over the time the clock springs can also wear out, it can cause problems such as unnecessary airbag warning light turning on, unresponsive horn or you can face malfunctioning of steering wheel controls as well.
So, it is really important to replace a faulty clock spring in terms of restore your car’s functions and it also ensures your safety on the road.
But to do this successfully you need certain kind of tools, you have to follow some safety precautions and that’s where this guide on How to Replace Car Clock Spring becomes useful, as it covers everything step-by-step.
How to Be On the Safe Side While Changing Car Clock Spring
1. Disconnect the Car Battery
The first and most important precaution is to disconnect the negative terminal of the car battery and wait at least ten to fifteen minutes.
This is necessary because the airbag system stores energy and waiting allows it to fully discharge, reducing the chance of accidental deployment.
Deploying an airbag during operation can cause serious injury and require costly repairs.
2. Wear Safety Gloves and Eye Protection
Always protect yourself by wearing safety gloves and proper eye protection.
Gloves protect your hands from sharp edges, electrical connectors and accidental cuts, while eye protection reduces the risk of injury from small particles or sudden electrical sparks during the process.
3. Ensure the Steering Wheel is Centered
Before disassembling, ensure the steering wheel is centered.
This step is essential to maintain proper alignment when reinstalling steering components.
If the steering wheel is not centered, the new clock spring may have been installed incorrectly, which could worsen the steering angle and damage the replaced part.
Tools
| Tools or Materials | Easy Explanation | Why It’s Important |
|---|---|---|
| Screwdriver (Phillips and Flathead) | A screwdriver is a hand-held tool used to turn screws. A Phillips screwdriver is cross-shaped, while a flathead screwdriver is straight-edged. | These are needed to remove screws holding airbag modules, trim covers, or other steering components. |
| Socket Wrench Set | A socket wrench is a tool with removable heads (sockets) that fit different nut sizes. This makes loosening and tightening bolts easier. | This tool is needed to safely and quickly remove steering wheel nuts and other bolts. |
| Steering Wheel Puller (if needed) | A steering wheel puller is a tool that helps pull the steering wheel off its shaft without damaging it. | Some steering wheels fit tightly and this tool ensures you can remove it without applying too much force or breaking parts. |
| Replacement Clock Spring | This new part will replace the old, damaged clock spring inside the steering wheel. | Without the clock spring, the airbag, horn and steering wheel controls may stop working. |
| Torque Wrench | A torque wrench is a tool that measures how tightly a bolt or nut is tightened, so you don’t under- or over-tighten it. | It ensures that the steering wheel nut is tightened correctly for safety and proper alignment. |
How to Disconnect the Battery
1. Remove the Battery’s Negative Terminal
The first step in replacing a clock spring is to disconnect the car’s battery.
Specifically, you’ll need to remove the negative terminal, which is usually marked with a minus sign.
This step cuts off the vehicle’s electrical power, ensuring that no accidental current flows to sensitive systems like the airbags.
Disconnecting the negative terminal first is crucial because it reduces the chance of sparks or short circuits while working on the steering wheel.
2. Wait at least 10-15 minutes for the airbag system to discharge
After disconnecting the battery, it’s important to wait ten to fifteen minutes before proceeding.
This waiting period is necessary because the airbag system has a backup power supply in the form of capacitors that can maintain a charge even after the battery is removed.
Waiting gives the system time to fully discharge, ensuring that the airbags don’t accidentally deploy while working on the steering wheel.
This step is not only for the safety of the car but also saves you from serious injury.
How to Remove the Airbag Module
1. Find the screws or clips behind the steering wheel
The airbag module is attached to the steering wheel with screws or spring-loaded clips, usually located behind the steering wheel.
These clips hold the airbag firmly in place and the first step to safely removing them is locating them.
Depending on the car model, you may need a screwdriver or small tool to remove these clips.
Careful care is taken here to avoid damaging the steering wheel trim or airbag housing.
2. Carefully Disconnect the Airbag Connector
After removing the airbag module, you will see the electrical connectors attached to it.
These connectors supply power to the airbag system and must be disconnected very carefully.
Most connectors have safety locks or tabs that must be gently lifted before removing them.
Pulling too hard or at the wrong angle can damage the wiring or connectors, which are essential for proper airbag operation.
Handle these connectors carefully to ensure the system can be reassembled without any problems later.
3. Place the airbag upside down on a flat surface
Once the airbag module is completely disassembled, place it upside down on a clean, flat surface.
This is important because if the airbag accidentally deploys, placing it upside down could cause it to deploy again, creating a dangerous situation.
Placing it upside down reduces the risk and keeps the airbag stable while working on the steering wheel.
This simple precaution keeps both you and your workstation safe during the repair process.
How to Remove the Steering Wheel
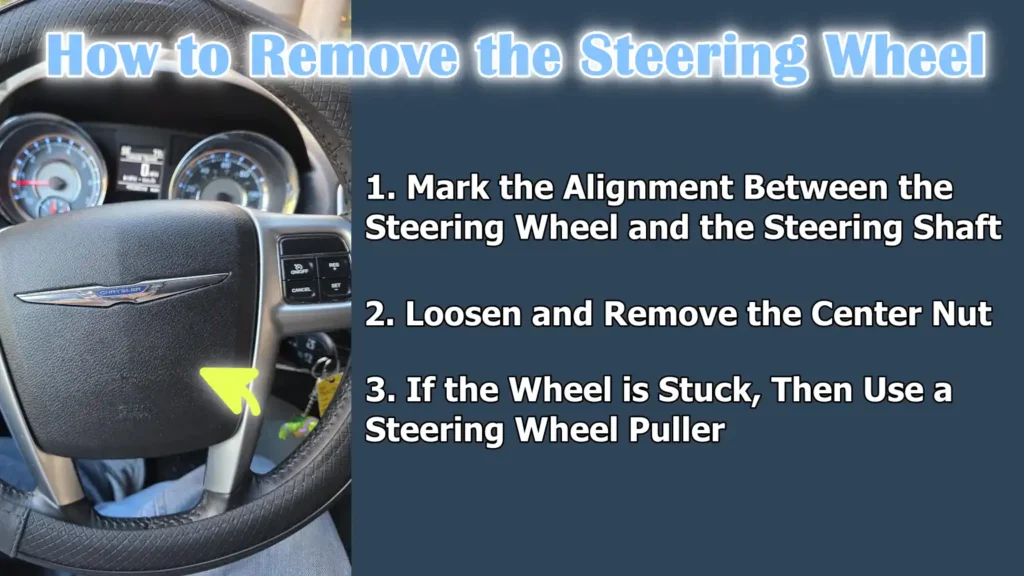
1. Mark the Alignment Between the Steering Wheel and the Steering Shaft
Before removing the steering wheel, it is very important to mark its alignment with the steering shaft.
This can be done by creating a reference point between the wheel and the shaft using a marker or tape.
These marks will guide you during reinstallation and ensure the wheel remains straight and centered.
If you skip this step, the steering wheel may be reinstalled off-center, causing uneven steering, driver discomfort and disrupting the alignment of the new clockspring.
2. Loosen and Remove the Center Nut
There is a large retaining nut in the center of the steering wheel that holds the wheel tightly to the steering shaft.
This nut should be carefully loosened and removed using a socket wrench.
It is advisable not to remove it completely at first, but to allow it to remain threaded a few times while pulling the wheel out.
This can prevent injury if the steering wheel suddenly comes loose.
Once the wheel is loose, the nuts can be completely removed and the wheel can be safely removed.
3. If the Wheel is Stuck, Then Use a Steering Wheel Puller
In some vehicles, the steering wheel may fit tightly on the shaft and be difficult to remove by hand.
In such cases, a steering wheel puller is the safest tool.
This tool applies even force to the wheel and helps remove it without damaging the steering shaft or wheel.
Trying to remove the wheel with a hammer or force can damage the delicate parts of the steering column.
Using a puller ensures that the removal process is controlled, safe and effective.
Read More:
How to Access and Remove the Old Clock Spring
1. Detach the Electrical Connectors from the Clock Spring
Once the steering wheel is removed, you’ll have easy access to the clock spring.
The first step is to carefully detach the electrical connectors that connect the clock spring to the airbag system, horn and steering wheel controls.
These connectors are often color-coded and may have locking tabs to secure them.
Gently remove the tabs and pull the connectors straight out to avoid damaging the wires.
Proper detaching ensures that all circuits can be reconnected without error later, which is essential for the new clock spring to function properly.
2. Remove the Retaining Screws or Clips
After detaching the connectors, the clock spring is held in place by small retaining screws or clips, depending on the vehicle’s design.
These fasteners securely attach the clock spring to the steering column.
Use the correct screwdriver or tool to carefully remove these, keeping an eye on the screws so they can be reused during installation.
It’s important not to use excessive force here, as the clock spring is attached to delicate parts of the steering column and could be damaged if handled carelessly.
3. Remove the Old Clock Spring Gently
After removing the connector and retaining fasteners, the clock spring can be removed.
This must be done very carefully, as the clock spring is a delicate part and its internal ribbon cable may still be under tension.
Pulling too hard could damage surrounding parts or make it difficult to align the new clock spring.
Removing it smoothly and carefully ensures that the steering column remains intact and ready for the new part to be installed.
How to Install the New Clock Spring
1. Align the new clock spring to its neutral or centered position
Before installing the new clock spring, it is very important to ensure that it is in its neutral or centered position.
Most clock springs come with locking pins or printed alignment marks indicating the correct center point.
This alignment ensures that the internal ribbon cable rotates equally in both directions when the steering wheel is turned.
If the clock spring is not centered before installation, it may twist excessively and break when the wheel is turned, causing immediate damage to the new component.
Therefore, correct alignment is essential for both safety and long-term reliability.
2. Secure it with screws or clips
Once the clock spring is properly centered, it should be installed on the steering column and secured with the retaining screws or clips that were removed earlier.
These should be tightened firmly, but not too tight, as the clock spring housing is made of plastic and can be damaged by excessive force.
Properly securing the component ensures that it will remain firmly in place when the steering wheel is turned during normal driving.
3. Reconnect the electrical connectors properly
After securing the clock spring, the next step is to reconnect all electrical connectors.
Each connector must be carefully installed and locked to ensure a strong connection.
These connectors control essential systems such as the airbag, horn and steering wheel buttons, so it’s important to ensure each connector is securely connected.
A loose or incorrectly connected wire can cause warning lights to appear or prevent safety features from functioning properly.
Double-checking each connection at this stage helps prevent problems during system testing later.
How to Reinstall the Steering Wheel and Airbag
1. Align the steering wheel using your marks
When reinstalling the steering wheel, the alignment marks you made earlier between the wheel and steering shaft are very important.
These marks help ensure that the steering wheel is correctly centered and in the position it was before removal.
If the steering wheel is not properly aligned, it can cause uneven steering and damage the newly installed clock spring.
Taking the time to properly align the marks ensures smooth steering and keeps the clock spring functioning as expected.
2. Tighten the central nut with a torque wrench
After aligning the steering wheel, the large central nut that holds it in place must be reinstalled.
A torque wrench should be used for this step so that the nut can be tightened to the exact specifications recommended by the vehicle manufacturer.
Using the correct torque setting is crucial, as under-tightening the nuts can cause the wheel to loosen over time, while over-tightening the nuts can damage steering components.
Properly tightened nuts ensure both the safety and durability of the steering system.
3. Reconnect the Airbag Connector and Secure the Airbag Module
The final step in this phase is reconnecting the airbag connector to the airbag module.
These connectors typically have a locking mechanism that clicks into place to ensure a secure connection.
After reconnecting the connector, the airbag module should be carefully reinstalled on the steering wheel and tightened with its original screws or clips.
Properly installing and tightly securing the airbag ensures that it will function as designed in the event of an accident and also prevents dashboard warning lights from igniting.
How to Reconnect the Battery and Test It’s Working
1. Reconnect the Negative Battery Terminal
After installing the new clock spring and reconnecting the steering wheel and airbag, the next step is to restore power to the vehicle by reconnecting the negative battery terminal.
This reconnects the electrical system and ensures proper functioning of all components, including the airbag and steering wheel controls.
Ensure the terminals are securely tightened to avoid loose connections, which could cause electrical problems or system malfunctions.
2. Start the Car and Check if It Works Properly
After the battery is reconnected, start the car to ensure everything is working properly.
Start by checking the horn, as this is an easy way to confirm that the electrical connections connected to the clock spring are working properly.
Next, test the steering wheel buttons, such as the audio controls or cruise control, to ensure that signals are being sent through the new clock spring.
Finally, pay attention to the airbag warning light on the dashboard.
This light will flash briefly and then turn off when the car is started, indicating that the airbag system is functioning properly.
If the light remains on, it may indicate a connection problem or that the system may need to be reset.
How to Do Troubleshooting When You Change Car Clock Spring
As well as, NHTSA research shows that even dust and debris inside a clock spring can break airbag circuit paths and that can trigger a warning light as well and sometimes manufacturers replace the clock spring and covers as the repair, so if you still see signs of contamination or a persistent airbag light and you should treat the clock spring as a safety item and consider replacement rather than repair it.[¹]
1. What to Do If the Airbag Light Stays On
After replacing the clock spring and reconnecting the battery, the airbag warning light on the dashboard will flash briefly and then turn off.
If the light remains on, it usually means there’s still a problem with the airbag system.
This could be caused by a loose connector, incorrect installation of the airbag module, or a fault code stored in the car’s computer.
In some cases, the system needs to be reset with a diagnostic scan tool, which clears any error codes and enables the car to recognize the new part.
Ignoring the light is risky because it means the airbag may not deploy in a crash, so it’s important to get it repaired immediately.
2. The Importance of Purchasing an OEM or High-Quality Replacement
When replacing a clock spring, it’s always best to purchase a part manufactured by the original equipment manufacturer (OEM) or a high-quality aftermarket replacement.
OEM parts are designed specifically for your vehicle model, ensuring proper fit, durability and reliability.
Cheap or substandard parts may save money initially, but they can wear out quickly, leading to frequent repairs and even posing a safety hazard.
As the clock spring is directly connected to critical systems like airbags and steering wheel controls, using reliable parts helps keep the car’s safety features working properly and consistently.
3. If parts still don’t work after replacement, check the fuses
If certain features, such as the horn, steering wheel buttons, or audio controls, still don’t work after installing a new clock spring, the problem may not be the clock spring.
Often, a blown fuse in the vehicle’s fuse box can disrupt the power supply to these systems.
Checking and replacing a faulty fuse is an easy solution to restore proper operation.
Always consult your car’s manual to find the correct fuse for each system.
If the fuse keeps blowing repeatedly even after replacing it, it could be a sign of an underlying electrical problem that requires professional diagnosis.
Conclusion – How to Replace Car Clock Spring
The clock spring actually controls from airbag safety to steering wheel controls, that means it is really critical and affects safety system which is why you should replace it correctly that can make all the different between a actually functional car and potential errors.
The clock spring is a small but crucial component that transmits electrical signals between the steering wheel and the car’s systems and controls the airbag, horn and steering wheel buttons.
A faulty clock spring can cause serious problems, such as the airbag warning light coming on, the horn not working, or the steering wheel controls not functioning.
By carefully following the proper steps—disconnecting the battery, safely removing the airbag and steering wheel, replacing the clock spring and testing all components—you can restore the vehicle’s full functionality and maintain its safety standards.
Using high-quality or OEM replacement parts and paying attention to proper alignment and secure connections are crucial for long-term results.
Doing this repair yourself can save money, improve your understanding of your vehicle and ensure vital safety systems remain fully operational.
Regular inspections and attention to warning signs help prevent further damage and maintain peace of mind while driving.
Just comment down your thoughts below this guide.
Frequently Asked Questions
Q1. What is a car clock spring and why is it important?
Answer: The car clock spring, also known as a spiral cable, is a small but vital component inside the steering wheel. When the steering wheel is turned, it transmits electrical signals between the steering wheel and the car’s systems. This means it controls the airbag, horn and steering wheel buttons. If the clock spring fails, all of these functions may stop working properly, affecting both safety and convenience.
Q2. What are the symptoms of a clock spring malfunction?
Answer: Some common symptoms of a clock spring malfunction include the airbag warning light coming on, the horn not working, or the steering wheel buttons and controls not working. In some cases, you may hear unusual noises when turning the steering wheel. If any of these problems occur, it’s important to have the clock spring inspected and replaced if necessary.
Q3. Can I replace the clock spring myself?
Answer: Yes, with the right tools, safety precautions and step-by-step guidance, many car owners can replace a clock spring themselves. However, it’s important to follow all safety precautions, such as disconnecting the battery and handling the airbag carefully. If you experience any difficulty or discomfort working with the airbag system, it’s best to seek professional help.
Q4. What tools will I need to replace a clock spring?
Answer: To replace a clock spring, you’ll need basic tools like a screwdriver (Phillips and flathead), a socket wrench set and a torque wrench. In some cases, a steering wheel puller may also be required. You’ll also need a replacement clock spring that matches your car model. Having the right tools ensures this process goes safely and smoothly.
Q5. How do I make sure the new clock spring is working properly?
Answer: After installing the new clock spring, you should reconnect the battery and test all related functions. To ensure everything is working properly, check the horn, steering wheel buttons and airbag light. Also, make sure the steering wheel is centered and the clock spring is properly aligned during installation. Using high-quality or OEM parts helps ensure reliable performance.
Q6. What should I do if the airbag light remains on after replacing it?
Answer: If the airbag light remains on, first double-check all electrical connections to ensure they are secure. If the connections are correct, it may be necessary to reset the airbag system using a diagnostic tool. Persistent airbag warnings should be addressed immediately, as they indicate a problem with the vehicle’s safety system.
Q7. Is it necessary to purchase an OEM clock spring?
Answer: It is extremely important to purchase an OEM or high-quality replacement clock spring. OEM parts are designed to meet your car’s needs, ensuring proper fit, reliable performance and safety. Low-quality or incompatible parts can cause control malfunctions or even damage the airbag system.
References:
[1] Safety Recall S40 / NHTSA 16V-288 Airbag Clockspring
https://static.nhtsa.gov/odi/rcl/2016/RCRIT-16V288-8400.pdf

Guys, I’m a car audio enthusiast and customization expert and I love clear sound and clean installation. Plus, I have spent years helping people build their dream audio setups. And whenever I’m working on cars, I probably listen to music and thinks about the next big upgrade.