 Skip to content
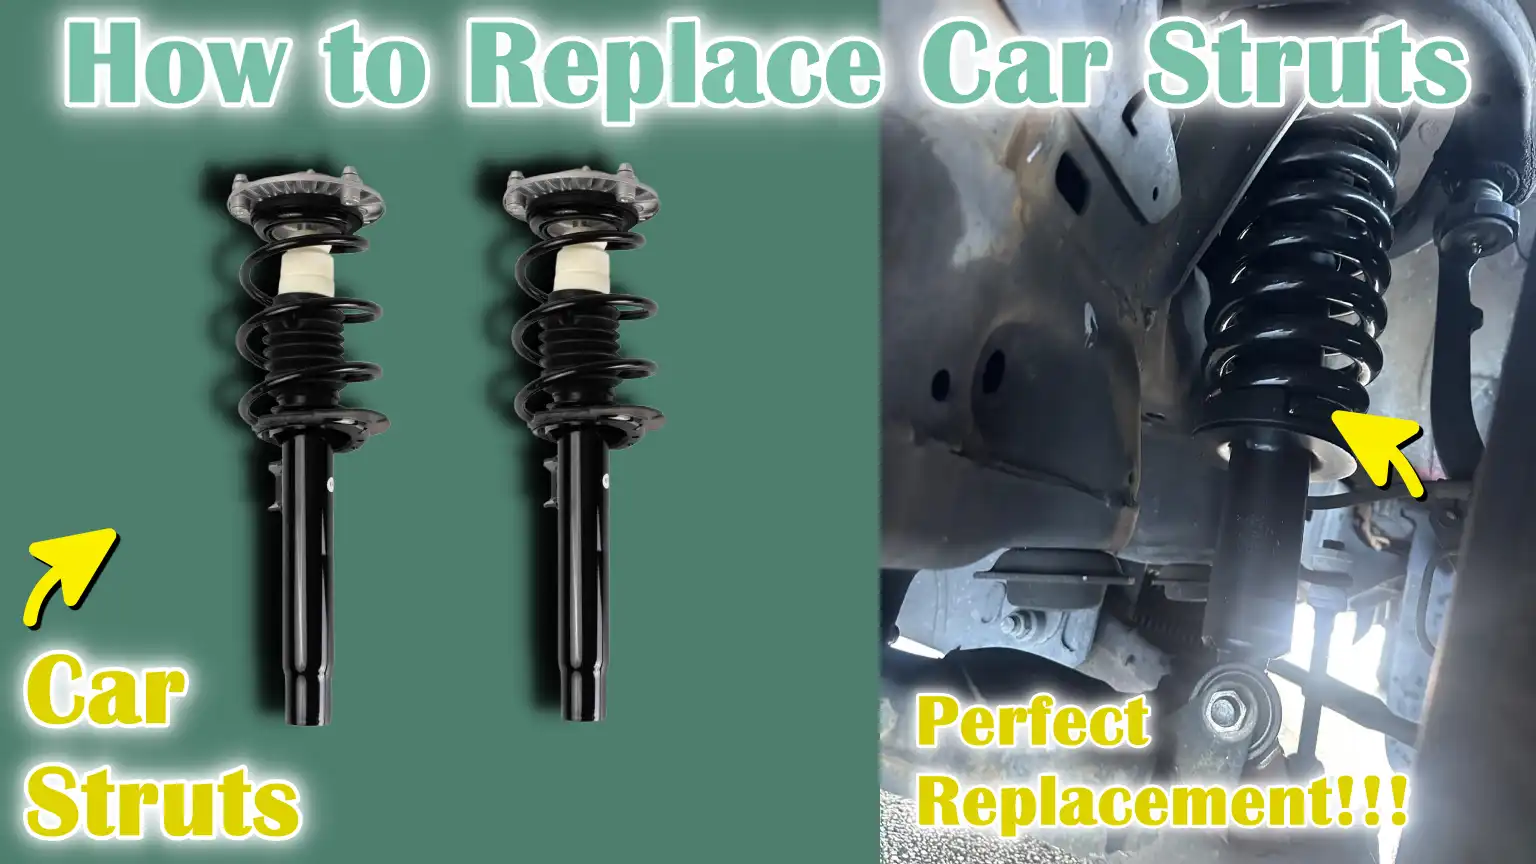
Written By: Don Dodi
Fact Checked By: Kristen Brown
Reviewed By: Diego Rosenberg
When you go over the bump and your vehicle maintains its stability then it is well-functioning pair of struts that quietly works to control the motion and support the vehicle’s weight nicely.
Basically, it is directly responsible for how your car handles bumps, turns and braking forces, as each of the strut combines a shock absorber and a spring into a single unit, that helps to control the body movement and literally keep your tires firmly in contact with the road.
But it is again true that over the period of time, struts wear out as well due to the constant movement, heat and road vibrations, which can actually leads to the reduced stability, uneven tire wear and that makes a less comfortable ride.
Not only this, you should know that in most of the vehicles and specifically those with a MacPherson strut design, the struts actually play a structural role as it supports the vehicle’s weight and maintains wheel alignment as well.
So, when you replace the old or damaged struts then it actually restores that smooth driving and comfort and also improves braking performance as well as steering response and even tire lifespan as well.
Now, this is the guide that shows you How to Replace Car Struts, so that you can understand working of struts and maintain better vehicle control as well.
What are Car Struts?
Car struts are one of the main components of a vehicle’s suspension system and they play a crucial role in how smooth, stable and safe your ride will be.
A strut is a robust mechanical component that combines two main parts – a shock absorber and a coil spring – into a single unit.
The shock absorber inside the strut controls how quickly the suspension moves up and down when the car goes over bumps or uneven surfaces, while the coil spring supports the weight of the vehicle and helps absorb road shocks.
Together, they ensure that your tires maintain firm contact with the road at all times, which is essential for comfort, steering control and braking safety.
1. Definition and Function of Struts in a Suspension System
In simple terms, a car strut is a structural part of the suspension that connects the wheel assembly to the vehicle’s body.
It not only absorbs shocks from the road but also provides a mounting point for the suspension system.
Unlike regular springs that only absorb shocks, a strut helps maintain the correct position of the wheels, ensuring that the tires remain aligned with the road surface.
This means that every time your car goes over a pothole or speed bump, the struts help dampen the impact, reduce body roll while cornering and prevent the car from bouncing uncontrollably.
A properly functioning strut helps maintain ride height, supports the weight of the vehicle and directly contributes to the overall balance and safety of the car.
2. The Difference Between Struts and Shock Absorbers
Although struts and shock absorbers are often mentioned together, they are not the same thing.
Both work to control suspension movement, but they play different roles in the vehicle’s design.
A shock absorber is a single component that dampens the movement of the suspension springs – primarily reducing bounce and vibration after hitting bumps.
A strut, on the other hand, does everything a shock absorber does, but it is also a primary structural component of the suspension and steering system.
Struts support the weight of the vehicle, help maintain wheel alignment and are directly connected to the steering knuckle.
In short, while shocks control movement, struts also control movement and maintain the vehicle’s suspension geometry.
3. Common Types of Struts
Several types of struts are used in modern vehicles, but the two most common are MacPherson struts and coilover struts.
The MacPherson strut design is the most widely used design, specially in front-wheel-drive cars.
It combines the shock absorber, coil spring and upper mount into a single compact unit, saving both space and weight.
This design also offers simpler construction and improved handling.
Coilover struts, found in many performance and sports cars, feature a threaded design that allows for height and stiffness adjustments.
These are popular in tuning and racing applications because they offer greater control over ride comfort and suspension response.
Some vehicles, particularly luxury models, may also use air struts, which utilize pressurized air instead of a metal spring for adjustable ride height and comfort.
4. The Importance of Struts in Vehicle Handling and Alignment
Struts aren’t just for comfort; they are crucial for your car’s handling and steering.
When struts fail, they can cause problems such as uneven tire wear, pulling to one side, vibrations at high speeds, or a bouncy and unstable ride.
This is because worn-out struts can no longer firmly hold the wheels to the road or maintain proper alignment.
A car’s alignment is directly affected by the condition of its struts, as they influence the camber and caster angles—two key settings that impact tire contact and steering accuracy.
Replacing old or worn struts restores balance, reduces braking distances and provides better control during turns or emergency maneuvers.
In short, good struts mean a safer, smoother and more predictable driving experience.
Basic Signs That Indicate You Need to Replace Your Struts
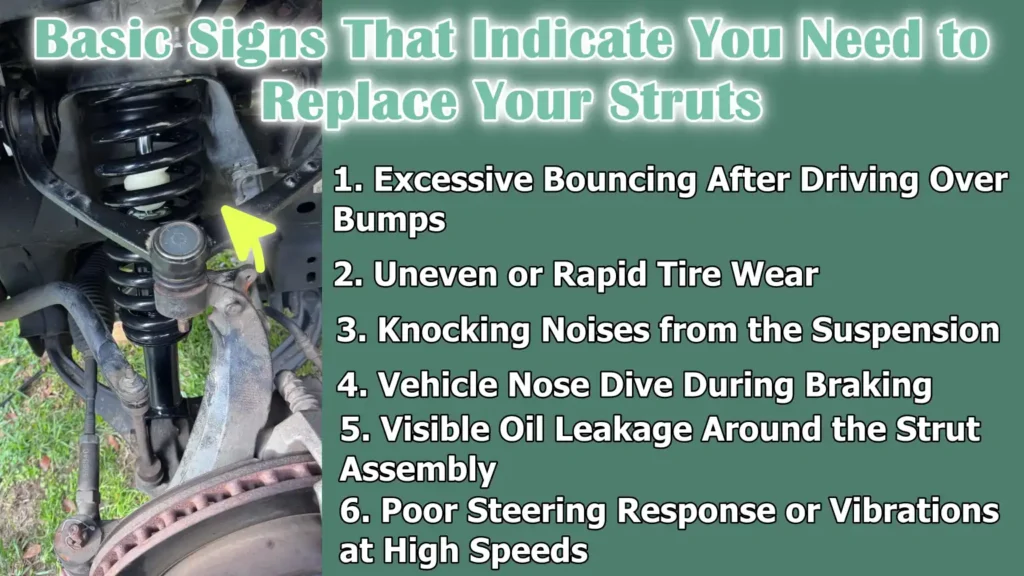
Struts are designed to last for thousands of miles, but like all mechanical parts, they wear out over time due to constant use and driving on rough roads.
When struts begin to fail, you’ll notice clear changes in your vehicle’s ride comfort, handling and tire condition.
Because struts play a crucial role in keeping your car balanced and stable, even minor signs of wear should not be ignored.
Recognizing these symptoms early can save you from costly repairs and maintain your car’s safety and performance.
Below are the most common warning signs that indicate it’s time to replace your struts.
1. Excessive Bouncing After Driving Over Bumps
The easiest way to tell if your struts are failing is if your car continues to bounce after going over a bump or pothole.
Normally, a properly functioning strut absorbs energy from the spring, allowing the vehicle to settle quickly after an impact.
If the strut loses its ability to control motion, the car will bounce repeatedly, specially from the front or rear.
This happens because the hydraulic fluid or gas pressure inside the strut weakens over time.
Excessive bouncing not only makes the ride uncomfortable but also reduces traction, making the vehicle difficult to control, specially on uneven or wet roads.
2. Uneven or Rapid Tire Wear
Struts directly affect how your tires make contact with the road.
When they wear out, they fail to keep the tires pressed evenly against the surface.
This results in uneven tire wear, such as cupping or scalloping – small indentations or raised spots around the tread.
Uneven wear reduces the lifespan of your tires and can cause vibrations or pulling to one side while driving.
Because struts are part of the suspension geometry, they affect wheel alignment, so worn struts often cause misalignment issues as well.
If your tires are wearing unevenly even after balancing and rotation, the problem may be with your struts.
3. Knocking Noises from the Suspension
When a strut’s internal components or its mounting hardware become loose or worn, you may hear knocking or rattling noises coming from the suspension area.
These noises are often most noticeable when going over bumps, turning the steering wheel, or braking.
Each strut contains a piston that moves through hydraulic fluid and when that mechanism fails, metal parts can collide, causing the noise.
Additionally, a worn strut mount or bushing can also produce similar noises.
Ignoring this problem can lead to more serious damage to the suspension system and unsafe handling.
4. Vehicle Nose Dive During Braking
If the front of your car dips sharply forward when you brake, it’s a clear sign that the front struts are weak.
Struts help keep the car level and stable during braking by controlling how much weight shifts to the front.
When they lose their damping force, the front of the car dips excessively, reducing braking performance and increasing stopping distance.
This can be dangerous during emergency stops, as it affects how quickly your tires grip the road.
Properly functioning struts distribute weight evenly, allowing your car to stop smoothly and safely.
5. Visible Oil Leakage Around the Strut Assembly
Struts contain hydraulic fluid that helps absorb road shocks.
If you see oil or greasy residue on the strut body, it means the internal seals are leaking.
Once the fluid leaks out, the strut loses its ability to function properly because there isn’t enough pressure to control the movement.
Leaking struts can also allow dirt and debris into the system, causing further wear and tear internally.
A simple visual inspection can detect this problem – any wetness or oily buildup around the strut housing usually indicates that it’s time for replacement.
6. Poor Steering Response or Vibrations at High Speeds
Worn struts can cause the steering to feel loose, unstable, or sluggish when turning.
This is because the struts are connected to the steering and suspension geometry, which helps keep the wheels properly aligned while driving.
When they fail, your vehicle may wander or require constant corrections even when driving straight.
You may also feel vibrations in the steering wheel, specially at higher speeds.
These symptoms are not only uncomfortable; they can also make it difficult to maintain control of the car, particularly during sudden turns or on rough roads.
Replacing the struts restores steering precision, improves stability and makes your driving experience safer and smoother.
Tools
| Tool / Material Name | Purpose / Use | Helpful Details for Beginners |
|---|---|---|
| Floor Jack and Jack Stands | Used to lift and safely support your car while working underneath. | The floor jack raises the vehicle and jack stands keep it stable and secure. Never rely on the jack alone for support. |
| Lug Wrench or Impact Wrench | Helps loosen and tighten wheel nuts. | A lug wrench works manually, while an impact wrench (electric or pneumatic) makes the job faster and easier. |
| Socket and Ratchet Set | Used for removing and installing bolts and nuts of various sizes. | Make sure you have both metric and standard sockets. Longer bolts may have deeper sockets. |
| Torque Wrench | This ensures that the bolts are tightened to the correct pressure level. | Each car has a specific torque setting for the strut bolts. Over- or under-tightening can cause safety issues. |
| Spring Compressor | Safely Compresses Coil Spring When Replacing Pre-Disassembled Struts. | The coil spring is under high tension. This tool is necessary to remove or install the spring without injury. If you are using pre-assembled struts, this tool may not be necessary. |
| Replacement Struts (OEM or Equivalent) | The new parts will replace the old struts. | OEM (Original Equipment Manufacturer) struts are made to factory standards. High-quality aftermarket brands are fine if they meet the same standards. Always replace struts in pairs to maintain balance. |
| Penetrating Oil (e.g., WD-40) | Helps loosen rusted or stuck bolts and nuts. | Spray the bolts a few minutes before removing them, which will make the job easier and reduce the chance of damage. |
| Safety Gear (Gloves, Eye Protection) | Protects your hands and eyes while working. | Always wear gloves to avoid cuts and eye protection to protect against dust, rust, or splashes of liquids. Safety should always be paramount. |
How to Take Safety Precautions
When replacing car struts, safety should always be the top priority.
Working with suspension parts involves handling heavy components, sharp tools and high-pressure springs.
While this job can be done at home, it must be done carefully and correctly to avoid accidents or damage to the vehicle.
Following proper safety procedures not only keeps you safe but also ensures that your car’s suspension system functions correctly after the repair.
Below are some essential safety precautions you should always follow before, during and after replacing your car’s struts.
1. Work on a Level, Stable Surface
Always perform strut replacement work on a level and flat surface.
A smooth concrete driveway or garage floor is the safest place as it provides a strong and stable base for lifting the vehicle.
Working on uneven or soft ground like gravel or dirt can cause the jack or jack stands to shift or sink, potentially causing the car to fall.
Before lifting the car, ensure the parking brake is firmly engaged and the wheels remaining on the ground are blocked with wheel chocks to prevent them from rolling.
Keeping the car stable and secure is one of the most crucial aspects of safe suspension work.
2. Always Use Jack Stands; Never Rely Solely on the Jack
A floor jack is only for lifting, not for holding the vehicle in place.
Once the car is lifted, it should always be supported by sturdy, high-quality jack stands.
Hydraulic jacks can lose pressure over time or suddenly slip, causing the vehicle to fall without warning.
Jack stands provide a solid and locked position, ensuring the car remains stable while you work underneath it.
Always place the jack stands under the lifting points specified by the manufacturer, which are usually shown in the vehicle owner’s manual.
Before starting work, gently shake the car to ensure it is securely resting on the stands and will not move.
3. Handle coil springs with extreme caution – they are under considerable tension
The coil spring is one of the most dangerous parts of the strut assembly because it stores a significant amount of energy when compressed.
If released suddenly, it can cause serious injury or damage.
When replacing a strut that requires removing and reusing the coil spring, always use a proper spring compressor tool.
This tool safely holds and compresses the spring while you remove the old strut and install the new one.
Never attempt to remove the spring without a compressor and always double-check that the tool is properly positioned and secure before loosening anything.
If you have any doubts or difficulties handling the spring, it is best to use pre-assembled struts or seek assistance from a professional mechanic.
4. Refer to your vehicle’s repair manual for torque specifications and procedures
Each car model has its own specific torque specifications and assembly procedures, which are detailed in the vehicle’s repair or service manual.
These torque values tell you how tightly each bolt should be fastened.
Under-tightening bolts can cause them to loosen during driving, while over-tightening can strip threads or damage parts.
Using a torque wrench ensures that each fastener is tightened to the correct level for safety and performance.
The manual will also guide you on the correct removal sequence, mounting points and alignment requirements for your specific vehicle.
Following these instructions not only ensures your safety but also guarantees that the strut will function correctly and last its intended lifespan.
How to Replace Car Struts – Complete Guide
Replacing car struts might seem daunting at first glance, but when approached carefully and step by step, it becomes a manageable and rewarding task.
This process involves lifting the car, removing the old strut assembly and installing a new one with the correct tools and safety precautions.
Taking your time and carefully following each step will help prevent mistakes and ensure your vehicle’s suspension system functions correctly afterward.
Proper replacement restores smooth handling, stable braking and even tire wear.
The following steps explain how to begin this process safely and correctly.
Let’s Prepare the Vehicle
Preparing the vehicle is the foundation of a safe and successful strut replacement.
This step ensures the car remains stable, the tools function correctly and you remain safe while handling the suspension parts.
Before touching any bolts, it’s crucial to ensure the vehicle is secure and your workspace is properly set up.
1. Park the vehicle on a level surface and engage the parking brake
Always begin by parking your vehicle on a flat and level surface.
A solid concrete floor, such as in a garage or driveway, is best as it prevents the car from moving or rolling during the repair.
Avoid working on slopes, dirt, or gravel, as these surfaces can create instability.
Once parked, fully engage the parking brake to lock the wheels on the ground.
For added safety, place wheel chocks behind the rear tires if you are working on the front suspension, or behind the front tires if you are replacing the rear struts.
These steps prevent any unwanted movement while the vehicle is being lifted.
2. Loosen the wheel lug nuts slightly before lifting
Before lifting the car, slightly loosen the wheel lug nuts.
This step is easier and safer when the tires are still on the ground, as the contact between the tires and the surface keeps the wheel stable.
Use a lug wrench or impact wrench to loosen each nut about a quarter to half a turn.
Do not remove them completely yet.
Loosening the nuts beforehand prevents the wheel from spinning when you apply force to it and makes it easier later when the car is already lifted.
3. Lift the car with a jack and secure it with jack stands
Position your floor jack under the vehicle’s designated lifting point.
These points are reinforced sections of the frame designed to support the weight of the car and you’ll find them in your owner’s manual.
Slowly raise the car until the wheel you’ll be working on is a few inches off the ground.
Once lifted, carefully slide the jack stands under the car at the correct support points and gently lower the car onto them.
This ensures the entire weight of the vehicle is safely supported by the stands.
Never rely solely on a floor jack to hold the car – hydraulic jacks can lose pressure or slip unexpectedly.
Once the car is resting on the jack stands, give it a slight shake to ensure it’s stable before beginning work.
4. Remove the wheel to access the strut assembly
After confirming the car is safely supported, completely remove the loosened lug nuts and take off the wheel.
Place the wheel in a safe location where it won’t roll away or be damaged.
Removing the wheel provides clear access to the strut assembly, which is typically located behind the brake rotor and attached to the steering knuckle.
Before proceeding, inspect the area for any signs of rust, oil leaks, or damage to nearby components such as brake hoses or ABS wires.
Cleaning the area with a soft brush or cloth will make your workspace cleaner and safer.
Taking a few minutes now to inspect and clean will make the rest of the replacement process much easier and more efficient.
How to Locate and Assess the Strut Assembly
Once the wheel is removed and the car is securely resting on jack stands, the next step is to locate the strut assembly and carefully assess its condition before removal.
The strut is a long, cylindrical component that connects the wheel hub to the upper part of the car’s body or frame.
It’s typically located just behind the brake rotor and is connected to the steering knuckle at the bottom.
At the top, the strut is attached to the vehicle via several mounting bolts, which can be accessed from under the hood or inside the trunk, depending on whether you’re replacing the front or rear struts.
Before loosening any bolts, it’s crucial to understand where the strut is located and how it connects to other suspension and braking parts.
1. Locate the Upper Mounting Bolts Under the Hood
Open your vehicle’s hood to locate the upper part of the strut assembly.
On most cars, the upper strut mount looks like a circular metal plate with two or three bolts protruding from it.
These bolts securely hold the top of the strut to the vehicle’s body or shock tower.
Some vehicles may have a small plastic cover or trim panel that needs to be removed to access the mounting bolts.
Do not completely remove these bolts yet, as they help hold the strut in place until the lower connections are loosened.
For now, simply locate them and inspect them to ensure they are clean, free of rust and easily accessible later.
At this stage, it’s also helpful to check for signs of wear or damage around the upper mount area.
If you see cracked rubber, rust, or leaking fluid near the top of the strut, it may indicate that the inner mount or bearing is also damaged.
In such cases, it’s best to replace the entire strut assembly or mount to avoid future problems.
Taking a few minutes to inspect these areas can save you extra work later and ensure a smoother installation process.
2. Inspect any brake lines or ABS wires attached to the strut and carefully disconnect them.
On many vehicles, brake lines, ABS sensor wires, or other cables are attached to the side of the strut with clips or bolts.
These lines carry important signals and fluid pressure, so it’s crucial to handle them carefully.
Before you begin loosening any bolts, carefully inspect each line to see where it’s attached to the strut body.
You may find small metal brackets or plastic clips holding them in place.
Using a small wrench or screwdriver, carefully remove the bolts or unclip the lines from their mounts without pulling or bending them.
Be specially careful with ABS sensor wires, as they are delicate and can easily be damaged if pulled too hard.
Once disconnected, gently move the wires or brake lines aside and secure them in a safe place where they won’t be pinched or snagged while you’re removing the strut.
This step not only protects vital components from damage but also gives you more room to work comfortably.
Ensuring these connections are safely out of the way before proceeding makes removing the strut assembly easier and helps prevent accidental damage to your car’s braking and electronic systems.
How to Remove the Old Strut
Removing the old strut is the most crucial and detailed part of the replacement process.
This step requires patience, caution and proper handling to ensure both safety and accuracy.
The strut connects the suspension to the steering knuckle at the bottom and the vehicle’s body at the top.
Over time, these connections can corrode or seize due to moisture, dirt and road salt.
Therefore, it’s essential to safely loosen and remove the strut to prevent damage to surrounding components such as brake hoses or steering parts.
Working slowly and carefully during this step will make the subsequent installation easier and reduce the risk of broken bolts or misaligned parts.
1. Spray penetrating oil on the bolts to loosen rust or corrosion
Before attempting to touch any bolts, it’s wise to apply a penetrating oil like WD-40 or PB Blaster to all the strut mounting bolts.
These oils help break down rust and corrosion that has accumulated around the bolts over time.
Allow the oil to soak in for a few minutes to loosen the metal-to-metal bond.
This step is specially important for older vehicles or those frequently exposed to rain, snow, or salted roads.
Attempting to remove rusted bolts without lubrication can cause them to break, making the job significantly more difficult.
A well-lubricated bolt will come out easily and reduce the risk of damaging the threads on the steering knuckle or strut mount.
2. Remove the bolts connecting the strut to the steering knuckle
Once the bolts are loosened, use the correct socket and ratchet or impact wrench to remove the bolts connecting the bottom of the strut to the steering knuckle.
These bolts are typically large and tightly fastened as they hold a significant portion of the suspension in place.
Pay attention to the position of any alignment shims or camber bolts, as they affect the vehicle’s wheel alignment.
Marking their position or taking a photo before removing them is a good idea to make reinstallation easier.
Sometimes, if the strut is stuck in the steering knuckle due to rust or a tight fit, gently tapping it with a rubber mallet can help loosen it.
Avoid using excessive force, as this can damage surrounding components.
3. Support the Steering Knuckle to Prevent Strain on the Brake Hose
After removing the lower bolts, the steering knuckle may become loose or hang freely.
This can put excessive strain on the brake hose and ABS wires, which are still connected.
To prevent any damage, support the knuckle by tying it to the car’s frame or control arm with a bungee cord, rope, or wire.
Supporting it ensures that the brake lines remain safe and undamaged.
Even a slight stretch or bend in the brake line can cause internal damage, potentially leading to brake failure.
This extra step of securing the knuckle may seem simple, but it plays a crucial role in maintaining the integrity of your vehicle’s braking system during the repair process.
4. Remove the Upper Strut Mounting Nuts and Carefully Lower the Strut
Once the lower part of the strut is disconnected and the knuckle is supported, you can move on to the upper strut mount.
Under the hood or inside the trunk, carefully remove the nuts holding the upper part of the strut.
To prevent the strut from suddenly falling, it’s best to leave one nut slightly tightened while loosening the others.
When you’re ready, remove the last nut while supporting the strut from below and then gently lower it out of the vehicle.
The strut can be heavy and awkward to handle, so maintaining a firm grip is essential.
After removing the strut, inspect the mounting area for rust, dirt, or damage.
Cleaning this area before installing the new strut ensures a proper fit and correct alignment.
This completes the removal process and prepares the way for the clean and accurate installation of the new strut assembly.
Carefully and precisely removing the old strut not only ensures safety but also helps maintain the accuracy of your vehicle’s suspension geometry.
How to Transfer Components – If Necessary
In many vehicles, specially those that don’t use pre-assembled strut units, you may need to transfer some components from the old strut to the new one.
These components often include the coil spring, upper mount, bearing plate and rubber insulator.
The purpose of this step is to reuse parts that are still in good condition while installing a new strut body that restores suspension performance.
This process requires patience and careful work because the coil spring is under considerable tension and can be dangerous if released suddenly.
Working systematically and using the correct tools, such as a spring compressor, ensures the job is done safely and correctly.
This step is even more crucial when you are rebuilding the strut assembly rather than replacing it entirely with a pre-assembled version, also known as a “quick strut”.
1. If reusing the spring, compress it using a spring compressor.
Before removing the spring from the old strut, it must be compressed using a spring compressor tool.
A spring compressor safely compresses the coil spring, holding it in a smaller, locked position so it can be disassembled without sudden force.
This is a critical safety step because the coil spring is under significant pressure and improper release can cause serious injury or damage.
Always ensure the compressor hooks are securely and evenly seated on the spring coils before tightening.
Tighten a little at a time on each side, alternating between both sides to maintain balance and even pressure.
Once the spring is safely compressed and there is no pressure on the upper mount, the top nut on the strut shaft can be safely removed.
Working carefully during this step ensures your safety and prevents the sudden release of spring tension.
2. Remove the top mount and spring from the old strut
With the spring safely compressed, you can now remove the top mount and other parts from the old strut.
The top mount connects the strut to the vehicle’s body and typically contains a bearing that allows the strut to rotate during steering.
Over time, this bearing can wear out and cause noise or rough steering, so it’s a good idea to inspect it carefully.
If you see any cracks, corrosion, or looseness in the bearing, it should be replaced.
Once the top mount is removed, carefully lift the compressed spring off the old strut.
Pay attention to any rubber isolators or bump stops, as these help reduce road vibrations and protect the strut from harsh impacts.
If they are cracked or worn, replace them before reassembling the parts.
Cleaning the parts before reassembly also ensures they fit together properly.
3. Install the spring onto the new strut – ensure correct alignment
Before placing the spring onto the new strut, ensure the strut shaft and mounting area are clean and free of dirt or oil.
Correct spring alignment is crucial for both safety and performance.
Most coil springs have a specific upper and lower end that fits into grooves or seats on the strut and mount.
Ensure the bottom coil of the spring is properly seated in its place on the new strut base.
Once aligned, reinstall the upper mount and tighten the center nut to the manufacturer’s torque specifications.
A torque wrench ensures the nut is neither too tight nor too loose, helping to prevent future problems such as rattling noises or misalignment.
When everything is properly installed, slowly and evenly release the tension on the spring compressor until the spring is fully seated and stable on the new strut.
How to Install the New Strut
Installing the new strut is a crucial part of this process as it ensures the suspension system functions correctly.
This step involves carefully positioning the new strut assembly in place, securing it at both the upper and lower mounting points and reconnecting any brake or sensor connections that were previously disconnected.
Correct strut installation is essential because it directly impacts your car’s ride height, alignment and handling.
A small mistake, such as bolt misalignment or incorrect torque, can lead to uneven tire wear, noise, or instability in the steering.
Therefore, every bolt and nut must be properly reinstalled according to the manufacturer’s specifications.
Taking your time with this step guarantees that your suspension will function correctly, provide a smooth ride and maintain vehicle stability in all driving conditions.
1. Position the New Strut and Loosely Tighten the Upper Mounting Nuts
To begin, carefully position the new strut assembly in the vehicle, aligning the upper mounting studs with the holes in the strut tower under the hood or inside the trunk.
It’s best to initially hand-tighten the upper mounting nuts, but only loosely.
This helps hold the strut in place while still allowing enough movement to align the lower part of the strut with the steering knuckle later.
Keeping the upper nuts slightly loose also prevents the strut from twisting or becoming misaligned during installation.
Ensure the strut is oriented correctly, with the spring seat and lower bracket facing the correct direction relative to the wheel hub.
If the strut is installed upside down, it can interfere with brake lines or steering components, so double-check its orientation before proceeding.
2. Reconnect the Lower Bolt to the Steering Knuckle and Tighten to Torque Specifications
Once the strut is properly seated at the top, align the lower end with the steering knuckle.
Insert the bolt through the lower mounting holes of the strut and into the knuckle.
You may need to wiggle it slightly to fully align them, specially if the strut and knuckle aren’t at the exact same angle.
In some cases, using a small jack under the control arm can help lift or position the assembly correctly.
Once the bolt is in place, install the nut and tighten it to the manufacturer’s specified torque using a torque wrench.
The correct torque is crucial as it ensures the suspension components are securely fastened without overtightening, which could stretch the bolt or damage the threads.
Some vehicles also have camber adjustment bolts here, which control the wheel alignment angle.
If your vehicle has these, ensure they are set to their original marked position to maintain proper wheel alignment.
3. Fully Tighten the Upper Mount Nuts
After properly tightening the lower bolt, go back to the top of the strut tower and fully tighten the upper mounting nuts.
Use a torque wrench for the correct torque setting specified in your vehicle’s service manual.
Overtightening can damage the mount or bearing, while undertightening can allow the strut to move slightly, causing a knocking noise while driving.
Tightening the nuts evenly and in a cross pattern ensures the top mount sits flat and securely against the car’s body.
Once this step is complete, the strut should be firmly in place without any excessive movement or gaps.
4. Reconnect the Brake Lines or ABS Sensor Wires
Once the strut is securely in place, it’s time to reconnect any brake lines, ABS sensor wires, or other components that were previously disconnected.
These lines are typically attached to the strut body with small brackets or clips.
Carefully reconnect them, ensuring they are secure but not bent or stretched.
The routing of these lines is crucial because if they rub against moving parts of the suspension or wheel, they can wear through over time, leading to serious safety issues.
Always verify that each line is routed along the same path it followed before removal.
Finally, carefully inspect the entire assembly, ensuring all bolts, nuts and connections are tight and properly aligned.
How to Reassemble and Lower the Vehicle
Once the new strut is securely installed and all connections are checked, it’s time to reassemble the vehicle and lower it back to the ground.
This stage may seem straightforward, but it plays a crucial role in ensuring the suspension system is properly set and all components are secure before driving.
Reattaching the wheel and lowering the car should be done carefully and in the correct sequence to avoid putting excessive stress on the new strut or wheel assembly.
Properly tightening the lug nuts using the correct torque values ensures the wheel remains firmly attached and balanced.
This step not only completes the repair but also ensures safety, stability and even tire wear once the vehicle is back on the road.
1. Reattach the Wheel and Tighten the Lug Nuts
First, place the wheel back onto the hub, aligning the holes with the wheel studs.
Gently push the wheel into place and hand-tighten the lug nuts to avoid cross-threading.
Hand-tightening the nuts initially ensures the threads seat properly and reduces the risk of damage.
Once all the nuts are in place, use a wrench to tighten them in a crisscross or star pattern.
This pattern helps the wheel seat evenly against the hub, preventing wobbling or misalignment.
At this stage, you are not applying full torque – the goal is simply to secure the wheel in place while the vehicle is still lifted.
It’s important to check that the wheel is properly seated against the hub, as any gaps or uneven seating can lead to vibrations or a loose wheel while driving.
2. Slowly Lower the Vehicle
After the wheel is securely tightened, use the jack to slightly raise the car and remove the jack stands from underneath the vehicle.
Next, slowly and steadily lower the vehicle until the tires are fully in contact with the ground.
Lowering the vehicle too quickly or unevenly can put unnecessary stress on the new struts or other suspension components.
Doing it slowly allows the suspension to settle into its natural position.
Once the vehicle is fully on the ground, gently bounce each corner to help the struts and springs settle into their correct positions.
This also allows you to check for any unusual movement or noises that may indicate loose parts.
3. Torque the Lug Nuts to Manufacturer Specifications
With the vehicle safely on the ground, it’s now time to fully tighten the lug nuts to their precise torque specifications.
Using a torque wrench is crucial for this step, as over-tightening or under-tightening the lug nuts can cause serious problems.
If the lug nuts are too loose, the wheel could wobble or come off while driving.
If they are too tight, they can stretch the studs or warp the brake rotor.
The correct torque value can be found in your vehicle’s owner’s manual or service guide and is typically measured in foot-pounds (ft-lbs).
Tighten the nuts again in a crisscross pattern to ensure even pressure on the wheel.
After torquing, double-check each nut to make sure none were missed.
Properly completing this step ensures the wheel is securely attached and the vehicle is ready for a safe test drive.
Once the car is back on the ground, it’s also a good practice to re-check the torque on the lug nuts after driving a short distance.
This helps confirm that everything is tight and the wheel is properly secured.
Properly completing this reassembly and lowering process ensures that the strut replacement is both safe and effective, allowing your car to once again provide smooth, controlled handling.
Read More:
Post-Installation Tips You Should Follow
After installing new struts, it’s crucial to perform some final checks to ensure your vehicle’s suspension system is functioning correctly and safely.
Many drivers assume that once the struts are replaced, the job is done – but post-installation inspection and testing are just as important as the installation itself.
This stage helps confirm that every bolt, nut and connection is secure and that the vehicle is handling properly on the road.
Even a small oversight, such as a slightly loose fastener or a misplaced component, can lead to poor handling, strange noises, or uneven tire wear.
Double-checking your work and performing a short test drive ensures the new struts perform exactly as they should, resulting in smooth and stable performance.
Additionally, a professional wheel alignment is essential after installation – it’s crucial for proper tire contact, steering response and long-term suspension health.
1. Recheck All Fasteners and Connections
Before starting the engine or lowering the car from the jack stands, carefully inspect all fasteners and connections associated with the strut.
Double-check every nut and bolt you loosened or replaced during the installation, including the upper mount nuts, the lower strut-to-knuckle bolts and any brackets holding brake lines or ABS wires.
Ensure each one is tightened to the manufacturer’s torque specifications.
Even a single loose bolt can cause rattling noises, misalignment, or, in rare cases, component failure.
It’s also wise to check the area around the strut to ensure no tools, clips, or parts have been accidentally left behind.
Ensuring all connections are tight and clean guarantees that the struts will function safely and efficiently once the vehicle is back on the road.
2. Take a short test drive to verify handling and ride comfort
Once everything is double-checked and secure, take the vehicle for a short, cautious test drive.
Drive slowly at first, ideally on a smooth, open road where you can safely feel how the car responds.
Pay attention to how the vehicle handles bumps, corners and braking.
With properly installed struts, the car should feel more stable, steering control should be improved and bouncing should be reduced.
Listen for any unusual clunking, rattling, or creaking noises, which could indicate loose fasteners or misplaced components.
Try gently braking and taking a few low-speed turns to see if the steering feels smooth and centered.
Driving the vehicle for a short period not only confirms that everything is properly installed but also helps the new struts settle into place.
If anything feels off, return to your workspace and double-check your installation before driving at higher speeds.
3. Get a wheel alignment – this is crucial after any strut replacement
Wheel alignment is one of the most important final steps after replacing struts.
Struts are directly connected to the vehicle’s suspension geometry, which affects the angle at which your tires contact the road.
Even a slight change in strut position can alter your camber, caster and toe angles – all of which affect handling, tire wear and steering response.
Without proper alignment, your car may pull to one side, the steering wheel may be off-center and your tires could wear unevenly in just a few hundred miles.
A professional alignment ensures that all four wheels are perfectly balanced and positioned according to factory specifications.
This not only protects your new struts but also improves safety, fuel efficiency and tire life.
Common Mistakes to Avoid While Replacing Car Struts
Replacing car struts is a job that demands precision and attention to detail.
Even a small mistake during installation can lead to poor vehicle performance, safety hazards, or premature failure of suspension components.
Being aware of the most common mistakes allows you to avoid them and ensure a safe, reliable and long-lasting strut replacement.
Proper handling of the springs, applying the correct torque, professional wheel alignment and using high-quality parts are crucial for the success of this repair.
Understanding these common errors helps both DIY mechanics and professionals complete the job efficiently while maintaining the integrity of the vehicle’s suspension system.
1. Failing to Properly Align the Spring During Reassembly
One of the most common mistakes is failing to properly seat the coil spring when installing it on the new strut.
The spring has an upper and lower end, which must be aligned with the seats on the strut body and strut tower.
Misalignment can lead to strange noises, uneven ride height and even damage to the strut or spring over time.
Furthermore, incorrect spring placement can affect the vehicle’s handling, making the car feel unstable during turns or braking.
Take the time to carefully check that the spring is properly seated in all the grooves, ensuring the suspension functions as designed and extending the lifespan of both the strut and the spring.
2. Forgetting to Properly Torque the Bolts
Properly torquing all strut bolts is critical for safety and performance.
Under-tightened bolts can loosen over time, leading to rattling noises, misalignment, or even component failure.
On the other hand, overtightening bolts can also damage threads, mounts, or suspension geometry.
Using a torque wrench and following the manufacturer’s specifications ensures that each fastener is tightened correctly.
This step should never be skipped or guessed, as proper torque guarantees the integrity of the entire suspension system.
3. Skipping Wheel Alignment
A professional wheel alignment is crucial after replacing struts, yet many people overlook this step.
Struts directly affect the wheels’ camber, caster and toe angles, which determine how the tires contact the road.
Skipping alignment can lead to uneven tire wear, poor handling, steering pull and reduced fuel efficiency.
Even if the installation is perfect, the wheels must be adjusted to factory specifications to maintain safe driving conditions and ensure optimal performance from the new struts.
4. Using Low-Quality Aftermarket Struts
Another common mistake is installing cheap, low-quality aftermarket struts.
While these may save money initially, they often fail prematurely, don’t dampen properly and negatively impact ride comfort and vehicle handling.
Struts are a critical safety component and using inferior parts can compromise stability, increase bounce and cause premature tire wear.
Choosing high-quality OEM or reputable aftermarket struts ensures proper fitment, a longer service life and reliable performance.
Investing in quality components from the start avoids unnecessary repairs and maintains the safety and comfort of your vehicle.
As well as, research into the hydropneumatic strut systems actually reveals that the damping behaviour of a struct literally changes substantially with the vehicle loading and velocity, which is why when you install the new struts, then its not enough just to match the part number, but you should even have to consider whether the replacement strut is rated for your specific vehicle’s load or not such as: for the full passenger or cargo weight so that it can maintain proper damping and handling always.[¹]
What are The Estimated Time and Cost
Understanding the time and cost involved in strut replacement helps vehicle owners better plan for repairs and make informed decisions between DIY (do-it-yourself) and professional service.
Strut replacement is a moderately difficult repair and the time required depends on your experience, tools and whether you are replacing one strut or both.
On average, a DIYer with all the necessary tools and parts readily available and no unforeseen complications can expect to spend approximately two to four hours replacing a pair of struts.
This time includes removing the old struts, transferring parts if necessary, installing the new struts, reassembling the suspension and performing basic post-installation checks.
1. Average Professional Cost
Having your struts replaced by a professional mechanic offers convenience, precision and safety, but it comes at a higher cost.
On average, the total cost of professional strut replacement ranges from $400 to $800 per axle, depending on the vehicle’s make and model.
This estimate typically includes labor costs, which can be substantial due to the need for careful handling of the struts, coil springs and alignment-sensitive components.
Professional service ensures that all fasteners are torqued correctly, the vehicle is safely reassembled and proper wheel alignment is performed afterward, which is crucial for handling and tire longevity.
2. Parts Cost
The cost of struts can vary significantly depending on the vehicle model, brand and quality of the replacement parts.
On average, a single strut costs between $100 and $400.
OEM struts, designed by the original vehicle manufacturer, are typically more expensive but offer a perfect fit, consistent performance and a longer service life.
High-quality aftermarket struts are often slightly less expensive but still meet safety and performance standards.
Using lower-quality parts may reduce the initial cost, but in the long run, it can lead to premature wear and tear, poor ride quality and additional expenses.
Conclusion – How to Replace Car Struts
The well-maintained or properly installed struts actually restores your car’s smoothness and also protects the tires, brakes and other suspension components from having premature wear as well.
Struts are a crucial part of a vehicle’s suspension system, controlling how the car absorbs bumps, handles corners smoothly and maintains tire contact with the road.
Over time, worn struts can lead to excessive bouncing, uneven tire wear, poor braking performance and reduced steering stability.
By following the correct steps for removing the old struts, transferring necessary components and installing the new struts with proper alignment and torque, you can restore your vehicle’s performance and ensure a safer, more comfortable ride.
Furthermore, post-installation checks, a thorough test drive and a professional wheel alignment guarantee long-lasting durability and stability.
Whether you perform the replacement yourself or hire a professional, investing the time and attention in this repair improves handling, enhances vehicle safety and ensures a smooth driving experience for many miles to come.
Now, you can comment down below you thoughts as well.
Frequently Asked Questions
Q1. What are struts and why are they important in a car?
Answer: Struts are a crucial part of your car’s suspension system. They combine the shock absorber and spring into a single unit, allowing your car to absorb bumps and maintain tire contact with the road. Struts keep your car stable during braking, turning and acceleration. If the struts are worn out, your car may bounce excessively, experience uneven tire wear, or feel unstable while driving. Maintaining proper struts ensures a smooth ride, better handling and improved safety.
Q2. How do I know if my struts need replacing?
Answer: Several signs indicate worn-out struts. If your car bounces excessively after going over bumps, dips forward during braking, or leans excessively when turning, your struts may be failing. Uneven or rapid tire wear and rattling noises from the suspension also suggest potential strut problems. Oil leaks around the strut assembly or poor steering response at higher speeds are additional warning signs. Recognizing these symptoms early can prevent further damage and maintain safe driving conditions.
Q3. Can I replace the struts myself, or should I hire a professional?
Answer: With the right tools and safety precautions, a knowledgeable DIYer can replace struts. However, it’s a moderately complex repair requiring a spring compressor, torque wrench and careful handling of suspension components. For those without mechanical experience or the proper tools, hiring a professional is safer and ensures correct installation. Professionals can also perform a wheel alignment afterward, which is essential for proper handling and tire wear.
Q4. What tools and materials will I need to replace my car’s struts?
Answer: To replace the struts, you will need a floor jack and jack stands to safely lift and support the vehicle. A lug wrench or impact wrench is needed to remove and reinstall the wheels. A socket and ratchet set and a torque wrench are essential for loosening and tightening bolts to the correct specifications. If the struts are not pre-assembled, you will also need a spring compressor to safely transfer the coil springs. Replacement struts, penetrating oil and safety gear such as gloves and eye protection are also necessary for a smooth and safe repair.
Q5. How long does it take to replace struts?
Answer: For a DIY enthusiast, replacing a pair of struts typically takes two to four hours, depending on experience and available tools. Professional mechanics can often complete the job faster, sometimes in one to two hours per axle. The time can vary if the vehicle has rusted bolts, hard-to-reach parts, or requires the replacement of additional parts such as mounts or bearings. Carefully following each step ensures safety and prevents damage to other suspension components.
Q6. How much does it cost to replace struts?
Answer: The cost of replacing struts depends on whether you do it yourself or hire a professional. High-quality struts typically cost between $100 and $400 per strut, depending on the vehicle model and brand. If you hire a professional, the total cost, including labor and alignment, usually ranges from $400 to $800 per axle. While DIY installation can save money, professional service guarantees proper installation, safety and accurate wheel alignment.
References:
[1] Damping characteristics of hydropneumatic suspension strut in function of car static load
https://www.extrica.com/article/15773

Guys, I’m a car audio enthusiast and customization expert and I love clear sound and clean installation. Plus, I have spent years helping people build their dream audio setups. And whenever I’m working on cars, I probably listen to music and thinks about the next big upgrade.
