Written By: Don Dodi
Fact Checked By: Kristen Brown
Reviewed By: Diego Rosenberg
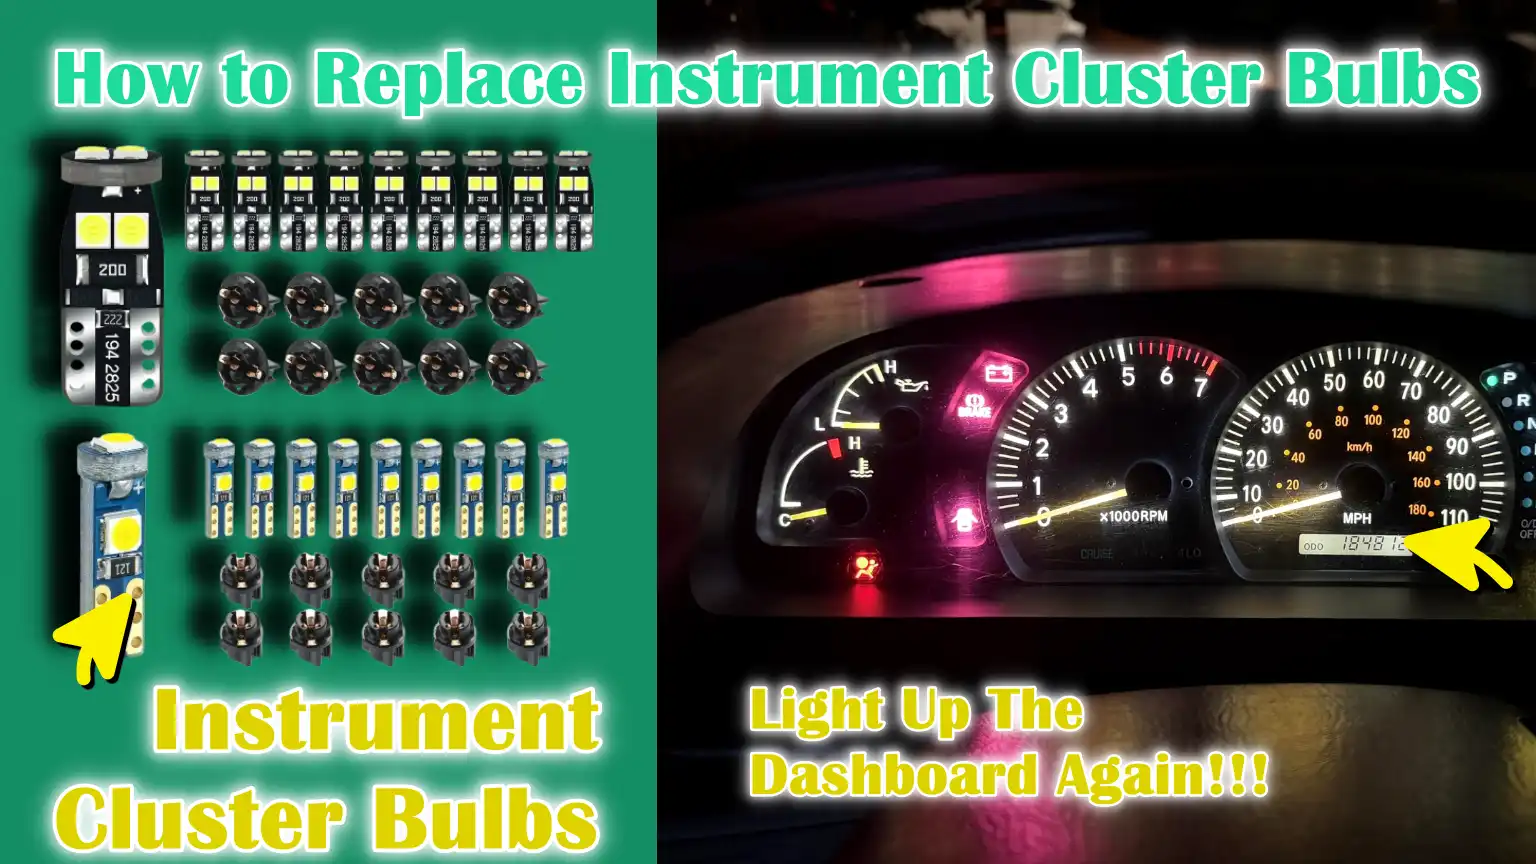
Over the period of time, the instrument cluster bulbs slowly wear out just like the headlight bulbs that’s why you need to replace them in terms of illuminating the speedometer, fuel gauge, warning symbols and other critical driving information again.
Basically, these bulbs allows the drivers to clearly see the vehicle data in the low light, at night or in the poor weather conditions as well.
And, over the period of time and usage, the instrument cluster bulbs gets dim, flicker or burn out completely due to the normal wear, heat exposure and constant electrical use.
Plus, there’s automotive service data that shows that the dashboard illumination bulbs are among the one of the most commonly replaced interior lighting components, specifically in the vehicles that are more than 5 years old.
So, whenever these bulbs fail, then the drivers may struggle to read the speed or warning indicators that also increases the risk of the missed alerts or unsafe driving conditions.
Now, in this guide you’ll understand everything about How to Replace Instrument Cluster Bulbs, as it doesn’t requires advanced mechanical skills because of the straightforward maintenance task.
Now, Let’s Understand About Instrument Cluster Bulbs
1. What Instrument Cluster Bulbs Do
Instrument cluster bulbs are small light sources located behind the dashboard panel to illuminate the speedometer, fuel gauge, temperature gauge and warning lights.
Their primary purpose is to clearly display essential driving information in low-light conditions, such as at night or during heavy rain.
These bulbs operate when the vehicle is running and are designed to provide consistent, non-glaring illumination, allowing the driver to quickly and easily read the information without distraction.
When these bulbs begin to fail, the dashboard may appear dim, unevenly lit in certain areas, or completely dark, making driving unsafe and uncomfortable.
2. Types of Bulbs Used in Instrument Clusters
Vehicle manufacturers use different types of bulbs in instrument clusters depending on the age, design and technological level of the vehicle.
Older vehicles typically utilize traditional bulb designs, while newer vehicles often employ modern lighting systems that offer longer lifespan and greater energy efficiency.
Understanding the type of bulb used in your vehicle is crucial for proper replacement and maintaining optimal dashboard illumination.
Incandescent Bulbs
Incandescent bulbs are the most common type found in older vehicles.
These bulbs produce light by heating a thin metal filament until it glows.
They are inexpensive, easy to replace and readily available, which is why they were used in dashboards for many years.
However, incandescent bulbs generate more heat and have a shorter lifespan compared to newer alternatives.
Over time, the filament weakens and eventually breaks, causing the bulb to fail or become significantly dimmer.
LED Bulbs
LED bulbs, or Light-Emitting Diodes, are commonly used in modern vehicles.
These lights produce illumination by passing electricity through semiconductor material, making them more energy-efficient and significantly longer-lasting than incandescent bulbs.
LED bulbs generate very little heat and often provide brighter, more consistent light.
Many LED dashboard lights can last the entire lifespan of the vehicle, but when replacement is necessary, correct polarity and compatibility are crucial to ensure proper operation.
3. Common Bulb Sizes and Socket Types
Instrument cluster bulbs come in specific sizes and fit into matching sockets designed to securely fit into the cluster housing.
These sockets often feature a twist-lock design, allowing the bulb and holder to be removed together with a slight twist.
Using the correct bulb size and socket type is essential, as an incorrect fit can lead to poor electrical contact, uneven illumination, or damage to the cluster circuit board.
The vehicle’s service manual typically specifies the correct bulb size required for each dashboard position.
4. Difference Between Backlight Bulbs and Indicator Bulbs
Backlight bulbs are responsible for illuminating the main dashboard background, making the gauges and numbers visible at night.
These bulbs typically illuminate a large area evenly and operate continuously whenever the vehicle’s lights are on.
Indicator bulbs, on the other hand, are used for warning and status lights such as the check engine light, turn signals, high-beam indicator and seat belt warning.
Indicator bulbs only illuminate when specific conditions are met.
Understanding this distinction is important because backlight and indicator bulbs may have different brightness levels, colors and replacement requirements.
Tools
| Tool or Material | Why You Need It |
|---|---|
| Replacement Bulbs – OEM or Compatible Aftermarket | Using the correct light bulb ensures the right brightness and a longer lifespan. Using the correct type also prevents flickering, dim lighting, or electrical problems after installation. |
| Phillips and Flathead Screwdrivers | Without the correct screwdriver, the screws can become stripped or damaged. Using the right tool ensures that they can be removed safely without damaging the dashboard parts. |
| Trim Removal Tools | These tools protect the dashboard surface and clips. They help in easily removing trim without damaging expensive interior parts. |
| Gloves – Clean, Dry Gloves | The oil from bare fingers can shorten the lifespan of the bulb and cause uneven heating. Gloves help keep the bulb clean and ensure it lasts longer. |
| Vehicle Service Manual | This manual helps you make informed decisions and avoid mistakes. It ensures you use the correct bulb size and remove the parts in the correct order. |
How to Ensure Safety By Taking Necessary Precautions Before Starting
1. Disconnecting the Vehicle Battery
Before working on the instrument cluster, it is crucial to disconnect the vehicle’s battery.
The instrument cluster is directly connected to the vehicle’s electrical system and even a small amount of live current can cause short circuits or damage sensitive electronic components.
Disconnecting the battery also reduces the risk of accidental airbag deployment in vehicles where dashboard components are located near airbag wiring.
In most vehicles, removing the negative battery cable safely cuts the power, ensuring the safety of both the vehicle and the person performing the repair.
2. Allowing Dashboard Electronics to Fully Discharge
After disconnecting the battery, allow time for the dashboard electronics to fully discharge.
Modern vehicles contain control modules and memory systems that can retain an electrical charge for several minutes even after the battery is removed.
Allowing this time helps prevent electrical sparks, warning light errors, or damage to the instrument cluster circuit board.
Waiting ensures that the system resets properly and that the electronic components are safe to handle while replacing bulbs.
3. Protecting Dashboard Trim and Interior Panels
Dashboard trim and interior panels are often made of plastic materials that can easily scratch, break, or become damaged.
Protecting these surfaces is essential, as replacing damaged trim can be expensive and difficult.
Taking care when removing panels and properly supporting them helps maintain the aesthetic integrity of the vehicle’s interior.
Clean hands or gloves also prevent dirt, oil and fingerprints from getting on light-colored panels, ensuring that the dashboard looks clean and well-maintained after the repair is complete.
How to Prepare the Vehicle
1. Adjusting the Steering Wheel for Access
Before working on the instrument cluster, the steering wheel should be adjusted to provide maximum working space.
In most vehicles, the steering wheel can be tilted or telescoped, allowing it to be moved down and away from the dashboard.
This extra space makes it easier to access the instrument cluster without having to contort your hands in tight spaces.
Properly adjusting the steering wheel also reduces the risk of scratching the cluster lens or damaging the steering column trim during removal.
2. Lowering or Removing the Steering Column Cover
In some vehicles, the steering column cover slightly obstructs access to the instrument cluster or dashboard trim.
These covers are typically made of plastic and are held in place by small screws on the underside of the column.
Carefully lowering or removing them provides better visibility and more working space.
Taking your time with this step can prevent broken clips or cracked covers, which are common problems when panels are removed forcefully or hastily.
3. Identifying the Dashboard Bezel and Cluster Mounting Points
The dashboard bezel is the trim piece that surrounds and holds the instrument cluster in place.
Before removing anything, it’s crucial to know where the bezel is attached to the dashboard and where the instrument cluster’s mounting screws are located.
These mounting points are often hidden behind trim pieces or small covers to give the dashboard a clean look.
Knowing their exact location prevents pulling in the wrong places, which can damage clips, wiring, or the cluster housing.
How to Remove the Dashboard Trim
1. Carefully Removing the Trim Panel
Dashboard trim panels are typically held in place by a combination of hidden clips and light pressure fittings.
Carefully removing these panels from the dashboard prevents cracking or warping of the plastic.
Applying light and even pressure allows the clips to release without breaking.
Because dashboard trim is often exposed to heat and sunlight over time, it can become brittle, so patience is crucial to avoid any permanent damage that could affect the look and fit of the interior.
2. Removing Screws and Fasteners
Some trim panels are secured with screws or small fasteners that must be removed before the trim can be fully detached.
These screws are often hidden behind small covers or near air vents and controls to maintain a clean look on the dashboard.
Using the correct screwdriver size prevents stripping the screw heads.
Carefully removing the screws in the correct order reduces stress on the trim and ensures that the panels come off easily without force.
3. Safely Storing Clips and Screws
The clips and screws used in dashboard trim are small and easily lost, but they are essential for proper reassembly.
Storing them safely ensures that the trim remains secure and doesn’t rattle after reinstallation.
Keeping each fastener organized also saves time during reassembly and ensures that the dashboard fits well and looks original after the repair is complete.
How to Remove the Instrument Cluster
1. Locating and Removing the Cluster Mounting Screws
The instrument cluster is attached to the dashboard with mounting screws that hold it securely in place while the vehicle is in motion.
These screws are typically located around the edges of the cluster housing and may be hidden behind trim panels or small plastic covers.
It is crucial to locate and remove all mounting screws, as attempting to pull the cluster out without completely removing the screws can crack the housing or damage the dashboard.
Using the correct size screwdriver prevents stripping the screws and ensures that the cluster can be securely reinstalled later.
2. Gently Pulling the Cluster Forward
After removing the mounting screws, the instrument cluster can be gently pulled forward from the dashboard.
This step should be performed slowly and evenly to avoid putting excessive stress on the plastic housing or scratching the clear lens protecting the gauges.
At this stage, the cluster is still connected to the wiring, so it should not be pulled out completely.
Pull it forward just enough to access the rear, providing sufficient space to safely disconnect the electrical connections without bending or breaking them.
3. Disconnecting the Electrical Connectors
The back of the instrument cluster is connected to the vehicle’s wiring harness via one or more electrical connectors.
These connectors supply power and transmit data for speed, fuel level, warning lights and other indicators.
Most connectors have locking tabs that must be pressed or lifted before they can be removed.
Carefully disconnecting them prevents bent pins, loose connections, or electrical malfunctions.
Proper handling ensures that the cluster will function correctly after reinstallation and helps avoid warning light malfunctions or gauge problems.
How to Access the Instrument Cluster Bulbs
1. Identifying the Bulb Holders Behind the Cluster
After removing the instrument cluster, several small bulb holders will be visible on the back of the unit, embedded in the cluster housing.
These holders are typically round and made of plastic and they are positioned directly above the light pathways that illuminate the gauges and symbols on the front.
Each holder contains a bulb and connects it to the electrical circuit.
Correctly identifying these holders is crucial, as removing the wrong component can damage the circuit board or affect the functionality of the gauges.
The bulb holders are designed to be serviceable, meaning they can be removed without disassembling the cluster.
2. Understanding Twist-Lock Bulb Sockets
Most instrument cluster bulbs utilize twist-lock sockets, designed for quick and secure removal.
These sockets typically require a slight twist to unlock them from the cluster housing.
The twist-lock design ensures that the bulb maintains proper electrical contact and doesn’t loosen due to vibrations while driving.
Understanding this system prevents applying excessive force to the socket, which could break the holder or damage the printed circuit on the back of the cluster.
When removed correctly, the bulb and socket come out together for easy replacement.
3. Differentiating Between Illumination and Warning Bulbs
Instrument clusters use different bulbs for general illumination and warning indicators.
Illumination bulbs provide uniform background lighting that makes the speedometer and gauges visible at night.
These bulbs typically illuminate when the headlights are turned on.
Warning bulbs, however, are used for specific alerts such as engine warnings, turn signals and high-beam indicators.
These only illuminate when certain conditions are met.
Understanding the differences between these types of bulbs ensures that the correct bulb is replaced, preventing problems such as uneven lighting or malfunctioning warning lights after reassembly.
How to Replace the Bulbs
1. Removing the Old or Defective Bulbs
Old or defective instrument cluster bulbs are typically removed by gently pulling them out of their holders, or, depending on the vehicle’s design, the bulb and holder may be replaced as a unit.
Over time, these bulbs can fail due to heat, vibration and prolonged use, which can cause the filament to break or the light output to diminish.
Carefully removing the bulbs helps prevent damage to the holder and the printed circuit board behind the cluster.
It’s crucial to work slowly and steadily, as older plastic components can be brittle and may break if handled roughly.
2. Installing the New Bulbs Correctly
New bulbs should be installed using clean hands or gloves to prevent dirt and skin oils from getting on the bulb’s surface.
Oil on the bulb can create hot spots, reducing the bulb’s lifespan and brightness.
The replacement bulb should match the original bulb’s type, size and electrical rating for proper illumination and safe operation.
Using the correct bulb ensures consistent lighting on the dashboard and prevents electrical problems such as flickering or overheating.
3. Ensuring Proper Seating and Alignment
After installing the new bulb, it must be properly seated in its holder and correctly aligned within the cluster housing.
A bulb that is not fully seated may not illuminate at all or may work intermittently while driving.
Proper alignment ensures that the light is evenly distributed across the gauge markings and symbols, providing clear visibility at night.
Taking a moment to ensure each bulb is securely in place helps avoid the need to remove the cluster again due to poor lighting or loose connections.
How to Test the New Bulbs
1. Temporarily Reconnecting the Cluster
Before fully reinstalling the instrument cluster into the dashboard, it’s essential to temporarily reconnect it for testing.
This allows you to confirm that the new bulbs are working correctly without having to remove the trim again.
The cluster should be handled carefully when reconnecting the electrical connector.
This temporary connection helps identify any issues quickly, such as a bulb not being properly seated or a connector not being fully locked.
2. Reconnecting the Battery
Once the cluster is temporarily connected, the vehicle’s battery can be reconnected to restore power.
Reconnecting the battery supplies power to the dashboard system and activates the instrument cluster.
This step should be performed carefully to avoid sparking and ensure a secure connection.
Reconnecting the battery only after all connectors are properly attached protects the cluster electronics and ensures accurate testing results.
3. Checking Lights, Indicators and Dimming Function
With the power restored, the dashboard lights should be checked under normal operating conditions.
Turning on the vehicle’s lights confirms that the backlight bulbs are illuminating the gauges evenly and clearly.
Warning indicators such as turn signals and high-beam lights should also be tested to ensure they activate correctly.
Adjusting the dimmer control allows you to confirm that the brightness changes smoothly, indicating proper bulb installation and correct electrical contact.
How to Reinstall the Instrument Cluster
1. Securely Reconnecting the Wiring Harness
When reinstalling the instrument cluster, it’s crucial to securely reconnect all wiring harnesses to ensure proper communication between the dashboard and the vehicle’s electronic systems.
These connectors carry signals for speed, fuel level, engine warnings and lighting functions.
Each connector is designed to fit in only one position and typically clicks or locks into place when properly seated.
Ensuring these connections are fully engaged helps prevent issues such as flickering lights, inaccurate gauge readings, or warning lights failing to illuminate.
2. Positioning the Cluster Back into Place
After reconnecting the wiring, the instrument cluster should be carefully placed back into its original position in the dashboard.
Aligning it correctly ensures the cluster sits flush and that there is no undue stress on the mounting points or wiring.
Proper positioning also keeps the clear lens centered within the dashboard opening, maintaining good visibility and a factory-finished look.
Taking your time during this step helps avoid pinched wires and uneven gaps around the cluster.
3. Tightening the Screws to the Correct Torque
The mounting screws that hold the instrument cluster in place should be tightened evenly and with moderate force.
These screws are designed to secure the cluster without damaging the plastic housing or dashboard frame.
Overtightening can strip the threads or warp the cluster casing, while undertightening can lead to vibrations or rattling while driving.
Tightening the screws just enough to hold the cluster firmly in place ensures long-term stability and reliable operation.
How to Reinstall the Dashboard Trim
1. Aligning the Trim Panels Correctly
When reinstalling the dashboard trim, proper alignment is crucial to restoring the original look and fit of the interior.
The trim panels are designed to fit into specific locations, featuring built-in guides and clips that line up with corresponding slots in the dashboard.
Carefully aligning the panels before applying pressure helps prevent broken clips and uneven edges.
Correct alignment also ensures that openings around buttons, air vents and the instrument cluster function smoothly and provide a factory-finished look.
2. Reinstalling Screws and Clips
Once the trim panels are aligned, the screws and clips should be reinstalled in their original positions.
These fasteners securely hold the trim in place and prevent movement while driving.
Using the correct screws helps maintain the proper tension without damaging the trim material.
Reinstalling all clips and screws ensures that the dashboard remains stable and prevents loose panels that could rattle or vibrate over time.
3. Ensuring No Gaps or Rattles
After the trim is fully installed, it’s essential to check for any gaps, loose edges, or uneven surfaces.
Gaps can allow dust and noise to enter the dashboard area, while loose trim can cause rattling noises while driving.
Gently pressing on the edges helps ensure that all clips are fully engaged.
A final inspection confirms that the dashboard is secure, quiet and visually clean, just as it was before the repair.
What are the Final Inspection and Function Check
1. Verifying Brightness Consistency
After completely reassembling the dashboard, the instrument cluster’s brightness should be checked to ensure all areas are evenly illuminated.
Consistent brightness helps the driver read the gauges clearly without eye strain, specially during nighttime driving.
Uneven lighting may indicate a bulb is not properly seated or that the bulb’s brightness doesn’t match the others.
Taking the time to view the cluster in low-light conditions helps ensure the lighting is balanced and comfortable to view.
2. Checking Warning Lights and Gauges
All warning lights and gauges should be checked to confirm they are functioning correctly.
This includes indicators such as the check engine light, turn signals, high-beam indicator, fuel gauge, speedometer and temperature gauge.
These components rely on accurate illumination and electrical signals to provide crucial vehicle information.
Ensuring they function correctly helps prevent missed alerts and promotes safe driving by keeping the driver fully informed about the vehicle’s status.
3. Adjusting Dimmer Settings
Most vehicles have a dimmer control that allows the driver to adjust the dashboard brightness.
Testing this feature ensures the new bulbs respond smoothly to brightness changes without flickering or sudden fluctuations.
Proper dimmer operation allows the driver to set a comfortable level of illumination for various driving conditions.
A smooth and consistent dimming response confirms that the bulbs and electrical connections are working as expected.
What are the Common Mistakes to Avoid During Replacement of Instrument Cluster Bulbs

Also, there’s open educational resource that shows that when you replace the bulb then you should also inspect the bulbs, sockets, connectors and all the related wiring as well, as this literally provides a broader content for the cluster repair when simple bulb swaps does not resolve that dim or flickering cluster lights.[¹]
1. Installing the Wrong Type of Bulb
One of the most common mistakes when replacing instrument cluster bulbs is installing the wrong type of bulb.
Bulbs may look similar in size, but they can differ in voltage, brightness and base design.
Using the wrong bulb can result in dim lighting, uneven illumination, or even damage to the instrument cluster’s electrical circuit.
Some bulbs may draw too much power, leading to overheating or premature failure.
Ensuring the replacement bulb precisely matches the vehicle’s specifications guarantees proper lighting performance and longevity.
2. Touching the Bulb with Bare Fingers
Touching the bulb with bare fingers is another common mistake that can shorten its lifespan.
Skin oils and moisture can adhere to the bulb’s surface, creating hot spots when the bulb heats up.
These hot spots can weaken the bulb’s material and cause it to fail prematurely.
Handling the bulb with clean gloves or a cloth keeps the surface clean and allows the bulb to operate at a uniform temperature, resulting in better brightness and a longer lifespan.
3. Forgetting to Test Before Reassembly
Failing to test the instrument cluster before fully reassembling the dashboard can lead to unnecessary extra work.
If a bulb isn’t properly seated or a connector is loose, the problem may only become apparent after everything has been put back together.
Testing the cluster before reinstalling all the trim panels ensures that all the lights, indicators and gauges are functioning correctly.
This simple check saves time, prevents frustration and ensures the repair is completed correctly the first time.
Read More:
What are the LED Upgrade Considerations That You Needs to Be Aware Of
1. Advantages of Upgrading to LED Bulbs
Upgrading instrument cluster bulbs to LEDs offers several practical advantages.
LED bulbs consume significantly less power than traditional incandescent bulbs, reducing the load on the vehicle’s electrical system.
They also generate much less heat, helping to protect the instrument cluster housing and surrounding plastic parts from long-term heat damage.
LEDs typically last many times longer than standard bulbs, meaning fewer replacements will be needed over the vehicle’s lifespan.
They also provide more consistent illumination, resulting in clearer and more uniform lighting on the dashboard.
2. Polarity Issues with LEDs
Unlike incandescent bulbs, LED bulbs are polarity-sensitive, meaning they must be installed in the correct orientation to function.
If an LED bulb does not light up after installation, the cause is often reversed polarity.
This is a common characteristic of LED technology and not an indication of a faulty bulb.
Removing the bulb and rotating it or changing the socket position usually resolves this issue.
Understanding polarity helps avoid confusion during installation and prevents unnecessary bulb replacements.
3. Brightness and Color Selection Tips
Choosing the right brightness and color for LED dashboard bulbs is crucial for comfort and safety.
Overly bright LEDs can cause glare and eye strain during nighttime driving, while bulbs that are too dim can reduce visibility.
Selecting a balanced brightness level ensures that the gauges are clearly legible.
Color choice also matters, as lighter colors such as white or light amber closely resemble factory lighting and are more comfortable on the eyes.
Maintaining a consistent color and brightness across the cluster provides a clean, professional look.
When You Should Consult to the Professional
1. Digital or Fully Integrated Clusters
Some modern vehicles feature digital or fully integrated instrument clusters that combine the screen, control modules and lighting into a single, sealed unit.
These clusters do not use simple replaceable bulbs and instead rely on built-in lighting systems and electronic displays.
Attempting to open or repair these units without proper training can damage sensitive electronics or cause software errors.
In such cases, professional service is recommended, as specialized tools and diagnostic equipment are often required to safely repair or replace the cluster.
2. Vehicles with Airbag-Integrated Dashboards
Many vehicles have airbags located behind or near the dashboard and instrument cluster area.
These airbag systems are connected to sensors and control modules that must be handled with extreme care.
Improperly removing dashboard components in these vehicles can trigger airbag warning lights or create a safety hazard.
Professional technicians are trained to work safely around airbag systems and follow proper procedures, so professional assistance is the safest option when airbags are involved.
3. Persistent Lighting Problems After Replacement
If dashboard lighting problems persist even after replacing the bulbs, the issue may stem from faulty wiring, defective connectors, a malfunctioning dimmer switch, or a problem with the instrument cluster circuit board.
These problems are not always visible and can be difficult to diagnose without testing equipment.
Seeking professional help ensures accurate diagnosis and proper repair, preventing further damage and ensuring that the dashboard lighting functions correctly and reliably.
Conclusion – How to Replace Instrument Cluster Bulbs
So, well-lit instrument cluster is not just about having the great appearance; but it is more about having the clear vision of information of your vehicle to drive in the safe way.
Basically, a clear and evenly lit dashboard allows drivers to easily read speed, fuel level, engine temperature and warning signals without distraction, specially when driving at night or in bad weather.
But, Over the time, heat, vibration and constant use can cause dashboard bulbs to burn out, making their replacement a common part of car maintenance.
In case of having modern digital clusters, airbag systems, or persistent lighting problems, you should go for the professional assistance to ensure the vehicle remains safe and reliable.
And, when you maintain the proper dashboard lighting not only improves visibility but also helps drivers react quickly to vehicle alerts, leading to safer and more confident driving every day.
So, that’s it from this guide and let us know if you still have confusion.
Frequently Asked Questions
Q1. What are instrument cluster bulbs and why are they important?
Answer: Instrument cluster bulbs are small lights located inside the dashboard that illuminate the speedometer, fuel gauge, temperature gauge and warning symbols. These bulbs help drivers clearly see essential vehicle information, specially at night or in low-light conditions. When these bulbs stop working or dim, it becomes difficult to read the gauges and see warning lights, which can affect driving safety and comfort.
Q2. How do I know if my instrument cluster bulbs need replacement?
Answer: Instrument cluster bulbs typically need replacing when parts of the dashboard become dark, the lighting is uneven, or they flicker while driving. Some gauges may be visible while others remain dark, which is a common sign of a burnt-out bulb. If the dashboard looks fine during the day but becomes difficult to read at night, it’s likely that the bulbs have failed and need replacing.
Q3. Is it safe to replace instrument cluster bulbs at home?
Answer: Yes, replacing instrument cluster bulbs is generally safe for most vehicles when basic safety precautions are followed. Disconnecting the battery, handling the bulbs carefully and working slowly will help prevent damage. This task doesn’t involve complex engine components and usually only requires basic tools. However, vehicles with digital clusters or airbag systems near the dashboard may require professional assistance.
Q4. How long does it take to replace instrument cluster bulbs?
Answer: For most vehicles, replacing instrument cluster bulbs takes approximately one to two hours. The time depends on how easy it is to remove the dashboard trim and access the cluster. Working carefully and thoroughly testing the bulbs before reassembling everything can prevent repeated work and save time overall.
Q5. Do I need special tools to replace instrument cluster bulbs?
Answer: Replacing instrument cluster bulbs typically doesn’t require special tools. Basic screwdrivers and trim removal tools are often sufficient to complete the job. Having gloves and a vehicle service manual can make the process easier and help avoid mistakes during removal and installation.
Q6. Can I replace instrument cluster bulbs with LED bulbs?
Answer: Yes, many vehicles allow for replacing instrument cluster bulbs with LED bulbs. LED bulbs consume less power, generate less heat and last longer than traditional bulbs. However, LEDs must be installed correctly as they are polarity-sensitive. Choosing the correct brightness and color ensures clear and comfortable dashboard illumination.
Q7. Why do new instrument cluster bulbs sometimes not light up?
Answer: New instrument cluster bulbs may not light up if they are not installed correctly or if the electrical connector is loose. In the case of LED bulbs, incorrect polarity is a common cause of failure. Removing and reinstalling the bulb correctly usually resolves the issue. Testing the cluster before complete reassembly helps identify such problems early.
Q8. What happens if I install the wrong type of bulb?
Answer: Installing the wrong type of bulb can result in uneven lighting, flickering, or electrical problems. Some bulbs may generate excessive heat or draw more power than the cluster’s design allows. This can shorten bulb life or damage the instrument cluster circuitry. Using the correct type of bulb ensures proper illumination and safe operation.
References:
[1] Automotive Technology/Instrument Cluster and Driver Information Systems Diagnosis and Repair
https://en.wikiversity.org/wiki/Automotive_Technology/Instrument_Cluster_and_Driver_Information_Systems_Diagnosis_and_Repair

Guys, I’m a car audio enthusiast and customization expert and I love clear sound and clean installation. Plus, I have spent years helping people build their dream audio setups. And whenever I’m working on cars, I probably listen to music and thinks about the next big upgrade.