 Skip to content
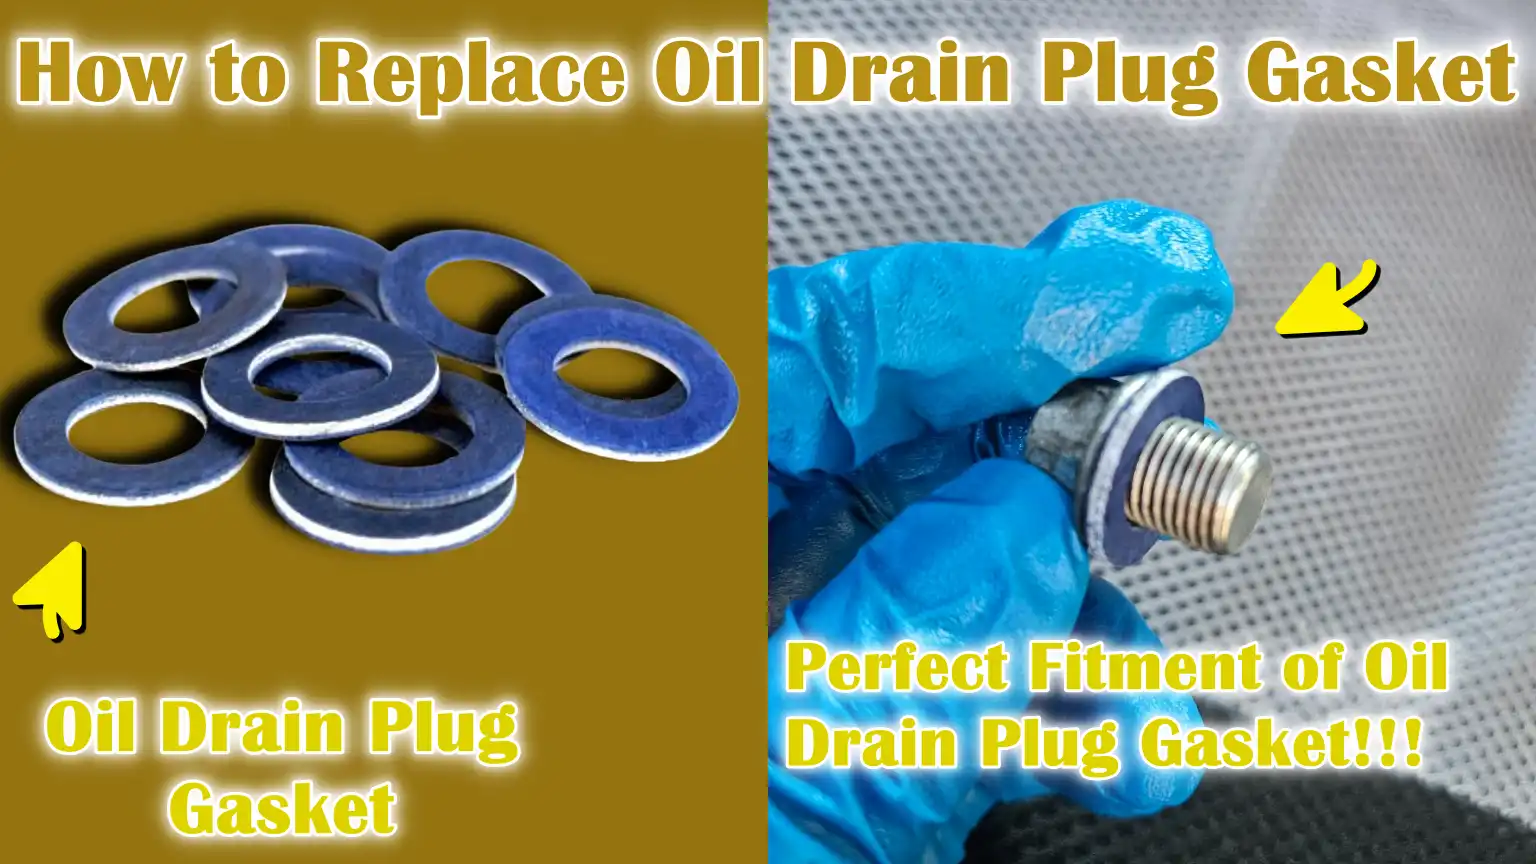
Written By: Don Dodi
Fact Checked By: Kristen Brown
Reviewed By: Diego Rosenberg
It is just a tiny metallic ring under your car that have the capability to decide whether your car’s engine stays healthy or leaks itself into the trouble, so just understand about the power of the oil drain plug gasket which is actually crucial element in the car’s hood.
This small ring usually made of the copper, aluminum or rubber materials, basically it forms a tight seal between the oil pan and the drain plug, that actually ensures that no engine oil escapes after each oil change.
And over the time, just like the other components it can passed out as well because of the excessive heat cycles, pressure and repetitive tightening that can harden, crack or just flatten this gasket and that leads to the beginning of the oil leak story that potentially harm the engine as well.
You should be away of the fact that even the minor oil leak can lead to the 10% to 20% faster degradation of engine components as it doesn’t meet the proper lubrication and there can be buildup of the contaminants as well.
Now, this guide literally shows you How to Replace Oil Drain Plug Gasket in the correct and easy way, which is also the maintenance task you can say.
Tools
| Tool / Material | Description | Purpose / Use | Tips |
|---|---|---|---|
| Replacement Oil Drain Plug Gasket | A small ring made of copper, aluminum, or rubber. | Creates a tight seal between the drain plug and the oil pan to prevent leakage. | Always select the correct size according to your car model and brand. |
| Socket Wrench or Spanner | A hand tool consisting of a handle and a socket or open end for turning bolts. | Used to safely loosen and tighten the oil drain plug. | Use the correct size to prevent damage to the plug. |
| Oil Drain Pan | A shallow container made of metal or plastic. | Old engine oil collects when the drain plug is removed. | Place it directly under the plug; make sure it is large enough to hold all the drained oil. |
| Clean Cloths or Paper Towels | Absorbent cloth or disposable paper. | It is used to wipe away old oil, clean surfaces and clean up spills. | Have several cloths ready; avoid leaving fibers on the plug or oil pan. |
| Jack and Jack Stands (if needed) | A hydraulic or scissor jack with a supporting stand. | If space is limited, the car can be safely lifted to access the oil pan. | Never work under a car supported only by a jack. Always use jack stands for safety. |
| Torque Wrench (recommended) | A wrench that measures the amount of tightening force applied to a bolt. | This ensures that the drain plug is tightened to the manufacturer’s specified torque without over-tightening. | Consult your car’s manual for the correct torque value; this can prevent damage to the gasket or threads. |
| Safety Gloves and Goggles | Protective gloves and safety glasses. | It protects the hands from hot oil and the glasses protect the eyes from splashes. | Always wear gloves when handling oil; goggles prevent accidental oil splashes from getting into your eyes. |
How to Safely Prepare Your Vehicle for Replacing Oil Drain Plug Gasket
1. Park the car on a level surface
Before starting any work, it’s crucial to park your car on a flat and stable surface.
This ensures the car doesn’t roll or tilt while you’re working underneath it.
A level surface also helps the engine oil drain evenly from the pan, preventing incomplete drainage and ensuring no old oil remains inside the engine.
Working on an uneven or sloped surface increases the risk of accidents and makes it difficult to properly reinstall the drain plug.
2. Allow the engine to cool completely
Never attempt to remove the oil drain plug while the engine is hot.
Engine oil can be extremely hot and cause severe burns if it comes into contact with your skin.
Allowing the engine to cool completely allows the oil to settle and reduces the risk of injury.
Additionally, cooler oil is thicker, making it easier to handle and less likely to spill during the process.
3. Engage the parking brake and use wheel chocks
Safety begins with preventing the car from moving unexpectedly.
Always engage the parking brake and, for added safety, place wheel chocks behind the tires.
This prevents the car from rolling, even on a slightly sloped surface or if the jack were to slip.
Wheel chocks are a simple but highly effective safety measure that protects both the person working and the vehicle.
4. Safely lift and support the vehicle with jack stands if needed
If the oil drain plug is in a difficult-to-reach location, you may need to lift the vehicle using a hydraulic or scissor jack.
It’s crucial not to rely solely on the jack to support the car.
After lifting the vehicle, place sturdy jack stands under the car at the manufacturer-specified points to safely support the weight.
Properly securing the vehicle can prevent accidents, such as the car falling and provides a stable working environment for tasks such as draining oil and replacing gaskets.
How to Locate the Oil Drain Plug
1. Locate the oil drain plug
The oil drain plug is typically located on the underside of the engine, attached to the oil pan.
The oil pan is a metal container that holds the engine oil and is situated at the bottom of the engine to allow the oil to drain downwards for circulation.
Depending on your vehicle’s make and model, the drain plug may be located on the side of the oil pan or closer to the center.
It’s usually a small bolt that screws directly into the pan and is designed to be removed during an oil change.
Correctly identifying the drain plug is crucial, as removing the wrong bolt could damage the engine or oil system.
Many car manuals include diagrams showing the exact location of the drain plug, making it easier for novices to find it safely.
2. Position the Oil Drain Pan Directly Beneath It
Once the oil drain plug has been located, it’s essential to place an oil drain pan directly beneath it before loosening the plug.
The pan should be large enough to contain all the engine oil that will drain out when the plug is removed.
Positioning the pan correctly prevents oil from spilling onto the garage floor or driveway, which could create a slippery surface and cause injury.
Proper placement also makes cleanup easier after the oil change and ensures that no oil is wasted.
Taking a moment to properly position the drain pan is a simple step that protects both the environment and your workspace.
How to Drain the Engine Oil – If You Think It is Truly Necessary
1. Carefully Loosen the Oil Drain Plug
Once the oil drain plug is located and the drain pan is in place, the next step is to carefully loosen the plug using a socket wrench or spanner.
It’s crucial to turn the plug slowly and gently to avoid damaging the threads or breaking the plug.
If the plug is very tight, it’s better to apply light and consistent pressure rather than forcing it.
Overtightening or forcing the plug can damage the oil pan or the plug itself, leading to costly repairs.
Properly loosening the drain plug ensures that the oil drains easily and safely.
2. Allow the Old Oil to Drain Completely
After loosening and removing the plug, the engine oil will begin to drain into the drain pan.
It’s essential to allow all the oil to drain completely, as any remaining old oil can mix with the new oil, reducing engine efficiency and potentially causing sludge buildup.
Depending on the vehicle and the type of oil, this draining process can take several minutes.
Being patient during this step ensures that the engine will be filled with clean, fresh oil, which helps maintain proper lubrication and extends engine life.
3. Clean the Area Around the Plug After Draining
Once the oil has completely drained, it’s important to clean the area around the drain plug and the oil pan opening.
Wiping away old oil, dirt and debris provides a clean surface for the new gasket and prevents leaks when reinstalling the plug.
This step also gives you an opportunity to inspect the drain plug and surrounding area for any damage or signs of corrosion.
Keeping the area clean makes it easier to handle the plug securely and ensures a proper seal when installing the new gasket.
How to Remove the Old Gasket
1. Inspect the Drain Plug and Old Gasket
Before removing the old gasket, it’s crucial to carefully inspect both the drain plug and the gasket itself.
Over time, constant exposure to engine heat and pressure can cause the gasket to harden, crack, or deteriorate.
It’s equally important to check the drain plug for signs of wear, corrosion, or damaged threads, as a faulty plug will not seal properly and may leak even after installing a new gasket.
A thorough inspection ensures you’re not just replacing the gasket, but also addressing any potential issues that could affect engine performance.
2. Carefully Remove the Old Gasket
After inspection, the old gasket should be carefully removed.
It may be stuck to the drain plug or oil pan due to residual oil or pressure over time.
Gently lift or pry it off using your fingers, avoiding bending the gasket or scratching the surfaces it seals against.
Forcing it off or using sharp tools can damage the oil pan or drain plug threads, leading to leaks or more costly repairs.
Taking the time to properly remove the old gasket ensures a clean surface for the new gasket to seal against.
3. Thoroughly Clean Both Mating Surfaces
Once the old gasket is removed, it’s essential to thoroughly clean both the mating surfaces of the drain plug and the oil pan.
Use a clean cloth or paper towel to remove any old oil, dirt and small pieces of gasket material.
A clean, smooth surface is crucial for the new gasket to create a proper seal and prevent oil leaks.
Skipping this step can result in uneven sealing, leading to persistent leaks and requiring a repeat of the gasket replacement process.
Clean surfaces also help in better inspection of any potential damage or corrosion that may need attention before reinstalling the plug.
How to Install the New Oil Drain Plug Gasket
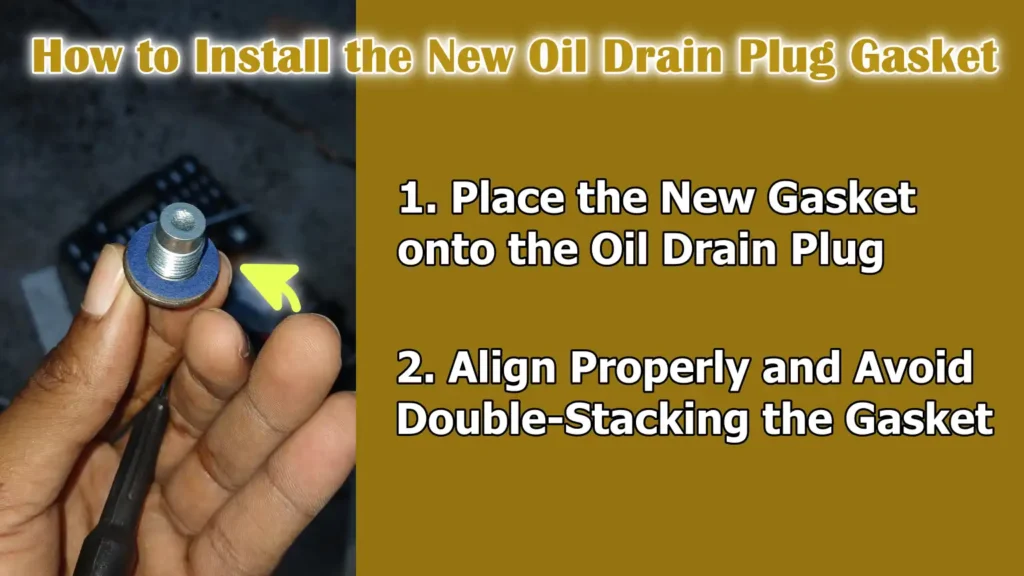
1. Place the New Gasket onto the Oil Drain Plug
After removing the old gasket and cleaning the surfaces, the next step is to place the new gasket onto the oil drain plug.
The gasket, which is typically made of copper, aluminum, or a durable synthetic material, should sit evenly around the plug to create a tight seal.
It’s crucial to ensure it’s properly seated, as even a small gap or unevenness can lead to engine oil leaks over time.
The new gasket should fit comfortably without forcing or stretching it, as excessive pressure can damage it and compromise the seal.
Proper placement also reduces the risk of the gasket slipping when reinstalling the drain plug.
2. Align Properly and Avoid Double-Stacking the Gasket
It’s essential to properly align the new gasket with both the drain plug and the oil pan hole.
The gasket should be flush against both surfaces to create a secure and leak-free seal.
Never place the old gasket under the new one, as this can create uneven pressure, prevent a proper seal and increase the likelihood of oil leaks.
Double-stacking the gasket can also make it difficult to properly tighten the plug and potentially damage the oil pan threads.
Taking the time to properly align and install the new gasket ensures a reliable seal, prevents future leaks and extends the life of your engine.
How to Reinstall the Drain Plug
1. Tighten the Plug by Hand First
After installing the new gasket onto the oil drain plug, the first step is to carefully hand-tighten the plug into the oil pan.
Hand-tightening ensures that the threads are properly aligned and reduces the risk of cross-threading, which can permanently damage the oil pan or drain plug.
Cross-threading occurs when the plug is forced in crookedly, stripping or damaging the threads.
By starting with hand-tightening, you establish a smooth and secure fit before applying any additional torque, which is crucial for creating a leak-free seal.
2. Use a Torque Wrench to Tighten to Manufacturer’s Specifications
Once the plug is hand-tightened, the next step is to use a torque wrench to tighten it to the correct torque specified by the vehicle manufacturer.
Torque specifications vary depending on the make and model, but following them precisely ensures that the plug is securely tightened without over-stressing the gasket or threads.
Using a torque wrench is essential because over-tightening can compress the gasket, while under-tightening can lead to oil leaks.
The correct torque strikes the perfect balance between a tight seal and a secure installation, contributing to the long-term reliability of the engine.
3. Avoid Over-tightening
Over-tightening the drain plug is a common mistake that can lead to serious problems.
Applying too much force can strip the threads in the oil pan, damage the gasket, or, in extreme cases, even crack the pan.
This not only results in oil leaks but can also lead to costly repairs.
By carefully following the manufacturer’s torque specifications and avoiding overtightening, you ensure that the gasket functions correctly, the plug remains secure and your engine is protected from oil leaks and contamination.
Tightening correctly is a small step that prevents big problems and extends the lifespan of both the gasket and the engine.
How to Refill the Engine Oil
1. Reinstall the oil filter (if removed) and add new engine oil
After replacing the oil drain plug gasket, the next step is to add new oil to the engine.
If the oil filter was removed during this process, it should be reinstalled or replaced according to the manufacturer’s instructions.
Using the correct type and grade of engine oil is crucial for proper lubrication, optimal engine performance and longevity.
Carefully pour the oil into the engine through the fill cap to prevent spills and allow the oil to settle evenly.
Fresh oil helps remove accumulated contaminants from the engine, reduces friction between moving parts and maintains the correct operating temperature, leading to improved fuel efficiency and extended engine life.
2. Check the oil level with the dipstick
After adding the new oil, it’s essential to check the oil level using the dipstick.
The dipstick allows you to measure the correct amount of oil in the engine and ensure it’s within the recommended range.
Too little oil can lead to increased friction, overheating and engine damage, while overfilling can cause increased pressure and leaks.
Remove the dipstick, wipe it clean, fully reinsert it and then check the level again to confirm the correct level.
Regularly monitoring the oil level after refilling ensures the engine runs smoothly and prevents problems caused by incorrect oil levels.
Read More:
How to Check for Leaks on the Oil Drain Plug Gasket
1. Start the Engine and Let It Run
After reinstalling the drain plug and refilling the engine with new oil, it’s crucial to start the engine and let it run for a few minutes.
Running the engine allows the new oil to circulate throughout all the components, building pressure in the oil system.
This pressure tests the integrity of the drain plug gasket seal and ensures that the oil is flowing correctly throughout the engine.
Observing the engine while it’s running also helps in quickly identifying any unusual noises or problems, allowing for immediate action to prevent potential damage.
2. Check the Drain Plug Area for Oil Leaks
While the engine is running, carefully inspect the area around the drain plug for any signs of oil leaks.
Even a small drip of oil can indicate that the gasket isn’t properly seated or that the plug is slightly loose.
Oil leaks not only create a mess but can also lead to a decrease in engine oil level over time, resulting in insufficient lubrication, overheating and increased wear on engine components.
A thorough check at this stage ensures that any issues are addressed before they become more serious.
3. Tighten Slightly if Necessary
If a minor leak is detected, tighten the drain plug just enough to stop the leak, but avoid overtightening.
Overtightening can compress the gasket, strip the threads, or even crack the oil pan, leading to costly repairs.
Using careful, controlled pressure ensures that the seal is secure and that both the drain plug and gasket remain intact.
This final check provides assurance that the oil system is functioning correctly and that the engine is protected from leaks, ensuring long-term reliability and performance.
How to Clean Up and Dispose of Used Oil
Basically, use engine oil and Oil Drain Plug Gasket must be handled responsibly, as EPA also shows that that used oil is actually recyclable but it can pollute soil and water as well if you dumped carelessly, so it is truly easy as well as most of the automotive stores actually accepts used engine oil and used oil filters or oil drain plug gaskets for safe recycling.[¹]
1. Clean Up Spilled Oil
After changing the oil and replacing the gasket, it’s crucial to immediately clean up any spilled oil.
Engine oil can make surfaces slippery, posing a risk of slips or accidents in your garage or driveway.
Use a clean rag or paper towel to carefully wipe up any drips or residue from the drain area, oil pan and surrounding surfaces.
Thorough cleaning also prevents dirt and debris from sticking to the leftover oil, which can make future maintenance difficult and harm the environment if it washes into storm drains.
2. Properly Dispose of Used Oil and Gasket
Used engine oil and old gaskets should never be thrown in regular trash or poured down drains, as they are hazardous to the environment.
Engine oil contains harmful chemicals and metals that can contaminate soil and water if not disposed of properly.
Take the used oil and gasket to an authorized recycling center or automotive service facility that accepts used oil for safe recycling.
Many communities offer designated collection points for hazardous automotive waste.
Proper disposal ensures environmental protection and helps maintain clean water and soil, while also complying with local regulations for hazardous materials.
Conclusion – How to Replace Oil Drain Plug Gasket
When you change the oil then you need to be really receptive to the small details such as: its oil drain plug gasket should be perfectly fine and in perfect condition to make this maintenance work more effective.
A properly installed gasket ensures a secure seal between the oil pan and drain plug, preventing leaks and low oil levels, protecting engine parts from damage and avoiding costly repairs.
By carefully preparing, using the correct tools and systematically following each step—from draining the old oil to inspecting and cleaning the surfaces—you not only safeguard your engine but also gain confidence in performing basic vehicle maintenance.
Regularly checking and replacing a worn gasket during oil changes improves engine performance, increases fuel efficiency and reduces environmental pollution.
Ultimately, mastering this simple yet crucial maintenance task saves money, enhances vehicle reliability and provides practical knowledge that will serve you well in long-term car care.
If you still have queries or questions then just comment down below.
Frequently Asked Questions
Q1. What is an oil drain plug gasket?
Answer: An oil drain plug gasket is a small ring, typically made of copper, aluminum, or rubber, that sits between the oil drain plug and the oil pan. Its main function is to create a tight seal to prevent engine oil from leaking. Although small, it plays a crucial role in keeping your engine oil inside the pan, ensuring proper engine lubrication and preventing damage.
Q2. How do I know if my oil drain plug gasket needs replacing?
Answer: If you notice oil stains under your car, a loose drain plug, or a persistent oil leak even after an oil change, you may need to replace the gasket. Sometimes, due to engine heat and pressure, the gasket can harden, crack, or flatten. If you remove the drain plug and the gasket appears worn, damaged, or deformed, it’s time to replace it.
Q3. Can I reuse the old gasket?
Answer: It is not recommended to reuse the old gasket. Once a gasket has been compressed and exposed to heat and oil, it will not seal properly a second time. Reusing it can lead to leaks, reduced engine lubrication and potential engine damage. Always use a new gasket when replacing the oil drain plug.
Q4. What tools will I need to replace the oil drain plug gasket?
Answer: To replace the gasket, you will need the correct replacement gasket for your car, a socket wrench or spanner to remove the plug, an oil drain pan to collect the old oil, clean rags or paper towels and a torque wrench to tighten the plug to the correct specifications. Safety gloves and goggles are recommended and if your car is low to the ground, you may need a jack and jack stands to safely lift it.
Q5. Do I need to drain the engine oil to replace the gasket?
Answer: Yes, it’s usually necessary to drain the engine oil before replacing the gasket. This ensures that oil doesn’t spill when you remove the drain plug. Draining the oil also gives you an opportunity to inspect the drain plug and oil pan for any damage and properly replace the gasket. After installing the new gasket, you can refill the engine with new oil.
Q6. How can I prevent oil leaks after replacing the gasket?
Answer: To prevent leaks, ensure the gasket is seated evenly and correctly on the drain plug. Hand-tighten the plug first to avoid cross-threading and then use a torque wrench to tighten it to the manufacturer’s specified torque. Avoid overtightening, as this can damage the gasket or the threads of the oil pan. After refilling the oil, start the engine and check the area for leaks.
Q7. Can I do this myself, or should I go to a mechanic?
Answer: Replacing an oil drain plug gasket is a simple maintenance task that most car owners can do themselves with the right tools and safety precautions. It doesn’t require any special skills, but care should be taken to avoid cross-threading the plug or damaging the gasket. If you’re unsure, going to a professional mechanic ensures the job is done correctly.
Q8. How often should the oil drain plug gasket be replaced?
Answer: It’s recommended to replace the gasket whenever you change the oil or if you notice any signs of wear or leaks. Even if it looks fine, using a new gasket every time you change the oil is a small investment that prevents potential oil leaks and engine damage in the long run.
Q9. What happens if I ignore a leaking oil drain plug gasket?
Answer: Ignoring a leaking gasket can lead to low oil levels, resulting in poor lubrication of engine parts. This can cause overheating, excessive engine wear and even severe engine damage over time. Small leaks can escalate into larger ones, leading to oil spills and costly repairs. Replacing the gasket promptly protects your engine and ensures safe operation.
Q10. Is there a difference between copper, aluminum and rubber gaskets?
Answer: Yes, different materials have different properties. Copper gaskets are durable and can withstand high temperatures, aluminum gaskets are lightweight and corrosion-resistant and rubber gaskets are flexible and provide a good seal but can degrade more quickly over time. Always use the type recommended by your vehicle manufacturer for optimal performance and leak protection.
References:
[1] Used Oil
https://www.epa.gov/system/files/documents/2025-06/used-oil_v8_508_0.pdf

Guys, I’m a car audio enthusiast and customization expert and I love clear sound and clean installation. Plus, I have spent years helping people build their dream audio setups. And whenever I’m working on cars, I probably listen to music and thinks about the next big upgrade.
