Written By: Don Dodi
Fact Checked By: Kristen Brown
Reviewed By: Diego Rosenberg
On average, the drivers uses the power window switches over 2,000 times a year and they response to your action and controls the up-and-down movement of your car’s windows with just a push of a button accordingly.
So basically, these are the switches that sends an electrical signal to the window motor and then which raised or lowers the glass.
And it is obvious that over the time, they can wear out because of the regular use, moisture, dirt or some electrical issues as well.
After using it so many times, it becomes faulty switch that makes the window stop working completely.
As well as, according to the market research there are 20% of the vehicle owners that reported the issues in the power window system because of the switch failure.[¹]
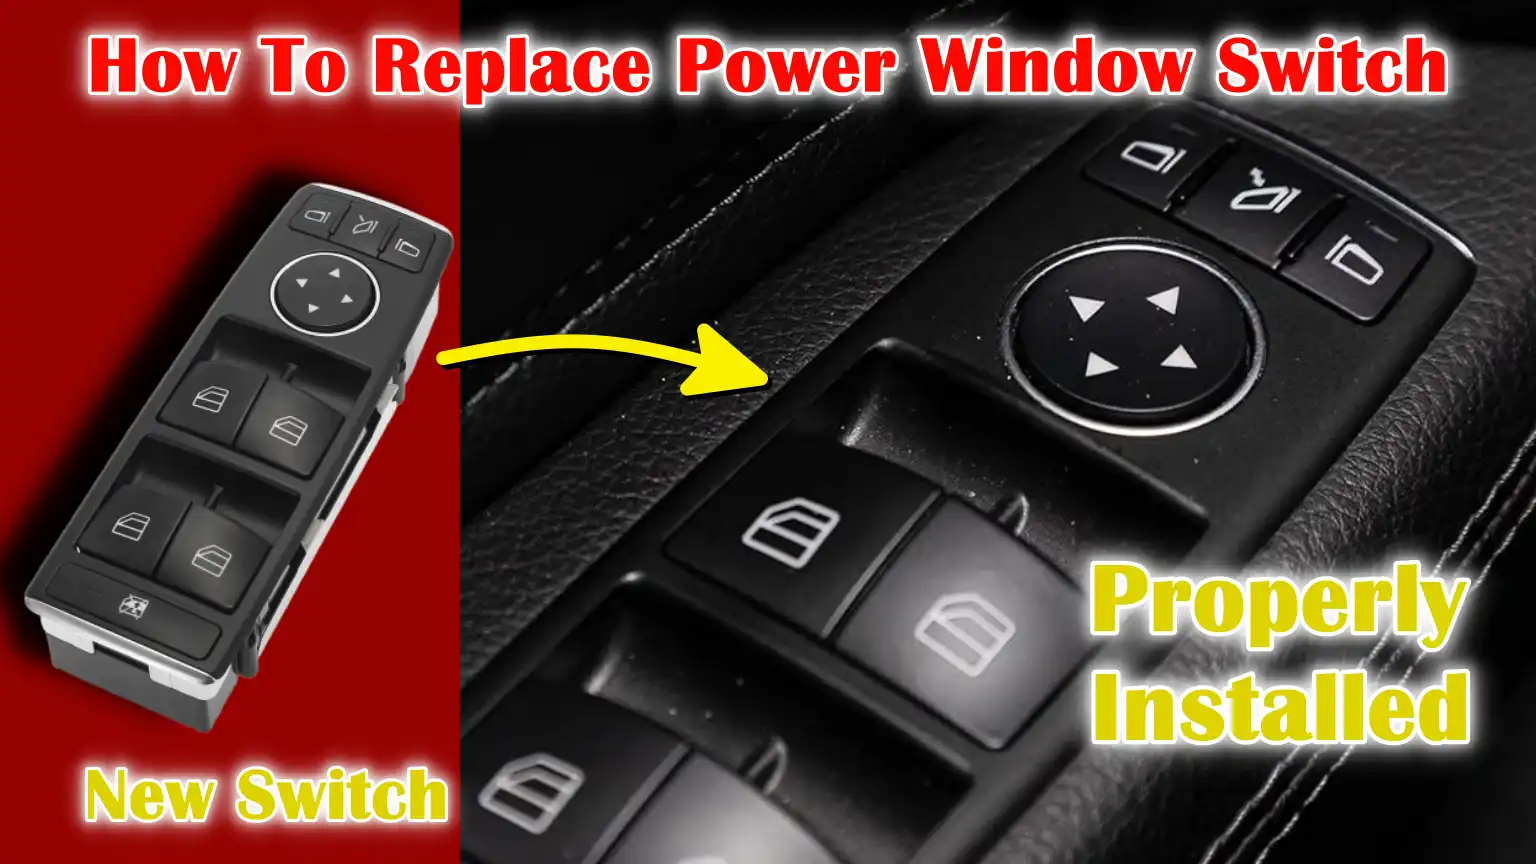
Now, you can just learn How To Replace Power Window Switch, and this guide is tells you everything from basic tools to learn exactly how to spot the signs of a failing switch, how to replace it and there are precautions as well.
Tools
| Tool / Material | What It’s For |
|---|---|
| Flathead screwdriver | It is used to gently remove window switch panels or trim without damaging them. |
| Trim removal tool (optional) | A plastic tool that helps remove panels safely, especially useful for beginners. |
| Phillips screwdriver | Helps to open panels or switches (used in most vehicles). |
| Torx screwdriver (if needed) | Some vehicles use Torx screws instead of Phillips screws – check your car type. |
| Electrical contact cleaner (optional) | Cleans any dirt or corrosion from the connector to ensure smooth operation. |
| Replacement window switch | Make sure the new switch you install is compatible with your car’s make and model. |
| Gloves (optional) | Protects your hands from dirt, sharp edges or accidental injury. |
| Multimeter (for testing) | This helps to check whether power is reaching the switch – this is useful if you are unsure about the problem. |
How to Ensure The Safety
It’s important to be careful when working on any part of your car’s electrical system—like power window switches. Taking the right safety steps can keep both you and your vehicle safe.
Electrical components may seem harmless, but if not used properly, they can cause short circuits, damage or injury. Here are some safety tips when replacing a power window switch:
1. Park the Car on a Flat Surface
Before any repair work, always make sure your vehicle is parked on a flat and level surface. This keeps the vehicle stable and prevents it from accidentally rolling or moving while work is being done.
If you’re working in a garage, make sure there’s adequate lighting and enough space to open the doors fully.
2. Turn Off the Ignition and Remove the Key
Once the vehicle is parked, turn the ignition completely off and take the key out of the ignition slot.
This stops all electrical power flowing through the car’s system and ensures that the window switch circuit is not activated.
Never work on the switch or any wiring while the ignition is on, as this could result in electric shock or damage to sensitive components.
3. Disconnect the Negative Battery Terminal
This is one of the most important safety steps. Disconnect the negative (-) terminal of your car battery with a wrench.
This completely cuts off electrical power from the system, making it much safer to handle wires and electrical connectors.
Disconnecting the battery also helps prevent the risk of accidental short circuits or sparking, especially if a metal tool touches a live wire.
IMPORTANT: Always disconnect the negative terminal first, not the positive terminal. This avoids electrical grounding problems and is a standard procedure in all car repair jobs.
4. Why These Safety Steps Matter:
Each year, thousands of minor accidents occur because people ignore simple safety precautions when attempting to repair a car themselves.
Even the low voltage circuits used in power windows can be dangerous if handled incorrectly.
By parking safely, removing the keys, and disconnecting the battery, you are reducing the risk of electrical shock, damaging your vehicle’s fuse box, or triggering the airbag system.
Symptoms of a Bad Power Window Switch
A power window switch is a small button or panel on your car door that controls whether your window goes up or down.
It sends an electrical signal to the window motor, telling it what to do. Over time, like any other part, it can wear out due to constant use, exposure to dust or moisture, or even an internal electrical fault.
Knowing the signs of a power window switch going bad can help you spot the problem early and fix it before it gets worse. Below are some of the most common symptoms you should look out for, explained in a very simple and clear manner.
1. Window Doesn’t Respond to the Switch
This is the most obvious and common sign. You press the switch, but nothing happens—no sound, no movement, and the window remains stuck.
This usually means that the switch is not sending any power to the window motor. This could be due to worn internal parts inside the switch or a broken circuit connection.
2. Switch Only Works Intermittently
Sometimes the switch works, and sometimes it doesn’t. For example, it might open the window once, but then stop working the next time you try.
This is a sign of a loose or damaged contact inside the switch. Intermittent problems often get worse over time and can cause a lot of trouble if not fixed quickly.
3. Other Windows Work, but One Does Not
If all the other windows in your car are working fine, but a particular window refuses to budge, it’s a clear sign that the problem is with that switch, not the motor or the fuse.
This problem is especially common in the driver’s master switch panel, which controls all the windows. If only one switch is bad, replacing it may fix the problem without touching the window motor.
4. Physical Damage to the Switch
Sometimes the problem is easy to spot. If the switch looks loose, cracked, broken, or sunken, it may have suffered physical damage.
This can be due to repeated use, impact, or even a spilled beverage. A damaged switch may make a clicking sound when pressed, but it will not send the correct signal to the motor.
How To Replace Power Window Switch – Easy Method
Replacing a bad power window switch may seem complicated, but it’s actually one of the easiest DIY car repairs you can do — especially if you follow the right steps.
Most switches are held in place by clips or small screws and connected to a simple wiring harness.
This step-by-step guide will walk you through the entire process, making it easy to understand, even if you’re a complete beginner.
Take your time, follow each step carefully, and your window switch will be working again in no time.
1. Locate and Identify the Faulty Switch
The first step is to figure out which switch isn’t working. If only one window is bad and all the others are working fine, the problem is probably in that switch.
Power window switches are usually located on the driver-side door panel, often in a master control unit that controls all windows, or directly next to the window that controls individual doors.
2. Remove the Door Panel or Switch Bezel
Once the faulty switch is identified, use a flathead screwdriver or plastic trim removal tool to carefully pry open the bezel (the plastic frame around the switch) or the entire door panel, if necessary.
Work carefully to avoid breaking the plastic clip or scratching the car’s interior. Start at the edge and slowly loosen it, being careful not to apply too much force.
3. Disconnect the Wiring Harness
After removing the bezel or panel, you will see the electrical connector attached to the switch. This is called the wiring harness.
Press the locking tab or clip and gently pull it out. This will cut power to the switch and allow you to remove it safely.
4. Remove the Old Window Switch
Now, unscrew the switch from its housing or remove the clip. This step may vary slightly depending on your vehicle model—some switches are attached with screws, while some use snap-on clips.
When removing it, be careful not to damage the mounting points or interior trim. Take your time and keep track of any screws or parts that have been removed.
5. Install the New Window Switch
Take your new power window switch, align it properly in the housing, and secure it using the old one’s screws or clips.
Make sure it fits snugly in place. Then, reconnect the wiring harness, pressing it in until you hear or feel a click to confirm a secure connection.
6. Test the New Switch Before Reassembly
Before putting everything back together, reinsert your car’s battery and turn on the ignition. Test the new switch to make sure the window now works properly.
Try both the “up” and “down” functions and check for smooth movement. If the switch does not work, double-check the connections and make sure the correct switch is installed.
7. Reassemble the Door Panel or Bezel
Once you’ve confirmed the switch is working, turn off the ignition, disconnect the battery again for safety, and begin reassembling.
Reinstall any screws, clips, or panels you removed earlier. Make sure everything is properly aligned and firmly in place so there are no rattles or loose parts.
Read More:
Troubleshooting Tips – If the New Switch Doesn’t Work
Sometimes, even after replacing the power window switch, the windows still won’t work. This can be frustrating, but don’t worry—it doesn’t always mean there’s a major problem.
The problem may be somewhere else in the power window system, such as the fuse, wiring or motor.
Below are some simple, fact-based troubleshooting steps that anyone can follow to figure out what’s really going on. Each step is important and can help you solve the problem without any professional help.
1. Check the Fuse Related to Power Windows
Every power window system is protected by a fuse—a small electrical component designed to break the circuit if overloaded. If the fuse blows, power will not reach the switch or motor.
You can find the fuse box in the dashboard, engine bay or under the steering wheel depending on the car model. Refer to the owner’s manual for the exact location of the fuses.
Pull out the fuse labeled “Power Window” and examine it. If the metal strip inside is broken, replace it with a fuse of the same rating (measured in amperes).
2. Test the Window Motor Function
If the fuse is okay and the switch is new, the problem may lie in the window motor — the part that physically moves the window up and down.
If you press the switch and don’t hear any sound, it could mean the motor is not receiving power or is damaged.
If you hear a clicking or humming sound but no movement, the motor may be stuck or weak. In this case, the switch is working, but the motor needs to be checked or replaced.
3. Inspect for Corroded or Damaged Wiring
Over time, the wiring inside your car’s door can become frayed, bent, or rusted, especially if moisture gets inside.
Take a close look at the wiring harness connected to the switch. If you see green deposits (rust), broken insulation, or loose wires, these may be preventing the signal from reaching the motor.
Cleaning the contacts or repairing damaged wires may restore full functionality.
4. Use a Multimeter to Test for Voltage at the Connector
A multimeter is a small device that helps you check if electricity is flowing to the right place. Set your multimeter to “DC voltage” and connect the probes to the wires going into the switch’s connector.
When you press the switch, the multimeter should show voltage — usually 12 volts.
If there is no voltage, the problem is upstream, possibly in a fuse, relay or wiring. If there is voltage but the motor is not running, there is probably a motor or mechanical problem.
Maintenance Tips of Power Window Switches
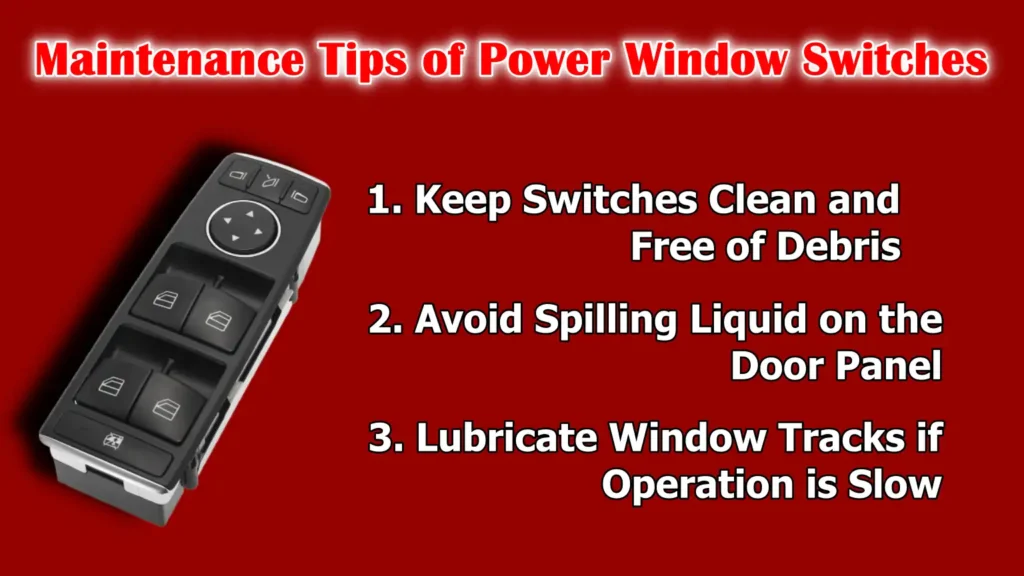
Keeping your power window switches in good condition not only improves the functionality of your windows, but it also helps prevent costly repairs in the future.
Because these switches are used frequently – sometimes hundreds of times a month – they are exposed to dust, moisture and physical damage.
Fortunately, some easy maintenance habits can help your power windows and switches last longer. Below are the most effective and easy tips, explained in simple language that anyone can understand and use.
1. Keep Switches Clean and Free of Debris
Dust, dirt, crumbs and even pocket lint can fall into the small spaces around the power window switch. Over time, this buildup can prevent the switch from making proper contact with the inside.
Use a soft brush or dry cloth to clean around the switch once a month. Avoid using sharp objects that could damage the plastic or push debris further inside.
2. Avoid Spilling Liquid on the Door Panel
Spilled liquids such as coffee, soda or water can seep into the switch panel and cause electrical short circuits or corrosion inside the switch. Even a little moisture can make the buttons sticky or inactive.
Always be careful with beverages in the car, especially near the driver-side panel where most switches are located. If a spill occurs, dry the area immediately and do not use the switch until you are sure it is dry.
3. Lubricate Window Tracks if Operation is Slow
If your windows are shaking slowly or making noises, the problem might not be in the switches—it could be in the window tracks (the guides along the side of the window that help it move up and down).
Dirty or dry tracks cause the motor to work harder, which also puts stress on the switch.
Use a silicone-based spray lubricant (not oil-based) on the window tracks every few months to make the window slide easier and reduce resistance.
Read More:
Conclusion – How To Replace Power Window Switch
Yes, it is true that modern cars are really complex, but not the power switches as you can replace them easily.
Power window switches are used constantly – more than a thousand times a month by some drivers – so it’s no surprise that they wear out over time.
Whether it’s caused by physical damage, moisture or internal wear and tear, a faulty switch can leave you stranded with an inoperative window, which isn’t just inconvenient – it can also become a real safety issue.
The good news is that most power window switches are designed for easy removal and replacement. With a few basic tools, the correct replacement part and the step-by-step instructions in this guide that makes it simple and easy to follow as well.
You also learned how to safely isolate a battery, identify common symptoms of a bad switch, and how to test the electrical system if a new switch doesn’t work immediately.
For long-term success, following regular maintenance tips – such as keeping the switch clean and avoiding spills – is crucial to making your switch and motor last longer.
So, that’s it from this guide and now you can comment down your thoughts about this guide.
Frequently Asked Questions
Q1. How do I know if my power window switch is bad?
Answer: You can usually tell if your power window switch is bad if the windows don’t move at all when you press the switch. In some cases, the windows only work occasionally or move very slowly. Another sign is if just one window won’t work while all the others do—this often means there’s a problem with that window’s switch, not the motor or fuse. Also, if you think the switch is loose, corroded, broken, or doesn’t make a “click” sound when you press it, it could mean an internal part is broken. In some rare cases, you might even hear a clicking sound when you press the switch, but the window still won’t move. This means the switch is sending power but isn’t working properly. An easy way to check is to try the window controls on both the driver’s side and the affected door—if one works and the other doesn’t, the switch is probably responsible.
Q2. How much does it cost to get a power window switch replaced?
Answer: The cost of replacing a power window switch depends on a few factors, such as the make and model of your car and whether you’ll do it yourself or go to a mechanic. If you do it yourself, this part typically costs between $20 and $60 for most cars. Some higher-end vehicles or multi-switch panels, such as the Driver Master Control, can cost around $80 to $150. If you go to a professional mechanic or dealership, the total cost (including labor) can range from $100 to $250. Labor charges vary depending on where you live and the shop’s hourly rate. The good news is that this repair usually doesn’t take long – most mechanics can complete the job in less than an hour.
References:
[1] Automotive Power Window Switch Market to Reach USD 1.7 Billion by 2034; reliability concerns reported by J.D. Power
https://www.openpr.com/news/4118407/automotive-power-window-switch-market-to-reach-usd-1-7-billion

Guys, I’m a car audio enthusiast and customization expert and I love clear sound and clean installation. Plus, I have spent years helping people build their dream audio setups. And whenever I’m working on cars, I probably listen to music and thinks about the next big upgrade.