 Skip to content
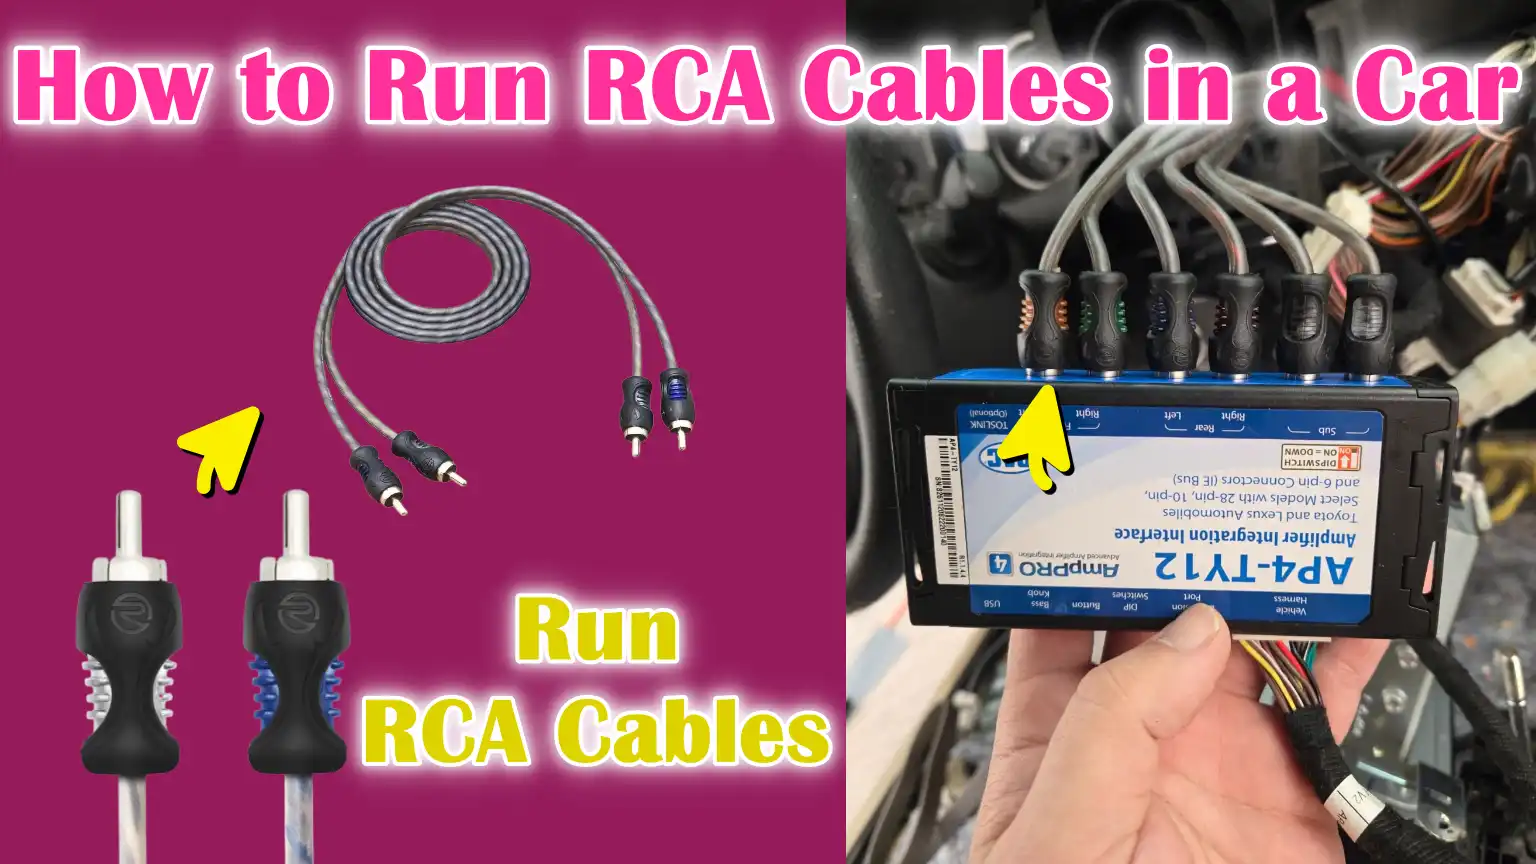
Written By: Don Dodi
Fact Checked By: Kristen Brown
Reviewed By: Diego Rosenberg
So, the way your RCA cables are routed it also affects the audio, as if you run RCA cables too close to the power wires then it can completely ruin your sound quality as well.
You can think that running RCA cables in a car is just small step in an audio installation, but it plays one of the most important roles to achieve clean, powerful and noise-free sound.
And basically, RCA cables first introduces by the Radio Corporation of America in the 1940s and now it is still widely used just because of their reliable ability to transmit low-level audio signals between a head unit and an amplifier.
Plus, in car audio systems: it makes a huge difference that how these cables are actually routed, as improper installation can cause interference, humming or distortion and on the other hand if you have done the routing correctly then it ensures clear sound quality.
Not only this, more than 70% of unwanted noise issues in car stereos really comes from poor wiring, as running RCA cables alongside the power wires also cause the noise issues.
And it clearly means that the way you run these cables actually affects performance but you need to understand that it can also protect your investment in speakers, subwoofers and amplifiers as well.
Now, this guide solely focuses on How to Run RCA Cables in a Car, so that even if you’re beginner you can route RCA cables neatly and just as the professional do.
Tools
| Equipment/Materials | Purpose/Usage | Tips/Notes |
|---|---|---|
| RCA Cables | Carry audio signals from the head unit to the amplifier. | Choose the correct length and high-quality, shielded cables to reduce noise. |
| Wire Fish Tape/Coat Hanger | Helps tuck cables out of tight spaces behind panels and under carpets. | Fish tape is easy and secure; a straightened coat hanger can be useful. |
| Electrical Tape | Protects cable connections and keeps wires securely fastened. | Use high-quality tape that adheres well and won’t wear out over time. |
| Zip Ties | Secures cables to walls, panels and under carpets. | Do not overtighten cables to avoid damage. |
| Screwdriver | Used to remove screws from panels, dashboards, or head units. | Have both flathead and Phillips screws ready. |
| Trim Removal Tool | Helps remove interior panels without scratching or breaking them. | Plastic tools are safer than metal tools to avoid scratches. |
| Grommet (Optional) | Protects cables when passing through metal surfaces, such as firewalls. | Prevents cable insulation from being cut or frayed. |
| Conduit / Cable Sleeve (Optional) | Provides additional protection to RCA cables from abrasion and interference. | Useful in high-traffic or tight areas to extend cable life. |
How to Prepare Before Running RCA Cables
1. Disconnect the Car Battery for Safety
Before you begin running RCA cables, the most important step is to disconnect your car’s battery.
Working with electrical equipment while the battery is connected can cause short circuits, sparks, or even damage your head unit and amplifier.
Disconnecting the battery ensures your safety and protects expensive audio equipment from accidental power surges.
Automotive experts always recommend removing the negative terminal first, as this reduces the risk of any electrical accidents when handling wires and panels.
2. Plan the Cable Route
Planning the route for your RCA cables is crucial for both sound quality and safety.
RCA cables carry low-level audio signals that are very sensitive to interference.
Running them too close to power cables or vehicle electrical wiring can cause humming, buzzing, or distortion in your system.
A general rule recommended by car audio experts is to run RCA cables in the opposite direction of the power cables.
Take the time to look under carpets, behind trim panels and along existing wiring channels to find the cleanest path with minimal contact with moving parts.
Proper planning at this stage saves time, prevents future troubleshooting and ensures a professional, clean installation.
3. Identify Entry Points from the Head Unit to the Amplifier
Before laying the RCA cables, identify the points where the cables will enter and exit various parts of the car.
Typically, the cables start from the head unit, which is the stereo or audio source and go to the amplifier, which is usually located in the trunk or under a seat.
Carefully inspect areas such as firewall grommets, floor panels and trim spaces to locate safe entry and exit points.
It’s best to use existing holes or channels as this reduces the risk of damaging the cables or the vehicle’s interior.
Correctly identifying these points also ensures that cables remain secure, hidden from view and protected from abrasion, thereby extending their lifespan and maintaining optimal audio performance.
How to Run RCA Cables in a Car – Step-By-Step Guide
1. Access the Head Unit
The first step to running RCA cables is to access the head unit, which is the main control center of your car’s audio system.
Start by carefully removing the dashboard trim using plastic trim removal tools to avoid scratches or damage.
After removing the trim, locate the RCA output ports on the back of the stereo.
These ports are usually color-coded, with red for the right channel and white or black for the left channel.
It’s important to ensure you have clear access to these outputs, as proper connection here determines the quality of the audio signal transmitted to your amplifier.
2. Lay the Cables from the Head Unit to the Amplifier
After reaching the head unit, plan the route for the RCA cables to the amplifier.
Run the cables through the dashboard and under the carpet or side panels, making the installation as neat and safe as possible while utilizing existing wiring channels.
It’s important to route the RCA cables in the opposite direction from the power cables, as placing them together can cause interference, such as a buzzing or humming sound.
Carefully placing the cables reduces the risk of damage and ensures the cleanest signal transfer from the head unit to the amplifier.
3. Route through panels and carpets
As the RCA cables travel through the vehicle, they will need to pass behind panels and under carpets.
Gently lift the panels using trim removal tools and securely tuck the cables out of sight.
When the cables pass through metal parts or the vehicle’s firewall, it’s important to use grommets to prevent the insulation from being cut or worn over time.
Protecting the cables from sharp edges and areas of high friction ensures they last longer without interference or signal loss, maintaining audio quality.
4. Connect the RCA cables to the amplifier
The final step is to connect the RCA cables to the amplifier.
Ensure each cable is securely and accurately inserted into the amplifier’s input port and corresponds to the correct left and right channels.
Leave a little slack to reduce pressure on the connectors, but avoid creating loose loops, as this can cause noise or interference.
Once connected, double-check that the cables are in the correct place, away from moving parts or any heat sources.
A properly connected and secure RCA cable setup provides clear, interference-free audio and contributes to a professional-looking installation.
How to Secure and Protect Cables
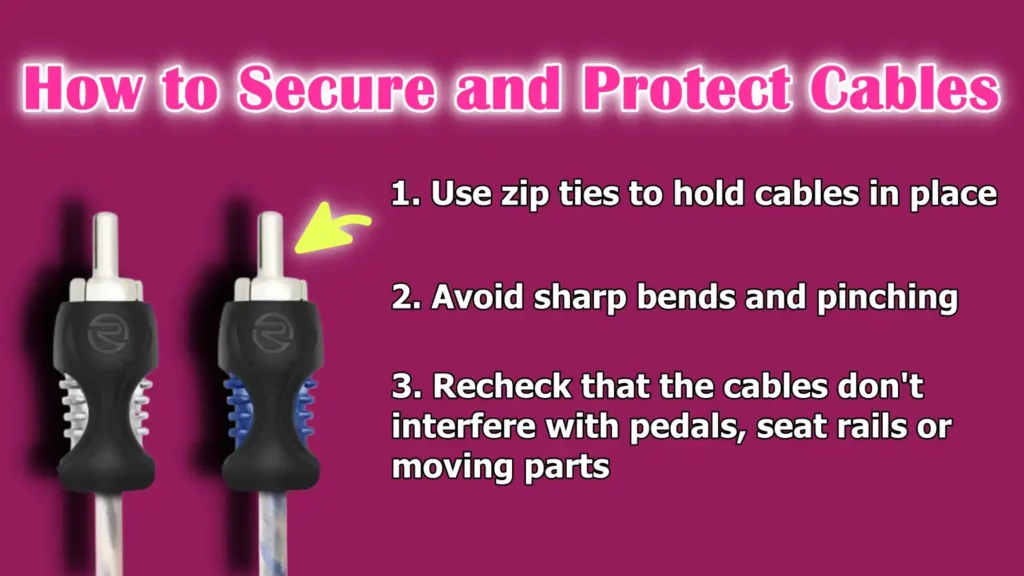
1. Use zip ties to hold cables in place
After installing RCA cables, it’s important to secure them to prevent movement, fraying, or accidental damage.
Zip ties are one of the easiest and most effective tools for this task.
By tying cables together and connecting them to existing wiring channels or panels, you can keep the installation neat and organized.
Automotive experts recommend placing zip ties every 12 to 18 inches along the cable path to ensure stability without putting unnecessary stress on the wires.
Properly secured cables reduce vibration, prevent friction on sharp surfaces and maintain consistent audio performance over time.
2. Avoid sharp bends and pinching
Sharp bends, twists, or pinched cables can cause signal degradation or damage internal wiring.
RCA cables are designed to carry low-level audio signals and even minor damage to the insulation or wires can cause unwanted noise or hum in your audio system.
To avoid this, always keep cables in smooth bends, avoid forcing them into tight corners and leave enough slack to accommodate movement caused by seat adjustments or body flex.
Maintaining gentle bends and proper spacing keeps cables secure and ensures long-lasting, high-quality sound transmission.
3. Recheck that the cables don’t interfere with pedals, seat rails, or moving parts
After securing the cables, it’s important to inspect the entire route to ensure they don’t interfere with any moving parts, such as the pedals, seat rails, or steering column.
Cables tangled in these areas can become pinched, frayed, or even broken, creating safety hazards and system malfunctions.
A careful final check ensures that the installation is both safe and durable.
Professional car audio installers recommend gently moving seats, pedals and other components when inspecting cable paths to ensure nothing interferes with or damages the RCA cables.
How to Check the Setup
1. Reconnect the Battery
After completing the installation and securing all RCA cables, the first step in checking your setup is to reconnect the car battery.
To ensure safety and avoid accidental short circuits, reconnect the negative terminal last.
Reconnecting the battery restores power to your audio system, allowing you to verify that all connections are working correctly.
It’s important to ensure the battery is fully connected and the terminals are clean, as loose or corroded connections can affect the performance of your head unit and amplifier.
2. Check the Sound System for Clarity and the Absence of Buzzing or Humming
After reconnecting the battery, play audio in your system to check for clarity and overall sound quality.
Listen carefully for any buzzing, humming, or distortion, which often indicate interference from nearby power cables or poor RCA connections.
Car audio experts say that even a well-installed system can pick up noise if the cables are too close to high-current wires.
Testing at different volumes and with multiple tracks helps identify potential problem areas and ensure the audio system delivers clear and crisp sound.
3. If interference is detected, adjust the cable position
If you notice any interference, buzzing, or distortion during testing, it’s important to adjust the position of the RCA cables.
Move the cables away from the power cables, re-secure them with zip ties, or check that they aren’t tangled behind panels or near metal surfaces.
Even small adjustments can make a significant difference in reducing noise.
It’s crucial for professional car audio installers to properly position and separate the RCA cables from the power cables to maintain a high-quality, interference-free sound system.
Read More:
Common Mistakes to Avoid
It is true that when you invest in high-quality RCA cables then it can make a noticeable difference in your car’s audio performance, as premium cables are actually constructed with lot better materials and design and that directly helps to reduce in signal loss and noise interference as well. So, basically this upgrade leads to the clearer, more detailed sound and that ideally allows you to fully appreciate the shades of music.[¹]
1. Placing RCA Cables Too Close to Power Cables
One of the most common mistakes when installing RCA cables is placing them too close to power cables.
RCA cables carry low-level audio signals that are highly sensitive to electrical interference.
When installed near power cables, the audio signal can produce unwanted noises such as humming, buzzing, or static.
Industry studies and car audio experts consistently show that over 70% of noise problems in aftermarket installations are caused by incorrect cable placement.
To avoid this, always install RCA cables on the opposite side of the car’s power cables and keep them as far apart as possible.
2. Using Cheap, Unshielded RCA Cables
Another common mistake is using low-quality or unshielded RCA cables.
Shielding is a protective layer that prevents external electrical signals from interfering with the audio signal inside the cable.
Without shielding, the cable can easily pick up interference from the car’s electrical system, resulting in distorted sound.
Investing in high-quality, secure RCA cables ensures clear and reliable audio and reduces the risk of problems over time.
Professional installers recommend choosing cables with durable insulation and sturdy connectors for long-term performance.
3. Leaving cables loose and unsecured
Leaving RCA cables loose or unsecured is a mistake that can lead to numerous problems.
Loose cables can rub against sharp edges, moving parts, or metal panels, damaging the insulation and exposing the wires.
This can cause signal degradation, short circuits, or even damage to the audio system.
It’s important to secure RCA cables with zip ties or cable clips to prevent them from moving, fraying and maintaining sound quality.
Properly secured cables also create a neat and professional-looking installation.
Conclusion – How to Run RCA Cables in a Car
It is really important the way RCA cables are installed as this simple looking thing can be the different between average sound and a truly professional audio experience that can provided in your car.
Proper preparation, careful routing and secure installation deliver clear and powerful sound while protecting your investment in amplifiers, speakers and head units.
By keeping RCA cables away from the power cord, using shielded cables and properly securing them, you can avoid common problems like buzzing, humming and signal loss.
Testing your system after installation ensures everything is working properly and allows you to make minor adjustments if needed.
Following these professional guidelines not only improves sound performance but also simplifies future upgrades or troubleshooting, giving you a long-lasting and reliable car audio experience.
As well as, you can comment down you queries in the comment section for more information about this guide.
Frequently Asked Questions
Q1. What are RCA cables and why are they important in a car audio system?
Answer: RCA cables are the wires used to transmit audio signals from your car’s head unit (stereo) to the amplifier. They are essential because they carry low-level signals that determine the clarity and quality of your sound system. Improperly installed or low-quality RCA cables can cause noise, buzzing, or distortion, while properly installed shielded cables ensure clear and crisp sound and protect your equipment from interference.
Q2. Where should I install RCA cables in my car?
Answer: RCA cables should be installed before your car’s power cables. This is because power cables carry higher current, which can interfere with RCA signals and cause buzzing or hissing noises. It’s recommended to use existing wiring channels or run cables along trim panels and under carpets. Carefully planning the route before installation saves time and avoids potential audio problems.
Q3. Can I use cheap RCA cables for my car audio system?
Answer: Using cheap or unshielded RCA cables is not recommended. Shielded cables are designed to prevent electrical interference from electrical wiring and other electronic devices in the car. Low-quality cables can deteriorate over time, causing noise or even damage to your audio system. Investing in high-quality, shielded RCA cables ensures better sound performance and durability.
Q4. How do I secure RCA cables in my car?
Answer: RCA cables should be secured behind panels and along existing wiring channels with zip ties, cable clips, or other fasteners. Loose cables can rub against sharp edges, moving parts, or metal surfaces, causing insulation damage or signal loss. Properly securing cables keeps them safe, prevents vibration and maintains consistent audio quality over time.
Q5. What should I do if I hear a humming or buzzing sound after installation?
Answer: Humming or buzzing noises usually occur when RCA cables are too close to electrical wires or if the cables are damaged. First, check the cable route and move the RCA cables away from the electrical wires. Make sure all connections are strong and secure. If necessary, replace low-quality cables with shielded cables. Relocating cables often reduces noise and improves sound quality.
Q6. Do I need to disconnect the battery when running RCA cables?
Answer: Yes, disconnecting the car battery is very important for safety. Working with electrical equipment while the battery is connected can cause a short circuit, spark, or damage your head unit or amplifier. To reduce risk, always disconnect the negative terminal before beginning installation.
Q7. Can RCA cables be installed under carpet or behind panels?
Answer: Yes, it is safe and recommended to install RCA cables under carpet or behind trim panels, provided the cables are protected from sharp edges and moving parts. Using trim removal tools and grommets when passing through metal or firewalls helps prevent cable damage. This also makes the installation look neat and professional.
References:
[1] Why High Quality RCA Cables Matter for Car Audio Performance?
https://eliteautogear.com/blogs/news/why-high-quality-rca-cables-matter-for-car-audio-performance

Guys, I’m a car audio enthusiast and customization expert and I love clear sound and clean installation. Plus, I have spent years helping people build their dream audio setups. And whenever I’m working on cars, I probably listen to music and thinks about the next big upgrade.
