Written By: Don Dodi
Fact Checked By: Kristen Brown
Reviewed By: Diego Rosenberg
Yes, starter motor literally uses more electrical current in a few seconds than most of the other components uses during an entire drive, this is huge right?
And, whenever you turn the key or press the start button, then it is the starter motor that draws a large amount of electrical current from the battery: which is often relies between 150 to 300 amps in most of the passenger cars, to crank the engine so that the combustion can begin.
Now-a-days, modern starter systems such as: Bosch and Denso are engineered to deliver the high torque in just a few seconds, even in the cold weather conditions where engine oil thickens and makes the cranking harder.
But you also need to understand that: most of the starter motors are literally built to last between 1000,000 and 150,000 miles, but there are other factors such as: weak batteries, corroded cables, frequent short trips and extreme temperatures that can also shorten their lifespan as well.
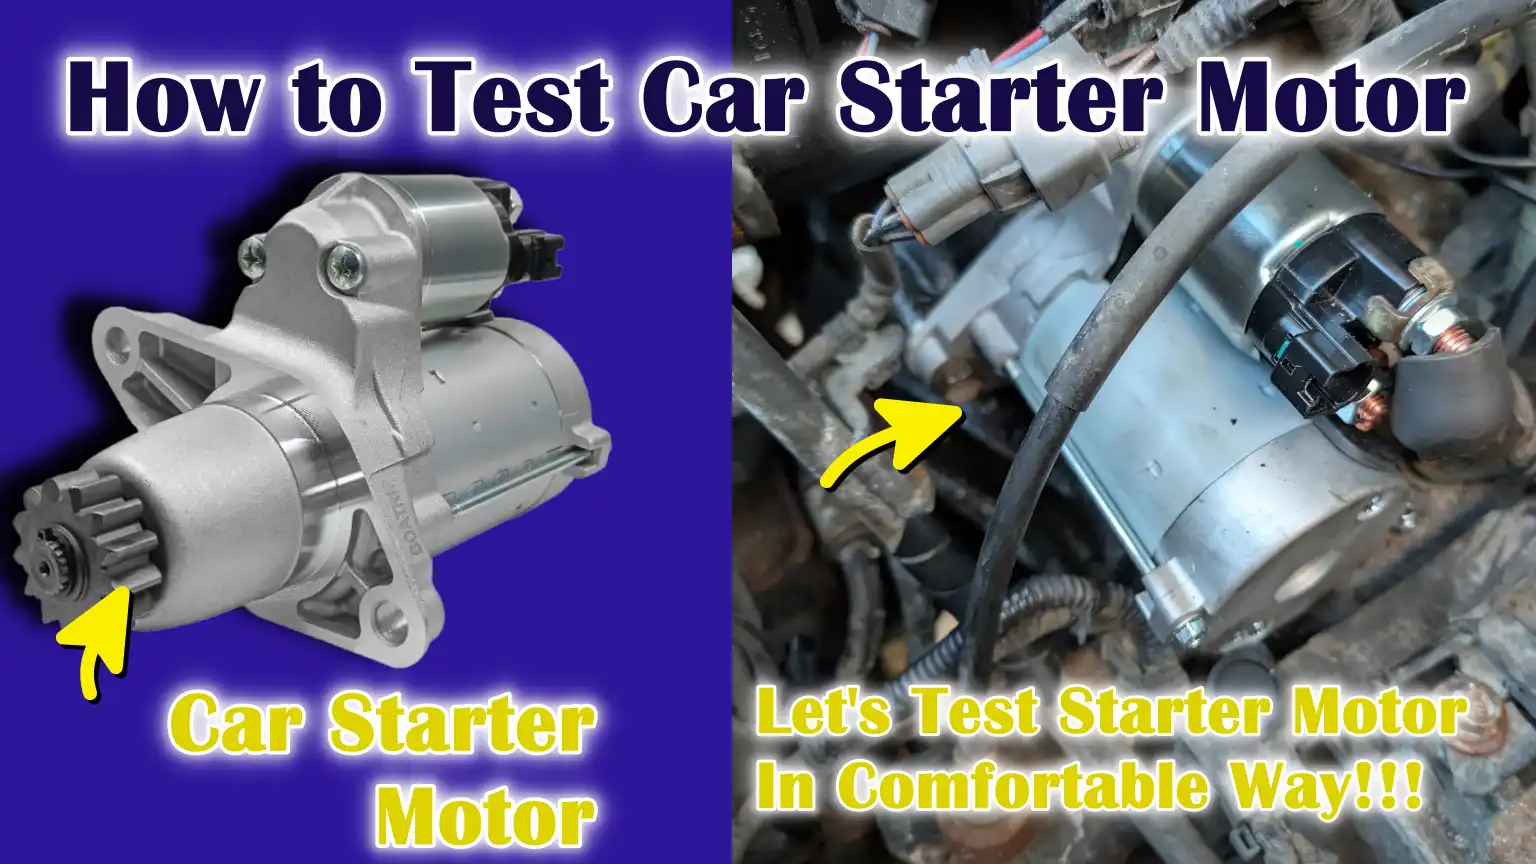
So, because the start is directly connected to the battery, ignition system and flywheel: you need to diagnose it properly that’s why in this guide you’ll learn proven method on How to Test Car Starter Motor and test the starter motor correctly if there’s symptoms such as: clicking sounds, slow cranking or no-start condition at all.
What is a Car Starter Motor?
A car starter motor is a powerful electric motor responsible for starting your vehicle’s engine.
When you turn the key or press the start button, the motor rotates the engine’s crankshaft, igniting air and fuel inside the cylinder.
This initial movement is called cranking.
Without this action, the engine cannot start on its own.
Even though the starter only operates for a few seconds at a time, it uses a large amount of electrical current from the battery.
Because of this, it must be strong, properly connected and in good working condition.
If it fails, the engine may not crank, may crank slowly, or may only make a clicking sound.
1. Definition and Purpose of a Starter Motor
The starter motor is designed to convert electrical energy from the vehicle’s battery into mechanical energy.
Its primary purpose is to spin the engine fast enough to initiate combustion.
An internal combustion engine cannot start on its own because it requires rotation to compress the air and fuel mixture.
The starter provides this initial rotation.
When the engine starts running on its own power, the starter automatically stops and disengages to prevent damage.
Simply put, a starter motor is the device that turns a stationary car into a running one.
2. Basic Parts of a Car Starter Motor
A starter motor has several important internal and external parts.
Each part plays a specific role in generating the power needed to crank the engine.
Armature
The armature is the rotating central part of the starter motor.
It consists of a shaft wrapped with copper wire windings.
When electricity flows through these windings, a magnetic field is created.
This magnetic field interacts with other magnets inside the starter housing, causing the armature to rotate at high speed.
The rotating armature creates the mechanical force necessary to turn the engine.
If the armature is damaged or short-circuited, the starter may rotate weakly or not at all.
Solenoid
The solenoid is an electromagnetic switch mounted on the starter motor.
It performs two very important functions simultaneously.
First, it acts as a heavy-duty electrical switch that allows a large amount of current from the battery to reach the starter motor.
Second, it pushes the starter drive gear forward so that it can connect to the engine’s flywheel.
When you turn the key, a small amount of current activates the solenoid, which then closes a high-current circuit.
If the solenoid fails, you may hear a clicking sound, but the engine will not crank.
Bendix Drive – Starter Drive Gear
The Bendix drive, also called the starter drive gear, is a small gear attached to the starter motor shaft.
When the solenoid is activated, this gear moves forward and engages with a larger gear on the engine’s flywheel.
This connection allows the starter motor to physically rotate the engine.
Once the engine starts and begins rotating rapidly from the starter, the Bendix drive automatically retracts.
This protects the starter from damage caused by the rapidly rotating engine.
Brushes and Commutator
Brushes and commutators are internal electrical components that help transmit power to the rotating armature.
The brushes are typically made of carbon and apply pressure to the commutator, a segmented copper ring connected to the armature winding.
As the armature rotates, the brushes maintain electrical contact to keep the current flowing.
Over time, friction can cause the brushes to wear.
Worn brushes can cause slow cranking, intermittent starting, or complete starter failure.
3. How the Starter Motor Works with Other Vehicle Parts
The starter motor doesn’t work alone.
It relies on several other vehicle parts to function properly.
Vehicle Battery
The battery provides the electricity needed to run the starter motor.
During cranking, the starter in most passenger vehicles can draw 150 to 300 amps of power.
This is significantly more than most other electrical parts.
If the battery is weak, discharged, or has damaged terminals, the starter may crank slowly or not work at all.
A healthy battery is essential for proper starter performance.
Ignition Switch
The ignition switch is the control point that activates the starter system.
When you turn the key or press the start button, the ignition switch sends a small electrical signal to the starter solenoid.
This signal doesn’t directly power the starter.
Instead, it tells the solenoid to connect the battery to the starter motor.
If the ignition switch or its wiring is faulty, the starter may not receive a signal to operate.
Flywheel
The flywheel is a large, heavy metal disc attached to the engine’s crankshaft.
It has teeth on its outer edge.
The starter motor’s Bendix drive gear engages with these teeth to turn the engine.
Once the engine is running, the flywheel automatically rotates, disengaging the starter gear.
If the flywheel teeth are faulty, you may hear a grinding noise when starting.
Bosch Starter System
Many modern vehicles use starter systems designed by companies like Bosch.
These systems often use gear reduction technology, allowing the motor to rotate at higher speeds and deliver more torque to the engine.
This design makes the starter smaller, lighter and more efficient, while also generating enough force to crank the engine in cold or difficult conditions.
Advanced starter systems are also built to handle frequent engine starts and prolonged use.
What are the Common Symptoms of a Bad Starter Motor
A bad starter motor can give several warning signs before it fails completely.
Because the starter is directly connected to the battery, ignition switch and flywheel, problems with this system are usually detected the moment you try to start the car.
The starter motor uses a very high electrical current for a few seconds to crank the engine.
If any internal parts, such as the solenoid, armature, or brushes, fail, the cranking process will not proceed properly.
Understanding common symptoms can help drivers avoid unexpected breakdowns and prevent unnecessary replacement of other parts, such as the battery or alternator.
1. Clicking Sound When Turning the Key
One of the most common signs of starter problems is a clicking sound when turning the key or pressing the start button.
This clicking sound usually comes from the starter solenoid.
The solenoid is trying to engage, but the motor itself isn’t spinning.
A loud clicking sound often means the solenoid is working, but the starter motor may be internally damaged.
A loud, repetitive clicking sound usually indicates low battery voltage, but it can also occur when there’s high resistance in the cable.
This symptom is important because it indicates that power is reaching the starter, but the motor isn’t cranking properly.
2. The Engine Won’t Crank
If you turn the key and the engine won’t crank at all, the starter motor may be faulty.
In this case, you may hear nothing or only a faint sound.
The engine must rotate at a certain speed to initiate combustion.
If the starter fails to turn the crankshaft, the engine will stall completely.
This could be due to worn brushes, a bad armature, a bad solenoid, or faulty wiring.
However, it’s important to check the battery first, as a completely discharged battery can also cause this symptom.
If the battery is fine and the engine still won’t crank, the starter could be a possible culprit.
3. Squeaking Noises When Starting
Squeaking noises when starting the engine usually indicate a problem with the starter drive gear or flywheel teeth.
The starter motor uses a small gear to engage with the larger flywheel gear attached to the engine.
If the gears aren’t meshed properly, they can rub against each other, causing a loud grinding sound.
This could be caused by worn teeth, a bad Bendix drive, or misalignment.
Wear should never be ignored as it can damage both the starter and flywheel, leading to more expensive repairs.
4. Smoke from the Engine Bay
Smoke from the engine bay when starting is a serious warning sign.
The starter motor draws a lot of electrical current and if it’s engaged for too long or short-circuited, it can overheat.
Overheating can burn electrical wires or melt insulation, causing smoke and a burning smell.
This can happen if the driver holds the key in the start position for too long or if the solenoid becomes stuck and remains connected to the starter.
If you see smoke, you should immediately stop trying to start the car to avoid further damage or the risk of fire.
5. Intermittent Starting Problems
Sometimes a faulty starter motor isn’t completely damaged, but simply worn out.
A car may start normally one day and fail to start the next.
This is often caused by worn internal brushes, loose electrical connections, or a faulty solenoid.
Heat can also affect starter performance.
After driving, engine heat can heat the starter, increasing its electrical resistance and causing it to fail.
Intermittent problems are often difficult to detect, but they are a sure sign that the starter motor is about to fail.
6. Dashboard Lights Illuminate, But Engine Won’t Start
If the dashboard lights illuminate normally but the engine won’t start, it means the battery has enough power for the low-current system but not enough to run the starter motor, or the starter itself is faulty.
Lights, radios and other electronics use much less power than the starter.
The starter requires a lot of current for a short period of time.
If the battery is overcharged and the light remains on when trying to start, the problem may be with the starter motor or its solenoid.
This symptom is very common and drivers often mistakenly blame other systems.
Tools
| Tool Name | What It Is Used For | Simple Explanation (3 Lines) |
|---|---|---|
| Digital Multimeter | Measures voltage, resistance and electrical flow | A digital multimeter checks whether power is reaching the starter motor. This helps you see if the battery has sufficient voltage, usually around 12.6 volts when fully charged. It also helps detect broken wires or high resistance in the circuit. |
| Battery Load Tester | Tests battery strength under load | A battery load tester checks whether the battery can handle the starter’s high power requirements. The starter delivers a high current for a few seconds. This tool shows whether the battery drops too much voltage during cranking. |
| Jumper Cables | Supplies direct power for testing | Jumper cables are thick wires used to connect the starter directly to the battery. They help monitor whether the starter is turning properly during bench tests. They should be used with caution to avoid sparks or short circuits. |
| Socket Wrench Set | Removes and installs the starter | A socket wrench set helps loosen and tighten the bolts holding the starter motor in place. Starters are usually mounted near the engine or transmission. The correct socket size prevents damage to the bolts. |
| Screwdrivers | Removes covers and small connections | Screwdrivers are used to remove small screws or electrical connectors. They help access wiring terminals and mounting brackets. Using the correct size prevents stripping of screw heads. |
| Protective Gloves and Safety Glasses | Protects hands and eyes | Gloves protect your hands from sharp edges and hot engine parts. Safety glasses protect your eyes from sparks or dirt. Because starter testing involves high current, safety protection is crucial. |
How to Make Sure That Your Vehicle & You Stay Safe During Testing the Car Starter Motor
Testing a car starter motor involves working around high electrical currents, heavy metal parts and moving engine parts.
The starter can draw hundreds of amps from the battery, meaning a small error can cause a spark, burn, or short circuit.
In some cases, the engine may suddenly crank even when the system is connected, causing serious injury.
Therefore, safety should always be put first before touching any wiring or removing the starter.
Taking a few simple precautions can prevent accidents, protect the vehicle’s electrical system and make the testing process safer and easier.
1. Park on a Level Surface
Always park the vehicle on a flat and stable surface before beginning any starter testing.
A flat surface prevents the car from rolling suddenly, specially if you have to work underneath it.
If the vehicle is parked on a slope, gravity may cause it to move even with the engine off.
Stability is crucial when using tools or disconnecting electrical components.
A flat surface gives you better control and reduces the risk of sudden movements.
2. Apply the Parking Brake
After parking the vehicle on a level surface, firmly engage the parking brake.
The parking brake locks the rear wheels and prevents the vehicle from rolling.
This is specially important when the transmission is in neutral or you’re testing the starter from underneath the vehicle.
When your hands are near mechanical parts, even the slightest movement can be dangerous.
Applying the parking brake adds another layer of safety and keeps the vehicle safe during testing.
3. Disconnect the Negative Battery Terminal
Before touching the starter motor or its wiring, disconnect the negative battery terminal.
The negative terminal is usually marked with a minus sign and is often connected to a black cable.
Removing this connection cuts off power to the starter system.
This step prevents accidental sparks, short circuits, or sudden engine cranking while working.
Because the starter handles a lot of current, disconnecting the battery is one of the most important safety steps you can take.
4. Avoid loose clothing near moving parts
Loose clothing, long-sleeved clothing, jewelry, or dangling accessories can easily become entangled in engine parts.
Even if the engine is off, accidentally cranking moving parts can cause them to rotate rapidly and suddenly.
Items like scarves, bracelets, or loose shirts can become entangled and cause serious injury.
It’s best to wear fitted clothing and remove jewelry before working near the starter or engine area.
Keeping your work area clean reduces the risk of accidents.
5. Use insulated tools
Always use insulated tools when working with electrical systems.
Insulated tools have special protective handles that reduce the risk of electric shock and prevent sudden contact between metal parts.
If a metal tool touches two battery terminals at the same time, it can cause a strong spark and cause damage.
Insulated tools help protect both you and the vehicle’s electrical system.
Using the right tools not only improves safety but also ensures more accurate and controlled testing.
How to Test a Car Starter Motor – Easy & Proven Methods
Testing a car starter motor should be performed in a clear and logical order.
The starter motor relies on strong battery power, clean wiring connections, proper grounding and proper mechanical alignment with the flywheel.
Because it can draw 150 to 300 amps during cranking, even a minor electrical problem can prevent it from working.
Many starting problems are caused by a weak battery or high resistance in the cables, rather than the starter itself.
A detailed step-by-step process helps you avoid misdiagnosis and unnecessary replacement of expensive parts.
How to Test Car Starter Motor By Performing a Visual Inspection
Many starter problems can be detected by carefully examining the parts before using tools.
1. Check for Corrosion on the Battery Terminals
Battery terminals must be clean and tight for proper current flow.
Corrosion typically appears as a white, blue, or green powder around the terminals.
This buildup increases electrical resistance and reduces the amount of current reaching the starter.
Because the starter requires a high current, even a small amount of corrosion can cause slow cranking or a clicking sound.
Cleaning the terminals with the appropriate brush can often restore normal starting performance.
2. Check the Starter Wiring Connections
The wires connecting the starter motor and solenoid should be secure and undamaged.
Check the thick positive cable from the battery and the small signal wire from the ignition switch.
Loose or dirty connections can interfere with the electrical signal that activates the starter.
Weak connections may allow some power to reach the starter, but not enough to properly rotate the motor.
Tight and clean wiring ensures that full voltage reaches the starter.
3. Check for Loose or Damaged Cables
Starter cables should be in good physical condition.
Check for broken insulation, exposed copper wires, burn marks, or melted parts.
Damaged cables can cause voltage loss, short circuits, or overheating.
Sometimes, the outside looks fine, but the wires inside are broken or damaged, reducing current flow.
Replacing damaged cables can prevent further electrical failure.
4. Check the Mounting Bolts
The starter motor must be tightly mounted to the engine block.
Loose mounting bolts can cause misalignment between the starter gear and flywheel.
This misalignment can cause a grinding noise during starting and damage to both gears.
Tight bolts also ensure proper grounding, as the starter is often grounded to its metal housing.
A poor ground connection can prevent the motor from working properly.
How to Test Car Starter Motor By Checking the Battery
Always test the battery before assuming the starter motor is faulty.
A weak battery is one of the most common causes of starting problems.
1. Test the Battery Voltage – 12.6V when fully charged
Use a digital multimeter to measure the battery voltage with the engine off.
A fully charged battery should read approximately 12.6 volts.
If the reading is approximately 12.2 volts or lower, the battery may be slightly discharged.
A low reading means the battery may not have enough power to crank the engine at the required speed.
Correct voltage is important because the starter requires a good power supply.
2. Perform a Load Test
The load test checks how the battery performs under high demand.
During engine cranking, the battery voltage in most vehicles should not drop below approximately 9.6 volts.
If it drops too low, the battery will not be able to handle the increased starter current.
Even if the battery shows good voltage at rest, it may fail under load.
This test confirms the battery’s true strength.
3. Clean Corroded Terminals
If the terminals are corroded, clean them before further testing.
Dirty terminals can falsely indicate a bad starter.
After cleaning, tighten the connections properly.
Good contact allows full power to reach the starter motor.
4. Rule out battery problems before blaming the starter
Many people replace the starter motor when the real problem is a weak battery.
Always confirm that the battery is fully charged and working properly.
If the battery passes all tests and the engine still won’t crank, consider the starter system.
How to Test Car Starter Motor By Testing the Starter Voltage Using a Multimeter
Voltage testing confirms whether power is reaching the starter motor.
1. Set the multimeter to DC volts
Set the digital multimeter to measure DC voltage.
This is important because the car’s electrical system uses direct current.
The correct setting provides accurate readings.
2. Check the voltage at the starter terminals
Place the positive probe on the large starter terminal connected to the battery cable.
Place the negative probe on a good ground point.
This measures voltage directly at the starter.
3. Have someone turn the ignition key
Have someone turn the key to the start position while you monitor the reading.
This allows you to see the real-time voltage during cranking attempts.
4. Interpret the readings
If there are approximately 12 volts but the starter won’t crank, the starter motor may be internally damaged.
If there is no voltage reading, the problem could be a bad ignition switch, relay, fuse, or broken wire.
Correctly identifying the correct part helps avoid replacing the wrong one.
How to Test Car Starter Motor By Performing a Voltage Drop Test
Voltage drop testing identifies hidden resistance in the cable and ground path.
1. Perform a Positive Cable Voltage Drop Test
Measure the voltage between the positive terminal of the battery and the positive terminal of the starter while cranking.
The reading should typically be less than 0.5 volts.
A reading higher than this indicates resistance in the cable.
2. Perform a Ground Circuit Voltage Drop Test
Measure the voltage between the starter housing and the negative terminal of the battery while cranking.
Again, the reading should be very low.
A reading higher than this indicates poor grounding or a worn ground strap.
3. Identify High Resistance Problems
High resistance reduces current flow and impairs starter performance.
Even if the voltage appears normal at rest, resistance under load can prevent proper cranking.
Correcting cable or ground problems often restores normal operation.
How to Test Car Starter Motor By Bench Test – Advanced
A bench test confirms that the starter motor itself is functioning properly.
1. Remove the Starter Motor
First, disconnect the battery, then remove the starter from the vehicle.
The starter is usually mounted near the transmission housing.
Removing it allows for safe external testing.
2. Secure It Properly
Place the starter on a stable surface and secure it firmly.
The motor may shake or jump when power is applied because it produces high torque.
3. Connect the Jumper Cables
Connect the positive jumper cable to the large starter terminal.
Connect the negative cable to the metal body of the starter.
Ensure the connections are tight and secure before turning on the power.
4. Check Gear Extension
When power is applied, the starter drive gear should engage quickly and completely.
This indicates that the solenoid is functioning properly.
5. Check for Smooth Spinning
The motor should spin quickly and smoothly without any unusual noises.
Slow spinning or jerky motion indicates internal problems.
6. Signs of Malfunction During a Bench Test
If the gear does not extend, spins weakly, emits smoke, or makes a grinding noise, the starter motor is faulty.
A proper bench test will clearly confirm whether it needs to be replaced.
How to Test a Starter Solenoid
The starter solenoid is a vital part of the starting system.
It acts as a heavy-duty electrical switch that allows high current from the battery to reach the starter motor.
It also pushes the starter drive gear forward so it can connect to the engine’s flywheel.
When you turn the key or press the start button, a small electrical signal activates the solenoid and the solenoid is then connected to a much larger electrical circuit.
If the solenoid fails, the starter motor may not rotate even when the battery is fully charged.
Carefully examining the solenoid helps you determine whether the problem lies within the solenoid or elsewhere in the starting system.
1. Identify the Solenoid Terminals
The first step in testing a starter solenoid is to correctly identify its terminals.
Most starter solenoids have three main connection points.
One large terminal connects directly to the battery’s positive cable.
The second, larger terminal connects to the starter motor itself.
The smaller terminal, often called the signal or control terminal, receives power from the ignition switch when the key is turned.
It’s important to understand these terminals because each has a different function.
The larger terminal carries a very high current, often exceeding 150 amps, during cranking, while the smaller terminal carries a low-current signal that activates the solenoid.
Knowing which terminal does what helps you test safely and accurately.
2. Jump the solenoid terminal carefully
Jumping the solenoid terminal is a quick way to check if the solenoid can send power to the starter motor.
This test must be done carefully because it involves direct electrical contact.
To perform this test, use an insulated tool and briefly connect the battery terminal on the solenoid to the starter motor terminal.
If the starter rotates when you do this, it means the motor itself is working and the problem may be in the solenoid control circuit or the ignition switch.
If nothing happens, the starter motor or solenoid may be faulty.
Before performing this test, always make sure the vehicle is in neutral or park and the parking brake is engaged to avoid sudden movements.
3. Check for Clicking Sounds
When you turn the key, a clicking sound often comes from the solenoid.
A loud click usually means the solenoid is receiving power and attempting to engage.
However, if the starter motor doesn’t engage after the click, the solenoid’s internal contacts may be worn or burned.
Loud clicking usually indicates low battery voltage, preventing the solenoid from engaging.
If there’s no clicking sound at all, the solenoid may not be receiving an ignition signal, or it may be completely damaged.
Listening carefully can help you determine if the solenoid is trying to turn.
4. Measure Solenoid Resistance
Measuring resistance with a digital multimeter can provide more accurate information about solenoid health.
Set the multimeter to ohms and place the probes on the small control terminal and the solenoid body or ground point.
A healthy solenoid coil will show a low resistance value, typically a few ohms.
If the reading shows very high resistance or an open circuit, the coil inside the solenoid may be damaged.
When the solenoid is activated, you can also test for continuity between the two large terminals.
If they are not properly connected, the internal contacts may be worn.
This test confirms whether the solenoid can complete the electrical circuit as designed.
How to Know If It Is Starter Or Alternator Problem
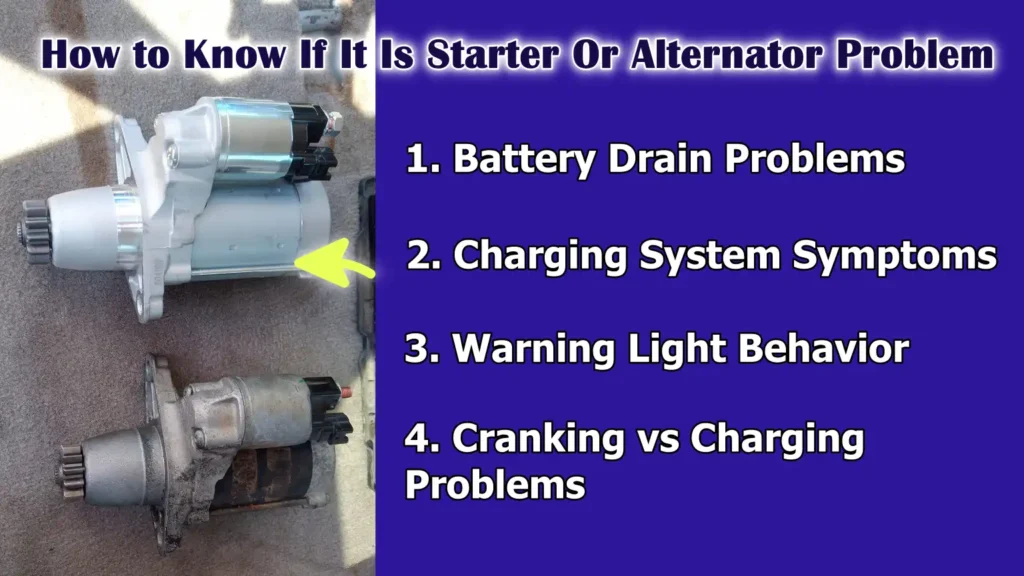
Many drivers confuse starter motor problems with alternator problems because both are connected to the battery and can cause the car to fail to start.
However, these two parts perform very different functions.
When you first turn the key or press the start button, the starter motor is responsible for cranking the engine.
It only operates for a few seconds at a time.
The alternator, on the other hand, works after the engine is running.
Its job is to recharge the battery and provide power while driving.
Understanding the difference between these two systems helps you diagnose problems correctly and avoid replacing the wrong part.
Moreover, there’s technical report that clarifies that the starter motors actually converts the electrical energy from the battery into the mechanical energy which is necessary to the crank the engine, also this engineering document on the starter control systems shows that the physical and electrical principles are behind the starter operation.[²]
1. Battery Drain Problems
Battery drain problems are often related to the alternator rather than the starter.
If your battery drains overnight or after a short trip, it may be because the alternator isn’t charging it properly.
A good alternator typically delivers 13.5 to 14.5 volts of power when the engine is running.
If it delivers less than this, the battery will gradually lose power.
A faulty starter motor usually doesn’t drain the battery when the car is parked, as it only works during cranking.
However, repeatedly trying to start a car with a faulty starter can weaken the battery.
If the battery drains after driving, suspect the alternator.
If the battery doesn’t charge after repeated attempts, check the condition of the starter and battery.
2. Charging System Symptoms
Charging system symptoms usually appear when the engine is running.
Dim headlights, flickering dashboard lights, weak power windows and slow windshield wipers can all point to an alternator problem.
These symptoms occur because the alternator isn’t providing enough power to support the vehicle’s systems.
These problems aren’t necessarily related to a starter problem, as the starter stops working after the engine is running.
If the car runs normally but has trouble starting, the problem may be more related to the starter or battery than the alternator.
3. Warning Light Behavior
Dashboard warning lights can provide helpful clues.
If the battery or charging warning light comes on while driving, it usually indicates a problem with the alternator or charging system.
This light means the battery isn’t recharging properly.
A bad starter motor usually doesn’t illuminate the battery warning light while driving.
However, if all the dashboard lights illuminate normally when you try to start the car, but the engine won’t crank, the problem may be with the starter motor.
Observing when the warning light comes on can help you understand which system is malfunctioning.
4. Cranking vs Charging Problems
Cranking problems occur when you try to start the engine.
If you hear a clicking sound, slow cranking, or no cranking at all, there’s usually a problem with the starter motor or battery.
Charging problems occur when the engine is already running.
If the car starts but then stalls due to low battery power, the alternator may not be charging properly.
An easy way to test is to measure the battery voltage.
With the engine off, a healthy battery should have about 12.6 volts.
When the engine is running, the voltage should rise to about 13.5 to 14.5 volts if the alternator is working properly.
If the voltage doesn’t rise, the alternator may be faulty.
If the voltage is normal but the engine won’t start, there may be a problem with the starter system.
Read More:
When You Should Replace a Car Starter Motor
Additionally, there’s functional diagnostics by using the magnetic field sensors that actually have been shown to detect the wear before starter failure occurs, so the journal demonstrates that how Hall effect sensors can be used to monitor the starter condition, that provides the measurable data that can predict the failure and improve the maintenance schedules for the vehicles.[¹]
Knowing when to replace a starter motor is essential to avoid unexpected vehicle failures.
Starter motors are designed to last for many years, but they can deteriorate over time due to frequent use, heat, or poor electrical connections.
Replacing a starter too early can be unnecessary and costly, while waiting too long can leave you stranded.
Understanding the key features, symptoms and costs helps drivers make informed decisions and ensure their vehicle starts reliably every time.
1. Cost Comparison: Repair vs Replacement
When a starter motor begins to fail, it may be possible to repair some parts, such as worn brushes or a faulty solenoid.
However, the repair cost can sometimes be comparable to the price of a new or re-manufactured starter, specially if labor charges are included.
A brand-new starter motor typically costs $150 to $400, depending on the make and model of the vehicle, while a re-manufactured unit may cost slightly less.
It’s important to compare the cost of repair and replacement, as a complete replacement often lasts longer and is more reliable, while a repair may only provide a temporary fix.
Estimating the cost helps ensure you choose the most cost-effective and effective method for your vehicle.
2. Signs of Internal Part Wear
Several symptoms indicate wear on the starter’s internal parts.
Worn brushes can reduce electrical contact with the armature, causing slow cranking or difficulty starting.
A bad solenoid can cause the starter motor to click without engaging properly, while a bad Bendix drive can cause a grinding noise when the starter engages with the flywheel.
Burnt or melted wiring inside the starter also indicates excessive wear.
If these symptoms persist even after testing the battery and connections, it’s a clear sign that the internal components of the starter motor are no longer functioning properly and replacement is recommended.
3. Due to Mileage-Based Wear
As a vehicle’s mileage increases, the starter motor is put under more stress.
Under normal driving conditions, starters can typically last 100,000 to 150,000 miles, but frequent short trips, stop-and-go traffic and bad weather can wear out the motor faster.
Each start requires a higher electrical current and repeated starts generate heat and friction within the motor.
Starters that are used more frequently or run colder often wear out faster.
Considering mileage and observed symptoms can help determine whether a replacement is necessary, rather than assuming that every starting problem is caused by a temporary electrical fault.
4. Professional Diagnosis is Recommended
Even with obvious symptoms, it’s often advisable to have the starter motor diagnosed by a professional mechanic before replacement.
Technicians can perform detailed tests, such as voltage drop measurements, bench tests and solenoid checks, to confirm whether the starter or another component is causing the problem.
This reduces the risk of unnecessary replacement and ensures that the repair is performed correctly.
Professional diagnosis provides a complete guarantee, saves time and money and ensures that your vehicle’s starting system will operate safely and reliably after service.
Know, The Estimated Starter Motor Testing and Replacement Costs
Understanding the costs associated with starter motor testing and replacement helps drivers plan their maintenance budget and make informed decisions.
The total cost depends on whether you perform the testing yourself, hire a professional for diagnostics, or replace the entire starter.
Costs vary depending on the vehicle’s make, model and location, as well as the type of starter used: new, re-manufactured, or high-performance.
Knowing each cost can help you choose the most practical and cost-effective option, while also ensuring reliable starting performance.
1. DIY Testing Costs
Testing a starter motor at home can be very inexpensive, specially if you already have basic tools like a digital multimeter, jumper cables and a socket wrench set.
The main expense of DIY testing is usually purchasing a multimeter, which can cost $20 to $50 for a reliable model.
Other expenses, such as gloves, safety glasses, or small hand tools, are minimal.
By performing a self-diagnosis, voltage test and solenoid check, you can often determine if there’s a problem with the starter motor or battery without the need to spend money on professional services.
2. Mechanic Diagnostic Fees
If you have your starter motor tested by a professional mechanic, the diagnostic fee typically ranges from $50 to $150, depending on the shop and area.
This fee typically includes a detailed examination of the battery, starter wiring, solenoid and sometimes the alternator to rule out other causes.
Mechanics can also perform voltage drop tests and bench tests to confirm the condition of the starter.
Paying for a professional diagnostic can provide peace of mind and ensure a correct diagnosis before committing to a costly replacement.
3. Average Replacement Cost Range
The cost of replacing a starter motor varies depending on the type and brand of the unit.
A standard new starter motor typically costs between $150 and $400, while a re-manufactured or refurbished unit can cost $100 to $250.
High-end or specialized starters for luxury or performance vehicles can cost over $500.
In addition to the part itself, some shops also include smaller components like mounting bolts or wiring terminals in the replacement cost.
Understanding the price range helps you budget for repairs and avoid being surprised by hidden fees.
4. Estimating Labor Time
Replacing a starter motor typically takes 1 to 3 hours of labor, depending on the vehicle’s design and access to the starter.
Labor costs at most repair shops typically range from $80 to $150 per hour.
Vehicles with starters located under the engine or in tight spaces may require longer, increasing the overall labor cost.
Including parts and labor, replacing a complete starter for most passenger vehicles can cost between $250 and $600.
Knowing the estimated labor time helps you plan for downtime and ensure the repair is done correctly.
Conclusion – How to Test Car Starter Motor
So, with this guide you can easily prevent signs such as: clicks, slow cranking or grinding noises, as these are literally the early warnings that should be fixed immediately, otherwise it can lead to the full starter failure as well.
As, the starter motor is the bridge between a parked engine and a running engine, relying on strong battery power, good wiring and a proper mechanical connection to the flywheel.
Whe you carefully tests the starter system, recognizing starting symptoms and distinguishing starter problems from battery or alternator issues can save both time and money.
As well as, timely replacement of a faulty starter, along with proper safety precautions and accurate diagnostics, ensures reliable engine starts and prevents unexpected failures.
A well-maintained starter motor improves vehicle reliability, reduces repair costs and provides peace of mind every time you turn the key.
Now, that’s all from this guide and you can ask related questions in the comment box below.
Frequently Asked Questions
Q1. What is a starter motor and why is it important?
Answer: A starter motor is an electric motor that helps start a car’s engine. When you turn the key or press the start button, the starter motor turns the engine’s crankshaft, igniting air and fuel inside the cylinder. Without the starter motor, the engine cannot start on its own. It only runs for a few seconds, but it draws a lot of current from the battery. A good starter motor ensures that the car starts smoothly every time, making it an essential component for reliable driving.
Q2. What are the common symptoms of a bad starter motor?
Answer: A bad starter motor often shows early warning signs. You may hear a clicking sound when you turn the key, which usually indicates a problem with the solenoid. A loud clicking sound could mean a weak battery. A squealing sound indicates a bad starter gear or flywheel. Sometimes, the engine won’t crank at all, or you may experience intermittent starting problems. Smoke or a burning smell coming from the engine bay during cranking is also a sign that the starter is overheating or has an internal problem. Recognizing these signs early can prevent a complete breakdown.
Q3. How can I safely test my starter motor?
Answer: There are several important steps to follow to safely test the starter motor. First, park the vehicle on a flat surface and apply the parking brake. Disconnect the negative battery terminal to prevent accidental sparks. Avoid wearing loose clothing and always use insulated tools when working around electrical parts. You can start by visually inspecting the battery, wiring and starter mounting bolts. Then, check the battery voltage, listen for the starter sound and measure the starter voltage using a multimeter. Advanced testing may include a voltage drop test or a bench test of the starter motor. Safety precautions and step-by-step testing eliminate the risk of injury and provide accurate results.
Q4. How do I know if the starter motor or battery is causing starting problems?
Answer: Starter motor problems are often confused with battery problems. A weak battery can cause slow cranking, a loud clicking sound, or no cranking at all. To determine the cause, first check the battery voltage with a multimeter; a fully charged battery should have a voltage of about 12.6 volts. Perform a load test to see if it can handle the current required to start. If the battery is fully charged and working properly, but the engine still won’t crank or only makes a clicking sound, the starter motor is likely the problem. Listening for sounds during cranking and checking the voltage at the starter can help differentiate between battery and starter problems.
Q5. Can a starter motor be repaired or should it always be replaced?
Answer: Some starter motor problems can be repaired, such as replacing worn brushes, fixing a faulty solenoid, or cleaning worn contacts. However, the cost of repair can sometimes be comparable to the cost of a new or re-manufactured starter. A new starter motor typically lasts longer and provides more reliable performance. When internal parts such as the armature, solenoid, or Bendix drive become worn, replacement is often recommended, specially if the starter has reached high mileage or is failing frequently. The decision to repair or replace depends on the cost, the severity of the problem and how long you expect the starter to last.
Q6. How long do starter motors typically last?
Answer: Starter motors are designed to last for many years, typically between 100,000 and 150,000 miles under normal driving conditions. However, frequent short trips, stop-and-go traffic and extreme heat or cold weather can cause starter wear faster. Every engine start requires a high electrical current, which creates heat and friction inside the motor. Regular maintenance, such as keeping battery connections clean and ensuring the electrical system is functioning properly, can extend the life of a starter motor.
References:
[1] Using the Hall Effect for Monitoring the Starter Condition in Motor Vehicles
https://www.mdpi.com/2076-3417/8/5/747
[2] Starter motor control system
https://www.researchgate.net/publication/305658348_Starter_motor_control_system

Guys, I’m a car audio enthusiast and customization expert and I love clear sound and clean installation. Plus, I have spent years helping people build their dream audio setups. And whenever I’m working on cars, I probably listen to music and thinks about the next big upgrade.