Written By: Don Dodi
Fact Checked By: Kristen Brown
Reviewed By: Diego Rosenberg
It is the fact that factory speakers usually handle just 15 to 25 watts RMS as they are often designed to be cost-effective rather than high-performing and on the other hand when you add aftermarket ones with them then you can manage up to the 100 watts: which simply means it gives you louder, cleaner music.
Plus, most of the factory speakers are made with lightweight materials such as paper cones and these kinds of speakers wear out faster and they just cannot handle the higher power levels as well.
Not only this, there’s a industry surveys that shows: over 60% of car owners who upgraded their audio system report noticeably lot better bass response and it boosted overall clarity as well.
Simply when you upgrade your factory speakers that improves sound quality of music, podcasts and audiobooks and it is true for the enhanced driving experience as well as it reduces the distortion at high volumes as well.
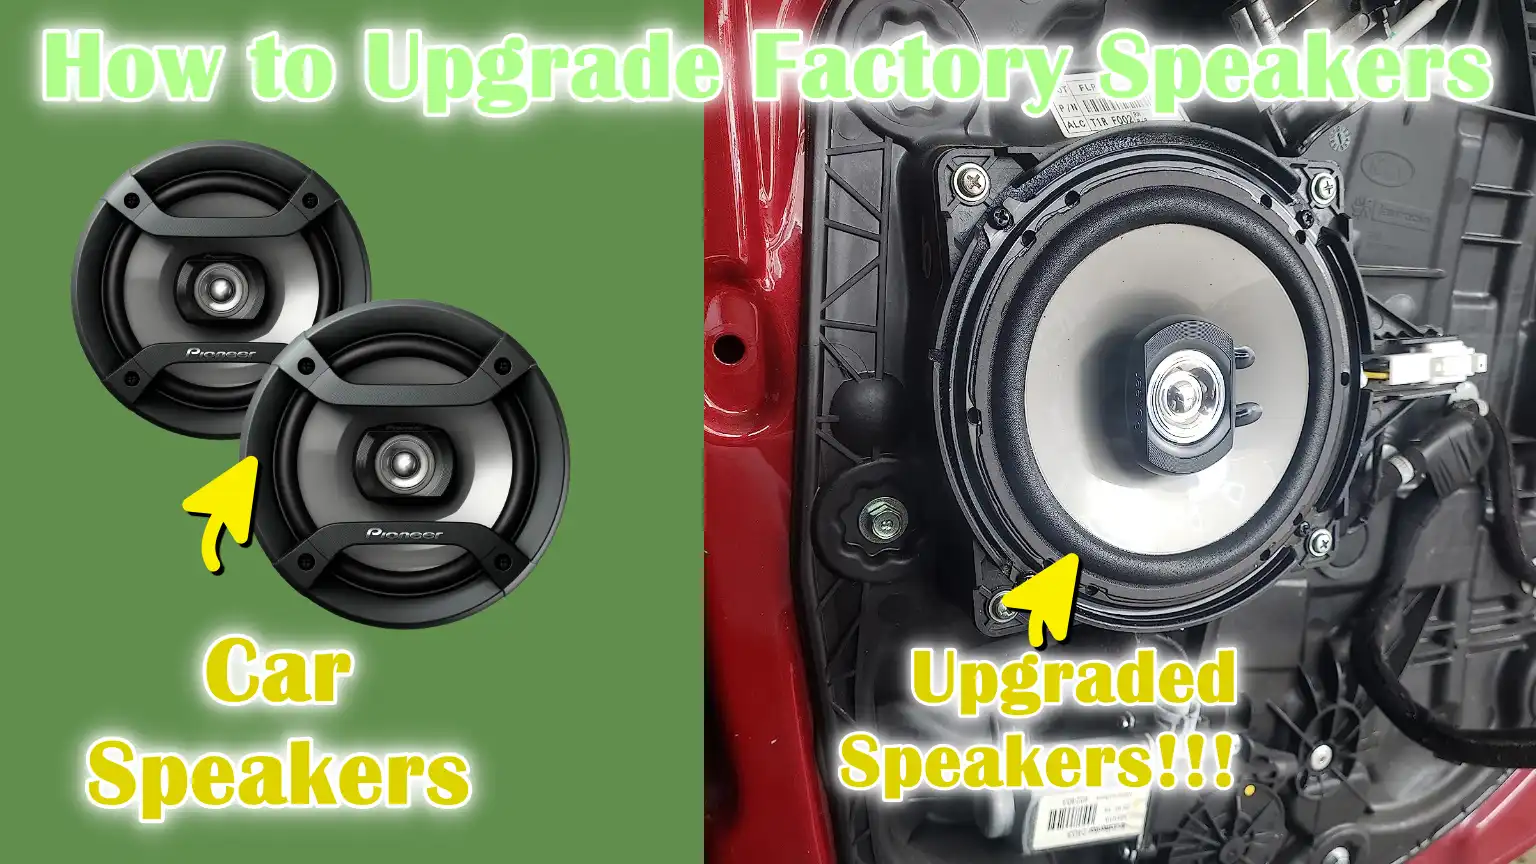
Also, the good news is the modern aftermarket speakers are actually designed to fit most of the vehicles comfortably, as you just need to know How to Upgrade Factory Speakers so that you can have impactful sound quality.
Tools
| Tools/Materials | Purpose/Use | Notes/Tips |
|---|---|---|
| Screwdriver | To remove screws from panels and speakers. | Both flathead and Phillips head may be required. |
| Panel Removal Tool | To safely remove doors or interior panels without damage. | Plastic pry tools are preferred over metal ones to avoid scratches. |
| Wire Strippers | To remove insulation from speaker wires. | Ensures clean connections. |
| Crimping Tool | To connect wires with crimp connectors. | Provides a secure and reliable connection. |
| Replacement Speakers | To replace factory speakers for better sound. | Must match the size and impedance (ohms) of your vehicle’s speakers. |
| Speaker Adapters/Mounting Brackets | To fit new speakers into factory mounts. | Often needed if aftermarket speakers are a different size than factory speakers. |
| Electrical tape | To insulate and secure wire connections. | Prevent short circuits. |
| Connector/soldering kit | To join wires for a more permanent and stable connection. | Soldering provides a stronger connection than crimping, but crimping is faster. |
How to Determine Compatibility and Speaker Size
1. How to Check the Vehicle’s Factory Speaker Size
Before upgrading your car’s speakers, it’s important to know the factory speaker size.
Most vehicles have standard speaker sizes for different locations, such as 6.
5-inch speakers for the front doors or smaller 4-inch speakers for the rear doors.
You can measure the speaker cone diameter yourself by removing a panel or consult your vehicle’s manual, which usually lists speaker sizes.
Knowing the correct size ensures that your new speakers will fit properly without any complicated modifications.
2. The Importance of Impedance and Power Handling
Impedance, measured in ohms, tells you how much electrical resistance a speaker offers to an amplifier.
It’s important to match the impedance of your new speakers to your car stereo or amplifier to avoid distortion or damage.
Most factory speakers are 4 ohms and many aftermarket speakers are designed for this size.
Power handling is another important factor and it’s usually expressed as RMS and peak power.
RMS is the power a speaker can handle continuously, while peak power is the maximum power it can handle in short bursts.
Choosing speakers with the proper RMS rating ensures clear sound even at high volumes without damaging the speakers.
3. Using Online Vehicle Audio Fit Guides or Manufacturer Charts
For convenience, you can use online audio fit guides or manufacturer charts to determine the correct speaker size and specifications for your car.
Many car audio websites offer useful tools where you can enter your vehicle’s make, model and year and it displays compatible aftermarket speakers.
Manufacturer charts also list the recommended size, power rating and impedance for each vehicle.
Using these resources can save time, avoid mistakes and help you choose the best speakers for your car’s audio system.
How to Remove the Factory Speakers
1. Safely Disconnect the Car Battery
Before removing the factory speakers, it’s important to disconnect your car’s battery.
This prevents any accidental short circuits or electric shocks while working with the speaker wires.
In most vehicles, the battery is located under the hood and you can disconnect it by loosening the negative terminal first, then the positive terminal.
This precaution also protects your car’s sensitive electronic components, such as the stereo system, airbags and other controls and prevents any damage during the speaker removal process.
2. Carefully Remove Interior Panels or Door Panels
To access the factory speakers, you’ll need to remove doors or interior panels.
Use plastic trim removal tools instead of metal ones to avoid scratching or damaging the panel.
First, locate the screws and clips holding the panel in place, then gently pry the edges to remove the clips.
Some panels may have hidden screws behind handles or under trim covers, so check each part thoroughly before applying force.
Carefully removing the panel ensures that your car’s interior remains in perfect condition and makes the reinstallation process easier.
3. Open and Disconnect the Factory Speaker Wiring Harness
After removing the panel, you can access the factory speakers.
Unscrew the speakers from their mounts and carefully remove them.
Speakers are usually connected to the car’s wiring via a harness.
Press the release tab or gently pull on the connector to disconnect it without damaging the wires.
Make a note of which wire is positive and which is negative, or take a quick photo, as this will help when connecting your new speakers.
Disconnecting correctly ensures that no wires are damaged and the new installation is clean and functional.
How to Install New Speakers
1. Mounting Considerations
When installing new speakers, it’s important to ensure they fit snugly into the existing speaker holes.
Some aftermarket speakers may not exactly match the factory mounts, so you may need to use adapters or brackets designed specifically for your vehicle.
These adapters allow the new speakers to fit securely without major modifications.
In cases where adapters are not available, minor modifications to the mounting area may be necessary, but it’s important to avoid damaging the car’s door panels or trim.
Proper mounting ensures that the speakers stay firmly in place and produce clear, vibration-free sound.
2. Connecting New Speakers
After mounting, the new speakers must be connected to the car’s audio system.
Many modern speakers come with plug-and-play wiring harnesses that match the factory connectors, making installation easy and quick.
If a plug-and-play option isn’t available, you may need to connect the wires using connectors or soldering for a secure connection.
Whichever method you choose, ensure the connections are strong and properly insulated to avoid short circuits and signal loss.
Proper wiring is essential for clear sound and reliable speaker performance.
3. Proper Polarity
It’s crucial to connect the positive and negative wires correctly when installing speakers.
Most speakers and wiring harnesses are marked with symbols or color codes to indicate polarity.
Connecting the wires incorrectly can cause phase issues where the speakers operate against each other, resulting in weak or distorted sound.
Always double-check the markings on the speakers and harness and test the connections before final assembly.
Correct polarity ensures balanced, clear and natural sound reproduction.
4. Fixing the Speakers Securely
After installing and connecting the speakers, ensure they are securely in place.
Loose speakers can rattle or vibrate, causing sound distortion and reduced audio quality.
Tighten the screws evenly and check for any movement by lightly pressing on the sides of the speaker.
If necessary, use additional mounting brackets or foam gaskets to eliminate gaps.
Firm installation guarantees that the speakers will perform optimally and deliver consistent sound quality over time.
How to Check and Reconnect
1. Reconnect the Car Battery
After installing the new speakers, the first step is to securely reconnect the car battery.
First, reconnect the positive terminal, then the negative terminal and make sure the connections are secure.
Reconnecting the battery restores power to your car’s audio system and other electrical components.
This step is important because testing the speakers requires full power and proper reconnection prevents damage to the car’s electronics.
2. Check Each Speaker for Sound Quality and Correct Polarity
Before reconnecting all the speakers, it’s important to test each speaker individually.
Play music or use test tones to ensure that each speaker produces clear and balanced sound.
Listen carefully for distortions, rattles, or weak output, which may indicate loose connections or incorrect polarity.
Correct polarity ensures that the positive and negative wires are connected correctly, preventing phase issues that can occur when speakers are running opposite each other.
Testing at this stage allows you to quickly correct any problems without removing the panel again, saving time and improving audio performance.
3. Reinstall the Door Panels and Trim Parts
Once all speakers have been tested and are working properly, you can carefully reinstall the door panels and trim parts.
Align the panels properly and press them gently to secure the clips, then tighten the removed screws.
Before completing the work, ensure that all handles, switches and locks are working properly.
Reinstallation protects the car’s interior and prevents damage to the new speakers, completing the installation process.
Proper reinstallation ensures that the interior looks factory-finished and your new audio system will function reliably for years.
Alternative Solutions
1. Installing Soundproofing Materials Inside the Doors
One of the most effective ways to improve your car’s audio quality is to install soundproofing material inside the doors.
Factory doors are often thin and can vibrate when loud music is played, causing rattling and reducing sound clarity.
Materials like butyl mats, foam, or special car audio damping sheets absorb vibrations and reduce external noise, allowing the speakers to work more efficiently.
This not only increases bass response but also improves overall sound clarity, making every note and tone sound richer and clearer while driving.
2. Installing an External Amplifier for More Power
For those who want louder and more detailed sound, installing an external amplifier is a valuable upgrade.
Most factory stereos provide limited power, which can limit speaker performance, specially at higher volumes.
An amplifier increases the power available to the speakers, ensuring they perform to their full potential without distortion.
Choosing an amplifier that matches your speakers’ power handling (RMS) is essential to avoid loss and achieve a balanced sound.
Amplifiers also provide greater flexibility in tuning your audio system for optimal bass, mids and highs.
3. Upgrading Tweeters or Adding a Component System
Tweeters are responsible for high-frequency sounds like vocals, cymbals and other musical nuances.
Upgrading factory tweeters or installing a full component speaker system, which separates the tweeter, mid-range driver and woofer, can significantly improve sound quality.
Component systems allow each speaker to focus on specific frequencies, resulting in clear highs, dense mids and deep lows.
This upgrade provides a more immersive and precise listening experience, making your car audio sound like a professional home or studio setup.
Read More:
What are The Basic Safety and Precautions
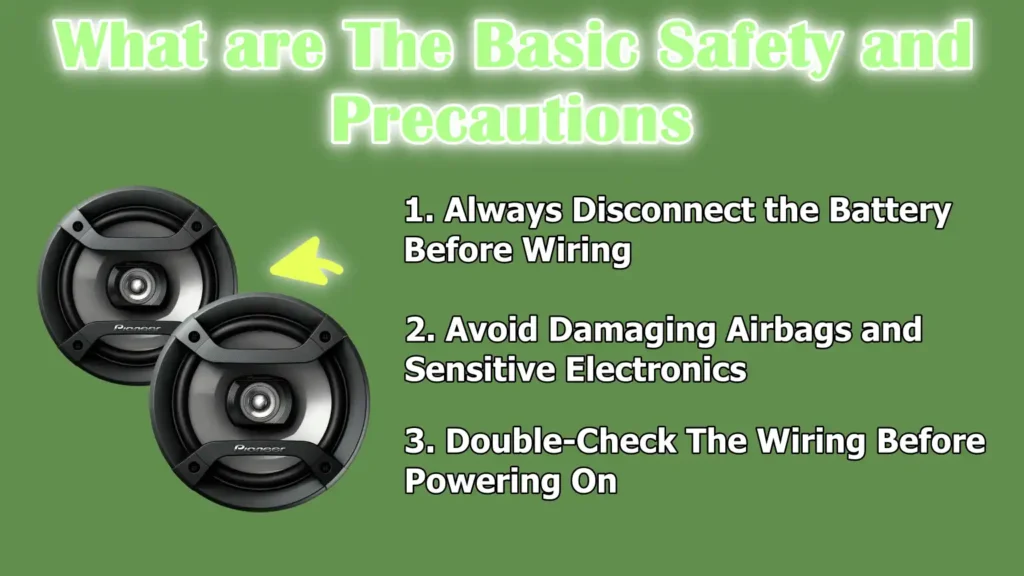
1. Always Disconnect the Battery Before Wiring
Before beginning any work on your car’s audio system, it’s essential to disconnect the battery.
Disconnecting the battery can prevent accidental short circuits, electric shocks, or damage to the stereo and other electronic components.
To ensure safety, always remove the negative terminal first, followed by the positive terminal.
This simple step protects both you and your vehicle and helps you work confidently on speakers and wiring.
2. Avoid Damaging Airbags and Sensitive Electronics
Modern vehicles are equipped with airbags and many sensitive electronic systems that can easily be damaged during speaker installation.
When removing panels or wiring, be careful not to interfere with the airbag module, sensors, or control unit.
Damaging these components can lead to costly repairs or safety hazards.
Keeping wires organized and using proper tools helps prevent accidental contact with these critical systems and ensures a clean installation.
3. Double-Check The Wiring Before Powering On
Before reconnecting the battery and turning on your audio system, carefully check all wiring connections.
Make sure all positive and negative wires are connected correctly and insulated to avoid short circuits or reverse polarity.
Double-checking the connections helps prevent distortion, protect your new speakers from damage and ensure the system will work properly the first time.
Checking the wiring before powering on will prevent problems and ensure a safe and successful upgrade.
So, there’s listening-test research which clearly confirms that when you upgrade the speakers then you should be aware about the perception of in-car audio as it is multi-dimensional that’s why it give you louder output but small changes in speaker layout or tuning actually change the perceived clarity and spatial impressions as well, yes the results vary with the test signal and listening conditions.[¹]
Conclusion – How to Upgrade Factory Speakers
Simply by upgrading the speaker or installing the new one can dramatically improve the sound clarity, depth and bass response and that actually makes the music, podcasts and audiobooks truly enjoyable.
Factory-installed speakers are often designed with economy in mind rather than sound quality, which can lead to issues like weak bass, muffled volume and high-pitched sound.
By choosing the right size speakers, matching impedance and power ratings and carefully installing them, you can transform your car into a personal audio environment that delivers clear, detailed and immersive sound.
Optional improvements, such as soundproofing materials, external amplifiers, or upgraded tweeters, can further enhance performance and make your system feel professionally tuned.
Following proper safety precautions ensures a smooth and risk-free installation, protecting both your vehicle and your investment.
Ultimately, replacing factory speakers is a practical, beneficial upgrade that brings music to life and makes every drive even more enjoyable.
If you still have questions then just comment down below for more information about this topic.
Frequently Asked Questions
Q1. Why should I upgrade my factory car speakers?
Answer: Factory car speakers are typically designed to keep costs low, which means they often don’t deliver deep bass, clear mids, or crisp highs. Upgrading to aftermarket speakers can improve the overall sound quality of your car’s audio system. New speakers can handle more power, reduce distortion at loud volumes and provide a richer and more detailed listening experience. Small changes, such as replacing the front door speakers, can improve the sound of music, podcasts and audiobooks.
Q2. How do I know what size speakers I need for my car?
Answer: You can check the size of your car speakers by measuring the diameter of the speaker cone or looking in your vehicle manual. Most cars have standard sizes for different locations, such as 6.5-inch speakers for the front doors or 4-inch speakers for the rear doors. Online audio fit guides or manufacturer charts are also helpful. These allow you to find suitable aftermarket speakers by entering your car’s make, model and year, ensuring the new speakers will fit properly without any modifications.
Q3. What tools do I need to replace car speakers?
Answer: To replace factory speakers, you’ll typically need a screwdriver to remove screws, trim or panel removal tools to safely remove the interior panel, wire strippers to handle the wires and a crimping tool or soldering kit to connect the new speaker wires. If the new speakers don’t match the factory mounts, you’ll also need replacement speakers and sometimes adapters or mounting brackets. Electrical tape or connectors are useful for insulating and securing the wires.
Q4. Is it safe to install car speakers yourself?
Answer: Yes, installing car speakers can be safe if you follow the proper precautions. Always remove the car battery before working on wiring to avoid short circuits or electric shock. Be careful not to damage airbags, sensors, or other sensitive electronic components inside your car. Double-check wiring connections before turning on the system to ensure correct polarity and prevent damage to the speakers or stereo. Following these steps will ensure a safer and more successful installation.
Q5. What is impedance and why is it important when choosing speakers?
Answer: Impedance, measured in ohms, is the resistance a speaker offers to electrical current coming from your stereo or amplifier. Most factory speakers are 4 ohms and aftermarket speakers are typically designed for less. Matching impedance is important because using speakers with the wrong impedance can cause distortion, reduced sound quality, or even damage to the stereo system. Always check that new speakers meet the requirements of your car’s audio system.
Q6. What are RMS and peak power in speakers?
Answer: RMS, or root mean square, refers to the amount of continuous power a speaker can safely handle without distortion. Peak power is the maximum power a speaker can handle in short bursts. Choosing speakers with the correct RMS rating ensures they can handle the power provided by your stereo or amplifier and produce clear sound even at high volumes. This helps prevent speaker damage and maintain their performance over time.
References:
[1] Measuring Sound Experience with In-Vehicle Speaker Systems
https://www.isca-archive.org/pqs_2013/wilfinger13_pqs.pdf

Guys, I’m a car audio enthusiast and customization expert and I love clear sound and clean installation. Plus, I have spent years helping people build their dream audio setups. And whenever I’m working on cars, I probably listen to music and thinks about the next big upgrade.