Written By: Don Dodi
Fact Checked By: Kristen Brown
Reviewed By: Diego Rosenberg
You need to understand that: most of the engine damage does not happen overnight, as it begins quietly with the low oil pressure that drivers cannot see without having a proper gauge for it.
Because, without the proper oil pressure; the engine components such as: crankshafts, camshafts, bearings and turbochargers just cannot stay properly lubricated and then it leads to the rapid wear or even it can completely lead to the engine failure as well.
Along with this, most of the factory vehicles only comes with a really basic oil warning light that turns on when the pressure drops to a dangerously low level: which is often around 5 to 10 PSI that literally means that the problem is already serious by the time you actually noticed it.
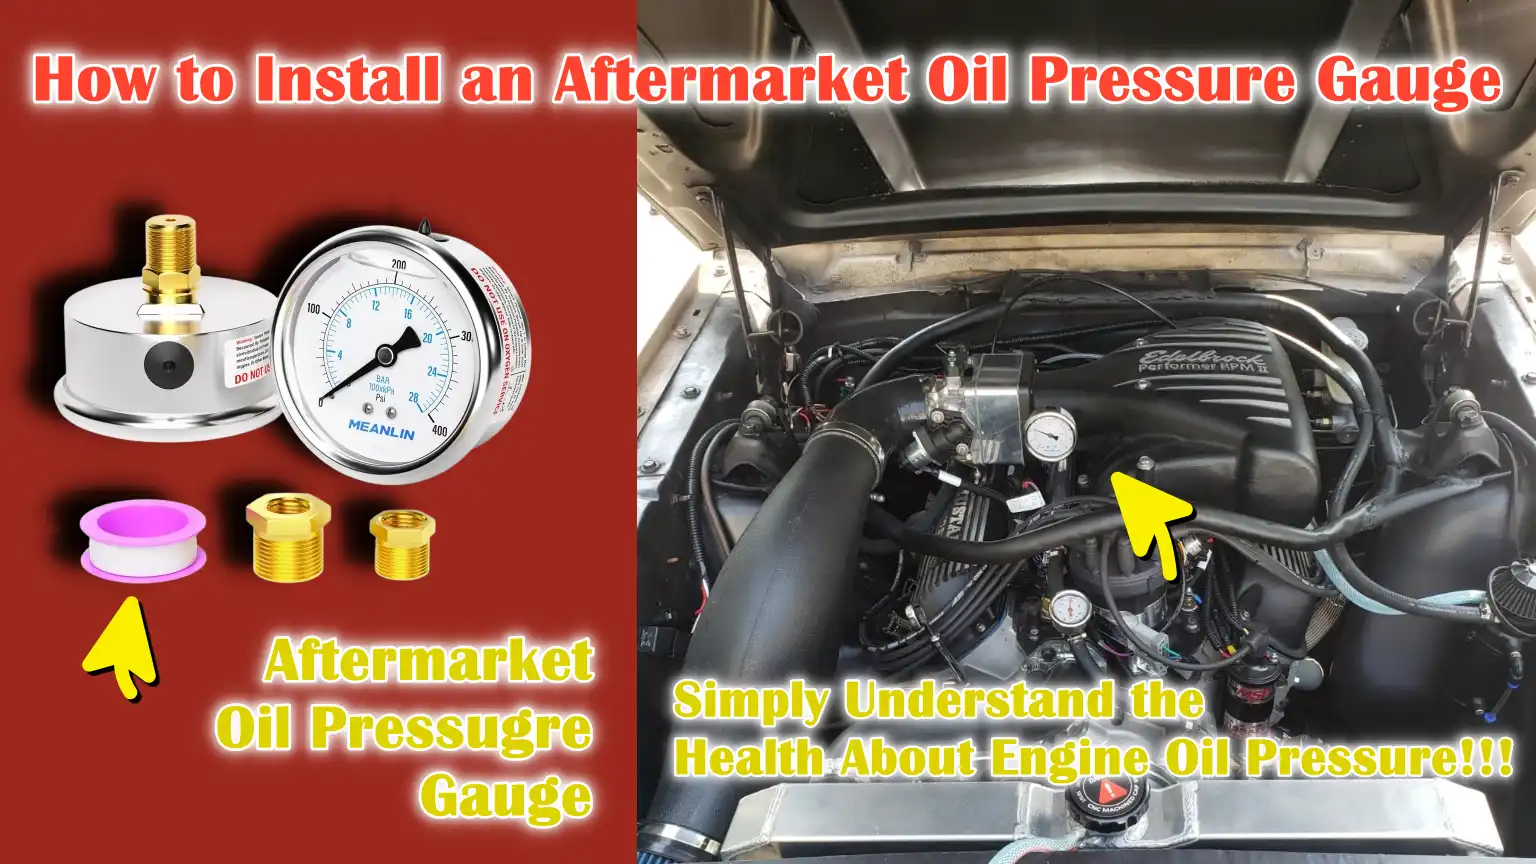
So, here’s the guide on How to Install an Aftermarket Oil Pressure Gauge, so that you can have real-time readings in PSI or bar, that actually allows you to monitor the engine health continuously.
How an Oil Pressure Gauge Works
An oil pressure gauge is a device that measures the force pushing engine oil through the engine’s lubrication system.
When the engine is running, the oil pump draws oil from the oil pan and pushes it through passages called oil galleries to moving parts such as bearings, camshafts and pistons.
When oil flows through small spaces between metal parts, resistance is created and this resistance creates pressure.
The gauge measures this pressure and displays it in PSI or bar.
This measurement helps you understand whether the oil pump is working properly and whether the engine is receiving adequate lubrication.
Oil pressure is not the same as oil level.
Even if the oil level is full, low pressure can still occur due to worn bearings, a weak oil pump, clogged oil passages, or too thin oil.
By monitoring oil pressure in real time, you can detect problems early and prevent serious engine damage.
1. Basic Principles of Measuring Oil Pressure
The basic principle of measuring oil pressure is simple and relies on force within a closed system.
When oil is forced through narrow spaces within the engine, it creates pressure.
A sensor or small tube is connected to the oil passage in the engine block, usually near the oil filter or where the factory sensor is installed.
This connection allows the gauge system to “feel” the pressure inside the engine.
In electrical systems, a pressure sensor converts this physical pressure into an electrical signal.
In mechanical systems, the actual pressure is transmitted directly to the gauge through a small tube.
The higher the engine speed, the faster the oil pump rotates and the greater the pressure will typically be generated, specially when the engine is cold.
As the oil heats up and thins, the pressure may decrease slightly, which is normal.
Understanding this basic principle helps drivers know what readings to expect and what may indicate a problem.
2. Difference Between an Oil Pressure Sender and an Oil Pressure Switch
Many people mistake an oil pressure sender for an oil pressure switch, but they perform very different functions.
An oil pressure switch is a simple on-off device.
It activates only when the oil pressure drops below a very low safety limit, often around 5 to 10 PSI.
When this happens, it illuminates an oil warning light on the dashboard.
It doesn’t display the actual pressure value; it only alerts you when the pressure is dangerously low.
An oil pressure sender, on the other hand, provides continuous information.
It measures the correct pressure and sends different signals to the gauge, allowing you to see if the engine is at 20 PSI, 40 PSI, or 60 PSI.
This detailed information helps you understand the engine’s condition during cold starts, idling, highway driving, or rapid acceleration.
Simply put, a switch alerts you when a serious problem occurs, while a sensor helps you monitor the engine’s health at all times.
3. Mechanical vs Electric Oil Pressure Gauges
Mechanical and electric oil pressure gauges measure the same thing, but they do it in different ways.
A mechanical gauge uses a small tube that carries actual engine oil from the engine to the cabin and directly behind the gauge.
Inside the gauge, the pressure drives a small internal mechanism that moves a needle.
Mechanical gauges are known for fast and accurate readings because they respond directly to changes in oil pressure.
However, they require careful installation because the oil is physically routed inside the vehicle.
An electric gauge uses a pressure sensor mounted on the engine.
This sensor converts oil pressure into an electrical signal that travels through wires to the gauge inside the cabin.
Electric gauges are generally easier and safer to install because there is no oil transfer inside the vehicle.
Both types of gauges can be accurate when installed correctly, but for safety and convenience reasons, electric gauges are more common in modern vehicles.
4. How Readings Are Displayed Inside the Cabin
Inside the cabin, oil pressure readings are displayed on either an analog dial or a digital screen.
An analog gauge uses a needle that moves on a numbered scale, usually marked in PSI or bars.
This allows drivers to quickly see whether the pressure is within the normal range.
A digital gauge displays the actual number on the screen, providing a more accurate reading.
In most vehicles, oil pressure will be higher during a cold start and will drop slightly as the engine warms up.
At idle, the pressure is usually lower than when driving at higher speeds.
A general guideline is about 10 PSI per 1,000 RPM, although this can vary depending on the engine design.
By observing these readings over time, drivers learn what is normal for their particular vehicle.
Any sudden drops, unusually low readings at idle, or unstable pressure movements could be signs of potential problems that should be checked immediately.
Know, Common Types of Aftermarket Oil Pressure Gauges
Aftermarket oil pressure gauges come in different types and understanding the differences helps you choose the right one for your vehicle and driving needs.
All oil pressure gauges measure the same thing: the force of engine oil flowing through the lubrication system, usually expressed in PSI or bar.
However, they differ in how they measure pressure, send signals and display information.
Some gauges use direct oil pressure, while others use electrical signals.
Some display readings with a moving needle, while others use a digital screen.
The best choice depends on safety, ease of installation, accuracy, budget and personal preference.
Knowing how each type of gauge works will help you make a smart and confident decision.
1. Mechanical Oil Pressure Gauge
Mechanical oil pressure gauges measure pressure using a small tube that carries the original engine oil directly from the engine block to the gauge inside the cabin.
When the engine runs, oil pressure flows through this tube and exerts pressure on a small internal mechanism inside the gauge, causing the needle to move.
Because the gauge responds directly to actual oil pressure, mechanical gauges are known for their fast and accurate readings.
They don’t rely on electrical signals, so they’re less affected by wiring problems or electrical interference.
However, because actual engine oil circulates within the vehicle, proper installation is essential.
Worn or poorly sealed tubing can cause oil leaks.
Mechanical gauges are often preferred in racing or performance applications where instant response is essential, but they require careful handling and secure installation.
2. Electric/Electronic Oil Pressure Gauge
Electric oil pressure gauges use a pressure sensor mounted on the engine rather than an oil pump in the cabin.
The sensor measures oil pressure and converts it into an electrical signal.
This signal travels through wires to a gauge mounted under the dashboard.
The gauge then displays the pressure based on the signal.
Electric gauges are very popular in modern vehicles because they are safer and easier to install.
Since only wires, not oil lines, pass through the firewall, they eliminate the risk of leaks inside the cabin.
Electric gauges are also easier to integrate with other electronic systems and lighting features.
Although they are generally very accurate, their readings depend on the quality of the sensors and wiring connections.
Poor grounding or loose wires can sometimes cause inaccurate or fluctuating readings.
Overall, electric gauges offer a good balance of safety, convenience and reliability.
3. Digital Oil Pressure Gauge
Digital oil pressure gauges display readings as precise numbers on a screen instead of using a needle.
These gauges are typically electronic and work with a pressure sensor.
The main advantage of a digital display is accuracy.
You can see precise pressure values, such as 42 PSI, instead of guessing between marks on a dial.
Digital gauges are often easier to read at night and may include additional features such as warning alerts, peak pressure memory, or a color-changing display when the pressure drops below a safe level.
These are common in modern performance cars and custom dashboards.
However, some drivers find it more difficult to quickly read constantly changing numbers than a straight needle.
Digital gauges also rely entirely on electrical systems, so proper wiring and voltage stability are essential for optimal performance.
4. Analog Oil Pressure Gauge
Analog oil pressure gauges have a traditional dial with a moving needle to indicate the pressure level.
These gauges can be mechanical or electric, depending on how they are connected to the engine.
The main advantage of analog gauges is that they allow drivers to quickly understand pressure changes at a glance.
Instead of focusing on exact numbers, you can easily see whether the needle is within the normal range or dropping suddenly.
This makes analog gauges very useful for everyday driving because they’re easy to see without distraction.
They’re simple, durable and often more affordable than advanced digital models.
While they may not display as accurate numbers as digital gauges, they provide clear and reliable information about engine health.
Tools
| Tool / Material | Why You Need It |
|---|---|
| Oil Pressure Gauge Kit – Gauge, Sender, Wiring or Tubing | It is an essential part of the installation. It measures oil pressure and displays the reading inside your car. |
| Wrenches and Socket Set | You need these tools to remove the factory oil pressure sensor and securely install the new sender or fitting. |
| Teflon Tape or Thread Sealant | When you install the sender or fitting, it seals the small gap between the metal threads to prevent oil leaks. |
| Wire Connectors and Crimping Tool | It helps create a strong and secure electrical connection so the gauge works properly without loose wires. |
| Drill – If Mounting Required | If there is no existing place to secure the gauge, you may need it to install a mounting bracket or pod. |
| Gauge Mounting Pod or Bracket | It keeps the gauge stable, easy to see and safe while driving. |
| Zip Ties and Electrical Tape | It tightly secures the wires and protects them from heat, movement and damage inside the engine bay or cabin. |
How to Ensure Safety Of Yours While Installing the Oil Pressure Gauge
Installing an aftermarket oil pressure gauge requires working around the engine, electrical wiring and sometimes hot engine oil.
While it’s not a particularly difficult task, it’s crucial to take proper safety precautions.
The engine area contains moving parts, hot surfaces, pressurized oil and electrical connections that can cause injury or damage if handled carelessly.
Simple preparation steps can prevent burns, electrical short circuits, oil leaks and costly mistakes.
Following these safety guidelines keeps both you and your vehicle safe and ensures a clean, accurate and professional installation.
1. Park on Level Ground
Before beginning installation, always park your vehicle on flat, level ground.
A flat surface keeps the car stable and prevents it from rolling or sliding while you’re working under the hood.
If the vehicle is tilted, engine oil may spill inside the oil pan, increasing the risk of minor leaks while removing the oil pressure sensor.
A stable position also allows you to safely open the hood and work comfortably without the vehicle suddenly moving.
Applying the parking brake adds another layer of safety and ensures the car remains secure throughout the process.
2. Disconnect the Negative Battery Terminal
Disconnecting the negative battery terminal is a very important electrical safety step.
When installing an electric oil pressure gauge, you’ll be working with wires that are connected to the power source, ground and lighting circuits.
If the battery remains connected, accidental contact between wires and metal parts could cause sparks, short circuits, blown fuses, or even damage sensitive electronic parts.
By removing the negative terminal first, you reduce the risk of electrical shock and protect the vehicle’s wiring system.
This simple task takes only a few minutes but can prevent serious electrical problems.
3. Let the Engine Cool Completely
The engine must be completely cool before removing the oil pressure sensor or touching engine parts.
During normal operation, engine oil temperatures can exceed 200 degrees Fahrenheit.
Touching hot metal parts, such as the exhaust manifold, engine block, or oil filter housing, can cause serious burns.
Furthermore, hot oil may be released under pressure while removing the sensor, increasing the risk of injury.
Waiting at least 30 to 60 minutes after driving allows the oil pressure to decrease and the engine parts to cool.
A cool engine makes the installation safer and more comfortable.
4. Wear Gloves and Eye Protection
Wearing gloves protects your hands from contact with sharp metal edges, hot surfaces and oil.
The engine compartment often contains tight spaces where your hands may rub against brackets, bolts, or rough surfaces.
Gloves also improve grip when handling tools and fittings.
Eye protection is equally important, as small drops of oil, dirt, or debris may fall when removing the factory sensor.
Even a small amount of oil in the eyes can cause irritation and discomfort.
Basic safety gear helps prevent minor injuries that can quickly turn into serious problems.
5. Prevent Oil Loss and Spills
When removing the factory oil pressure sensor, a small amount of oil may leak.
Placing a clean cloth or rag under the area helps contain the leak and keep the engine bay clean.
It’s crucial to keep dirt and debris away from the open oil port, as dirt entering the engine can damage it over time.
Always use clean tools to seal the leak and apply the correct amount of thread sealant so it doesn’t block the oil passage.
After installation, carefully check for any oil leaks while the engine is running.
Preventing oil leaks and spills not only protects the environment but also ensures accurate oil pressure readings and long engine life.
How to Select the Correct Oil Pressure Source Port
The most important part of installing an aftermarket oil pressure gauge is choosing the correct oil pressure source port.
The gauge can only provide accurate readings when connected to an oil passage with the correct pressure within the engine.
Oil pressure is generated by the oil pump and flows through internal channels called oil galleries, which carry oil to the bearings, camshafts and other moving parts.
If you connect the gauge to the wrong location, such as a low-flow or no-pressure location, the reading will not reflect the engine’s actual condition.
Proper connection ensures that you receive the correct oil pressure to the engine’s vital parts.
Taking the time to identify the correct port can prevent inaccurate readings, oil leaks and installation problems.
1. Locating the Factory Oil Pressure Sensor
The easiest and most reliable place to connect an aftermarket oil pressure gauge is usually where the factory oil pressure sensor is already installed.
This sensor is typically located near the oil filter housing, on the engine block, or in an oil passage near the cylinder head.
The manufacturer installs a factory sensor that measures the actual pressure of the engine oil after it leaves the oil pump.
By locating this sensor, you can access a reliable pressure source.
In many vehicles, a single wire or electrical connector is attached to the sensor.
Carefully identifying this component ensures you’re working with the correct part and not confusing it with nearby sensors like the coolant temperature or camshaft position sensor.
Using the factory location guarantees accurate and precise oil pressure readings.
2. Understanding the Oil Galley Port
Oil galley ports are internal channels in the engine block that carry pressurized oil to various engine components.
These passages are carefully designed to maintain proper oil flow and pressure throughout the engine.
Some engines have additional threaded plugs along these oil galleries that can serve as additional connection points for aftermarket gauges.
These ports provide direct access to pressurized oil, making them ideal for installing a sender or mechanical line.
However, it’s important to confirm that the port you select is part of the main oil pressure system, not a return or drain.
Connecting to the original oil galley ensures the gauge displays the pressure that protects engine bearings and moving parts.
Understanding how oil flows through these channels helps you avoid incorrect installation points.
3. Using a T-Adapter to Retain the Factory Sensor
In most modern vehicles, it’s not advisable to completely remove the factory oil pressure sensor because it controls dashboard warning lights or communicates with the engine control unit.
To keep the original system functioning while installing a new gauge, a T-adapter is typically used.
A T-adapter is a small metal fitting that divides one oil port into two connection points.
One end connects to the original factory sensor and the other to a new aftermarket sender or mechanical line.
This setup allows both systems to measure oil pressure simultaneously.
Using a T-adapter ensures you retain factory safety features while receiving real-time pressure readings.
It’s important to install the adapter securely and use the correct thread sealant to prevent oil leaks.
4. Ensuring Correct Thread Size and Compatibility
Thread size and compatibility are crucial when installing any oil pressure sender or fitting.
Engine oil ports are manufactured with specific thread types and sizes, such as NPT, BSPT, or metric threads.
Using the wrong thread type can damage the engine block, cause leaks, or result in inaccurate pressure readings.
Before installation, you should confirm the thread size of both the engine port and the aftermarket sender.
Many gauge kits include adapters for different thread sizes, but it’s important to verify compatibility rather than trying to force a part into place.
Applying the correct thread sealant and tightening to the correct torque helps create a leak-free seal without cracking the fitting.
Ensuring a proper thread match and secure installation protects the engine and provides accurate oil pressure measurements.
How to Install an Aftermarket Oil Pressure Gauge – Complete Installation Process for Electric Gauge
Installing an electric oil pressure gauge requires careful attention to both mechanical and electrical connections.
Electric gauges use a pressure sender mounted on the engine, which converts oil pressure into an electrical signal and transmits it to the gauge inside the cabin.
This method is safer than a mechanical setup because only wires, not pressurized oil, are used inside the vehicle.
Proper installation ensures accurate readings, prevents oil leaks and protects the vehicle’s electrical system.
Performing each step in the correct sequence reduces errors and ensures long-term reliability.
How to Remove the Factory Oil Pressure Sensor
Removing the factory oil pressure sensor is the first and most important step in installing an electric oil pressure gauge.
The factory sensor is already connected to the pressurized oil passage inside the engine, making it a reliable source for accurate readings.
This sensor typically controls dashboard warning lights or sends signals to the engine control unit.
Because it is directly connected to the engine’s oil system, it must be removed carefully to avoid oil leaks, thread damage, or electrical problems.
Taking your time during this step helps protect the engine and makes the installation process easier.
1. Locate the sensor near the oil filter or engine block
In most vehicles, the oil pressure sensor is mounted on the engine block or near the oil filter housing.
Manufacturers place it where it can measure actual oil pressure after the oil pump pushes oil through the engine gallery.
It often resembles a small metal or plastic cylinder with a wire connector on the end.
Before touching it, make sure the engine is cool, as surrounding parts like the exhaust manifold or engine block may remain hot after long driving.
Identifying the correct sensor is crucial, as confusing it with another sensor could result in installation errors or trigger the engine warning light.
2. Carefully Unplug the Wiring Harness
Once the correct sensor is located, the next step is to unplug the wiring harness.
The connector usually has a small locking tab that must be pressed before removing it.
Gently depress the tab and pull the connector straight back.
Never pull on the wire itself, as this could damage the wiring inside or loosen the connection inside the harness.
If the connector appears stuck, check for dirt or oil buildup and carefully clean it before trying again.
Keeping the connector in good condition ensures that you can reconnect it later if you’re using a T-adapter to maintain the factory system.
3. Remove the sensor using the correct socket
After disconnecting the wiring, use the correct sized deep socket or wrench to remove the sensor.
Oil pressure sensors are threaded into the engine block and using the correct tool can prevent rounded edges or cracks in the sensor housing.
Gently turn the sensor anti-clockwise to loosen it.
A little oil may drip when the sensor is removed, which is normal because the port is connected to a pressurized oil channel.
Placing a clean cloth underneath helps contain the oil and keeps the engine bay clean.
Removing the sensor carefully protects the threads inside the engine block, which is important because worn threads can cause leaks and require costly repairs.
How to Install a T-Fitting – If Needed
Installing a T-Fitting is often necessary when you want to keep the factory oil pressure sensor operational while also installing an aftermarket electric gauge.
Most modern vehicles rely on the original sensor to control the oil warning light or send information to the engine control unit.
Removing it completely could cause warning lights, fault codes, or important safety alerts to fail.
A T-Fitting allows one oil pressure port to service two devices simultaneously.
It divides the oil passage into two threaded openings, so that both the factory sensor and the new oil pressure sensor can read pressure from the same source.
This ensures you retain factory safety features and get real-time oil pressure monitoring inside the cabin.
1. Why T-Fitting is Important
T-Fitting is important because it allows both sensors to measure the actual engine oil pressure without interfering with each other.
Oil pressure within the engine is generated by the oil pump and flows through the oil gallery to lubricate moving parts.
By installing a T-fitting on the original sensor port, you ensure that both the factory system and the aftermarket gauge receive the correct pressure from the same pressure channel.
This prevents inaccurate readings and damage to the vehicle’s built-in warning system.
Using the correct T-fitting also reduces the need to drill new holes or modify the engine block, preventing unnecessary damage to the engine.
2. Apply Thread Sealant Properly
Before installing the T-fitting on the engine block, it is important to properly apply thread sealant or Teflon tape.
The sealant fills the very small gaps between the metal threads and prevents oil from leaking under pressure.
Engine oil systems, depending on the engine design, can operate at pressures ranging from about 20 PSI at idle to 60 PSI or more at higher engine speeds.
Even a small gap in the threads can allow oil to leak over time.
When applying Teflon tape, wrap it in the direction of the threads to prevent it from unraveling during tightening.
Use only a thin and even layer, as too much sealant can break off and enter the oil system, blocking small oil passages.
Proper sealing ensures a leak-free and reliable installation.
3. Secure Without Overtightening
Once the T-fitting is threaded into the engine block, tighten it carefully using the correct sized wrench.
It should be tight and secure, but not too tight.
Engine blocks are often made of aluminum, which is softer than steel and can warp if overtightened.
Excessive force can strip the threads, crack the fitting, or cause subsequent leaks.
Tighten the fitting until it is properly seated and aligned with the sensor.
After installation, always check the area for signs of oil leakage when starting the engine.
Properly tightening the fitting secures the engine threads, ensures accurate pressure readings and ensures long-term reliability of the oil system.
How to Install the New Oil Pressure Sender
Installing the new oil pressure sender is an important step because this part is responsible for measuring the engine’s oil pressure and transmitting that information to a gauge inside the cabin.
The sender works by sensing the force of the oil within the engine’s oil gallery and converting that pressure into an electrical signal.
This signal changes based on the pressure level and is sent to the gauge via a wire.
For accurate readings, the sender must be installed where it can measure accurate, pressurized engine oil.
Proper installation ensures stable readings, no leaks and protects the engine from contamination or thread damage.
1. Thread the sender into the adapter
Once the T-fitting or adapter is securely installed, the new oil pressure sender must be threaded into the adapter’s open port.
Start by carefully aligning the threads and turning the sender by hand.
This helps prevent cross-threading, which can damage both the sender and the engine fitting.
Cross-threading occurs when the threads are misaligned and forced together, permanently damaging the connection.
Once the sender is hand-tightened, use the correct wrench to tighten it further.
The sender must be firmly in place without vibration or movement to receive the correct oil pressure.
A secure connection ensures that the sender receives direct oil pressure from the engine’s lubrication system.
2. Ensure Proper Sealing
Proper sealing is essential because engine oil flows through the port under pressure.
Depending on engine speed and temperature, oil pressure can range from approximately 20 PSI at warm idle to 60 PSI or more during acceleration.
Even a small gap between the threads can cause oil leaks over time.
Apply a small amount of thread sealant or Teflon tape to the sender threads before installation, unless the manufacturer specifically recommends something else.
Sealant should be applied evenly and not excessively, as too much material can enter the oil passages and block flow.
After tightening the sender, check the connections to ensure they are properly installed and aligned.
A properly sealed sender prevents oil loss, keeps the engine bay clean and maintains accurate pressure readings.
3. Reconnect the factory sensor if necessary
If you are using a T-adapter to retain the factory oil pressure sensor, reconnect it after installing the new sender.
Insert the factory sensor into the remaining port on the adapter, using the same care you did before inserting it by hand and then tighten it securely.
Once installed, reconnect the original wiring harness to the factory sensor.
This step ensures that the vehicle’s original oil warning light and engine control system continue to function normally.
Many modern vehicles rely on factory sensors to monitor engine health and alert you when pressure gets too low.
Keeping the factory sensor connected provides an extra layer of safety, while an aftermarket gauge provides real-time pressure information.
Once both sensors are installed, double-check all connections before proceeding to the wiring stage.
How to Route the Sender Wire to the Cabin
Routing the sender wire correctly is crucial for safety and proper gauge operation.
The oil pressure sender sends a small electrical signal to the gauge inside the cabin and this signal must travel a safe path from the engine bay to the vehicle.
If the wire is damaged, exposed to heat, or loose, it can cause inaccurate readings, signal loss, or even an electrical short.
A clean and secure wire route keeps oil pressure readings stable and prevents long-term electrical problems.
Taking extra time during this step helps protect the wiring from heat, vibration and sharp edges inside the engine compartment.
1. Identify the Firewall Grommet
The safest way to route the sender wire to the cabin is through the existing firewall grommet.
The firewall is the metal wall that separates the engine bay from the interior of the vehicle.
Most vehicles have pre-installed rubber grommets in the firewall to safely route wiring harnesses, clutch cables, or other parts.
These rubber grommets protect the wire from rubbing against sharp metal edges.
Carefully locate an unused or easily accessible grommet and gently insert the sender wire through it.
If space is limited, you can carefully drill a small hole in the existing rubber grommet instead of drilling directly into the metal firewall.
Using a grommet prevents damage to the wire and reduces the risk of water, dust, or engine fumes entering the cabin.
2. Avoid Hot and Moving Engine Parts
When routing the sender wire inside the engine bay, it is crucial to keep it away from hot and moving parts.
Engine parts such as the exhaust manifold, turbocharger, radiator hoses and engine block can reach very high temperatures during operation.
Continuous exposure to heat can melt wire insulation and cause short circuits.
Moving parts, such as belts, pulleys, cooling fans and steering components, can cut or pull wires if improperly installed.
Whenever possible, plan a route that adheres to existing wiring harnesses, as manufacturers pre-design these routes for safety.
Keeping wires away from heat sources and mechanical movement ensures long-term durability and stable signal transmission.
3. Secure the wiring with zip ties
After the sender wire is securely installed, secure it securely using zip ties.
Loose wires can vibrate during driving, causing wear over time.
The engine bay experiences constant vibration as the engine runs at all speeds, specially high RPM.
Securing the wire to stable parts, such as the existing wiring harness or brackets, prevents stretching and protects the insulation.
Make sure the wire isn’t too tight, as a little flexibility helps absorb vibration.
Inside the cabin, tuck the wire neatly behind a panel or under the dashboard to keep the installation neat.
Properly secured wiring not only increases safety but also ensures accurate oil pressure readings without power outages or signal interruptions.
How to Install the Gauge Inside the Cabin
Properly installing an oil pressure gauge inside the cabin is crucial for safety, comfort and easy monitoring while driving.
The purpose of installing an aftermarket gauge is to provide real-time oil pressure without distraction.
If the gauge is incorrectly installed, it can block your view of the road or make it difficult to read quickly.
A properly installed gauge should be clearly visible at a glance, preventing you from taking your eyes off the road for more than a moment.
It should also be securely installed so that vibrations from driving don’t loosen it over time.
Proper installation improves driving awareness and allows you to quickly notice pressure changes.
1. Popular Mounting Locations
There are several common locations where drivers install oil pressure gauges.
One popular location is the A-pillar, the vertical support between the windshield and the front door.
A-pillar pods are designed to hold one or more gauges and place them at eye level, making them easier to read without having to look too far from the road.
Another common option is to mount a dashboard pod above the dashboard.
This position provides a clear view and keeps the gauges in the driver’s natural line of sight.
Some drivers choose an under-dash mount, which is installed below the dashboard.
This option makes the interior cleaner and less cluttered, but may require looking down slightly to read the gauges.
The best location depends on your preferences, the vehicle’s design and how often you want to monitor the gauges.
2. Drilling and Securing the Bracket
If your vehicle doesn’t have a pre-built mounting location, you may need to drill small holes to secure the mounting bracket or pod.
Before drilling, always check for hidden wires, airbags, or vital parts behind the surface.
Modern vehicles often have wiring harnesses and safety systems located behind the dashboard panel, so careful inspection is essential.
Use the correct sized drill bit for the mounting screws and drill slowly to maintain control.
After installing the bracket, secure it tightly using the provided screws.
The gauge should remain firmly in place without moving when the vehicle is moving.
A stable mount protects the gauge’s internal components from vibration damage and ensures accurate readings over time.
3. Ensuring Clear Driver Visibility
The gauge should be installed where it can be read quickly and safely.
Oil pressure can fluctuate depending on engine speed, temperature and driving conditions.
For example, pressure is typically higher during a cold start and lower when the engine is fully warmed up at idle.
During acceleration, pressure often rises again.
Being able to easily observe these changes helps you detect unusual drops or unstable readings.
Gauges should not block the windshield, mirrors, or factory instrument cluster.
They should also not interfere with airbag deployment zones, specially near the A-pillar.
Proper visibility allows you to monitor engine health without distraction, improving both safety and confidence while driving.
How to Connect the Electrical Wiring
Properly connecting the electrical wiring is one of the most important steps when installing an electric oil pressure gauge.
The gauge relies on a clean and strong electrical connection to provide accurate readings.
If the wiring is loose, connected to the wrong power source, or not properly grounded, the gauge may display an inaccurate pressure value, flicker, or fail completely.
Most electric oil pressure gauges use four main connections: a switched 12-volt power source, a ground connection, a sender signal wire and an illumination wire for nighttime illumination.
Understanding the purpose of each wire helps ensure a safe installation and long-term reliability.
Always reconnect the battery only when all wiring connections are complete and secure.
1. Power Source – Ignition-Switched 12V
The power wire for the gauge must be connected to an ignition-switched 12-volt source.
This means the gauge receives power only when the key is turned to the “On” position.
Leaving it connected to a power source continuously is not recommended, as the gauge may remain active even when the vehicle is off, draining the battery over time.
Most vehicles provide switched power through a fuse box or accessory circuit.
Using a fuse tap adapter is often the safest method as it protects the circuit and preserves the factory wiring.
A stable 12-volt supply ensures the gauge functions properly and provides a consistent reading without voltage fluctuations.
2. Ground Connection
The ground wire completes the electrical circuit and is just as important as the power connection.
A poor ground is one of the most common causes of inaccurate gauge readings.
The ground must be connected to a clean, uncovered metal surface on the vehicle’s chassis.
Paint, rust, or dirt can prevent proper electrical current flow, so the contact area must be clean and safe.
A strong ground ensures that the electrical signal from the sender is accurately measured by the gauge.
Without a proper ground, the gauge may flicker, display unstable pressure, or fail to function at all.
3. Sender Signal Wire
The sender signal wire connects the oil pressure sender in the engine bay to the gauge inside the cabin.
This wire carries a variable electrical signal that changes based on oil pressure.
As oil pressure increases, the sender’s resistance or voltage signal changes, which the gauge converts into a readable pressure value.
It is crucial that this wire is firmly connected to both the sender and the correct terminal on the back of the gauge.
A loose connection can cause a delay in readings or a sudden drop on the display.
Because the signal is sensitive, keeping the wire away from intense heat and heavy electrical parts helps reduce interference and ensure accurate pressure monitoring.
4. Illumination Wire – For Nighttime Illumination
The illumination wire allows the gauges to illuminate when the vehicle’s headlights or parking lights are on.
This makes the gauges readable at night and helps them match the brightness of the dashboard.
The illumination wire is typically connected to the vehicle’s dash light circuit, so when the dimmer control is adjusted, it dims along with the factory instrument cluster.
Proper connection ensures that the gauges are visible without being overly bright or distracting when driving at night.
While this wire does not affect pressure readings, it improves safety and comfort by making the gauges easier to read in low light.
How to Reconnect and Test the Battery
After completing all mechanical and electrical connections, the final step is to reconnect the battery and carefully test the oil pressure gauge system.
This step confirms that the installation was done correctly and that the gauge is providing accurate, stable readings.
Testing is crucial because oil pressure directly impacts engine lubrication and engine life.
Even a small error, such as a loose fitting or weak electrical connection, can cause inaccurate readings or oil leaks.
Taking the time to properly test everything ensures that your engine is safe and your new gauge is reliable.
1. Reconnect the Negative Terminal
First, reconnect the negative battery terminal, which was previously disconnected for safety reasons.
Tighten the terminal firmly so that it makes firm contact with the battery post.
A loose battery connection can cause electrical problems such as flickering or unstable readings.
Once the terminal is secure, turn the ignition key to the “On” position without starting the engine.
The oil pressure gauge should turn on and if it’s an electric gauge, it may show zero pressure for a short while because the engine isn’t running.
This confirms that the gauge is receiving proper power.
2. Start the Engine and Check the Reading
Start the engine and immediately check the oil pressure reading.
During a cold start, oil pressure is usually higher because cold oil is thicker and flows more slowly.
In many vehicles, cold start pressure can be between 40 and 70 PSI, depending on the engine design.
As the engine warms up, the oil becomes thinner and the pressure usually drops slightly, specially at idle.
At normal operating temperatures, many engines can have idle pressure between 15 and 30 PSI, although this can vary.
A general guideline is that there should be approximately 10 PSI of oil pressure for every 1,000 RPM.
For example, at 3,000 RPM, you can expect about 30 PSI or more.
Observing these readings helps confirm that the gauge and sender are working properly.
3. Check for Oil Leaks
With the engine running, carefully inspect the sender, T-fitting and the area around any threaded connections.
Look for small oil droplets or wet spots around the fittings.
Engine oil is under pressure while running, so even a small leak can quickly become serious if ignored.
If you notice a leak, stop the engine and tighten the fitting slightly, but don’t overtighten it.
Proper sealing is crucial, as oil leaks not only cause dirt but can also lower the engine oil level over time.
Ensuring a dry and secure installation protects both the engine and surrounding parts.
4. Verify Stable and Realistic Pressure Values
Finally, monitor the gauge for a few minutes to ensure the reading remains stable and realistic.
The needle or digital display should respond smoothly to changes in engine speed.
When you gently press the accelerator, oil pressure should increase.
When the engine returns to idle, the pressure should decrease slightly but remain within a safe range.
The gauge should not fluctuate unnecessarily.
If the reading is too low, stuck at zero, or too high, recheck the wiring connections and sender installation.
Confirming stable and logical pressure behavior ensures that your oil pressure gauge is installed correctly and ready to provide reliable engine monitoring on every drive.
How to Install Mechanical Aftermarket Oil Pressure Gauge – Mechanical Gauge
A mechanical oil pressure gauge works differently from an electric gauge because it uses actual engine oil pressure to move a needle inside the gauge.
Instead of sending an electrical signal, pressurized oil travels directly from the engine through a small tube to the gauge mounted in the cabin.
This design provides very fast and accurate readings because the gauge responds immediately to changes in oil pressure.
However, since actual engine oil is being transferred to the vehicle’s interior, proper installation is crucial.
Any loose fittings, damaged tubes, or incorrect routing can cause leaks.
Careful installation guarantees safety, accuracy and long-term reliability.
1. Installing the Compression Fitting
The first step is to install a compression fitting onto the engine’s oil pressure port.
After removing the factory oil pressure sensor, you’ll insert a fitting designed to securely connect the small oil pressure tube.
A compression fitting seals the connection by tightening a small metal ring around the tubing.
When properly tightened, it creates a strong, leak-resistant seal that can handle normal engine oil pressure, which is often 20 PSI at warm idle and 60 PSI or more at higher engine speeds.
It’s important to first thread the fitting by hand to prevent cross-threading.
After hand-tightening, use a wrench to tighten it securely, but avoid over-tightening as engine blocks are often made of aluminum, which can warp under excessive force.
2. Routing the Oil Pressure Tubing
Once the compression fitting is secure, connect the oil pressure tubing to the fitting.
This tubing is typically made of nylon, copper, or braided steel, depending on the gauge kit.
The tubing must be carefully routed from the engine bay to the inside of the vehicle.
Because this tube contains pressurized oil, it must be protected from damage.
Following existing wiring paths in the engine bay is often the safest approach, as those routes are already designed to avoid heat and moving parts.
A clean routing path ensures consistent oil flow and accurate pressure readings.
3. Avoid Bends and Sharp Turns
Oil pressure tubing should be smooth and free of bends or sharp curves.
Bends in the line can block oil flow and cause inaccurate gauge readings.
In extreme cases, a clogged line can cause pressure buildup and damage the tubing.
Oil should flow smoothly through the tubing so the gauge can respond quickly to pressure changes.
When bending the tubing, make wide, gentle bends rather than tight angles.
If the tubing is nylon, sharp bends can weaken it over time.
Maintaining smooth routing ensures proper pressure transfer and prevents premature wear and tear.
4. Securing the Tubing Through the Firewall
To bring the tubing into the cabin, it must safely pass through the firewall.
The firewall separates the engine bay from the interior and protects passengers from heat and smoke.
If possible, use the existing rubber grommet, as it prevents the tubing from rubbing against sharp metal edges.
If new holes are required, install the correct rubber grommet to protect the line.
Without protection, vibration from the engine and road can cause the metal edge to cut into the tubing over time.
Securing the tubing with clamps or ties inside the engine bay reduces vibration and strain, helping to prevent leaks.
5. Connecting the Tubing to the Back of the Gauge
After installing the tubing in the cabin, connect it to the fitting on the back of the mechanical gauge.
This connection also uses a compression fitting to create a tight seal.
Carefully insert the tubing into the fitting and tighten it evenly.
The connection must be secure, as oil pressure will flow directly into this part of the gauge.
A properly connected gauge will respond immediately to changes in engine speed.
Double-check that the gauge is firmly in place before final tightening, as movement can loosen the fitting over time.
6. Leak Testing While the Engine is Running
The final and most important step is leak testing while the engine is running.
Start the engine and immediately observe the gauge reading.
Oil pressure should rise within a few seconds of starting.
When the engine is idling, check for oil leaks in the engine bay and at all connection points behind the gauge.
Even small leaks should be repaired immediately.
Oil leaks can lower the engine oil level and pose a safety hazard inside the cabin.
Let the engine warm up and observe how the gauge responds to a slight increase in engine speed.
Pressure should rise smoothly as RPM increases and decrease slightly at idle.
Confirming a stable reading and a leak-free system ensures that the mechanical oil pressure gauge is securely installed and functioning properly.
Now, Let’s Understand About the Normal Oil Pressure Readings
Understanding what normal oil pressure looks like is just as important as installing the gauge.
Oil pressure isn’t a fixed number, as it varies with engine temperature, engine speed, oil viscosity and engine conditions.
The oil pump creates pressure by pushing oil through the narrow spaces between engine moving parts, such as bearings and camshafts.
If the oil is too thin, if parts are worn, or if the pump is weak, pressure can drop.
Observing how oil pressure behaves under different driving conditions helps you identify what’s normal for your engine and what might indicate a problem.
Knowing these patterns gives you confidence and allows you to react quickly before serious damage occurs.
1. Cold Start Readings
When you start your engine for the first time after several hours of running, the oil is cold and thick.
Thicker oil flows slowly, creating more resistance inside the engine.
Because of this resistance, oil pressure is typically higher during a cold start.
In many vehicles, cold start pressure can range between 40 and 70 PSI, depending on the engine’s size and design.
This higher reading is normal and usually doesn’t indicate a problem.
As the engine warms up, the oil becomes thinner and flows more easily, causing the pressure to gradually decrease.
If the cold start pressure is very low or doesn’t increase within a few seconds of starting, it could indicate a problem with the oil pump or a low oil level.
2. Idle Oil Pressure
Idle oil pressure is measured when the engine is running at its lowest speed, typically around 600 to 900 RPM.
At idle, the oil pump rotates slowly, so the pressure automatically decreases compared to higher speeds.
In many healthy engines, warm idle pressure can range between 15 and 30 PSI.
Some engines can operate safely at slightly lower pressures, depending on the manufacturer’s design.
It’s important that the pressure remains stable and doesn’t suddenly drop to zero.
Very low warm idle pressure may indicate worn engine bearings, thin oil, or a weak oil pump.
Consistent idle readings within a safe range usually indicate that the lubrication system is functioning properly.
3. Oil Pressure During Acceleration
When you press the accelerator and the engine’s RPM increases, the oil pressure should also increase.
This happens because the engine-driven oil pump rotates faster as RPM increases.
The higher pump speed forces more oil into the engine, creating more pressure.
During moderate acceleration, the oil pressure may increase to 40, 50, or even 60 PSI, depending on the engine.
This increase should be smooth and consistent.
If the pressure doesn’t increase with RPM, or if it fluctuates suddenly, it could be a sign of a blockage, lack of oil, or internal wear.
Monitoring the pressure during acceleration helps confirm that the oil pump and lubrication system are properly meeting the engine’s needs.
4. Rule: 10 PSI at 1,000 RPM
Many mechanics generally agree that oil pressure should increase by approximately 10 PSI for every 1,000 RPM.
For example, at 1,000 RPM, you’d expect about 10 PSI or more and at 3,000 RPM, you’d expect about 30 PSI or more.
This rule isn’t true for every engine, but it provides an easy way to determine if the oil pressure is okay.
Some modern engines may operate slightly differently depending on the design and oil type.
However, if your gauge reading follows this general pattern and steadily increases with RPM, it usually indicates healthy oil circulation.
Understanding this rule makes it easier to determine whether your reading is normal or not.
5. Warning Signs of Low Oil Pressure
Low oil pressure is a serious condition because engine parts rely on a thin film of oil to prevent metal-to-metal contact.
If the pressure drops too low, parts like the crankshaft bearing and camshaft journal can rapidly wear out or seize.
Warning signs include pressure readings near zero, a sudden drop while driving, flashes in the reading, or pressure that doesn’t increase with RPM.
You may also hear strange sounds from the engine, such as ticking or knocking, which could indicate poor lubrication.
If the oil pressure warning light comes on along with a low gauge reading, the engine should be shut off immediately to avoid damage.
Recognizing these warning signs early can prevent costly engine repairs and extend engine life.
What are the Common Installation Mistakes to Avoid

Installing an aftermarket oil pressure gauge isn’t difficult, but minor mistakes can lead to serious problems like oil leaks, inaccurate readings, electrical failure, or engine damage.
Many installation problems aren’t caused by faults in the gauge itself, but rather by minor errors in fittings or wiring.
Understanding the most common mistakes and their causes will help you avoid costly repairs and ensure your gauge functions properly and safely for a long time.
1. Overtightening the Fitting
One of the most common mistakes is overtightening the oil pressure sender or compression fitting.
Many people think that tightening it as much as possible will prevent leaks, but this can actually cause damage.
Most senders and adapters are made of brass or aluminum, which are soft metals.
If you tighten them too much, you could strip the threads, crack the sender housing, or even damage the engine block threads.
This can cause oil leaks that are difficult and expensive to fix.
The correct method is to tighten the fitting until it fits snugly, then turn it a little more as directed by the manufacturer.
Using the correct size wrench and avoiding excessive force will protect the threads and maintain a proper seal without damage.
2. Forgetting Thread Sealant
Another common mistake is installing the sender or fitting without thread sealant.
Oil pressure ports have threaded connections and without proper sealing, oil can slowly leak from the threads.
Even a small leak can reduce oil pressure over time and cause a mess in the engine bay.
For most oil pressure fittings, a small amount of thread sealant or Teflon tape designed for oil systems should be carefully applied to the threads.
It’s important not to block the sensor opening with too much sealant, as this can affect the pressure reading.
Properly applied sealant helps create a tight seal, prevent leaks and maintain accurate pressure readings.
3. Poor Grounding
Electrical oil pressure gauges depend on proper grounding to function properly.
A poor ground connection can cause fluctuating readings, vibrations in the gauge needles, or completely inaccurate pressure values.
The ground wire should always be connected to clean, undamaged metal surfaces on the vehicle chassis.
If there is paint, rust, or dirt on the grounding point, the electrical connection may be weak.
Cleaning the area with sandpaper before attaching the ground wire ensures good metal-to-metal contact.
A secure and clean ground connection is essential, as even a small amount of electrical resistance can affect the gauge’s accuracy.
4. Installing Wires Near Exhaust Parts
It’s a big mistake to install electrical wires or oil tubing too close to hot exhaust parts.
Exhaust manifolds and pipes can reach very high temperatures, often several hundred degrees Celsius.
If the heat melts the wiring insulation, it can cause a short circuit, inaccurate readings, or even an electrical fire.
Oil pressure tubing in mechanical gauges can also weaken or burst under extreme heat.
Wires and tubing should always be installed away from exhaust parts and secured with clips or zip ties to prevent movement.
If necessary, using a heat-resistant sleeve provides greater safety and improves long-term protection.
5. Ignoring Oil Leaks After Installation
After installing the gauge, some people don’t pay close attention to oil leaks while the engine is running.
Even a small drop around the camshaft or fitting can quickly become a major problem as the engine circulates oil under pressure.
Oil leaks can cause low oil levels, reduced lubrication and make engine surfaces slippery or dirty.
After installation, start and run the engine, inspecting all connections.
If any oil is visible, immediately stop the engine and repair the connections.
Regular inspection during the first few drives is also essential, as some leaks are only detected when the engine reaches full operating temperature.
Ignoring leaks can cause serious engine damage, so inspect them carefully to ensure the installation is safe and reliable.
Read More:
How to Fix Oil Pressure Gauge Problems
Even after careful installation, oil pressure gauges can sometimes experience problems.
These problems are often related to poor wiring, loose connections, faulty sensors, or installation errors, rather than serious engine damage.
Understanding how the system works makes it much easier to fix the problem.
An electric oil pressure gauge relies on three main things: a proper power supply, good grounding and a working pressure sender.
A mechanical gauge relies on a sealed oil line and proper fittings.
When something goes wrong, checking each part step-by-step helps determine the root cause, rather than needlessly guessing and replacing parts.
1. The Gauge Won’t Turn On
If the gauge won’t turn on at all, the problem is usually electrical.
First, check the 12-volt power source connected to the ignition switch.
The gauge should only receive power when the key is turned to the ON position.
If a fuse connected to the gauge circuit blows, the gauge will lose power.
Replacing a blown fuse is easy, but if it blows again, there could be a short circuit in the wiring.
Next, check the ground connection.
A weak or disconnected ground wire will prevent the gauge from working.
The ground should be connected to clean, undamaged metal on the vehicle’s chassis.
Also check all wiring connections to ensure they are tight and undamaged.
To ensure power is reaching the unit, use a multimeter to test the voltage at the gauge terminals.
2. Irregular or Fluctuating Readings
If the gauge needle moves erratically, fluctuates, or shows unstable pressure values, the problem is often caused by a poor electrical connection or a bad connector.
Loose signal wires can obstruct the flow of electrical current, causing the gauge to display inaccurate information.
Corrosion on the connector can also cause resistance, leading to unstable readings.
In some cases, electrical interference from nearby high-voltage components can affect the signal wire.
Ensuring that the sender wire is securely connected and away from the ignition coil or spark plug wire can help stabilize the reading.
For mechanical gauges, fluctuating readings may mean air is trapped in the oil line or a bent tube, restricting oil flow.
3. Always Zero Reading
If the gauge consistently reads zero, it’s important to determine whether the problem is electrical or mechanical before assuming engine failure.
First, check the oil level with a dipstick to ensure there’s enough oil in the engine.
If the oil level is correct and there are no strange engine noises, the problem may be a disconnected or damaged sender wire.
A faulty oil pressure sender can also cause the gauge to remain at zero.
Testing the sender with a multimeter or replacing it with a known, working unit for a while can confirm the problem.
In mechanical systems, a blocked or disconnected oil line can prevent pressure from reaching the gauge.
However, if the engine makes a knocking or ticking noise with a zero reading, the engine should be shut down immediately to avoid serious damage.
4. Oil Leaks from the Sender
Oil leaks around the sender or fittings are usually caused by improper installation.
The most common causes are loose fittings, worn threads, or a lack of thread sealant.
Even a small leak can reduce oil pressure over time and contaminate the engine bay.
If a leak is detected, the engine should be stopped immediately.
Carefully inspect the fitting to see if it needs tightening.
If the threads are worn or cracked, the sender may need to be replaced.
Applying the correct thread sealant and ensuring the correct torque during installation helps prevent future leaks.
5. Lights Not Working
If the gauge backlight doesn’t turn on at night, the problem is usually related to the illumination wire connection.
The illumination wire should be connected to the vehicle’s dashboard lighting circuit so that it receives power when the headlights are on.
If this connection is loose or connected to the wrong wire, the backlight won’t work.
It’s also important to check the fuse for the dashboard lighting circuit.
In some cases, the small bulb inside the gauge may burn out and need to be replaced.
Proper illumination is essential for safe driving at night, as it allows the driver to clearly see the oil pressure without distraction.
How to Maintain Aftermarket Oil Pressure Gauge
Plus, there’s study about the patterns and behavior of oil pressure signals within an engine’s lubrication system that shows that the early signs of the internal wear or defects, so basically the research shows that the even small variations in the oil pressure readings: specially when it is monitored dynamically, then it can reflect the lubrication flow problems that actually leads to the some serious kind of engine damage, that’s why it is really important to have real-time oil pressure gauges to monitor the engine health correctly.[¹]
Installing an aftermarket oil pressure gauge isn’t the last step.
Proper maintenance after installation is crucial to ensure the gauge continues to provide accurate readings and protect your engine from hidden problems.
An oil pressure gauge is a monitoring tool and like any tool related to the engine’s lubrication system, it should be checked regularly.
Engine heat, vibration and normal vehicle use can cause minor problems over time, such as loose fittings, worn wires, or a bad sender.
Simple routine checks can prevent leaks, electrical malfunctions and inaccurate pressure readings that can mislead you about the engine’s condition.
1. Periodic Leak Checks
Oil pressure systems operate under constant pressure whenever the engine is running, which means even a small leak in a fitting can eventually lead to a leak.
After installation, it’s important to visually inspect the sender, fittings, adapters and any mechanical tubing at regular intervals.
This check can be performed during an oil change or basic engine maintenance.
Check for fresh oil around the sender base, fittings, or firewall entry point.
Oil residue, wet spots, or dirt stuck to oily surfaces may indicate a slow leak.
Even minor leaks should be repaired immediately, as a lack of oil reduces lubrication and can damage internal engine components.
Ensuring that fittings seal properly helps protect the engine and keep the engine bay clean.
2. Checking the Condition of the Wiring
Electrical oil pressure gauges rely heavily on good wiring connections.
Over time, engine vibration and heat can cause wires to loosen, rub against sharp edges, or crack the insulation.
It’s important to periodically check all wiring connections behind the gauge and near the sender.
Ensure the terminals are tight and free of corrosion.
Check that the wires are not touching hot engine parts like the exhaust manifold or moving parts like belts and pulleys.
Poor insulation can cause a short circuit or inaccurate readings.
If any wire appears weak, melted, or worn, it should be replaced immediately.
Keeping the wiring in good condition ensures stable and accurate readings and can prevent electrical failure.
3. Monitoring for Unusual Pressure Variations
One of the main purposes of installing an oil pressure gauge is to quickly detect unusual engine behavior.
After installation, it’s important to know your engine’s normal pressure range during cold starts, idling, cruising and acceleration.
If you notice sudden changes, such as lower-than-normal idle pressure, a delayed increase in pressure during startup, or sudden fluctuations in pressure, don’t ignore it.
These changes could indicate problems like thin oil, a clogged oil filter, a weak oil pump, or wear inside the engine.
It’s more beneficial to monitor trends over time rather than focusing on a single reading.
Regular monitoring allows you to identify patterns and fix minor problems before they become major repairs.
4. When to Replace the Sender
The oil pressure sender is a small but essential part that converts oil pressure into a readable signal for the gauge.
Like any mechanical or electronic component, it can deteriorate over time.
Signs of sender failure include inaccurate readings, a sudden drop to zero without engine sound, oil leaks from the sender body, or the gauge not functioning properly despite good wiring.
Exposure to engine heat and constant pressure can weaken the internal seals and electrical elements.
If troubleshooting confirms that the wiring and gauge are working properly but the readings remain inaccurate, replacing the sender is often the most effective course of action.
Using a high-quality replacement part that meets gauge specifications ensures consistently reliable and accurate pressure monitoring.
Now, Let’s Know Installation Cost of Aftermarket Oil Pressure Gauge
Understanding the total cost of installing an aftermarket oil pressure gauge helps you plan your budget properly and avoid surprises.
The final cost depends on the type of gauge you choose, whether your engine requires additional adapters and whether you install it yourself or hire a professional mechanic.
While the gauge itself may seem inexpensive, small extra parts and labor charges can add to the total cost.
Knowing each cost factor in detail helps you make a smart and informed decision.
1. Gauge Kit Price Range
The price of aftermarket oil pressure gauge kits can vary depending on the brand, quality, type and features.
Basic mechanical gauge kits are generally more affordable, costing between 20 and 60 US dollars.
Electric gauge kits, which use a pressure sender and wiring instead of direct oil tubing inside the cabin, typically cost between $40 and $150, depending on build quality and the brand’s reputation.
Digital gauges with high-performance or advanced features, such as warning lights or programmable alerts, can be even more expensive.
Well-known automotive brands often command a higher price due to their improved accuracy, durability and reliability.
Choosing a slightly higher-quality gauge may be beneficial in the long run, as accurate oil pressure readings are crucial for engine safety.
2. Extra Fittings and Adapters
Many vehicles require extra fittings or adapters to properly install an oil pressure sender.
Engines may have different thread sizes for the oil pressure port, which means you may need a thread adapter or T-fitting if you want to replace the factory oil pressure sensor with an aftermarket gauge.
These small parts typically cost between $5 and $30, depending on the material and design.
Brass fittings are common and inexpensive, while stainless steel options are stronger but more expensive.
Thread sealant, wiring connectors, fuse holders and mounting hardware may also cost a little more.
While these parts may seem inexpensive individually, they can increase the cost of the entire project if not planned in advance.
3. Professional Installation Costs
If you choose to have the gauges installed by a professional mechanic, labor charges will be added to the total cost.
Professional installation typically costs between $80 and $250, depending on the vehicle type, dashboard complexity and local labor rates.
Vehicles with limited engine space or difficult firewall access may require longer, increasing labor costs.
Professional installation ensures proper wiring, secure routing and proper sealing of fittings, reducing the risk of leaks or electrical problems.
Although labor costs may seem higher, they offer peace of mind, specially for those who are not comfortable working with engine parts or electrical systems.
4. DIY vs Mechanic Comparison
Choosing between self-installation and professional installation depends on your experience and confidence level.
DIY installation can be significantly cheaper because you only need to pay for the gauge kit and necessary fittings.
Many car owners with basic mechanical knowledge and common hand tools can complete the installation in a few hours.
However, mistakes like poor grounding, incorrect thread sealing, or over-tightening fittings can lead to inaccurate readings or oil leaks.
Professional installation is more expensive, but it reduces the risk of errors and ensures that the system is installed according to safety standards.
If you have experience with automotive wiring and engine parts, DIY may be cheaper.
If you are unsure or inexperienced, hiring a mechanic can prevent costly engine damage later.
Conclusion – How to Install an Aftermarket Oil Pressure Gauge
Now, you have clearly understand the important of having a accurate information as it is far more valuable than any guesswork, so that’s why you need a oil pressure gauge to have that information in quick way.
And, unlike a simple warning light that only comes on when pressure drops too low, a dedicated oil pressure gauge gives you real-time information about how your engine’s lubrication system is performing every second the engine is running.
Because, oil pressure is directly related to how well vital internal parts like the crankshaft bearings, camshafts and piston assemblies are protected.
So, without proper oil pressure, metal parts can rub against each other, generating heat, increasing wear and ultimately leading to serious engine failure.
Moreover, a gauge helps you detect early warning signs long before serious damage occurs.
Now, that’s all from this guide and if you still have the questions and unsolved queries then just comment that bastard queries below this guide.
Frequently Asked Questions
Q1. What is an aftermarket oil pressure gauge and why is it important?
Answer: An aftermarket oil pressure gauge is an additional instrument installed in your vehicle that monitors engine oil pressure in real time. Oil pressure is crucial because it determines whether oil is circulating properly in the engine. Engine oil forms a thin protective layer between moving metal parts, such as the crankshaft bearings, camshafts and pistons. Without proper oil pressure, these parts can rub against each other, causing heat, friction and serious damage. Most factory vehicles only have a warning light that illuminates when the pressure drops too low. An aftermarket gauge displays accurate pressure readings at all times, helping you detect problems before major engine damage occurs.
Q2. What is the difference between a mechanical and an electric oil pressure gauge?
Answer: A mechanical oil pressure gauge works by pumping real engine oil through a small tube inside the cabin, just behind the gauge. The oil pressure physically moves the needle. An electric oil pressure gauge uses a pressure-sending unit mounted on the engine. This sender converts oil pressure into an electrical signal that travels through a wire to the gauge. Mechanical gauges are often more straightforward and sometimes more responsive, but they require careful routing of the oil lines. Electric gauges are generally safer for daily driving because they send only electrical signals to the cabin, not pressurized oil. If installed properly, both types of gauges can be accurate.
Q3. How long does it take to install an aftermarket oil pressure gauge?
Answer: Installation time typically depends on your experience and the vehicle’s design. For someone with basic mechanical knowledge and the right tools, installation can take one to three hours. If the oil pressure port and firewall are easily accessible from the engine bay, the job is quick. If space is limited or wiring is difficult, it may take longer. Professional mechanics can complete the installation more quickly because they have experience and specialized tools. It’s more important to take your time and double-check the connections rather than rushing the process.
Q4. Is it safe to install an oil pressure gauge yourself?
Answer: Yes, it can be safe if you follow the instructions carefully and understand basic automotive wiring and engine parts. Before wiring, you’ll need to disconnect the battery, use the correct thread sealant on the fittings and ensure there are no oil leaks. Wires should be kept away from hot exhaust ports and moving engine parts. If you’re unsure about working with the engine oil port or electrical connections, it’s safer to have it installed by a professional. Mistakes like poor sealing or incorrect wiring can cause leaks or inaccurate readings.
Q5. What is considered normal oil pressure?
Answer: Normal oil pressure varies depending on the engine type, oil viscosity and temperature. During a cold start, oil pressure is typically higher because cold oil is thicker. In many vehicles, this can be between 40 and 70 PSI. As the engine warms up, idle oil pressure can drop by about 15 to 30 PSI. When driving at higher speeds, the pressure often increases to 40 to 60 PSI. Many mechanics use a general guideline of about 10 PSI for every 1,000 RPM. However, for accurate information, you should always compare the reading with your vehicle manufacturer’s specifications.
Q6. Why does oil pressure drop when the engine warms up?
Answer: Oil becomes thinner when heated. Thinner oil flows more easily through the engine, reducing blockages and slightly reducing pressure. This is completely normal. The oil pump doesn’t stop working; it simply circulates oil more easily once it reaches operating temperature. A slight drop in pressure is expected after warming up. However, if the pressure drops too low or becomes unstable, it could be a sign of bad engine parts or a low oil level.
Q7. What should I do if my oil pressure gauge shows zero?
Answer: If your gauge shows zero, first check the engine sounds. If you hear a knocking or ticking sound, turn off the engine immediately to avoid damage. Next, check the oil level using the dipstick. Low oil can cause low pressure. If the oil level is normal and there are no strange noises, the problem could be a bad sender, loose wiring, or a faulty gauge. Testing the sender or checking the electrical connections can help diagnose the problem. Never ignore a zero reading without further investigation.
References:
[1] Oil Pressure Signatures for Engine Lubrication System Monitoring
https://saemobilus.sae.org/papers/oil-pressure-signatures-engine-lubrication-system-monitoring-840063

Guys, I’m a car audio enthusiast and customization expert and I love clear sound and clean installation. Plus, I have spent years helping people build their dream audio setups. And whenever I’m working on cars, I probably listen to music and thinks about the next big upgrade.