Written By: Don Dodi
Fact Checked By: Kristen Brown
Reviewed By: Diego Rosenberg
You would be surprise to know that a foam cannon have the capability to turn the ordinary car soap into the thick snow-like foam that helps you to loosen up all kinds of dirt and grime in easy way.
Understand this: now-a-days vehicle paint is comes with the protection known as “a clear coat” but that is only about 40 to 50 microns thick, which is roughly about half the thickness of a human hair; that’s why it becomes really important to wash your car properly otherwise it can get fine scratches which is also known as swirl marks.
Basically, a foam cannon helps you to reduce that risk; as it literally covers the vheicle in thick and lubricating soap foam that loosen-up the dirt without the needing the scrubbing.
As, the foam lifts and softens the contaminants so that they can be rinse away dry dust and grit across the surface easily.
As well as, the professional detailers love to use foam cannons as they improve the cleaning efficiency, increase the lubrication during the washing and actually helps them to minimize the any possible paint damage as well.
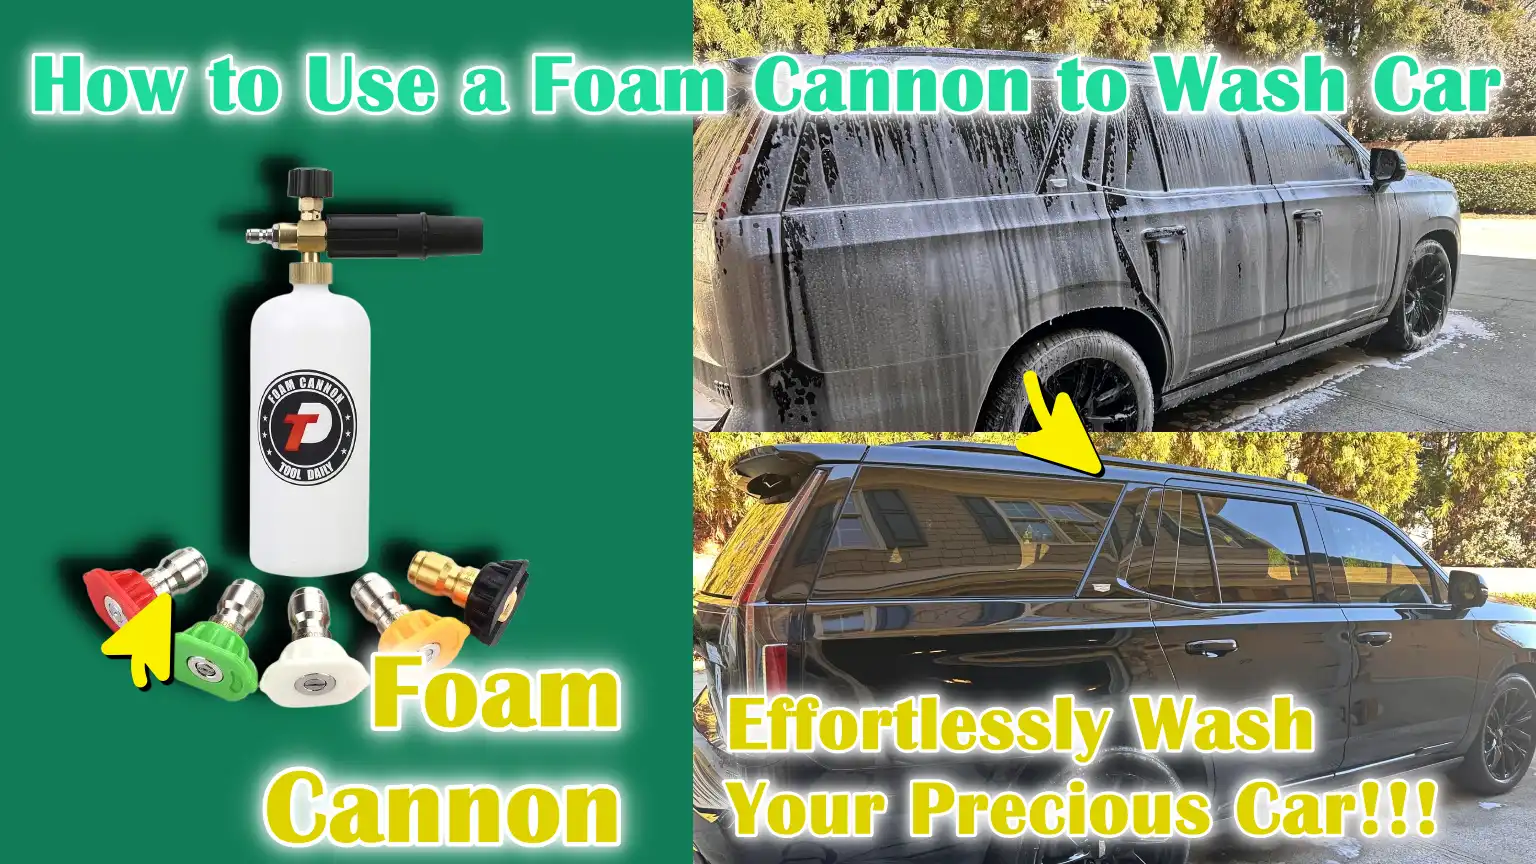
Now, this is the guide that specifically talks about How to Use a Foam Cannon to Wash Car, so that you can understand correctly that how you can pair foam cannon with a pressure washer to mix the water, air and car shampoo to create that lovely and useful dense foam that clings to the vertical surface, that ideally allows the soap more time to break down all kinds of bad things such as: road grime, mud and oily residue.
Now, Understand First What is a Foam Cannon and How Does it Work?
A foam cannon is a car washing tool that attaches to a pressure washer and sprays thick, viscous foam onto the car’s surface.
It’s designed to make washing safer by reducing direct contact between dirt and your car’s paint.
Modern car paint has a thin clear coat layer that protects the paint underneath, but rubbing dirt into this layer can easily cause small scratches.
A foam cannon helps reduce this risk by applying a thick layer of lubricating soap to the car, which loosens and softens dirt before your wash mitt touches the surface.
The foam clings to the paint, giving the cleaning agent time to break down the remaining road grime, mud and oil so they can be washed away more safely.
1. Basic Parts of a Foam Cannon
A foam cannon is made up of several simple but essential parts.
The bottom bottle contains a mixture of car shampoo and water.
This bottle is usually clear or has measurements printed on it so you can mix the correct ratio of soap and water.
The main body is located at the top of the bottle, which contains the mixing chamber and a small metal mesh filter that helps create a thick foam.
The nozzle at the front controls the spray pattern, allowing you to adjust it from a thin jet to a wide fan spray.
The adjustment knob at the top controls the amount of soap added to the water, varying the foam thickness.
Quick-connect fittings allow the foam cannon to be easily connected to a pressure washer wand, making setup quick and safe.
2. How the Foam Cannon Mixes Soap, Water and Air
The foam cannon works by combining three main components: water from the pressure washer, car shampoo from the bottle and air.
When you pull the trigger of the pressure washer, high-pressure water flows from the foam cannon.
As the water passes through the narrow passage inside, it creates suction that pulls the soap mixture up through the bottle.
Inside the cannon, water and soap mix and then pass through a fine metal mesh screen.
This mesh mixes the liquid with air and breaks it into tiny bubbles, creating a thick foam.
The result is a snow-like foam that spreads evenly over the vehicle and sticks directly to the panels instead of flowing away immediately.
3. The Role of Pressure Washers in Creating Foam
Pressure washers play a crucial role in creating thick foam.
Foam cannons are designed to operate with pressured water, usually in the PSI and GPM range specified by the manufacturer.
The pressure forces water out of the narrow spaces inside the cannon, creating the suction necessary to draw the soap mixture up and mix it properly with the air.
Without the proper pressure, the foam will be thin and watery, reducing its ability to adhere to paint and effectively loosen dirt.
Once the foam has settled on the surface, the pressure washer also helps to quickly and thoroughly wash away dirt.
4. Difference Between a Foam Cannon and a Foam Gun
Although they look similar, foam cannons and foam guns are not the same.
A foam cannon attaches to a pressure washer and uses high-pressure water to create a thick, dense foam that clings to the car.
A foam gun, on the other hand, connects to a regular garden hose and operates at a lower water pressure.
Because a garden hose doesn’t create as much pressure, a foam gun typically produces a lighter, more watery foam.
While a foam gun can help increase lubrication during washing, it doesn’t produce as thick a foam or the cleaning power as a foam cannon.
For deeper cleaning and better dirt removal, a foam cannon with a pressure washer is generally more effective.
Tools
| Tool / Equipment | Why You Need It and Important Details |
|---|---|
| Foam Cannon Attachment | It sprays a thick foam onto your car to loosen dirt before it touches the paint. Make sure it has an adjustable knob for foam thickness and a wide spray pattern for complete coverage. |
| Pressure Washer – Recommended 1,200–2,000 PSI and 1.4–2.0 GPM | It provides the necessary force to create a thick foam. Too little pressure creates a thin foam and too much pressure may be unsafe if used too close to the paint. A medium range is ideal for safe car washing. |
| Car Wash Shampoo – Foam Cannon Safe | It is pH-balanced and safe for clear coats, waxes and ceramic coatings. Never use dish soap as it can remove protection and dry out the paint. Follow the correct mixing ratio for the best foam results. |
| Microfiber Wash Mitt | It gently removes dirt from the surface without scratching. Microfiber traps dirt within its fibers, reducing swirl marks when washed and used correctly. |
| Two Buckets with Grit Guards | One bucket contains clean, soapy water and the other is for rinsing the mitt. The grit guard traps dirt at the bottom so it doesn’t return to your mitt and scratch the paint. |
| Microfiber Drying Towels or Car Dryer | It keeps water away without leaving scratches or water spots. To protect the clear coat, gently pat the surface instead of pulling hard. |
| Hose and Clean Water Supply | This supplies water to the pressure washer and is also used for the first wash of the car. Make sure the water flow is even to create suds and ensure proper rinsing. |
| Wheel Brush and Tire Cleaner – Optional but Recommended | Heavy brake dust and road grime accumulate on the wheels and should be cleaned separately. Using a special brush prevents dirty brake dust from spreading onto your paint. |
How to Choose the Right Car Shampoo for Foam Cannons
Choosing the right car shampoo is one of the most important steps when using a foam cannon.
The type of soap you use directly impacts how well it loosens dirt, how thick the foam is and how safe the wash is for your paint.
Modern cars are protected by a thin clearcoat layer that can gradually deteriorate with repeated use of harsh chemicals.
The right foam cannon shampoo is specifically formulated to produce a thick, adhesive foam and is safe for paint, plastic trim, rubber seals, wax and ceramic coatings.
Using the wrong soap can dull the shine, remove the protective layer, or even cause long-term damage to the surface.
1. pH-Neutral vs Heavy-Duty Soap
pH-neutral car shampoos are designed to safely clean away dirt without stripping wax or sealant protection.
pH-neutral means the soap is balanced and not overly acidic or alkaline.
This makes it ideal for regular weekly or biweekly washing, as it removes road dust, light dirt and normal grime without damaging your car’s protective layer.
Heavy-duty soaps, on the other hand, are stronger and sometimes labeled “strip wash” or “deep clean” formulas.
These are useful when you want to remove old wax before applying new protection, but they shouldn’t be used frequently as they can weaken or remove wax and sealants.
For regular maintenance washing, a pH-neutral shampoo is generally the safest and smartest choice.
2. Snow Foam vs Standard Car Shampoo
Snow foam is a type of shampoo specifically formulated to produce a thick foam when used with a foam cannon.
It’s designed to adhere to vertical panels like doors and bumpers for several minutes, giving the cleaning agent time to soften and break down dirt.
Standard car shampoo can also work in foam cannons, but it won’t produce as thick a foam unless it’s labeled foam cannon compatible.
Snow foam products often focus more on pre-washing and dirt removal, while standard shampoos focus more on lubrication when hand-washing.
For best results, many people use snow foam as a pre-wash step and then perform a contact wash using a pH-neutral shampoo.
3. Concentrated Formulas and Dilution Ratios
Most foam cannon shampoos are concentrated, which means they must be mixed with water before use.
Concentrated formulas are cheaper because a small amount of soap, properly mixed, can wash multiple vehicles.
The correct dilution ratio is usually provided by the manufacturer and can vary by brand.
Adding too much soap won’t always create a thick foam and can waste product, while adding too little can create a thin foam that drains quickly.
Following the recommended mixing ratio ensures the correct foam thickness, better cleaning and safe use on your car’s surface.
4. What to Avoid: Dish Soap and Harsh Detergents
Dish soap and household cleaners should never be used in a foam cannon for car washing.
These products are designed to remove grease from utensils, which means they are strong enough to strip wax, dry out rubber trim and weaken the protective coating on paint.
Harsh detergents can also leave marks that affect the surface’s shine and smoothness.
Over time, repeated use of harsh cleaners can cause paint to appear dull and unprotected.
Always choose a car shampoo that clearly states that it is safe for automotive paint and protective coatings for long-term care and best results.
How to Prepare Your Car Before Foaming It
Proper preparation before using a foam cannon is crucial, as it directly impacts how safely and effectively your car will be cleaned.
If the surface is too hot, too dry, or covered in heavy debris, even the best foam and shampoo won’t fully protect the paint.
Modern car paint has a thin clearcoat layer that protects the paint underneath and this layer can be damaged by heat, friction and trapped dirt.
Following a few simple preparation steps helps prevent water spots, soap scum and fine scratches.
Proper preparation also improves foam performance, as soap works best on a cool, controlled surface.
1. Parking in a Shady or Cool Place
Always park your car in a shady or cool place before washing.
Direct sunlight can quickly heat up paint, glass and metal panels.
When the surface is hot, water and soap can dry too quickly, leaving streaks, spots, or residue.
Foam is designed to remain on the surface for several minutes to loosen dirt, but if it dries too quickly, it may not work properly.
Washing in the shade keeps the foam wet longer, improving cleaning power and reducing the risk of paint stains.
2. Let the Car Cool Down
If the car has been driven recently, let it cool down before starting the wash.
Driving generates heat in the engine bay, wheels, brakes and body panels.
Brake parts can be particularly hot and should not be sprayed with cold water immediately as the sudden temperature change can cause stress or damage.
Hot paint can also cause soap to evaporate quickly, reducing its effectiveness.
Waiting 15 to 30 minutes for the car to cool down protects both the car and the cleaning results.
3. Close the Windows and Sunroof
Before applying foam, make sure all windows, doors and the sunroof are completely closed.
The foam cannon produces a thick soap that can easily penetrate small spaces.
If water and soap get into the cabin, it can wet the seats, electronics and interior surfaces.
Checking that the fuel door, trunk lid and hood are completely closed also prevents water from entering areas where it shouldn’t.
Taking a little time to double-check these areas can save you unnecessary cleaning later.
4. Remove Loose Debris by Hand
If there is large debris in the car, such as leaves, twigs, or heavy piles of mud, gently remove them before applying foam.
Dirt can get trapped under large debris and, if shaken up during washing, can scratch the surface.
You can also lightly rinse the car with water first to remove loose dust and sand.
Washing first allows the foam to handle less dirt and reduces the risk of sharp particles scratching the paint during handwashing.
5. Checking for Excessive Mud or Stuck Dirt
Carefully check the underside panels, wheel arches and bumpers for any mud or thick dirt buildup.
These areas tend to accumulate the most road grime because they’re closer to the ground.
If there’s a lot of mud, rinse thoroughly to soften and remove as much as possible before applying foam.
For stubborn dirt, like tar or insect residue, you may need to use a specialized cleaner after washing.
Identifying these problem areas early can help you adjust your cleaning method and avoid unnecessary pressure during washing.
How to Set-Up the Foam Cannon Correctly
Setting up your foam cannon correctly is crucial, as proper setup directly impacts foam thickness, cleaning power and safety.
Foam cannons work by mixing pressure washer water with car shampoo and air in a small mixing chamber.
If the mixture isn’t right or the parts aren’t properly connected, the foam can be too thin, too watery, or lumpy.
Proper setup ensures the foam adheres to the paint long enough to loosen dirt, soften road grime and reduce the risk of scratches when hand-washing.
Taking a few extra minutes to prepare everything correctly can greatly improve your final results.
1. Fill the bottle with the correct ratio of soap and water
Most foam cannon shampoos are thick, which means they need to be diluted with water before use.
The correct ratio of soap to water is usually written on the shampoo bottle and can vary depending on the brand and consistency.
Using too much soap won’t always create a thick foam and can waste product, while using too little can create a weak foam that drains quickly.
It’s generally recommended to add the soap first, then fill the rest of the bottle with warm water and mix the solution thoroughly.
After filling, shake the bottle gently to ensure the mixture is thoroughly mixed.
A well-balanced mixture helps create a thick, strong foam that stays on the car’s surface long enough to safely break down dirt.
2. Connecting a Foam Cannon to a Pressure Washer
A foam cannon is designed to be connected to a pressure washer using a quick-connect fitting.
Before connecting it, make sure the pressure washer is turned off and not under pressure to avoid sudden water discharge.
Firmly connect the foam cannon to the spray gun or lance until you hear or feel it lock into place.
A secure connection prevents leaks and ensures proper water flow.
It’s also important to ensure your pressure washer operates within the correct range, typically between 1,200 and 2,000 PSI, to ensure a consistent water flow.
This pressure range helps create strong suction inside the cannon, which pulls the soap mixture up from the bottle and thoroughly mixes it with air.
3. Adjusting the Foam Thickness Control Knob
The foam thickness control knob, usually located on top of the foam cannon, controls how much soap solution is drawn into the water stream.
Turning the knob one way increases the amount of soap, creating a thicker foam, while turning the knob the other way decreases the amount of soap, creating a lighter foam.
Start with a medium setting and gradually adjust as you test.
A very thick foam may feel good, but the most important thing is lubrication and coverage, not just appearance.
The goal is to create foam that adheres evenly to the surface, without being so thick that the product is wasted.
4. Testing the Spray Pattern Before Applying to the Car
Before spraying your car, test the foam cannon on the ground or a safe surface to check both the foam thickness and spray pattern.
Most foam cannons allow you to adjust the nozzle to produce a thin stream or a wide fan spray.
A wide fan pattern is usually best for covering large areas evenly and quickly.
Testing ensures that the foam is consistent, the spray is even and there are no leaks or blockages in the system.
This simple step prevents uneven application and helps you start washing with confidence, knowing your setup is working properly and safely.
How to Wash Your Car First
Pre-rinsing is one of the most important steps before applying foam because it removes loose dirt that could scratch your paint during washing.
When you drive, your car accumulates dust, sand, small stones, road salt and other debris.
These particles may seem small, but many are hard enough to cause fine scratches when rubbed against the clearcoat.
The clearcoat on modern vehicles is thin and designed to protect the underlying color layer.
If loose dirt isn’t removed first, even a soft wash mitt can drag these particles across the surface and create swirl marks.
A proper pre-rinse minimizes this risk by removing as much loose dirt as possible before any contact.
1. Why Pre-Rinsing Is Important
Pre-rinsing prepares the surface so that the foam and soap can work more effectively.
When the top layer of dust and dirt is removed, the foam can come into direct contact with the remaining dirt and break it down more effectively.
If you don’t pre-rinse, the foam can mix with heavy surface dirt, reducing its cleaning power.
Pre-rinsing also reduces the amount of dirt that accumulates in your wash mitt and rinse bucket, keeping your wash water clean.
This simple step makes the entire washing process safer and more controllable.
2. Removing Loose Dirt and Dust
During the pre-rinse, focus on removing visible dust, sand and loose dirt.
Use consistent water pressure to gently remove surface dirt without applying too much water to seals or trim.
The goal at this stage isn’t to completely clean the car, but to remove anything that can be easily washed off without scrubbing.
Focus on areas where dirt tends to accumulate, such as the front bumper, side mirrors and rear trunk area.
Removing loose dust before applying foam significantly reduces the risk of sharp particles scratching the paint later.
3. The Right Way to Spray From Top to Bottom
Always wash from the top of the vehicle and work your way down.
Gravity helps pull dirt and water down the panels, making it easier to remove dirt thoroughly.
Start with the roof, then the windows, hood, doors and finally the lower panels.
This method prevents dirty water from getting into areas you’ve already washed.
Maintain a safe distance between the spray nozzle and the paint, usually at least one to two feet, to avoid applying too much direct pressure.
Controlled and even spraying helps protect the surface and removes dirt more effectively.
4. Areas That Need More Attention
Some areas of the vehicle tend to accumulate more dirt than others and require more attention during pre-rinsing.
Wheel wells and lower panels are exposed to road spray, mud and brake dust, which can accumulate over time.
These areas should be thoroughly washed before applying foam to loosen thick dirt.
Driving air also traps a lot of dirt under the rear bumper and behind the wheels.
Spending more time in these high-traffic areas ensures that most of the dirt is removed before the foam step, making the entire wash safer and more effective.
Now, Learn How to Apply the Foam In Correct Way
Applying foam correctly is crucial because the correct method improves cleaning power and reduces the risk of scratches.
Foam works by softening and loosening dirt so it can be safely washed away before it touches the paint.
The cleaning agents in car shampoo break down road grime, oily deposits and light dirt.
Furthermore, the thick foam provides lubrication, meaning it creates a slippery layer between the dirt and the paint.
For foam to work effectively, it must remain on the surface long enough to do its work and not dry too quickly.
Proper spraying, even coverage and the right foam thickness all play a key role in safe and effective washing.
1. Spray from the bottom up for better dwell time
Many people think you should always spray from the top down, but when applying foam, starting from the bottom and working upward can actually improve dwell time.
Dwell time refers to how long the foam stays on a surface before sliding.
If you spray from top to bottom, the foam on the upper panels can flow down faster, reducing contact time on the lower areas.
Spraying from bottom to top creates a more uniform foam application and reduces streaks.
This allows the soap to stay in place longer, giving it more time to soften dirt and road grime.
2. Covering the Panels Completely
Complete and even coverage is essential, as missed areas won’t benefit from the foam’s cleaning action.
Spray each panel slowly and evenly, ensuring the roof, hood, doors, bumpers, mirrors and lower panels are all covered.
Overlapping each layer prevents dry spots.
Thick foam should adhere to straight surfaces, not slide off immediately.
Good coverage ensures that dirt is loosened throughout the vehicle, not just in certain areas.
3. Don’t use too much soap
Using too much soap doesn’t always mean a better clean.
Putting too much shampoo in a foam cannon can waste product and leave residue that needs to be rinsed out more often.
Foam works due to the correct chemical balance and water pressure, not just because it appears thick.
Too much soap can make rinsing take longer and increase water usage.
Following the shampoo manufacturer’s recommended dilution ratio ensures effective cleaning without unnecessary waste.
4. How thick should the foam be?
The ideal foam layer should be thick and creamy, but not too heavy like shaving cream.
It should adhere to the surface for several minutes and not drip immediately.
If the foam is too thin and watery, it will flow quickly, reducing cleaning time.
If it is too thick, it may slide off in heavy sheets, leading to excessive soap use.
The goal is to create a balanced foam that adheres evenly and takes long enough to safely loosen dirt.
When applied correctly, the foam will leave a smooth, even layer on the car, making the surface ready for safe hand washing.
How Much Time to Let the Foam Remain on the Surface
Leaving the foam on the surface for the correct amount of time is crucial for a safe car wash.
Foam isn’t just for show.
It contains cleaning agents called surfactants that surround and remove dirt particles from the paint.
These surfactants need time to break down road grime, traffic jams, light dirt and oil residue.
If you wash too quickly, the foam doesn’t have enough time to soften and loosen the dirt.
Waiting too long and letting it dry can leave residue or water spots.
The correct amount of time allows the soap to do most of the cleaning work before you touch the surface with the wash mitt.
1. Recommended Time
In most normal weather, the foam should remain on the car for about five to ten minutes.
This time gives the cleaning agent enough time to weaken the bond between the dirt and the clear coat.
The exact time may vary depending on the shampoo formula and weather conditions, but the key is to let the foam soak into the panel slowly, while it’s still wet.
As the foam soaks in, you’ll often see streaks of dirt forming, indicating that the dirt is loosening.
Always follow the shampoo manufacturer’s instructions to stay within safe limits.
2. Why You Shouldn’t Let the Foam Dry
Foam should never be allowed to dry on the paint.
As the soap dries, it can leave traces of minerals from the water and chemicals from the shampoo.
This can cause streaks, light stains, or water spots, specially on dark-colored vehicles.
Dried foam can also reduce lubrication, defeating the purpose of the pre-wash stage.
If the foam dries due to heat or wind, it’s better to rinse it off beforehand rather than waiting for the full dwell time.
Keeping the surface wet is essential for safe and effective cleaning.
3. Environmental Factors Affecting Dwell Time
Weather plays a significant role in how long foam can safely remain on your vehicle.
High temperatures, direct sunlight and strong winds can cause the foam to dry faster than expected.
Low humidity can also accelerate evaporation.
In hot weather, the dwell time may need to be reduced to prevent drying.
Washing in the shade or during cooler times of the day helps maintain a safe dwell time.
On cool and cloudy days, the foam may remain wet for longer, bringing it closer to the full recommended time.
Always adjust your dwell time based on your surroundings.
4. Signs That the Foam is Working
There are some visible signs that indicate the foam is working.
As the foam settles on the surface, you may notice it slowly pulling dirt downward in light brown or gray streaks.
This indicates that the cleaning agents are lifting and carrying away dirt.
The foam may also become slightly thinner as it breaks down the dirt.
Another indication is that water conductivity improves after washing, leaving the surface cleaner and smoother than before handwashing.
When foam is applied correctly and given the proper dwell time, it prepares the paint for safe contact washing and reduces the risk of scratching.
How to Handwash Your Vehicle After Foaming – Two-Bucket Method
Foam is an essential step before washing, but it doesn’t completely remove all dirt.
Even after the foam loosens and softens the grime, the remaining thin layer of road film and stuck-on dirt still requires gentle handwashing to safely remove.
This is where the two-bucket method becomes crucial.
The two-bucket method involves rinsing the wash mitt in one bucket with clean, soapy water and the other with plain water.
This method helps reduce the amount of dirt that gets back into the paint.
Because modern car paint has a thin clearcoat layer, minimizing rubbing and trapped dirt during washing is crucial to preventing swirl marks and fine scratches.
1. Why Foam Alone Isn’t Enough
Foam helps break up and lift dirt, but it primarily removes loose dirt.
Some dirt may remain slightly stuck to the paint due to static charge, oil, or road film.
Without light contact washing, this thin layer may remain on the surface.
Hand-washing after foaming ensures the paint is completely clean and smooth.
The foam prepares the surface and hand-washing ensures that the cleaning is completed safely.
Not contact-washing can leave the surface slightly dirty, specially on the underside and behind the wheels.
2. Proper Wash Mitt Technique
A good-quality microfiber wash mitt should be used because microfiber fibers trap dirt within their fibers rather than pulling it onto the paint.
When washing, dip the mitt in a bucket of soapy water, gently run it over a small area of the car and then rinse it in a bucket of clean water before dipping it back into the soapy bucket.
This process helps remove dirt from the mitt before touching the paint again.
Apply light pressure and let the mit glide easily over the lubricated surface.
Pressing too hard increases friction and increases the risk of scratches.
3. Wash in straight lines, not circular motions
Straight lines are recommended, not circular motions.
Straight lines help make any small marks less visible.
Circular motions can create swirling patterns that are more visible in sunlight.
Even if light marks do form, straight lines are usually less visible and easier to fix later.
Straight, controlled movements ensure even cleaning and reduce unnecessary rubbing.
4. Cleaning Wheels and Tires Separately
Wheels and tires can become heavily coated with brake dust, metal particles and road tar.
Brake dust often contains small pieces of metal that are harder than paint.
If these particles get on your wash mitt and are then used on the paint, they can cause scratches.
For this reason, wheels and tires should always be cleaned with separate brushes, separate tools and often with different cleaning solutions.
Cleaning them last or using specialized equipment prevents cross-contamination and protects the paint more effectively.
5. Washing the Mitt Frequently
Frequently washing the wash mitt is an essential part of the two-bucket method.
After cleaning each part of the car, thoroughly rinse the mitt in a bucket of clean water.
Gently rub it on the grit guard at the bottom of the bucket to remove any trapped dirt.
This step prevents dirt from accumulating in the mitt.
Clean mitt fibers provide better lubrication and reduce friction against the clearcoat.
Regular washing keeps the washing process controlled, safe and effective from start to finish.
Now, Learn How to Wash Foam From Vehicle
Washing is the stage in which all loose dirt, soap and remaining grime are thoroughly removed from the vehicle.
Even if the foam and hand washing steps are performed correctly, improper washing can leave behind dirt that can affect the shine and smoothness of the surface.
Car shampoo contains surfactants that remove dirt and thorough rinsing is essential.
If soap remains on the surface and dries, minerals in the water can cause streaks or water spots.
Proper rinsing ensures that the paint is completely clean and ready to dry safely without leaving any hidden marks.
1. Top-to-Bottom Washing
Always wash the vehicle from top to bottom.
Gravity helps pull soap and dirt down the panels, making the wash more effective.
Start with the roof, then move on to the windows, hood, doors and finally the lower panels and bumpers.
This method prevents dirty water from entering areas that have already been washed.
Keep the spray nozzle at a safe distance to avoid applying excessive pressure to seals and trim.
A consistent and controlled spray pattern helps remove suds evenly, preventing water from spreading to unwanted areas.
2. Ensure there are no soap residues
After the main wash, carefully inspect the surface to ensure there are no soap residues.
Soap residue often hides along panel edges, under door handles and near trim.
If any remains, it can dry and leave marks, dulling the shine.
Pay special attention to horizontal surfaces like the hood and trunk, as water can accumulate in these areas.
Rinse slowly and thoroughly until the water draining from the vehicle appears completely clear, without any bubbles.
Clear water usually indicates that all the soap has been removed.
3. Checking for Glass, Marks and Cracks
Some parts of the car can trap suds and water more easily than flat panels.
Small amounts of soap often accumulate in tight spaces around the edges of side mirrors, the front grille, badges, the fuel tank and door frames.
These areas should be carefully washed from different angles to remove any trapped suds.
If soap remains in these crevices, it can drip and leave marks when drying.
Taking a few extra seconds to wash these delicate areas prevents water marks and improves the final finish.
4. Final Inspection Before Drying
Before proceeding to the drying stage, do a quick final inspection of the entire car.
Walk around the car for suds, dirt marks, or missing parts.
Ensure that the wheels, lower panels and rear bumper are thoroughly washed.
This final check ensures that no dirt remains during drying that could cause stains or spots.
Careful inspection after washing prepares the surface to dry safely and helps maintain a clean, shiny and stain-free finish.
How to Properly Dry Your Car
Properly drying your car is just as important as washing it.
In fact, many dents and minor scratches occur during drying, not washing.
After washing, water left on the surface can evaporate and leave minerals like calcium and magnesium.
These minerals form water spots that can stick to the clear coat and dull its shine.
If left for a long time, mineral deposits can be difficult to remove.
Proper drying safely removes water deposits and leaves behind a thin clear coat layer that shines and protects your car.
1. Using a Microfiber Drying Towel
Good-quality microfiber drying towels are designed to absorb excess water while remaining gentle on the paint.
Microfiber is made of very fine synthetic fibers that break down into tiny threads.
These threads increase the surface area and help trap water and small particles securely within the towel instead of dragging them across the paint.
A thick, clean microfiber towel can absorb water many times its weight.
Always use a clean towel and avoid dropping it on the floor, as trapped dirt can cause scratches.
Washing microfiber towels separately from regular clothes maintains their softness and performance.
2. Blotting vs Dragging Technique
There are two main methods for drying a car with a towel: blotting and dragging.
Blotting means laying the towel flat on the surface and gently patting or pressing it to absorb water.
This method minimizes rubbing and reduces the risk of swirl marks.
Dragging means gently pulling the towel across the surface in straight lines.
If you want to drag the towel, apply very light pressure and ensure the surface is completely clean before doing so.
Blotting is generally safer as it reduces movement on the paint.
Always avoid circular motions, as this can make small marks more visible in the sun.
3. Using an Air Blower for Cracks
An air blower or car dryer is very helpful in removing water from tight spaces where towels can’t reach.
Water often accumulates in areas like side mirrors, door handles, vents, fuel doors, grilles and wheel lug nuts.
If water remains in these areas, it can drip later and leave marks on freshly dried panels.
Blowing air into these cracks allows the water to safely escape without touching the surface.
It’s best to use filtered air as it prevents dust from flying onto the paint.
Air drying tools are specially useful for vehicles with complex trim designs and large grilles.
4. Preventing Water Spots
Water spots form when water evaporates, leaving mineral deposits.
These stains are most common in areas where the water is dirty and contains a lot of dissolved minerals.
Drying the car immediately after washing is the most effective way to prevent water spots.
Washing and drying in the shade also reduces the risk of rapid evaporation.
If possible, use clean, filtered water for the final rinse to reduce mineral deposits.
Working panel by panel ensures that no area remains wet for too long.
Proper drying not only protects the paint but also improves shine and results in a clean, streak-free finish.
How to Apply Protection After Washing – Optional Up-to-You
After washing and drying your car, the paint surface is clean and free of loose dirt, making it the best time to apply protection.
Protection products form a thin layer over the clear coat.
This layer helps prevent dirt, water, sunlight and pollution from directly touching the paint.
Modern automotive clear coats are strong, yet still protect against UV rays, bird droppings, tree sap, acid rain and road grime.
Applying a protective layer reduces long-term wear and keeps the surface smooth and shiny.
Simple protection products can also enhance shine and simplify regular maintenance.
1. Spray Wax or Sealant
Spray wax and spray sealant are quick and easy protection options that can be applied after every wash.
Spray wax typically contains natural or synthetic wax ingredients that provide shine and water-repellent properties.
Spray sealants are often made of synthetic polymers that adhere to the surface and last longer than traditional waxes.
Both products create a thin protective layer that helps water roll off the paint instead of settling.
This behavior of water is often referred to as beading or sheeting.
Good water beading reduces water spots and makes further cleaning easier.
It’s easy to apply and usually involves spraying a small amount onto the surface and gently wiping with a clean microfiber towel.
2. Quick Detailer
Quick detailer is a lightweight spray product designed to enhance shine and remove light dust or fingerprints.
It doesn’t provide long-lasting protection like wax or sealant, but it can enhance shine and smoothness between washes.
Quick detailers often contain mild lubricants that make the surface feel smooth.
This smooth feel reduces friction when wiping and helps maintain the finish.
Although it’s not a substitute for wax or sealant, a quick detailer can improve the overall look and help maintain a freshly detailed look.
3. Benefits of Protecting Clear Paint
Protecting clear paint has several practical benefits.
The protected surface is smoother, which means dirt has longer to adhere firmly.
This requires less effort during the next wash.
Protection also protects the clear coat from UV damage, which can gradually fade or cause oxidation over time.
Environmental dirt, such as bird droppings and insect droppings, is less likely to adhere firmly to the protected surface.
By regularly applying a protective layer, you help maintain shine, preserve color depth and maintain long-term resale value.
4. How Protection Improves Future Foam Washes
When paint is protected, future foam washes become more effective and safer.
The foam glides more evenly over the protected surface and dirt is removed more easily.
Water also drains away faster during washing, reducing drying time and the risk of water spots.
Because dirt doesn’t stick as strongly, less physical contact is required during handwashing.
Over time, this reduces wear on the clear coat.
Applying protection after washing isn’t just about shine; it’s about making every future wash easier, safer and more efficient.
How to Clean & Maintain Your Foam Cannon
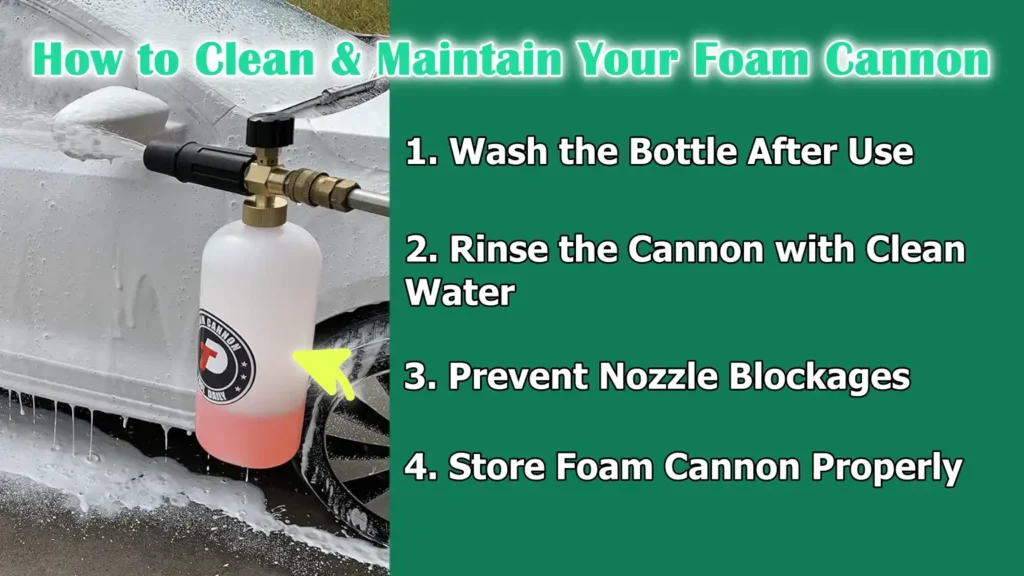
Proper cleaning and maintenance are crucial if you want your foam cannon to function properly for a long time.
Foam cannons pass soap solution and water through small channels and a fine metal mesh filter.
If soap dries inside these channels, it can cause blockages, weak foam, or a distorted spray pattern.
Dried shampoo residue can also damage the internal seals over time.
Regular cleaning after each wash keeps the internal components clean, maintains strong foam and prevents performance issues.
Taking a few simple steps after each use can significantly extend the life of your equipment.
1. Wash the Bottle After Use
After finishing washing, always empty the remaining soap solution from the bottle.
Leaving the mixed shampoo in the bottle for extended periods can cause deposits and a thick residue.
Rinse the bottle thoroughly with clean water to remove all traces of soap.
Gently shake the bottle inside with fresh water to rinse away any remaining mixture stuck to the sides.
Clean bottles prevent old soap from mixing with the fresh solution during the next wash, maintaining consistent foam quality and the correct dilution ratio.
2. Rinse the Cannon with Clean Water
Rinsing the foam cannon with clean water is one of the most important maintenance steps.
After rinsing the bottle, fill it with plain water and reconnect it to the pressure washer.
Spray the cannon with clean water for about thirty to sixty seconds.
This removes any remaining soap from the mixing chamber and metal mesh filter.
Residual soap can dry out and clog small spaces.
Flushing cleans the inside and ensures that the foam cannon produces a thick and consistent foam the next time you use it.
3. Prevent Nozzle Blockages
The nozzle and internal filter are the most sensitive parts of the foam cannon.
These parts control the spray pattern and foam thickness.
If the foam is weak or intermittent, it could be due to a minor blockage.
Hard water minerals and dried soap can build up inside the nozzle over time.
Regular flushing helps prevent this, but if performance decreases, the nozzle and filter may need to be carefully cleaned according to the manufacturer’s instructions.
Using clean water and the correct shampoo dilution also reduces the chance of blockages.
Preventing clogs keeps the spray smooth and the foam consistent.
4. Store Foam Cannon Properly
Storing your foam cannon properly protects its seals and plastic parts.
Always allow the bottle and body to dry completely before storing to prevent moisture buildup.
Store it in a cool, dry place away from direct sunlight.
Prolonged exposure to heat can weaken the plastic and rubber seals.
Do not leave the foam cannon attached to a pressure washer under pressure when not in use.
Keeping it clean, dry and properly stored ensures reliable performance and long equipment life.
Read More:
Know, Common Mistakes of Washing the Car With Foam Cannon to Avoid Them Later
Even when using a foam cannon, minor mistakes can reduce cleaning performance and increase the risk of paint damage.
Car paint is protected by a thin clear coat, which, if not washed properly, can cause marks and fine scratches.
Many problems aren’t caused by tools, but rather by incorrect technique or poor preparation.
Understanding the most common mistakes helps you avoid product waste, water spots, weak foam and prolonged wear on the surface.
Paying attention to these points ensures safe, efficient and effective washing.
1. Using Too Little or Too Much Soap
Using the wrong amount of shampoo is a very common mistake.
If you use too little soap, the foam will be thin and watery, reducing its lubrication and cleaning power.
Thin foam dissipates quickly and doesn’t stay on the surface long enough to properly loosen dirt.
On the other hand, using too much soap doesn’t automatically improve cleaning.
Too much soap can ruin the product, leave residue and make washing more difficult.
The correct dilution ratio, as recommended by the shampoo manufacturer, ensures a balanced foam thickness, the right cleaning power and safe use on paint, wax and sealant.
2. Washing in Direct Sunlight
Washing your car in direct sunlight can cause several problems.
Sunlight quickly heats up paint, glass and metal panels.
When the surface is hot, water and soap evaporate faster, causing streaks and water spots.
The foam can dry before it has enough time to break down dirt.
Rapid drying also reduces lubrication, increasing the risk of minor scratches when washing by hand.
Washing in the shade or during the cooler hours of the day allows the foam and water to remain on the surface for longer, improving cleaning results and protecting the finish.
3. Letting Foam Dry on Paint
Foam is designed to remain wet on the surface.
If it dries, it can leave soap residue and mineral stains.
Dried foam loses its lubricating benefits and may require more frequent washing to remove.
In hard water areas, dried soap can combine with mineral deposits to create visible marks.
Always pay close attention to the surface and rinse off the foam before it dries.
Keeping the paint wet ensures safe cleaning and prevents unwanted stains.
4. Using a Low-Pressure Washer That Can’t Produce Thick Foam
Foam cannons rely on adequate water pressure to produce thick, cohesive foam.
If the pressure washer doesn’t provide enough pressure or water flow, the foam can appear weak and watery.
Without a strong foam, the foam’s retention time is reduced and it becomes less effective at loosening dirt.
This can lead to more physical contact during washing, increasing the risk of scratches.
Choosing a pressure washer with the right range ensures proper suction and consistent foam production within the foam cannon.
5. Skipping the Hand Wash Step
Some people believe that foam alone is enough to thoroughly clean a vehicle, but this is rarely true.
Foam removes loose dirt and softens grime, but often leaves a thin film on the road.
Without proper, gentle hand washing, this film can remain on the surface.
Failing to contact wash can cause slight staining and dulling of the paint.
The safest approach is to use foam as a pre-wash step, followed by a thorough hand wash with a clean microfiber mitt and a two-bucket approach.
This combination provides the best balance between safety and deep cleaning.
Know, What’s the Difference Between Foam Cannon vs Traditional Car Wash Method
Along with this, there’s guide that shows that the modern foam products are formulated with the surfactants that literally breaks the surface tension and dissolve the grime, that means it is beyond the physical separation of the dirt, as foam shampoo chemistry actively breaks down that stubborn road grime and other environmental contaminants, that leads to the ultimate cleanliness and also you can get shine and long-term paint care as well.[¹]
Choosing between a foam cannon and a traditional bucket-and-hose wash depends on your goals, equipment and how much care you want to take of your car’s paint.
Both methods can clean a car, but they work in different ways and offer varying levels of protection and efficiency.
Modern automotive paint is protected by a thin clear coat and dirt can leave swirl marks if rubbed into it.
Because of this, the washing method you choose plays a crucial role in maintaining the surface’s long-lasting shine and health.
Understanding the differences helps you decide which method is best for your needs.
1. Safety Comparison
The foam cannon method is generally safer for paint when used correctly.
The thick foam loosens and softens dirt before it touches the surface, reducing friction during hand washing.
Less scrubbing means less chance of swirl marks and fine scratches.
Traditional washing using just a bucket and sponge often involves direct contact with dry or semi-dry dirt, increasing the risk of dirt and grime accumulating on the paint.
When combined with a two-bucket method and microfiber mitts, a foam cannon setup provides a safer cleaning process by reducing the amount of dirt left on the surface before contact washing begins.
2. Time Saving
A foam cannon can make the washing process faster and more organized.
The thick foam can cover the entire vehicle evenly in less time, removing dirt from all panels at the same time.
This can reduce the effort required when washing by hand.
However, setup time for a pressure washer and foam cannon may be slightly longer than filling a bucket with water and soap.
However, once set up, the foam method often speeds up the cleaning process because dirt is removed more easily.
For regular maintenance washing, many users find the foam method more efficient overall.
3. Water Usage
Water usage can vary depending on the equipment and technique.
Pressure washers with foam cannons often use less water per minute than free-flowing garden hoses because the water is delivered in a controlled spray pattern.
Traditional washing with an open hose can use a lot of water if the hose is constantly running.
However, by using a controlled-flow nozzle and rinsing carefully, water usage can be effectively managed.
Proper technique is essential for both methods to avoid unnecessary waste.
4. Results and Finish Quality
In terms of final results, the foam cannon method often results in a cleaner and shinier finish than hand washing and drying.
The pre-foam stage removes more loose dirt before contact, maintaining the clearcoat’s smoothness over time.
Less swirl means better reflection and shine in the sun.
Washing the old-fashioned way can also produce good results, but requires more care and attention to avoid scratches.
In the long run, regular use of a foam cannon and safe washing can result in a deeper shine, better clarity and improved overall paint condition.
Conclusion – How to Use a Foam Cannon to Wash Car
Now, you have know that a foam cannon is looks like another good device to help you out in car washing time, but it literally have the science behind it that makes a real difference in paint protection.
As, when you use a foam cannon to wash your car isn’t just about creating thick, white foam for a visual appeal.
It’s a smart and safe way to clean modern automotive paint.
As well as, modern vehicles are protected by a thin clear coat layer, which can easily leave swirls when rubbed with dirt.
Also, a foam cannon minimizes this risk by loosening and lifting dirt before it comes into contact with the surface.
Even, it provides even coverage, better lubrication and more consistent cleaning results.
The thick foam clings to the panel and gives the cleaning agent time to break down road grime, traffic film and light dirt.
This reduces the effort required during handwashing and reduces the risk of sharp particles abrading the paint.
Now, that’s all from this guide and you can also ask related questions in the comment box below.
Frequently Asked Questions
Q1. What is a foam cannon and do I really need one to wash my car?
Answer: A foam cannon is a tool that connects to a pressure washer and sprays thick, soapy foam onto your car. The foam helps loosen dirt before the wash mitt touches the paint. You don’t absolutely need a foam cannon to wash your car, but it makes the process safer and more effective. It reduces the chance of dirt spreading across the surface, helping to prevent swirl marks and minor scratches. If you want to keep your paint in its best condition, a foam cannon is a very helpful tool.
Q2. Can I use a foam cannon without a pressure washer?
Answer: A true foam cannon requires a pressure washer to function properly. The pressure creates suction that draws soap from the bottle and mixes it with air to form a thick foam. Without the proper pressure, the foam will be thin and watery. If you only have a garden hose, you can use a foam gun instead, but it won’t produce as thick and adhesive foam. For best results and thicker coverage, a pressure washer is recommended.
Q3. How much PSI do I need for a foam cannon?
Answer: Most foam cannons work best with pressure washers with around 1,200 to 2,000 PSI and a medium water flow. This range is strong enough to produce thick foam, but is also safe for car paint when used correctly. High pressure isn’t needed for washing a car and it should be used with caution to avoid damaging trim or seals. Always maintain a safe distance between the nozzle and the paint.
Q4. Can foam alone completely clean a car?
Answer: Foam alone removes loose dirt and softens grime, but it usually doesn’t completely clean the surface. A thin layer of road film often remains after the foam stage. That’s why gentle hand washing with a microfiber mitt is essential. Foam prepares the surface and makes hand washing safer by reducing friction, but it’s not a complete replacement for contact washing.
Q5. How long should I leave foam on my car?
Answer: Foam should generally be left on the surface for about five to ten minutes, depending on the weather and the shampoo used. The purpose is to keep the foam wet and give the cleaning agent time to break down dirt. You should never let the foam dry on the paint. If the weather is hot or sunny, reduce the time to avoid drying and water spots.
Q6. Can foam washing damage wax or ceramic coatings?
Answer: If you use a pH-neutral car shampoo designed for foam cannons, it’s generally safe for wax and ceramic coatings. These products are designed to clean without removing the protective layer. However, strong or heavy-duty strip washes can remove wax. Always read the label of the shampoo you’re using to ensure it’s safe for the surfaces being treated.
Q7. Why is my foam thin and watery?
Answer: Thin foam can occur for several reasons. The soap-to-water ratio could be too low, the pressure washer may not be generating enough pressure, or the foam cannon adjustment knob may not be set correctly. Hard water can also affect foam thickness. Make sure you’re using the correct dilution ratio and that your pressure washer is within the recommended range. Cleaning the filter inside the foam cannon can also improve performance.
Q8. Is it safe to use a foam cannon every week?
Answer: Yes, it’s safe to use a foam cannon regularly, as long as you use the right method and a safe shampoo. Regular washing helps remove dirt, bird droppings and road salt before they can damage paint. It’s better to wash frequently and gently than to let excess dirt sit on the surface for extended periods.
Q9. Can I use dish soap in a foam cannon?
Answer: Dish soap should not be used to wash your car. It is designed to remove grease from dishes and can strip wax, dry out rubber trim and reduce paint protection. Automotive shampoos are specifically formulated to safely clean car surfaces and maintain protective coatings. Using the right product helps protect your paint and maintain its shine.
Q10. Does using a foam cannon save water?
Answer: Pressure washers with foam cannons often use water more efficiently than a free garden hose. The water is delivered in a controlled spray, which can reduce overall water usage. However, water savings depend on how you wash. Turning off the water when you’re not washing thoroughly and working carefully from panel to panel can help reduce waste.
Q11. Is foam washing safe for new cars?
Answer: Foam washing is safe and highly recommended for new cars. New vehicles still have a clear coat, which can cause swirl marks if washed incorrectly. Using foam as a pre-wash step reduces friction and helps preserve the new paint finish longer. Starting safe washing habits early can help prevent problems.
References:
[1] How Foamers Are Transforming Car Washing
https://www.sunriseindustrial.com/car-wash-foamers-transforming-car-washing/

Guys, I’m a car audio enthusiast and customization expert and I love clear sound and clean installation. Plus, I have spent years helping people build their dream audio setups. And whenever I’m working on cars, I probably listen to music and thinks about the next big upgrade.